Table of Contents
The Payments interface allows you to see your existing payments, check their status, edit them, and also give you more information about what went wrong in case a payment fails.
Payments can also be added manually. In order to do so, click on the Add New button found at the top of the PMS -> Payments page.
Afterwards, you will be prompted to select a user and then set the subscription and payment info.
The payment is linked to a user so if the user is not a member yet, the selected subscription plan will be added to his account and activated. If the user you are adding the plan to is already a member, his current subscription will be updated.
If you hover over a payment row, the Edit Payment action will appear. This page lets you edit some of the information we store about a payment.
For example, if are using the Manual / Offline payments gateway, you can set the payment status to Completed after you confirmed a user’s payment. You can also edit the Transaction ID field if you want to store some external reference about the payment.
When a payment is set to Completed the associated subscription is also activated.
You can delete several Payments using the Delete Payments option from the Bulk Actions dropdown.
If a user pays correctly, the status of the payment will be set to Completed and a transaction ID will be added.
His subscription will be activated and he will have access to your restricted content.
When redirecting the user to PayPal to pay for the membership you provide, the payment is saved in the database with a status of Pending.
After the user has completed the payment within PayPal, PayPal sends a payment notification (IPN) back to your website with information about the payment.
The system processes this information and completes the payment saved in your website’s database if the user paid correctly.
We also save extra information for the payment (eg. Transaction ID) so you can easily correlate your website payments with the ones from your PayPal account.
If we do not receive a response from PayPal, the payment status will be set to Failed.
When a payment fails, its status will be set to Failed. This happens instantly for any non-IPN gateway, but for gateways which send the response through an IPN, the status is changed to failed after a while, if a response is not received.
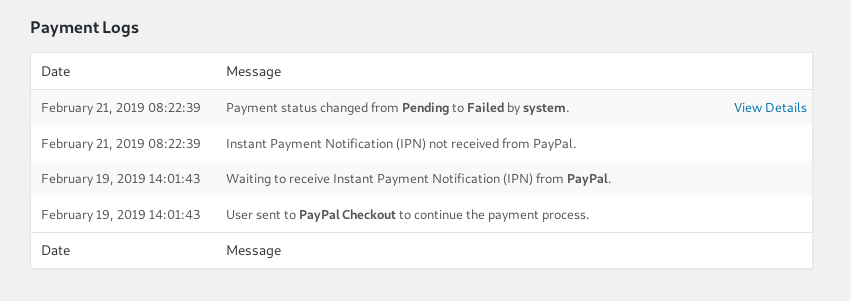
If you follow the Edit Payment link, you will be able to check the Payment Logs to figure out why the payment has failed.
Payment Logs appear at the bottom of the Edit Payment screen and they give you more information about a payment.
In the screenshot above we can see that the user was sent to PayPal to complete the payment and afterward the plugin received the IPN and set the payment status to Completed, activating the user’s subscription.
View Details
For some of the saved logs, additional data that might be relevant to that action is also saved. To see this data, you can press the View Details button and a modal will open.
For example, when the plugin receives an IPN from PayPal, all the received information is saved alongside the log entry. What is stored depends on the payment gateway that you have configured.
Failed Payment

This is an example of a failed payment. We can see that the user registered and was sent to the PayPal Checkout to complete the payment but the plugin did not receive a notification about that action so after some time, it changed the payment status to Failed.
The examples from above are for the PayPal Standard gateway. The logs look differently based on the payment gateway that is used to pay.
Accept (recurring) payments, create subscription plans and restrict content on your website. Easily setup a WordPress membership site using Paid Member Subscriptions.
Get Paid Member SubscriptionsCombine the power of Profile Builder with Paid Member Subscriptions to set up user registration, memberships, and recurring revenue.
Get 25% off with the bundle