

Table of Contents
- 1 Why You Should Customize the WooCommerce Registration Form (Plus Examples of How to Do It)
- 2 How Profile Builder Pro Can Improve Your WooCommerce Registration and Profile Forms
- 3 Installing and Configuring Profile Builder Pro and the WooCommerce Add-on
- 4 Configuring Profile Builder Pro to Create Custom WooCommerce Registration Forms
- 5 Creating Registration and Profile Forms with Profile Builder
- 6 Adding Your Forms to the WooCommerce Screens
- 7 Customizing Other Parts of the WooCommerce Registration Process
- 8 Create Your Custom WooCommerce Registration Form Today
Customizing the WooCommerce registration form in WordPress is something you should consider doing if you want to get more from your WooCommerce store and from the customer registration process. However, the WooCommerce plugin only allows you to collect basic information about your new users.
If you customize it using Profile Builder Pro, you can collect the exact information you need and make the registration process a better experience for your customers. For instance, you can allow users to add an avatar to their profile or implement a reCAPTCHA feature to keep out spammers.
In this post, we’ll start by discussing the benefits of customizing the WooCommerce registration form. Then, we’ll show you how to do it with Profile Builder Pro. Let’s get started!
Why You Should Customize the WooCommerce Registration Form (Plus Examples of How to Do It)
The benefits of customizing the WooCommerce registration form include capturing user data that helps you upsell to customers, creating custom forms for individual user groups, reordering fields in your forms to make them more user-friendly, redirecting users to a custom page after registration – and lots more.
There are plenty of ways you can improve the WooCommerce registration and profile forms, but in this post, we’re going to look at some specific examples you’re likely to find the most useful. These are:
- Adding custom fields to the WooCommerce registration form so you can collect additional information about your customers
- Enabling avatar uploads so users can customize their profiles
- Integrating reCAPTCHA to keep out spammers
- Using conditional logic so that fields are only displayed if they’re needed. This way, you don’t force people to fill out fields that aren’t relevant
These are just a few examples of ways you can improve your WooCommerce registration form.
How Profile Builder Pro Can Improve Your WooCommerce Registration and Profile Forms
If you’ve decided that the benefits of creating a WooCommerce registration form are worth it, you’ll need a robust form tool to help you get the job done. That’s where Profile Builder Pro comes in.
Profile Builder Pro is a form builder that uses blocks (and shortcodes) to add custom registration forms to your WordPress site. You can use it for user login forms and registration forms on membership sites, but also for WooCommerce sites. With WooCommerce the plugin makes it even easier – it taps into WooCommerce’s own API to add custom forms that you create.
What’s more, the plugin gives you endless flexibility when it comes to customizing WordPress registration forms, including WooCommerce forms.
In this tutorial, I’ll show you how to remove some unnecessary fields and add some useful fields to two forms: the registration form and the profile editing form.
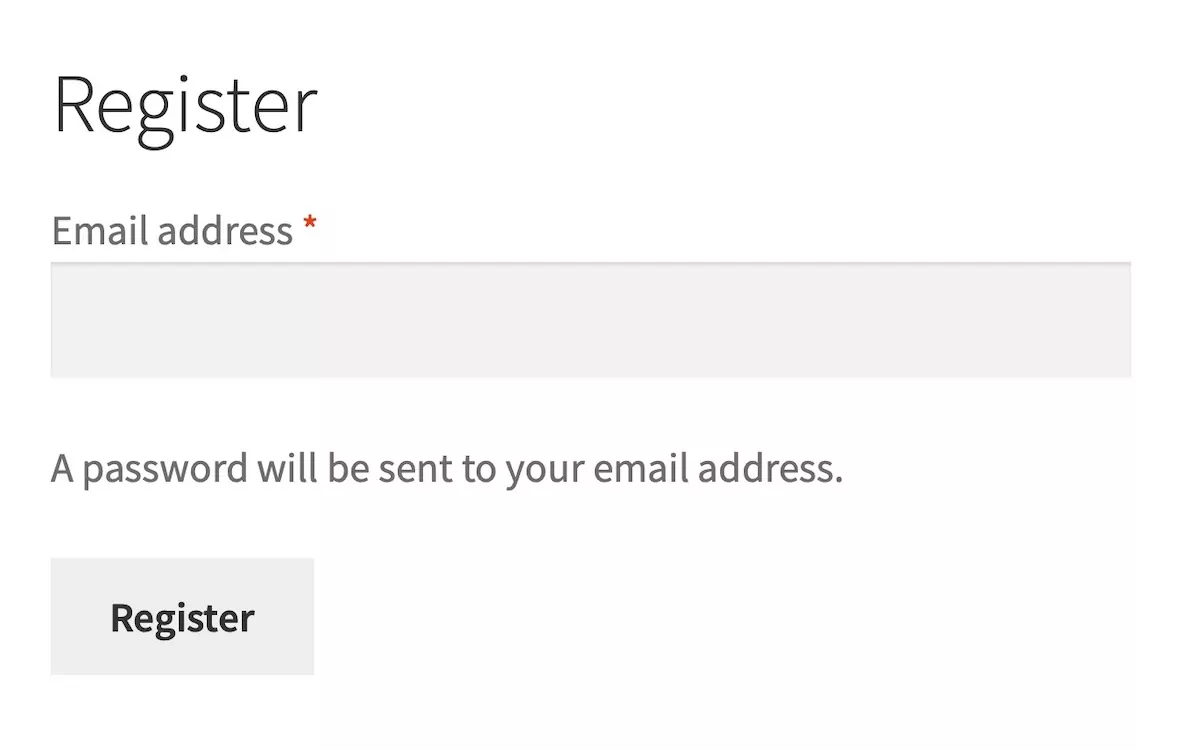
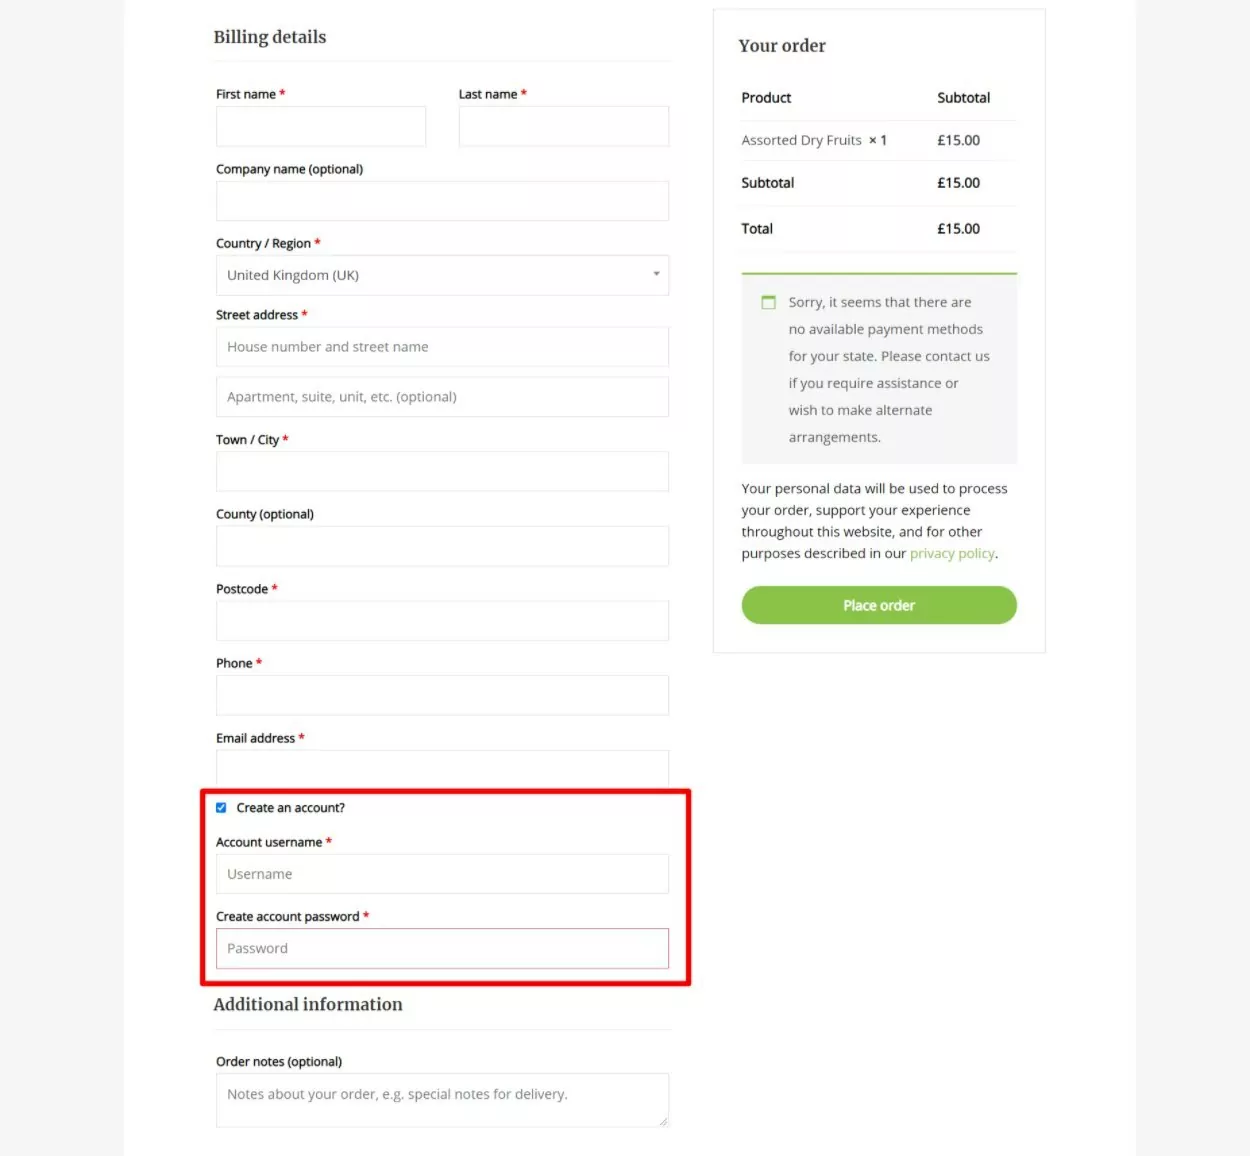
Here’s an example of the default WooCommerce registration form:
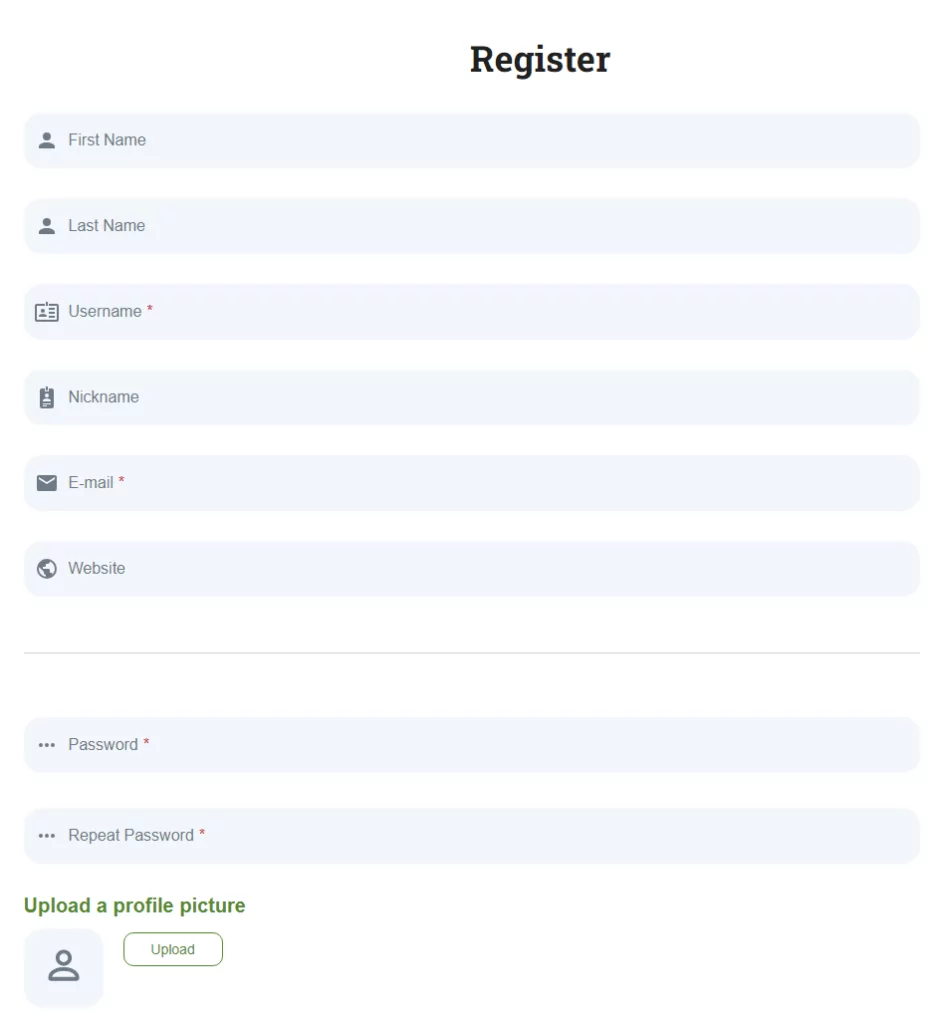
And here’s a custom registration form enhanced using the Profile Builder Pro plugin:
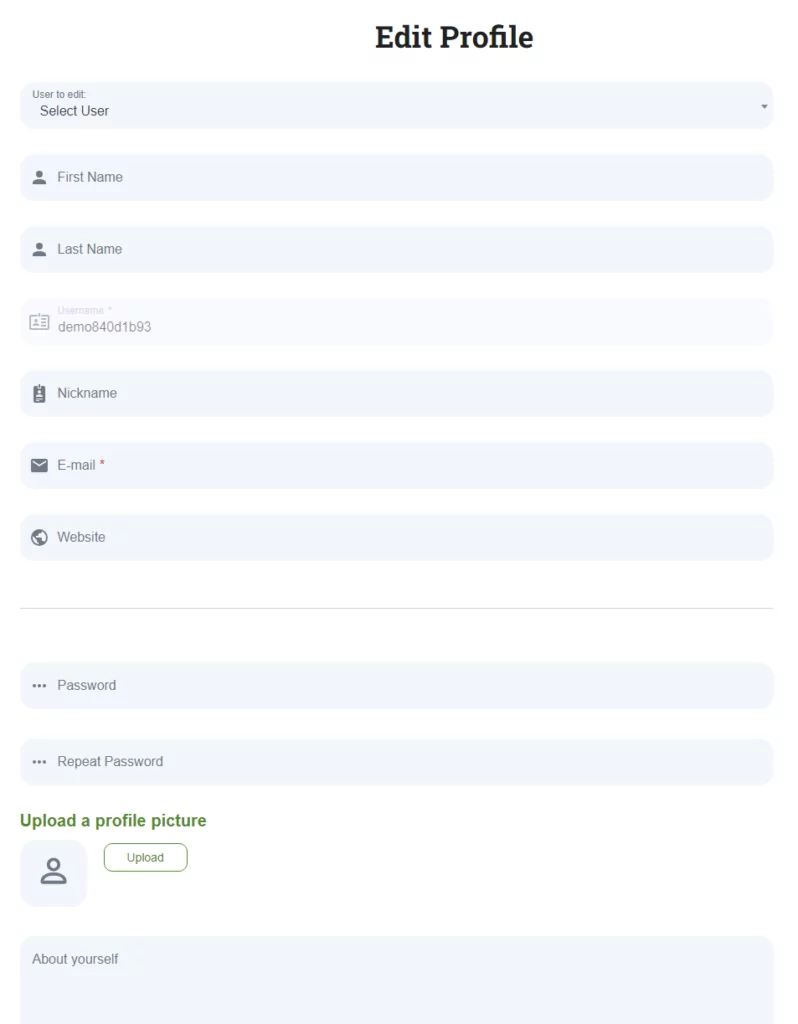
You can also create enhanced customer profile forms. The default profile form includes fields that aren’t needed for a store. It also leaves out some fields that would be quite helpful:

But with the Profile Builder plugin, you can customize this and add extra fields that will help you communicate better and sell more to your customers. Here’s the form with customization:
There’s a free version of the plugin plus a premium version with more features, so you can choose the one that’s right for you and your store. You can also use a wide variety of free and advanced add-ons to get access to extra functionality and integrations with other services or plugins.
So let’s take a look at how you can use Profile Builder to customize your WooCommerce registration form.
Installing and Configuring Profile Builder Pro and the WooCommerce Add-on
To customize your WooCommerce registration form, you’ll first need to have the free WooCommerce plugin installed, activated, and configured on your site.
Once you’ve done that, you’re ready to install and configure the Profile Builder Pro plugin and the WooCommerce Sync add-on.
Follow these steps for each of those two plugins to install and activate them, starting with the Profile Builder Pro plugin.
When you purchase a Profile Builder Pro license, you’ll be sent a download link. Use this to download the plugin as a zip file and save it to your computer. Now go to Plugins → Add New and click the Upload Plugin button:
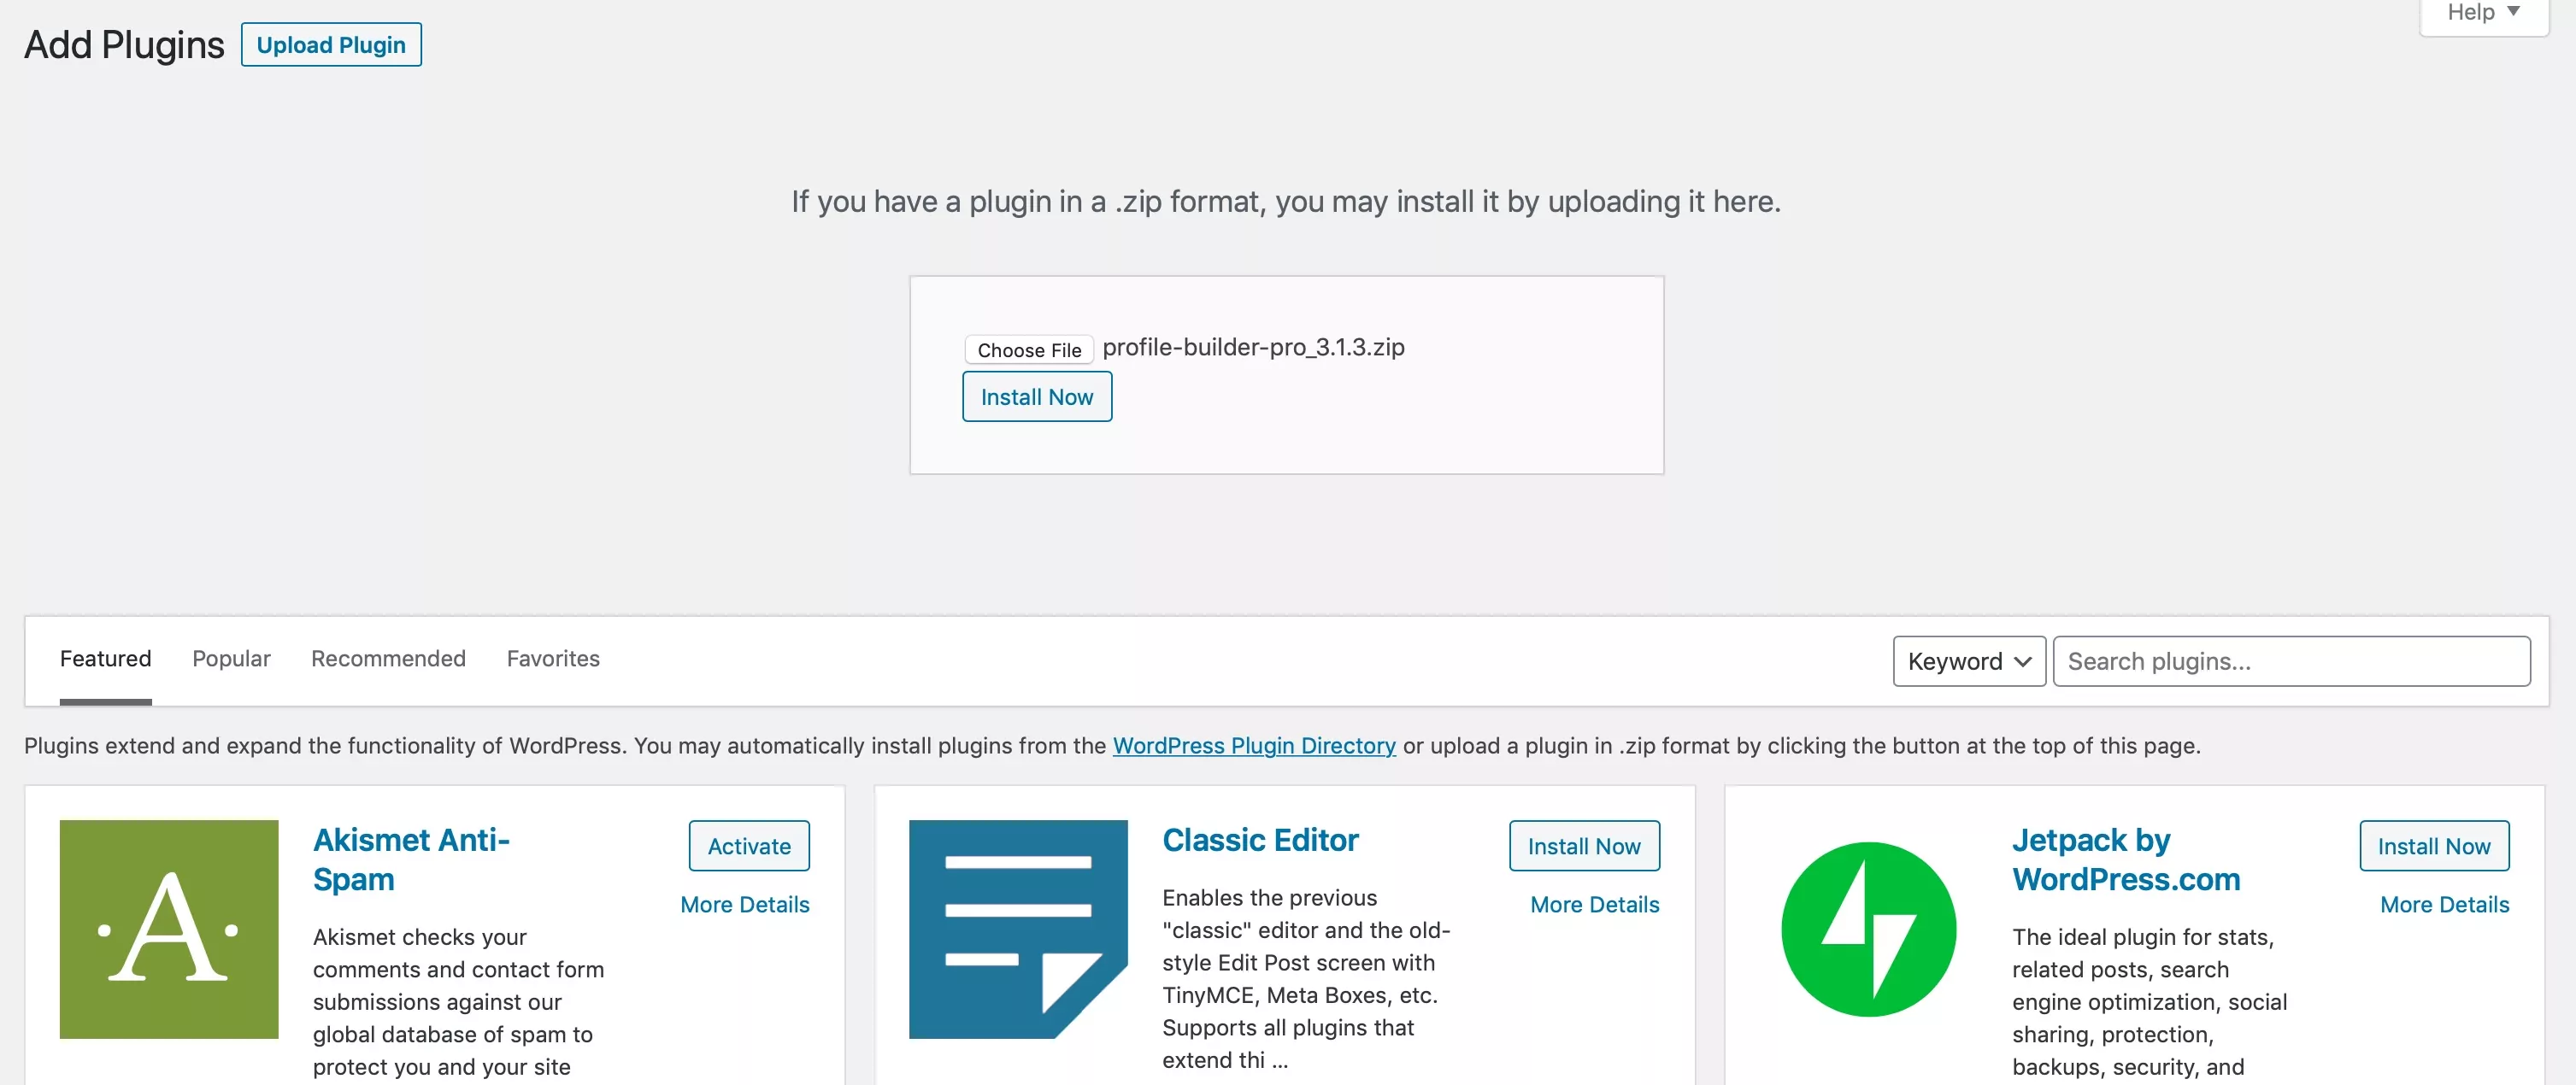
Upload the zip file you just downloaded and click on the Install Now button. You’ll be prompted to activate the plugin – click the Activate Plugin button to do this.
Once you’ve installed the plugin in WordPress, you’ll need to register it. If you aren’t automatically taken to the registration page, go to Profile Builder → Register Version:
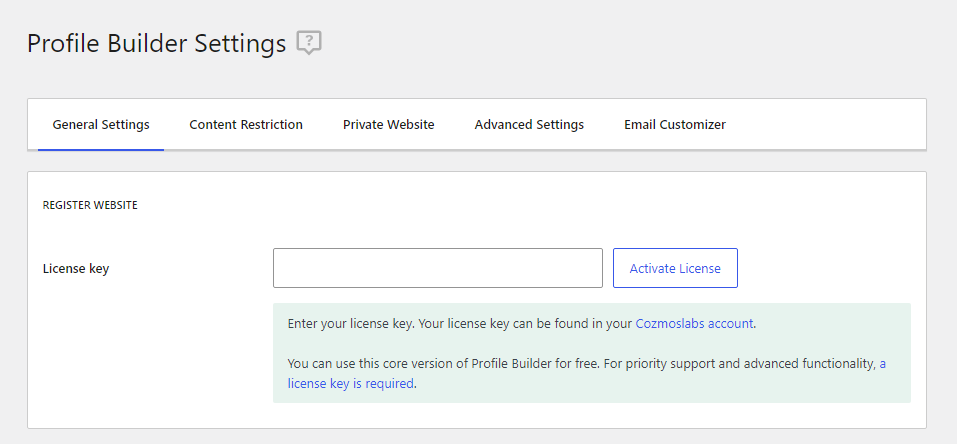
Find your license key in the email you were sent to confirm your purchase, or by logging in to your account. Paste that into the License key field and click the Activate License button.
Now, navigate to Profile Builder → Add-Ons and look for the WooCommerce Sync option. Note that this add-on will only show up if you have at least a Basic Profile Builder Pro license and WooCommerce active on your site:
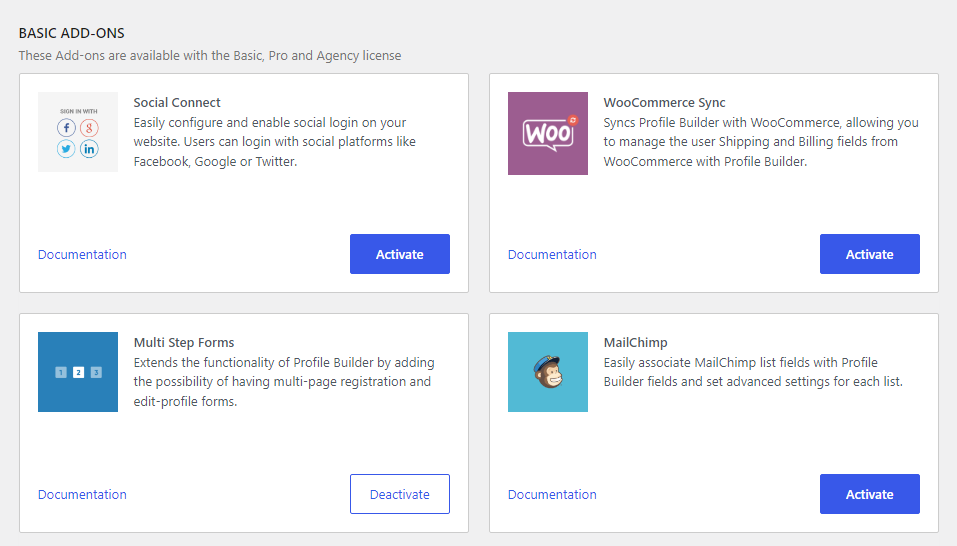
Click on Activate under WooCommerce Sync and you’re ready to start customizing your WooCommerce registration pages!
Configuring Profile Builder Pro to Create Custom WooCommerce Registration Forms
WooCommerce has two types of forms you can customize using Profile Builder Pro:
- Registration forms
- User profile edit forms
Before you can add those forms to your pages in WooCommerce, you’ll need to configure the plugin to create them.
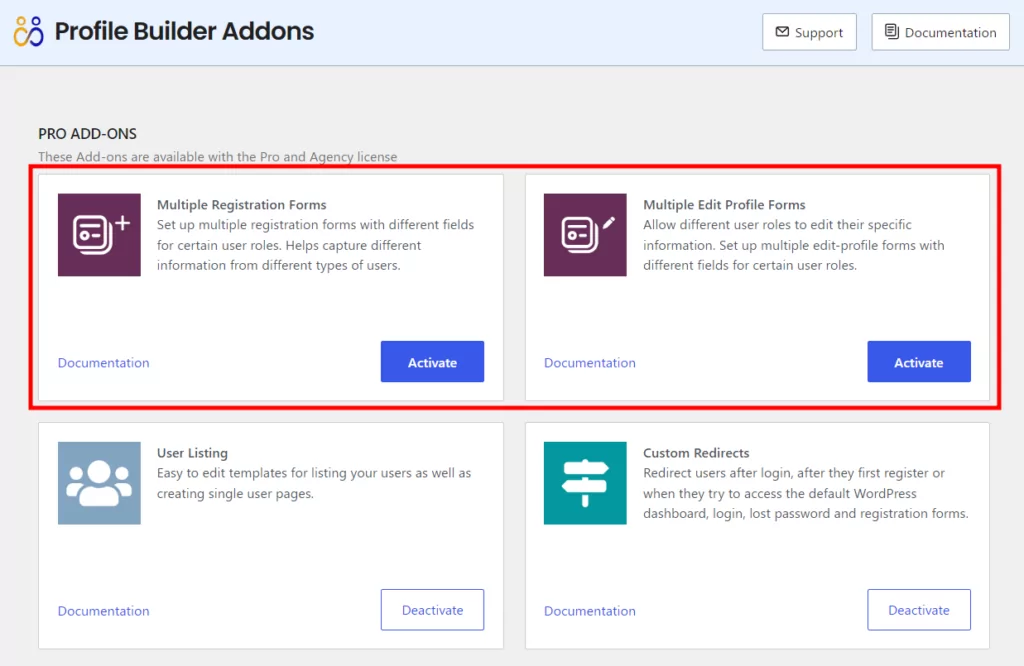
In the WordPress admin dashboard, go to Profile Builder → Add-Ons. Locate the Multiple Registration Forms and Multiple Edit-Profile Forms add-ons and click Activate for both of them. These add-ons are only available with Profile Builder Pro Agency and Pro licenses:
Click the Save Changes button. You’ll see that more options are added to the Profile Builder admin menu, which you can use to create your custom forms.
Creating Registration and Profile Forms with Profile Builder
The next step is to create the two forms we’ll be adding to the WooCommerce pages. Start with the user registration form.
Now, as we’ve shown you before, the default WooCommerce registration form looks like this:
It’s pretty sparse, with only an email field and a registration button. It gets the job done, but it’s a missed opportunity to collect more valuable user information.
There is a case for keeping any form on your WordPress site as lean as possible. This is especially true for ecommerce stores that require a user profile to make a purchase. In fact, a long or complicated checkout process is one of the top reasons for cart abandonment in the United States.
So, you won’t want to ask too much of your customers. That said, with an ecommerce site, you arguably need more information about customers, such as their billing and shipping addresses, interests, and other important data points.
With that in mind, let’s create a form that includes four fields:
- Name
- Email address
- Interests (from a selection)
- reCAPTCHA
You’ll create a form with these options and then tell Profile Builder Pro to display it on the WooCommerce registration page.
Creating a New Registration Form
To create a new form, open up the WordPress admin and go to Profile Builder Pro → Registration Forms → Add New:
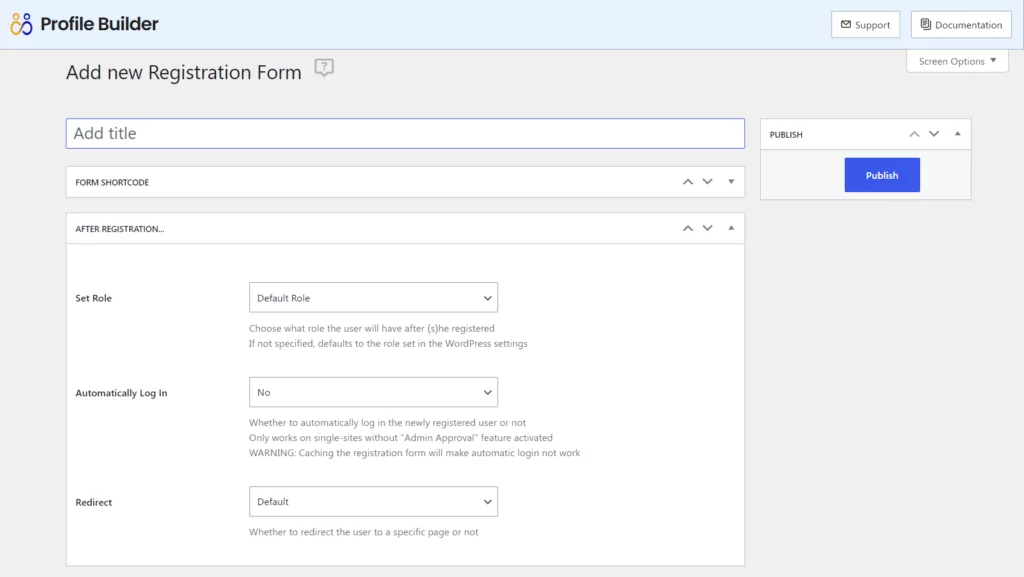
Give it a name and then select the user role a person will have after completing it. Customer is a good choice. Next, select whether you want the user to be automatically logged in or not and whether you want to redirect them to a special page. If you do, you’ll need to create a thank you page – or you could redirect them to the My Account page. You’ll learn how to do this in more detail shortly.
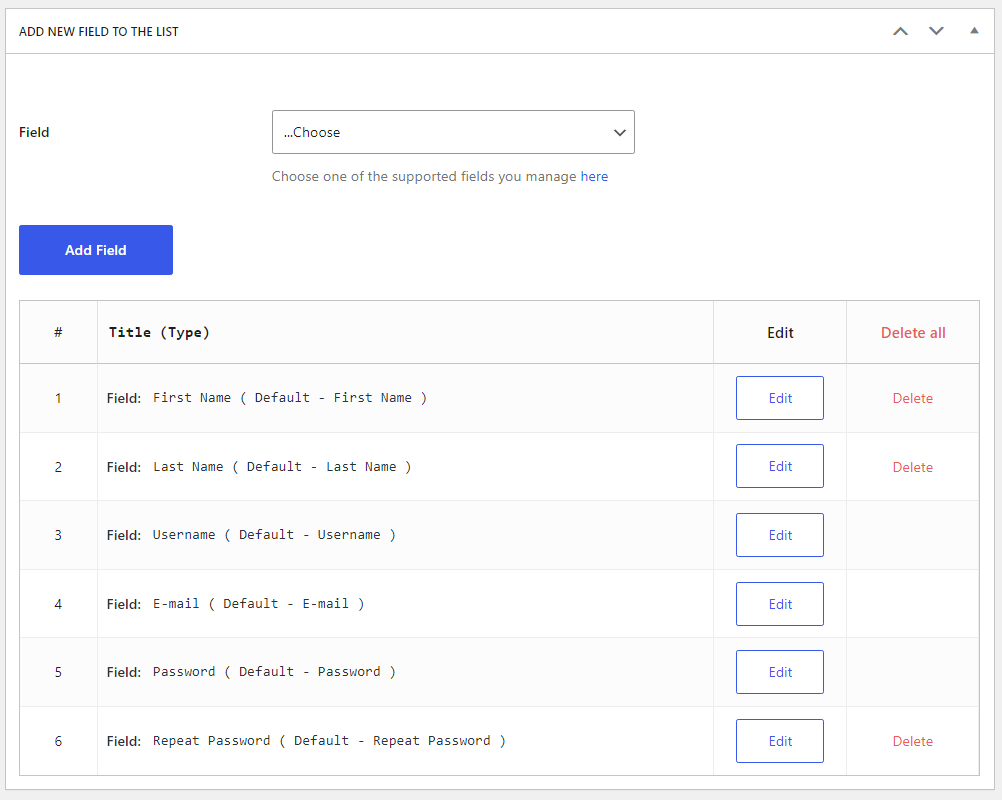
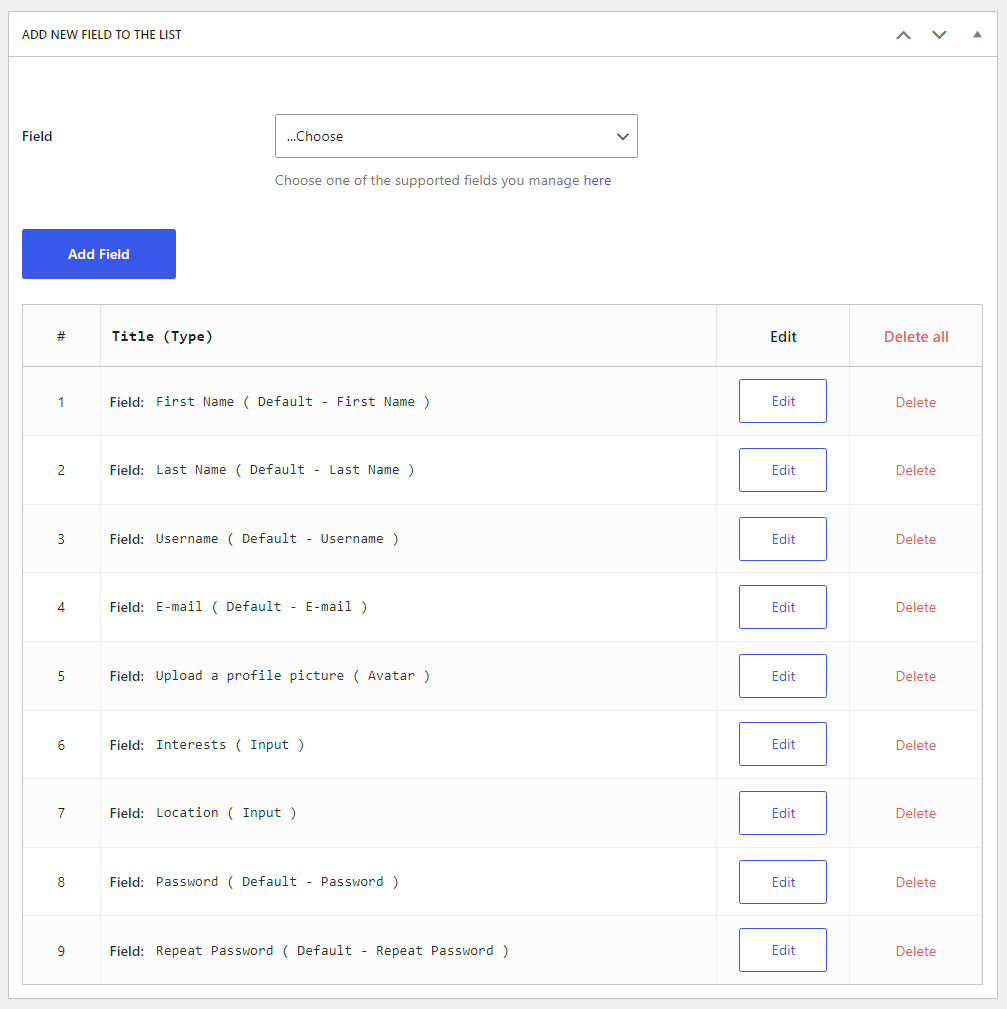
By default, the form will include the list of fields that you can see here below. This is a lot of fields, so if you want to remove any, you can do so by clicking the Delete link next to each option:

As we’re creating a very simple form here with just a few fields, go ahead and delete every field except for these:
- Username (Default – Username) (you can’t delete this one as it’s essential to create a user account)
- First Name (Default – First Name)
- Last Name (Default – Last Name)
- E-mail (Default – Email)
- Password (Default – Password) (you can’t delete this either)
- Repeat Password (Default – Repeat Password)
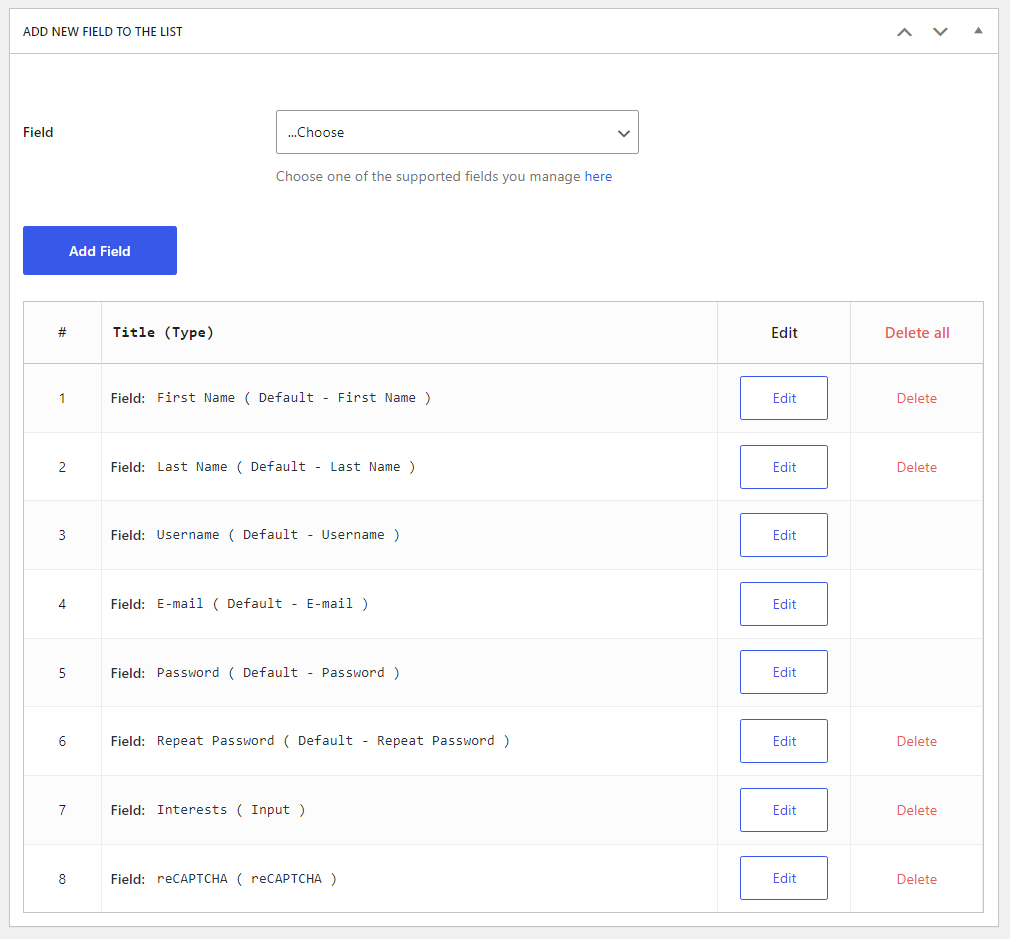
The remaining fields for the registration form should look like this:
Now, hit the Publish button at the top right to save your changes and to set the form to live.
Creating New Fields: Select Box and reCAPTCHA
At this point, we’re missing a couple of the custom fields we mentioned earlier. We still want to add an Interests field to learn more about potential customers, and a reCAPTCHA to deter spammers. We can do both using the form field manager in Profile Builder Pro.
Go to Profile Builder → Form Fields. Here, you’ll find a list of the available fields for use in custom forms. Profile Builder Pro also includes additional fields you can enable, such as an option for a CAPTCHA:
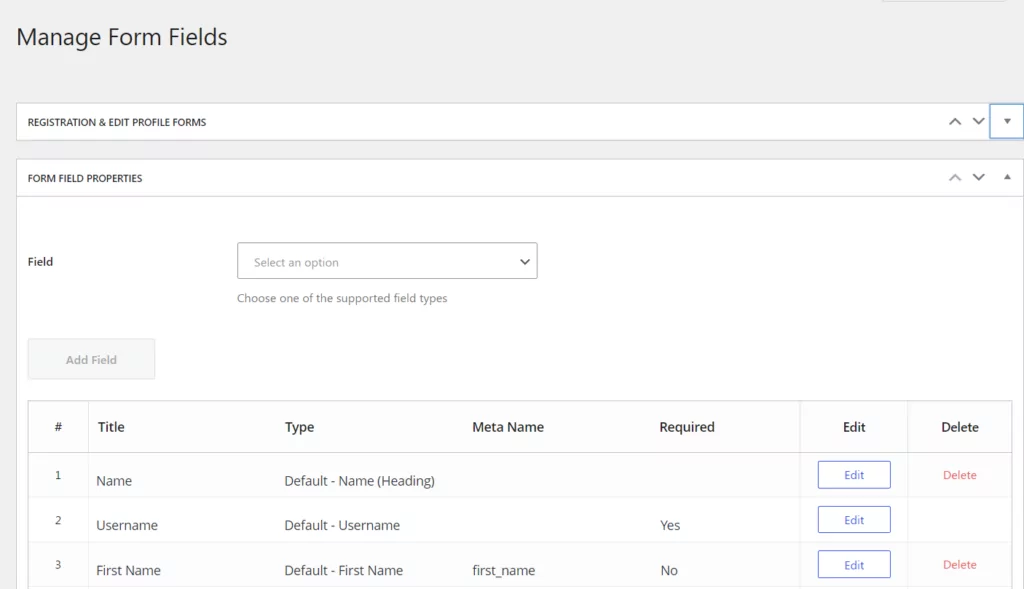
First, let’s take care of the Interests field. Click the Select an option field at the top, then choose the Select (Multiple) option. The screen will change to show the settings for a multiple select box:
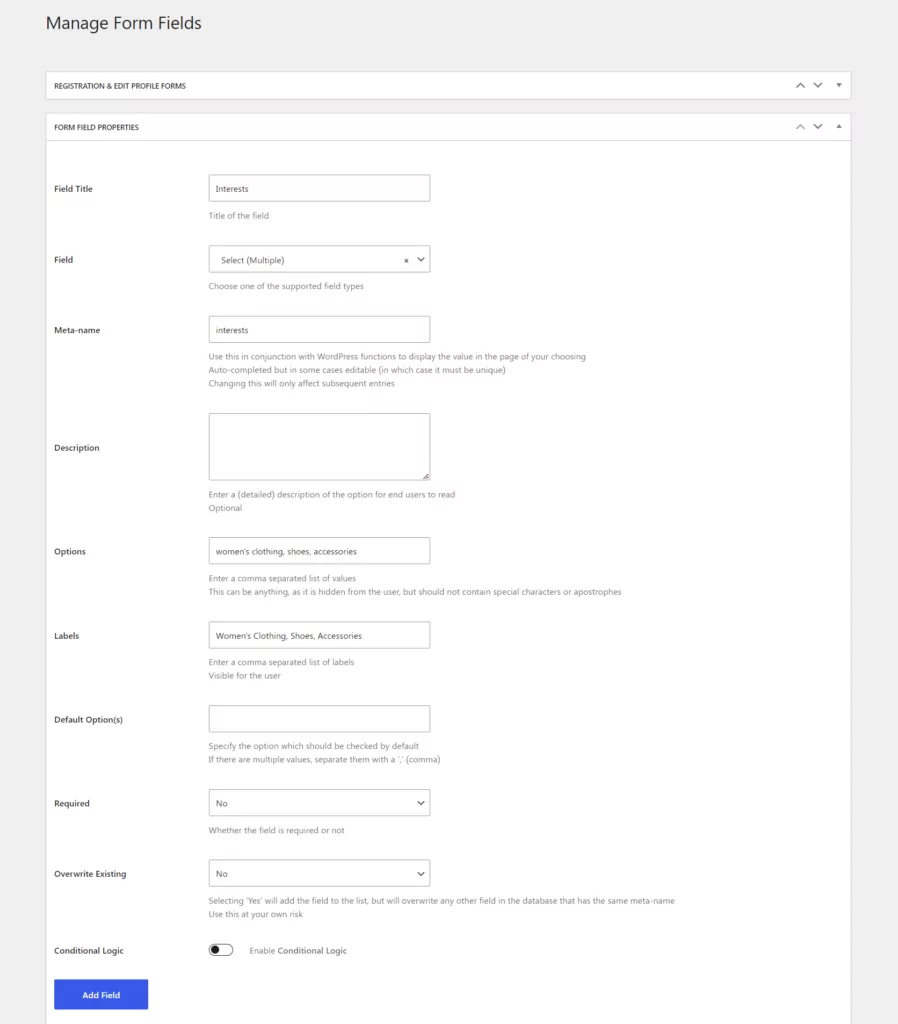
Give the new field a title and fill out other options as follows:
- Meta-name: This is for internal identification purposes only. We set the field to Interests to keep track of what its purpose is.
- Description: Type in a description such as Select the products you’d like to know more about.
- Options: Type in the options for your store, separated by commas. For example, in a clothing store, you might type clothes, shoes, accessories.
- Labels: These are the labels for the options the user will see, again separated by commas. So the above would be Women’s clothing, Shoes, Accessories.
- Default option: Type in one of your options which will be checked by default, if you want.
- Required: Select whether this field is required or not.
- Overwrite existing: Select No.
- Display on WooCommerce Checkout: Select Yes if you want to collect this data from customers when they check out.
Click the Add Field button to save it.
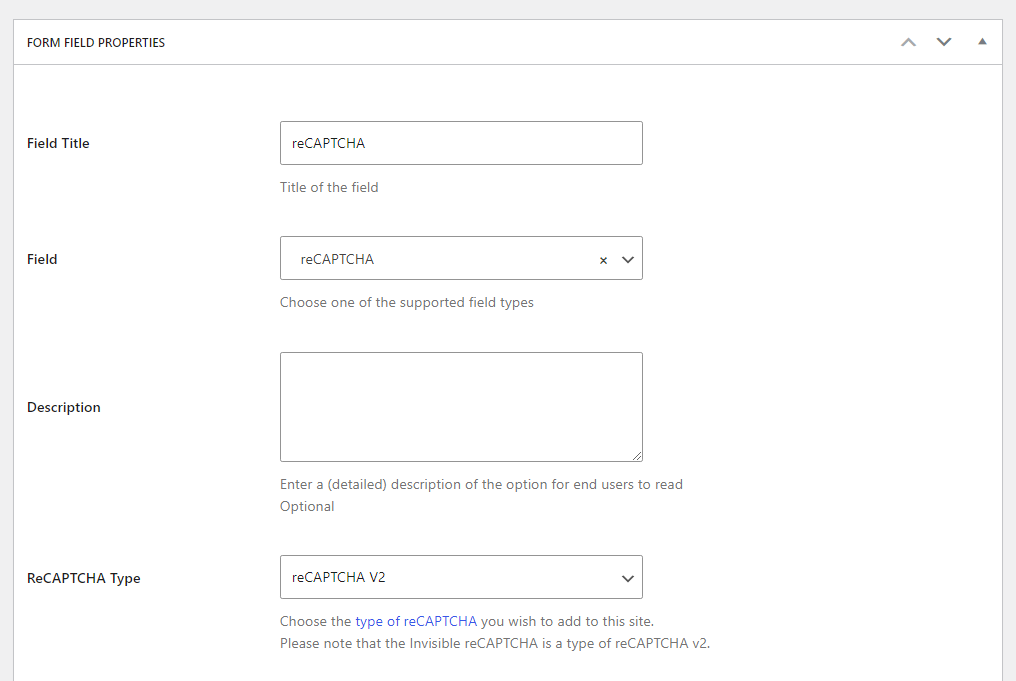
Now let’s create the reCaptcha field. Still on the same screen, click the Select an option field and type reCAPTCHA. The corresponding option will appear in the drop-down menu:
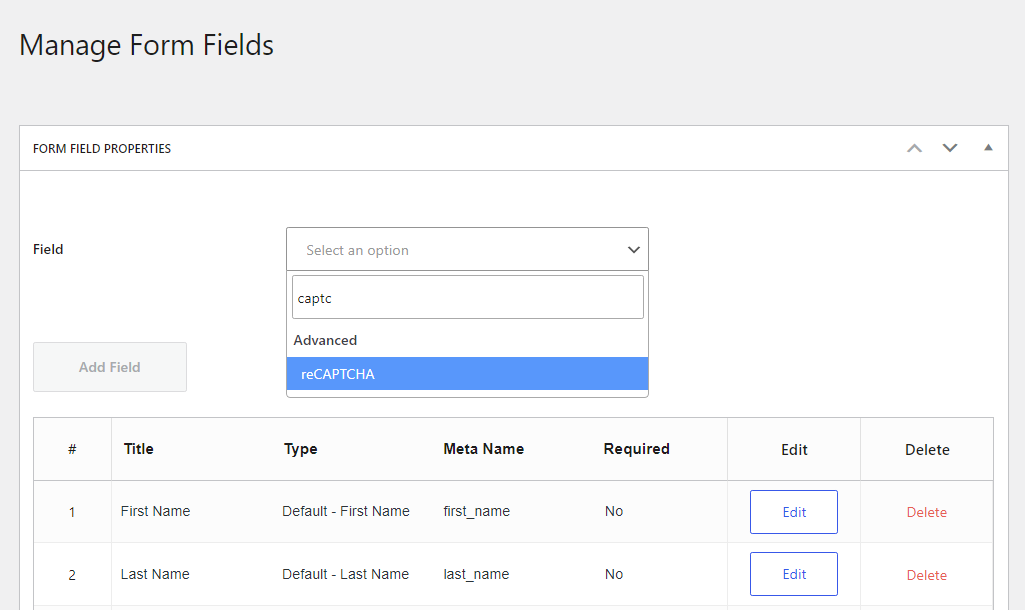
Give it a name and then, in the ReCAPTCHA Type drop-down, choose whether you want to use reCAPTCHA type 2 or invisible reCAPTCHA:
The invisible version is less intrusive for visitors, but version 2 might give them some peace of mind. The choice is up to you.
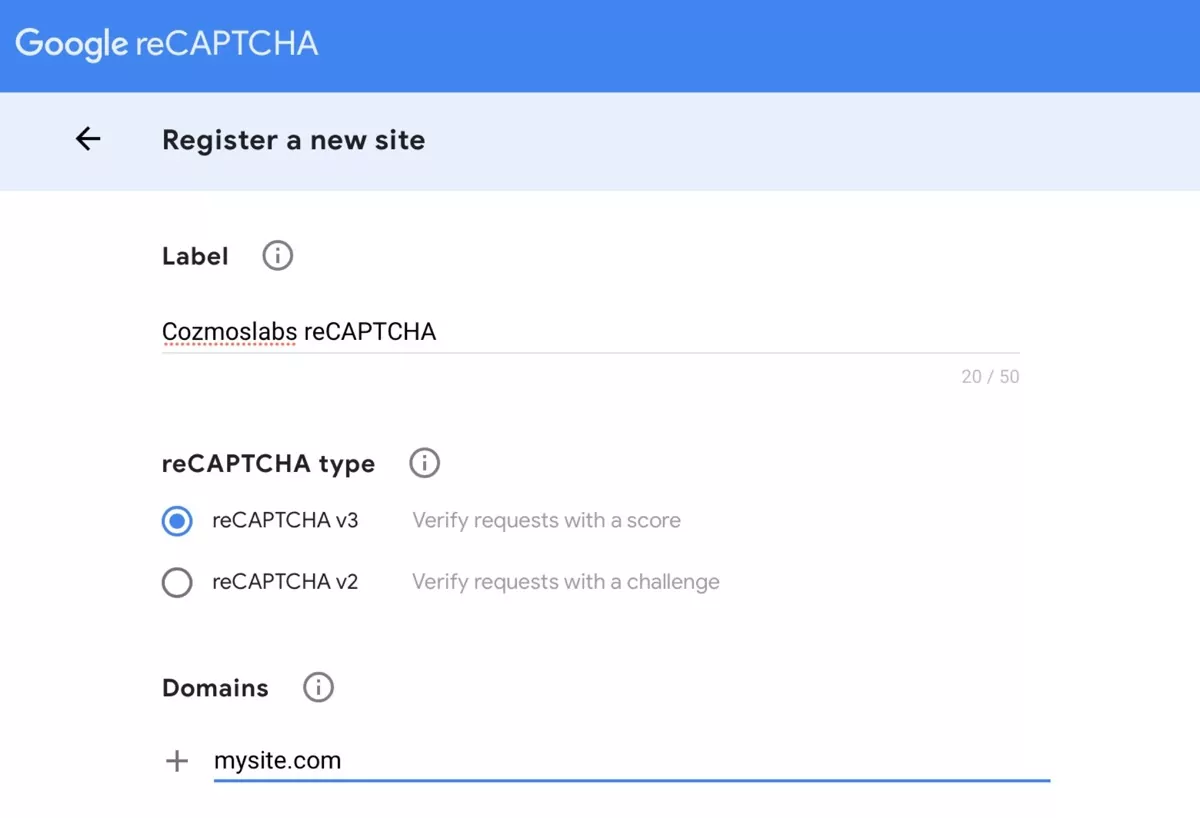
Next, click the link under the Site Key field to be taken to the Google reCAPTCHA settings where you will need to set up a key for using reCAPTCHA:

You should be taken to the Google reCAPTCHA submission form:
If you don’t see this, you may need to set up a Google account – see the documentation on reCAPTCHA fields or this complete reCAPTCHA guide for more information.
Complete the form to create your key and click the Submit button.
You’ll be taken to a screen with two keys: your site key and your secret key. Copy them into the relevant fields back in the screen for creating your field with the plugin and click the Add Field button.
Adding Your New Fields to the Form
Now go back to your registration form in WordPress. Go to Profile Builder → Registration Forms and select your new custom form.
In the Add New Field to the List section, click on the Field dropdown box and select the Interests field (or whatever you called your new field). Click the Add Field button:
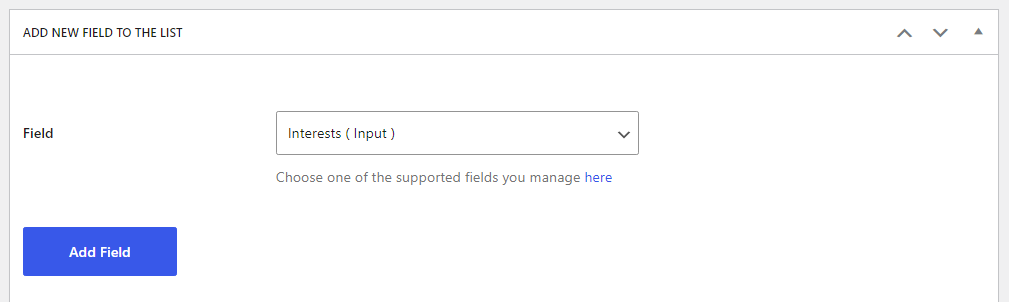
It will now be added to your form. Don’t forget to click the Update button to save the changes you’ve made. Repeat that for the reCAPTCHA field, putting that field at the end of your form:
Note the field editor includes drag-and-drop functionality. You can click on any field in the list at the bottom and modify its position by dragging it up or down. When you’re ready, save the changes to the custom form.
Adding a Redirect to the Form
After people have registered for the site, you may want to redirect them to a Thank you page. You can opt for a simple message or encourage users to visit other products or pages on your site.
Start by creating your thank you page. Go to Pages → Add New. Create your new page and publish it:
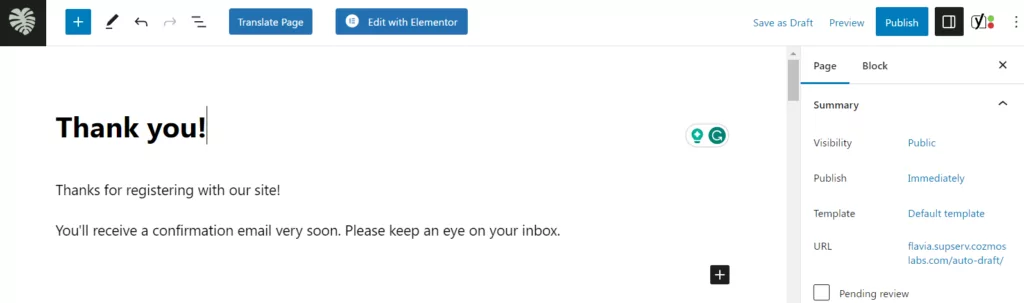
Make a note of the page’s URL – you’ll need that later. Now go to Profile Builder → Registration Forms and click on your form. In the Redirect dropdown box, select Yes. A URL field will appear. Copy the URL of your new page into it:
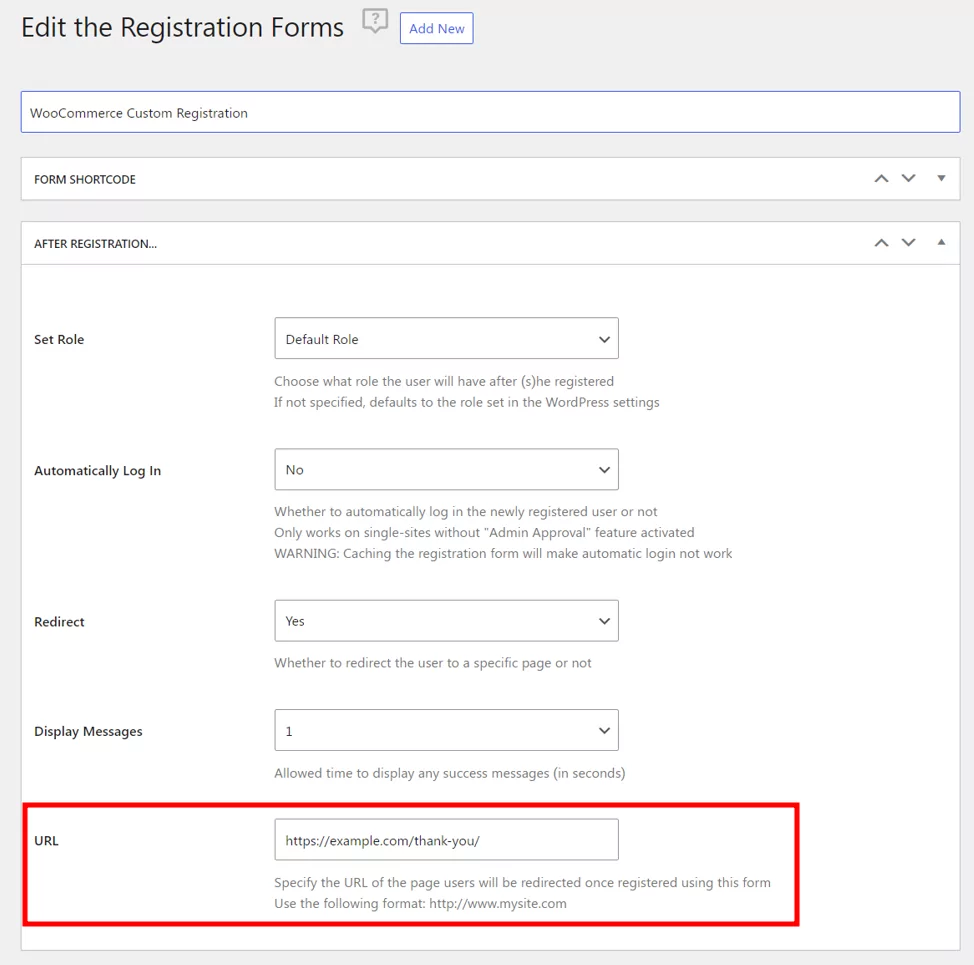
Finally, click the Update button to save your changes. Now it’s time to create another form – the edit profile form.
Creating a New Edit Profile Form
You can also edit the form that your users access to edit their WooCommerce user account. Go to Profile Builder → Edit-profile Forms. Click the Add New button.
You’ll see a very similar screen to the one you used to create the custom WooCommerce user registration form.
Creating the Form
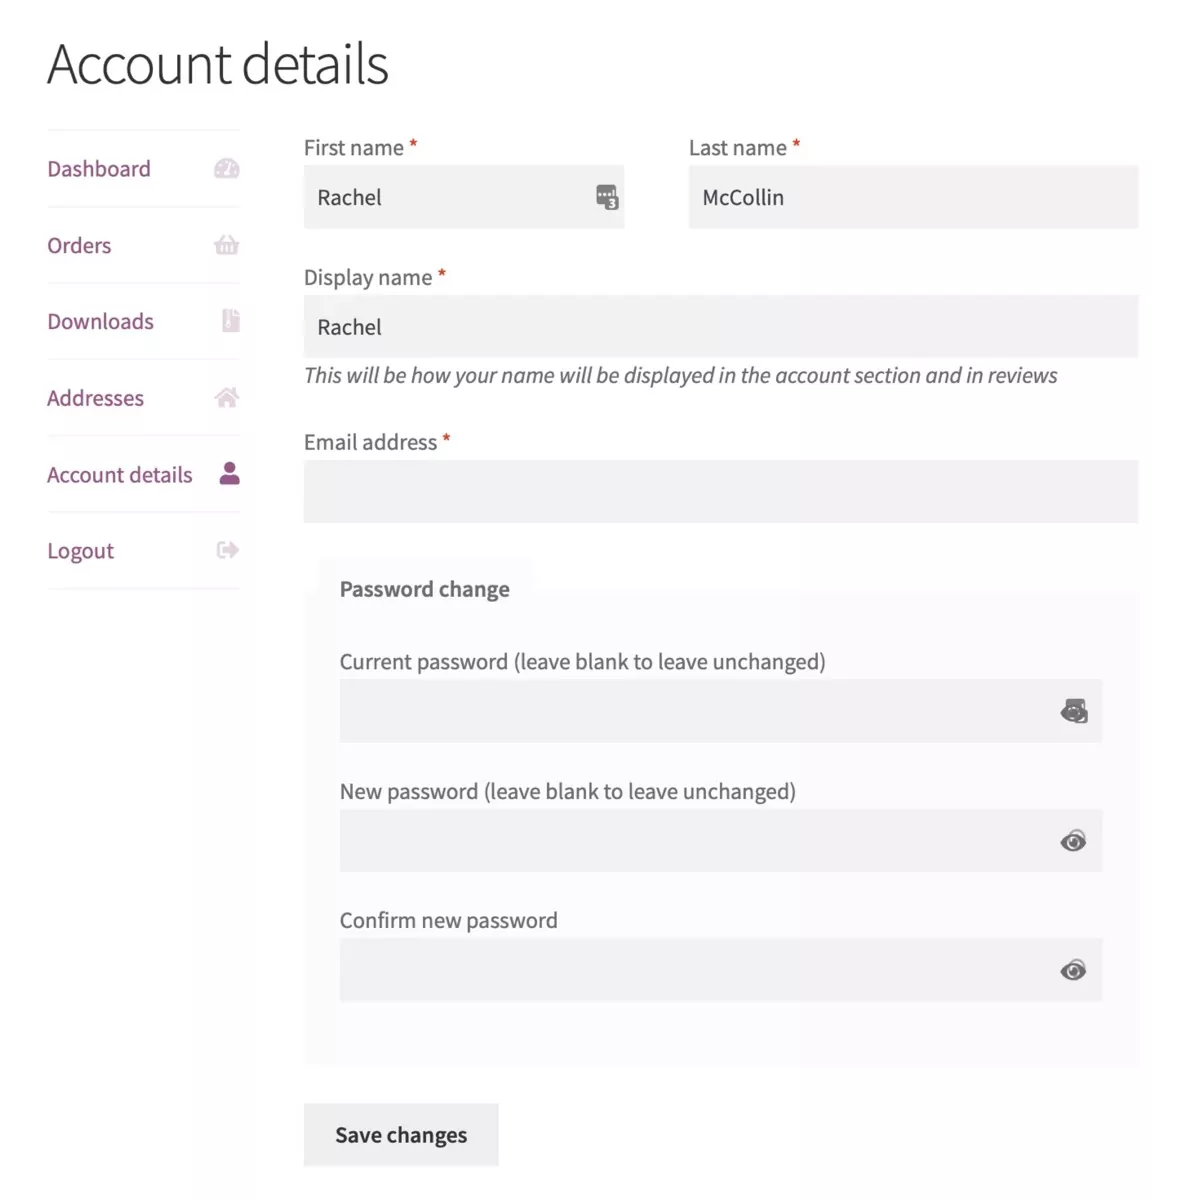
The default edit profile form in WooCommerce has just a few fields again: name, display name, password, and email address:
Let’s create a new form with some extra profile fields. This form is going to include:
- Name
- Username
- Email address
- Avatar
- Interests
- Password
- Phone number
- Billing Address
- Shipping Address
So, go to Profile Builder → Edit-profile Forms and click the Add New button. Name your new form and delete the fields you don’t intend on using. We’ve also gone ahead and added some of the fields mentioned above, which you can see in the example below:
Most of these fields already exist in the Profile Builder Pro library, so all you have to do is select them from the Field drop-down menu and add them. The only field we need to set up from scratch is an option for including a phone number.
Creating a New Field for Adding a Phone Number
Now let’s add the phone number field. We’ll use this to keep a phone on file in case there are problems with customer orders or you need to reach them under other extraordinary circumstances.
Go to Profile Builder → Form Fields and click the Select an option field. Select the Phone option and fill out the details for this field, giving it a name and ID. Add a description and choose whether to make it optional by configuring the Required field (if you select Yes, users will need to add a phone number to complete the registration):
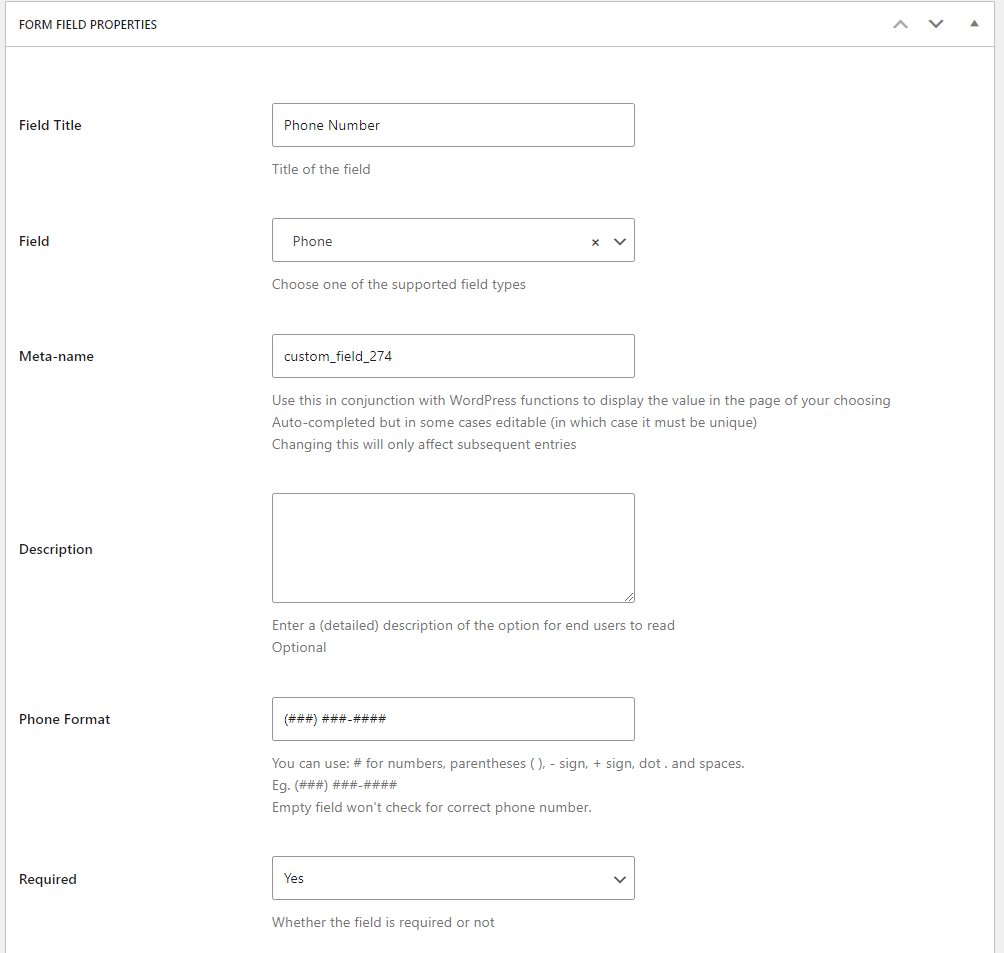
Click the Add Field button to add it to the available fields. Now let’s move on to talking about conditional logic or how to show different form options depending on who’s seeing the page.
Adding Conditional Logic to Fields
When you added the phone number field, you may have noticed that it includes formatting for USA-specific phone numers. But what if your customer is outside the USA?
You have two options for how to tackle this problem, both of which use conditional logic:
- Create a second phone number field, which will only be displayed to customers outside the USA while the existing field is only displayed to customers in the USA.
- Add conditional logic to the existing phone number field so it’s only shown to customers inside the USA.
If your business is in the USA and you won’t be able to call customers elsewhere in the world without significant costs, there isn’t much point in collecting that information. So we’re going to show you how to implement the second option, which is to only show the phone number field to customers in a specific country.
In the Manage Form Fields screen, click the Edit button next to your new phone number field.
Just above the Save Changes button, check the Enable conditional logic checkbox. In the Choose… field, select Location, then is, and type in United States:
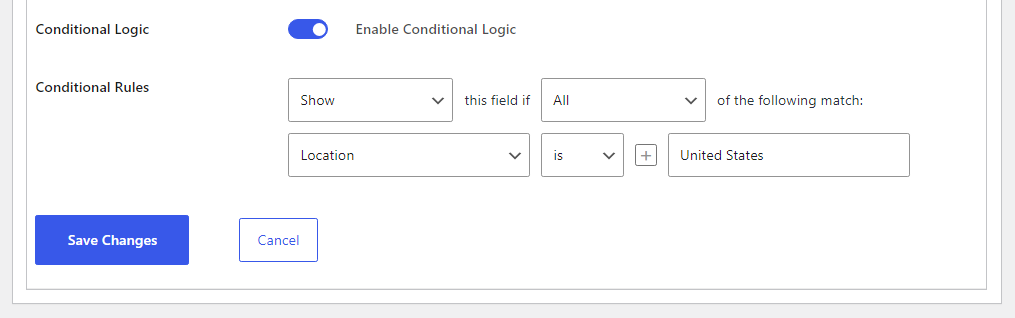
Click the Save Changes button. The field for phone numbers will now only be displayed to people who selected the United States as their country.
Now you can add this new field to the custom profile edit form. We show you how to do this in the previous section, so check it out if you’re having problems finding the corresponding options. Here’s an example of the custom profile edit form with these new fields:

Remember you can re-arrange the fields in any custom Profile Builder Pro form by using the drag-and-drop functionality in form editor. When you’re happy with how the form looks, click on the Update button.
Adding Your Forms to the WooCommerce Screens
You now have your forms set up but they aren’t showing up on your site yet. That’s because you need to tell Profile Builder Pro which forms to use on which WooCommerce pages on the front-end of your site.
Go to Profile Builder → Add-Ons and activate the WooCommerce Sync Add-on. Next, navigate to the newly added menu item, like so: Profile Builder → WooCommerce Sync.
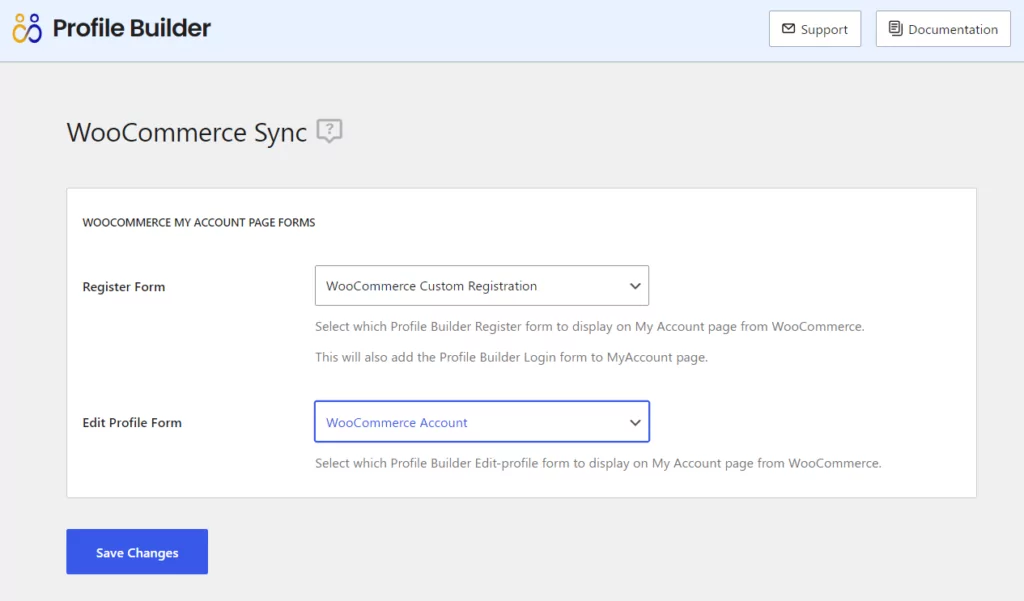
In the Choose Register form to display on My Account page dropdown box, select your newly created custom registration form.
In the Choose Edit Profile form to display on My Account page dropdown box, select your newly created custom edit profile form.
Click on the Save Changes button. Your forms will now display on the relevant WooCommerce pages.
On your live site, go to the WooCommerce My Account page. When you aren’t logged in, you’ll see the new custom registration form. When a new user completes the form, they’ll be redirected to your thank you page:

Now if someone has already registered, when the user logs in and navigates to the My Account page, they’ll be able to access their custom profile page.
You now have two new forms, with fields that will be more useful for you and your customers than the default forms. Well done!
Customizing Other Parts of the WooCommerce Registration Process
So far, we’ve given you a detailed look at how you can customize the registration and edit profile forms that appear on the My Account page of your WooCommerce store. Beyond that, Profile Builder Pro can also help you customize other aspects of the WooCommerce registration process. Let’s go through them.
Adding Fields to the Registration Form at WooCommerce Checkout
If you enable public registration, WooCommerce includes a feature that lets you give anonymous guests an option to create an account on the checkout page. You can enable this feature by going to WooCommerce → Settings → Accounts & Privacy → Account creation:
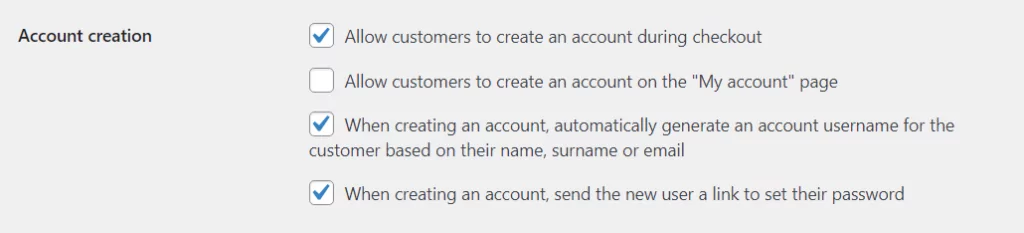
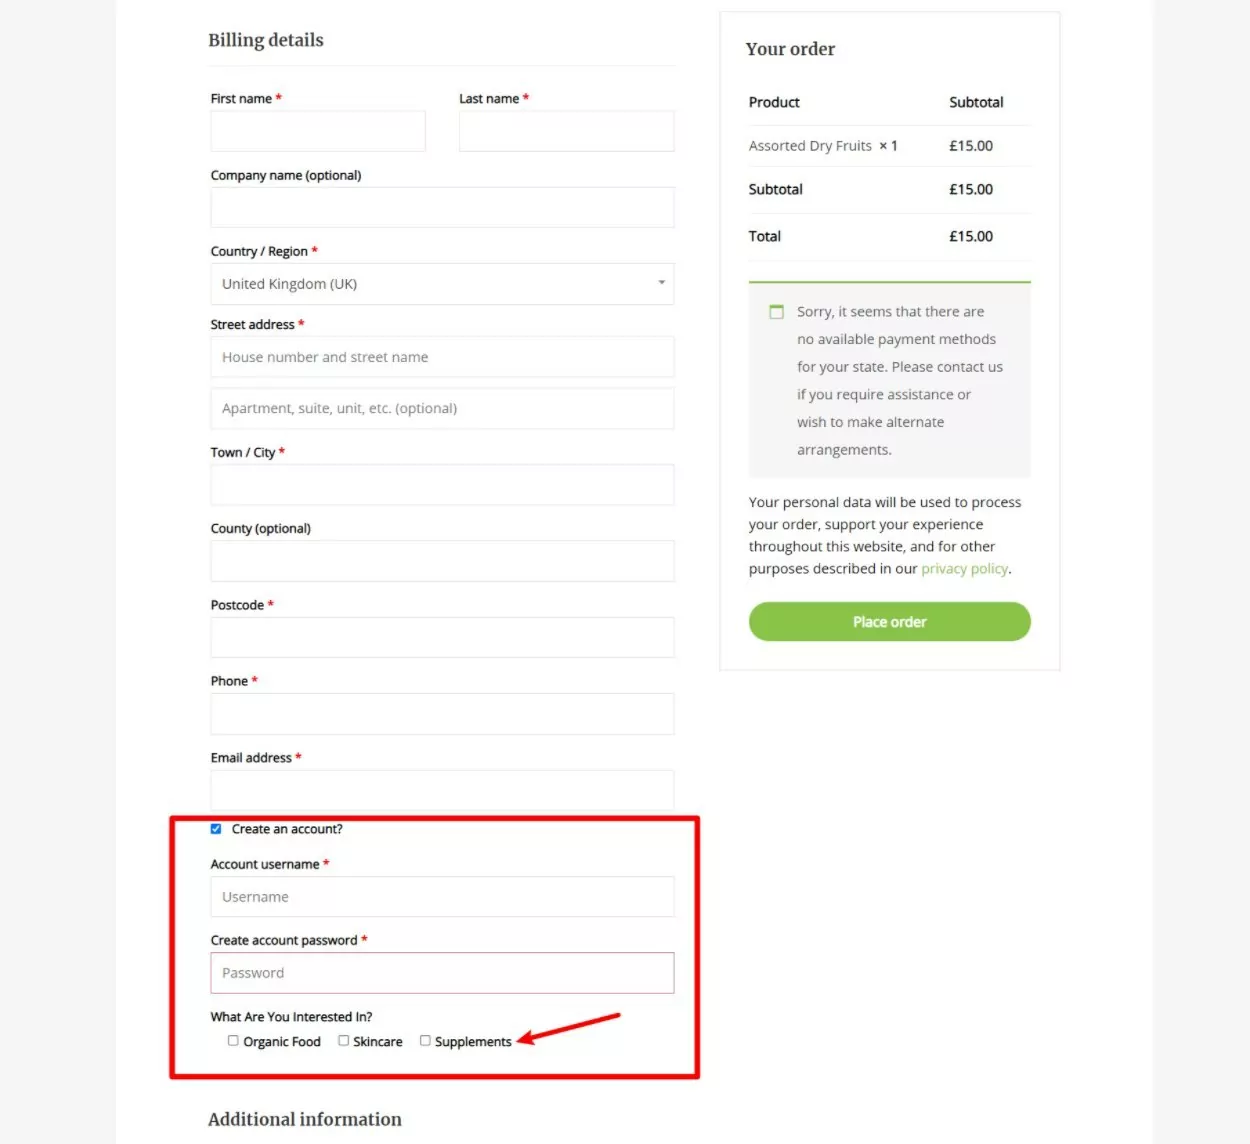
The default checkout registration form will look something like this if you choose to enable the Allow customers to create an account during checkout setting:
With Profile Builder Pro, you also have the option of adding custom fields to the form at checkout. This can make the checkout form a bit unwieldy, but it can help you capture more user registrations.
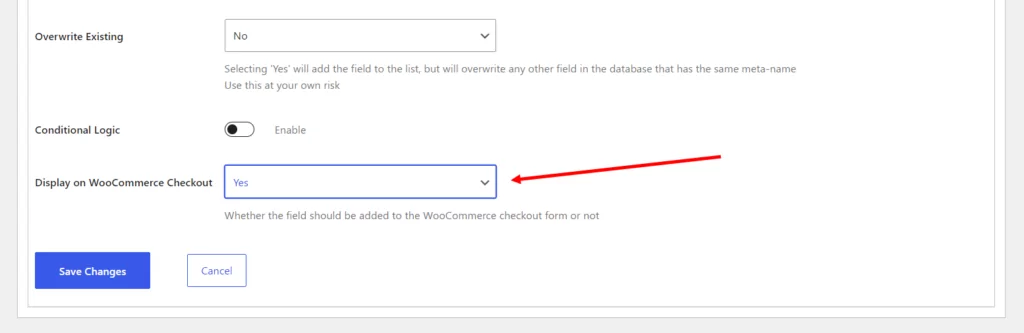
To set this up, go back to Profile Builder → Form Fields. Then, edit a field that you want to include on the checkout registration form and set the Display on WooCommerce Checkout drop-down equal to Yes:
To include additional fields on the checkout registration page, repeat the process to enable each field you want users to fill out.
When you’re finished, all of the fields that you’ve enabled will appear on the registration form at checkout – here’s an example:
Creating a Custom WooCommerce Registration Page
So far, we’ve focused on customizing the default WooCommerce registration forms, either in the My Account area or on the checkout form. Another thing that Profile Builder Pro lets you do is create one or more completely custom registration forms that you can display on any page on your store.
For example, you could create a custom registration page at yourstore.com/register instead of relying on the default form.
You can also create multiple unique registration forms, which is useful if your store has multiple WooCommerce user roles. For example, if you have a wholesale store, you might have one user role for wholesale customers and another for retail customers so that you can enable role-based pricing.
With Profile Builder Pro, you could create two separate registration forms and automatically assign users to the proper user role based on the form that they use.
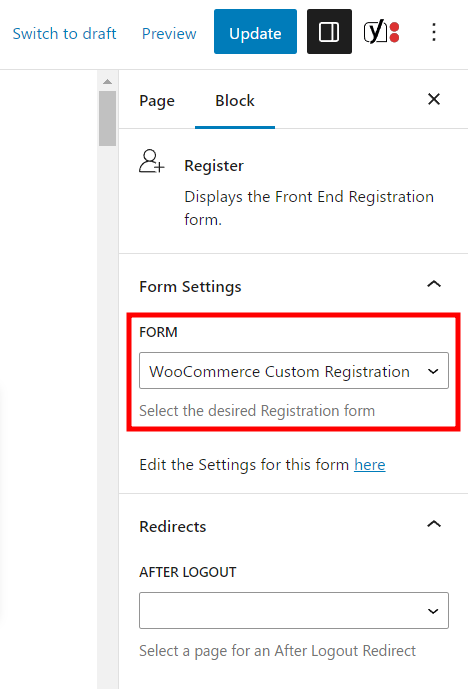
First off, you can always embed the primary registration form anywhere on your site using the Register block which lets you create a dedicated page for your registration form:
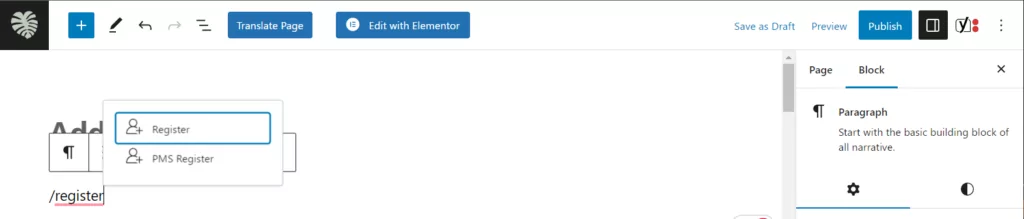
By “primary” registration form, we mean the form that you previously created and set as your main WooCommerce registration form. You can also specificy which form the block should load by using the FORM option under the block settings menu to the right of the screen (which appears while selecting the Register block):
If you want to create another unique registration form, you can do that by going to Profile Builder → Registration Forms. For each form that you create, you’ll be able to use the same drag-and-drop form builder to set up all the form fields.
Note that each form will get its own unique shortcode that you can use anywhere on your site. You can load forms using either shortcodes or blocks, depending on your preferrence.
Create Your Custom WooCommerce Registration Form Today
Using the Profile Builder Pro WordPress plugin, you can easily create custom WooCommerce registration and edit-profile forms that will help you collect valuable customer information and boost your sales.
In this tutorial, you’ve learned how to use the form builder to create a range of fields with this great plugin, including avatars, selects, and CAPTCHAs, but there are plenty more options. Try exploring the available field types, finding out which ones would work for your store.
Profile Builder Pro
Get the Profile Builder Pro plugin today and customize your WooCommerce Registration Forms on your WordPress site!
Get Profile BuilderStill have questions about creating custom WooCommerce registration forms? Ask them in the comments section below!
Related Articles

How to Customize the WooCommerce Login Page (No Code Needed)
Searching for a solution to customize the WooCommerce login page and otherwise control login behavior on your WooCommerce store? If you allow (or force) registration on your store, you'll want to create a user-friendly login experience so that your shoppers can easily log in to their accounts and access other key features. In this post, […]
Continue Reading
How to Customize the WooCommerce Register Page (Add Custom Fields)
Looking to create a custom WooCommerce register page for your store? Whether you want to create a dedicated registration page or add custom fields to the checkout register form (or both), we're going to show you an easy, code-free way to customize all parts of the WooCommerce registration process. By following this tutorial, you'll learn […]
Continue Reading
8 Best WordPress User Registration Plugins
Not sure what WordPress user registration plugin to use for your project? Going through all the WordPress user registration plugins can be disorienting. You may have spent hours and hours searching for plugins and tutorials to help you with your project, and you’re still as confused as you were when you started. Imagine finding the […]
Continue Reading2 thoughts on “How To Customize WooCommerce Registration Form (2026 Ultimate Guide)”
Comments are closed.
Is it possible to show custom registration form fields based on the product being purchased? For instance, I use Woocommerce Membership & Subscription plugins. When a user purchases a membership product from my store, I’d like to present them with the opportunity to provide more information about themselves. I can then make their information/profile available in a membership directory. Ths membership directory would only consist of active members (member role = Premium Subscriber). This will enable members to get to know each other and connect based on location, interests, circumstances, etc.. Is this possible using your plugin(s)? If so, can you assist? Thanks!
Is it possible to show a button ‘Create account’ on the My account page that redirects to a page with the custom registration form, instead of displaying the registration form on the My account login page?