

Table of Contents
- 1 What You Need to Sell Online Courses From Your Own Website
- 2 How to Sell Online Courses From Your Own Website (8 Steps)
- 2.1 1. Set Up Your Basic WordPress Site
- 2.2 2. Install Paid Member Subscriptions and Configure Basic Settings
- 2.3 3. Add Your Course Content
- 2.4 4. Create Your Course Membership Levels
- 2.5 5. Restrict Content (Including Content Dripping If Needed)
- 2.6 6. Customize Your Payment/Registration Page
- 2.7 7. Customize Your Navigation Menu for Course Takers
- 2.8 8. Launch Your Course Platform!
- 3 Need Quizzes and Assignments? You Can Integrate PMS With LearnDash
- 4 Create Your Own Course Selling Website Today
Are you trying to figure out how to sell online courses from your own website? Online courses are a great way to share your knowledge and even make a little money doing it. But, even if you have the perfect idea for an online course, you might not be sure how to create your own course-selling website.
In this detailed, step-by-step guide, we’ll show you exactly how to create your own online course-selling platform using WordPress and the Paid Member Subscriptions plugin. This method gives you an incredible amount of flexibility while keeping costs low. Better yet, it doesn’t require any special technical knowledge.
In this post, we’ll discuss what you need to sell online courses from your own website. Then, we’ll get right into the tutorial to show you how to do it. Let’s begin!
What You Need to Sell Online Courses From Your Own Website
If you want to create an online course platform, the open-source WordPress software offers the easiest way to get started. WordPress gives you access to all the features that you need. What’s more, this approach will also be a lot more affordable than expensive SaaS platforms like Teachable.
Essentially, WordPress will provide the foundation for your course platform. Then, you can add some important features using the Paid Member Subscriptions plugin:
Paid Member Subscriptions Pro
The best plugin to sell online courses from your WordPress website.
Get Paid Member SubscriptionsPaid Member Subscriptions is a membership plugin for WordPress that offers all the features you need to turn WordPress into a course-selling platform. You’ll be able to achieve the following:
- Create as many courses and lessons as you need
- Restrict access to course content so that only authorized users can access it
- Charge one-time or recurring fees to access course content
- Offer free plans or combine both free and paid plans
- Manage all of your members and give learners front-end dashboards where they can manage their own course access plans
By combining WordPress and the Paid Member Subscriptions plugin, you can create an incredibly flexible course platform at a surprisingly low price. For example, you’ll be able to sell one or more courses, coaching programs, consultancy services, or a mix of all three (and more).
How to Sell Online Courses From Your Own Website (8 Steps)
Now, let’s get into the step-by-step guide for how you can use WordPress and Paid Member Subscriptions to sell online courses from your own website.
1. Set Up Your Basic WordPress Site
Before you can start setting up your course functionality, you’ll need to have your basic WordPress site up and running. If you already have a WordPress site or you’re familiar with how to make a WordPress site, you can skip ahead to the next step.
If not, you’ll first want to:
- Choose WordPress hosting and a domain name. SiteGround is a good starting point for hosting if you’re not sure where to begin, but you can find lots of great WordPress hosts.
- Install the WordPress software. Your web host should have a tool that lets you install WordPress with just a few clicks.
- Log in to the WordPress dashboard. You can access it by adding /wp-admin to the end of your domain name and using the username and password that you created during your WordPress installation.
- Choose a WordPress theme to control the design of your course website. For this example, we’ll use the free Kadence theme and its free online course demo site. You can use any theme you like, but it’s probably best to choose a WordPress membership theme. Then, install the theme by going to Appearance → Themes → Add New in your WordPress dashboard.
After importing the Kadence course demo site, here’s how our example site looks:

Once your theme is installed, you can customize all of the content using the WordPress editor. This way, you can define the right look and feel for your website. After that, you can move on to set up the actual course and membership functionality.
2. Install Paid Member Subscriptions and Configure Basic Settings
Once you have your WordPress site up and running, you’re ready to install the Paid Member Subscriptions plugin. Again, Paid Member Subscriptions is what lets you add course functionality to your WordPress site. You need it to restrict access to course content, manage learners/access levels, and accept payments.
You can use the free version of Paid Member Subscriptions to create a very simple course site. However, the premium version adds key features like automatic recurring subscriptions, bulk content restriction, content dripping, and more. For that reason, we’re going to use the premium version for this tutorial.
Set Up Paid Member Subscriptions
To get started, you’ll first need to install the free version of Paid Member Subscriptions plugin to access the setup wizard. Keep in mind that if you plan to use the premium version, you’ll still need to install this free option.
To do this, go to Plugins → Add New Plugin in your WordPress dashboard. Then, look up the free tool using the search feature. Once you find it, click on Install Now followed by Activate.
Alternatively, you can download it from the WordPress plugin directory and go to Plugins → Add New Plugin → Upload Plugin. Just choose the file from your device and install and activate it.
Then, you can purchase the Paid Member Subscriptions plugin from the Cozmoslabs website to extend the core plugin with additional features. If you want to “drip” your course content out over time, you’ll want the Pro license.
At this point, you can download the pro plugin from your Cozmoslabs account dashboard and install it on your WordPress site. You’ll also want to add your license key so you’re able to activate the premium add-ons and enable automatic updates.
Once you’ve activated both the free and premium plugins, head to your new Paid Member Subscriptions area in the WordPress dashboard and click on the Open Setup Wizard button to configure some important settings:
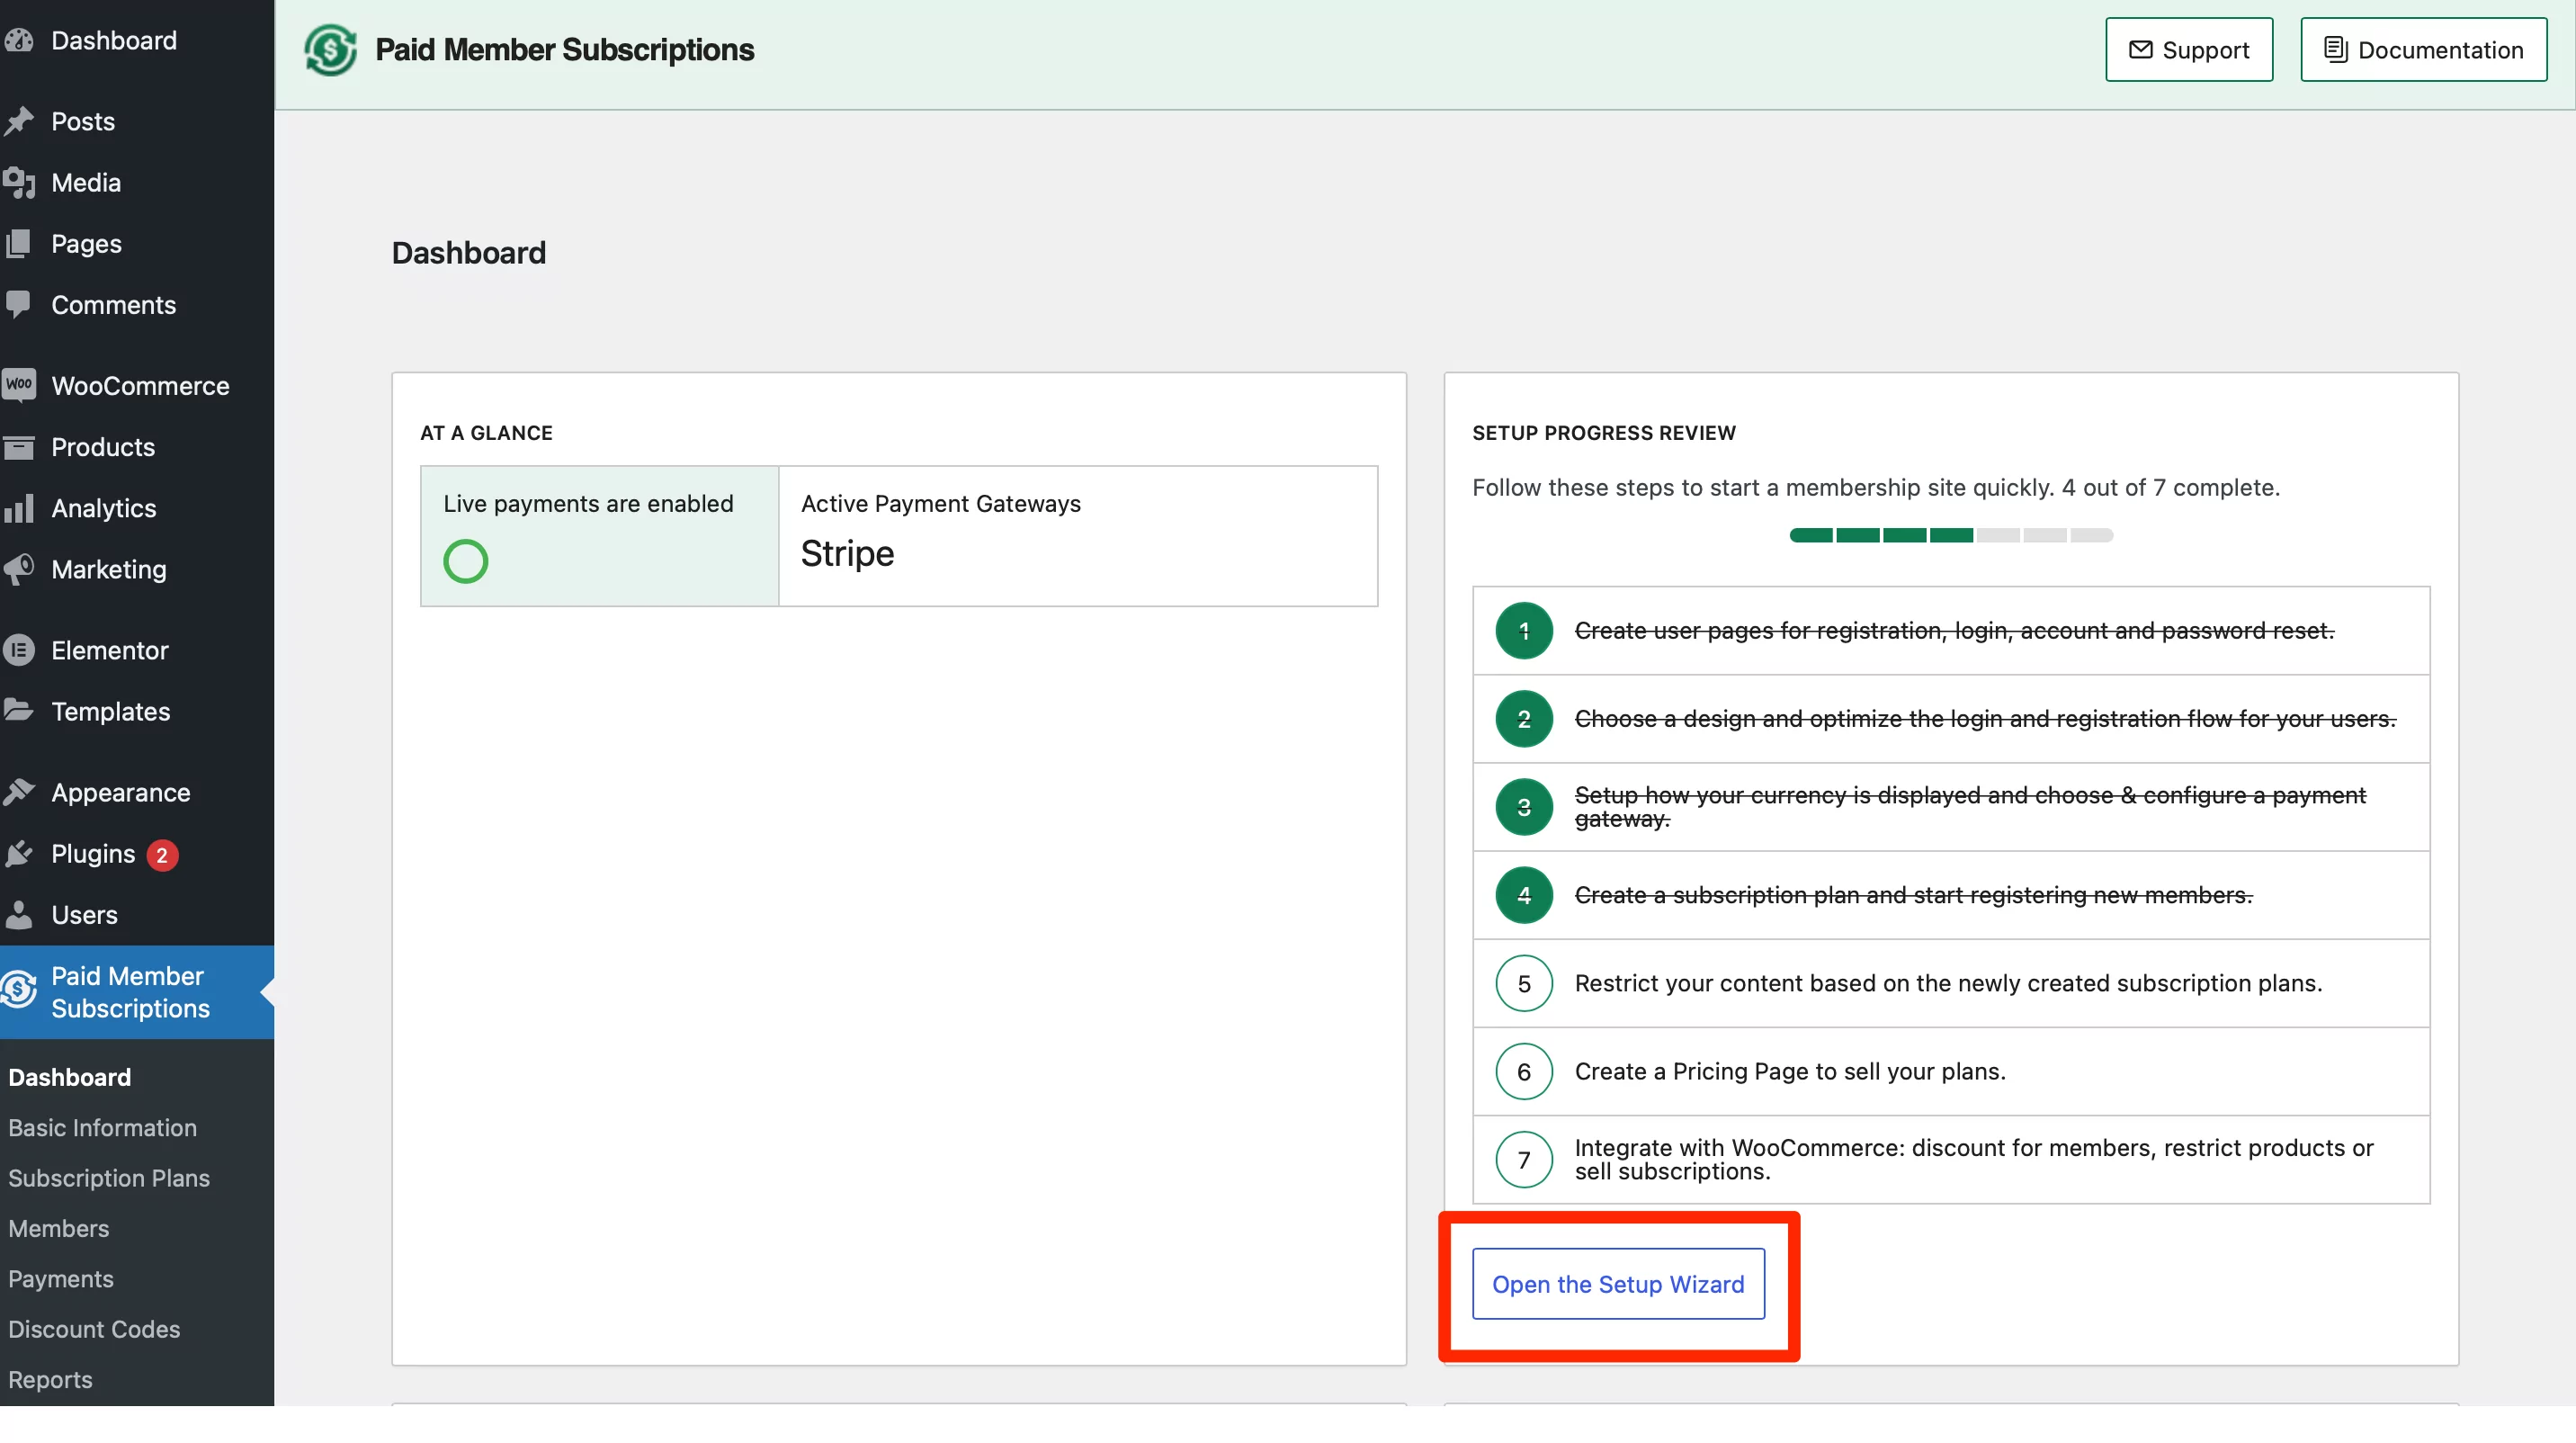
First, you can have the plugin create important pages for your course, such as pages for user registration, login, account management, and password reset:
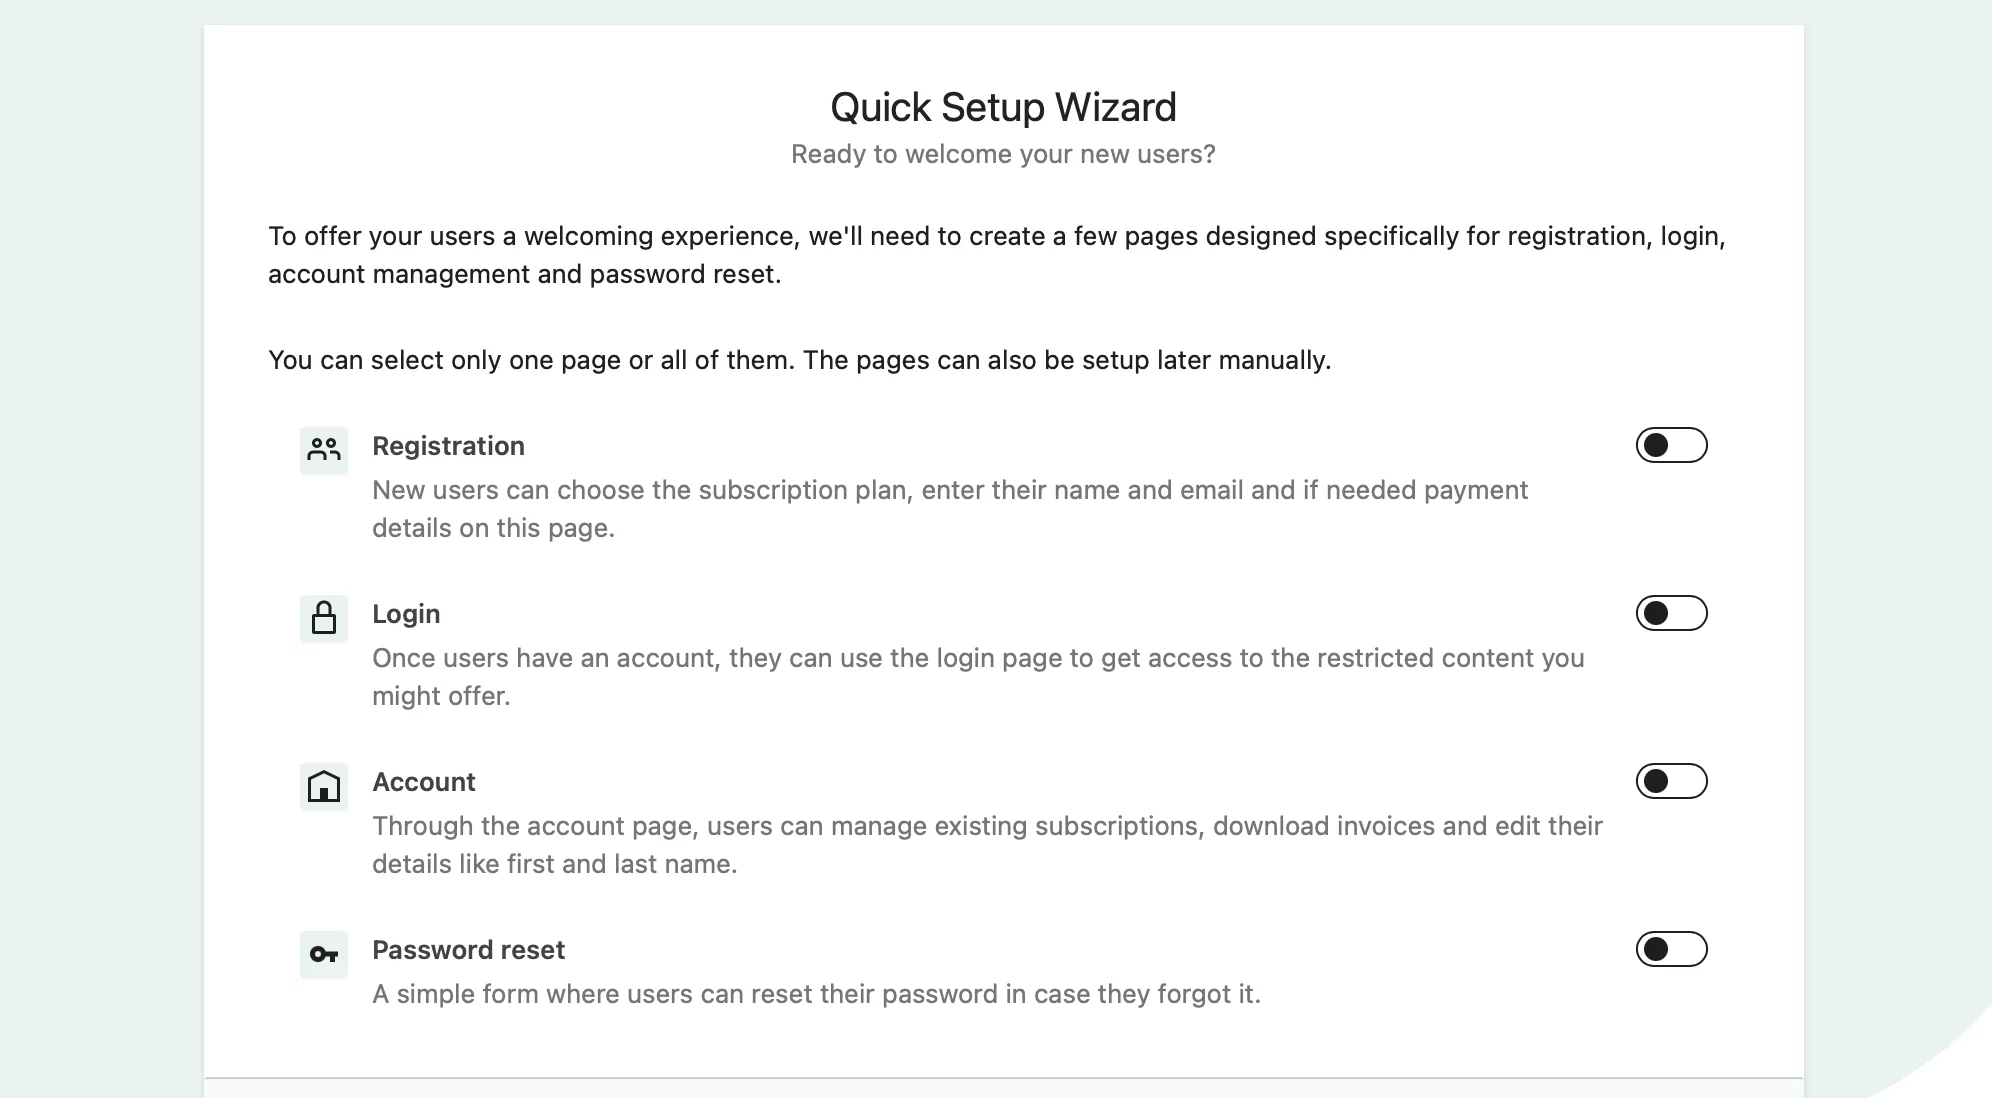
Then, you can choose a new style for your forms to better suit your website. If you stick with the default styling, your forms will generally inherit the look and feel of your current theme. But, you also have the option of three additional designs:
You’ll also find some extra settings here to optimize the registration and login process for members. For example, you can automatically log users in after registration and hide the admin bar.
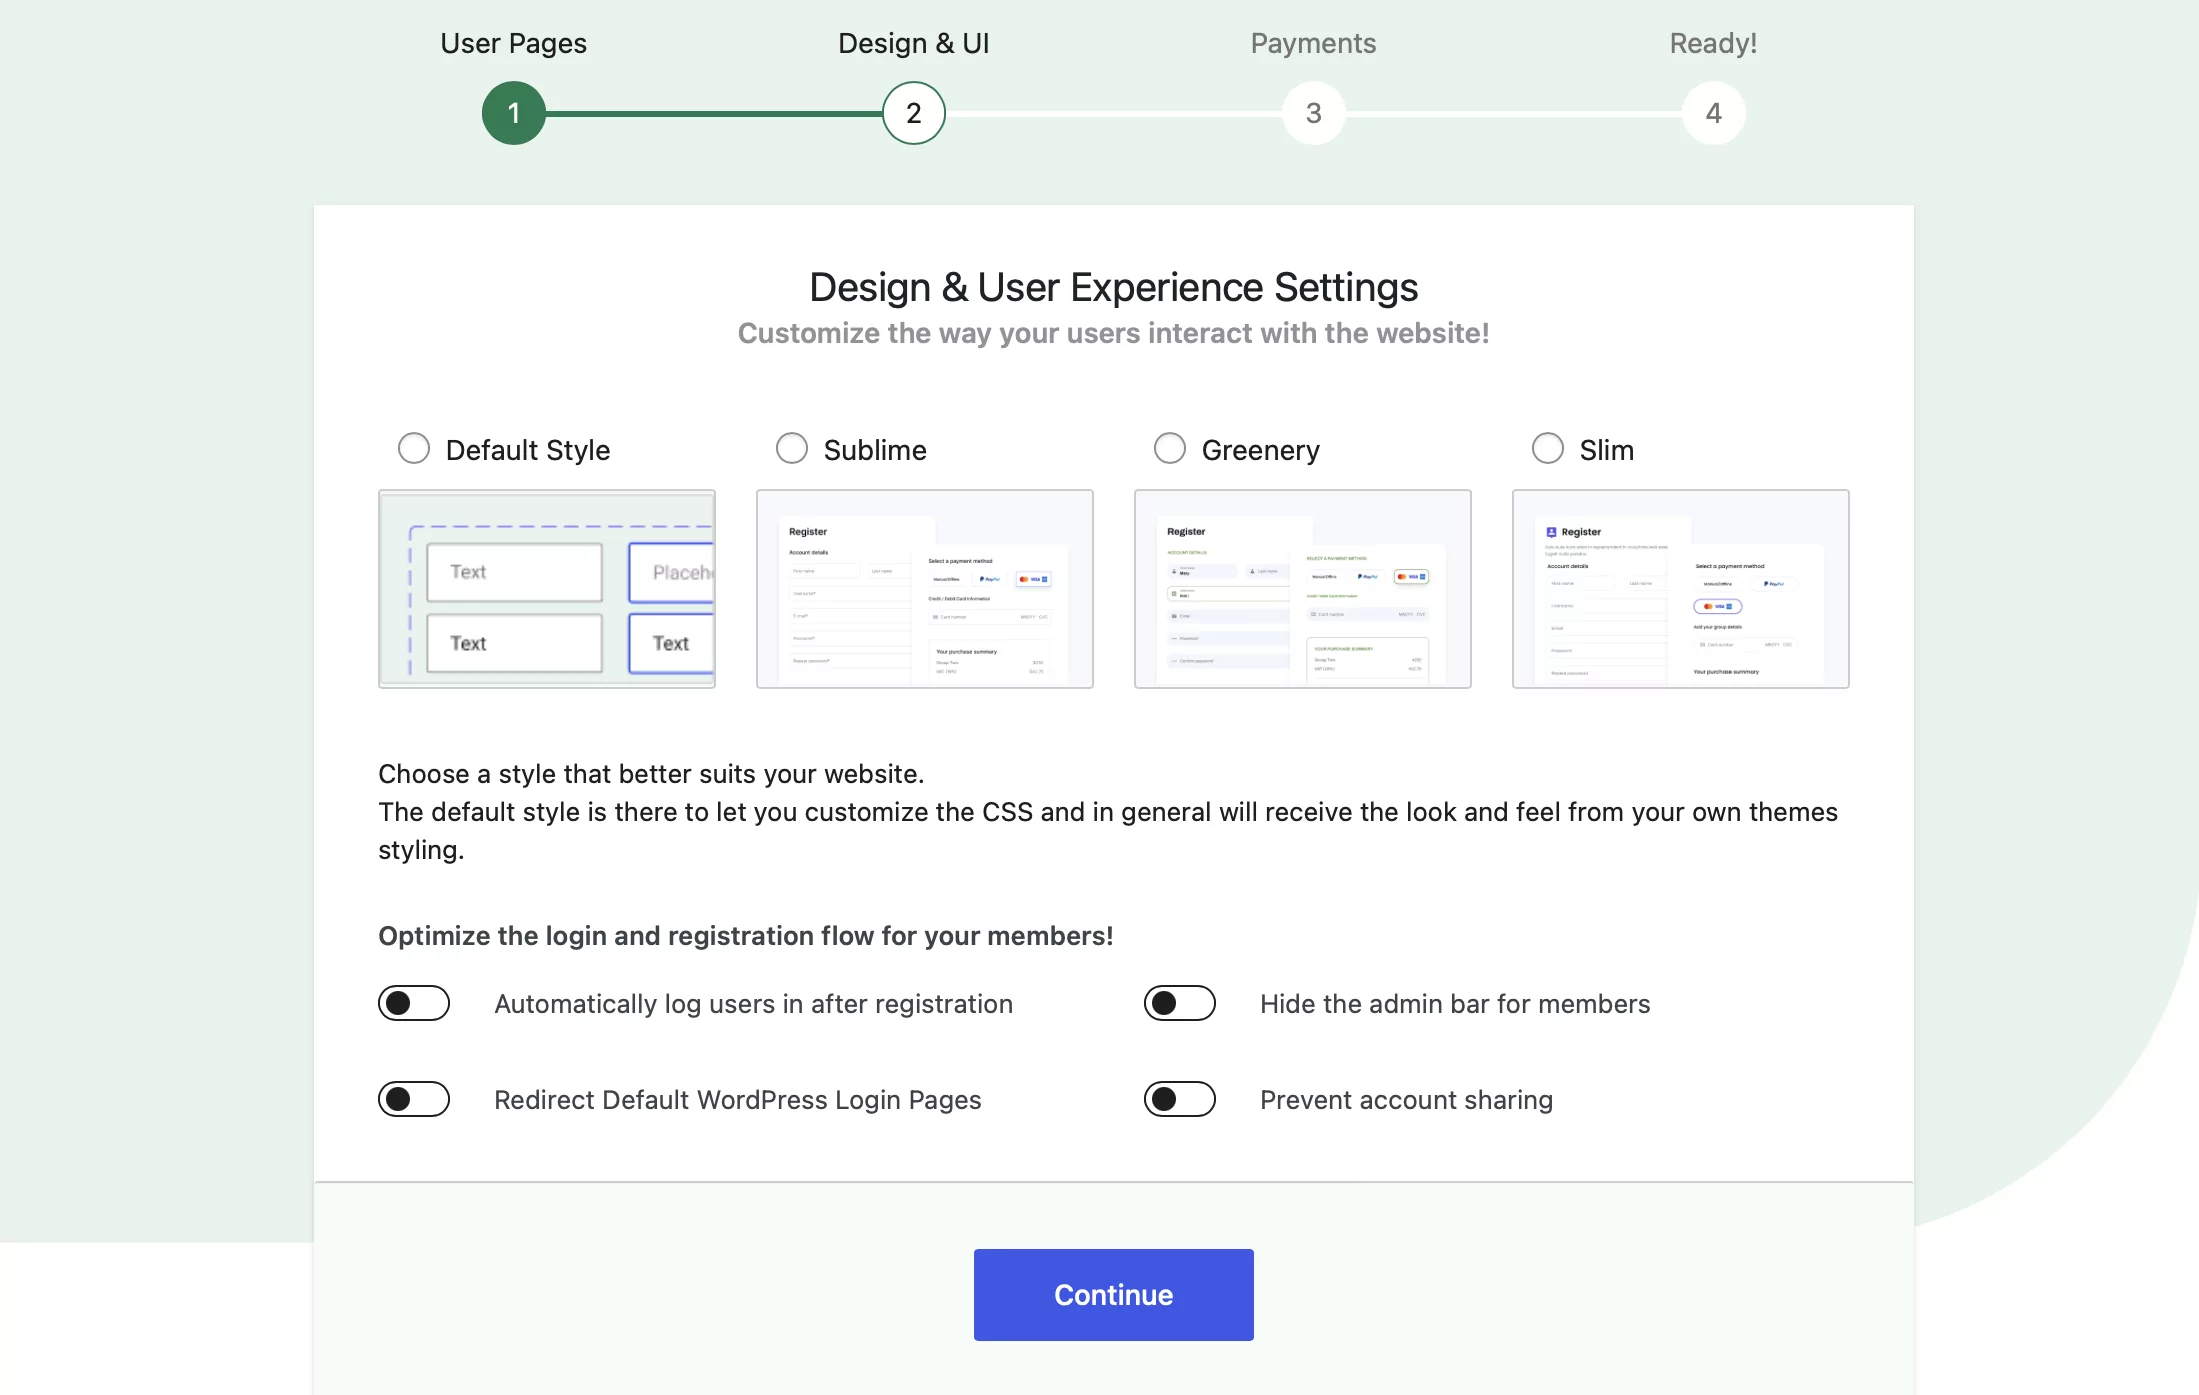
Next, you can configure your preferred payment gateways and the currency for your course. But, you can skip this step for now because we’re going to configure that in a second:
Now, you can return to your membership dashboard to define some more settings.
Enable Premium Add-Ons
If you purchased the premium version of Paid Member Subscriptions, you’ll next want to enable some of the premium add-ons for optimal course functionality. You can do this by going to Paid Member Subscriptions → Add-ons:
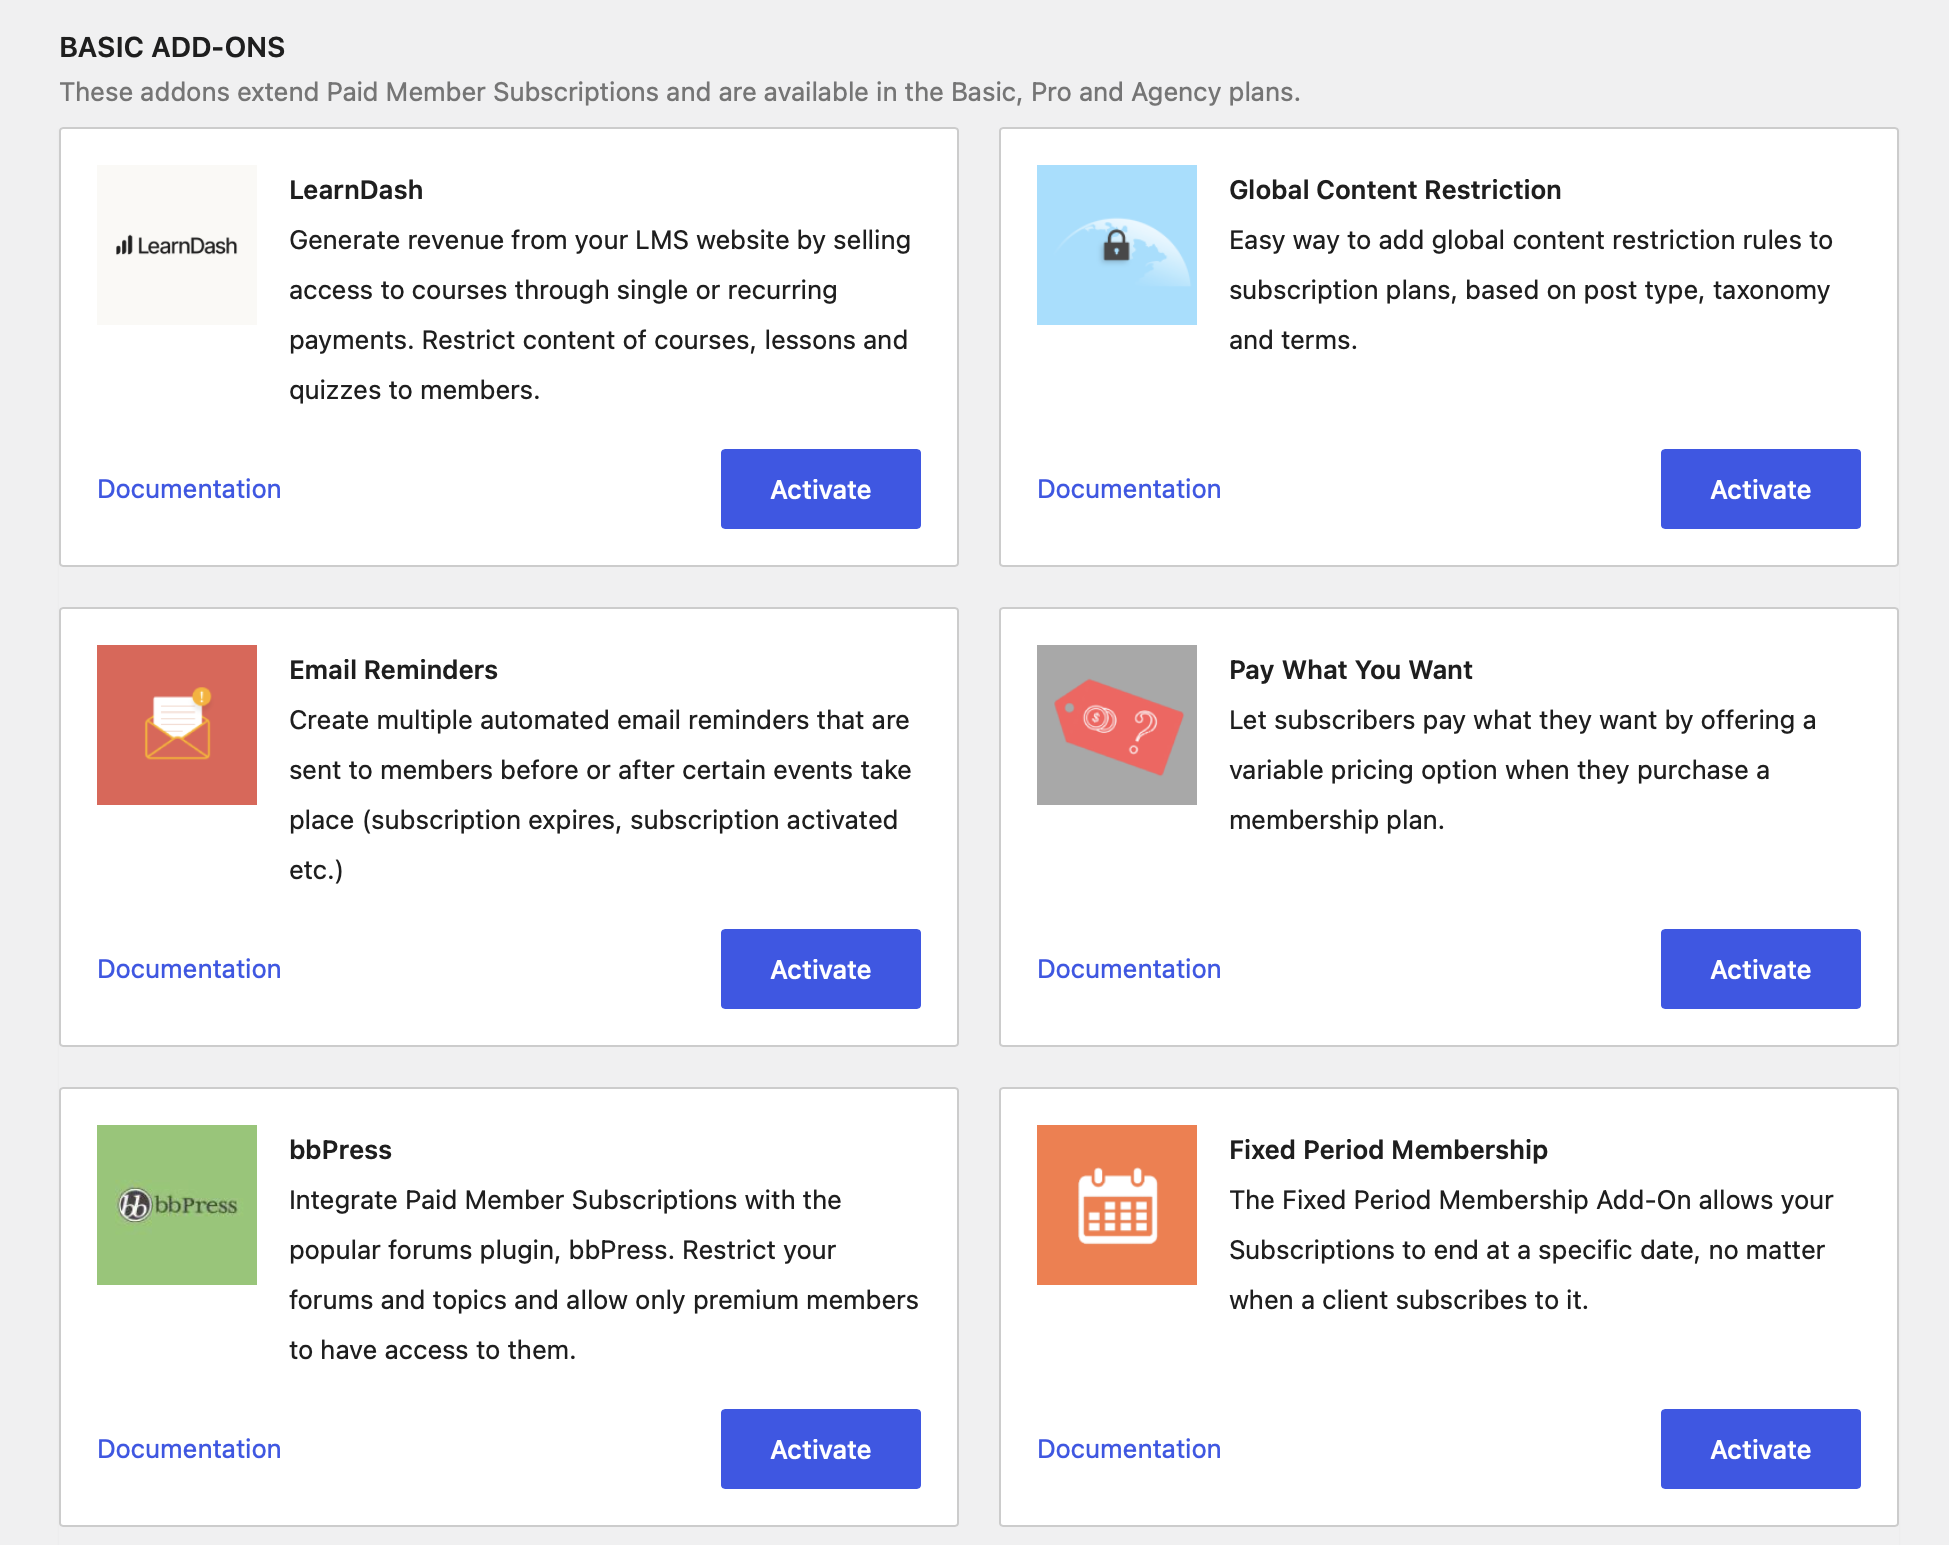
You can enable any add-ons that you want. But, here are the add-ons that we recommend to sell online courses from your own website:
- Global Content Restriction – this lets you easily restrict access to all of your course content.
- Navigation Menu Filtering – this allows you to optimize your navigation menus for logged-in users.
- Content Dripping – this lets you drip out lesson content on a schedule instead of making it all available at once.
- LearnDash – this enables you to integrate your site with the e-learning plugin to restrict access to courses, lessons, and quizzes.
You might also want to enable one of the premium payment gateway add-ons such as Stripe or PayPal Express. This will give you more flexibility for how you price your courses.
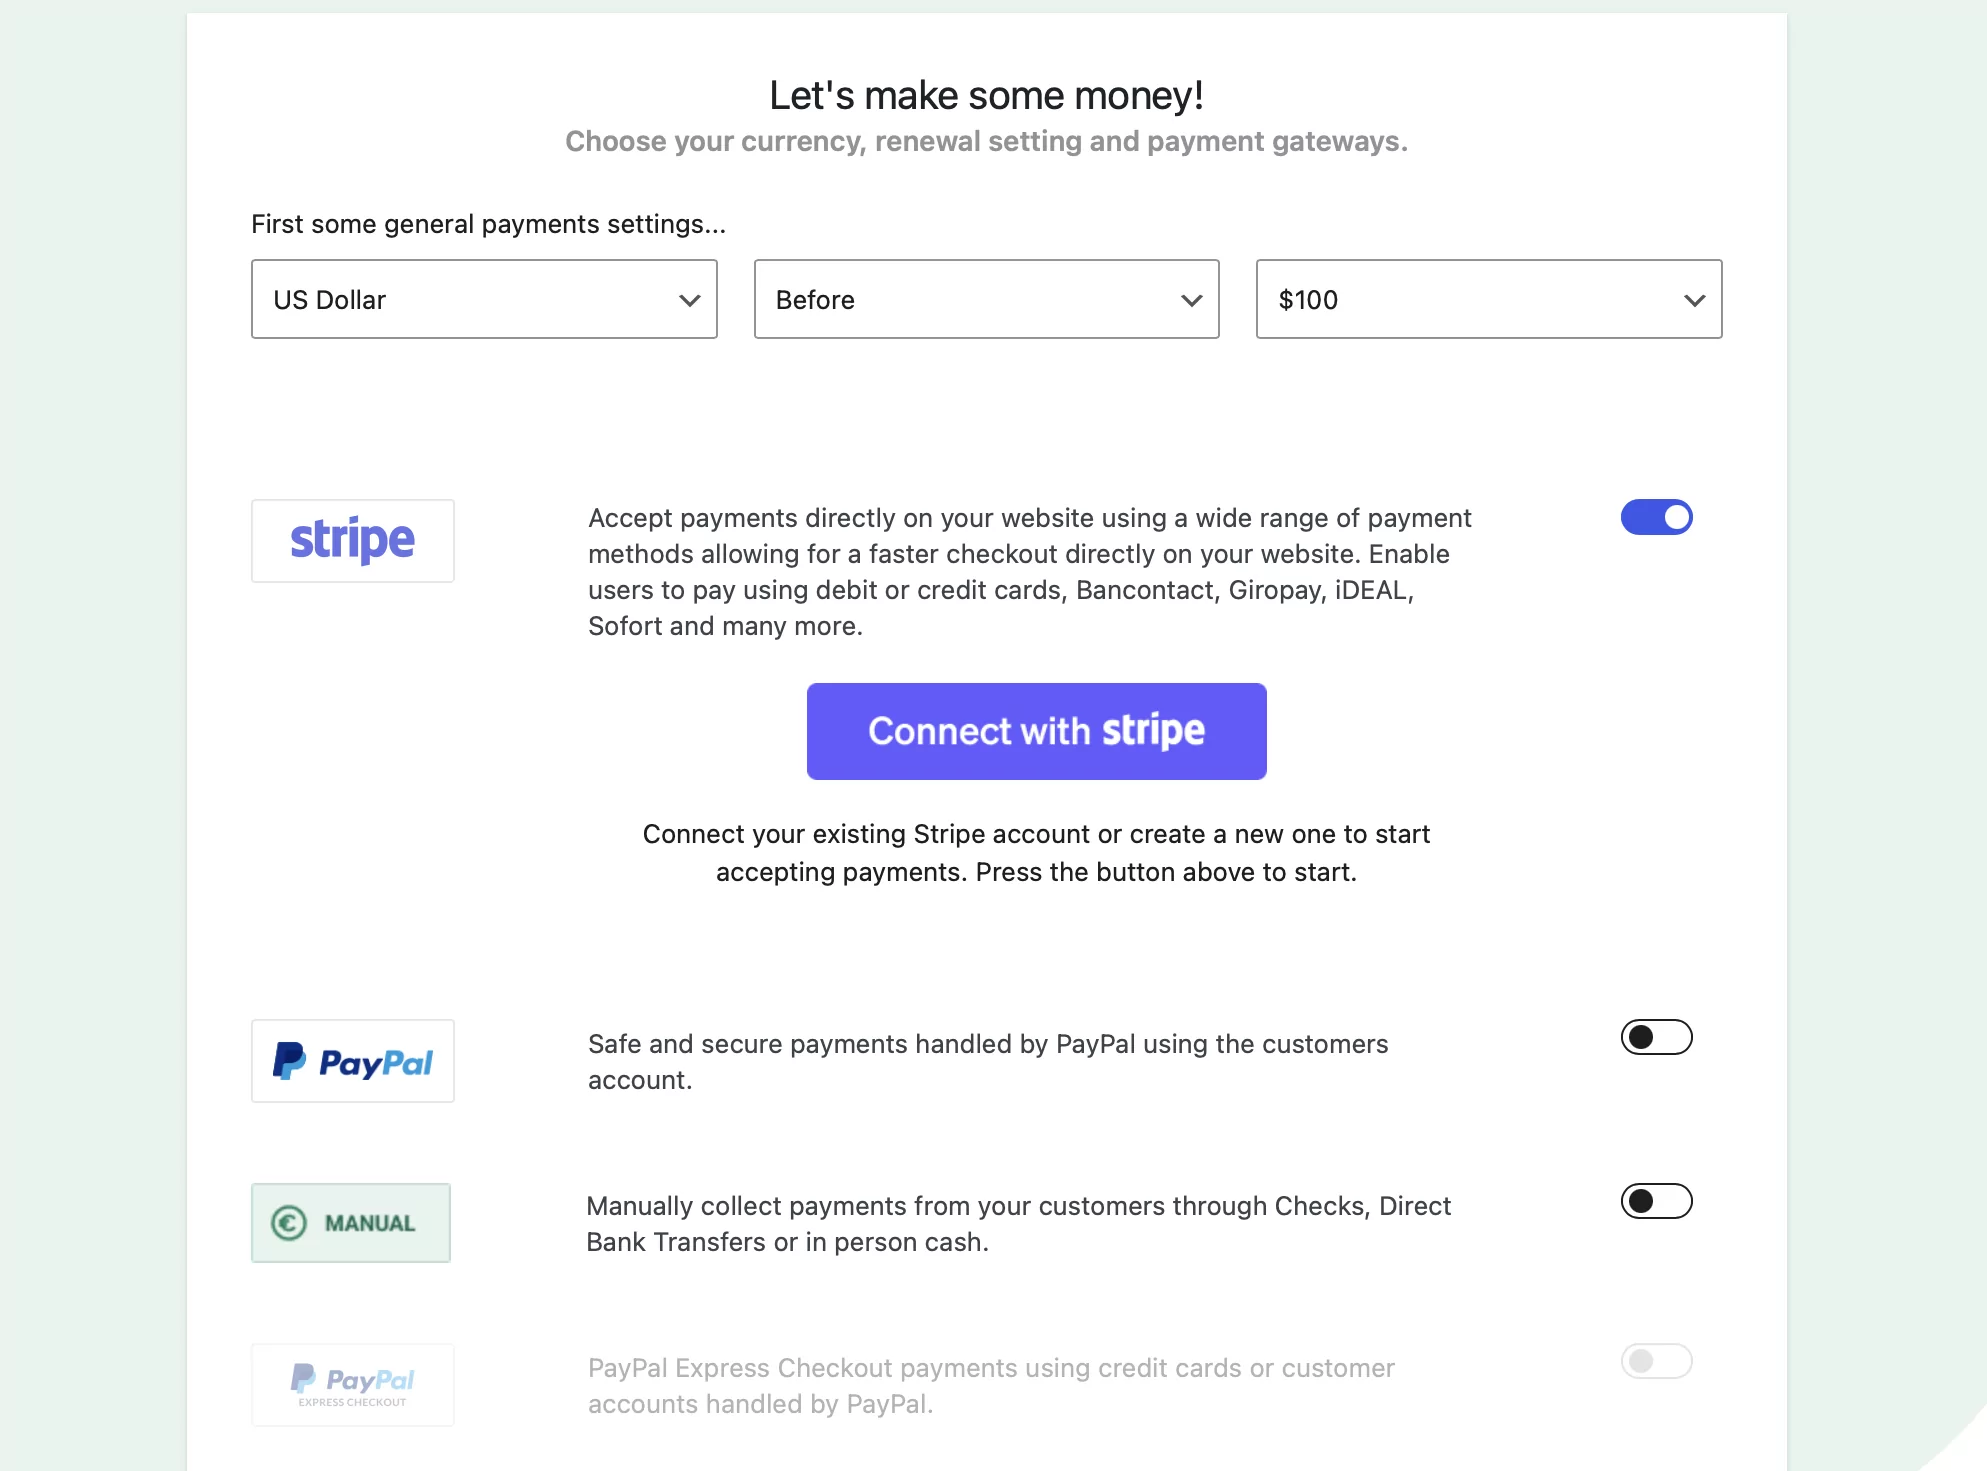
Configure Your Payment Gateway
To access the full payment gateway settings, head to Paid Member Subscriptions → Settings → Payments. Here, you can choose whether to enable one or more of the following options:
- Manual/offline payments
- PayPal Standard
- Stripe
- PayPal Express
If you choose to enable a payment gateway, you’ll also need to enter connection details for that gateway. Here are guides for the various gateways:
On this screen, you can also make some other choices about how payments function:
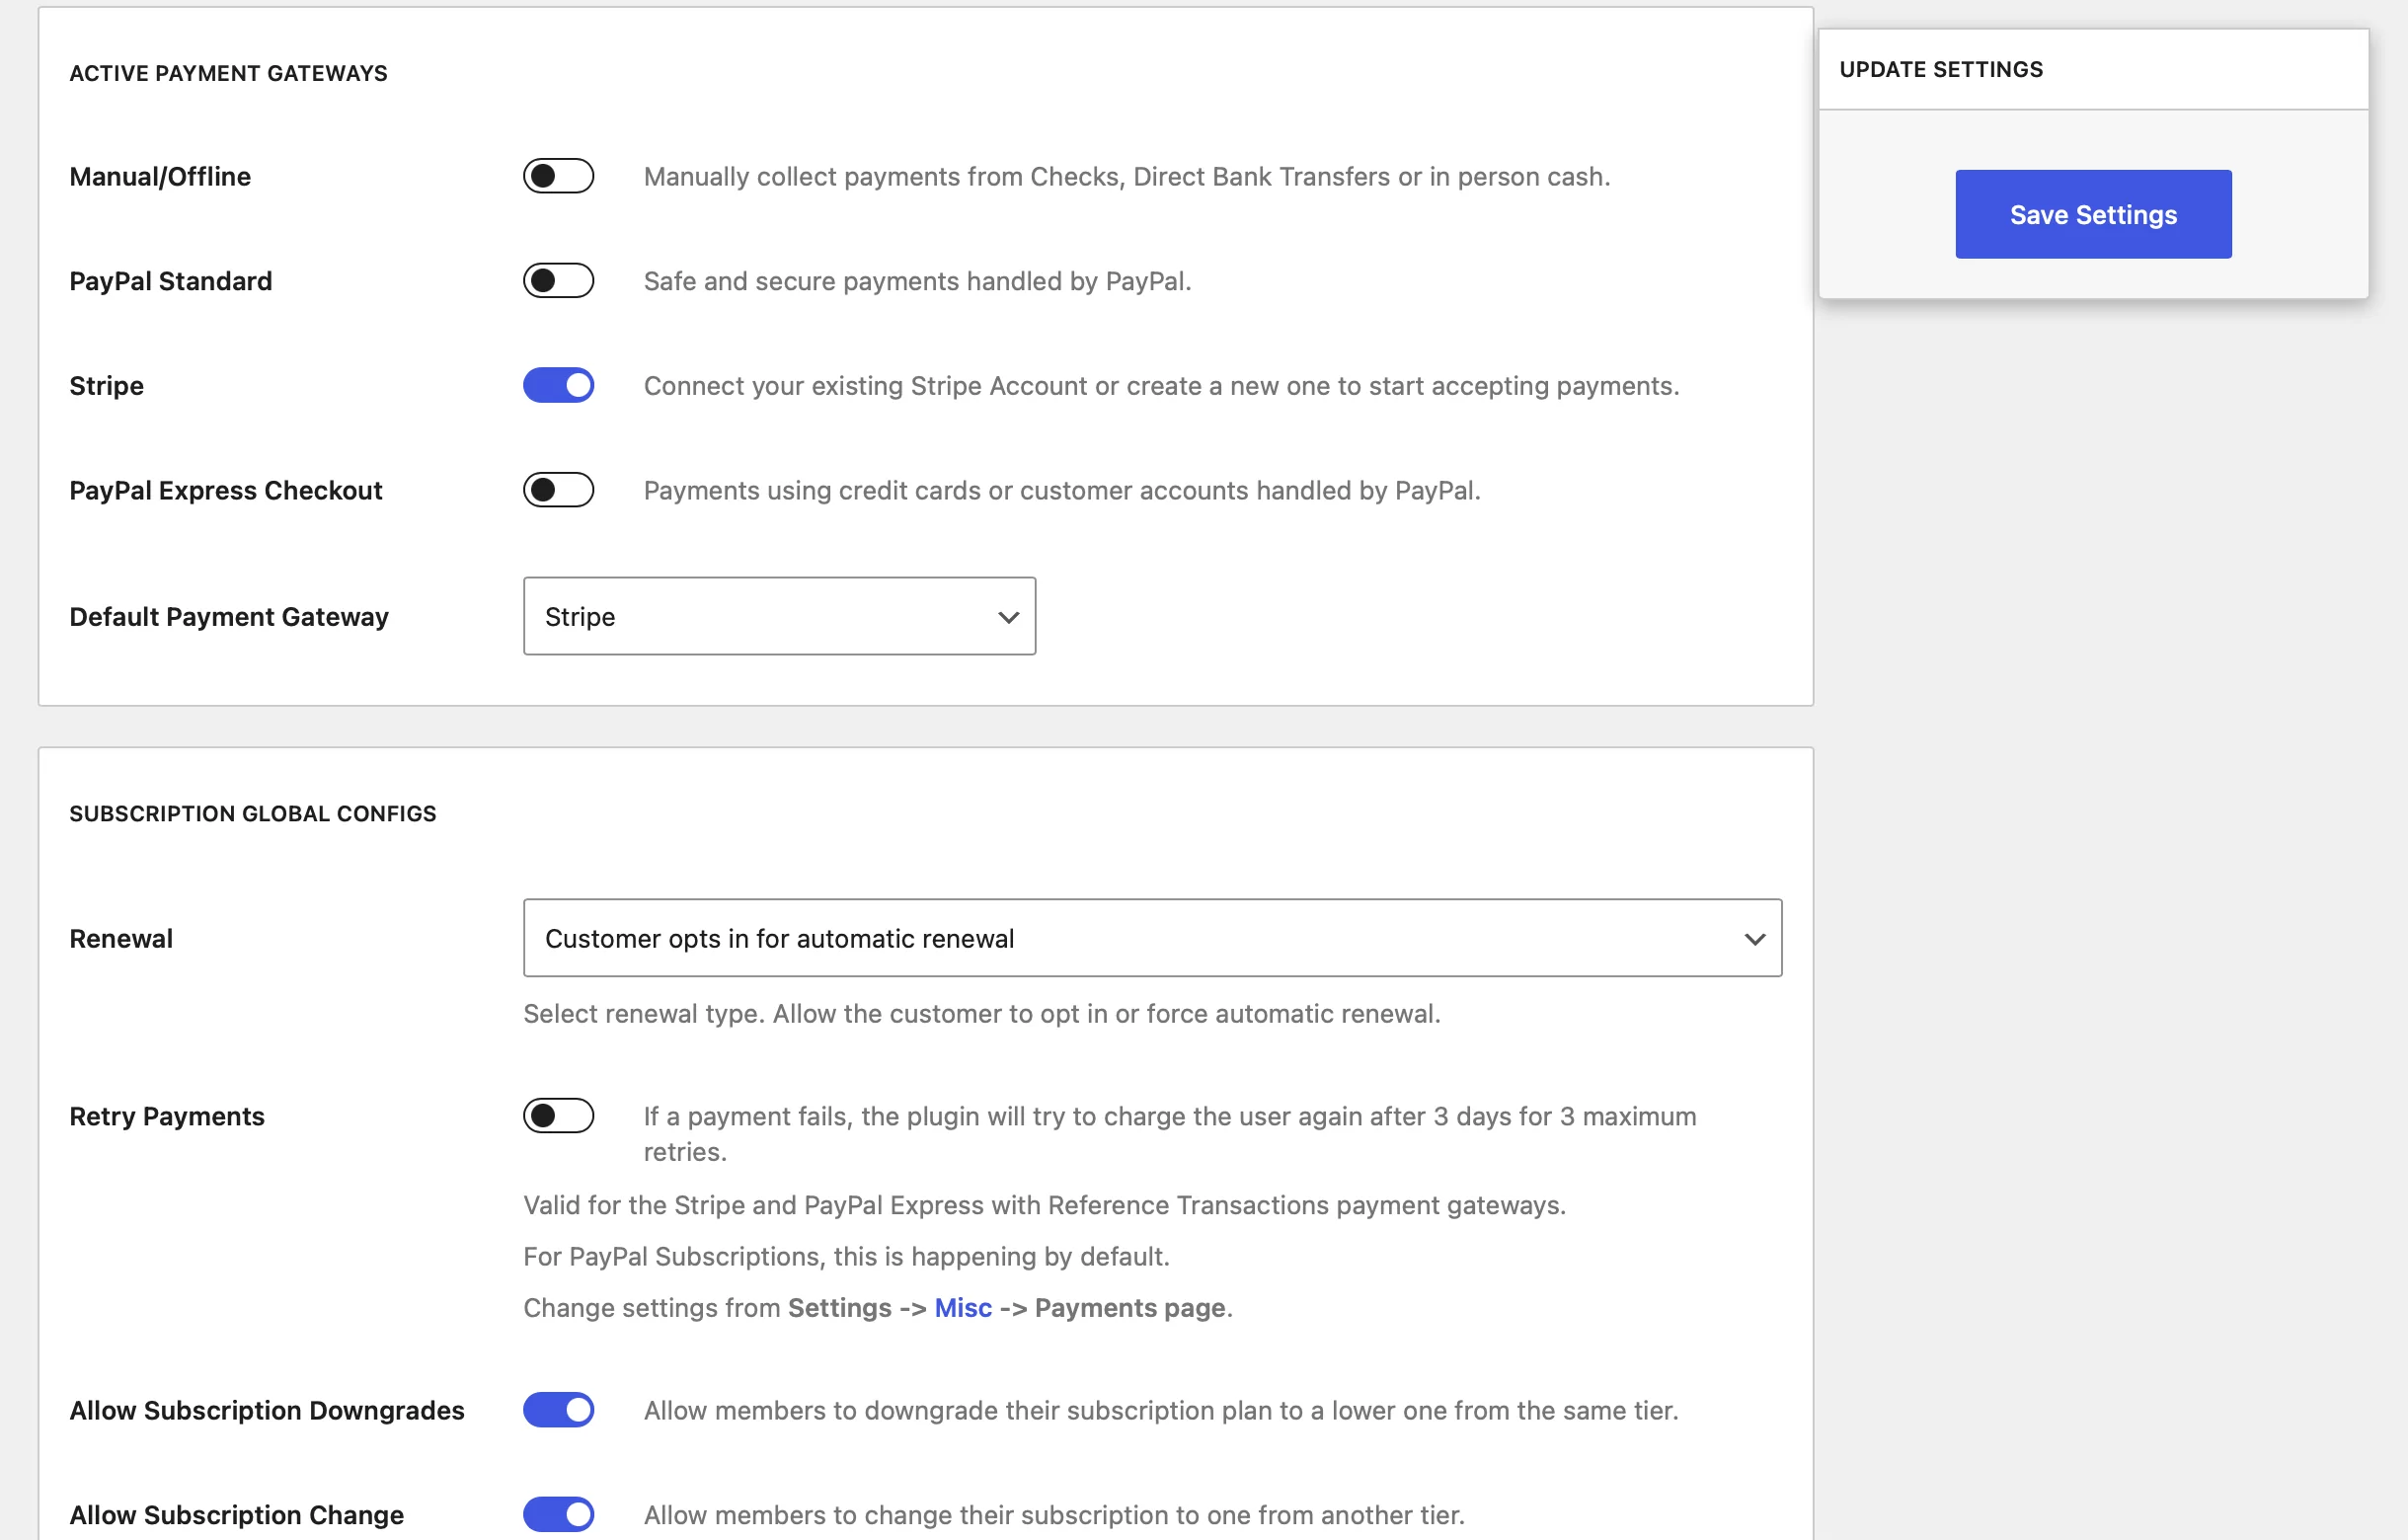
For instance, you can choose whether to automatically renew subscription payments by default or require the user to opt-in to automatic payments.
3. Add Your Course Content
Now, that you have the Paid Member Subscriptions plugin set up, you’re ready to add your course content. To separate your course content from your blog posts and regular pages, you’ll probably want to create a custom post type to house your courses.
If you’re not familiar with this term, a custom post type essentially lets you create a separate “type” of content on your site just for course lessons. So instead of going to Posts → Add New like you do when you’re writing a blog post, you would go to Lessons → Add New to create a new lesson.
If you don’t plan on creating a blog for your course platform, it’s totally fine to just add your course lessons as regular posts. However, if you want to create a blog in addition to your course content, we recommend creating a custom post type for your lessons. For that reason, we’re going to use the custom post type approach in our tutorial.
Create a Course Custom Post Type
The good news is that creating a custom post type is super easy and doesn’t require any code. All you have to do is install and activate the free WordPress Creation Kit plugin (WCK).
Then, navigate to WCK → Post Type Creator to create the custom post type for your course content. Here’s how to configure it:
- Post type – lesson
- Singular Label – Lesson
- Plural Label – Lessons
For the other settings, you can leave them as the defaults. However, we recommend considering each setting as you might want to change things.
For example, if you want to let people comment on individual lessons, you’ll want to check the comments box under Supports:
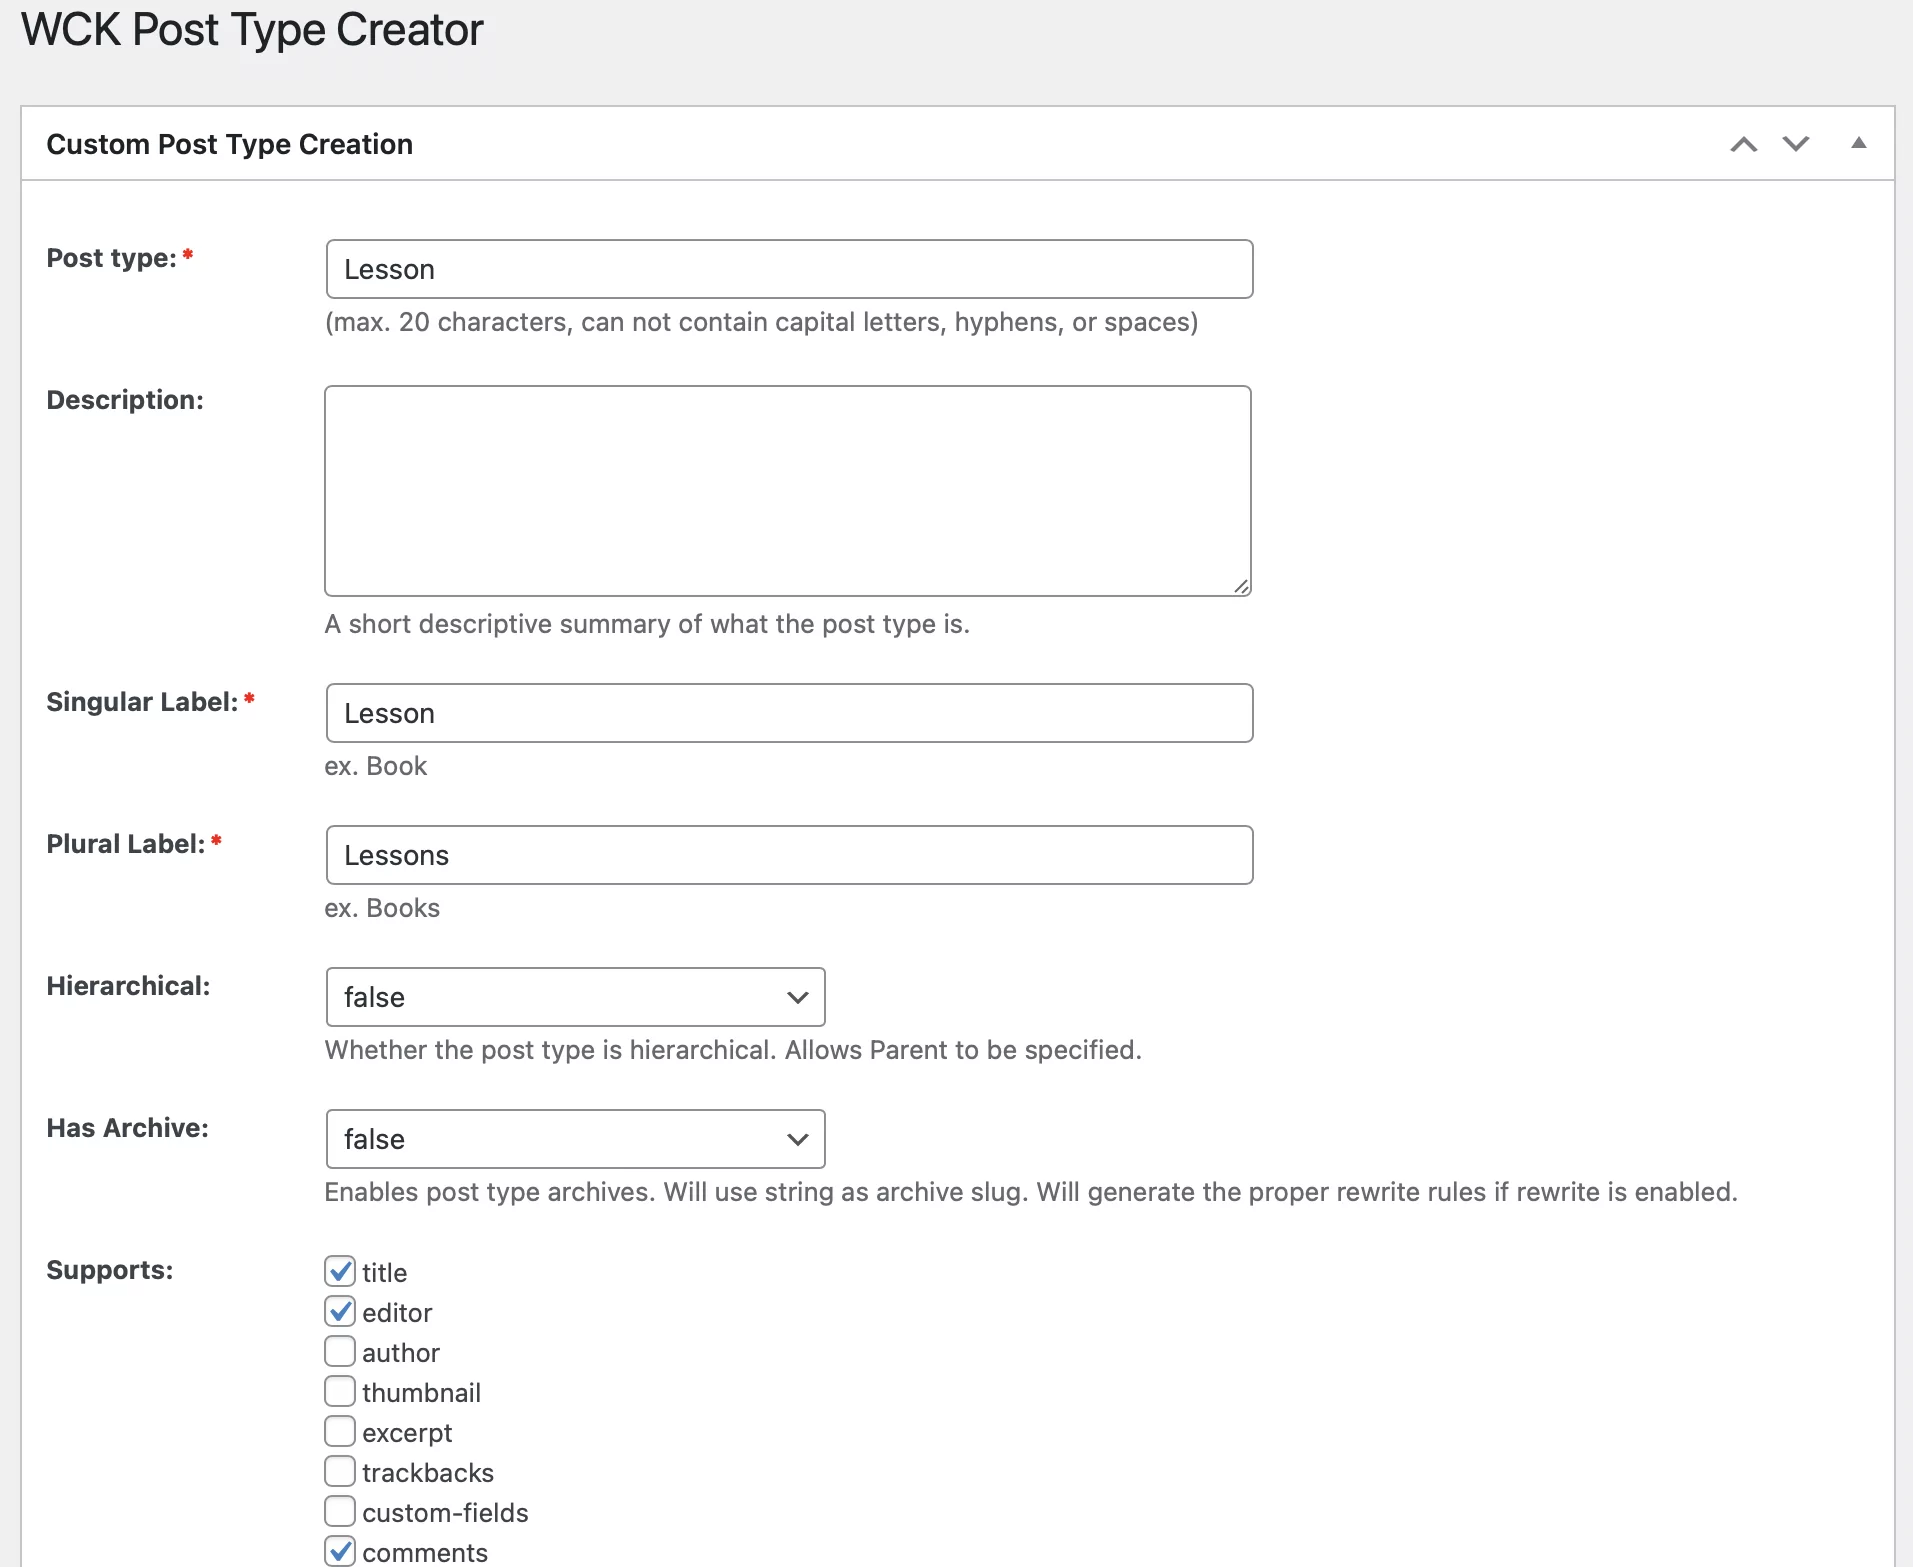
Once you’re finished, make sure to click on the Add Entry button. Now, you should see a new Lessons option in your WordPress dashboard sidebar.
Create a Custom Taxonomy to Organize Courses
If you’re creating multiple courses, you’ll also want to create a custom taxonomy so that you can organize lessons based on their course. A “taxonomy” is just a fancy way of saying “category” or “tag”.
WordPress comes with categories and tags by default, but you can create your own taxonomies to give you more control over organization. To create a taxonomy to organize lessons into distinct courses, go to WCK → Taxonomy Creator.
Here’s how to configure it:
- Taxonomy – course
- Singular Label – Course
- Plural Label – Courses
- Attach to – lesson
- Hierarchical – true
So, it should look something like this:
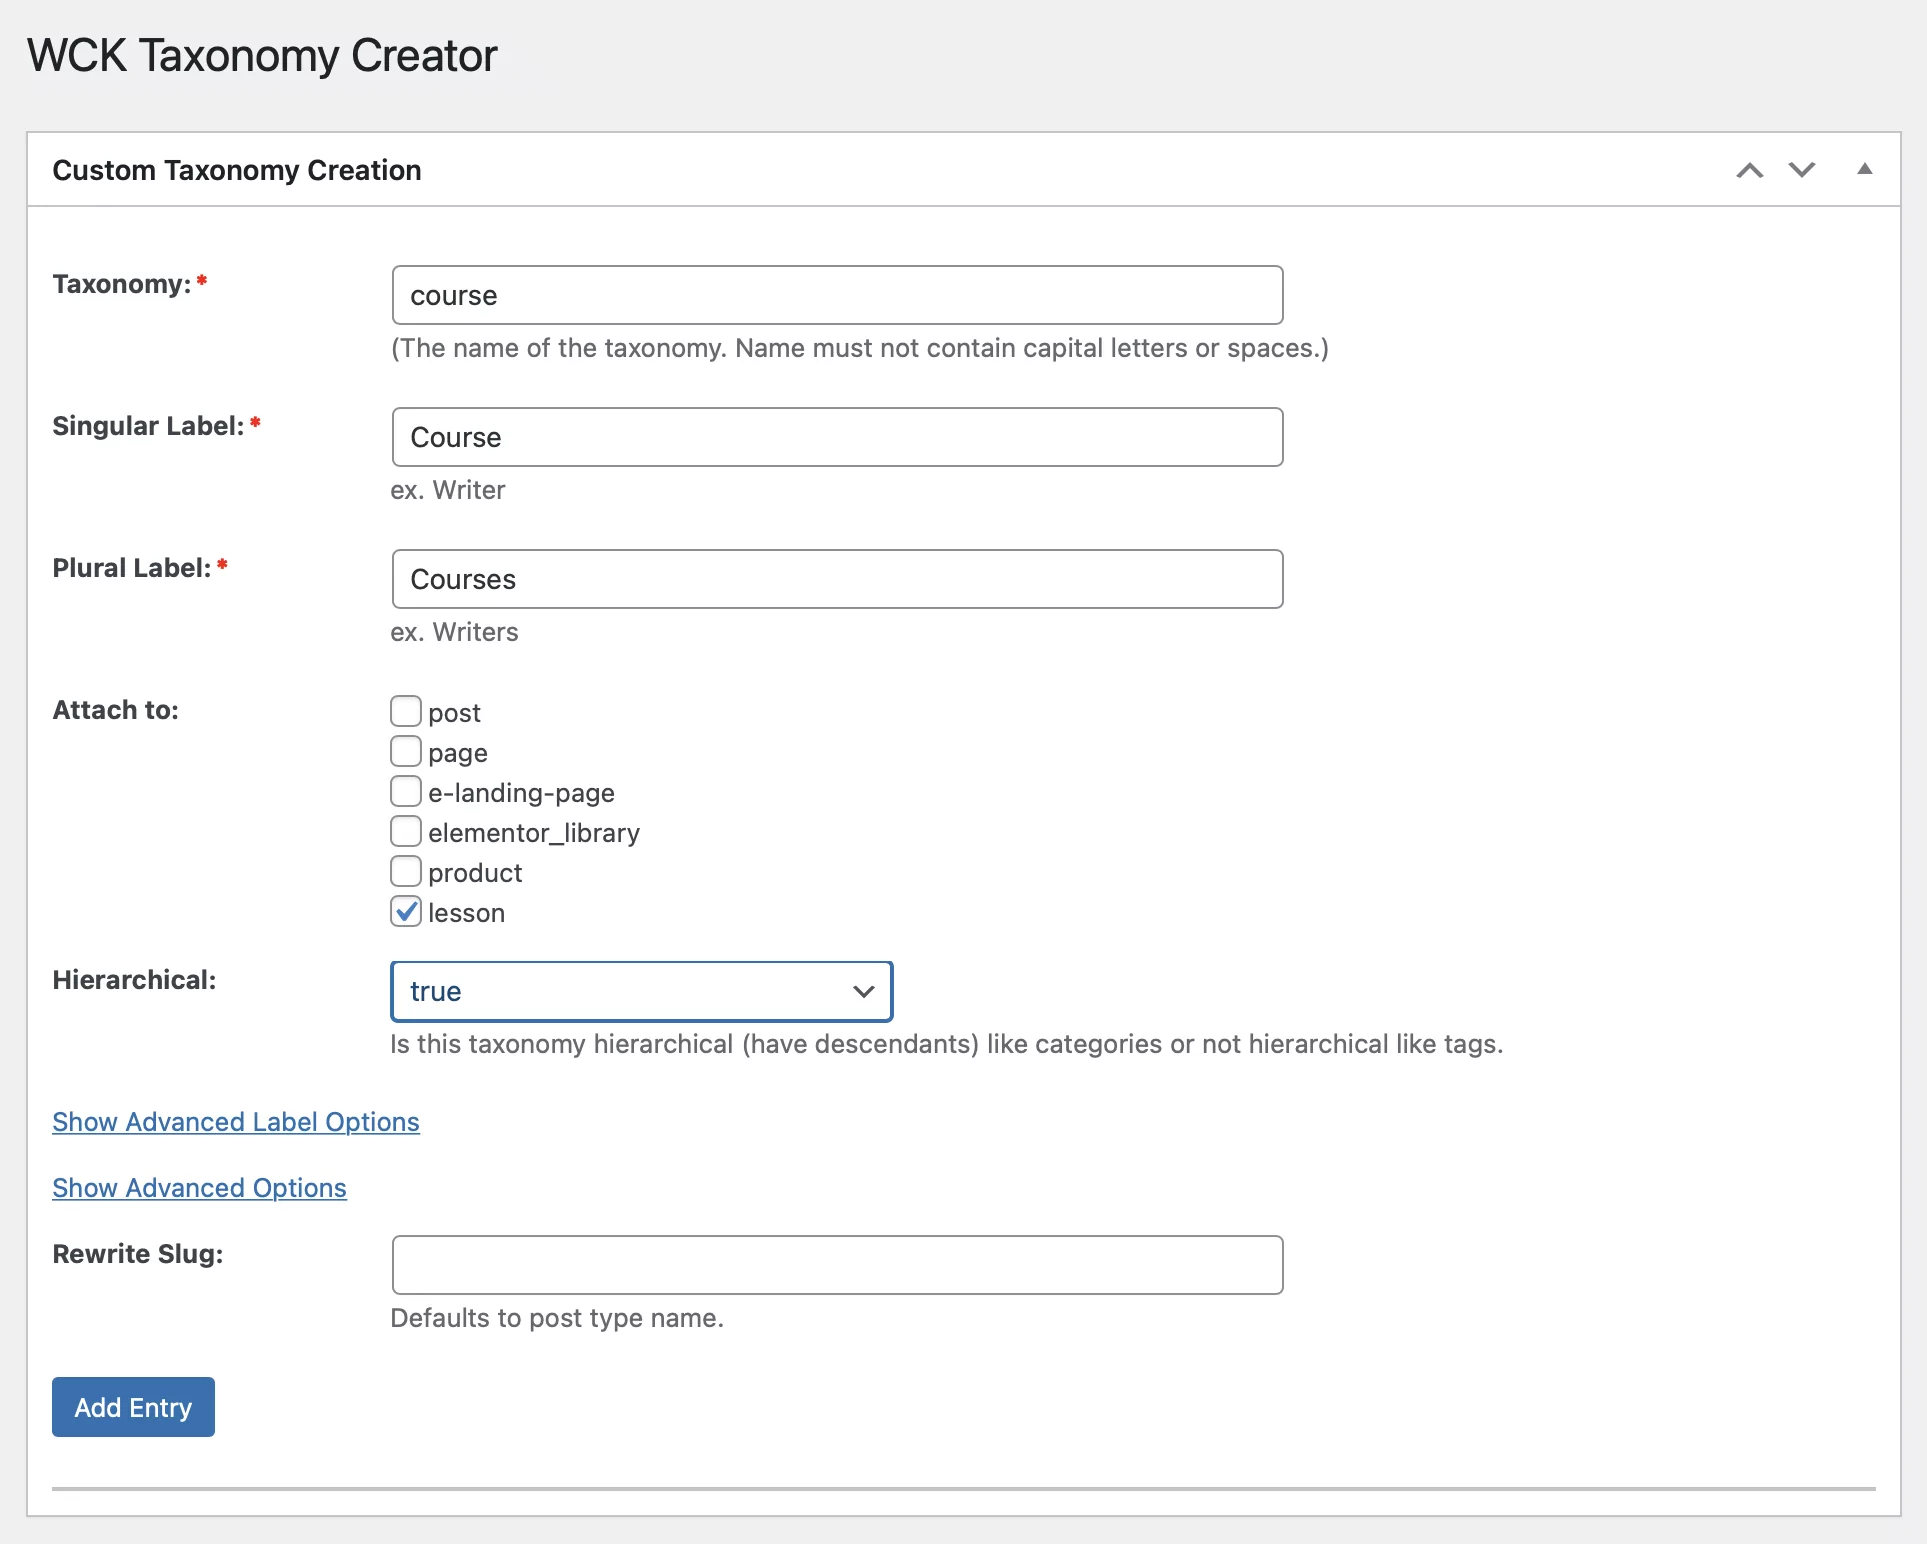
Then, make sure to click on the Add Entry button when you’re finished.
Add Lesson Content and Organize Into Courses
Once you’ve created your custom post type and taxonomy, you’re ready to start adding lesson content. To begin, go to Lessons → Add New in your WordPress dashboard. You’ll now be in the regular WordPress editor, where you can add all of your lesson content.
To add text lesson content, you can just click and type. If you want to add video or audio content, you can find dedicated blocks to embed your own self-hosted audio/video content or content from third-party sources such as YouTube or Vimeo.
If you need to keep your videos private, you can use Vimeo’s premium service to manage your videos and make sure learners can’t share videos with unauthorized users. Once you’ve added your content, use the Courses option in the Lesson sidebar to associate your lesson with a specific course:
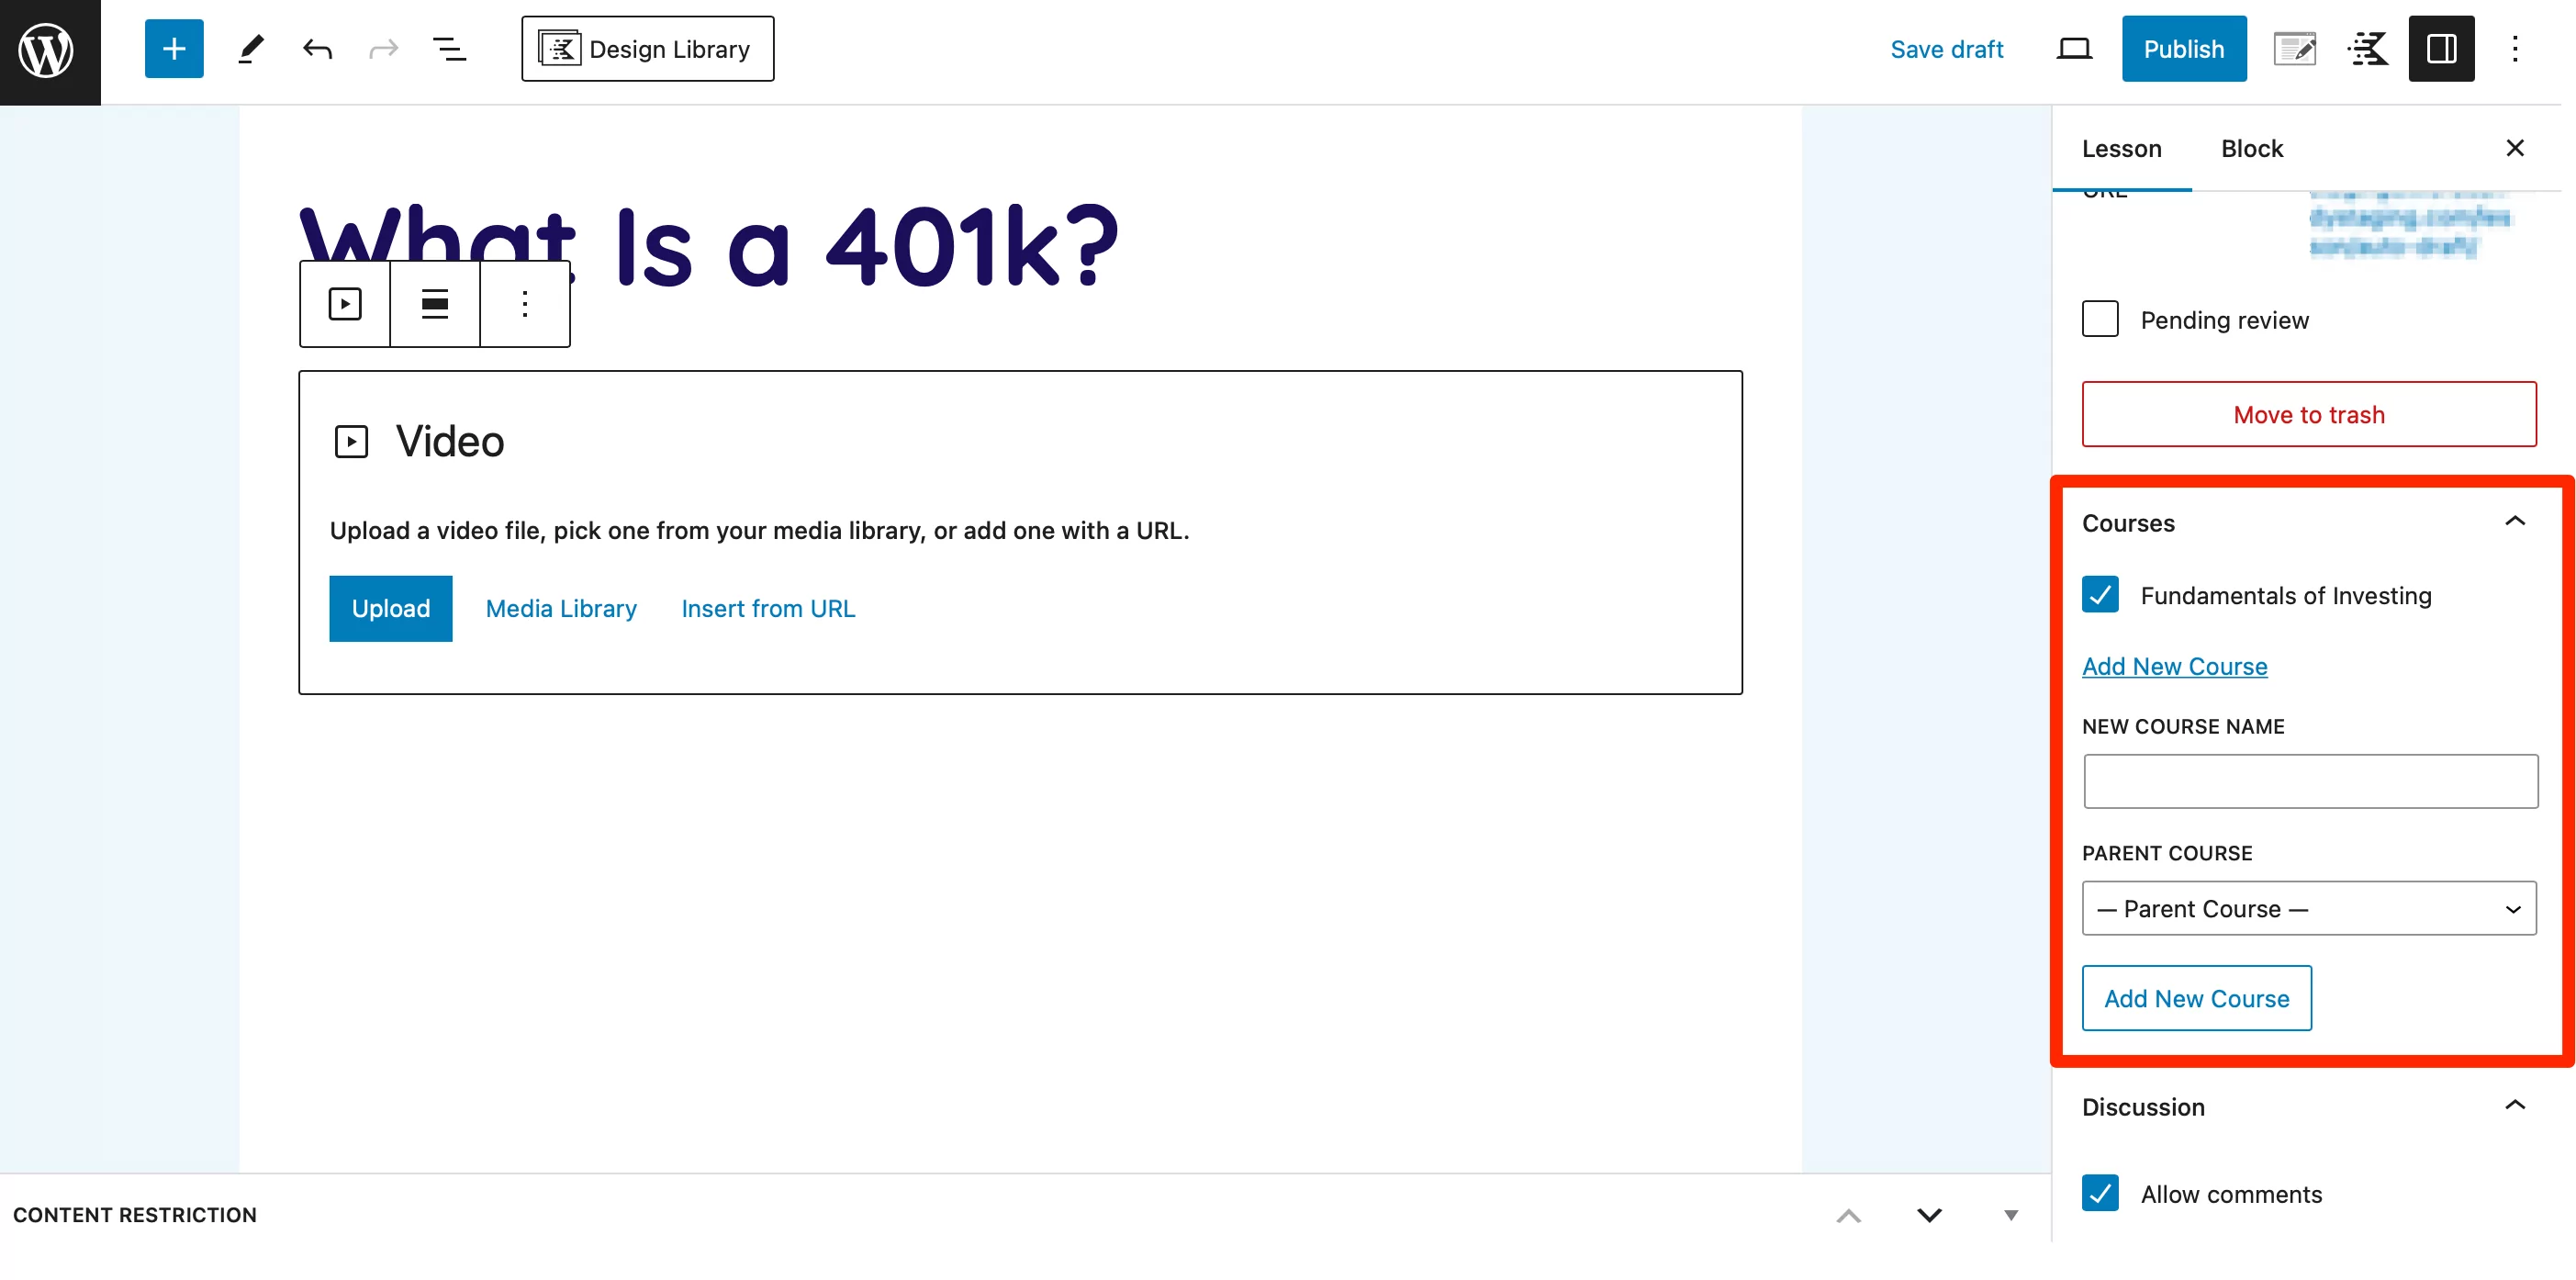
If you haven’t created any courses yet, you can do this by going to Lessons → Courses from the WordPress dashboard. Or, simply click on the Add New Course link here in the editor.
If applicable, you can even associate one lesson with multiple courses. Then, repeat the process to add additional lessons for all of your courses as needed.
Later in the post, we’ll also show you how to implement content dripping so that learners get access to course content over time. For example, you could give them access to the first three lessons as soon as they join and then add access to one new lesson per week.
Create a Course Overview Page
To make it easier for learners to browse the entire content of your courses, you might want to create a course overview page that links to all of the lessons. To do this, create a new lesson and name it “[Course Name] Overview” or something similar:
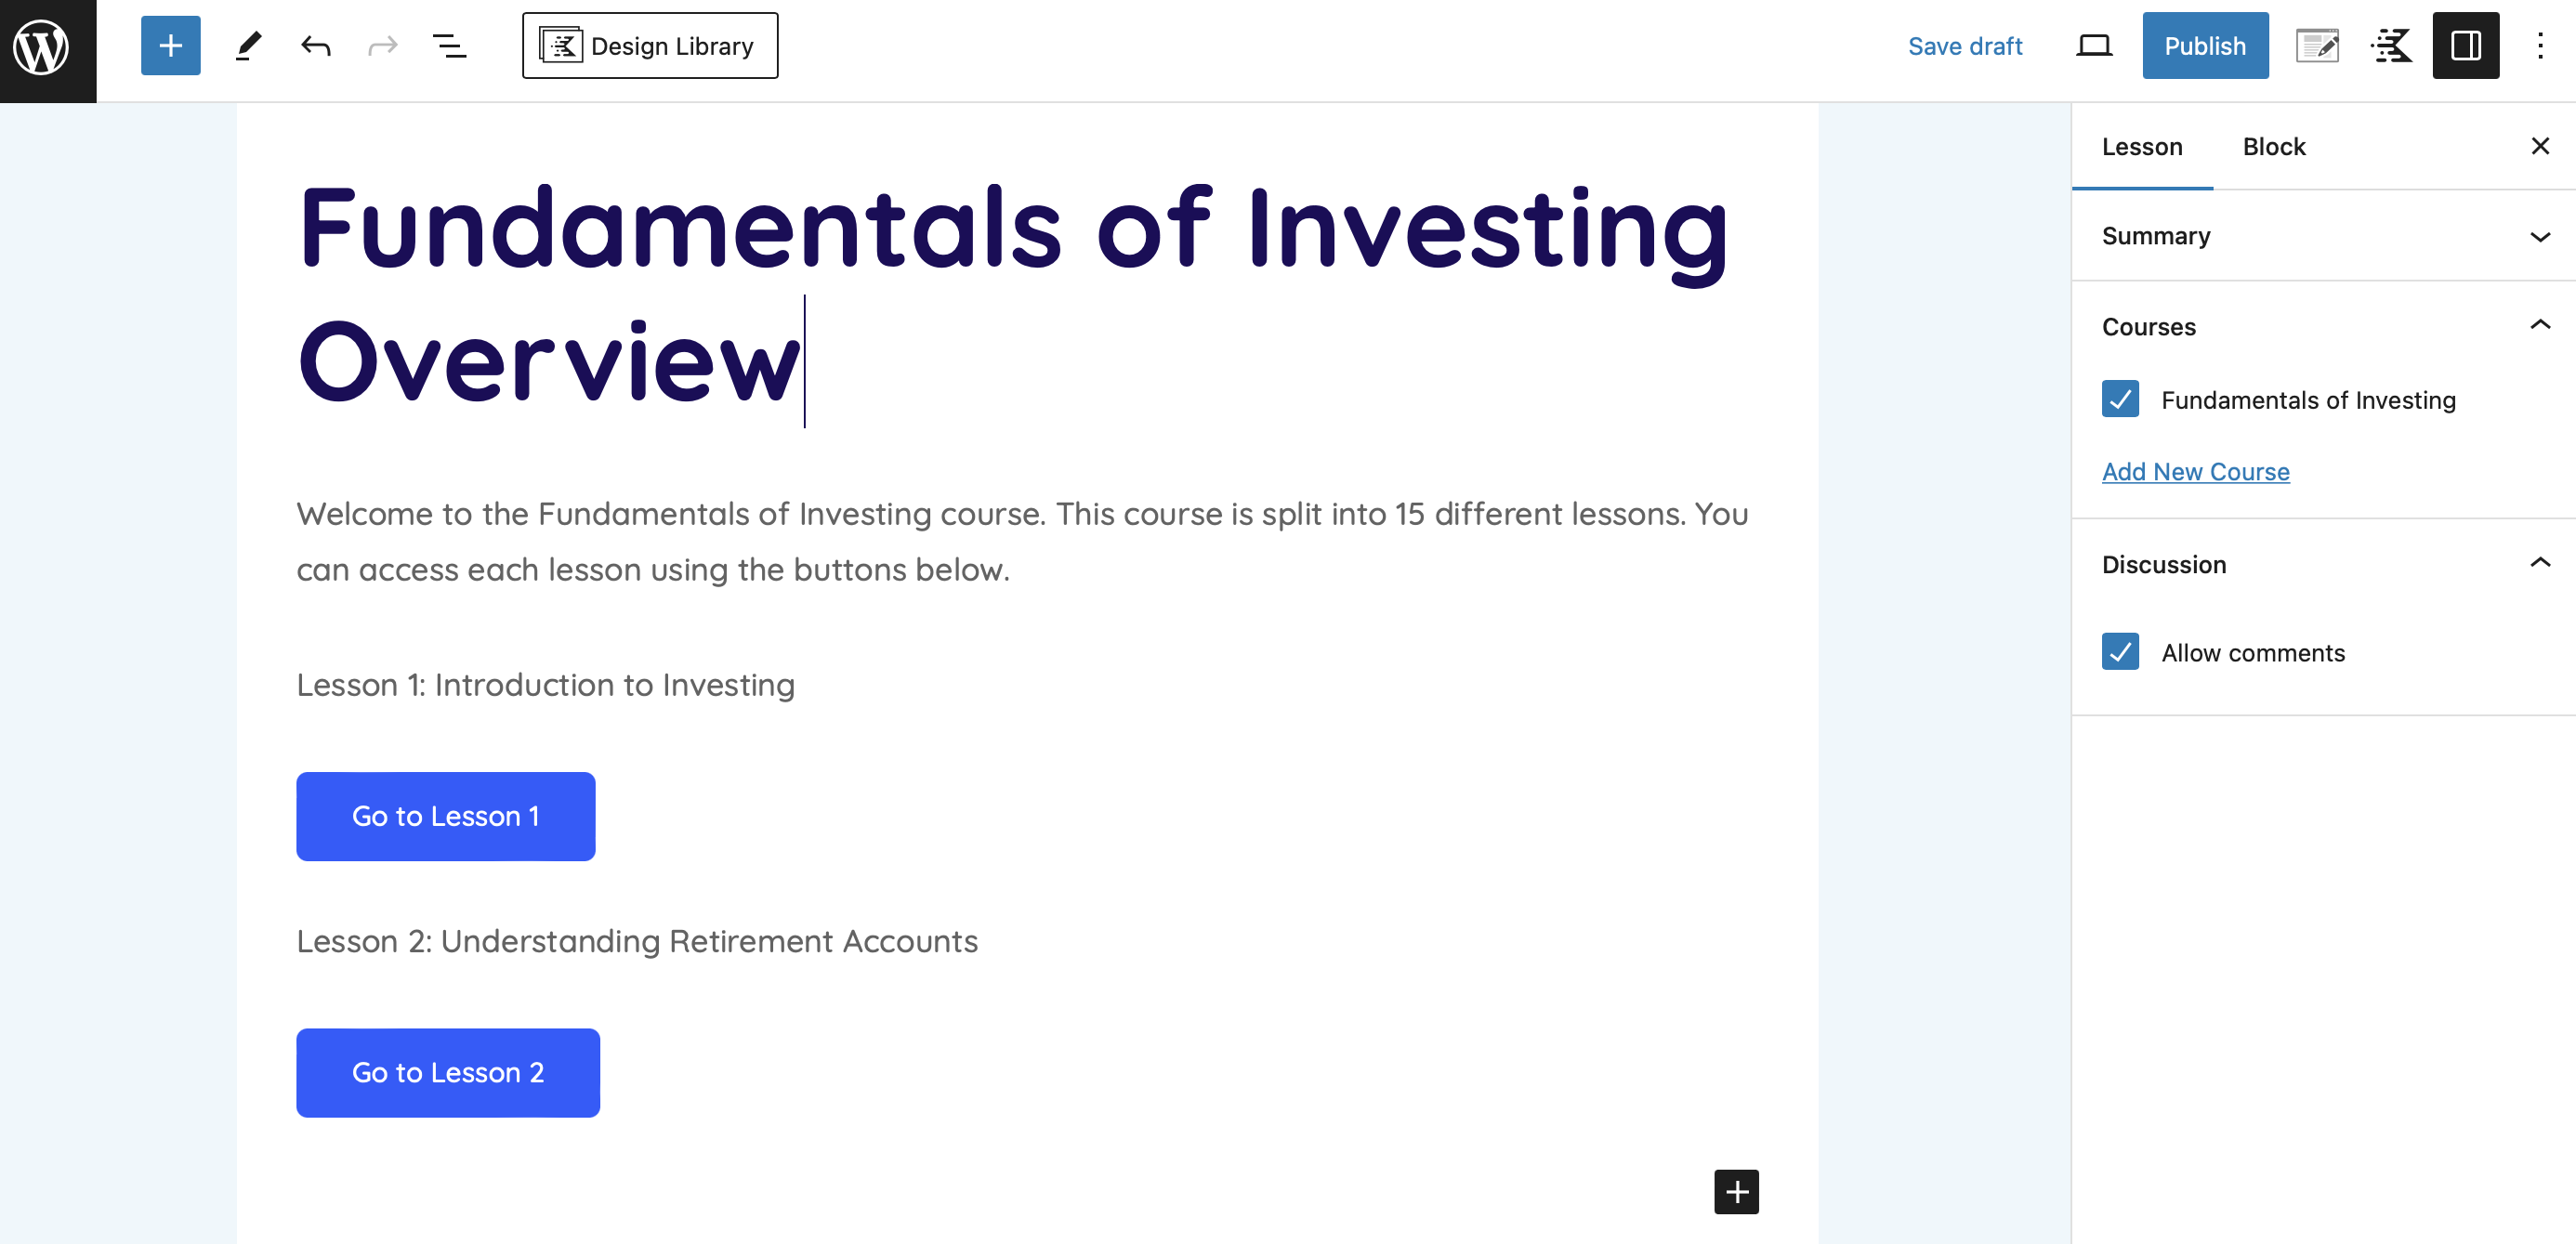
Then, you can add appropriate text to welcome members to your course. Plus, you can create a list of all your lessons and include buttons that link to the relevant lesson page.
4. Create Your Course Membership Levels
With your lessons and courses established, you’re now ready to create your course membership levels. Each membership level can have a different price and grant access to different courses.
For example, you could have a membership level that grants access to a single course as well as a bundle membership level that gives users access to all courses for one price. You can also create memberships for different durations of time.
So, you could have one membership that gives people access to all courses for a recurring monthly fee. Then, you could create another membership level that gives people lifetime access for one large upfront fee.
Basically, you have the flexibility to configure your membership levels to make sense for your course platform. When you’re ready to create a subscription level, go to Paid Member Subscriptions → Subscription Plans → Add New:
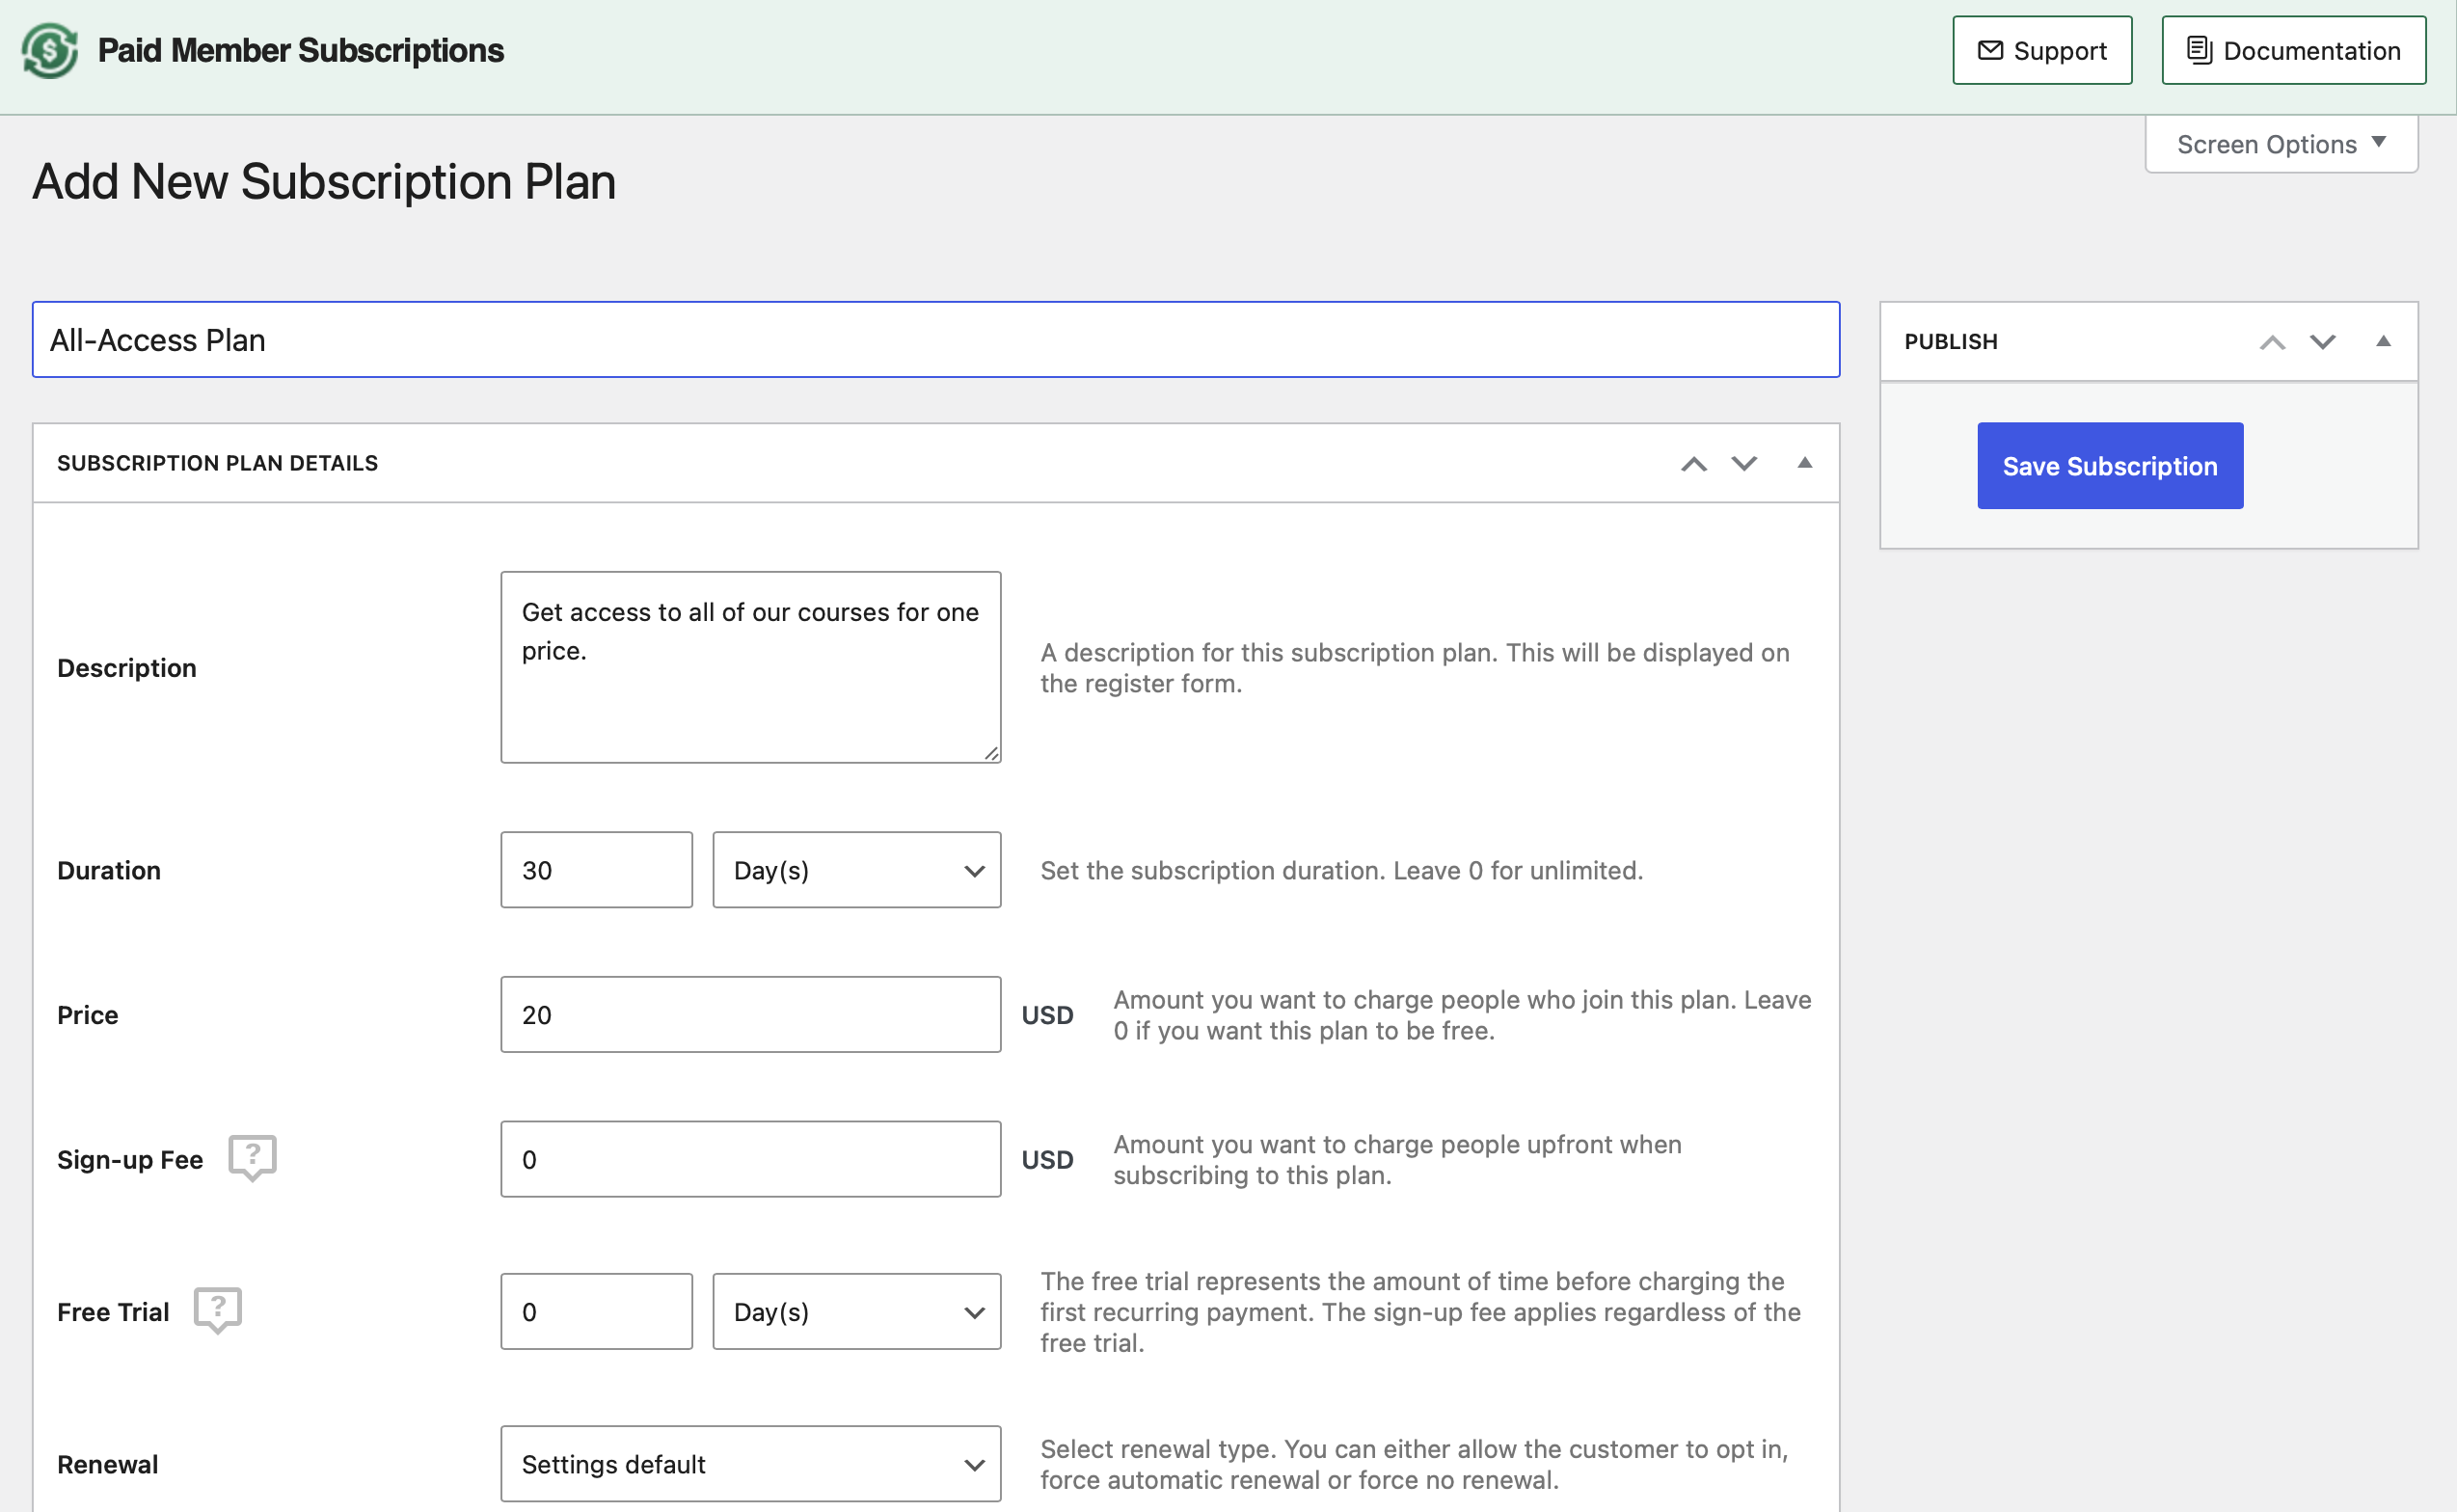
Here, you can configure the name, price, and access duration. You also get options to offer free trials or charge one-time signup fees.
For the User role setting, leave it as the default. But, feel free to adjust all of the other settings according to your needs. Then, make sure to click on the Save Subscription button to save everything.
If you want to offer multiple subscription options, repeat the process to create additional plans. You also have the option to add plans as upgrades or downgrades, which makes it easy for members to move between tiers:
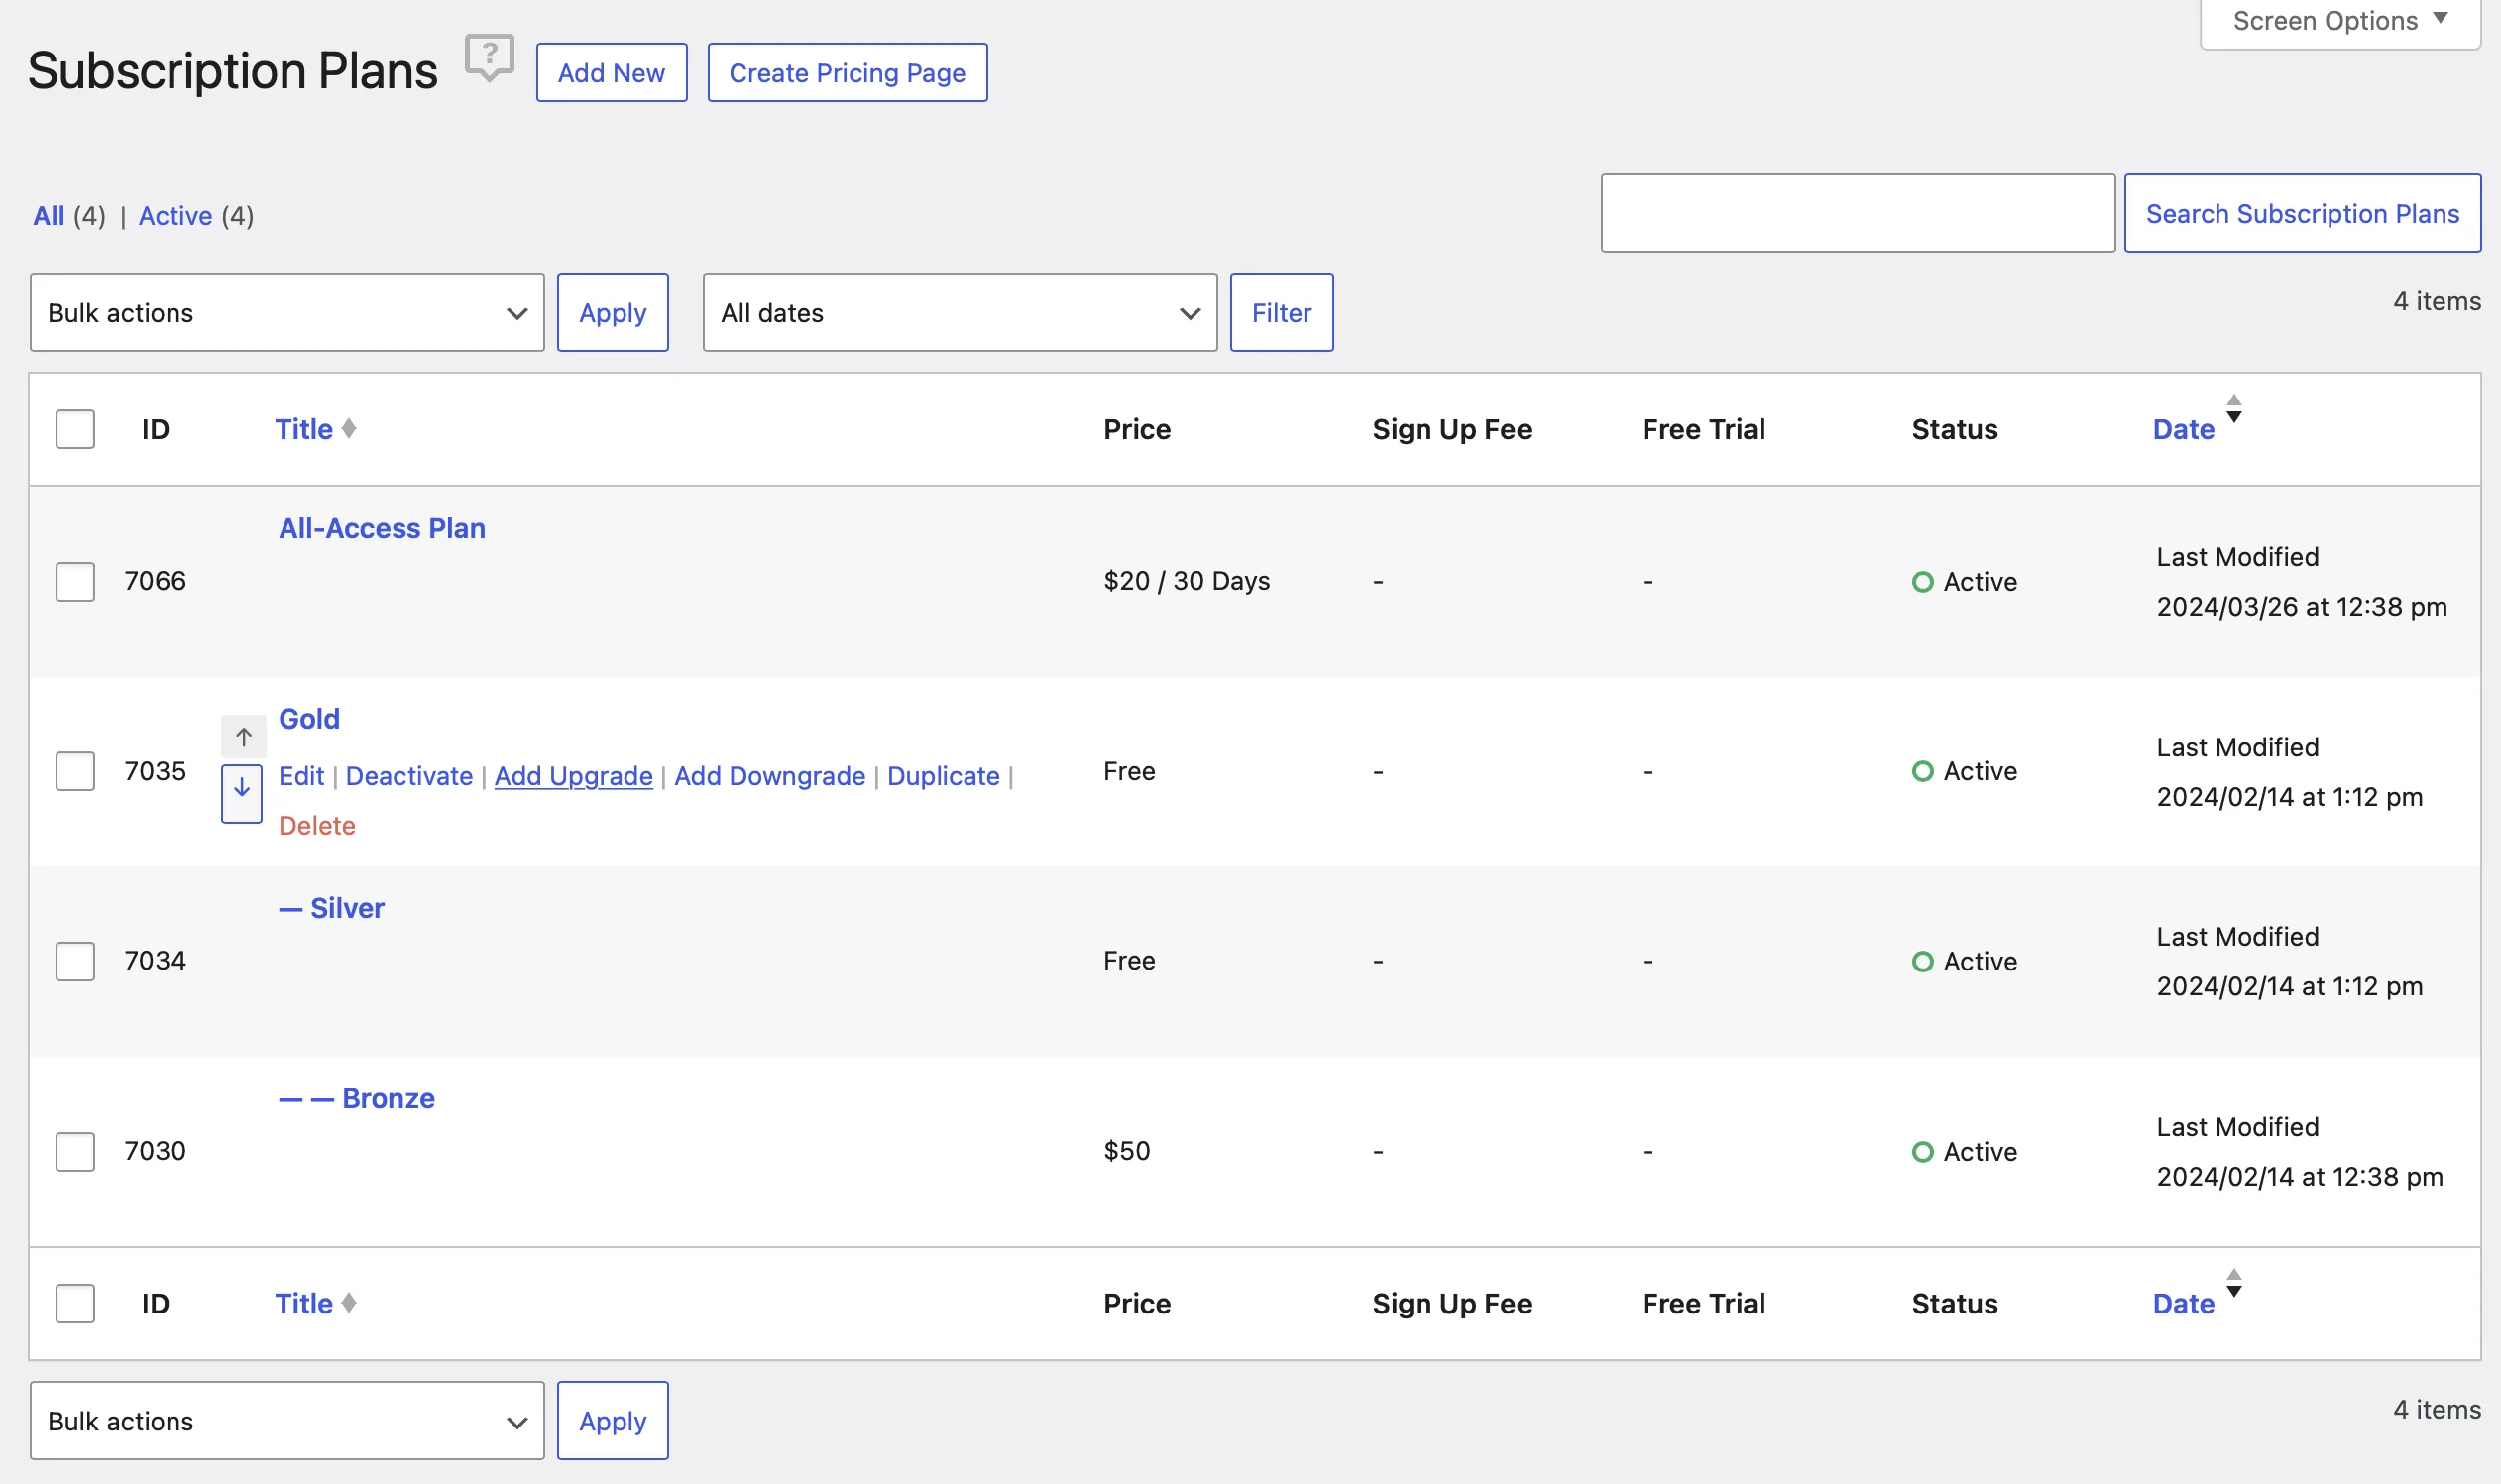
To do this, navigate to Paid Member Subscriptions → Subscription Plans. Hover over the relevant plan and click on the Add Upgrade or Add Downgrade link.
5. Restrict Content (Including Content Dripping If Needed)
Once you have your membership levels, you’re ready to restrict access to your course content and lessons. This ensures that only authorized users are able to view specific courses and lessons.
As we mentioned earlier, you also have the option to implement content dripping. This lets you slowly “drip” out course content over time instead of giving people access to it right away.
To save time while restricting content, you can use the Global Content Restriction add-on to bulk restrict content on your site. To enable the add-on, go to Paid Member Subscriptions → Add-ons.
Because you set up a custom taxonomy for each course, you can quickly restrict access to entire courses by targeting your custom taxonomy. First, go to Paid Member Subscriptions → Subscription Plans and edit the subscription plan that you want to use to give access to one or more courses.
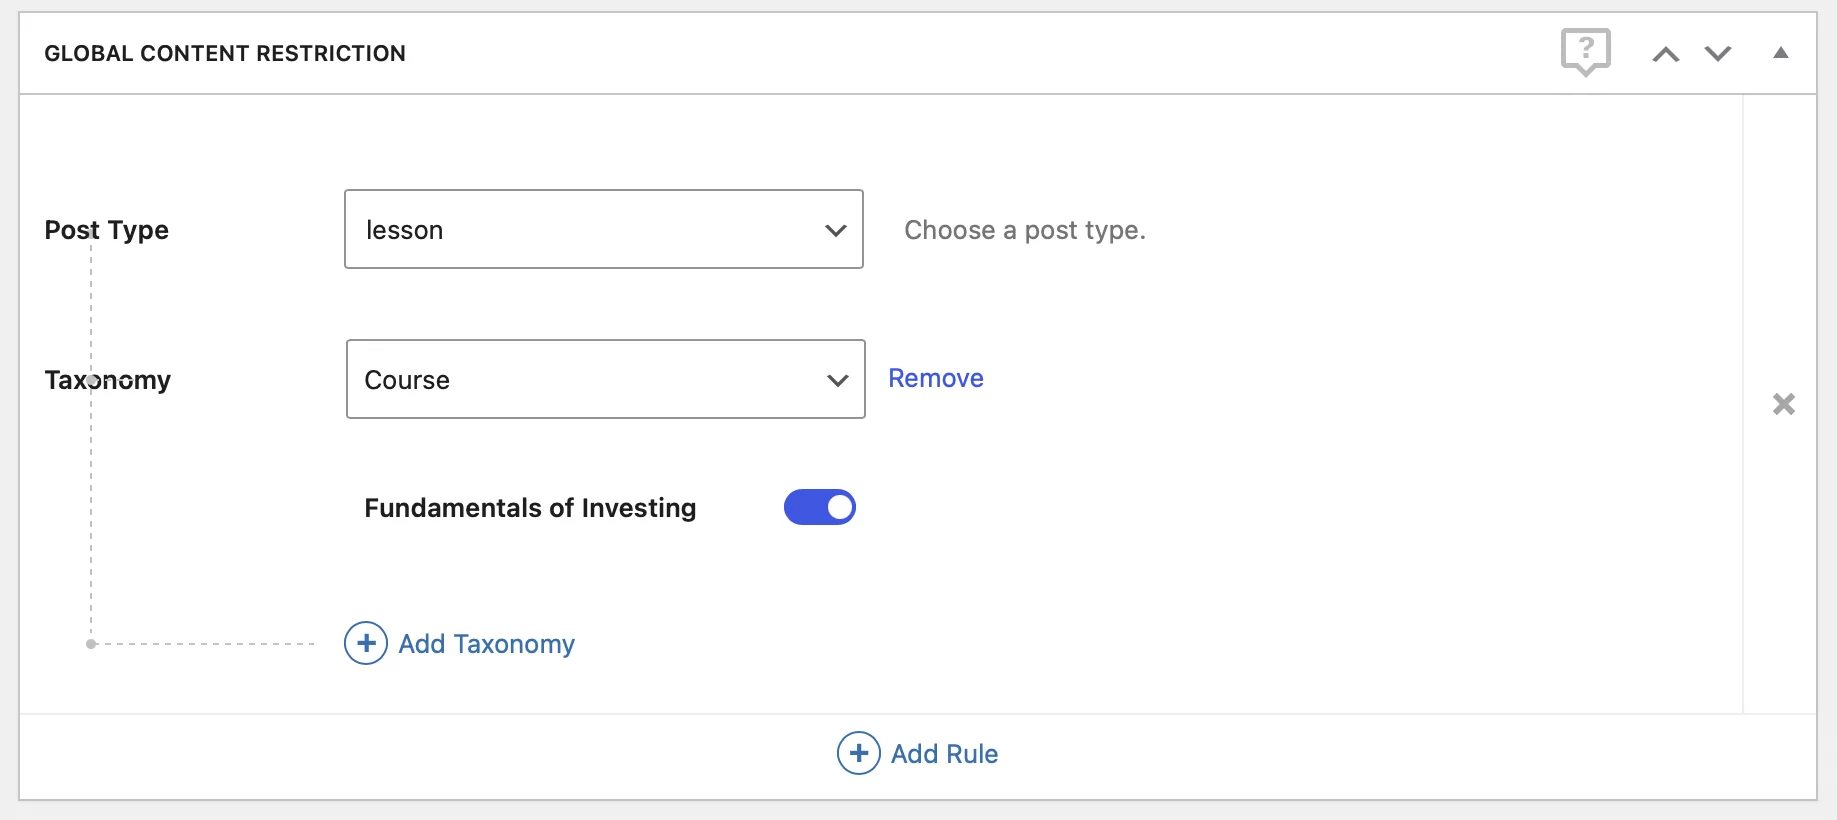
For example, let’s say you created a dedicated subscription plan for the “Fundamentals of Investing” course and you want to restrict that course to only people who purchased this plan. In the subscription plan’s settings, scroll down to the Global Content Restriction box:
- Choose lesson as the post type
- Choose Course as the taxonomy
- Use the slider to select the specific course
So, the section should look something like this:
You can also configure one membership level to give access to multiple courses. For example, let’s say you have an all-access plan that gives access to every single course. All you need to do is check the boxes for all of the courses:
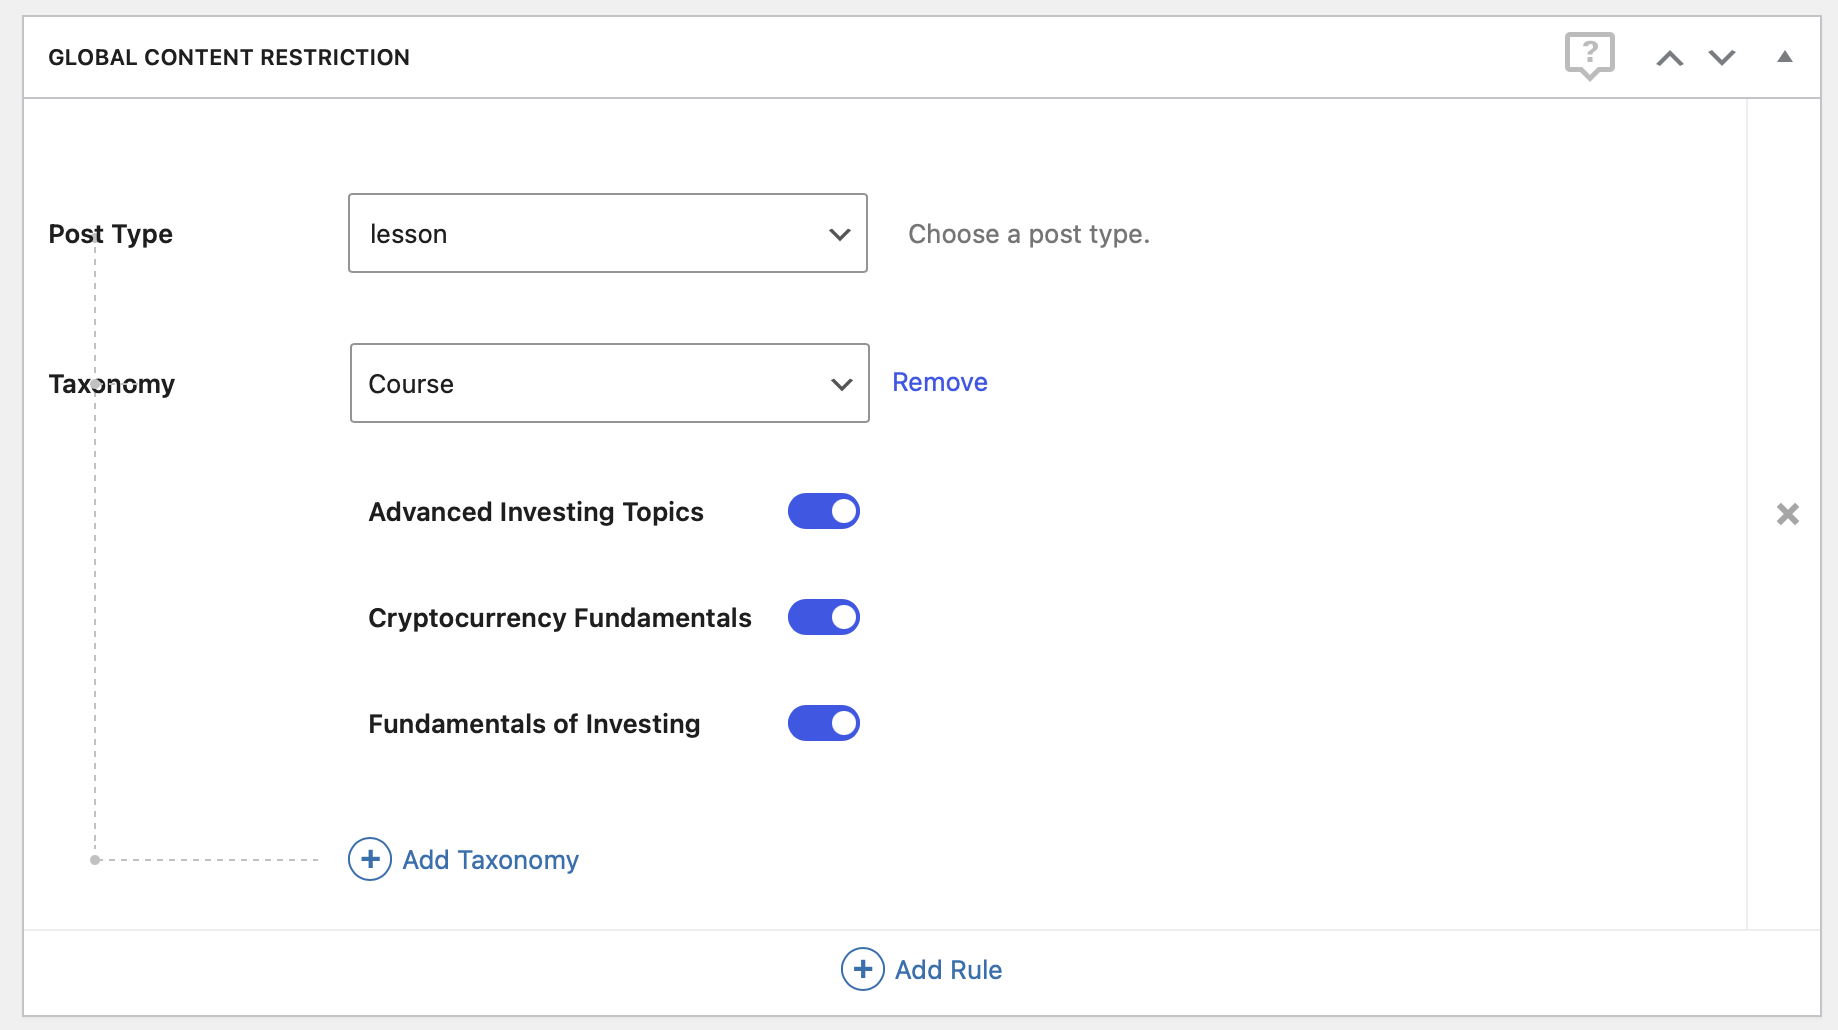
Or, you could just grant access to the entire lesson post type.
Set Up Content Dripping Schedules (Optional)
With your current configuration, learners will get access to every single lesson in the course as soon as they sign up. If you’d rather drip out course content over time, you can set that up by creating a content drip set with the Content Dripping add-on.
Once you’ve enabled the add-on, you can go to Paid Member Subscriptions → Content Drip Sets → Add New to create your first drip schedule. Select your desired subscription plan using the dropdown menu at the top.
Then, set up your content dripping schedule in the Content box:

Another cool thing you could do here is drip access to courses instead of individual lessons, which could be useful for an all-access plan:
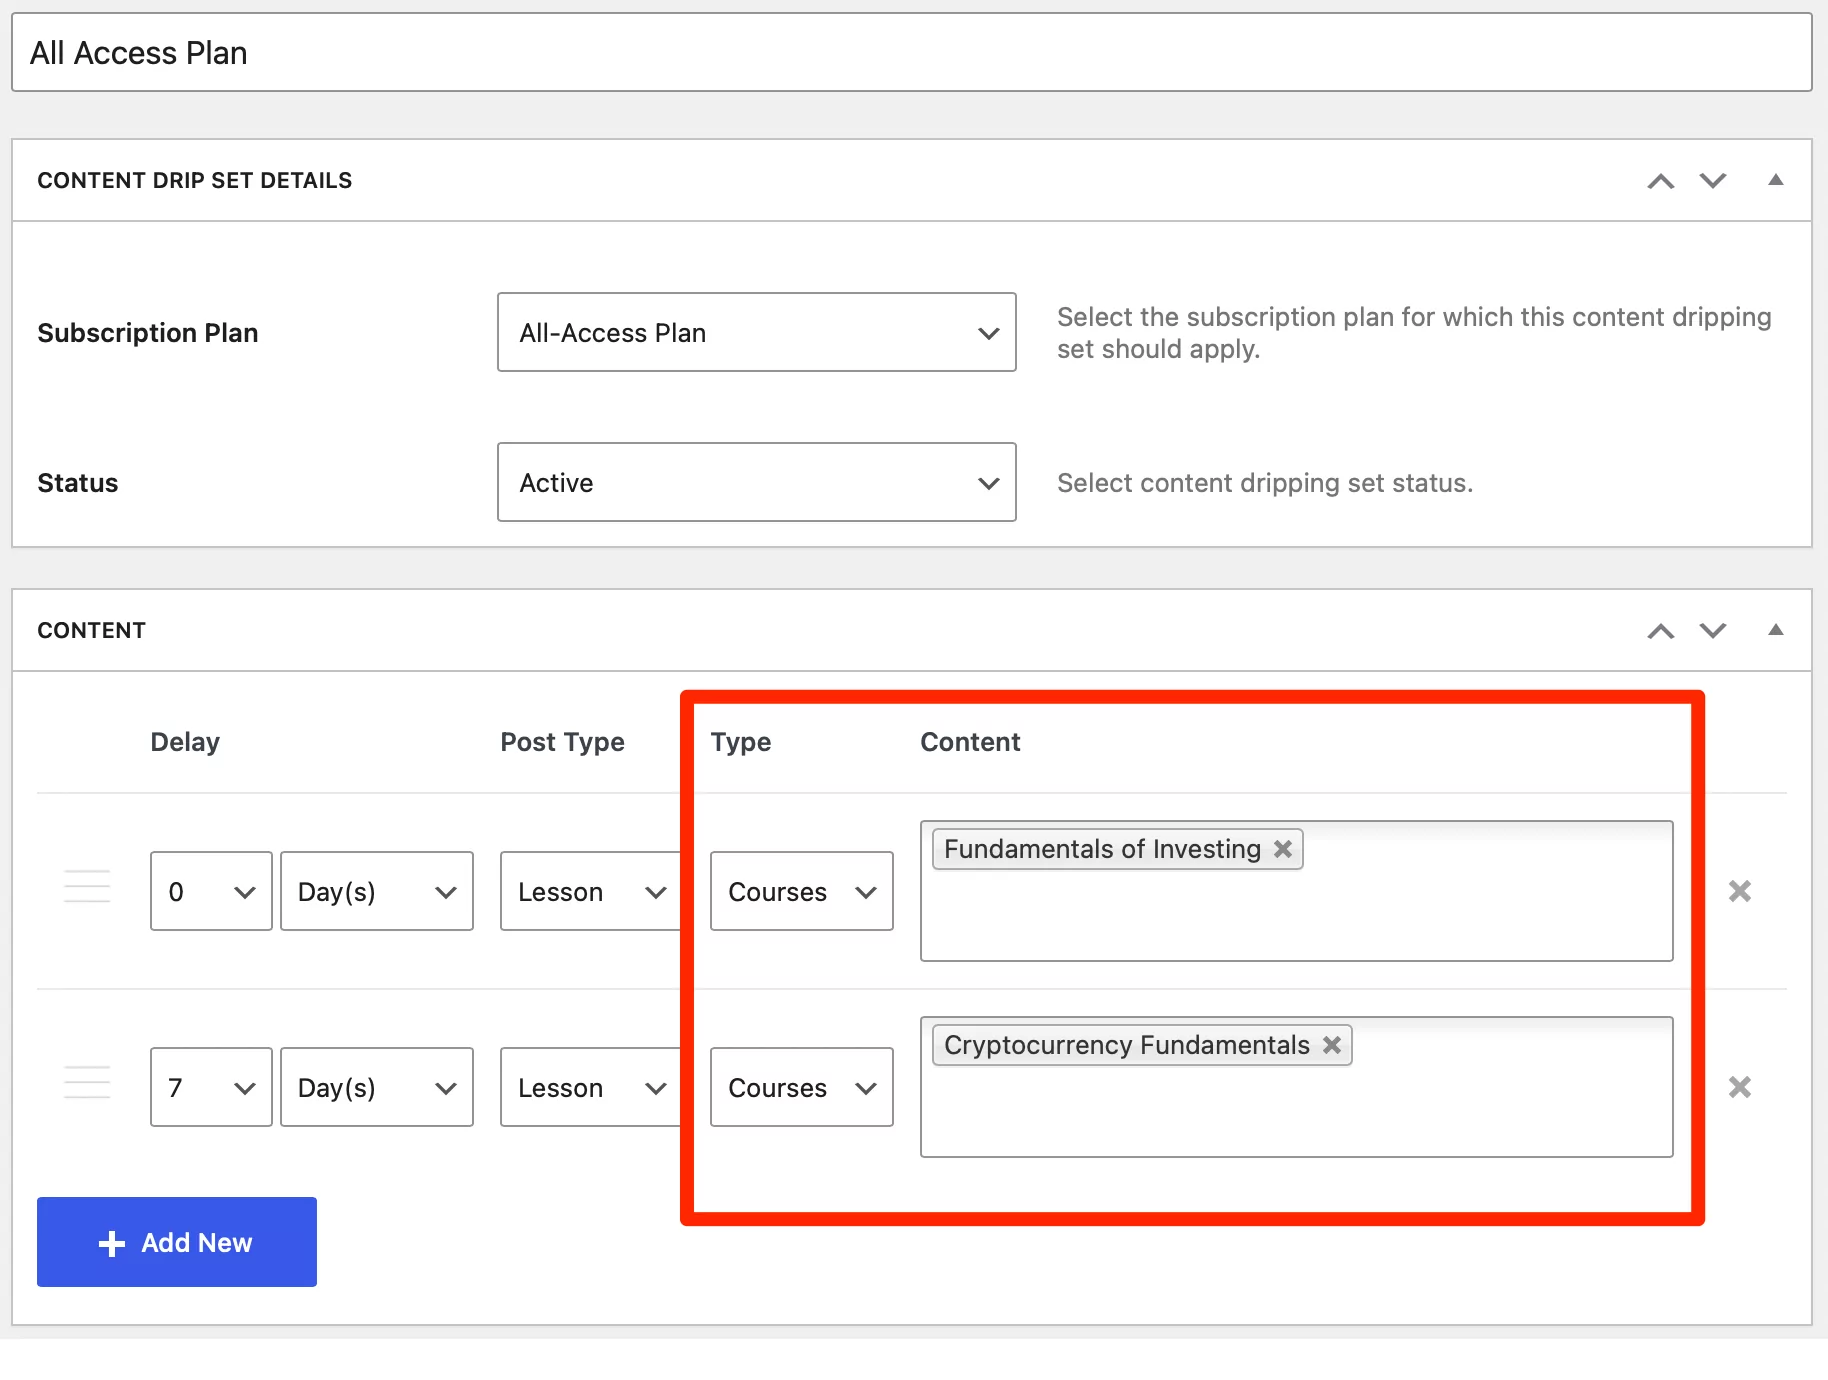 To do this, you would set Courses as the content type instead of choosing individual posts.
6. Customize Your Payment/Registration Page
The Paid Member Subscriptions plugin may have already created a registration page for your platform as part of its setup wizard. However, even if this is the case, you might want to make some improvements, like the following:
- Customize this registration page to optimize it for signups
- Create dedicated signup pages for specific courses, rather than (or in addition to) having one signup page for everything
Paid Member Subscriptions makes it easy to do both. So, if you want to customize your existing registration page, just go to the Pages area in your WordPress dashboard. Then, edit the Register page that Paid Member Subscriptions created for you.
However, you can also set up your own registration page by clicking on the Add New button from the Pages area. Here, click on the + icon to add a new block and select the PMS Register block:
Instantly, you should see that the PMS registration form has been added to the page:
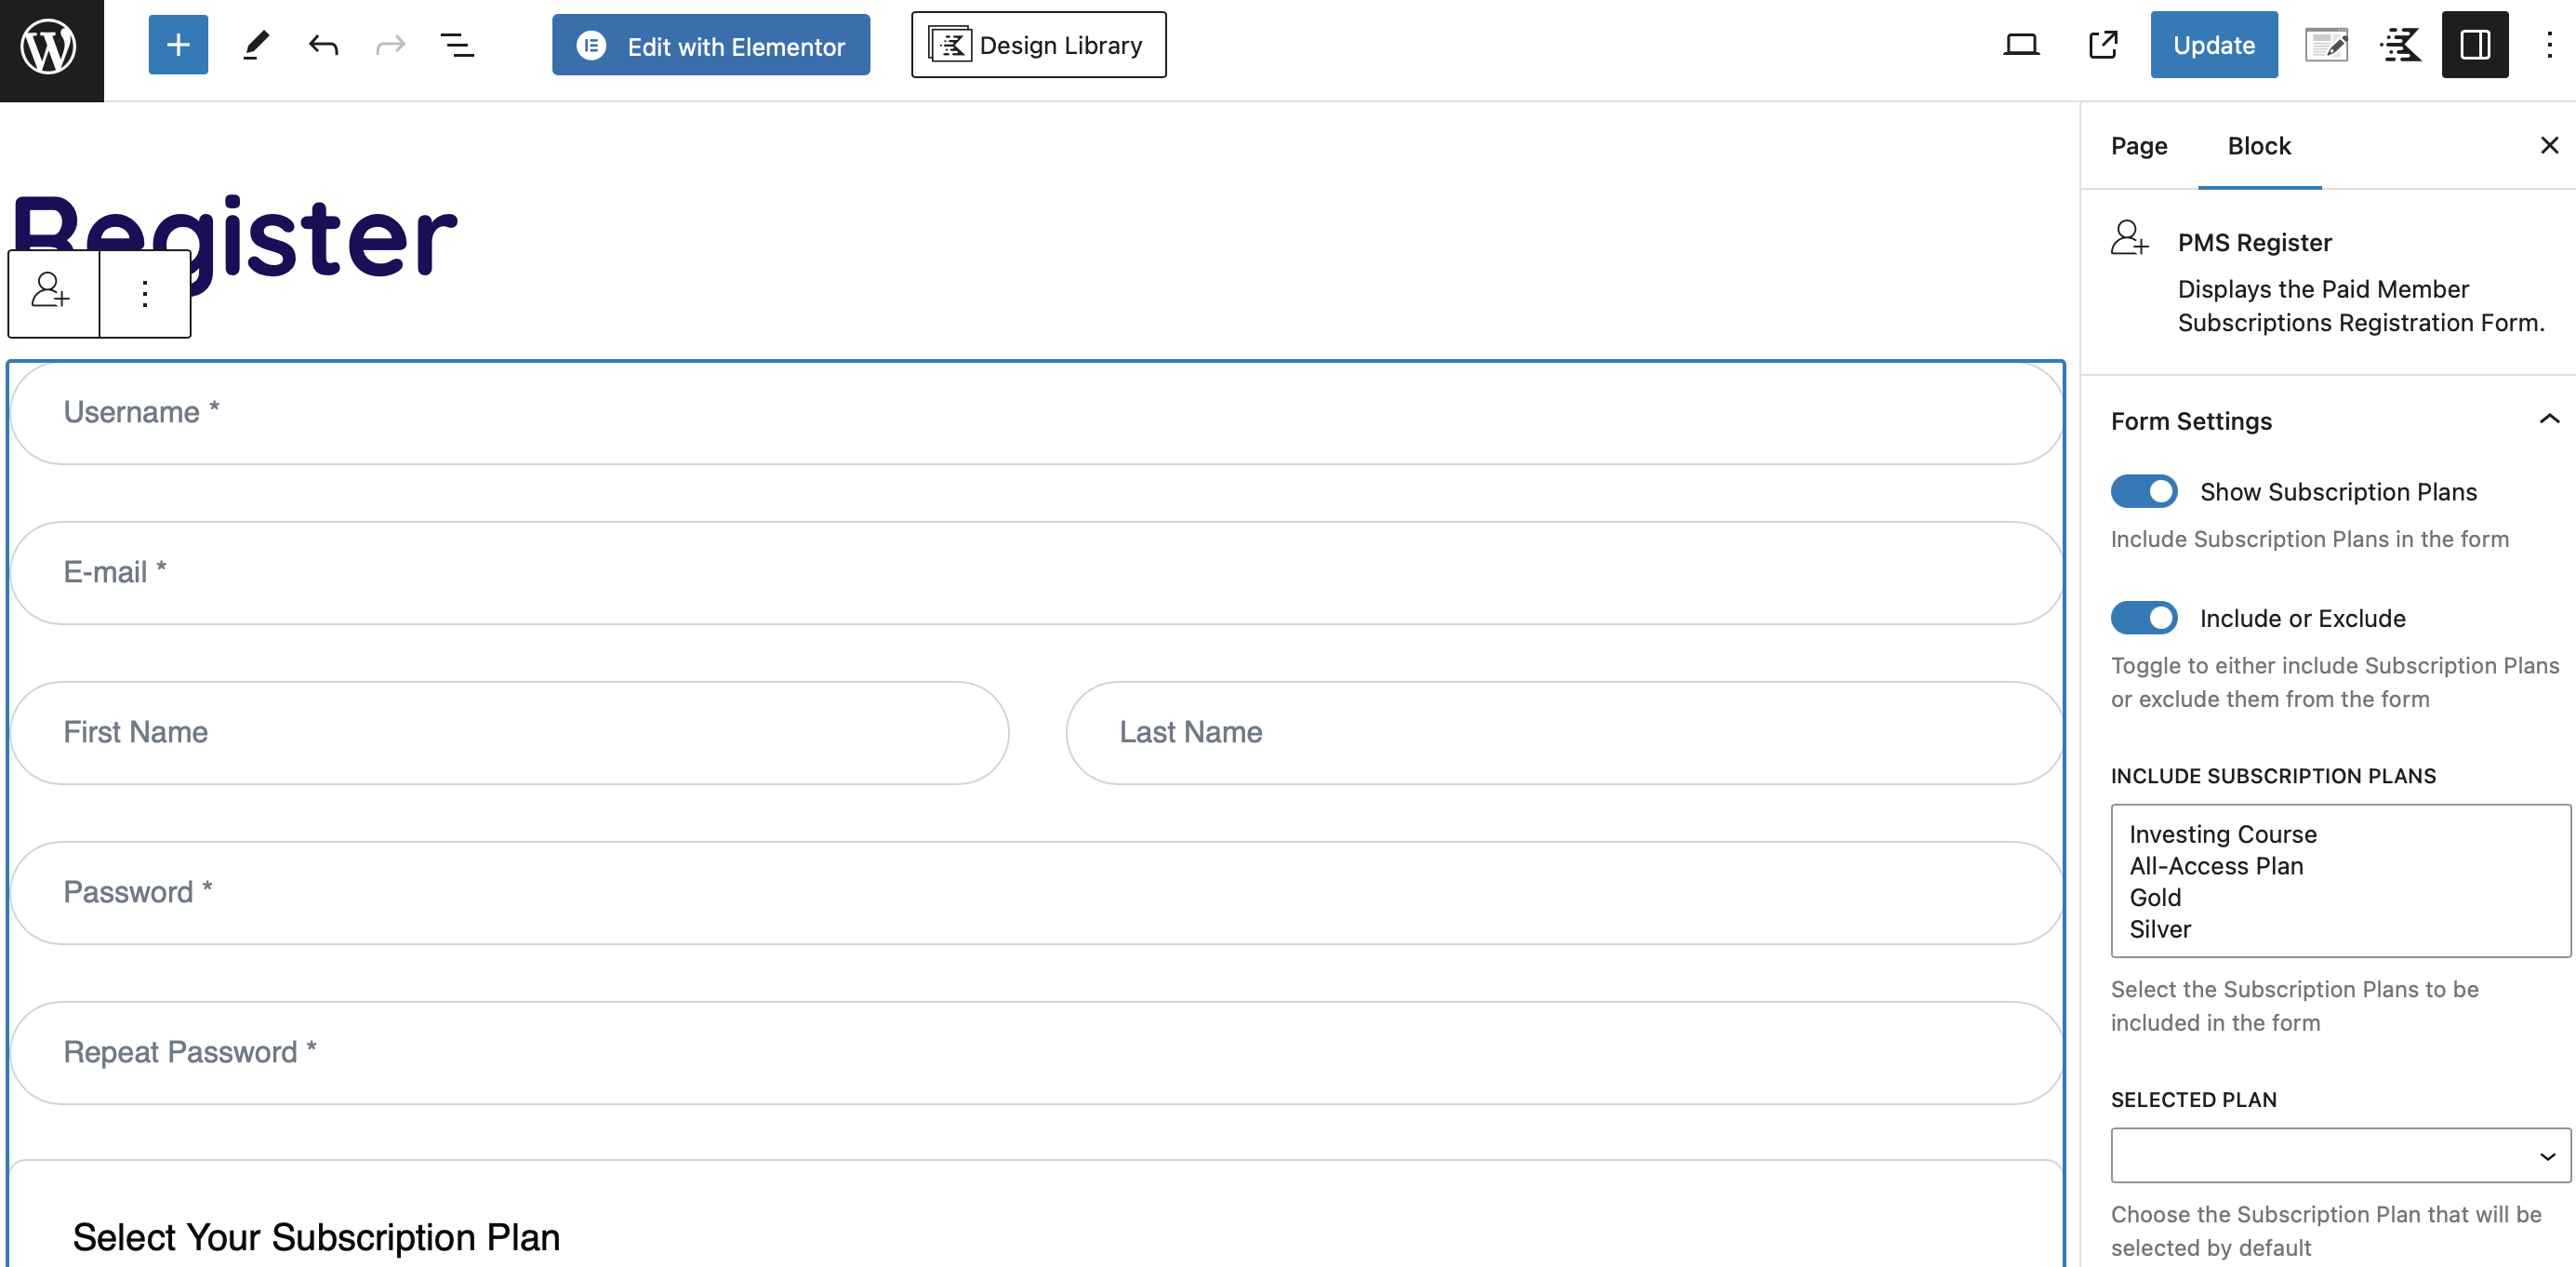
In the Block settings to the right of the screen, locate the Form Settings section where you can choose whether to show your subscription plans on the form.
You can also select exactly which plans you want to include on the page using the box beneath. Meanwhile, the options visible on the page should reflect this change immediately:
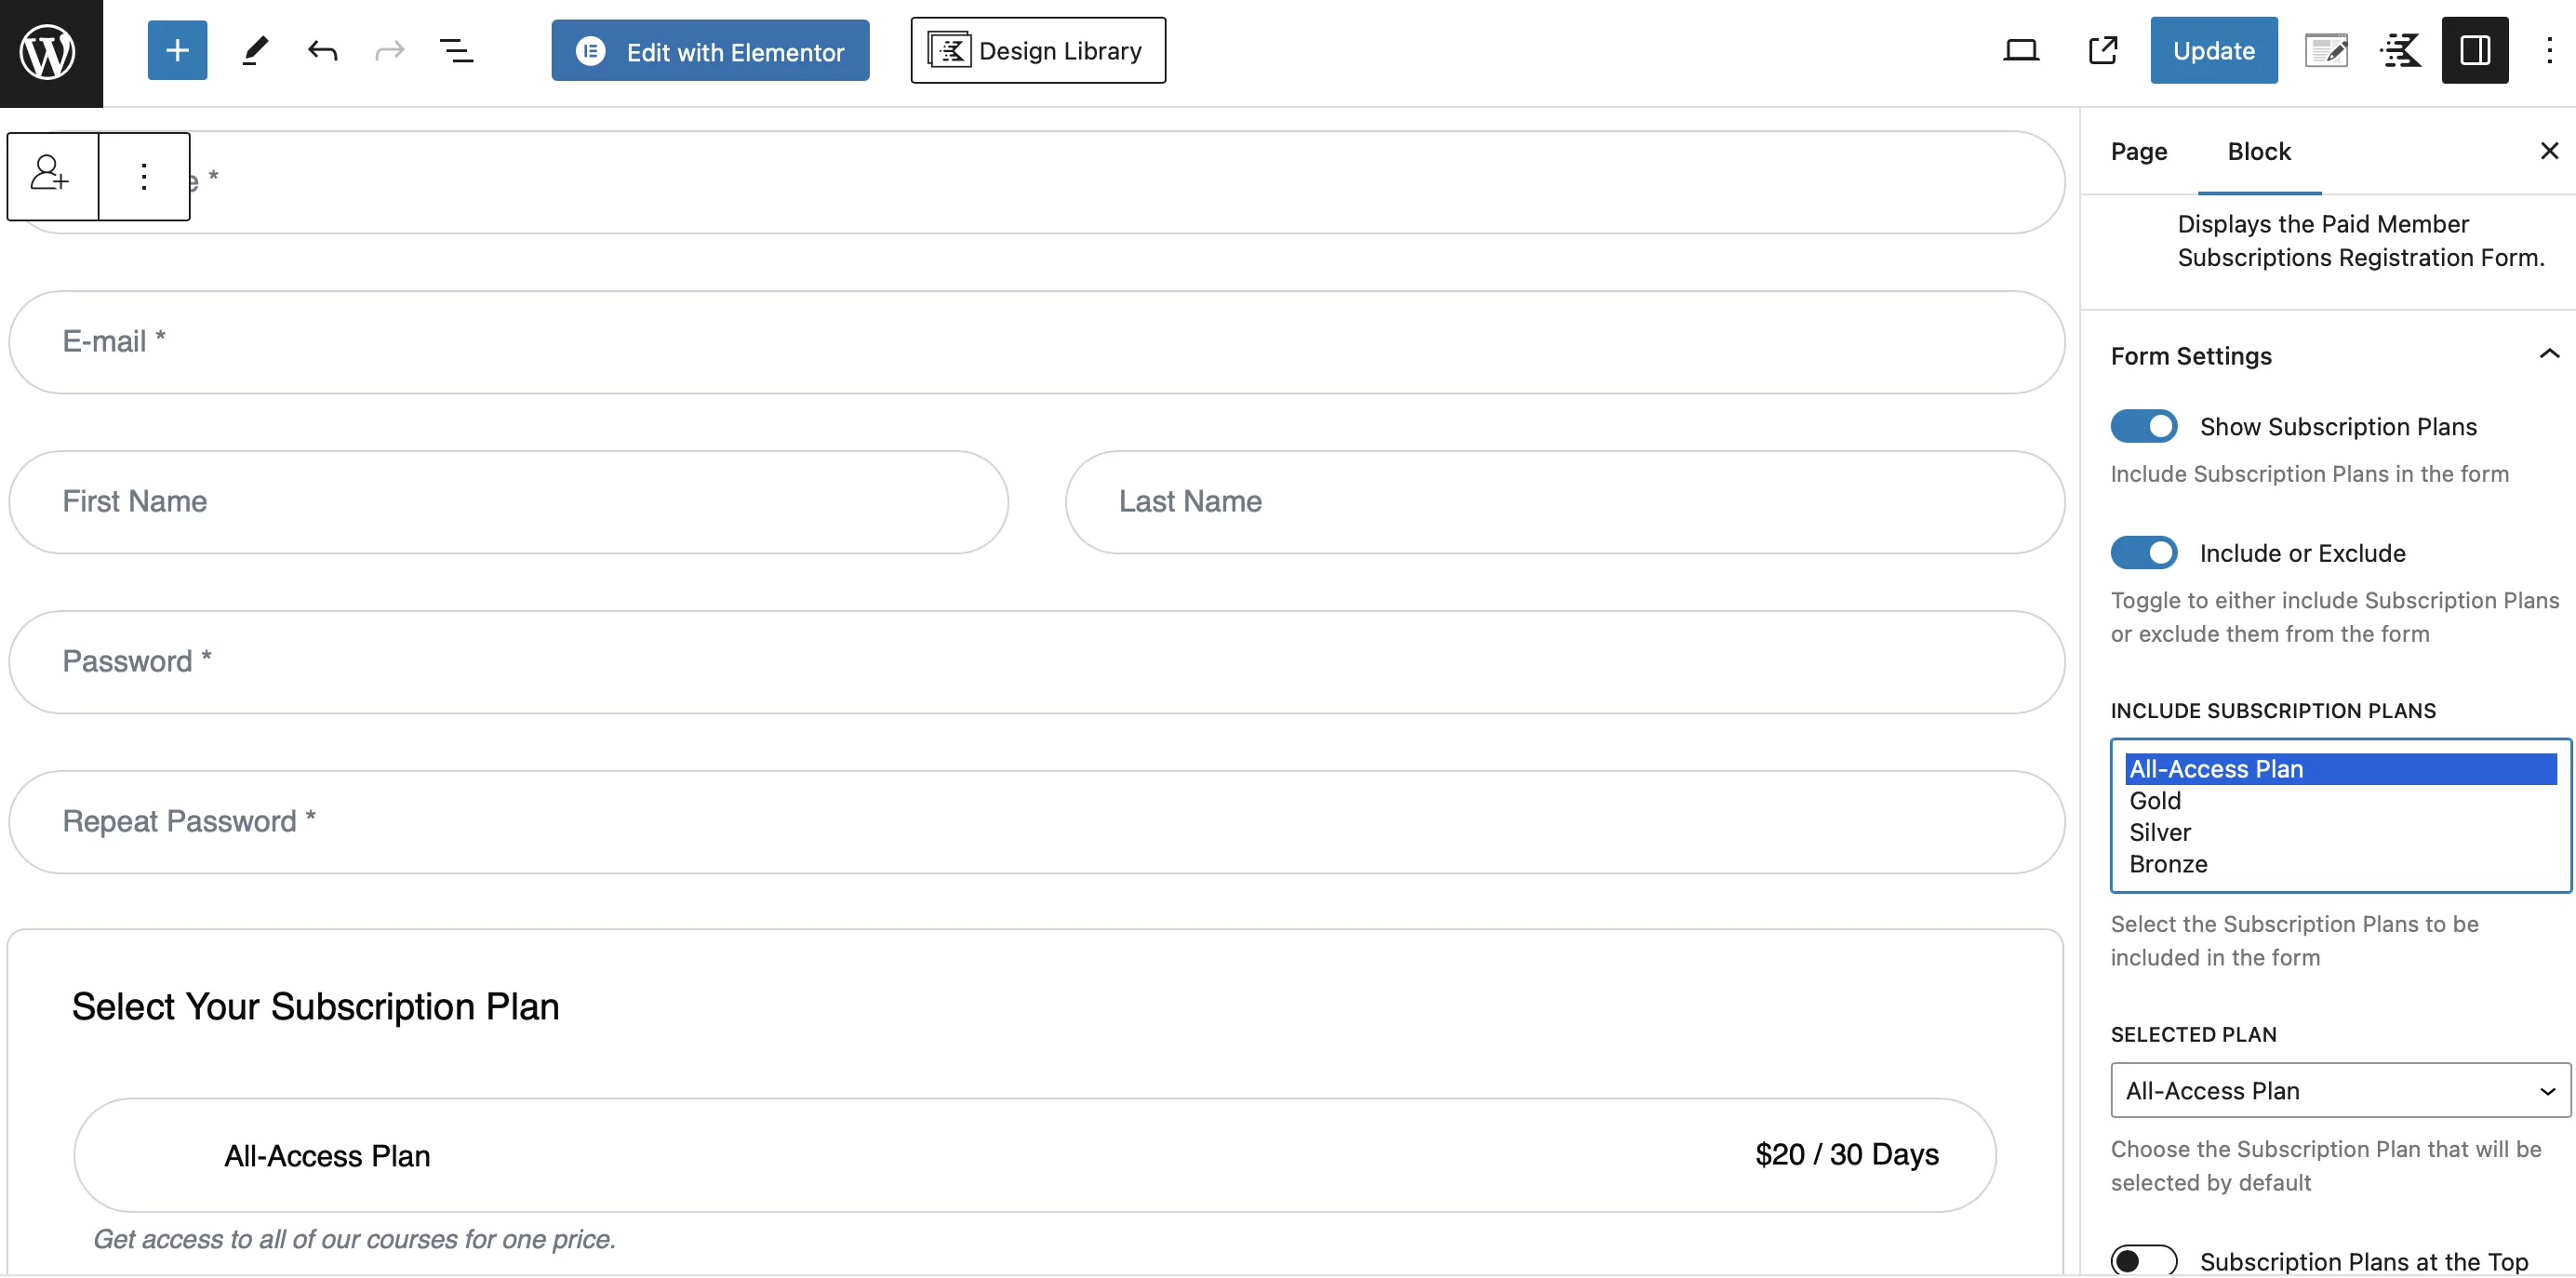
And, you might want to select a default plan using the Selected Plan dropdown menu at the bottom of the section.
To create a more user-friendly experience for your course takers, you might want to customize the navigation menu. This way, you can show different courses for different members, depending on whether or not users are logged in.
For example, an anonymous visitor might see a navigation menu item that prompts them to register for your courses. Meanwhile, logged-in users might see navigation menu items to quickly access the courses that they’ve purchased.
To set this up, you can use Paid Member Subscriptions’ Navigation Menu Filtering add-on. With this add-on, you’ll get some new options to control your navigation menus when you go to Appearance → Menus.
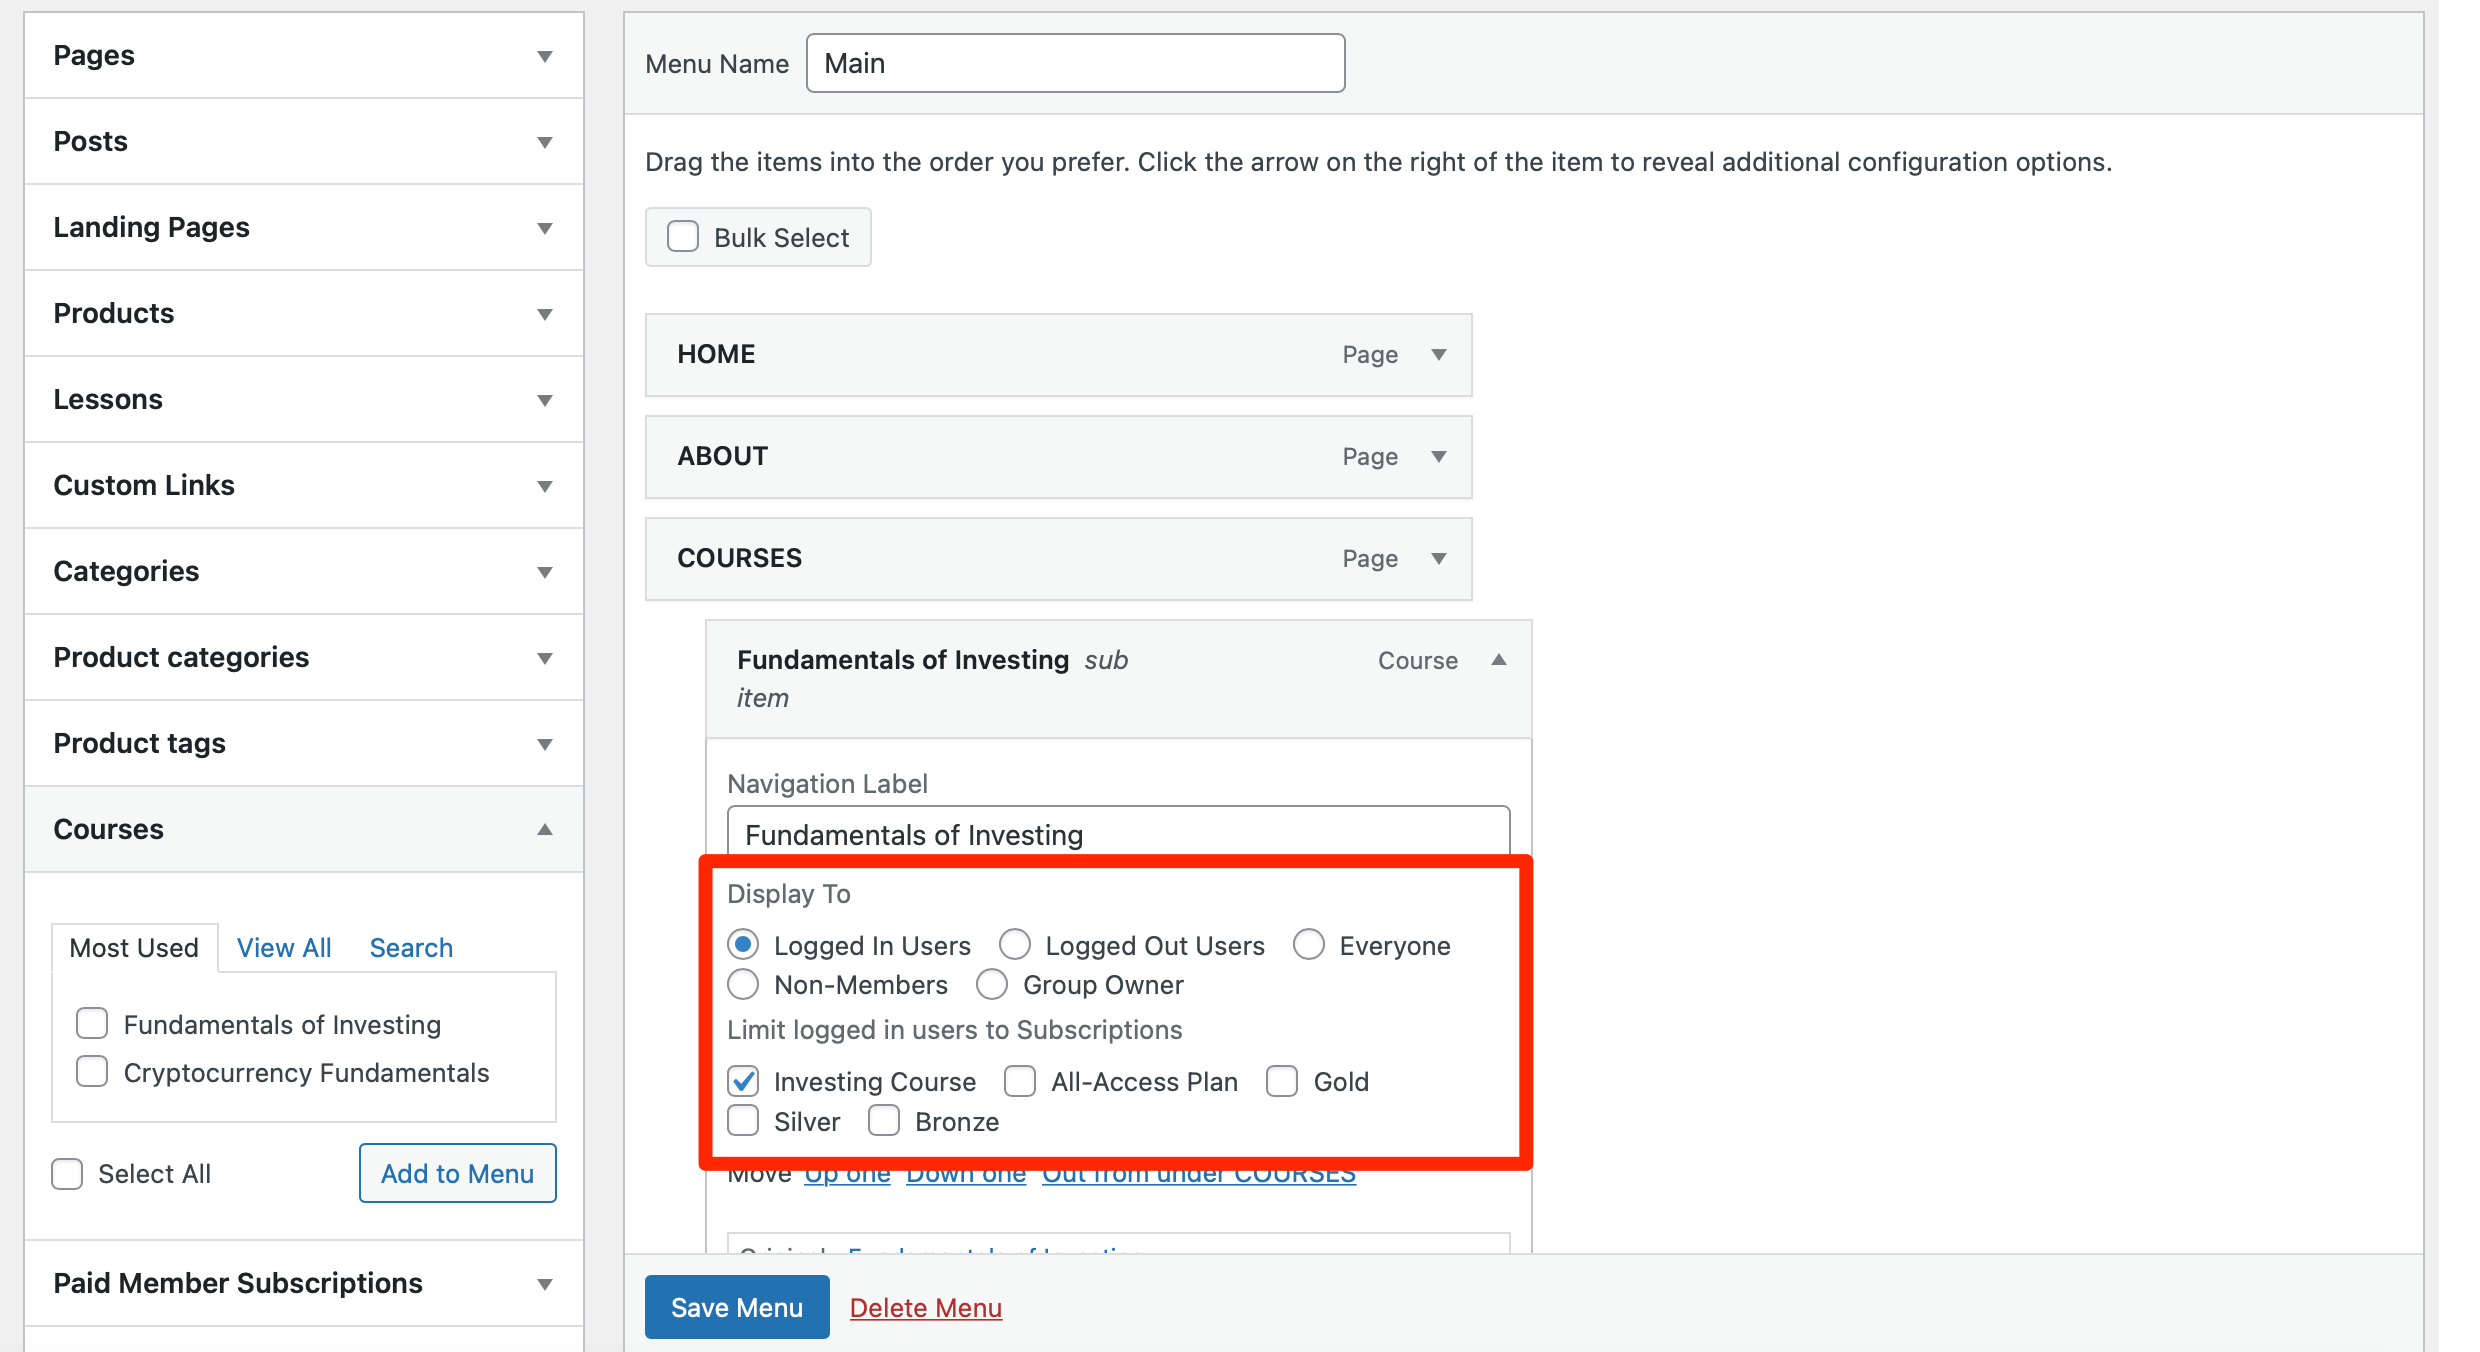
For example, let’s say you want to include a sub-menu link to the “Fundamentals of Investing” course table of contents, but only for people who are logged in and have purchased the “Fundamentals of Investing” course/subscription plan. To achieve this, add the menu item where you want it to appear.
Then, use the Display To rule to only show it to Logged In Users and save your changes. Then set the Limit to the relevant subscription plan:
You can also go in the opposite direction and only show certain menu items to anonymous visitors. For example, you could include a CTA to purchase a membership plan that only displays to non-members:
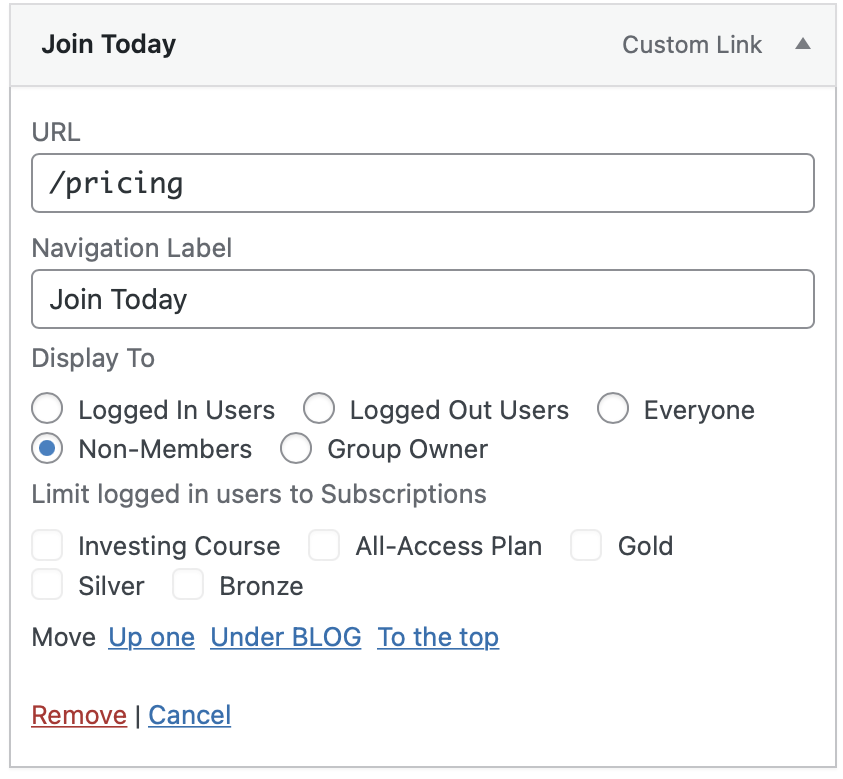
Then, make sure to save your changes.
8. Launch Your Course Platform!
And that’s it! You just set up your own online course selling platform using WordPress and the Paid Member Subscriptions plugin. Although, you might want to do a few other smaller housekeeping tasks.
For instance, it can be a good idea to customize the emails that your site sends to members via the Paid Member Subscriptions settings. But in general, you now have a fully working course selling website.
Need Quizzes and Assignments? You Can Integrate PMS With LearnDash
For most people, the features above are all that you need to create an online course platform. However, for more academic-focused courses, you might want the ability to include features such as gradable quizzes and assignments in your courses.
In that case, you can integrate the PMS plugin with the LearnDash LMS. To do this, head to Paid Member Subscriptions → Add-Ons and activate the LearnDash option:
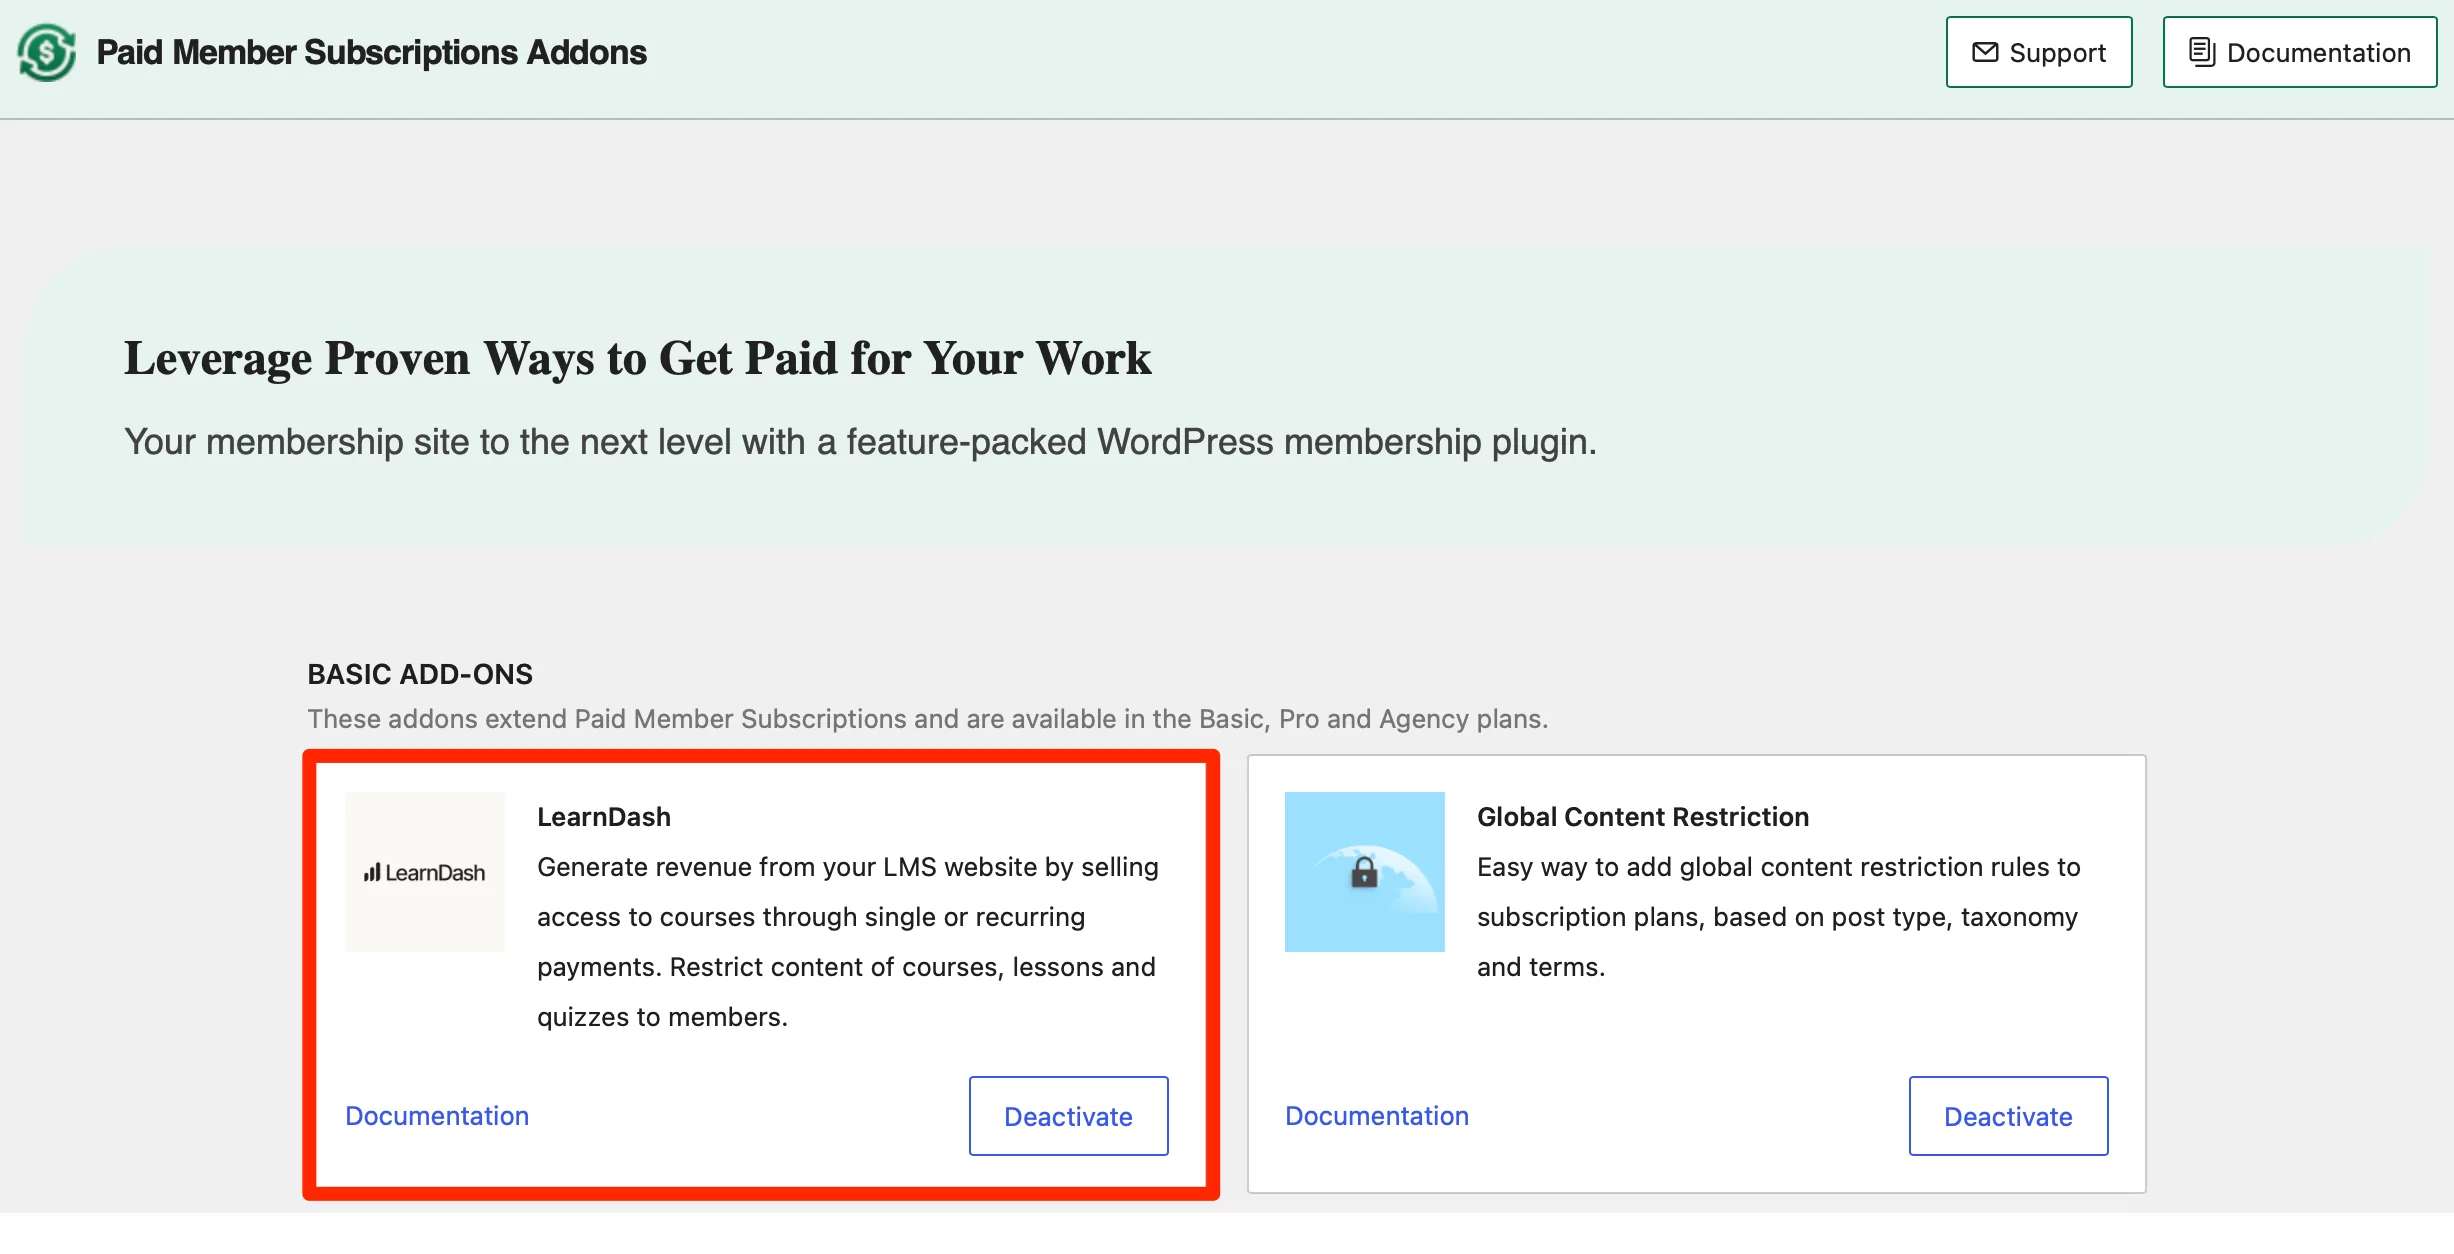
This way, you’ll still be able to use Paid Member Subscriptions to accept payments, restrict content, and manage learners. But then you can connect your membership levels to LearnDash courses so that you can take advantage of LearnDash’s quizzes, assignments, and other academic features.
How to Add LearnDash Courses to PMS Subscription Plans
If you want to associate certain LearnDash courses with your membership plans, you’ll first need to create your courses by going to LearnDash → Courses → Add New. Here, you can add all your course content in the editor.
Plus, if you switch to the Settings tab, you can configure the course access settings:
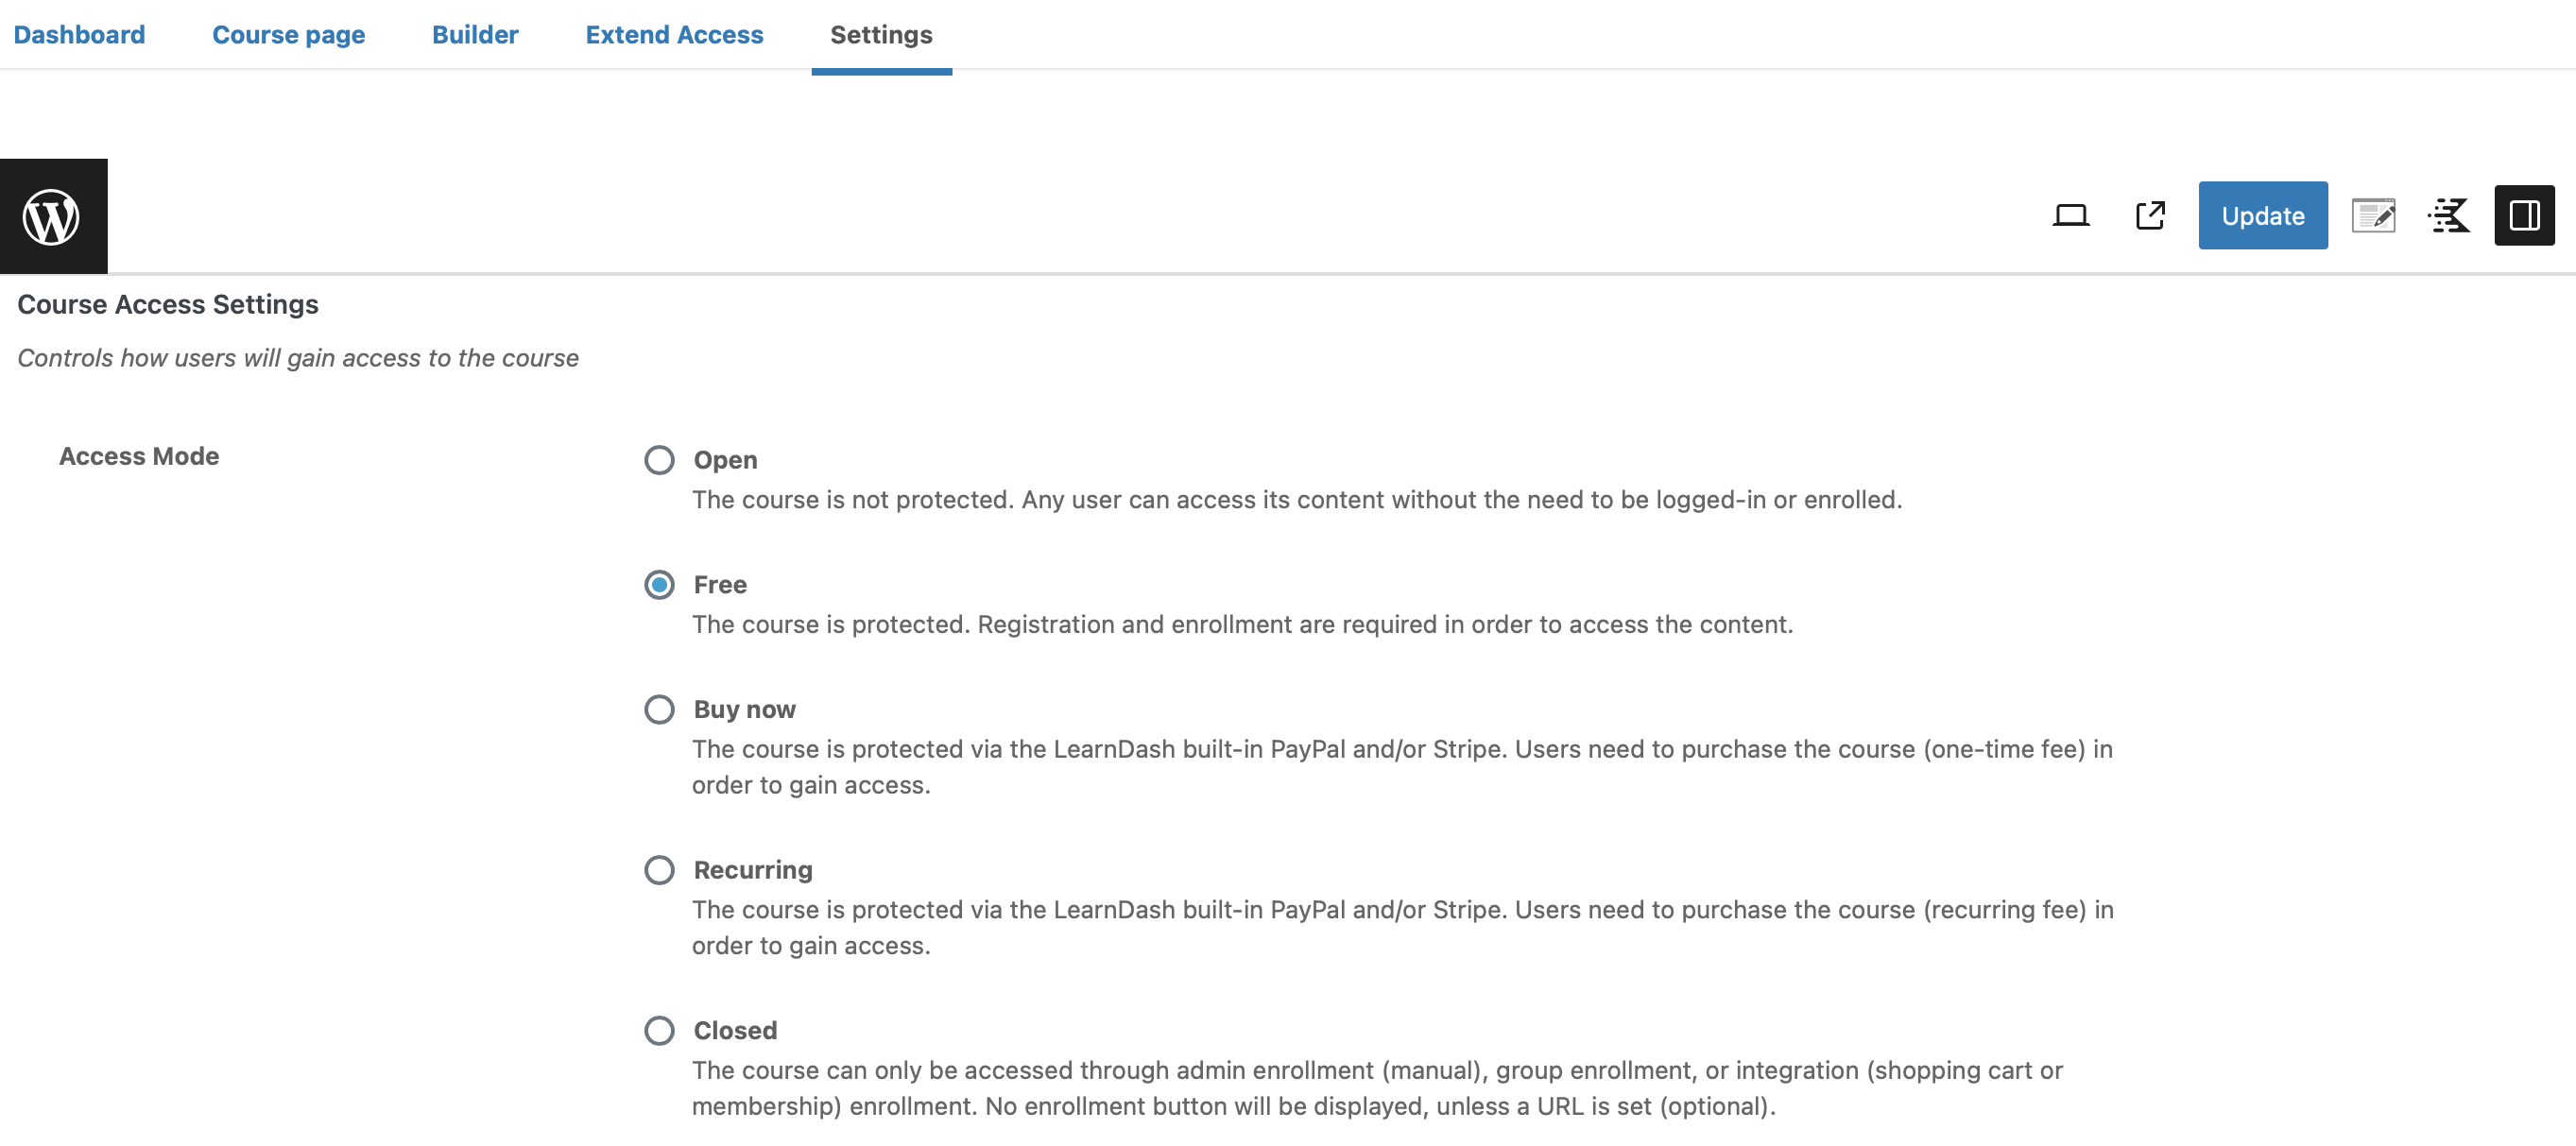
For example, a free course will require registration without payment. Meanwhile, a closed course can usually only be accessed via a membership.
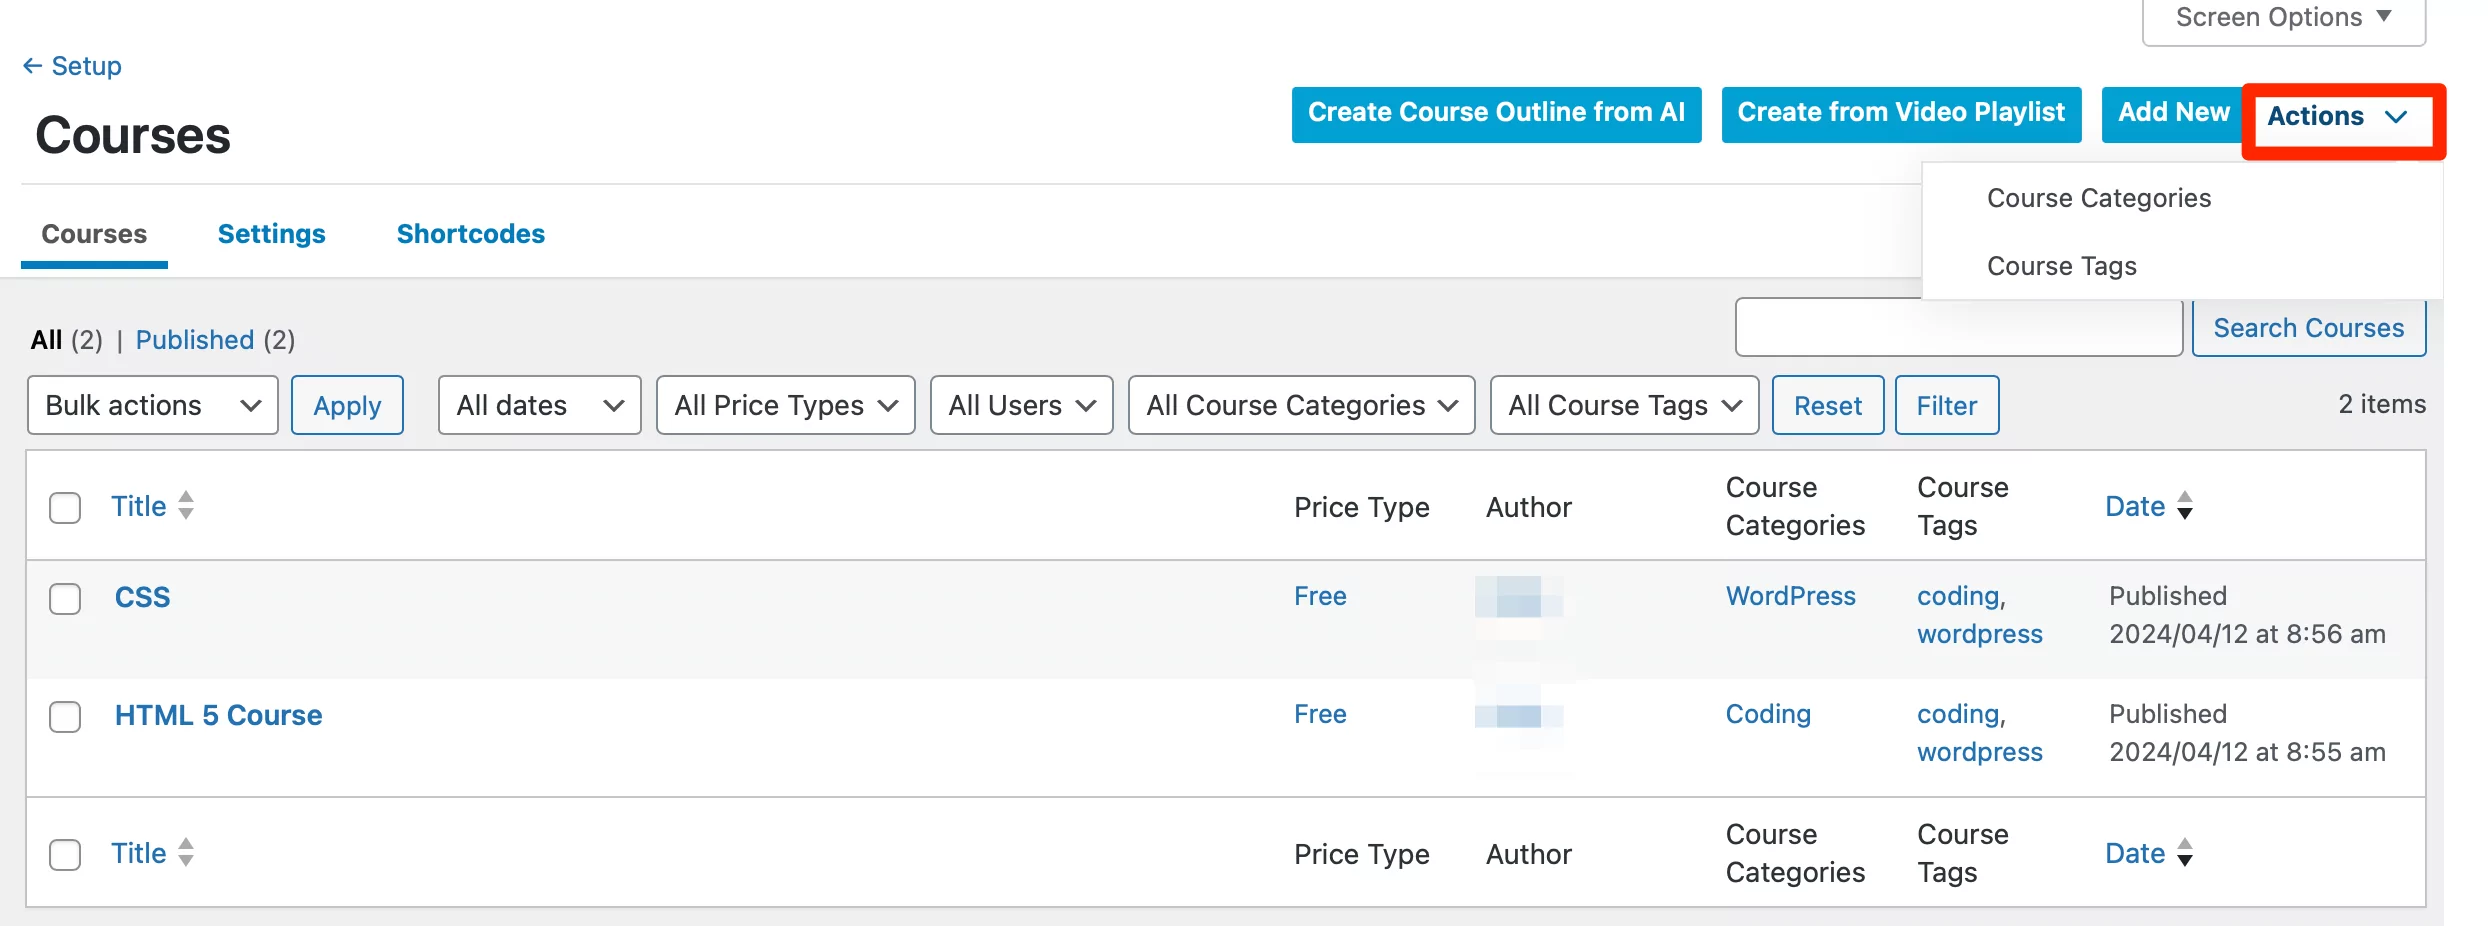
Once you’ve added a number of courses, you can set up tags and categories within the editor. Or, you can do this from the Courses page. To add tags, use the Quick Edit link and enter some topics in the Course Tags box.
For categories, you’ll need to use the Actions dropdown at the top of the page and select Course Categories:
Here, you can give your category a name, add a description, define the slug, and determine whether it’s a parent category.
Then, you’re ready to associate your LearnDash courses with your PMS membership tiers. So, head to Paid Member Subscriptions → Subscription Plans and create a new membership level (or edit an existing one).
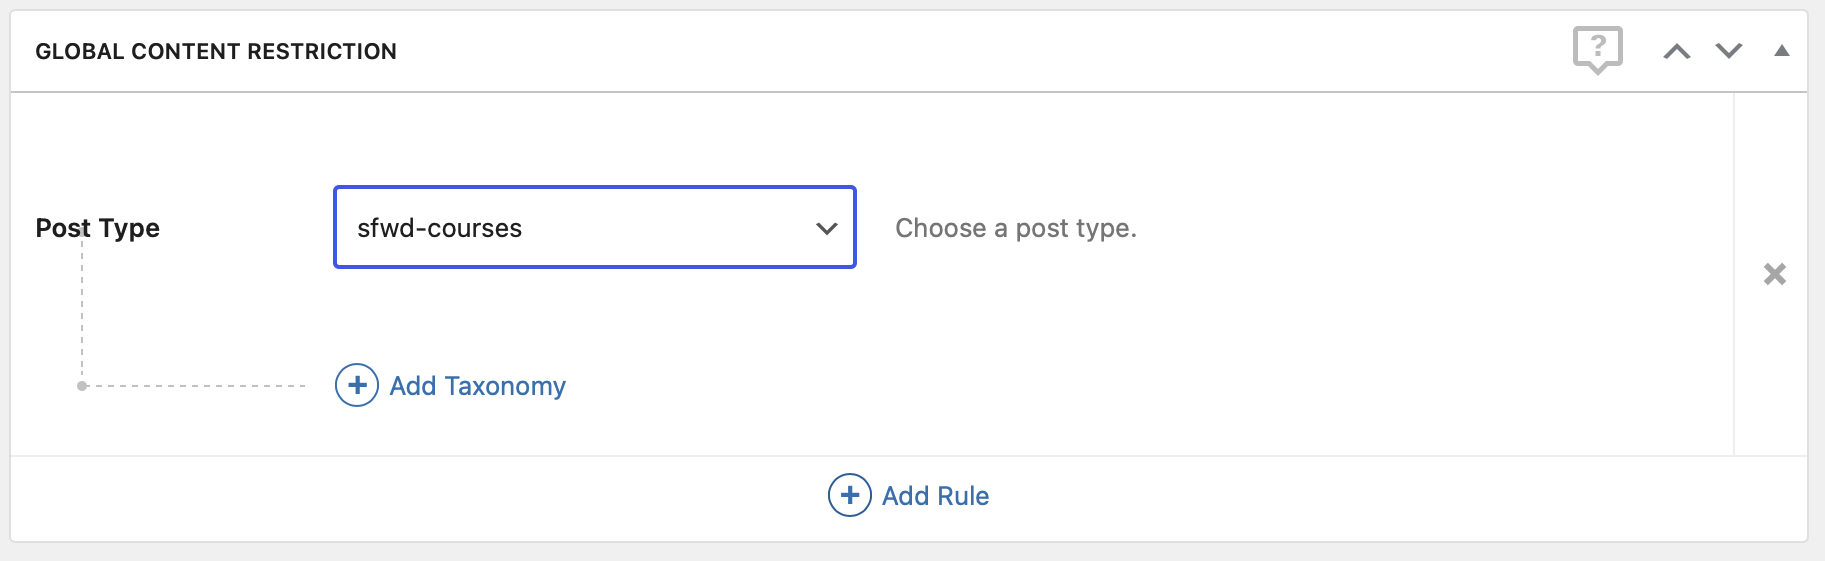
In the Global Content Restriction section, use the Post Type dropdown to select sfwd-courses:
Now, click on Add Taxonomy which lets you select courses by tags or categories. Let’s say you choose Course Category, you should see all your course categories appear below:
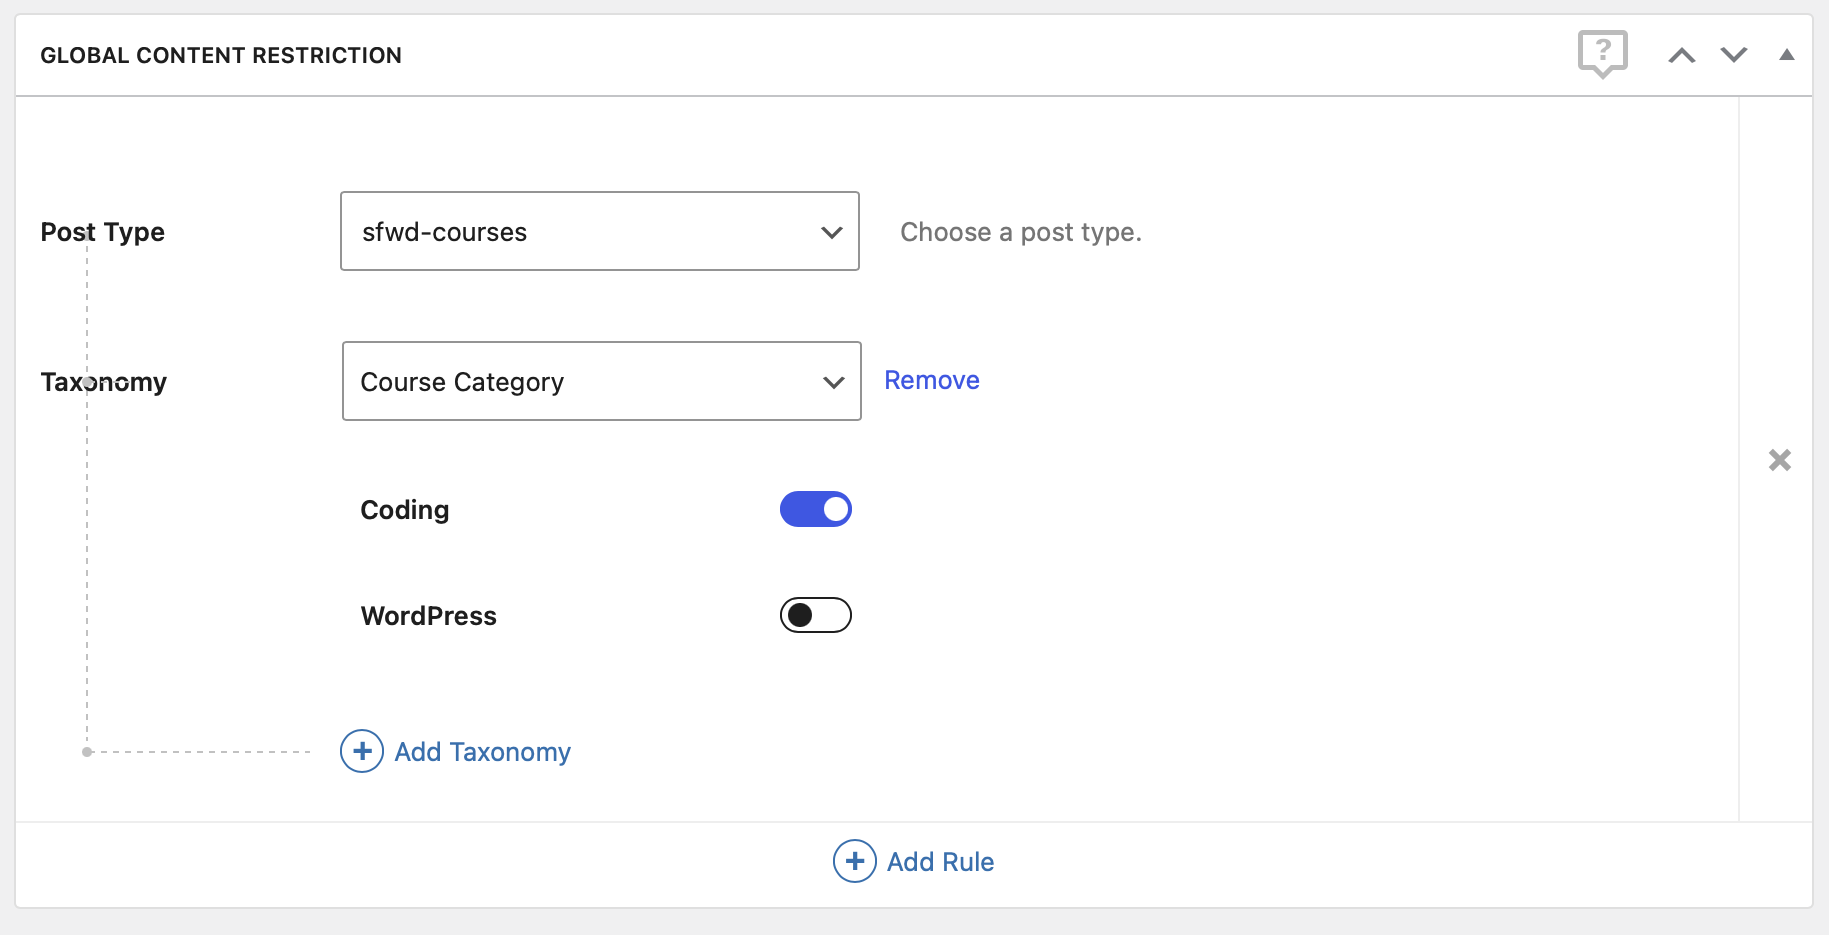
However, it’s important to note that only courses that you’ve marked as Closed or Free will be displayed here. Then, you can use the toggles to add certain course categories to your subscription plan.
The same goes for all LearnDash lessons, quizzes, assignments, and other content types. In these instances, you’ll simply use the Post Type dropdown to choose a different type of content.
How to Restrict Access to LearnDash Courses Using Your Membership Levels
Another way that you can utilize the PMS LearnDash integration is to restrict access to courses, lessons, quizzes, and more. This enables you to configure the settings on a case-by-case basis (rather than adding a whole course category to a subscription plan).
Better yet, the process is familiar if you use the PMS plugin to restrict access to other types of content like posts and pages. For certain types of content (like quizzes and certificates), you can access the content restriction settings as you usually would – at the bottom of the editor.
But, for courses, you’ll need to switch to the Dashboard tab:
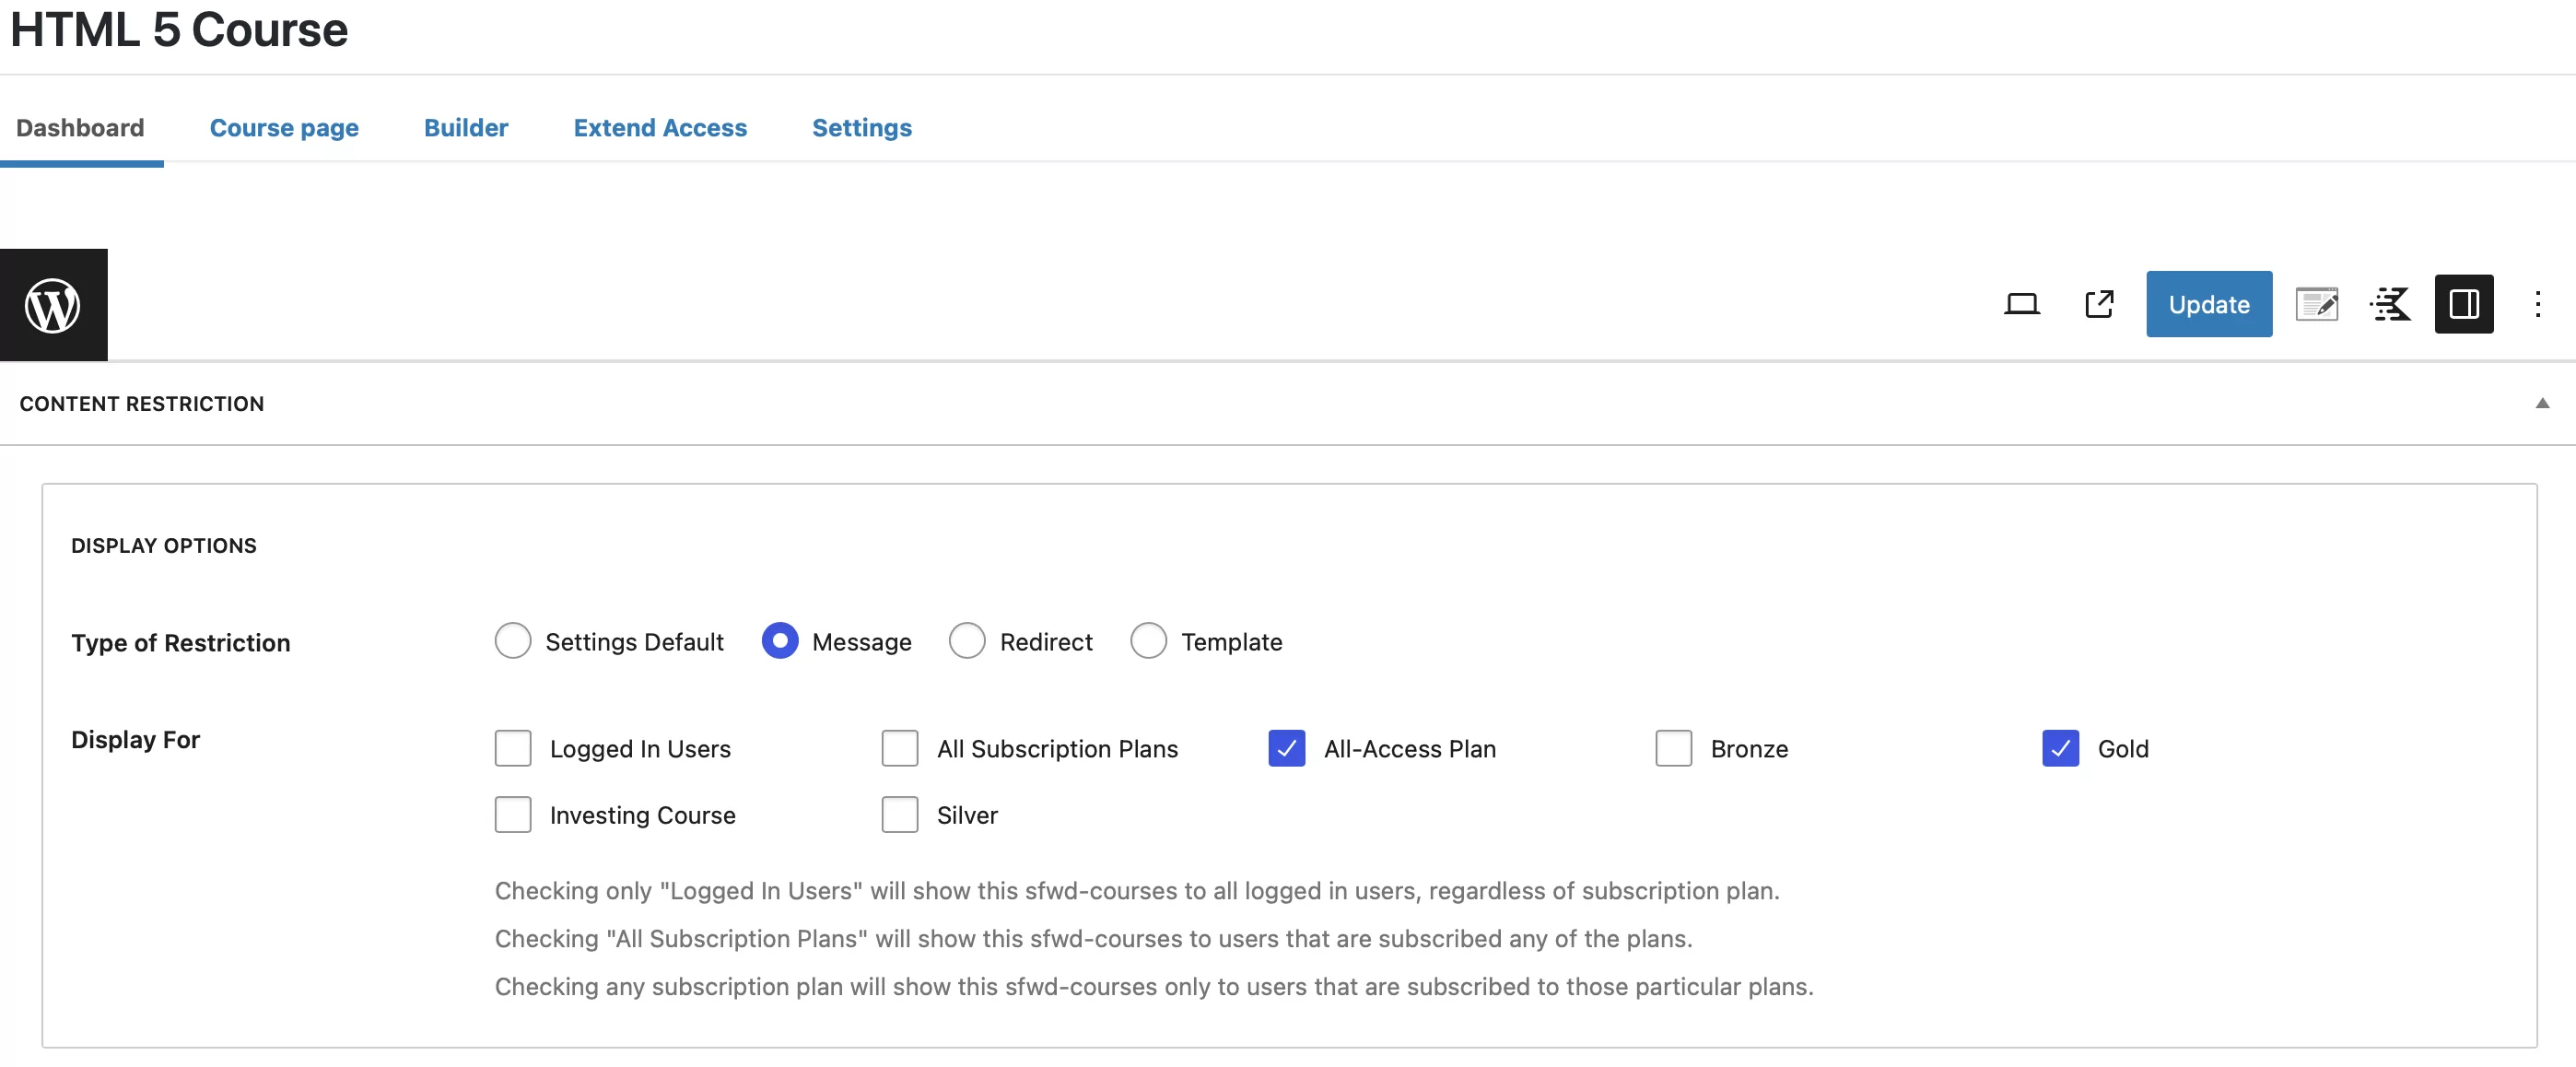
Here, you can see the usual PMS content restriction block where you can choose a restriction type like a message or redirect. And below, you should be able to see all your PMS subscription plans.
This way, you can make sure that the course is only visible to members of specific plans (or all logged-in users). And, you can even write custom restriction messages for your LearnDash courses.
Create Your Own Course Selling Website Today
Online courses provide a great way to share your knowledge, engage with passionate students, and monetize your website. The good news is that you don’t need any technical knowledge to sell online courses from your own website.
With Paid Member Subscriptions, you can add as many courses and lessons as needed to your WordPress site. Then, you can quickly restrict access to some or all of your courses using membership levels. Plus, you can charge users one-time or recurring fees to access your course content. And, if you already use LearnDash, or if you want more advanced course functionality, you can integrate PMS with the LMS using the LearnDash add-on.
Paid Member Subscriptions Pro
The best plugin to sell online courses from your WordPress website.
Get Paid Member SubscriptionsDo you still have questions about how to sell online courses from your own website using WordPress and Paid Member Subscriptions? Let us know in the comments section below!
Related Articles
How To Create a Divi Membership Site
If you’re thinking of building a membership site in WordPress, you’ll need a solid theme and a membership plugin that pairs well with it. In this complete guide, we’ll show you how to create a Divi membership site using the popular Divi theme in combination with the Paid Member Subscriptions plugin.
Continue Reading
Membership Blog: Why Start One, Popular Examples and How To
I think you will agree starting a membership blog seems daunting, especially for a first-timer. Talk to just about any beginner who has never created a membership blog (or even a simple website), and they will field questions such as: Why should I start a membership blog? What kind of content, products, or services should […]
Continue Reading
How to Build an Elementor Membership Site with Paid Member Subscriptions
Are you looking to add membership functionality to your Elementor site in WordPress? Perhaps you want to create subscription plans, restrict access to premium content, and accept payments within the popular page builder. The good news is that you can use Paid Member Subscriptions to do all this and more. For example, you can customize restriction […]
Continue Reading