

Table of Contents
- 1 Why It’s a Great Idea to Create a Subscription Site
- 2 Here’s How to Build a Subscription Website
- 3 Build Your Own Subscription Website & Start Earning!
A subscription website can be an incredible way to make money online. Subscription websites are highly flexible and can be adapted to a wide range of different websites and niches.
You can create a subscription website with gated content, a private membership community, membership-based products, and much more.
In this article, you’ll learn the different directions you can take with a subscription website, and how to create a subscription website step-by-step using WordPress and the Paid Member Subscriptions plugin.
Why It’s a Great Idea to Create a Subscription Site
Your subscription website can take many forms. You can choose to build a subscription website from scratch or have it be an add-on to your existing website.
Here are three of the most common forms of subscription websites:
Selling Membership Goods or Services
If you run a WooCommerce website, you can create subscriptions for your products. A straightforward method is to bundle products that visitors commonly buy together.
Instead of adding these to their cart, they can choose to purchase the bundle of goods together. You can even offer an option for a 10% monthly discount if they choose to subscribe monthly.
This works excellent for consumable goods that users need to re-order every month, like coffee, dog food, supplements, etc.
You can also create an eCommerce site that has specific products only reserved and available for subscribers.
Create a Community-Oriented Site (Like Patreon)
Some types of websites can benefit from adding a membership community. This can take many forms, like a subscriber-only forum, a monthly mastermind group, a freelancer network, and more.
You can also create a membership site that allows your readers to support your work and engage with you on a more intimate level, similar to Patreon.

Your visitors can subscribe to a specific subscriber tier and get certain “rewards” every single month. This could be exclusive content, monthly live webinars, and more.
Restrict Content with Different Subscriber Tiers
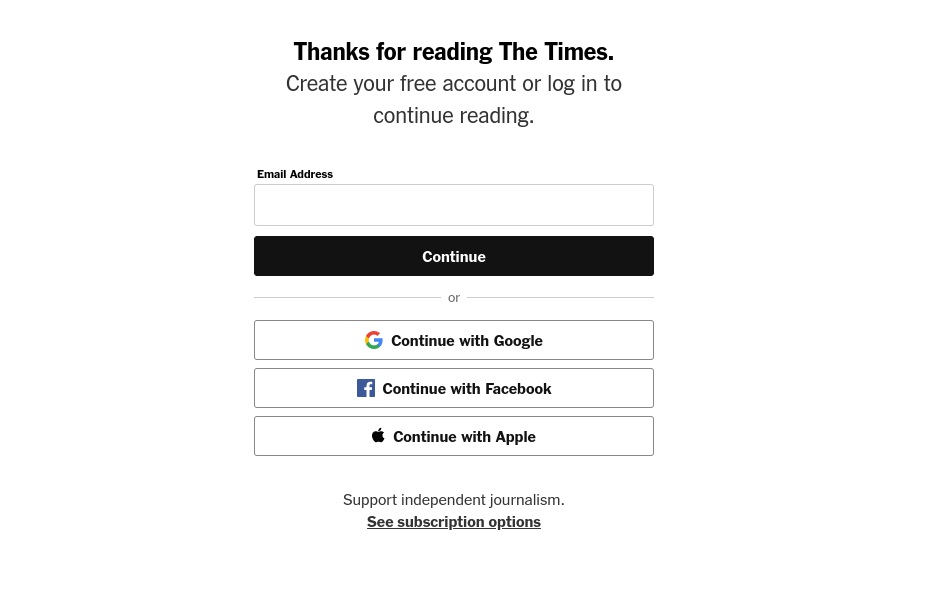
If you have a sizeable content-driven website, you can restrict certain portions of your site to paying subscribers. Think of how the New York Times offers a certain number of free articles per month before a user has to subscribe.
You can create sections of your website that only VIP subscribers can access. Or, you can even create online courses that you’ll restrict behind a paywall.
Another excellent example of this is from the blogger and author Mark Manson. He publishes regular blog posts accessible to anyone who visits his site and offers additional monthly articles, audio commentary, and courses for a monthly membership fee.

A fast and easy way to add subscription functionality to your website is through the Paid Member Subscriptions plugin.
Paid Member Subscriptions Pro
Accept (recurring) payments, create subscription plans and restrict content on your website. Easily setup a WordPress membership site using Paid Member Subscriptions.
Get Paid Member SubscriptionsHere’s How to Build a Subscription Website
Building a subscription website doesn’t have to be complicated. With the right tools, you can create a subscription website, even if you don’t have any tech skills.
You can follow three steps to create a subscription website with the best membership plugin for WordPress, Paid Member Subscriptions.
Choose the Right Platform
There are all kinds of different website building tools and platforms you can use to build your subscription website. However, there is one tool that holds a 43.5% share of the website builder market, WordPress.
Sure, you can use other tools like Wix, Joomla, or Drupal. But, WordPress is flexible, easy to customize, and can grow with you.
- WordPress is entirely free to use and install
- WordPress is an open-source CMS, and there’s a large and vibrant community surrounding the platform
- WordPress is the most popular website builder and has a massive community of contributors, so it’s very easy to find support for any issues you’re experiencing
- The most popular eCommerce platform in the world, WooCommerce, is built on top of WordPress
This guide will focus on building a website with user accounts, user profiles, and membership options, with WordPress.
Set Up Your Website Foundation
To build the foundation for your website, you’ll need four things:
- A domain name
- A hosting provider
- A WordPress membership theme
- A free installation of WordPress
If you haven’t picked up a domain name or hosting yet, SiteGround is a great choice. Not only is SiteGround beginner-friendly and has a WordPress one-click installation, but you can also purchase your domain name from there as well.
Your choice of host is crucial as it’ll influence your website speed and performance, plus their team is who you’ll rely on if you experience any technical issues with your website.
Regarding WordPress themes, there are thousands of different themes for you to choose from. The theme you choose will form the foundation for your web design.
To make things easier, we’ve compiled a list of some of the best WordPress membership themes. These themes will enhance the Paid Member Subscriptions plugin’s functionality and make it incredibly easy to build a functional subscription website.
Determine What Kind of Subscription Website You’re Building
Before you start building your subscription website you’ll need to determine what kind of subscription website you’re going to develop, for example:
- You can sell membership-only eCommerce products (physical or digital)
- You can create a community-oriented membership site, like Patreon
- You can create different subscription tiers and provide access to varying levels of content
- You can even create an entire store only available to paying subscribers
The type of WordPress site you’re building will change the kind of functionality you require.
Overall, a subscription website has different requirements than a standard WordPress website.
Here’s some of the functionality you’ll need:
- Create and manage member subscriptions
- Restrict individual pages or products for registered users only
- Restrict access to an entire store/website for members
- Create multiple membership tiers and price points
- Create user accounts with easy membership management
The Paid Member Subscriptions plugin can help you do all that and more.
Build your Subscription Website
With your hosting and domain name taken care of, WordPress installed, and your theme activated, it’s time to start building your subscription website.
1. Install and Configure the Paid Member Subscriptions Plugin
The very first step is installing the Paid Member Subscriptions plugin. Once you purchase the plugin, you’ll download a ZIP file containing the plugin.
Then, open up your WordPress dashboard and navigate to Plugins → Add New and upload the ZIP file.
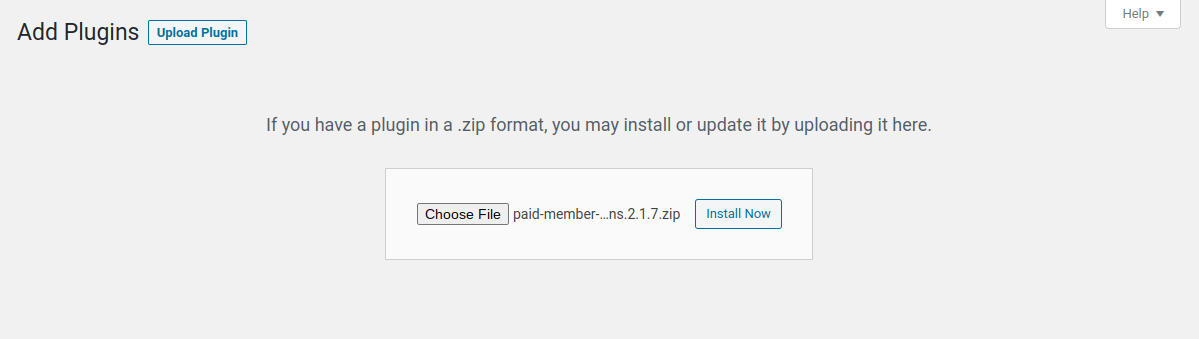
Once you click Activate the plugin will be live on your site, and you’re ready to start adding subscription functionality.
2. Setup a Basic Subscription Website
We’ll start by setting up a basic subscription website.
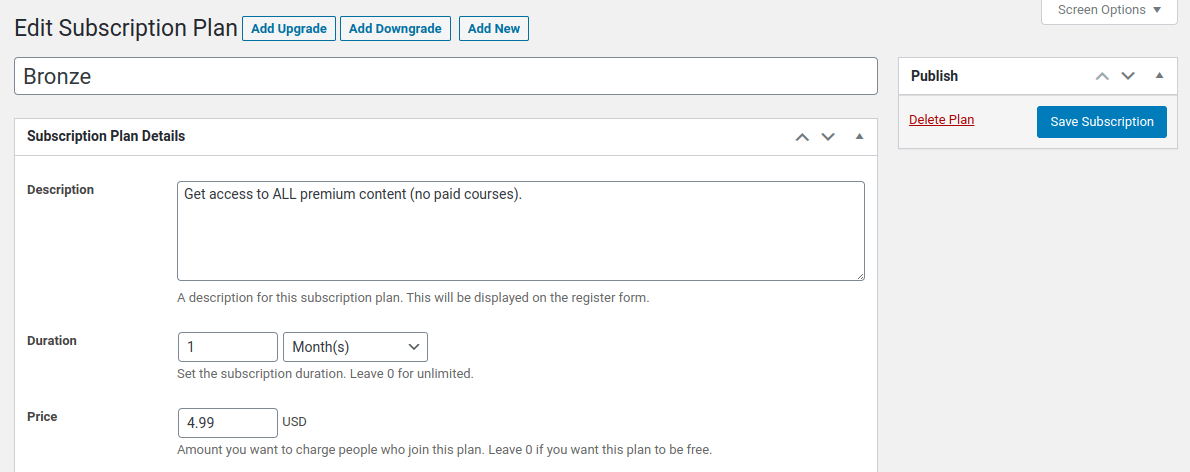
To create your first subscription plan, navigate to Paid Member Subscriptions → Subscription Plans, and click Add New.
The first subscription plan you create will be your main subscription plan. Every other plan you create will either be a downgrade or an upgrade of this main plan.

When you create a new subscription plan, you’ll have access to the following options:
- Subscription name. The name of the subscription plan. This will display on the front end and back end of your site.
- Description. This is the description of your plan and will display on the user registration page.
- Duration. This is the amount of time your subscription will be valid. If you want the subscription to be unlimited, then leave the number at 0. The longest subscription available is one year.
- Price. This is the amount you’ll charge users to subscribe to the plan. Leave this number at 0 if you want the plan to be free.
- User role. Here you can select which user role to associate with the plan. The best option is to create a new user role based on the name of the subscription plan.
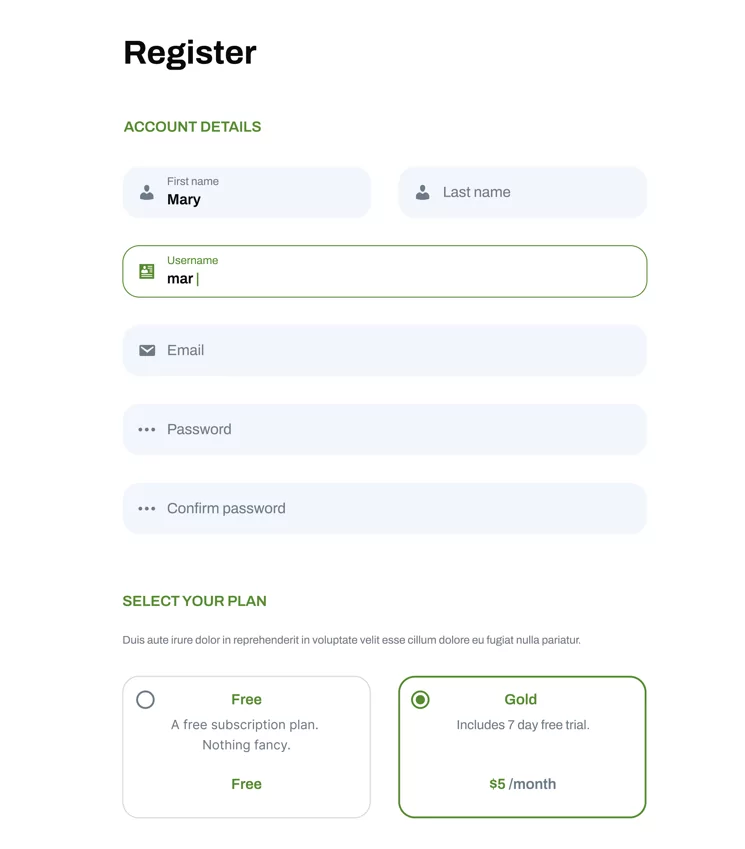
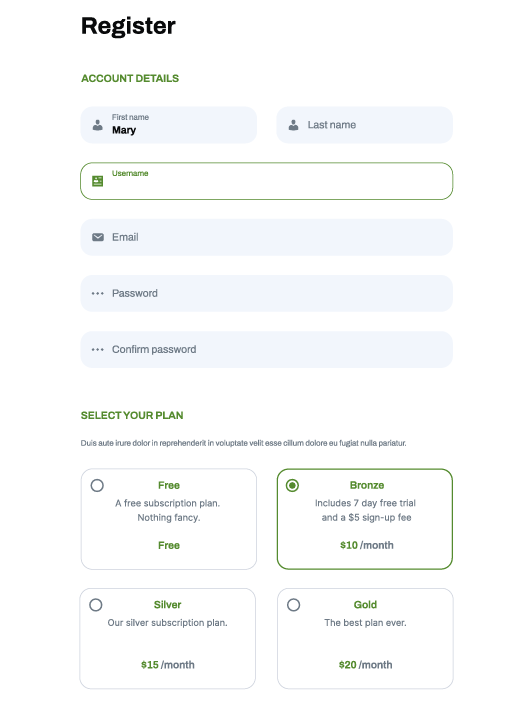
Here’s the registration page your front end users will see to sign up for a basic subscription plan:
3. Setup Content Restriction with Subscriber Tiers
With Paid Member Subscriptions, you can easily create a tiered pricing structure that allows your users to upgrade from their members area.
To create a subscription plan, navigate to Paid Member Subscriptions → Subscription Plans.
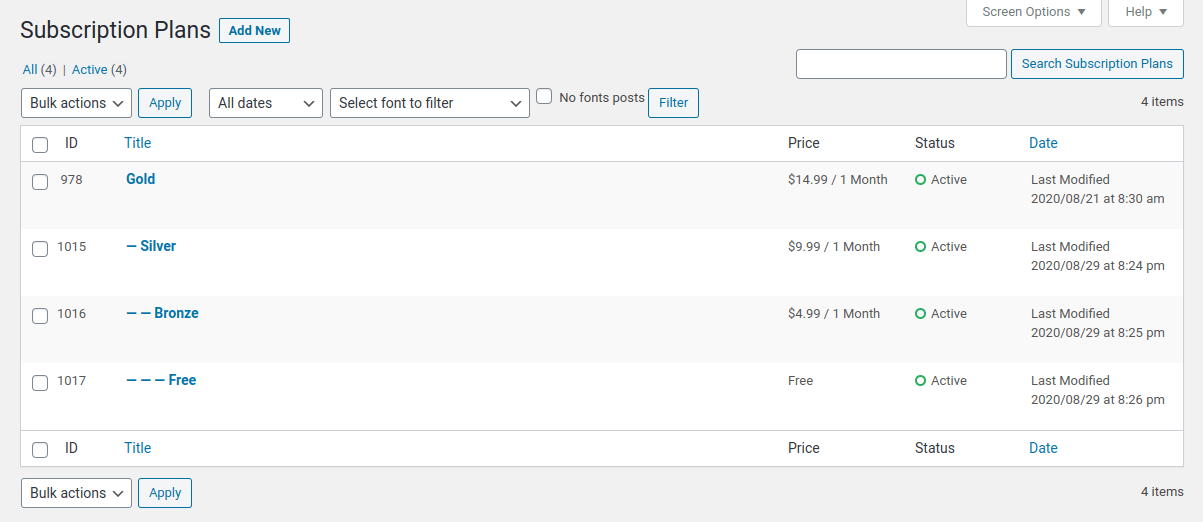
You’ll need to create at least two subscription tiers your visitors can choose between.
On the Subscription Plans screen click Add New, here you can fill out all the details regarding this tier of membership:
After you create a few different membership tiers, your registration form will allow users to sign up for the membership tier they prefer.
Here’s your user registration form that will appear to your front end visitors:
4. Setup Different Payment Options
There are a few different payment options and gateways you can set up with this plugin. The most important are adding a sign-up free, adding a free trial, or offering recurring payments.
Sign-up Fee
Sign-up fees are a feature where you can charge your users an additional fee on top of the existing subscription fee.
To set it up navigate to Paid Member Subscriptions → Subscription Plans → Edit your Subscription plan → Setup Sign-up Fee.
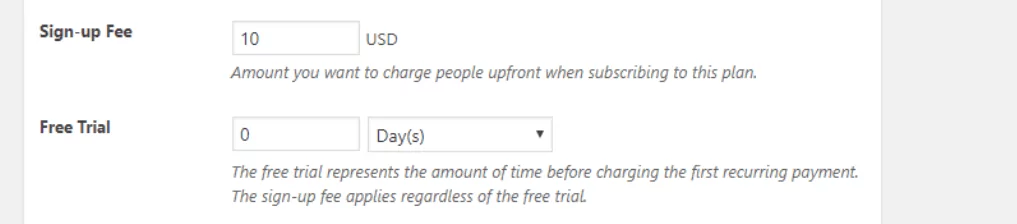
Based on the example above, users will have to pay a $10 sign-up fee on top of the existing $14.99 membership fee. The sign-up fee only occurs when a user initially creates their account.
Free Trial
You can offer your new users a free trial before your membership fees apply. A free trial can be one of the best ways to incentivize new users into signing up and eventually upgrading to a paid plan.
To set up the free trial, navigate to Paid Member Subscriptions → Subscription Plans → Edit your Subscription plan → Setup Free Trial.
You can specify the length of the free trial. Once the free trial expires, users will be able to upgrade to a paid plan if they want continued access.
Recurring Payments
You can use the PayPal Standard Payment Gateway to process recurring subscription payments. To use this feature, you’ll need the PayPal Standard add-on.
To enable the renewal feature, navigate to Paid Member Subscriptions → Settings → Payments → Renewal.
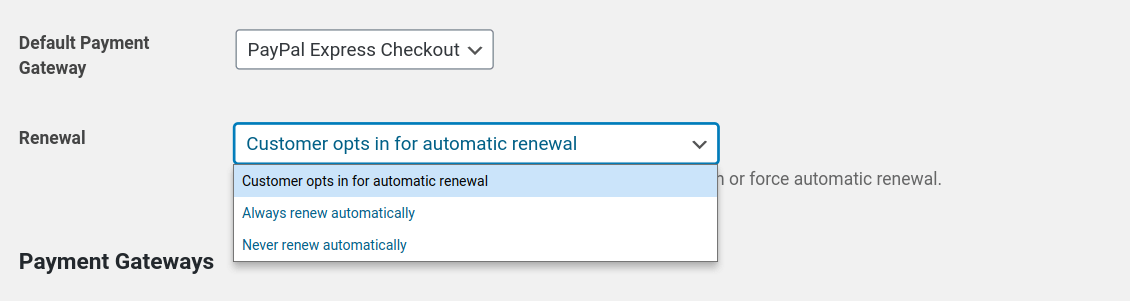
Here you’ll have a few different recurring and renewal options you can choose from:
- Customer opts in for automatic renewal
- Always renew automatically
- Never renew automatically
5. Create a WooCommerce-Based Subscription Store
If you run a WooCommerce store, then you’ll have a couple of different options for adding subscriptions.
There’s a lot you can do with WooCommerce and Paid Member Subscriptions, like:
- Restrict single products to paying subscribers
- Make your entire store a “members-only” store
- Offer discounts to your premium-level subscribers
- Add custom messages for non-members to encourage sign-ups
Restrict Individual Products
If you have a WooCommerce store with many products, you might want to restrict some of these for non-members. Only members who are subscribed to the correct membership level will be able to view or purchase these products.
To restrict product viewing, open up one of your WooCommerce products. Scroll down until you see a box labeled Content Restriction.
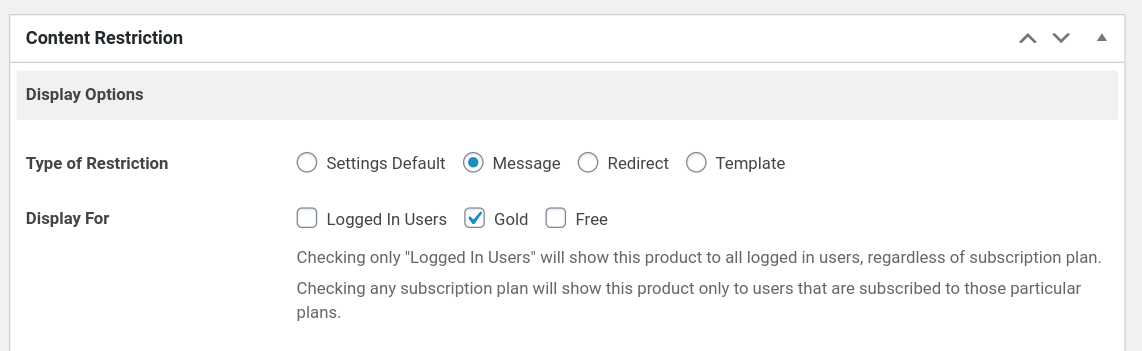
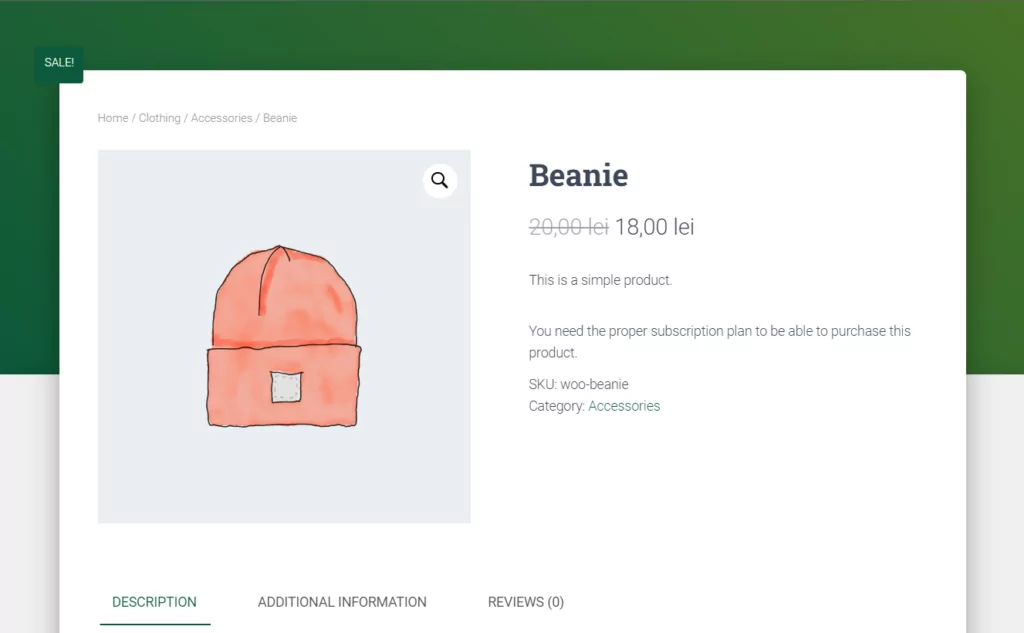
Here you can set which level of users the product will display. In this case, the product will only show for “Gold” subscribers. Users who aren’t logged in, or don’t have the proper subscription will see a screen like the one below:

Your other product restriction option is only to let subscribers purchase a particular product. This allows everyone to view the product, but only subscribers can buy the product.
This can lead to more subscribers, as people who really want to buy what you’re selling will become members.
To restrict product purchasing, open up the product that you’d like to restrict. Underneath the Content Restriction option, you’ll see an option titled Purchase Options.

Here you can select the membership levels that will be able to purchase the product. If they aren’t subscribed to the correct membership package here’s what they’ll see:
Create a Members-Only Store
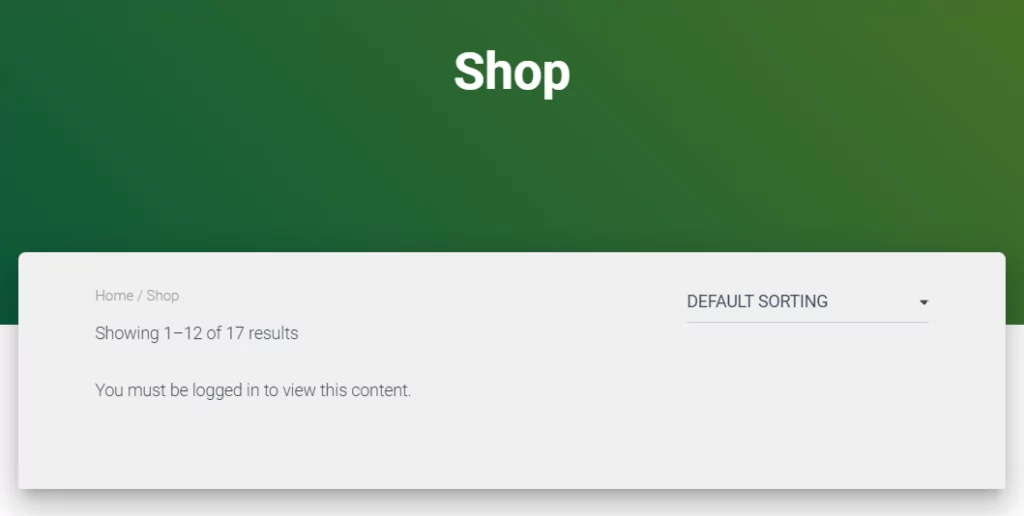
Maybe restricting single products isn’t enough; instead, you want to make your entire WooCommerce shop members-only.
This means your WooCommerce shop page will only be visible to users who are subscribed to one of your plans. Visitors and non-members won’t be able to see the products listed on your shop page.
To create a members-only store, navigate to your Shop page and click Edit Page. Underneath the page content section, you’ll find the Content Restriction box, here you can set which subscription levels can access your store.

Just select which subscription plans you want to have access to the shop page.
Members who aren’t on the right page will see a screen like the one below:
Additional Advanced Features
Beyond the features above, here are some additional features that might be useful for your membership site:
1. Email Integration
With email integration, you can send automated emails to users in various circumstances, for example:
- Automated user registration emails
- Automated emails when a subscription is activated
- Expiration emails
- Cancellation emails
You can also use the Email Reminders Add-on to send automated emails before certain events take place. For example, before a subscription expires, you can send a reminder email to have your users renew.
2. Stop Account Sharing
Account sharing is when multiple users use the same login instead of registering separately. This alone used to cost the streaming giant Netflix over $135 million every single month before they restricted their plans based on location.
When you enable this setting, it’ll prevent users from being logged into the same account from multiple places, at the same time.
3. Forum with bbPress
bbPress is a popular WordPress forum software. If you want to create a members-only forum, this will most likely be the software you’re using. You’ll need the bbPress add-on for this function to work.
You’ll be using the same Restrict Content meta box. When you’re on your forum page, select the user groups you want to have access to the forum.
4. Tax and EU VAT
If you’re running a WooCommerce store, then you’ll want to charge tax based on your user’s location. Within WooCommerce itself you can set up your tax rates on products.
But, if you want to charge and collect tax on your subscriptions, then you’ll need the Tax & EU VAT add-on. Once it’s set up, you can collect tax and payments processed through the Paid Member Subscriptions plugin. Also, using the Invoices add-on you can issue invoices for those subscription payments.
Build Your Own Subscription Website & Start Earning!
By now, you’ve successfully added subscription functionality to your WordPress or WooCommerce website. With WordPress and the Paid Member Subscriptions plugin, you can create the following types of subscription sites:
- A basic subscription website selling digital/physical products
- A content-restricted website where users must pay to access premium content
- A WooCommerce store with restricted products, or completely members-only
We’ve covered setting up your website foundation, choosing WordPress, and building the above website types step-by-step with the Paid Member Subscriptions plugin.
Paid Member Subscriptions Pro
Accept (recurring) payments, create subscription plans and restrict content on your website. Easily setup a WordPress membership site using Paid Member Subscriptions.
Get Paid Member SubscriptionsDo you still have questions on how to build a subscription website? Leave them in the comments section below.
Related Articles

How to Set Up WooCommerce Stripe Subscriptions with Recurring Payments (3 Methods)
Are you searching for a way to set up WooCommerce Stripe subscriptions? Setting up recurring subscriptions is a great way to build regular, dependable revenue for your website. And when it comes to processing payments, Stripe is one of the top options thanks to its competitive fees and flexible feature set. However, WooCommerce doesn't include […]
Continue Reading
5 Best WooCommerce Subscription Plugins
Subscriptions are a very common payment model, but WooCommerce doesn’t natively support recurring payments out of the box. This is where the power of using a WooCommerce subscription plugin comes into play. With this tool, you can start selling memberships, subscriptions, and product bundles. This way, you can increase your income through renewal fees and […]
Continue Reading
Subscription Business Ideas: 10 Ways to Make Money in 2026
Are you after brilliant subscription business ideas to spark your imagination, get your creative juices flowing, and make money in 2026? If that's a yes, you came to the right place. The subscription-based business model has gained tremendous popularity in recent years. According to a report by Statista, e-commerce sales via the subscription model in […]
Continue Reading