Table of Contents
User Listing Add-on you can create Multiple User Listings to display your users in the front-end of your website in any way you desire. You can also create profile pages by using the Single User Listing functionality.
The User Listing add-on is available only with a Profile Builder Pro, or Agency license.
After purchasing the Pro version of Profile Builder, you can check the following guide on how to install Profile Builder.
After this, a new User Listing tab will show up in the Profile Builder Admin interface. You can now create Multiple User Listings to display your users in the front-end of your website in any way you desire.
Displaying your website users in the front-end can be achieved by using the User Listing shortcode.
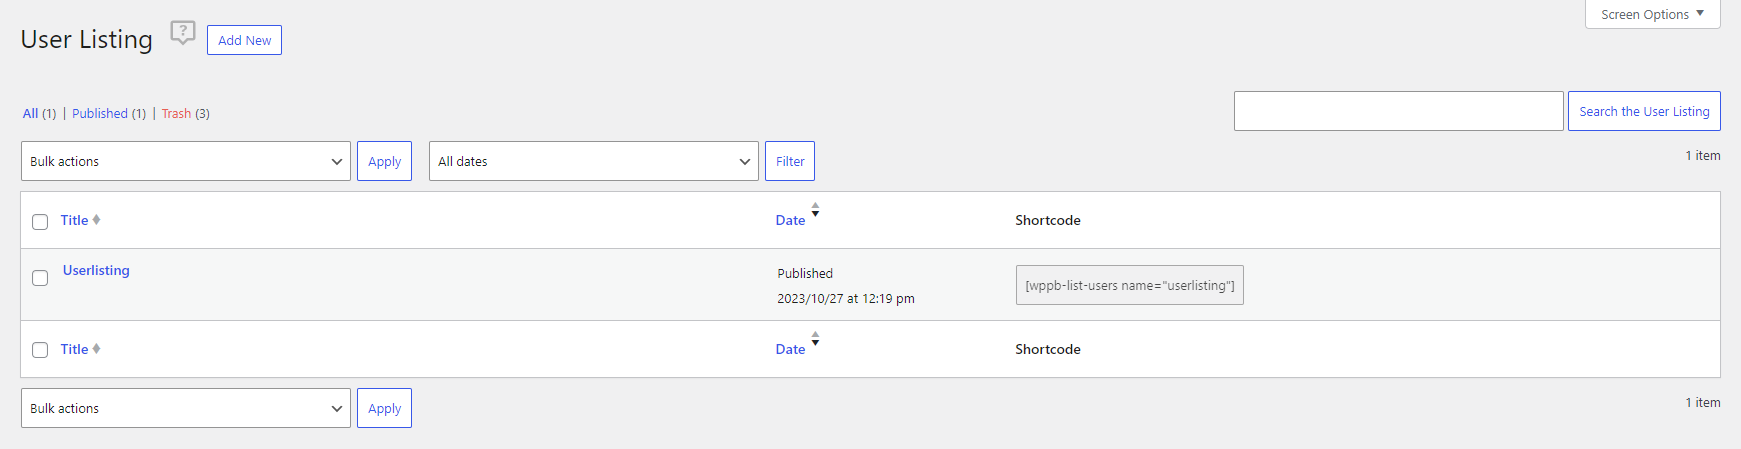
By navigating to the User Listing tab from the Profile Builder menu, you’ll notice a list of all the created User Listings and their specific shortcode.
From here you can also setup a new User Listing by clicking the Add New button at the top.
The Add New User Listing page will first ask you to enter a Title, followed by the User Listing Settings box. Then you can customize the All-Userlisting and Single-Userlisting Templates using one of the provided User-Listing Themes: Default, Tablesi, Vergid, Boxomo, Glimplist.
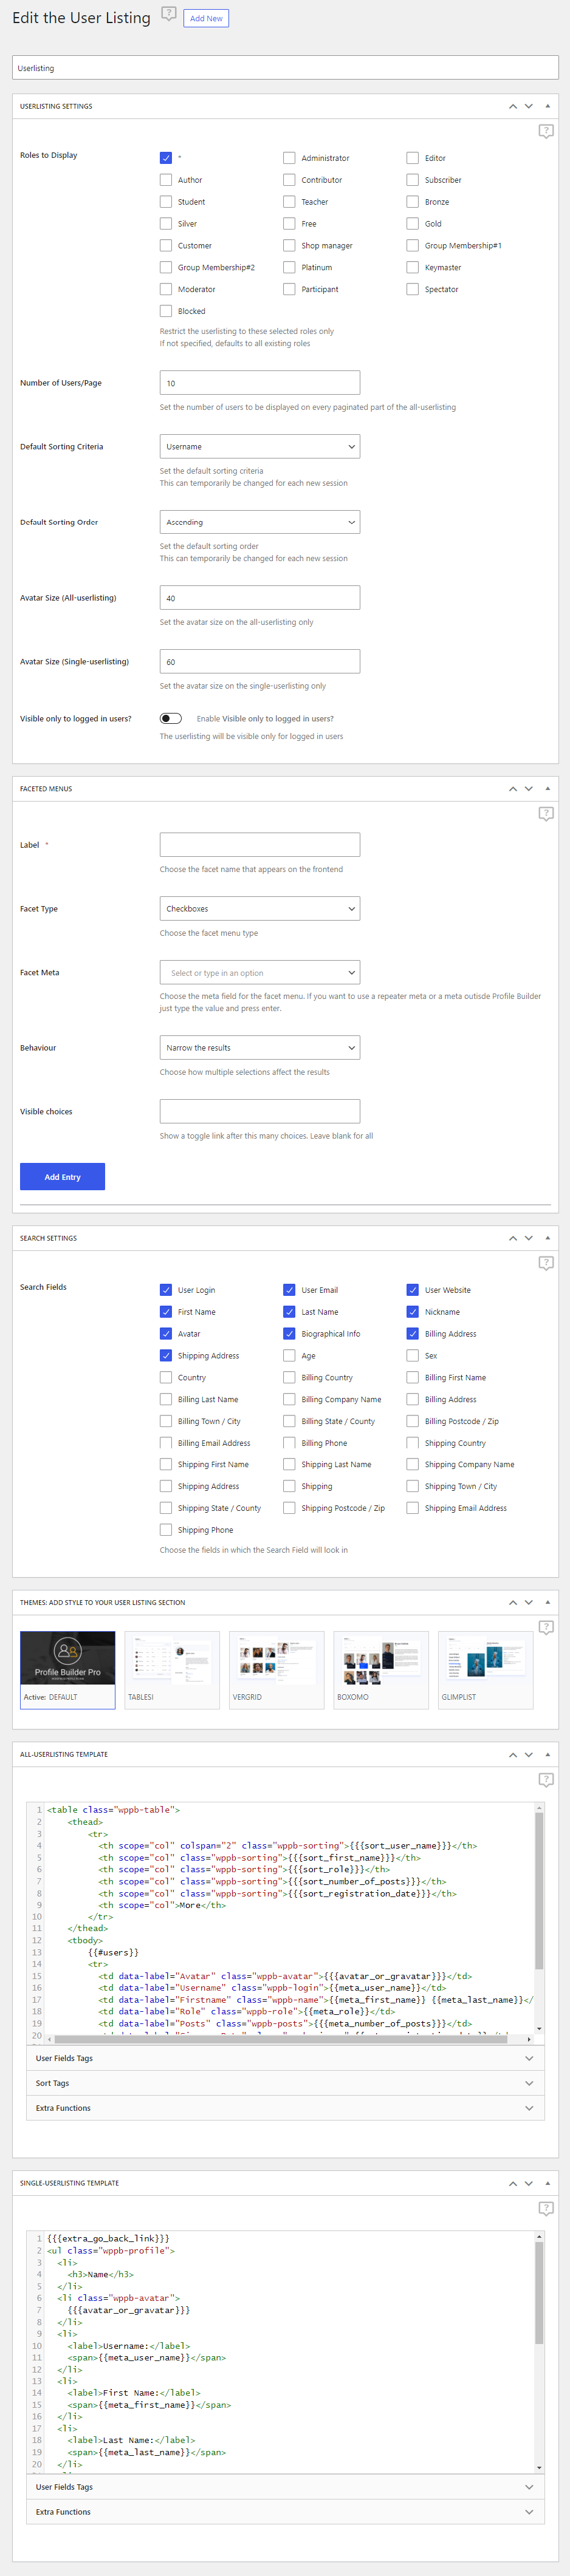
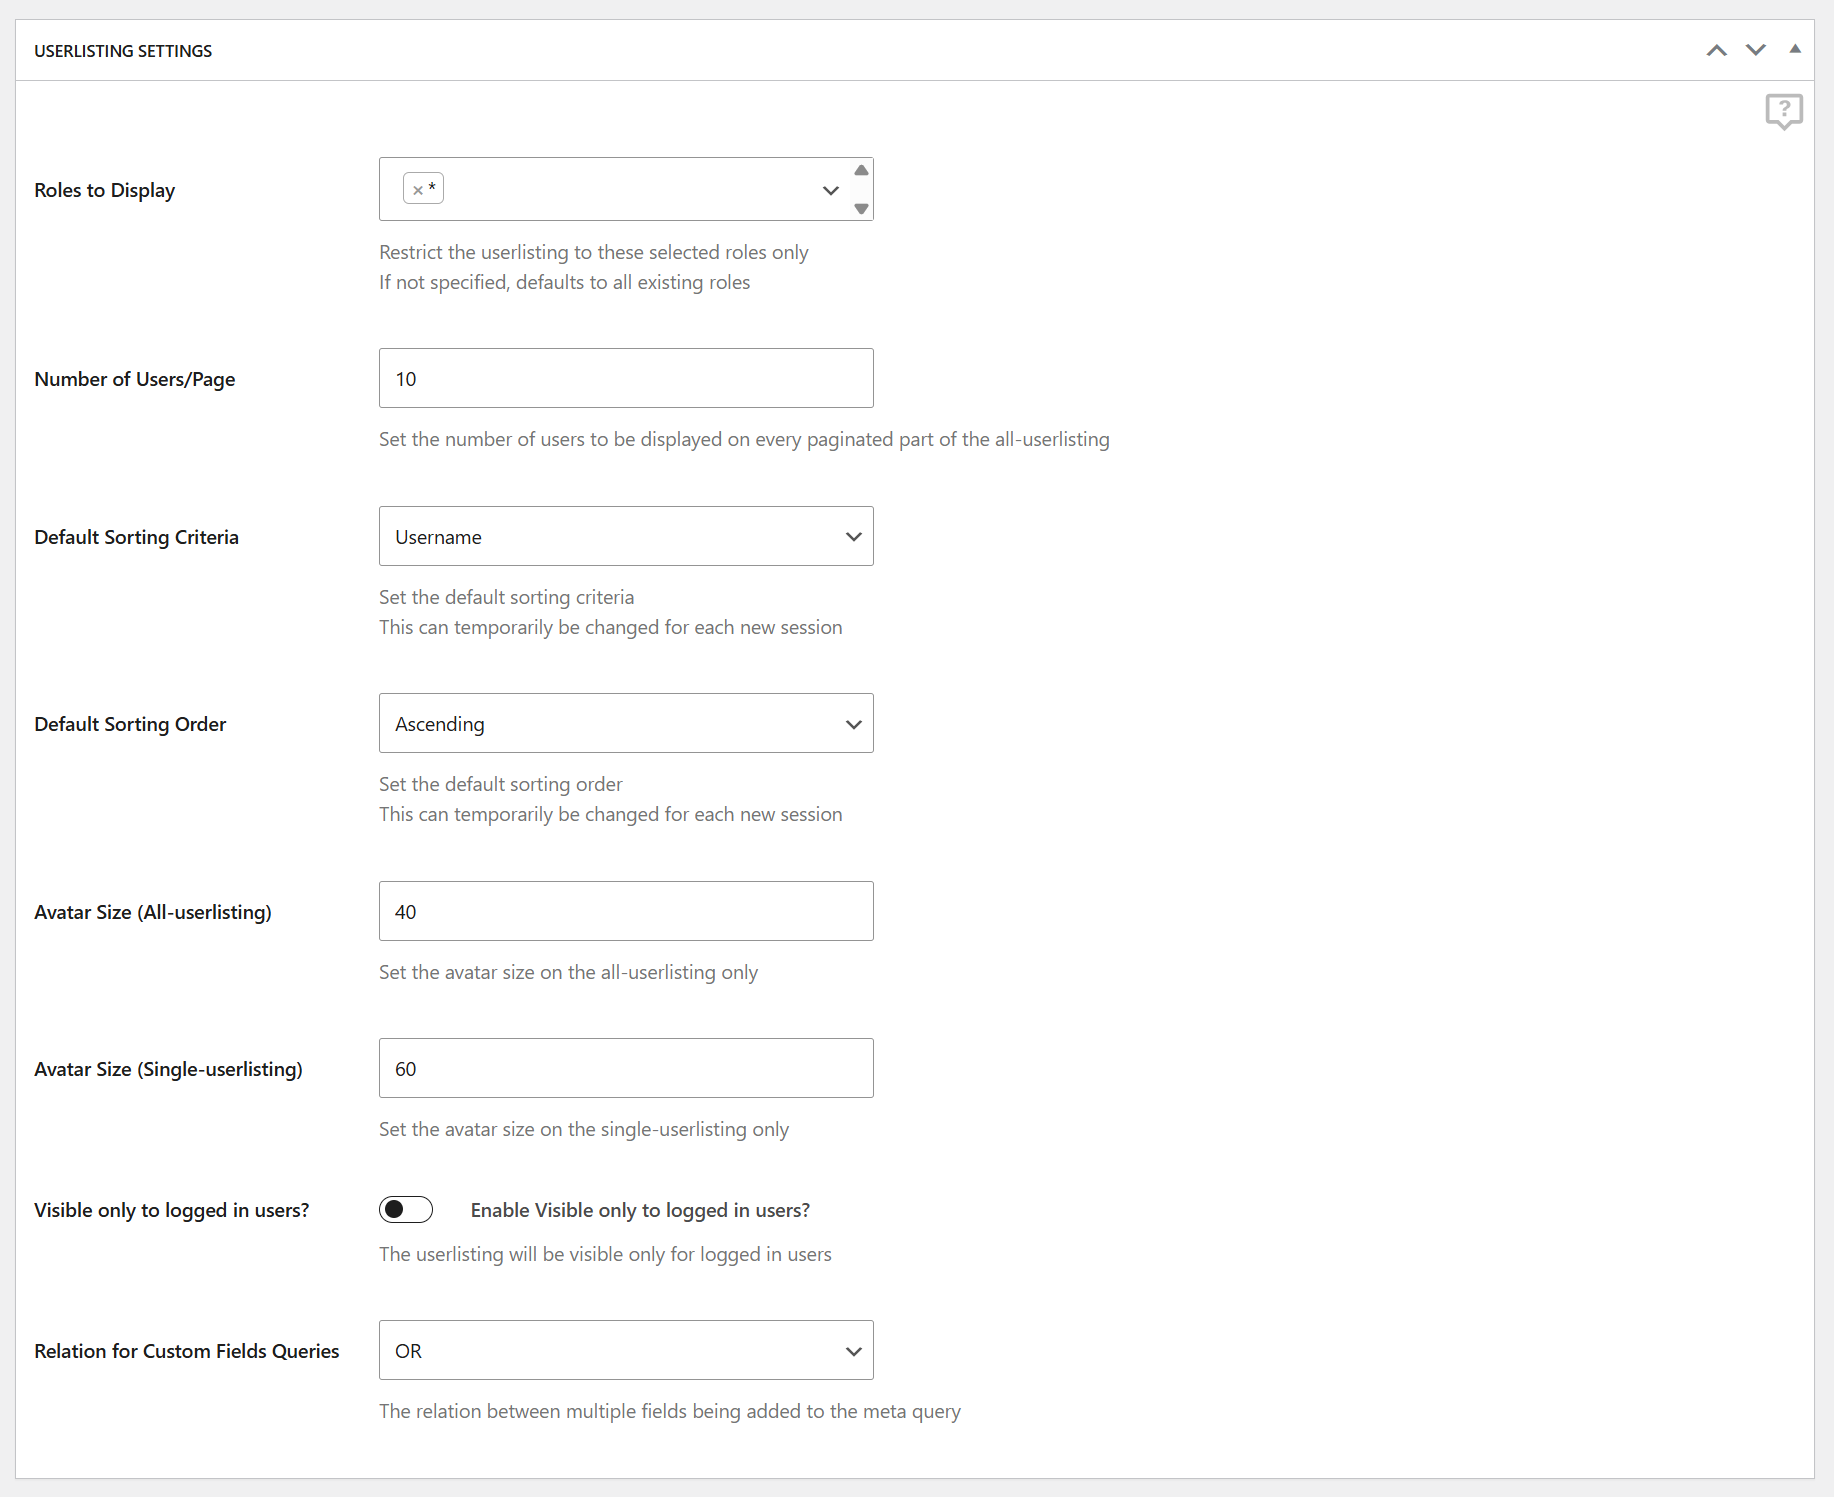
Inside the User Listing Settings tab we can set the:
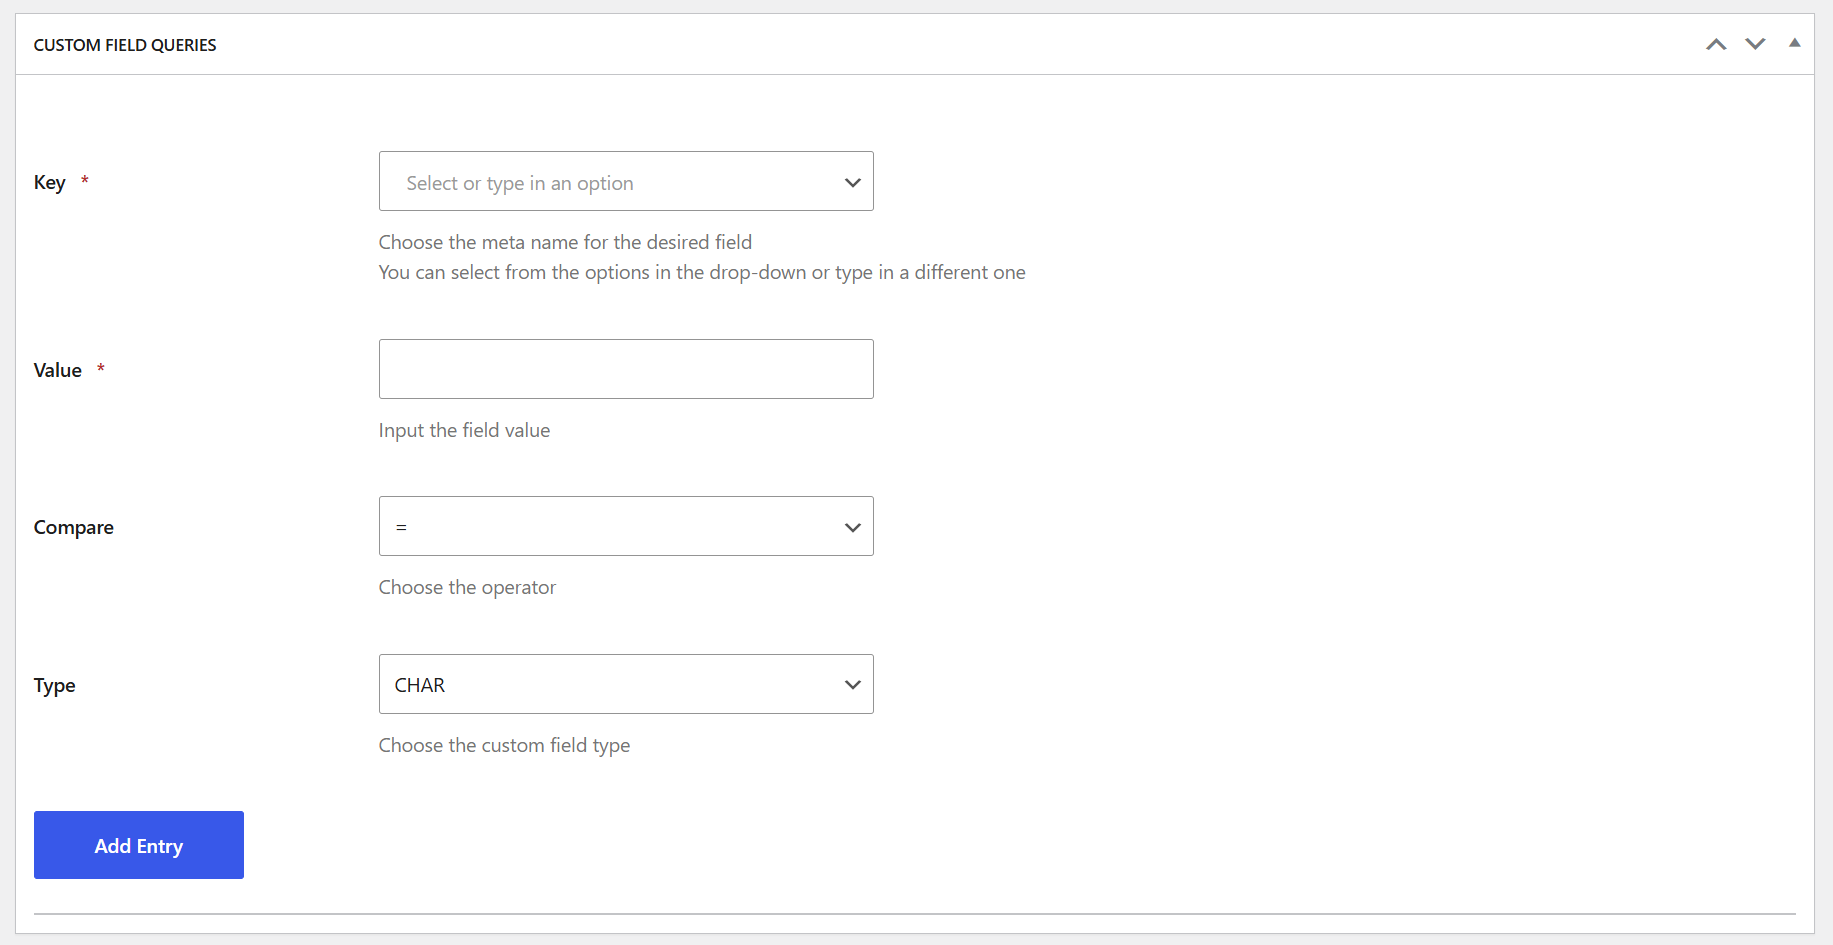
This section allows you to define specific criteria to filter and restrict which users are included in the listing. Multiple sets of custom field queries can be defined.
The possibilities are endless, but let’s explore some key examples:
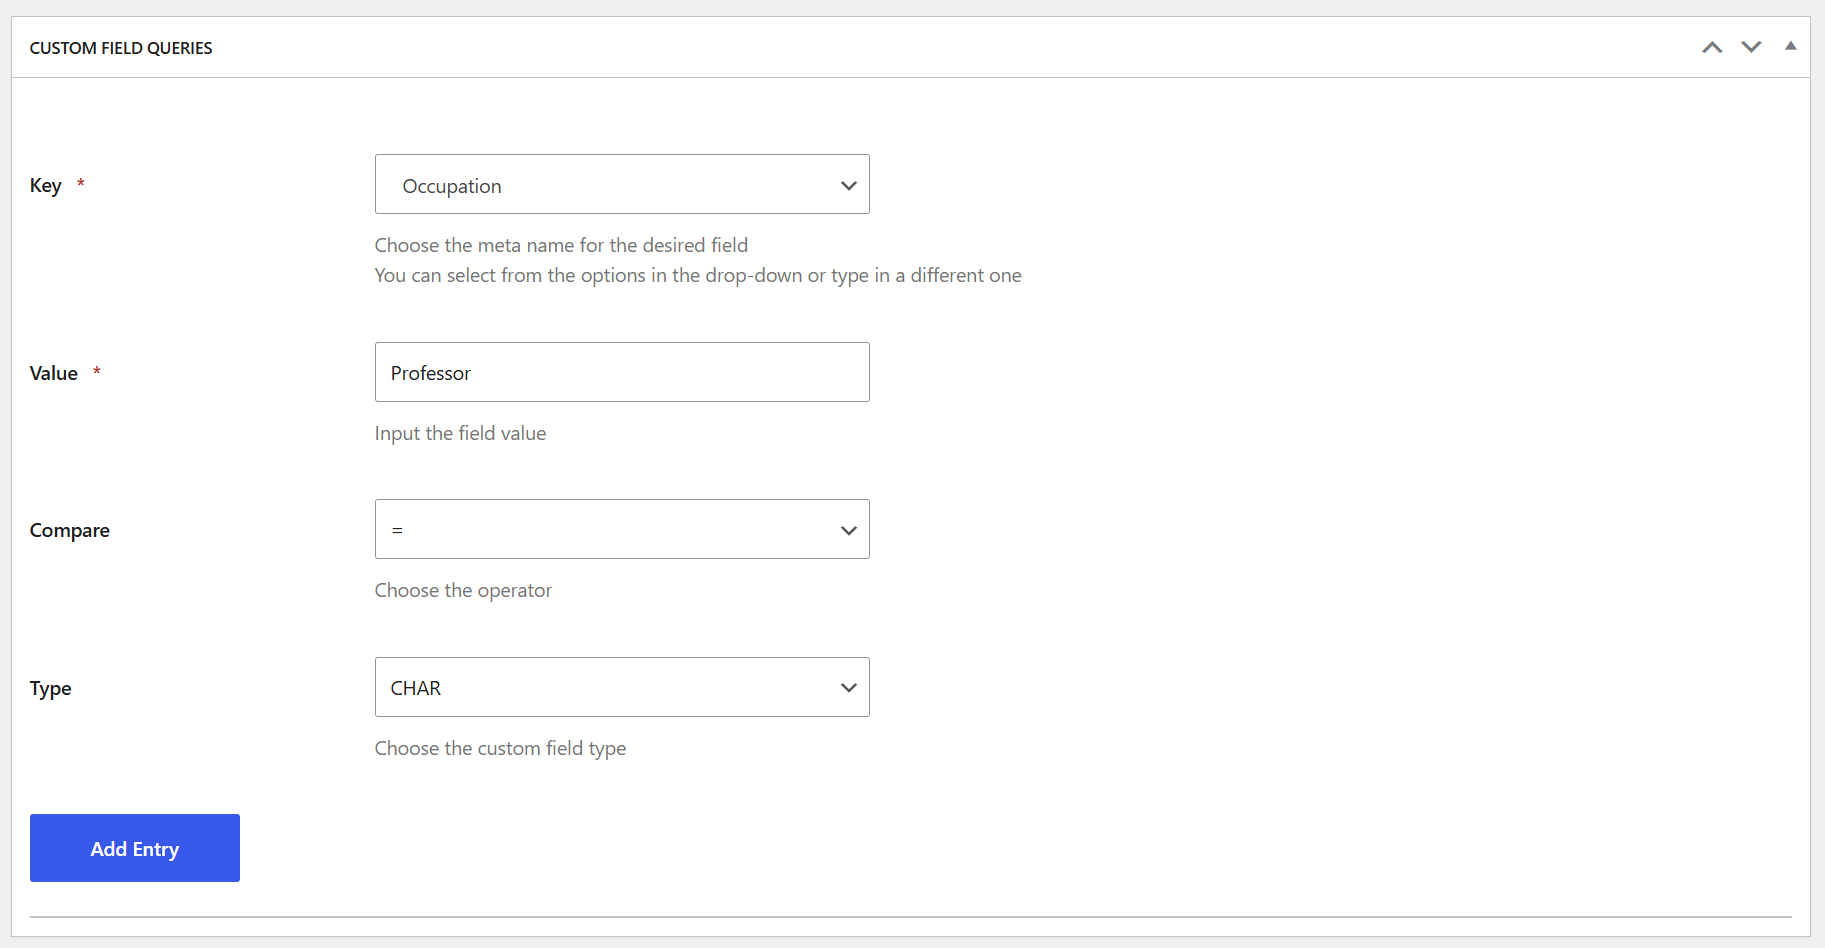
Let’s say you’re using a Select field that has several options. If you want your user listing to display only Professors, you’d simply set the key to the “Professor” option and the compare operator to “equal.”
2. Filtration based on a particular answer, even if the user selected multiple options.

Consider a Checkbox or Select (Multiple) field where users can choose multiple interests. To display all users who selected “Football” as an interest in your Listing—even if they picked other interests too—you’d use the “Like” operator for this specific selection.
3. Filter users whose field value is not the one specified.
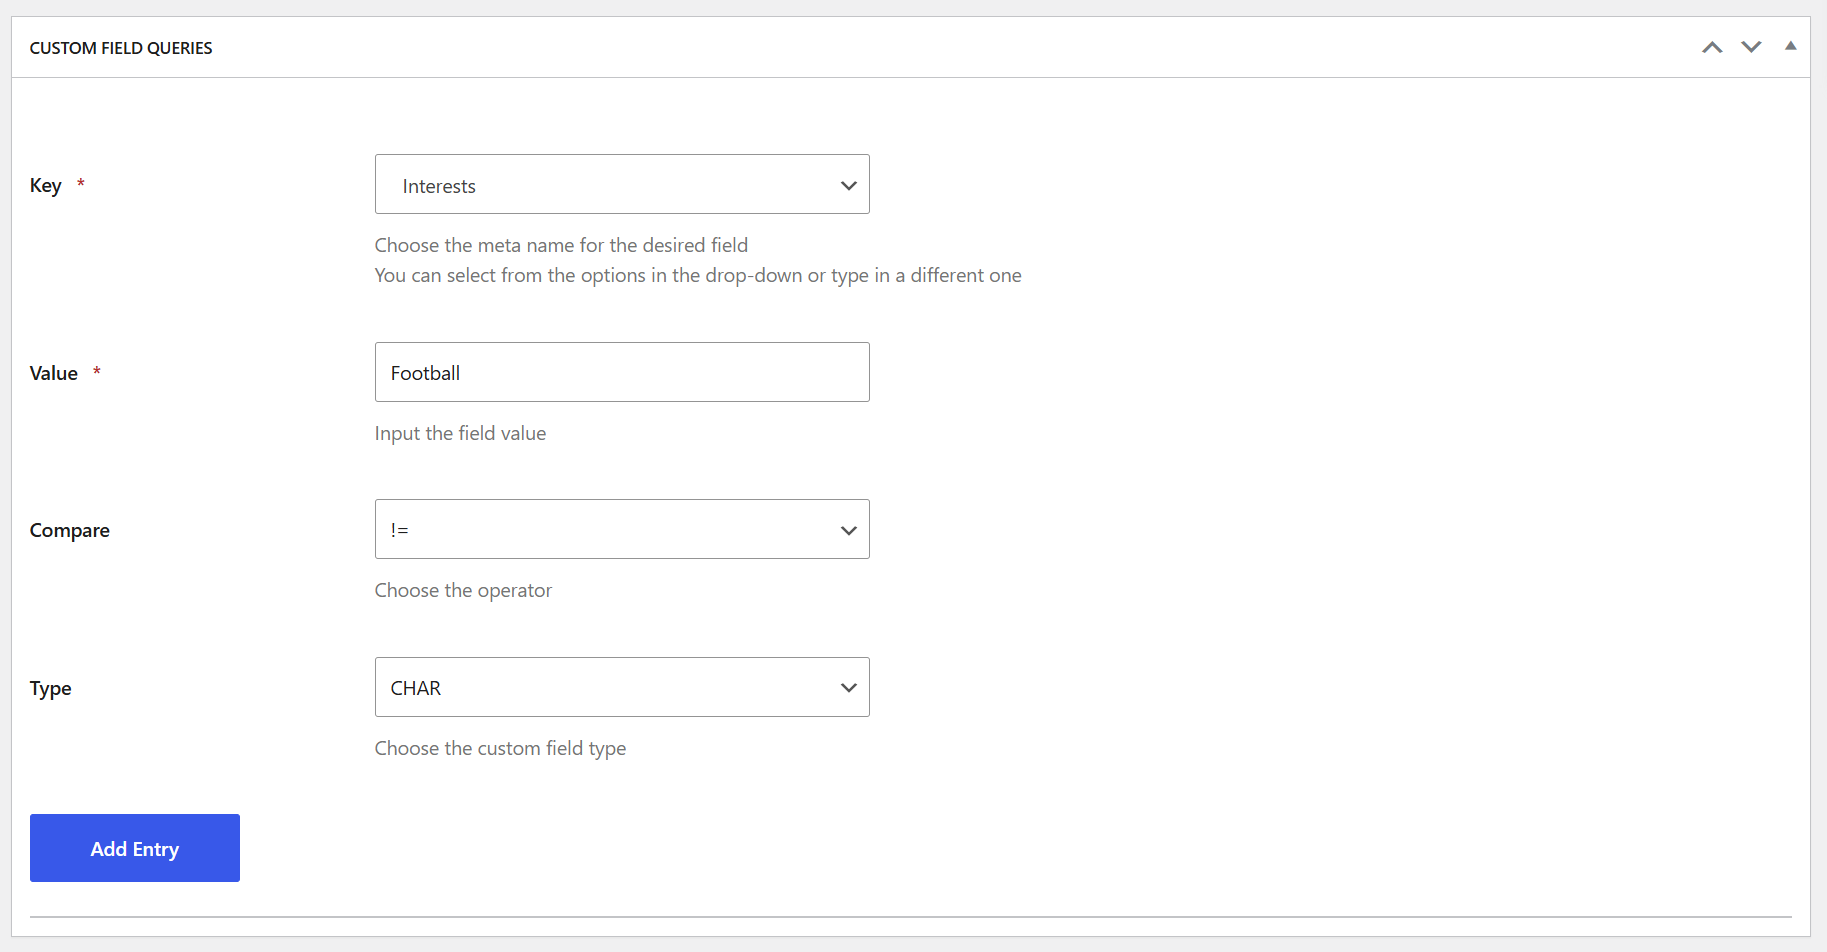
Building on the previous example, to display only users who did not select “Football” as an option, you’d use the “!=” operator.
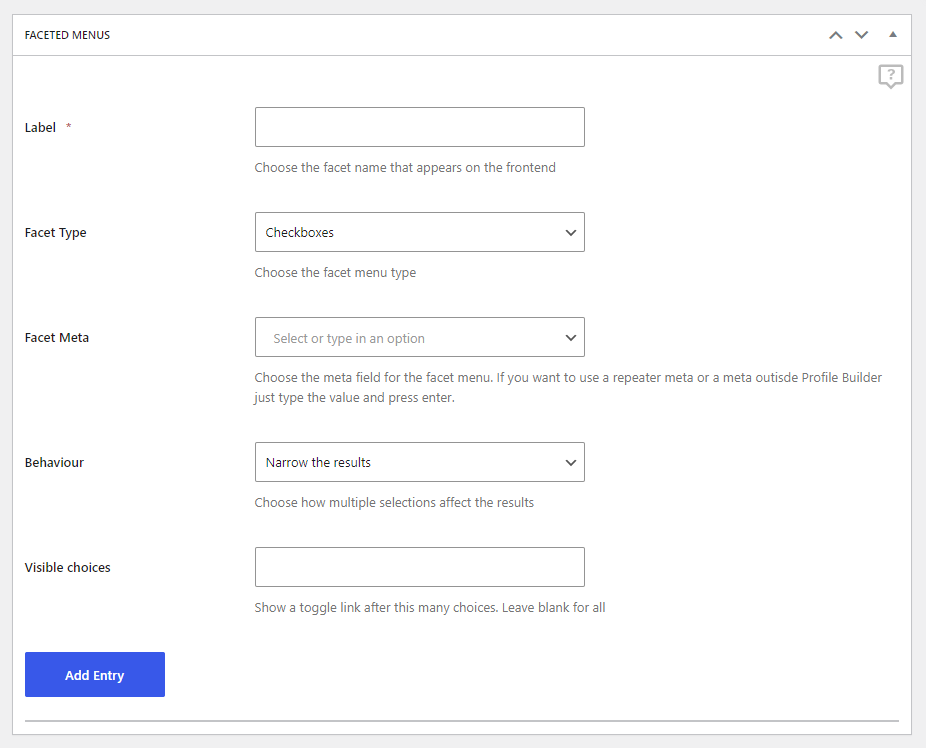
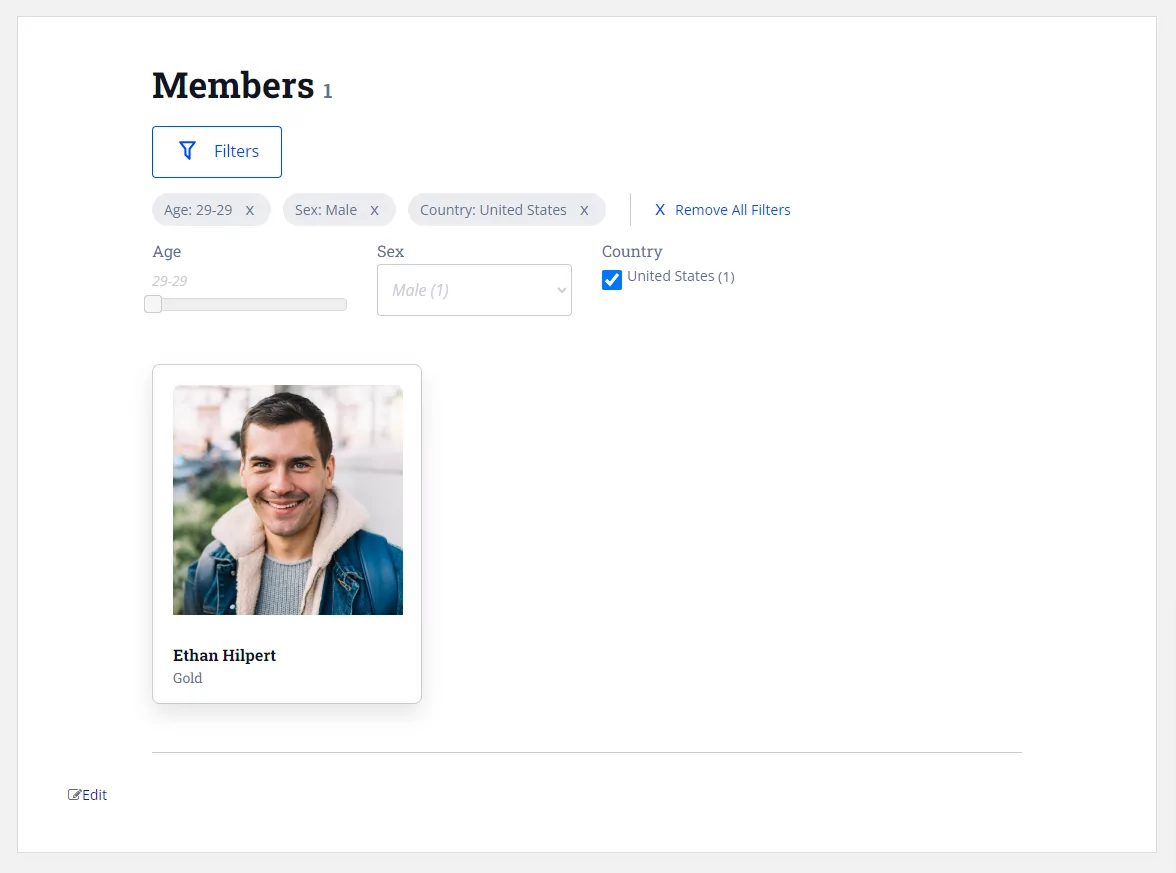
Faceted Menus lets you search users by selecting multiple options saved in user meta. Inside the Faceted Menus tab we can set the:
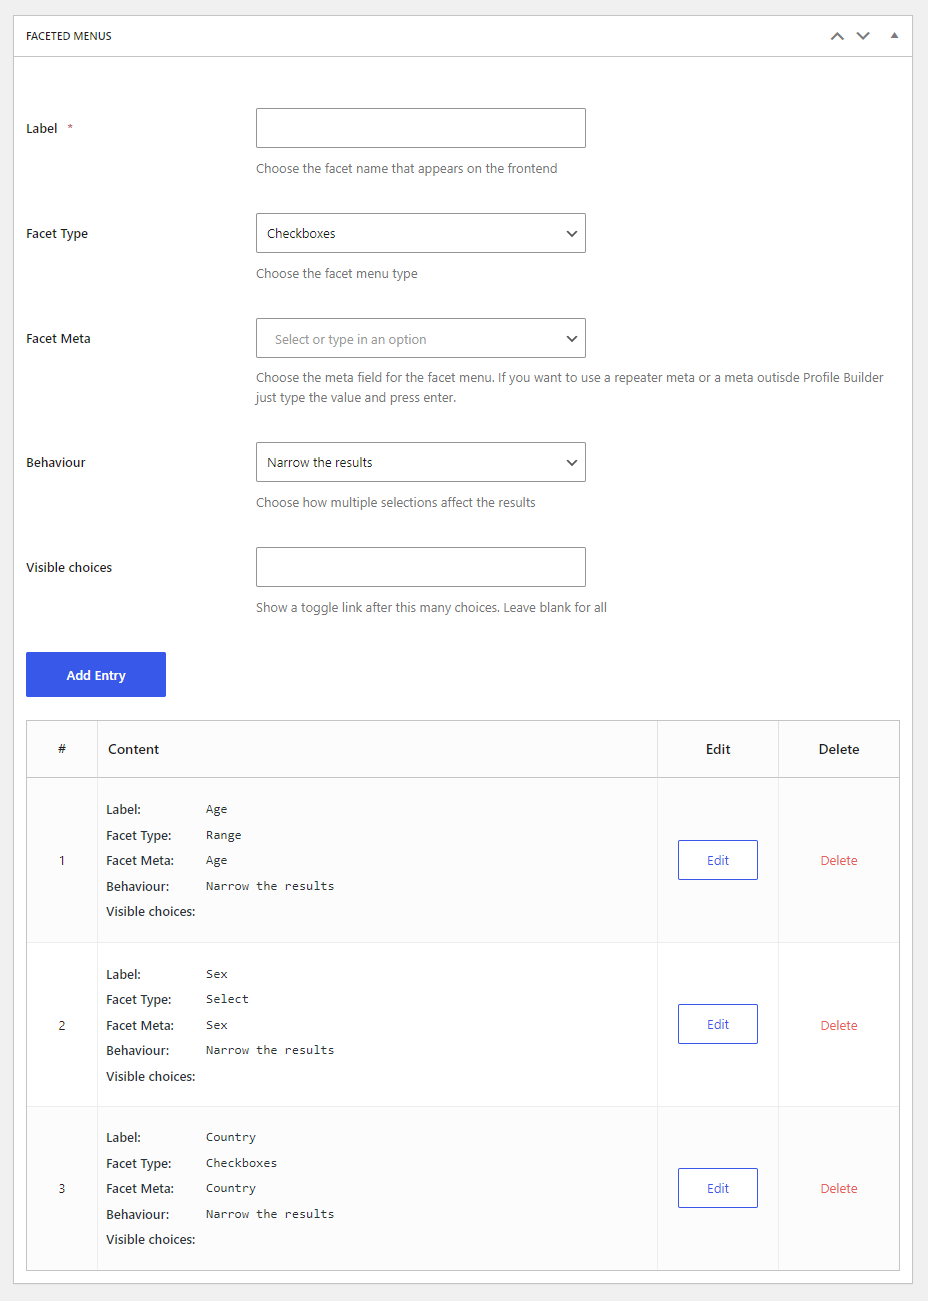
Lets say we created 3 Extra Fields Types inside Profile Builder -> Manage Fields. We added a Number Field called Age, a Select Field called Sex, and a Select (Country) Field called Country.
We can now setup our Faceted Search based on those fields:
In order to generate the Facet Search Menu in Front End, in the User Listing, you will need to use the {{{faceted_menus}}} tag, found in the Extra Functions tab, inside the All-Userlisting Template.
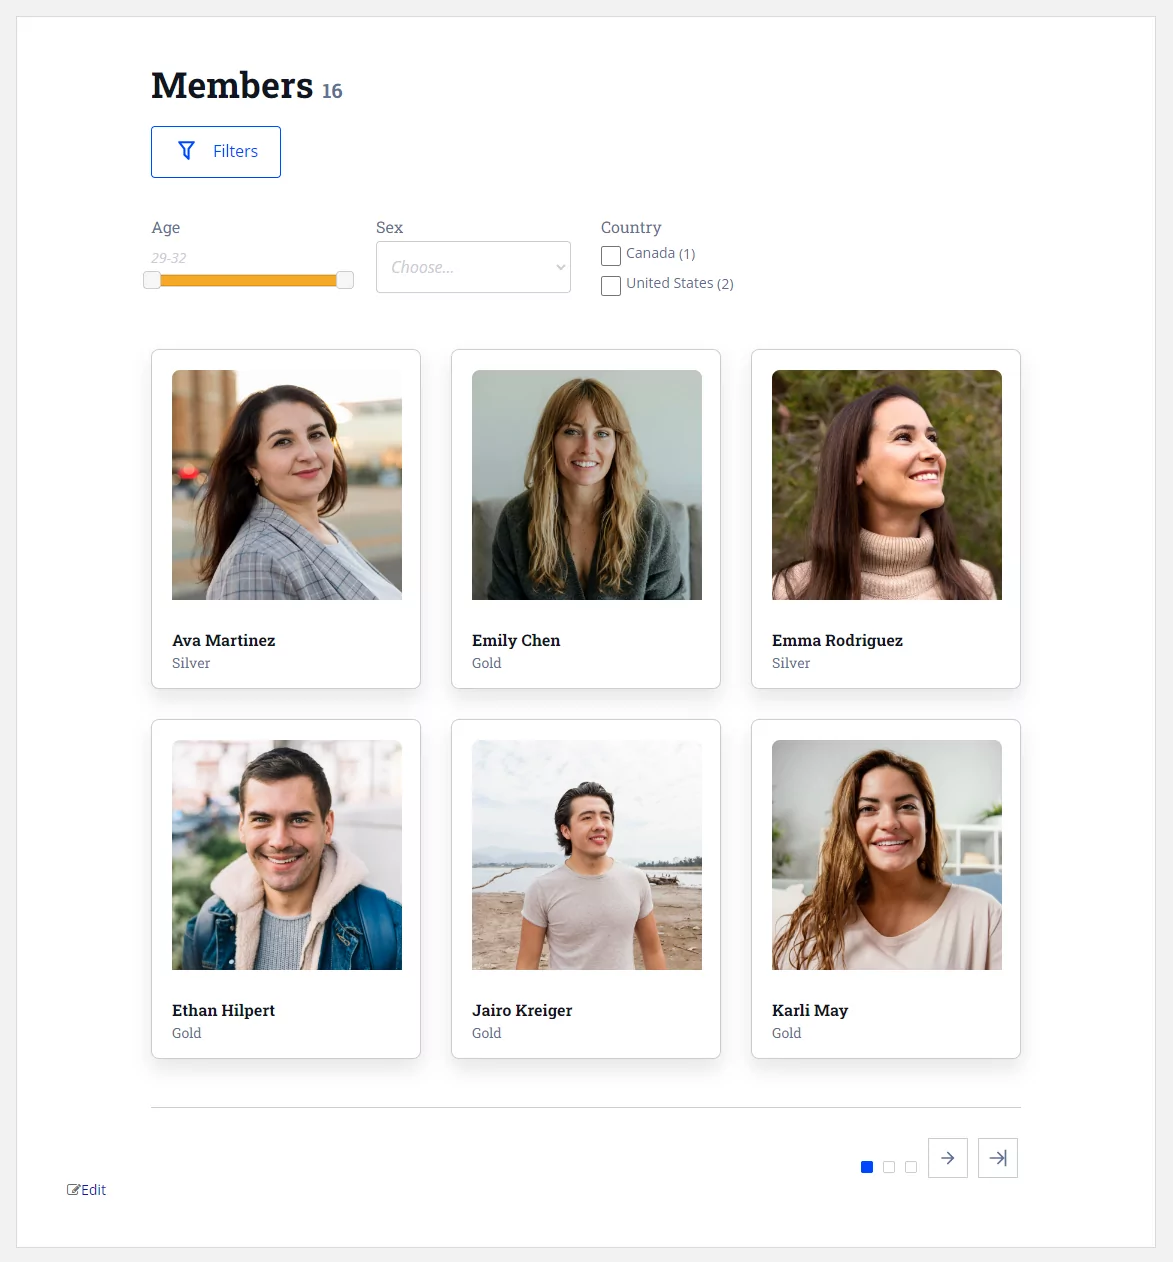
If we set the Age to 29, the Sex to Male, and Country to United States it will list all the users that correspond with those options.
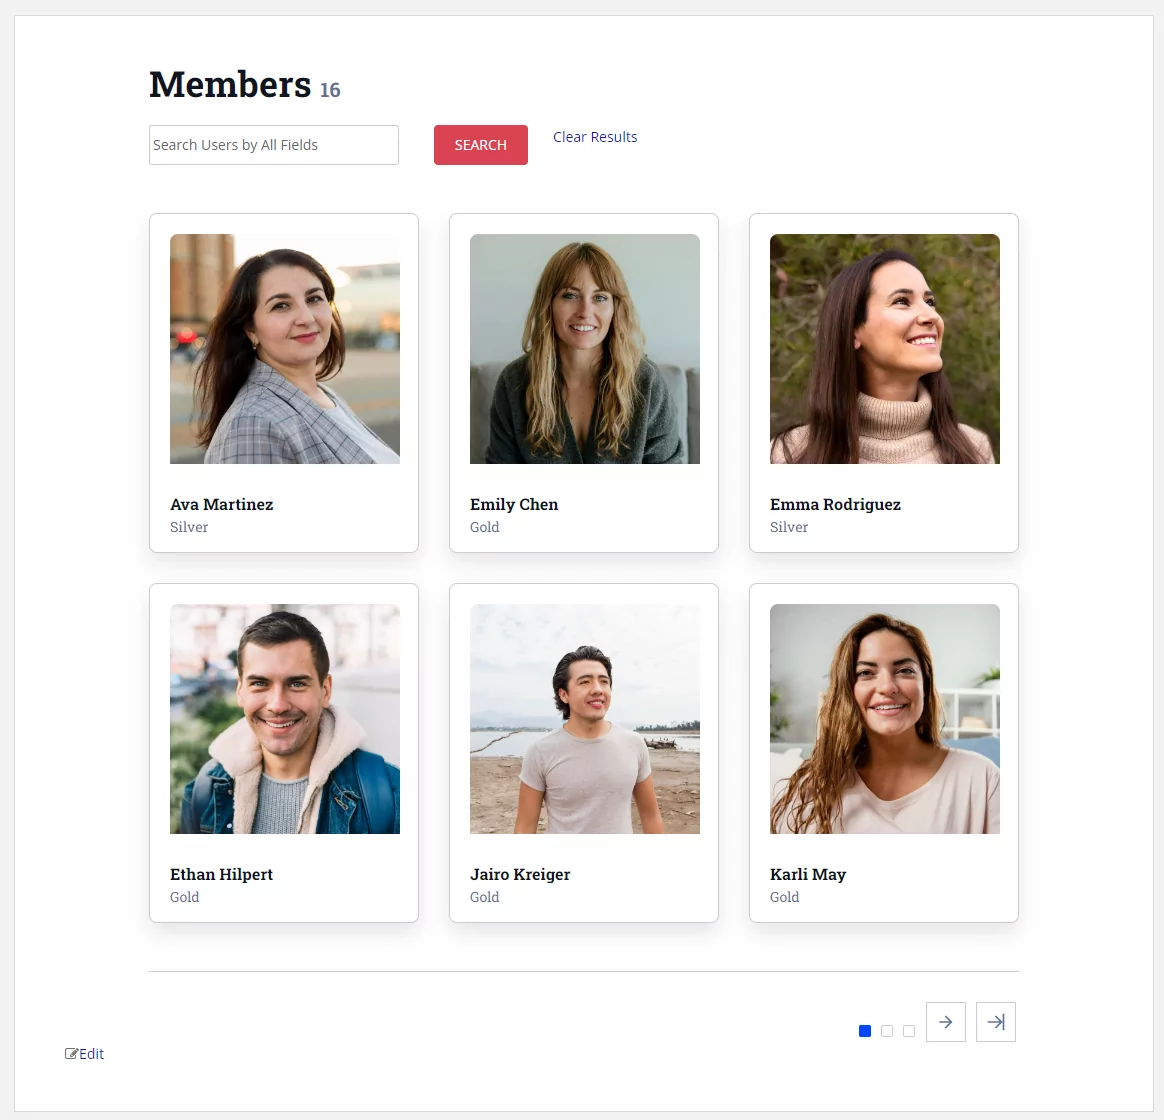
In the Search Settings tab, we select the fields that the Search Field will look into.
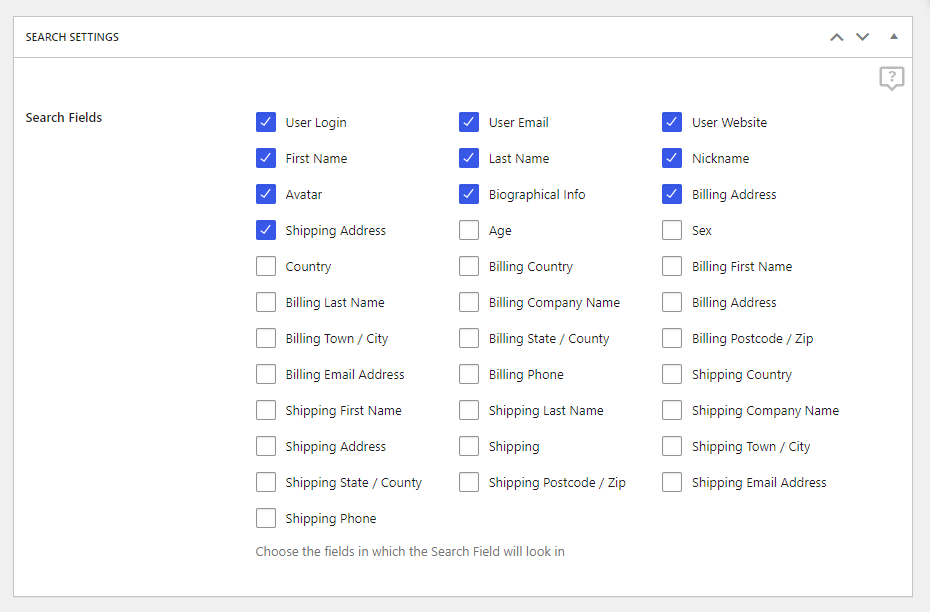
In order to generate the Search field in Front End, in the User Listing, you will need to use the {{{extra_search_all_fields}}} tag, found in the Extra Functions tab, inside the All-Userlisting Template.
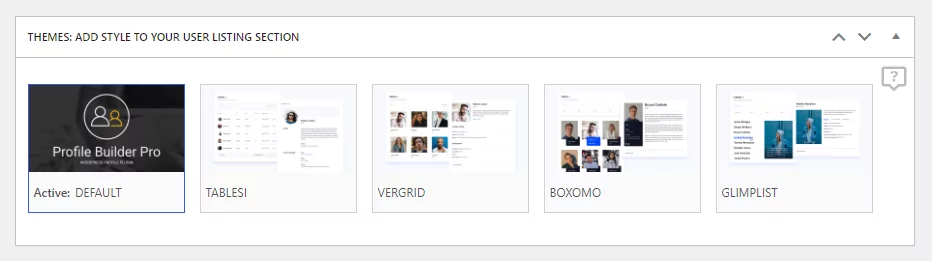
Click on the Preview button to see an example with the selected Theme’s templates. You see on this page how the themes look like.
Click on the Activate button of the desired Theme.
After Theme activation the following Settings are modified: Roles to Display, Number of Users/Page, Default Sorting Criteria, Default Sorting Order, Avatar Size (All-userlisting), Avatar Size (Single-userlisting).
These Settings can be saved individually per each theme, by adding the desired values and pressing the Update button.
Your existing All-userlisting and Single-userlisting Templates are replaced with the templates of the activated Theme. Any changes you make to these templates will be saved when the Update button is clicked.

To Reset an active User Listing Theme to its default settings, click on the Reset Data button (visible when hovering over an active Theme).
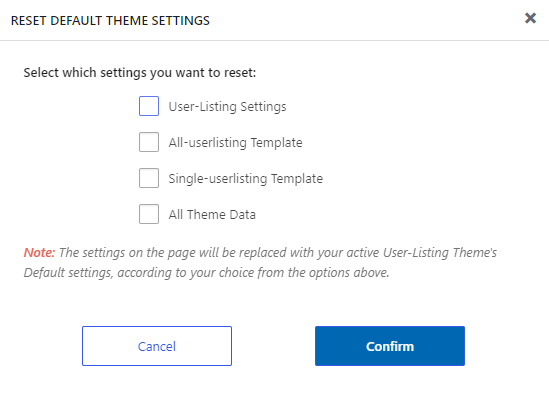
Select which Settings to be reset to their defaults and press Confirm. The default settings will be loaded on the page and saved when the Update button is clicked.
You can use your own template by adding the corresponding file to the currently active WordPress Theme or Child Theme in the following location:
– wp-content/themes/Your Active Theme/
Create the profile-builder directory containing the userlisting directory.
– wp-content/themes/Your Active Theme/profile-builder/userlisting
Add your template file into the userlisting directory.
To identify the ID you need to go to the User Listing Edit Page and look for the “post=xxx” argument in the link of the browser.
Example: www.your-website.com/wp-admin/post.php?post=803&action=edit – the ID you are looking for is 803
File name examples:single-userlisting-tablesi-ul-21.php – Single User Template for Tablesi User Listing Theme (it is used for the User Listing which has the id 21)
all-userlisting-boxomo-ul-345.php – All Users Template for Boxomo User Listing Theme (it is used for the User Listing which has the id 345)
If you try to reset the User Listing Theme templates (Single User or All Users) by pressing the Reset Data button and one of the templates is loaded using a template file placed in your currently active WordPress Theme, it will not be overwritten.The templates (Single User or All Users) loaded using a template file placed in your currently active WordPress Theme cannot be edited using the template editor, you have to make your changes directly in that file.
Template files that are placed whitin your currently active WordPress Theme have priority, therefor they are always loaded first. If no corresponding file exist for the User Listing Template (Single User or All Users) your previously saved template will be loaded from the Data Base.
This functionality allows you to download User Listing data in CSV format directly from the frontend.
It works through two tags that can be added to the All-Userlisting Template:
{{{download_all}}} – generates a button that lets you download the data for all users matching the applied filters.{{{download_page}}} – generates a button that lets you download the data for the users matching the applied filters on the currently displayed page only.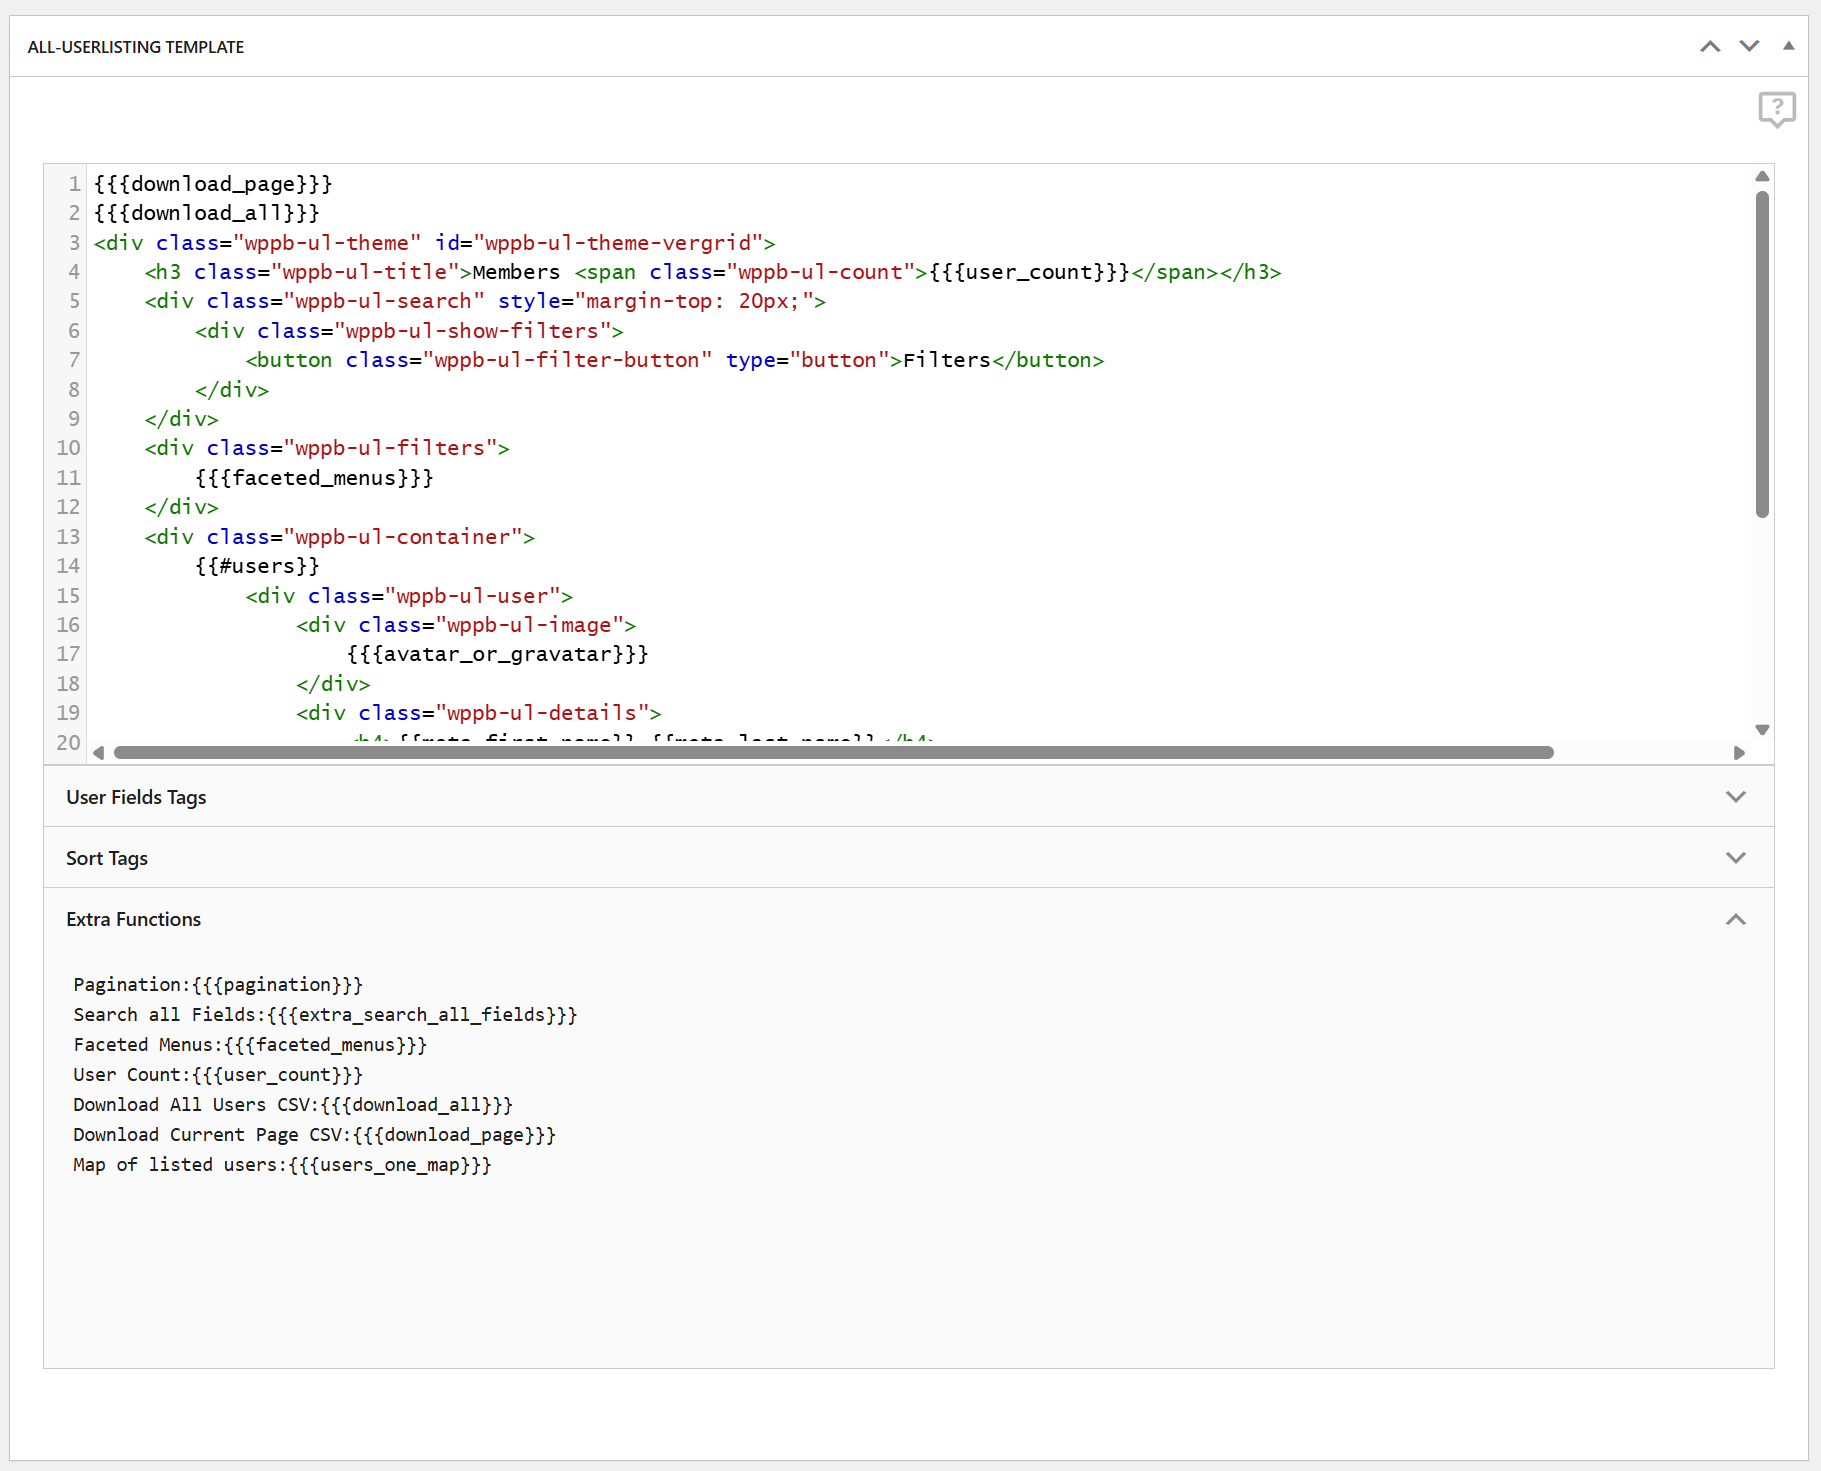
Front-end example:

A new meta box related to this functionality is also available in the User Listing settings.
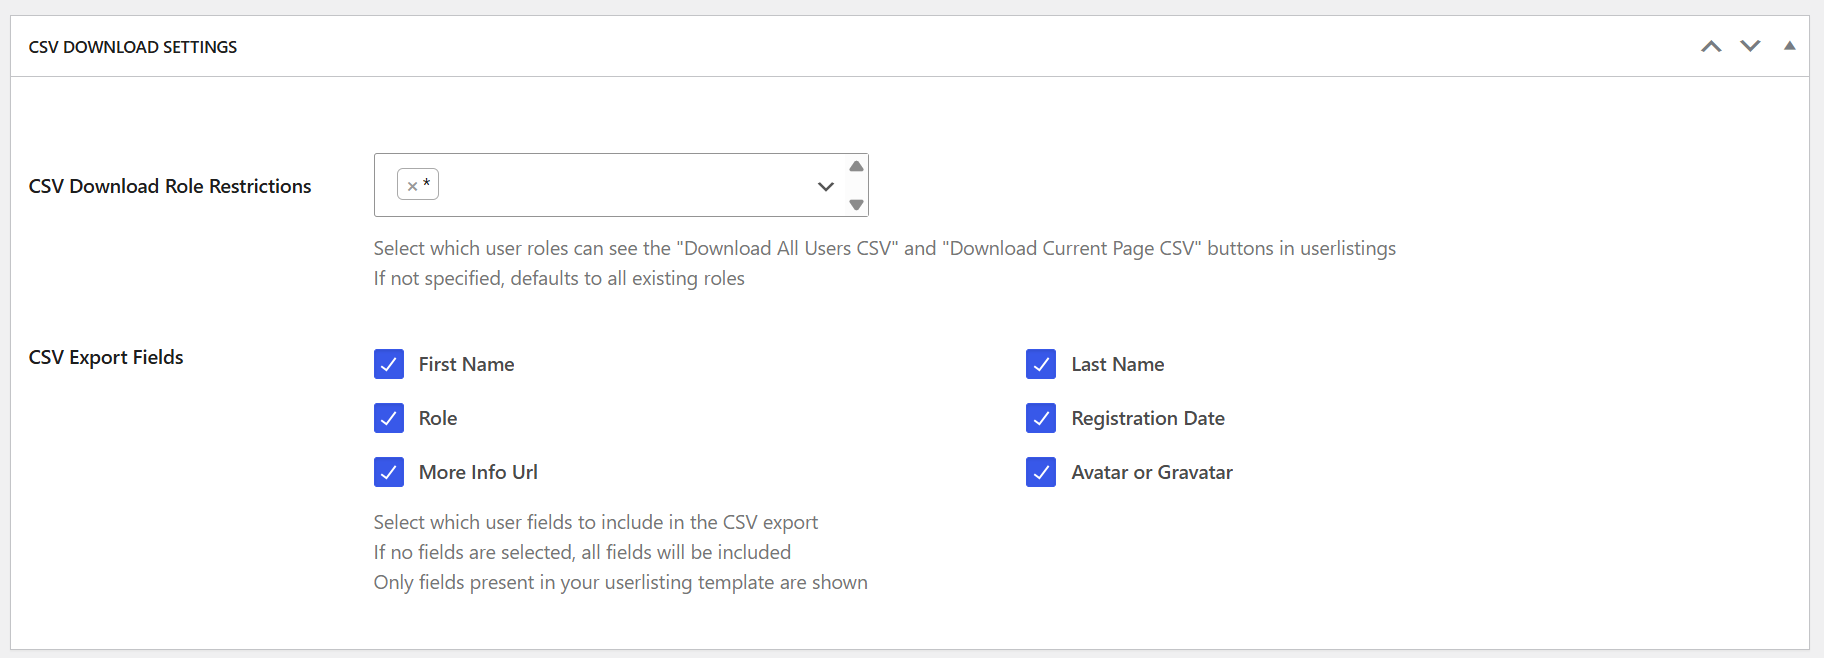
Here you will find the following two options:
CSV Download Role Restrictions – lets you choose which user roles can see the respective buttons in the user listings. If not specified, the default is all existing roles.
CSV Export Fields – lets you select which user fields to include in the CSV export. If no fields are selected, all fields will be included.
Only the fields present in your User Listing template are shown.
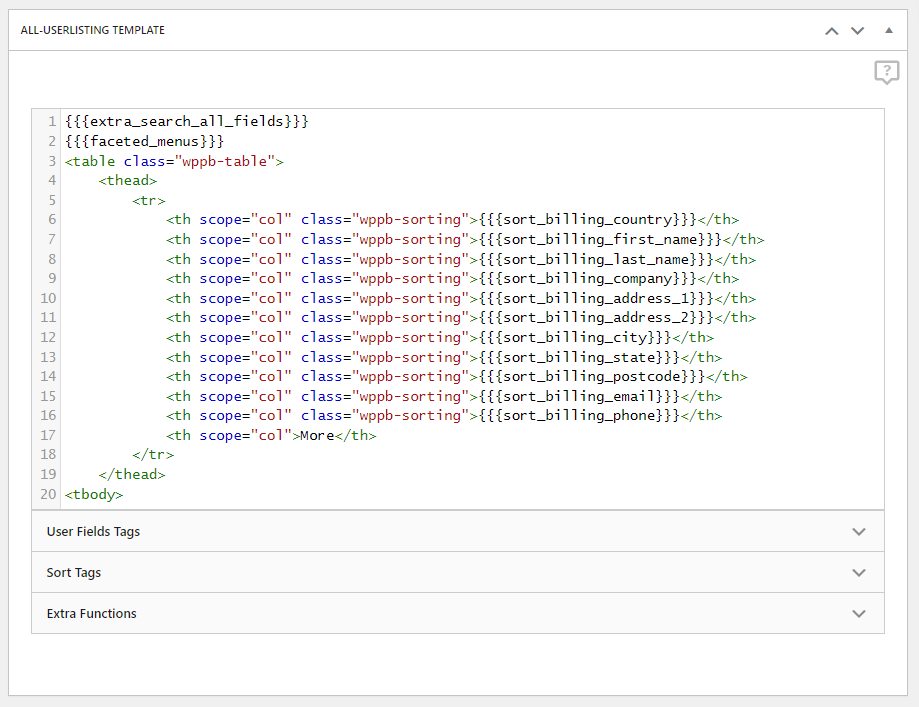
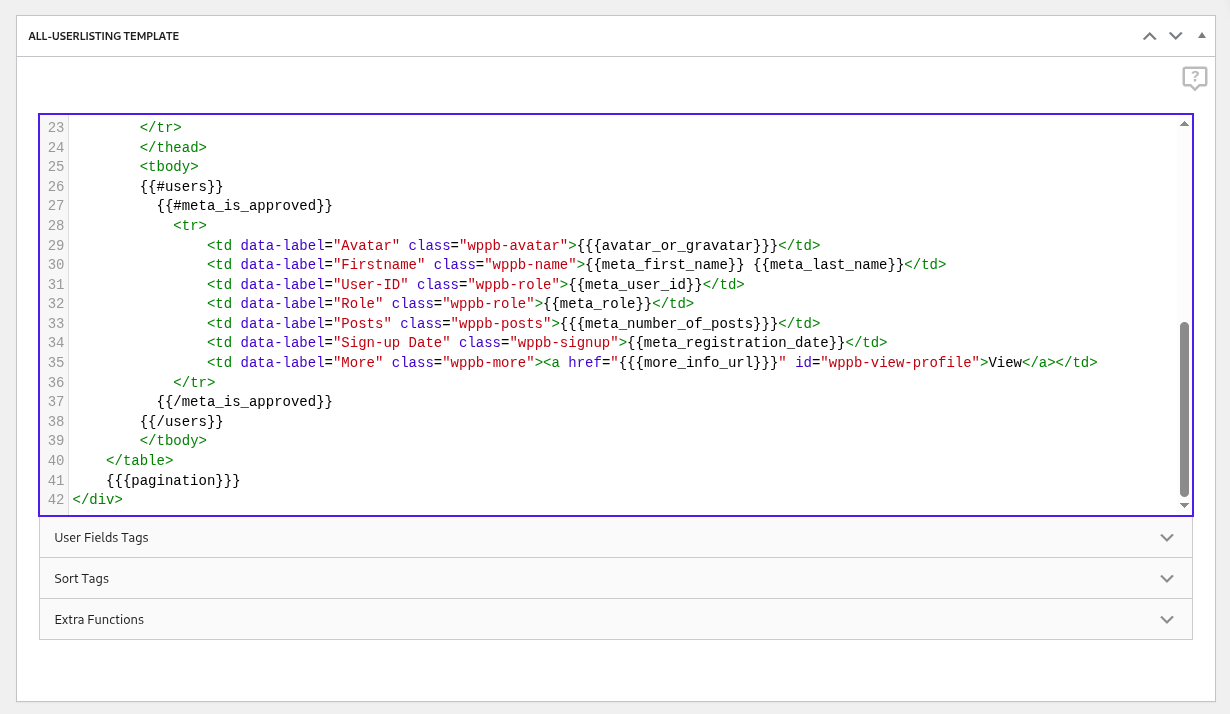
The All-Userlisting Template allows you to customize the looks of your Front End User Listing that displays a list of all your users. It’s shown on each page where the User Listing shortcode is present.
The All-Userlisting Template contains a default HTML template that includes User Fields Tags, which you can modify to fit your needs.

In the default All-Userlisting Template, you’ll have access to:

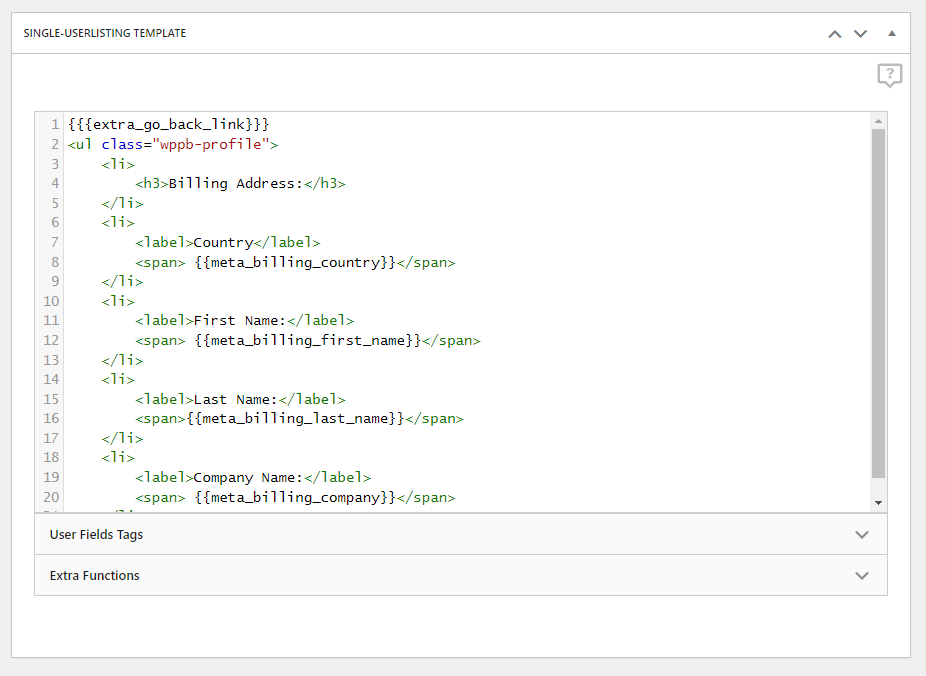
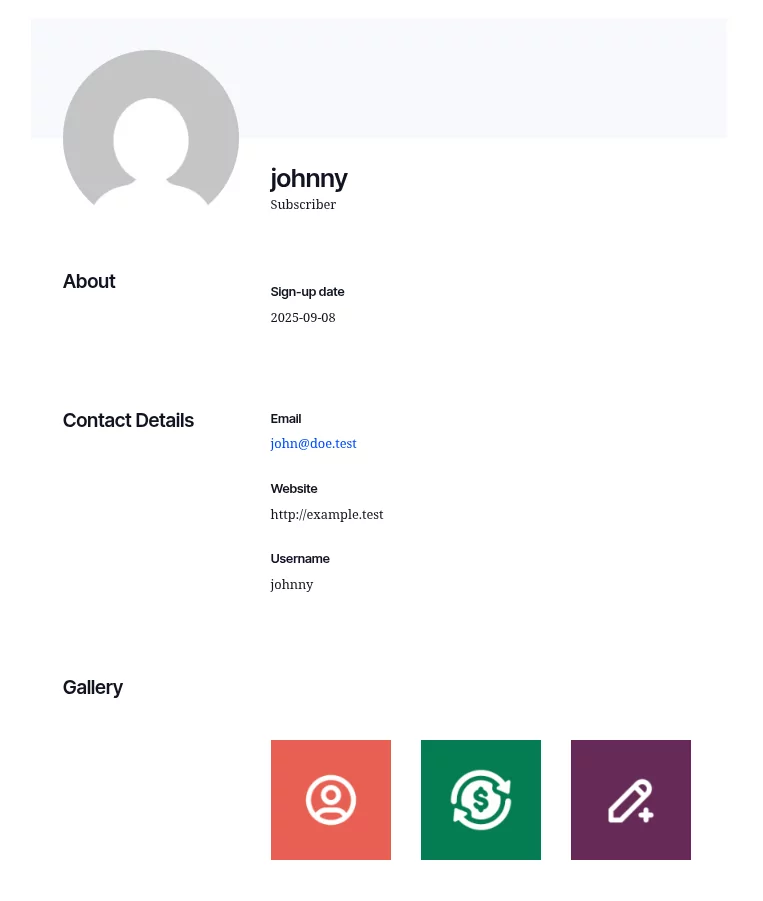
The Single-Userlisting Template applies for all individual user pages displayed in the front-end. You can access the Single-Userlisting page by clicking the “More” link from the All-Userlisting page.
The Single-Userlisting Template contains a default HTML template which includes User Fields Tags, that you can modify to fit your needs.
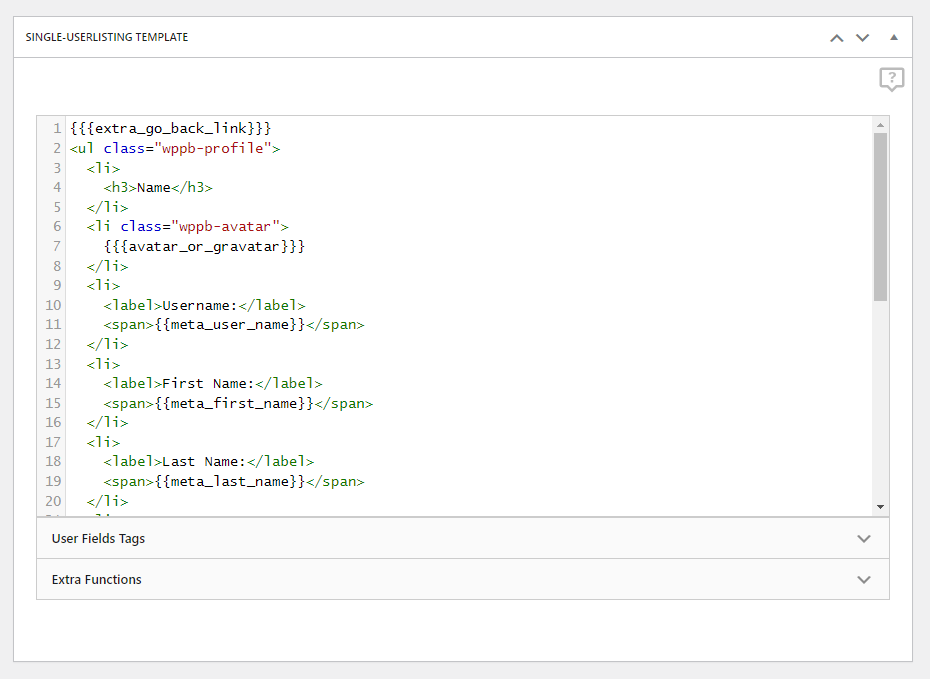
In the default Single-Userlisting Template, you’ll have access to:
You can display the Single User Listing Template of a user inside a page using:
[wppb-list-users single name="userlisting" id="3"]
Supported parameters:
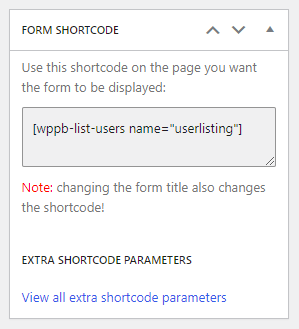
After setting up the User Listing you can go ahead an publish it by using the “Publish” button. After publishing your User Listing, the Form Shortcode tab will populate with the custom shortcode that you can use to display the newly created User Listing in any given page.
You can add extra parameters to the shortcode, to further filter the results.
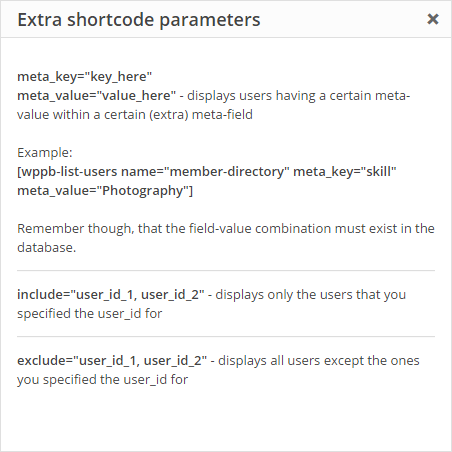
[wppb-list-users name="member-directory" meta_key="custom_field_1" meta_value="value"]
[wppb-list-users include="user_id_1, user_id_2"]
[wppb-list-users exclude="user_id_1, user_id_2"]

[wppb-list-users name="userlisting" meta_key="custom_field_2" meta_value="A" meta_compare="LIKE"]
It works similarly to how the Custom Field Queries functionality works, and more examples can be seen here.
Remember though, that the field-value combination must exist in the database.
Example:
[wppb-list-users name="member-directory" meta_key="custom_field_1" meta_value="value1,value2"]
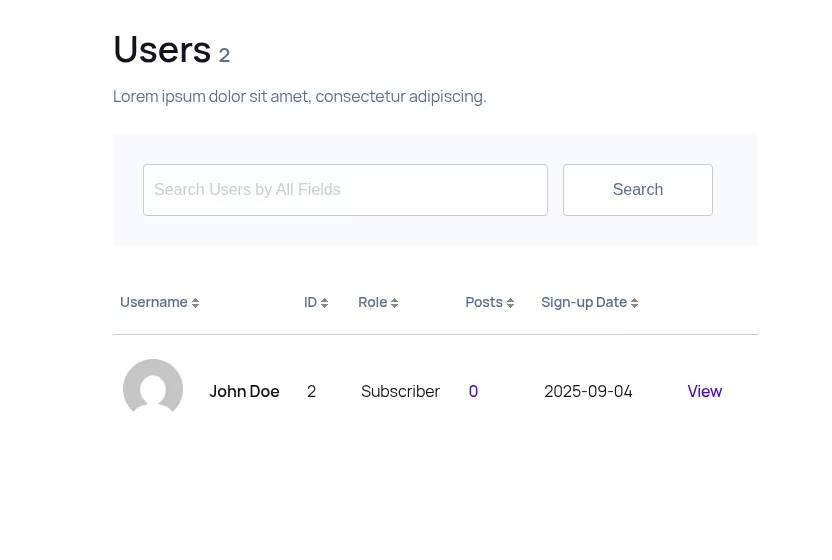
Here’s a look at how the User Listing page might look at the front end of your website:
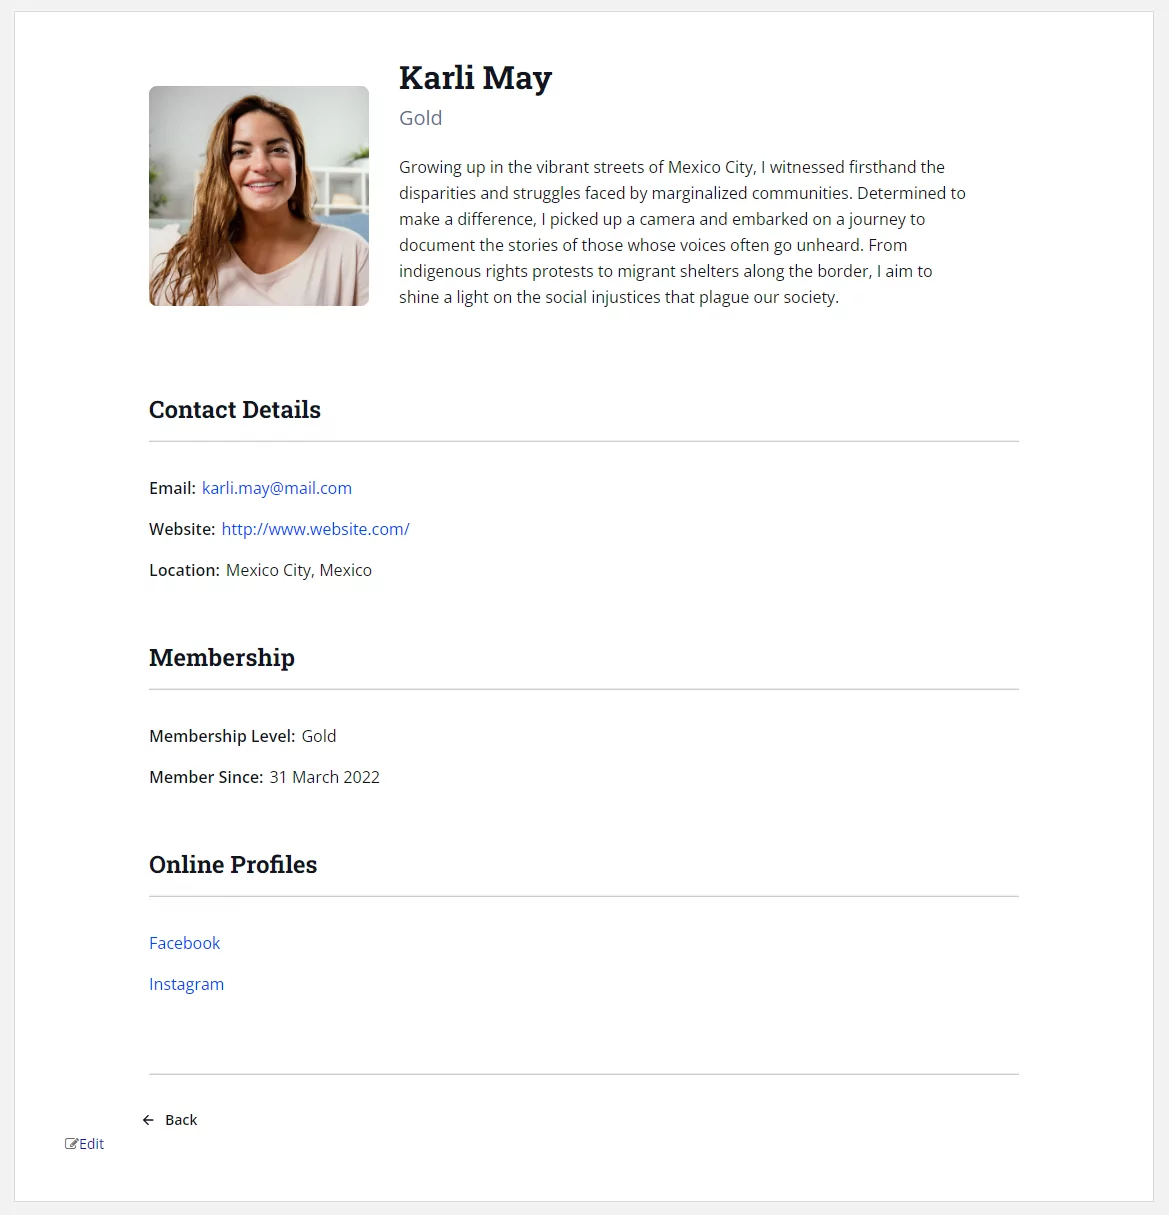
And this is the Single User profile page:
As shown above, both the All-Userlisting and Single-Userlisting Templates can be customized in any way you desire, directly from plugin UI.
First, you will need to go to Profile Builder -> Manage Fields to create the WooCommerce Customer Billing Address and WooCommerce Customer Shipping Address fields.
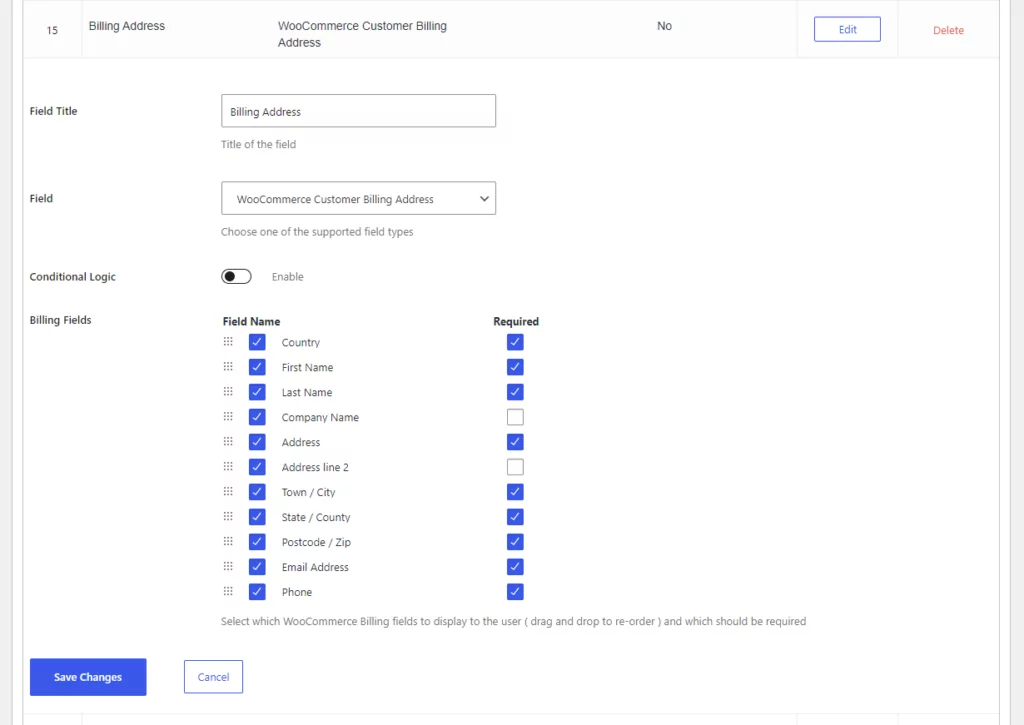
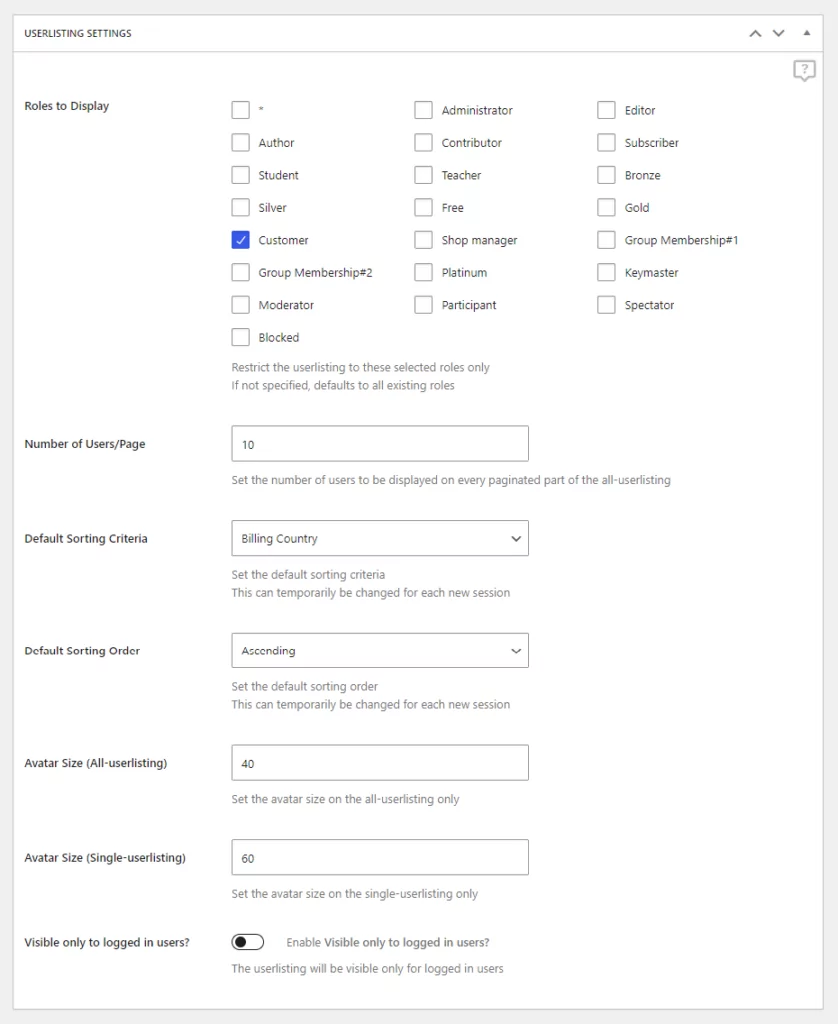
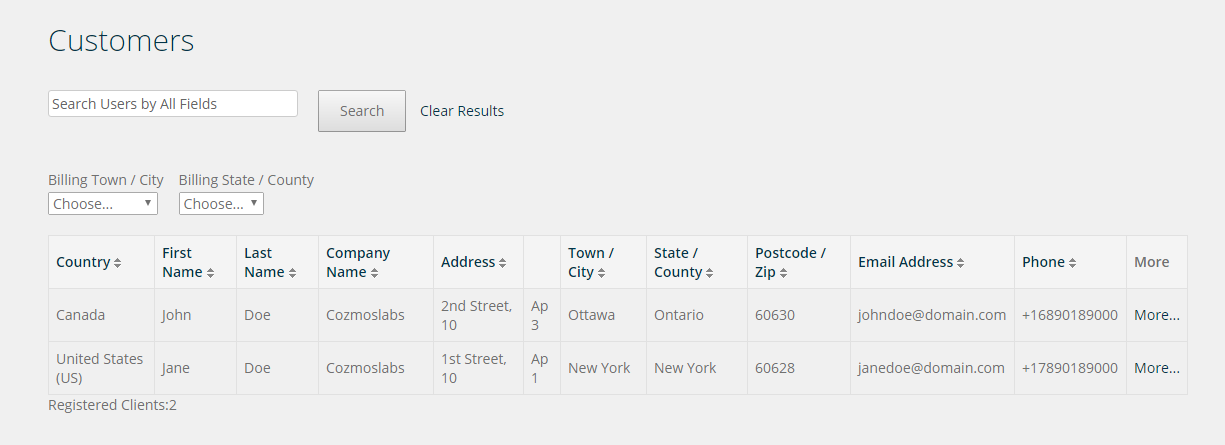
The next step is to set up the User Listing so go to Profile Builder -> User Listing -> Add New. In our case we named our User Listing – “Customers”. We also checked, in the “Roles to Display” option, the Customer role.
By doing so only users with the “Customer” role will be displayed in the User Listing. This role is created by the WooCommerce plugin.
We also set the Default Sorting Criteria to “Billing Country” – Order Ascending. This option will list and sort the users ascending based on Country.
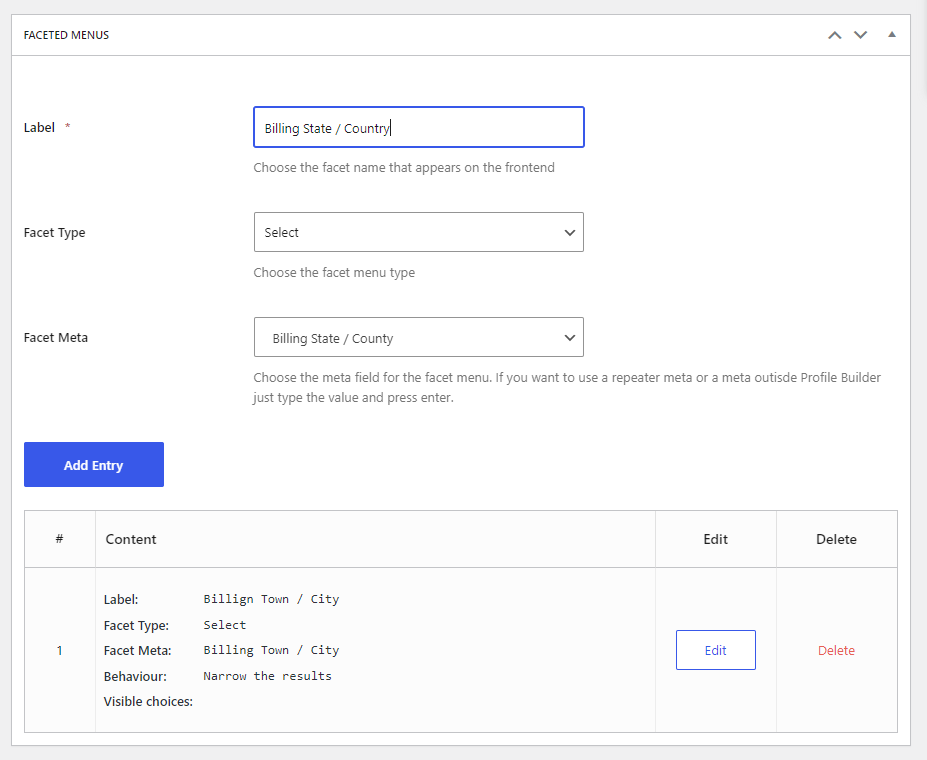
In the Faceted Menus section, we can add filters to further sort our User Listing based on WooCommerce fields. We added a filter based on Billing Town / City and another one based on Billing State / County.
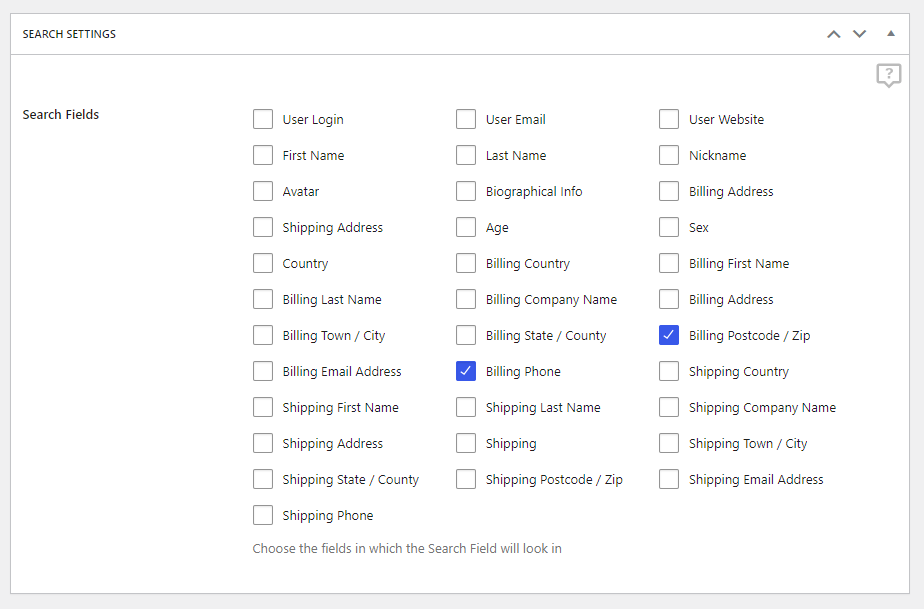
In the Search Settings tab, we can set in which fields should the Search Field look into. For example, we can allow to search based on Billing Postcode / Zip and Billing Phone.
In order to generate the Search field in Front End, in the User Listing, you will need to use the {{{extra_search_all_fields}}} tag, found in the Extra Functions tab, inside the All-Userlisting Template.
In the All-Userlisting Template, we can add all the WooCommerce fields by using the appropriate User Fields Tags.
In the Single-Userlisting Template, we can add all the WooCommerce fields by using the appropriate User Fields Tags.
To view the User Listing in Frontend we will need to use the generated shortcode inside a page. In our case the shortcode will look like this: [wppb-list-users name="customers"]
This is how the User Listing will look in Front End.
Several tags are available to use in the User Listing templates:
Using the User listing addon available in Profile Builder Pro you can create a member directory of all your forum users.
The bbPress add-on adds 3 new user tags which you can use on both All User Listing as well as Single-User Listing:
Lets say we have a Repeater field that uses the following field title: Accommodations. Inside the Repeater we added 2 Input fields that use the following field titles: Hotel and Motel.
All-Userlisting Template – The syntax below will output in a loop all the sets of fields inputted by the user on registration or while editing his profile.
{{#meta_accommodations}}
    Hotel:{{meta_accommodations_1}}
    Motel:{{meta_accommodations_2}}
{{/meta_accommodations}}
Single-Userlisting Template
Hotel:{{meta_accommodations_1}}
Motel:{{meta_accommodations_2}}
Hotel:{{meta_accommodations_1}}
Motel:{{meta_accommodations_2}}Lets say we have a Select field that uses the following meta name: custom_field_1. In the Single-Userlisting template we will need to add:
{{#meta_custom_field_1}}
  <li>
   <label>Select Field:</label>
   <span>{{meta_custom_field_1}}</span>
  </li>
{{/meta_custom_field_1}}
Read more about Mustache Tags here.
To display an uploaded file (example: a .pdf file) inside the Single-Userlisting Template you will need first to add inside Profile Builder -> Manage Fields an Upload field.
Inside the Single-Userlisting Template we will need to use:
<li>
	<label>Uploaded file:</label>
	<span><a href="{{meta_custom_field_1}}"><img src="https://wwwimages.adobe.com/content/dam/acom/en/legal/images/badges/Adobe_Document_Cloud_logo_SCREEN_RGB_48px.png" width="25px" height="25px"/></a></span>
</li>
Replace {{meta_custom_field_1}} with the meta name assigned to your Upload field.
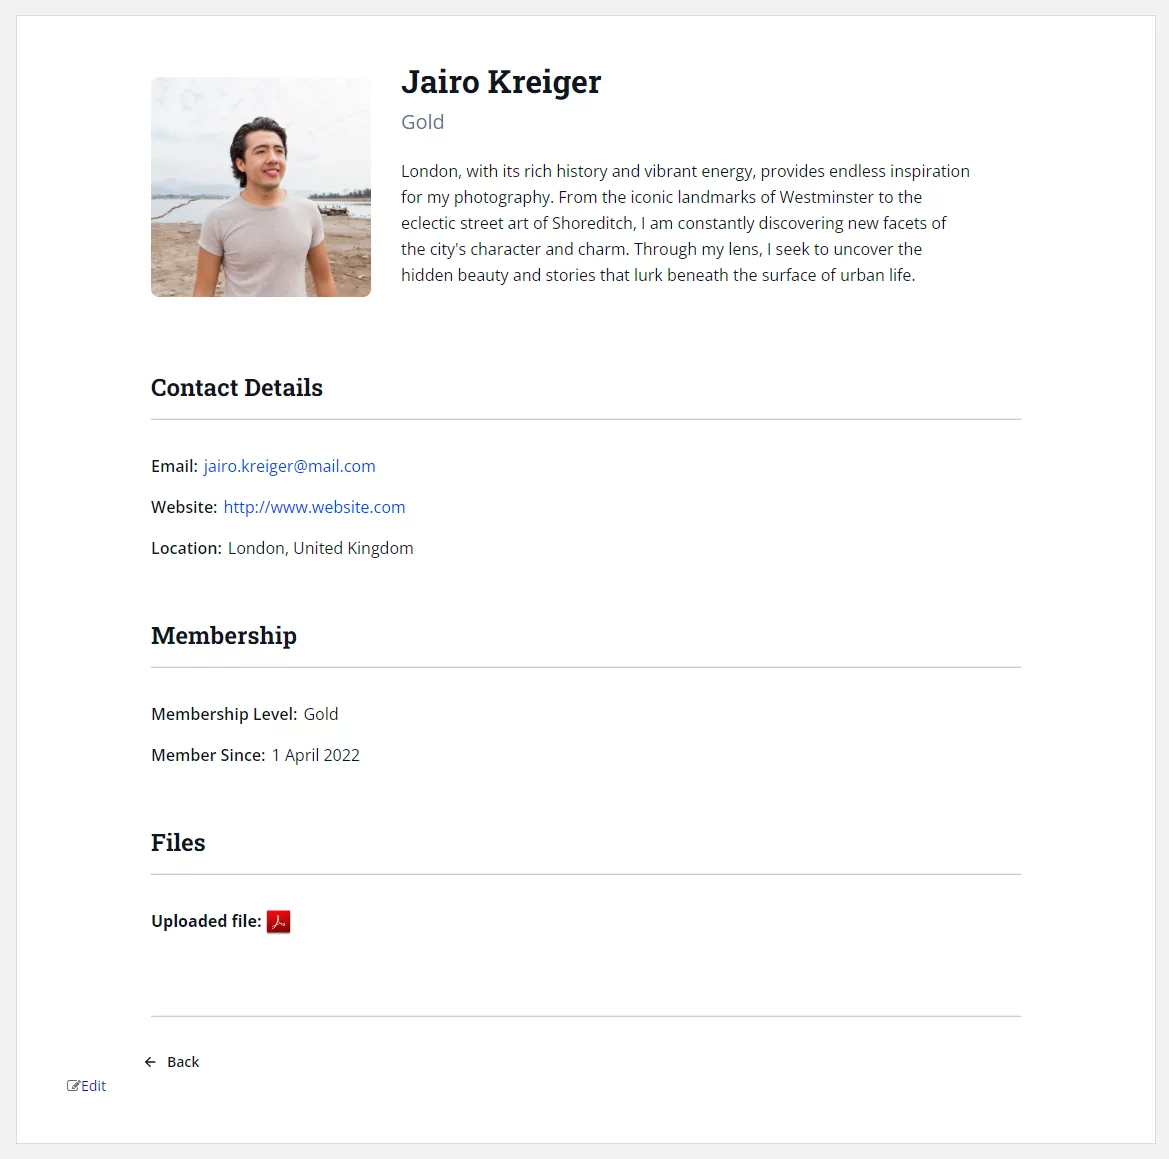
Front End Single Userlisting
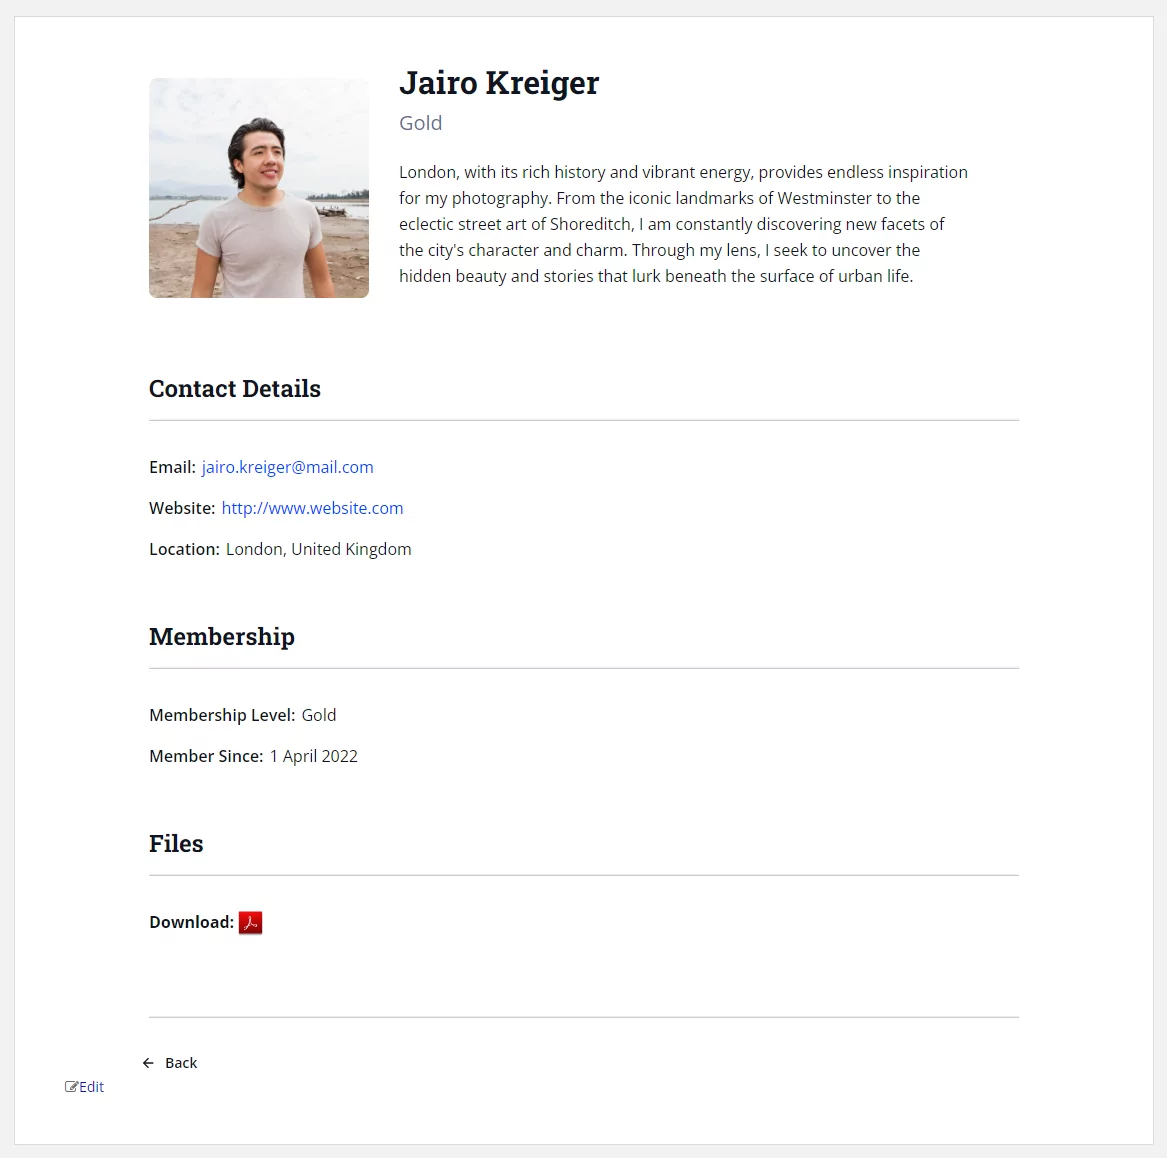
To download an uploaded file (example: a .pdf file) from the Single-Userlisting Template you will need first to add inside Profile Builder -> Manage Fields an Upload field.
Inside the Single-Userlisting Template we will need to use:
<li>
	<label>Download:</label>
	<span><a href="{{meta_custom_field_1}}" download><img src="https://wwwimages.adobe.com/content/dam/acom/en/legal/images/badges/Adobe_Document_Cloud_logo_SCREEN_RGB_48px.png" width="25px" height="25px"/></a></span>
</li>
Replace {{meta_custom_field_1}} with the meta name assigned to your Upload field.
Front End Single Userlisting
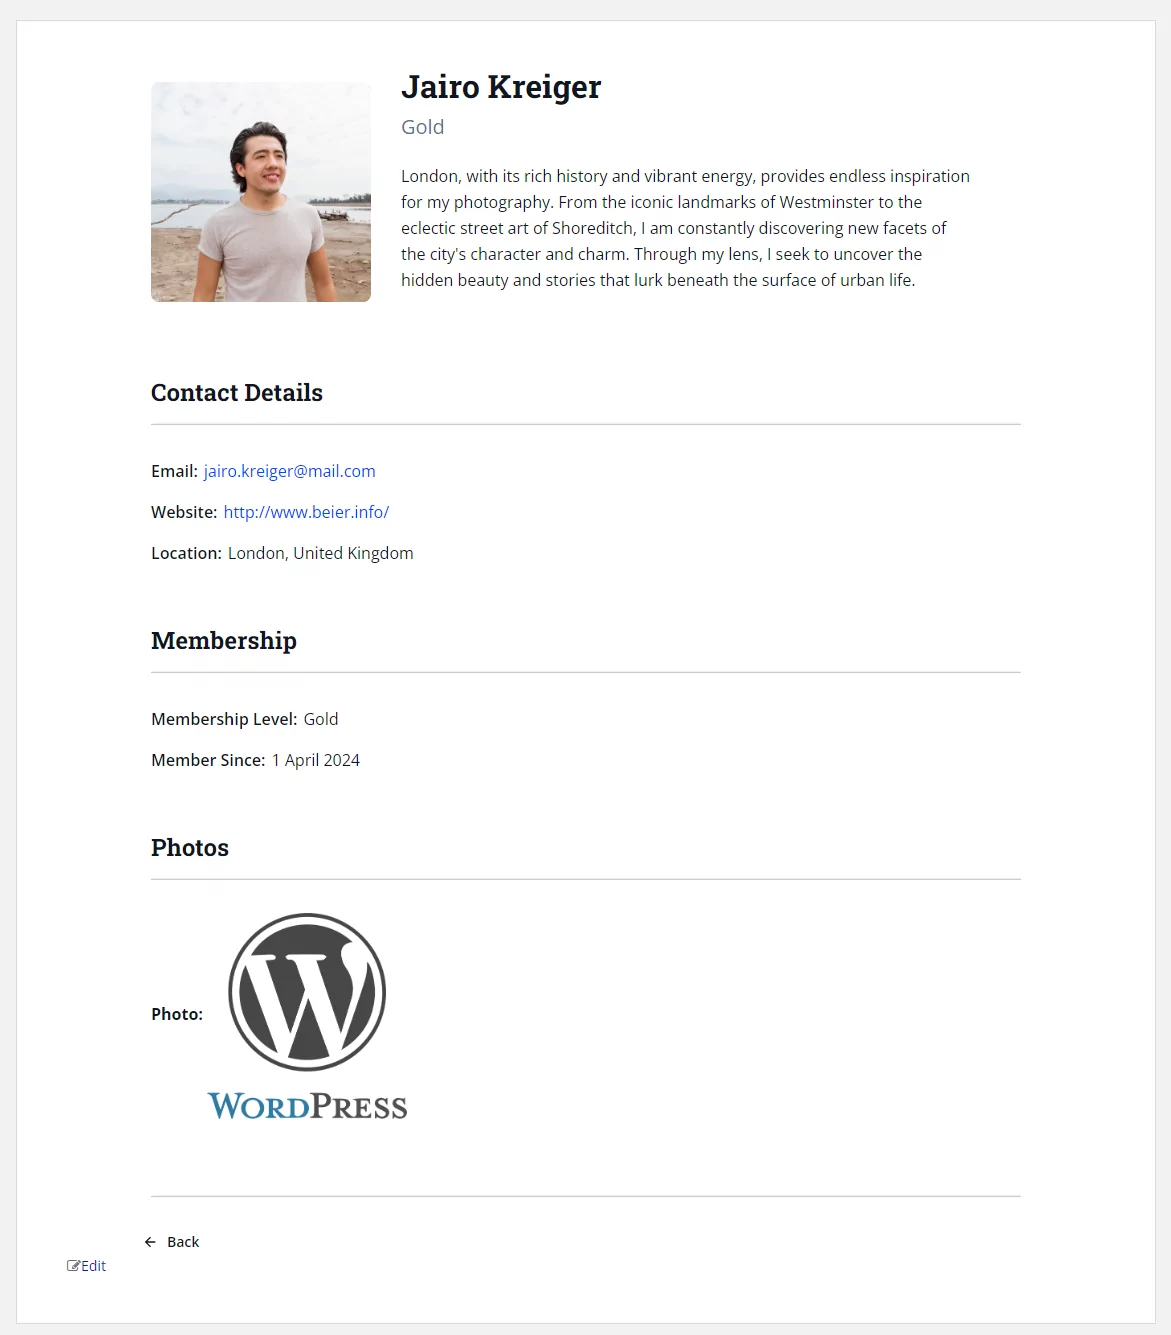
To display an uploaded photo (example: a .png or .jpg file) inside the Single-Userlisting Template you will need first to add inside Profile Builder -> Manage Fields an Upload field.
Inside the Single-Userlisting Template we will need to use:
<li>
	<label>Photo:</label>
	<span><img src="{{meta_custom_field_1}}" alt="WordPres" height="300" width="200"></span>
</li>
Replace {{meta_custom_field_1}} with the meta name assigned to your Upload field.
Front End Single Userlisting
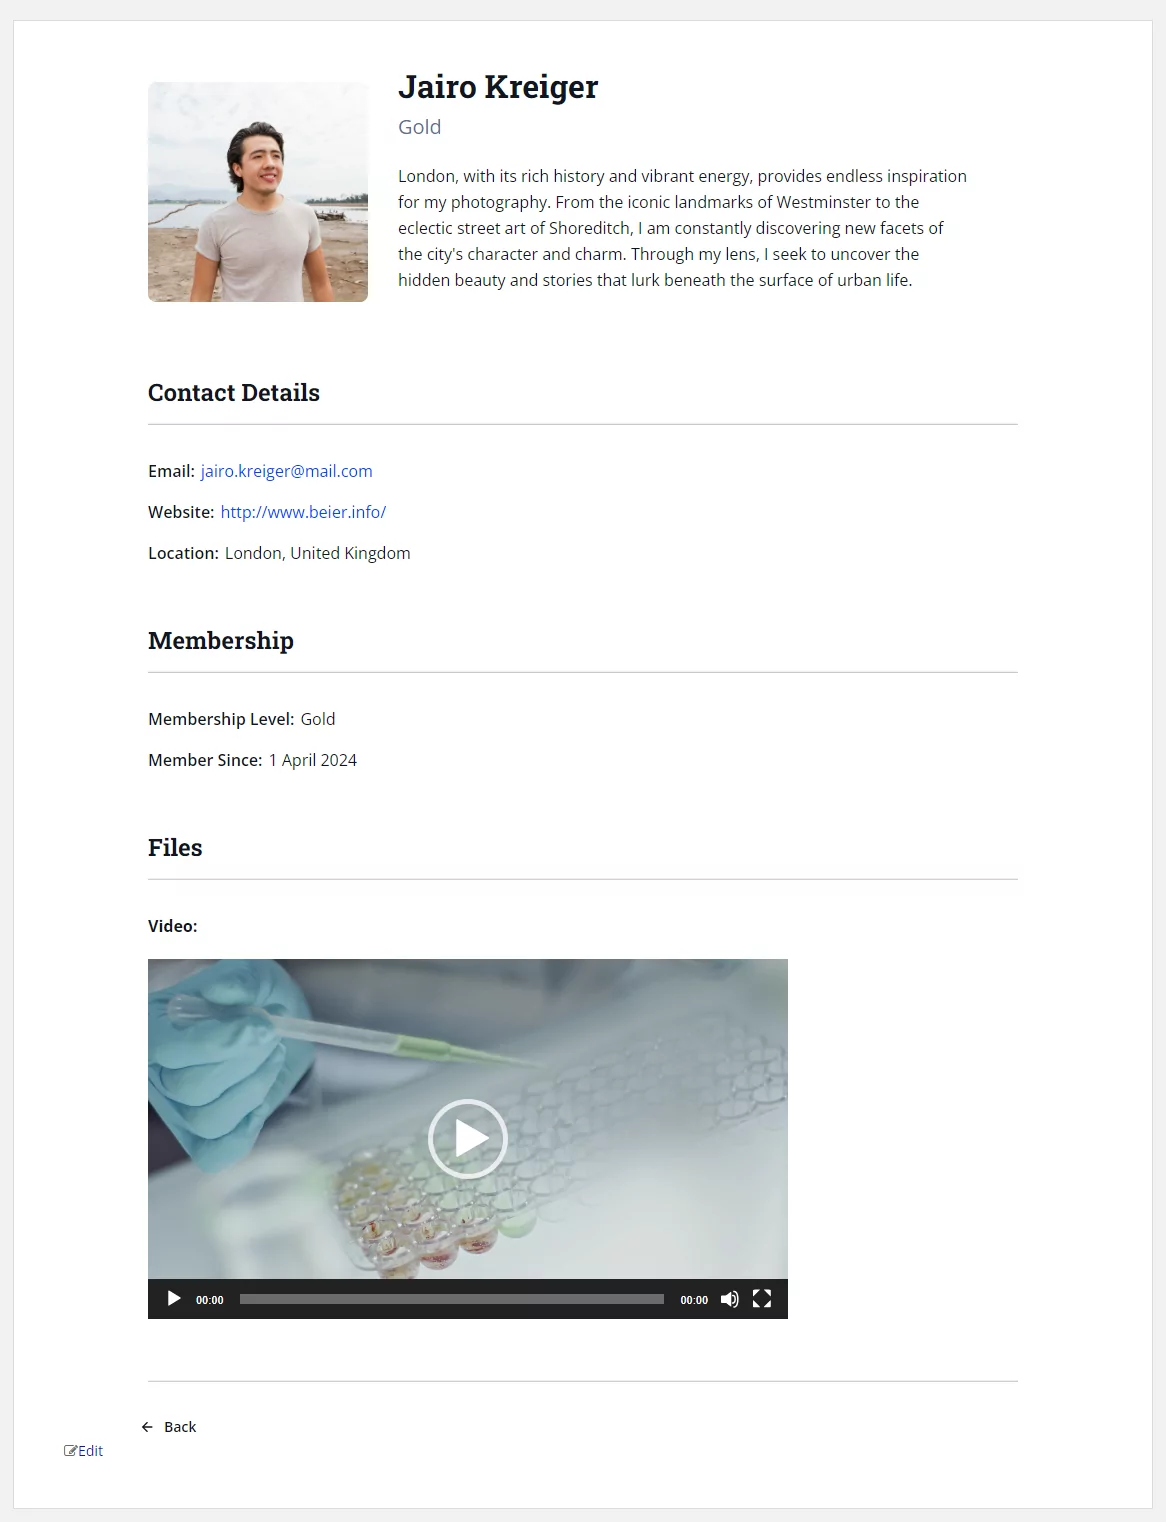
To embed an uploaded video (example: a .mp4 file) inside the Single-Userlisting Template you will need first to add inside Profile Builder -> Manage Fields an Upload field.
Inside the Single-Userlisting Template we will need to use the video shortcode:
<li>
	<label>Video:</label>
	<span>[video src="{{meta_custom_field_1}}"]</span>
</li>
Replace {{meta_custom_field_1}} with the meta name assigned to your Upload field.
Front End Single Userlisting
To display your users images using a gallery field inside your Single User Listing you will need to:
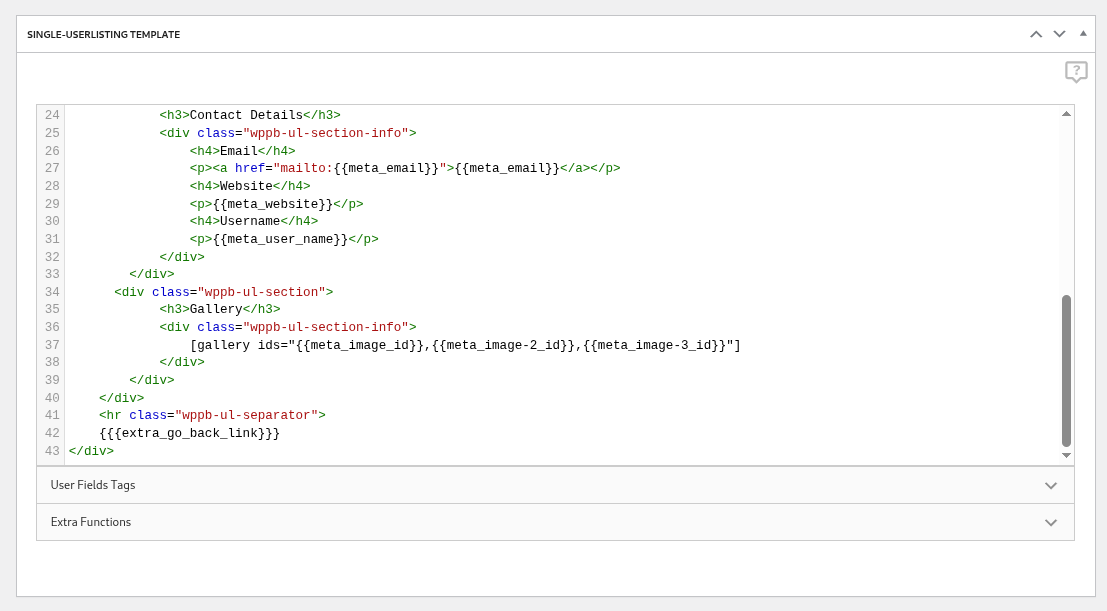
In the above example, we have added the gallery shortcode and used the parameter: ids=””
to add a comma separated list of the image IDs that the upload fields provide as meta data. This is what the gallery field looks like on the Single User Listing page:
To display the Age of a user inside the Single-Userlisting Template you will need first to add inside Profile Builder -> Manage Fields a Datepicker field.
1. Inside the Single-Userlisting Template you will need to add the following script:
<script>
  function getAge(dateString)
{
    var today = new Date();
    var birthDate = new Date(dateString);
    var age = today.getFullYear() - birthDate.getFullYear();
    var m = today.getMonth() - birthDate.getMonth();
    if (m < 0 || (m === 0 && today.getDate() < birthDate.getDate()))
    {
        age--;
    }
    return age;
}
  jQuery(document).ready(function(){
  	jQuery('.calc-age').each(function(index,item){
  		birthday = jQuery(item).text();
  		if(birthday != ''){
  			age = getAge(birthday);
  			jQuery(item).text(age)
  		}
  	})
  })
</script>

<script><br>  function getAge(dateString) <br>{<br>    var today = new Date();<br>    var birthDate = new Date(dateString);<br>    var age = today.getFullYear() - birthDate.getFullYear();<br>    var m = today.getMonth() - birthDate.getMonth();<br>    if (m < 0 || (m === 0 && today.getDate() < birthDate.getDate())) <br>    {<br>        age--;<br>    }<br>    return age;<br>}<br>  jQuery(document).ready(function(){<br>  	jQuery('.calc-age').each(function(index,item){<br>  		birthday = jQuery(item).text();<br>  		if(birthday != ''){<br>  			age = getAge(birthday);<br>  			jQuery(item).text(age)<br>  		}<br>  	})<br>  })<br></script>
2. And also to add the Datepicker User Field Tag:
<li>
	<label>Age:</label>
	<span class="calc-age">{{meta_birthday}}</span>
</li>
Replace {{meta_birthday}} with the meta name assigned to your Datepicker field.
By default, WordPress supports embedding content from different services directly in your pages. For an exact list of supported services please visit: https://wordpress.org/support/article/embeds/
However, that only works inside a page or post content.
In order to embed content like a YouTube video inside User Listing you’ll need to use the shortcode.
[wppb-embed width="500" height="300"]{{meta_youtube_link}}[/wppb-embed]To achieve this, you can create a new Profile Builder Field of type Input (Hidden). This field will not be visible to your users on the front-end.
After creating this field, you can use Mustache Tags in your User Listing to only display users that have a value present in this field. This way, every time you approve a user, you will need to also fill this hidden field as an administrator in order for them to appear in the User Listing.
With the above template if our website has newly registered users that are pending admin approval and have no value added to the Input (Hidden) field, they won’t be displayed on the User Listing page.
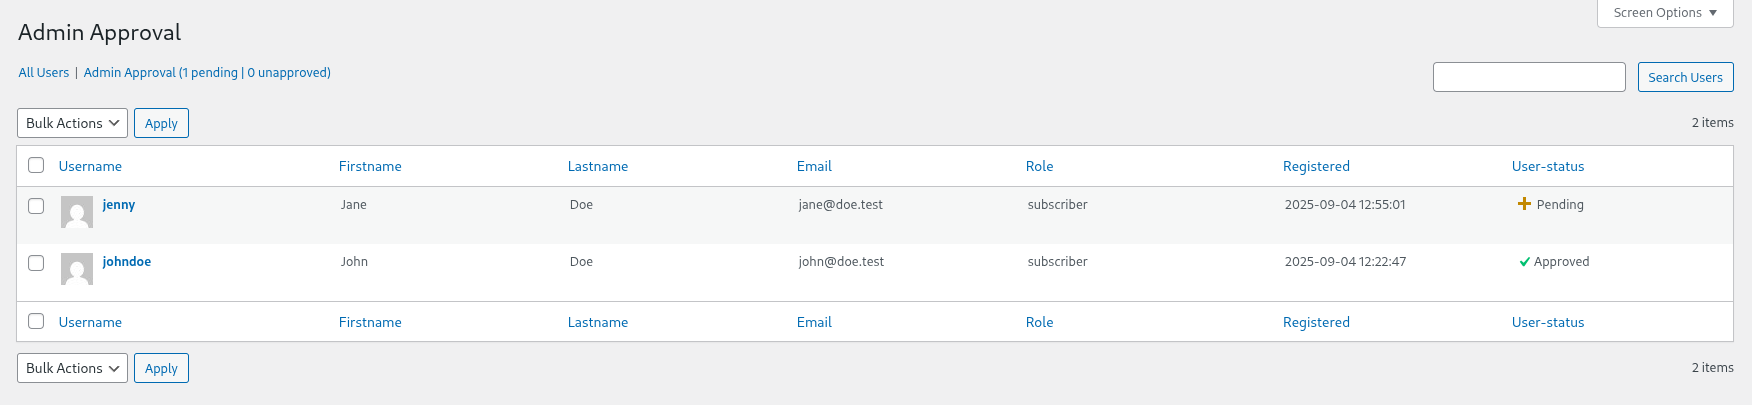
Only users that have a value present in the Input (Hidden) field with the meta key: is_approved will be displayed in the User Listing.
Create beautiful front-end registration and profile forms with custom fields. Setup member directories, custom redirects, cutomize user emails & more using the all in one user management plugin.
Get Profile BuilderCombine the power of Profile Builder with Paid Member Subscriptions to set up user registration, memberships, and recurring revenue.
Get 25% off with the bundle
