Table of Contents
WooCommerce Sync Add-on makes it easy for you to manage the Customer Shipping and Billing fields from WooCommerce with Profile Builder.
It also allows you to use Profile Builder Register and Edit-profile forms on the My Account page from WooCommerce, as well as to add custom fields created with Profile Builder on the WooCommerce checkout page.
WooCommerce Sync is an Advanced add-on, available with a Profile Builder Basic, Pro, or Agency license only.
After purchasing a premium version of Profile Builder, you can check the following guide on how to install Profile Builder.
For the WooCommerce Sync add-on to work as expected, you’ll also need to have the following plugins installed and activated on your site:
WooCommerce Sync addon allows you to add Customer Billing and Shipping address fields in:
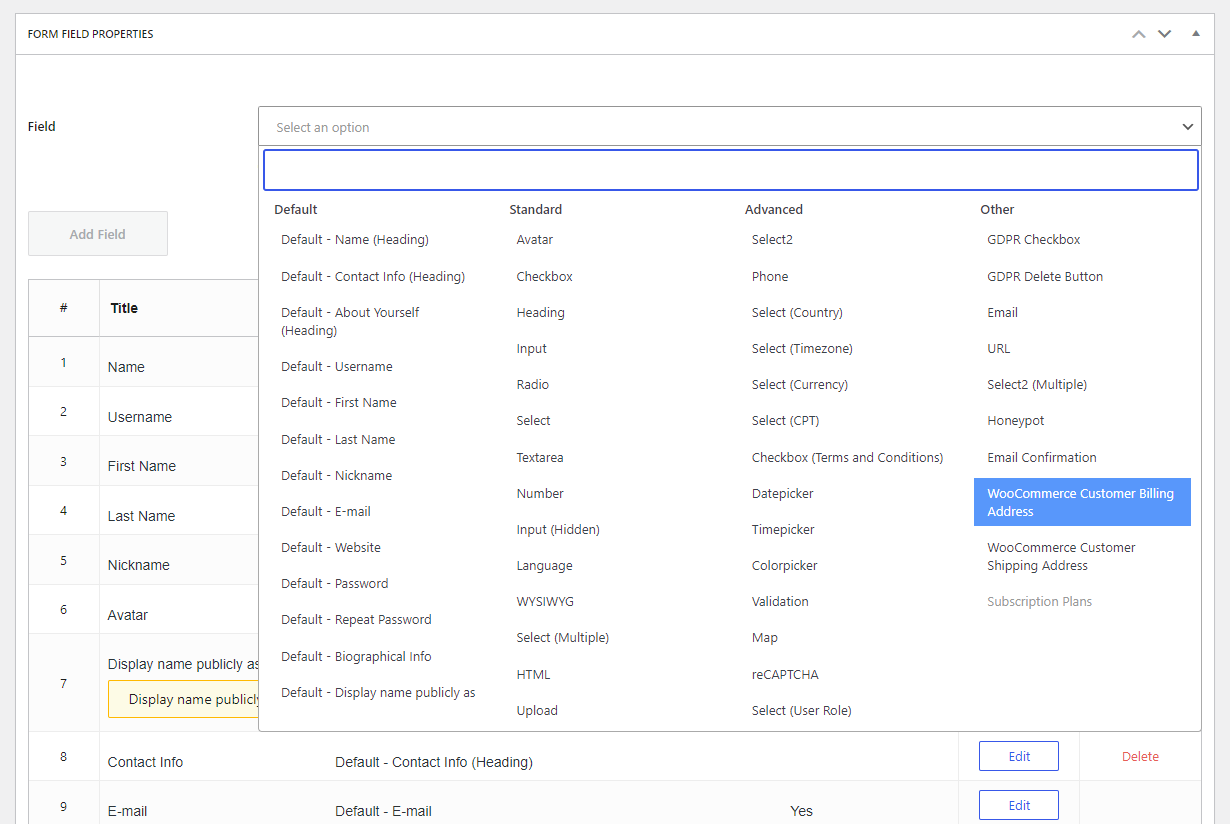
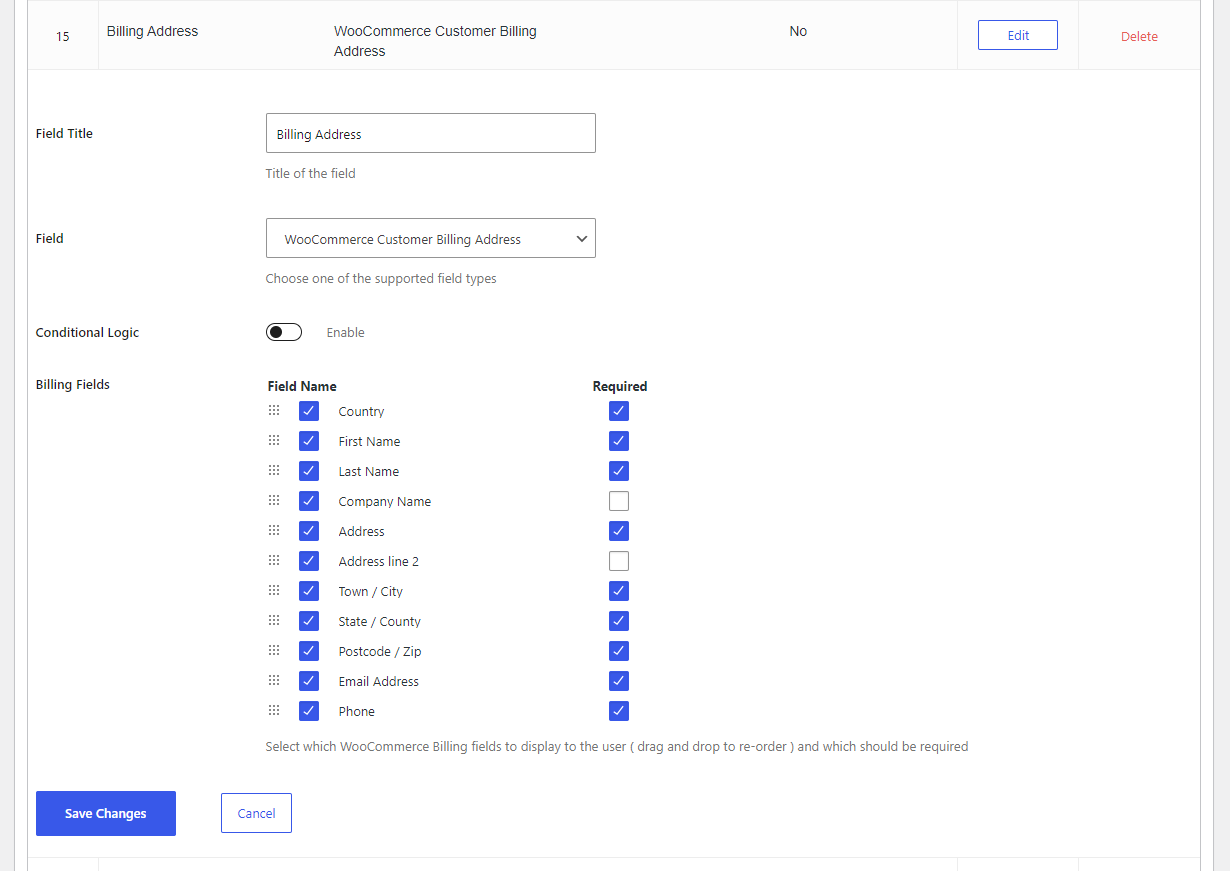
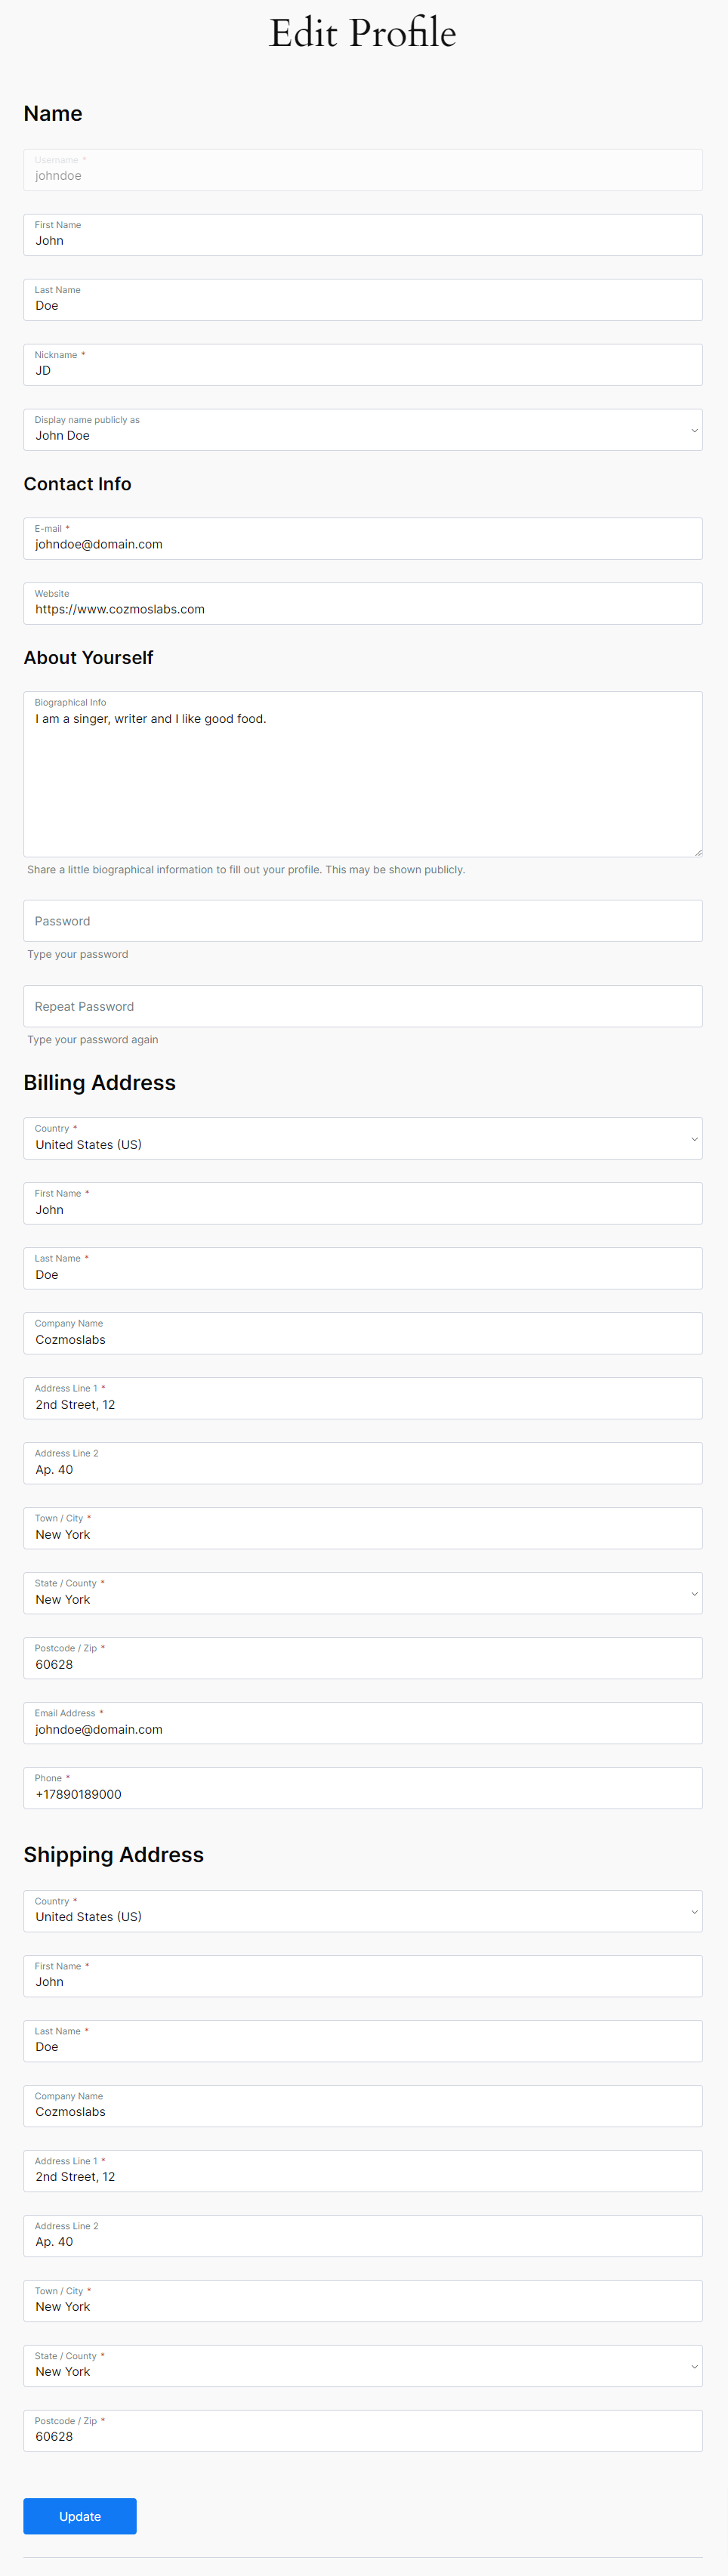
You will be able to sort the fields, edit their heading, and remove or re-add them to the Manage Fields interface.
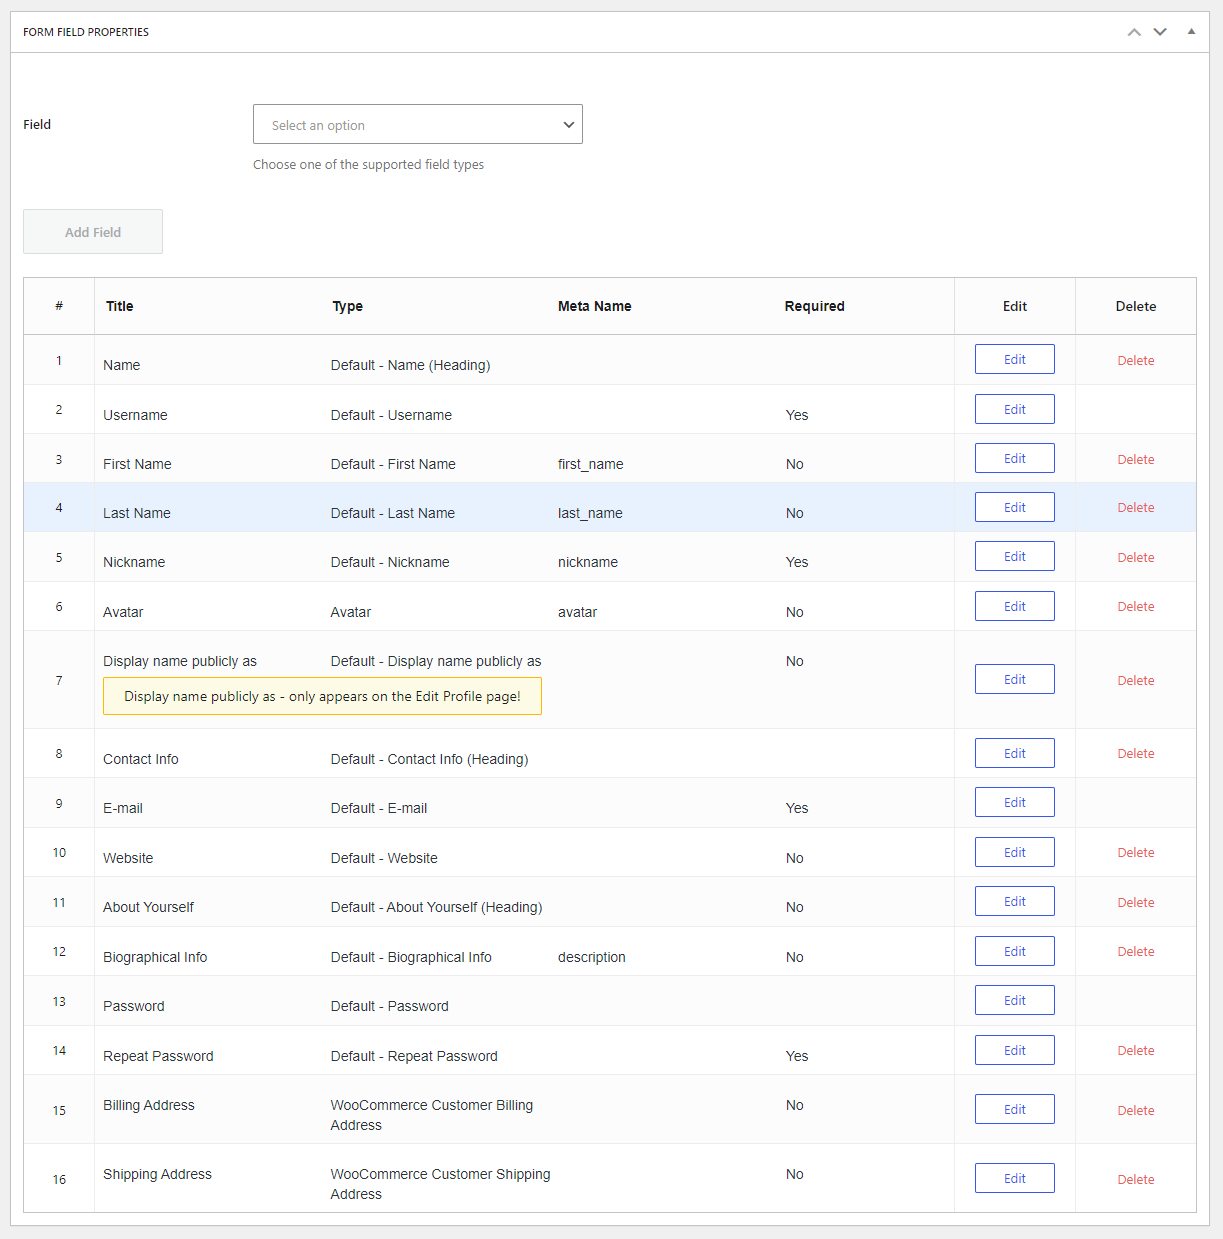
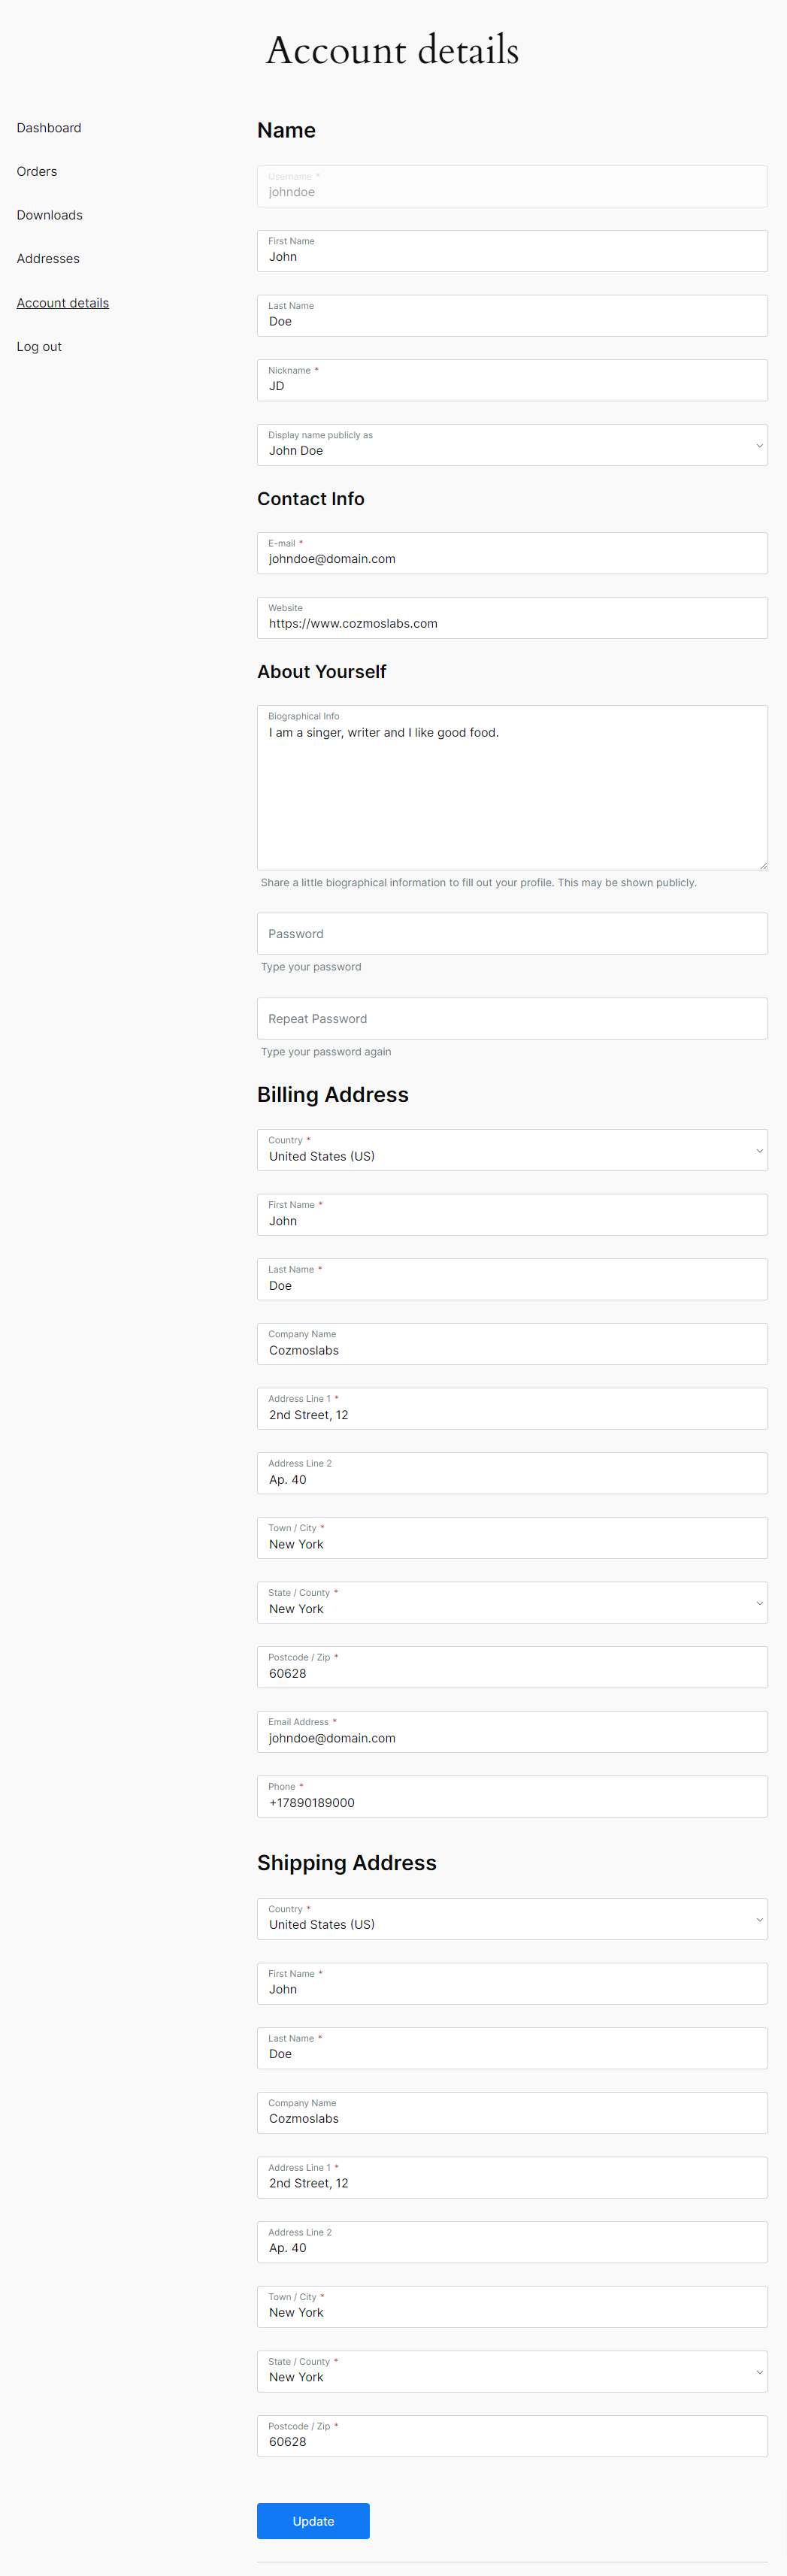
From the Manage Fields UI, you can rename and reorder each individual Billing and Shipping field. You can also choose which individual fields to display in the front-end as well as which should be marked as required.
Also, you can simply drag & drop to reorder the individual fields for both Billing and Shipping Addresses. When first added, the default names, order, and ‘required’ values are taken from WooCommerce.
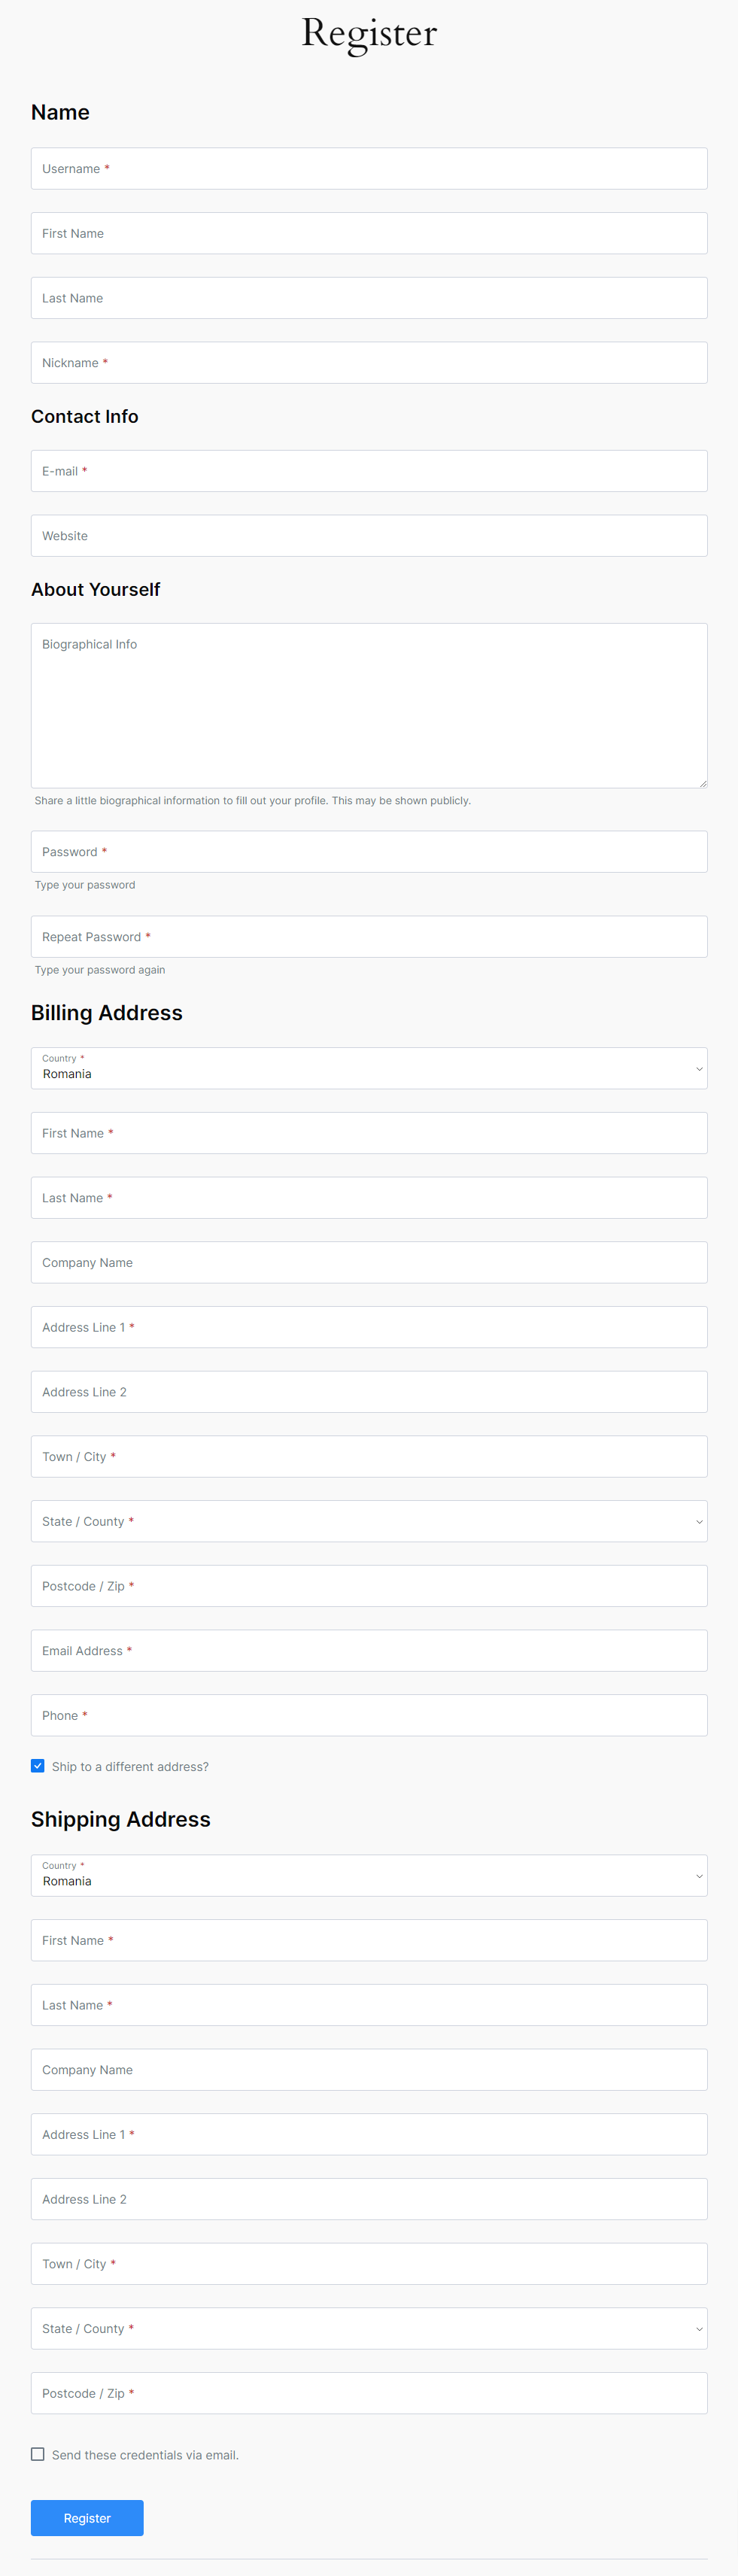
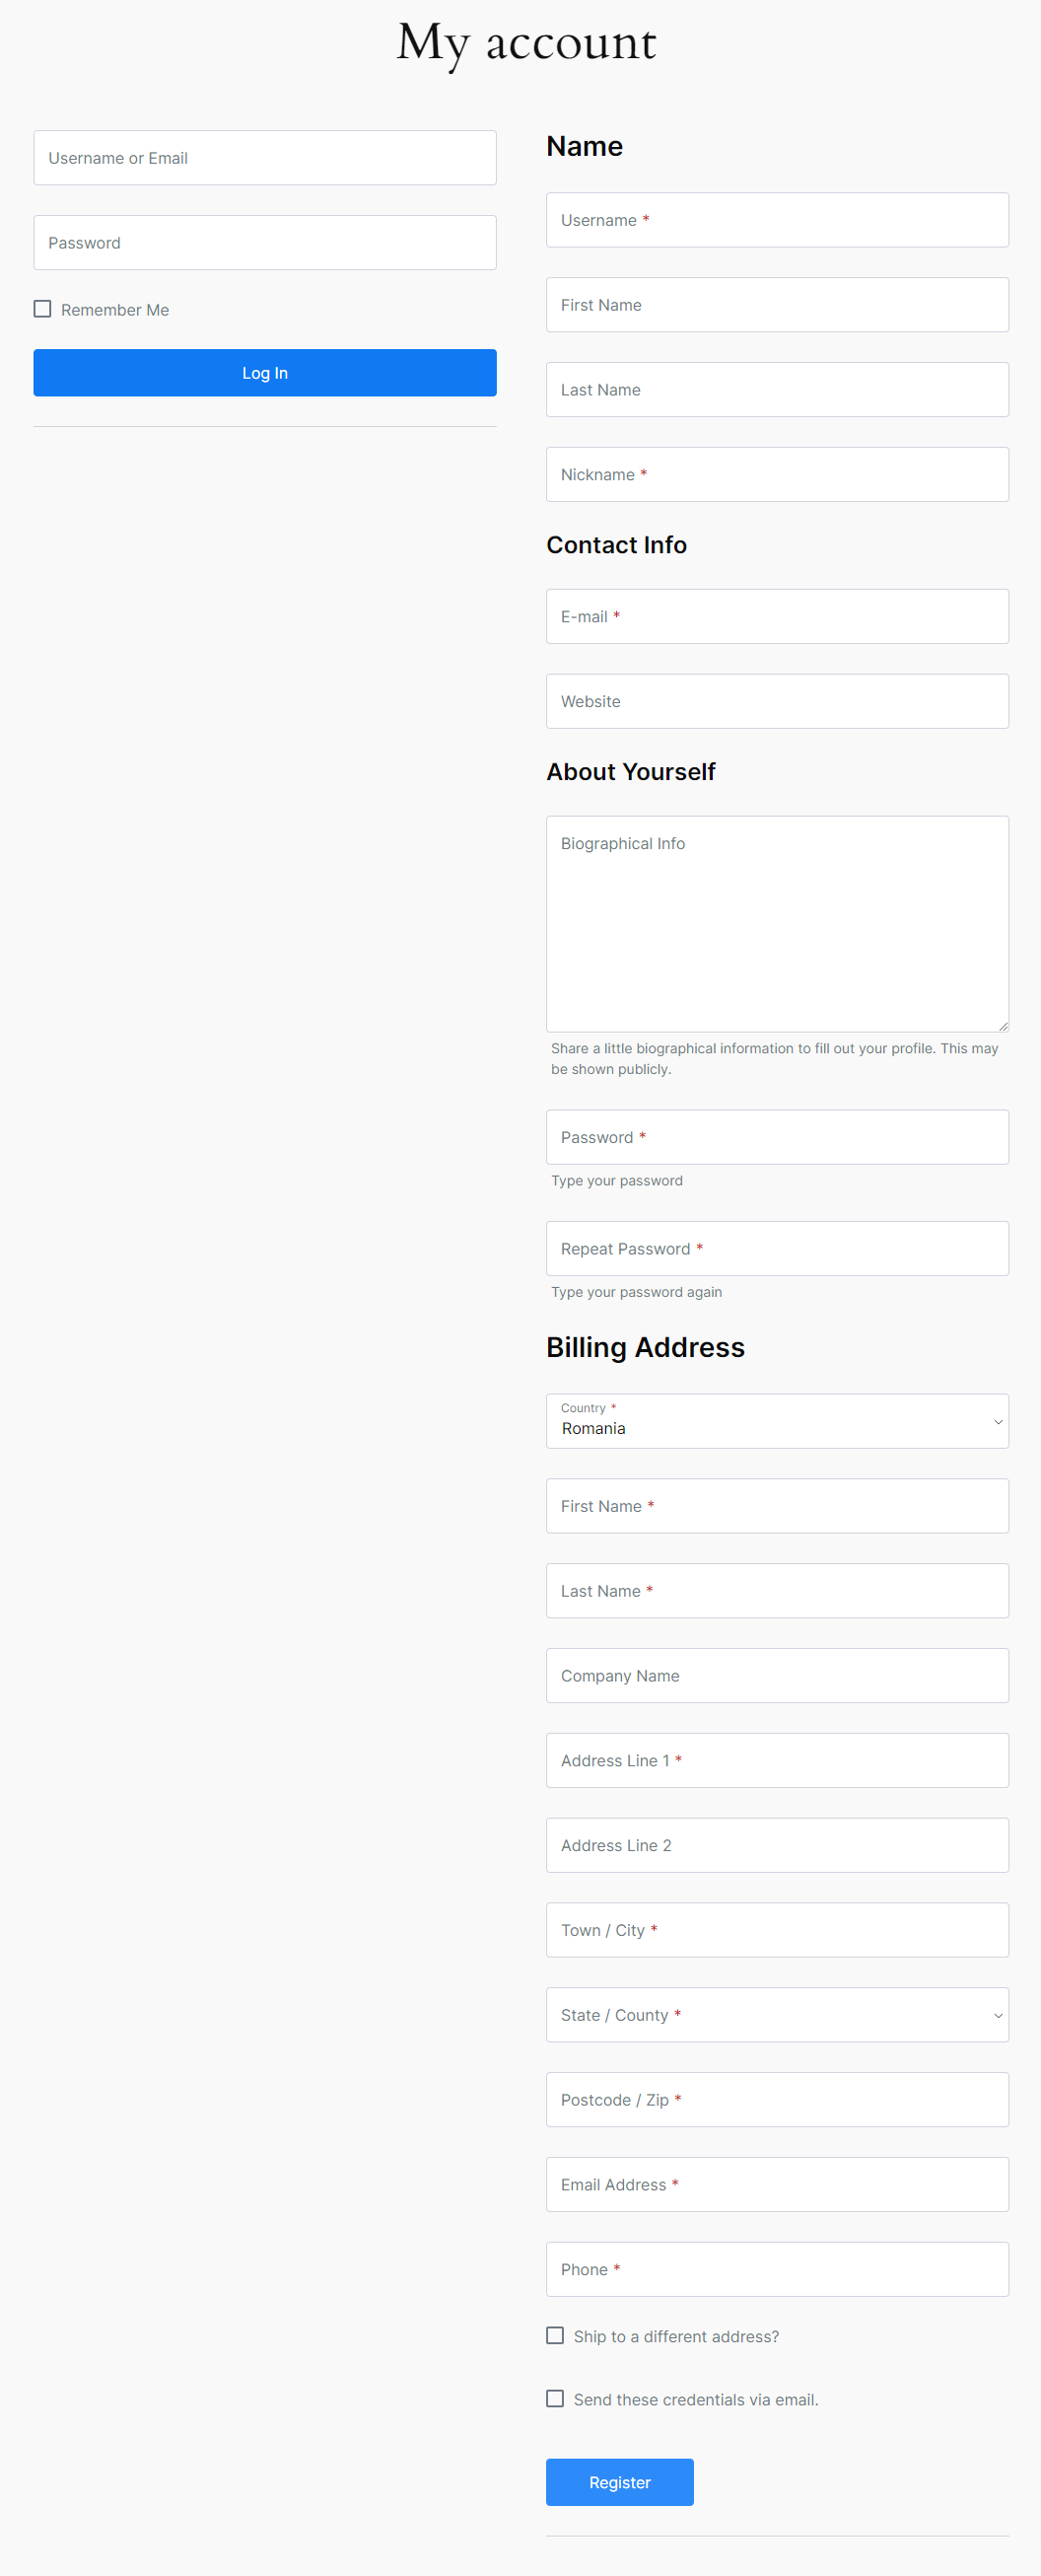
This gives you a lot of flexibility in terms of displaying the individual Billing and Shipping fields inside the Registration form:
Or inside the Edit Profile form:
So from now on, when a new user registers, you can give him access to add or modify the WooCommerce customer fields as well, all in one place.
WooCommerce Customer Billing Address Fields uses the following Meta Names:
WooCommerce Customer Shipping Address Fields uses the following Meta Names:
We can use Profile Builder’s Default and Extra Fields Types to add extra information to the “Create an Account” WooCommerce section. All fields are supported except certain default fields that are already taken into account by WooCommerce (email and username in particular).
Changes to the WooCommerce Billing and Shipping fields from Profile Builder’s Manage Fields interface do not get applied on the Checkout page.
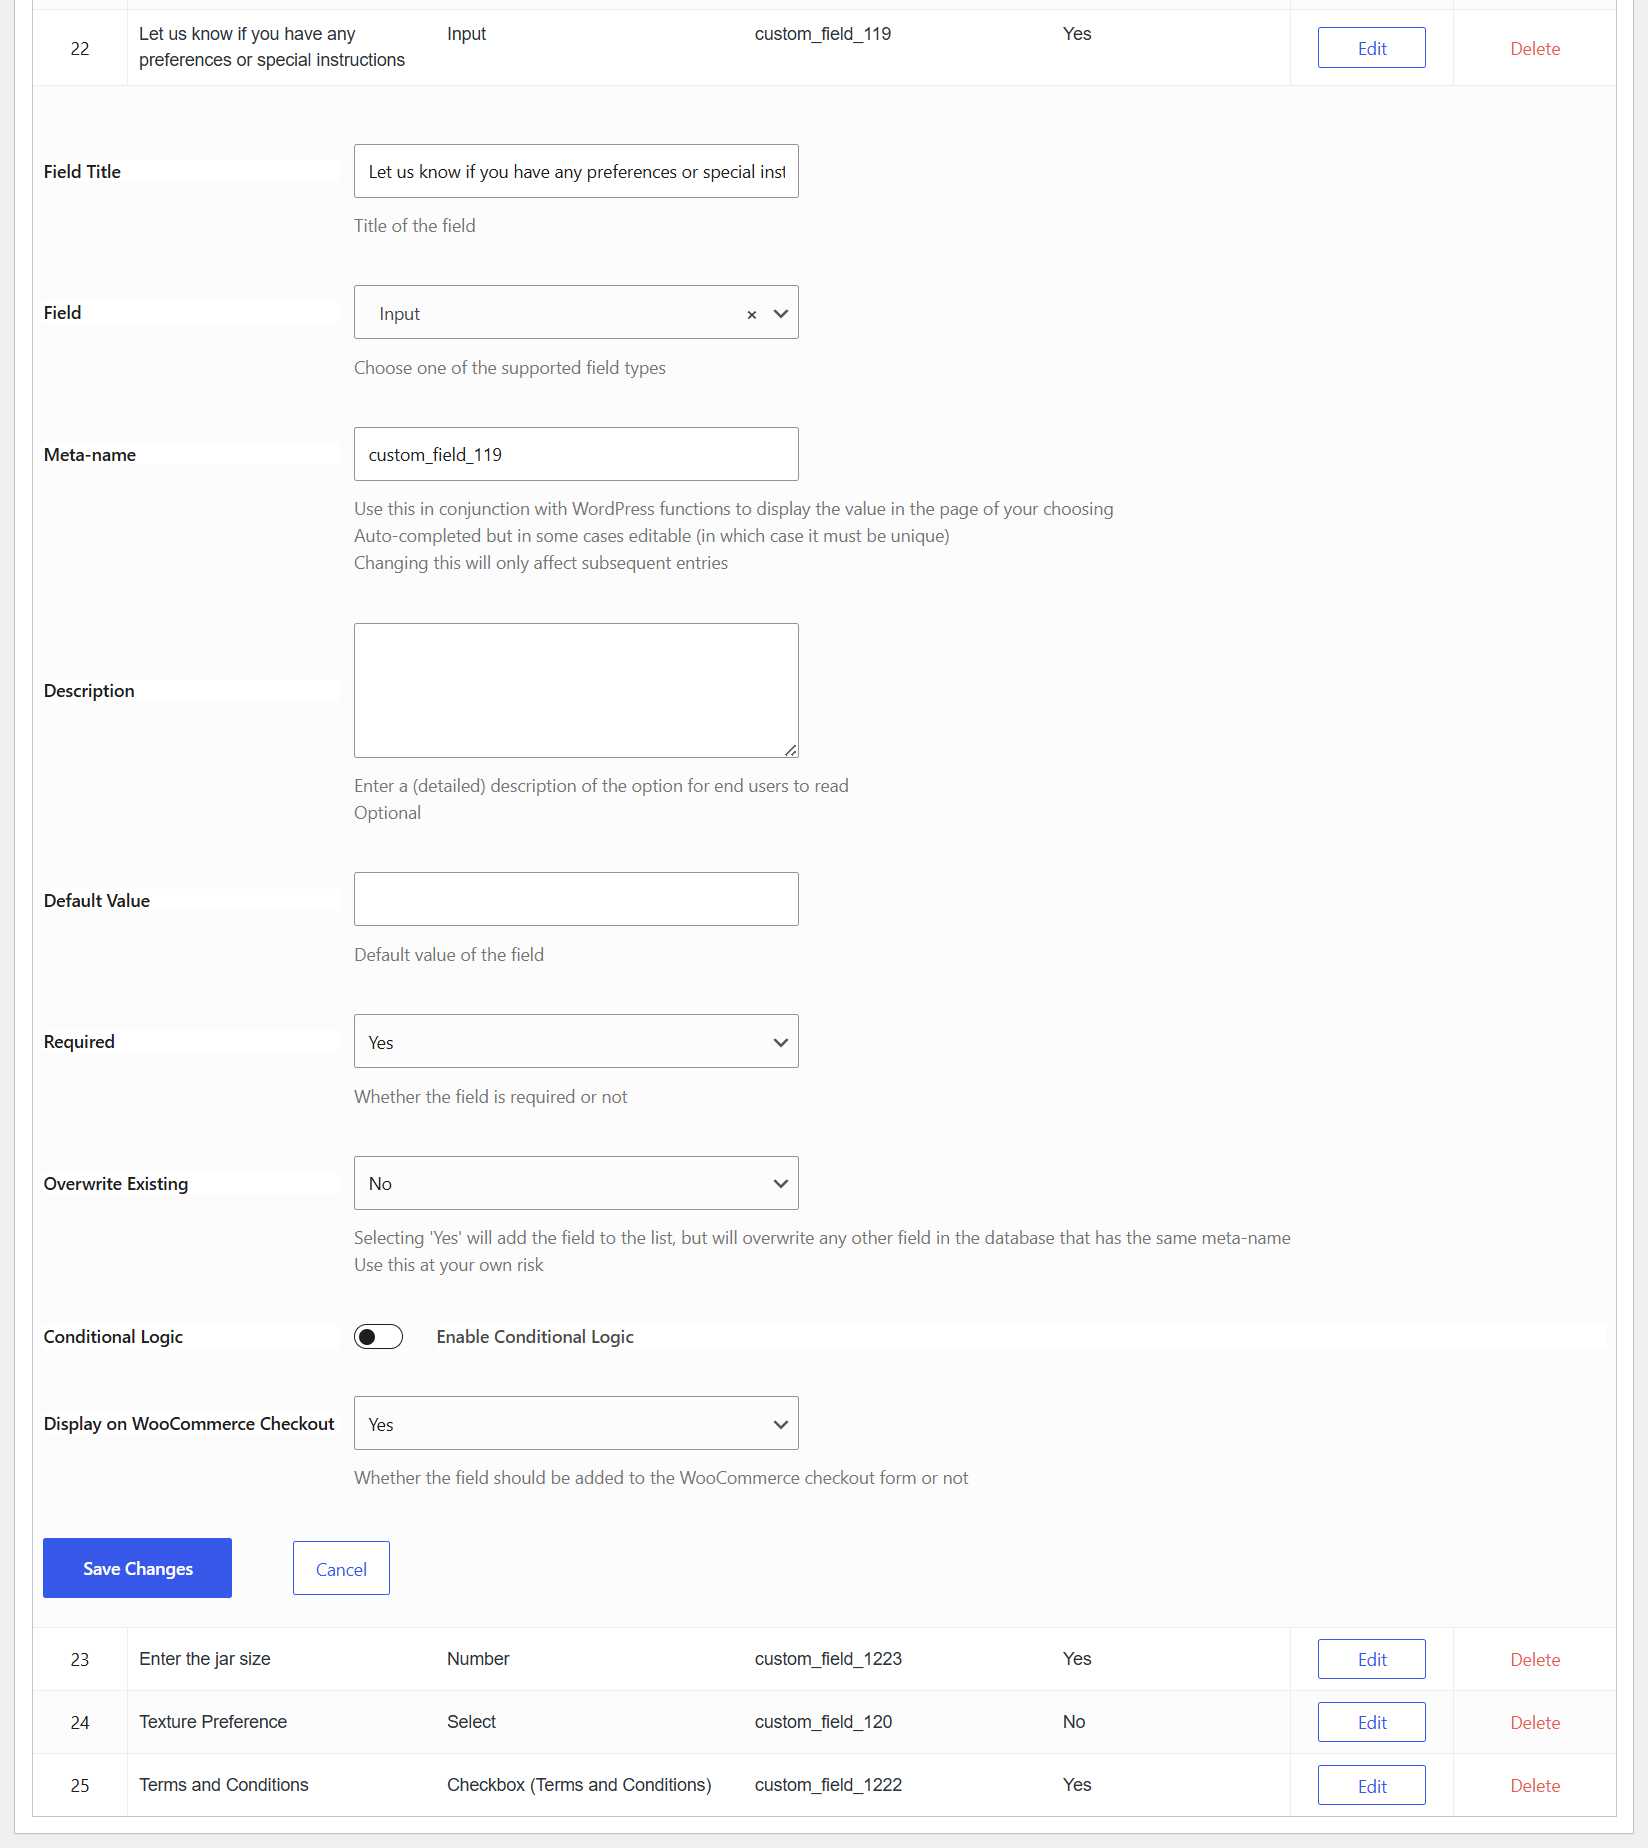
To add a Default or an Extra Field Type in the WooCommerce checkout page, you have to go to Manage Fields -> Add New / Edit Field -> Display on WooCommerce Checkout: Yes.

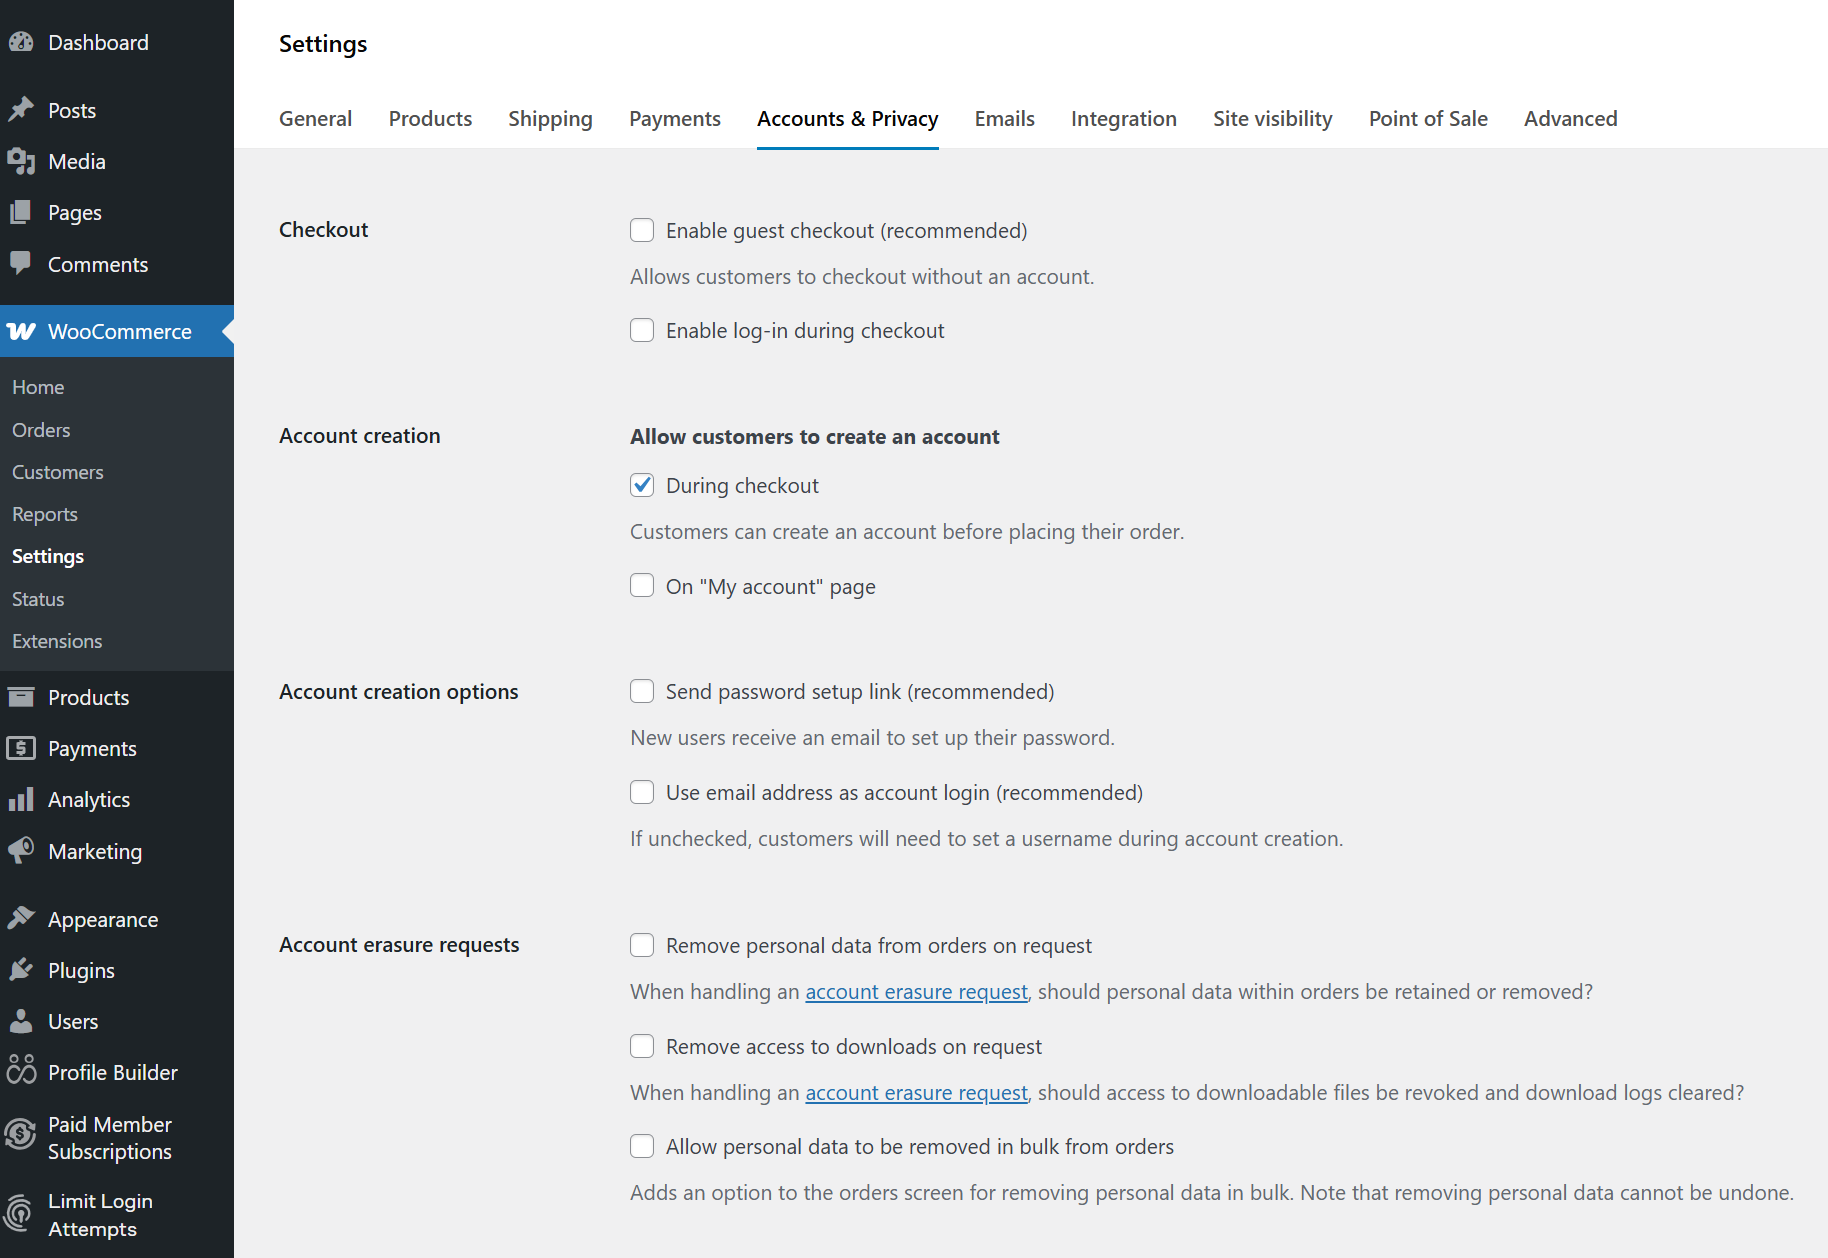
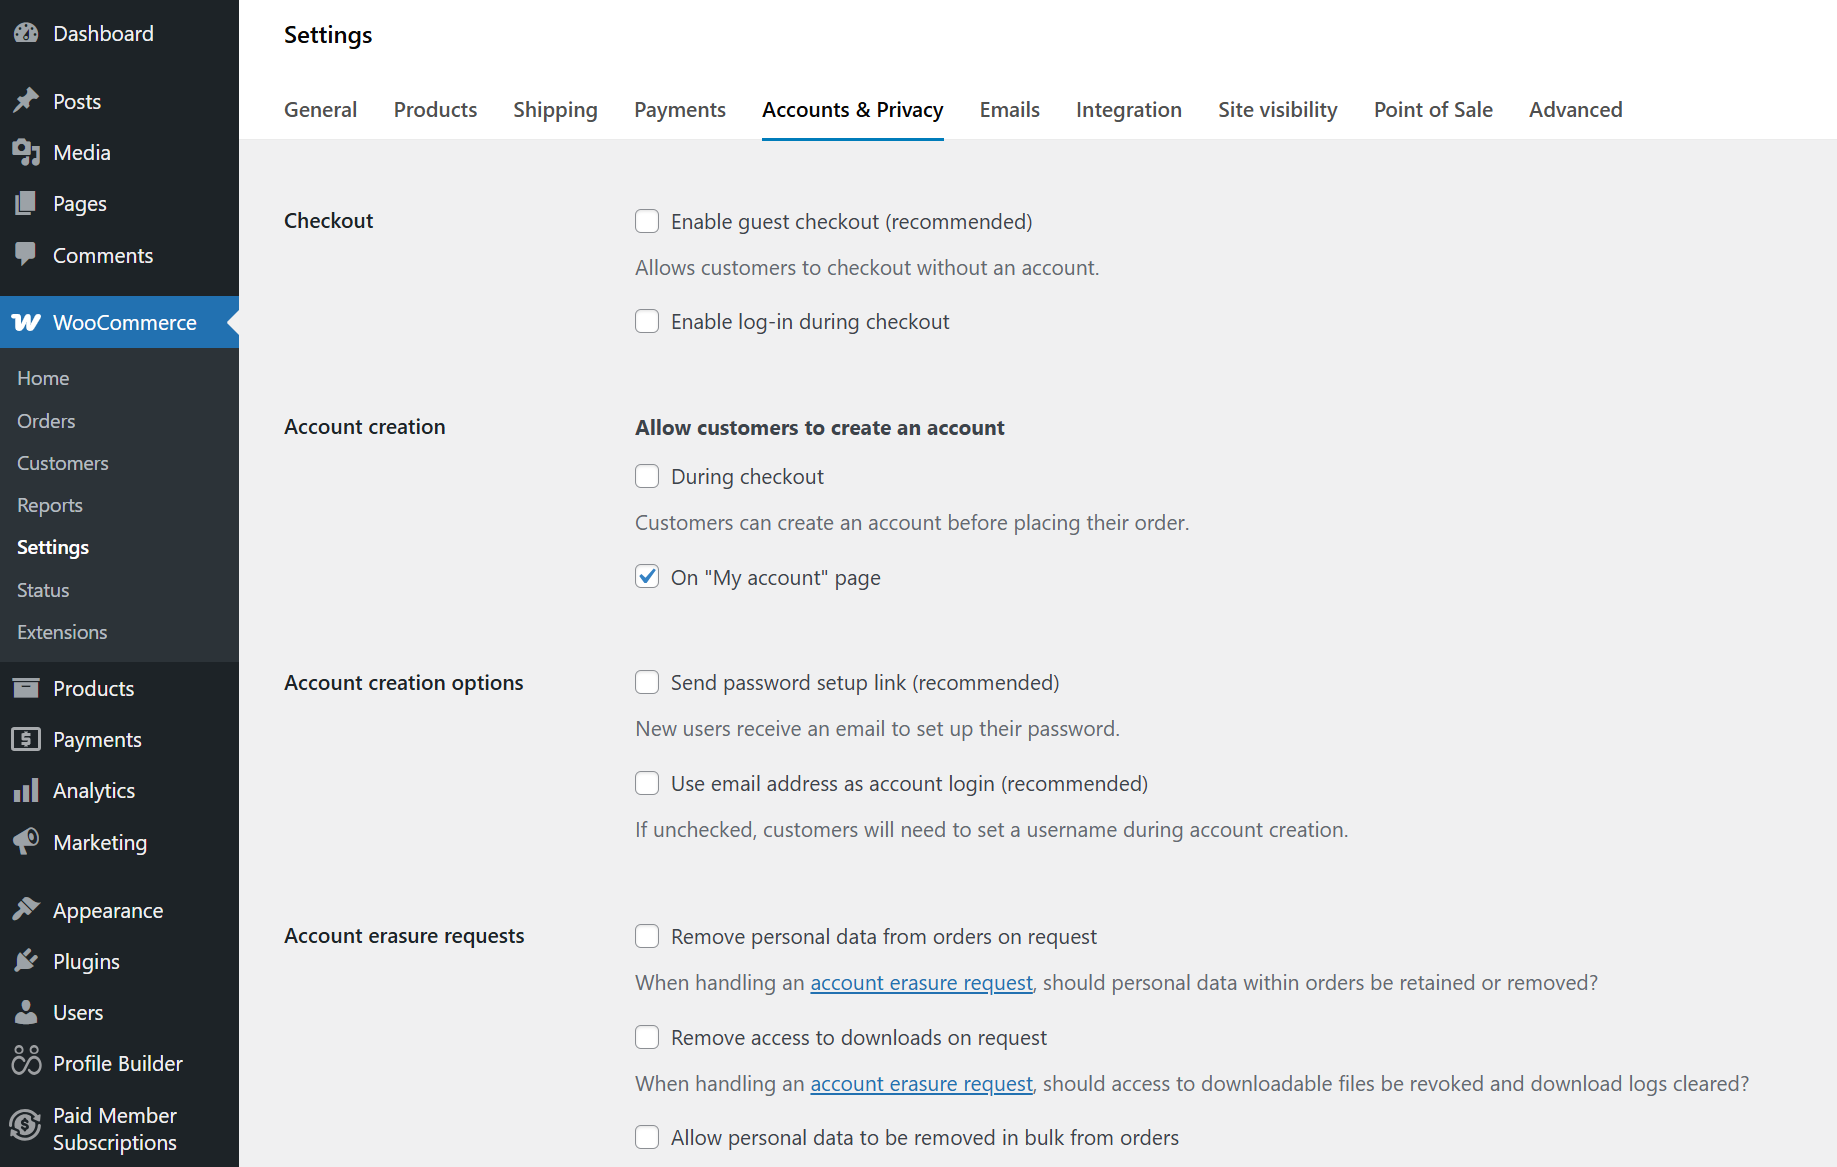
In order to let users register on the WooCommerce Checkout page, you will need to enable the During checkout setting from WooCommerce → Settings → Accounts & Privacy -> “Account creation” section
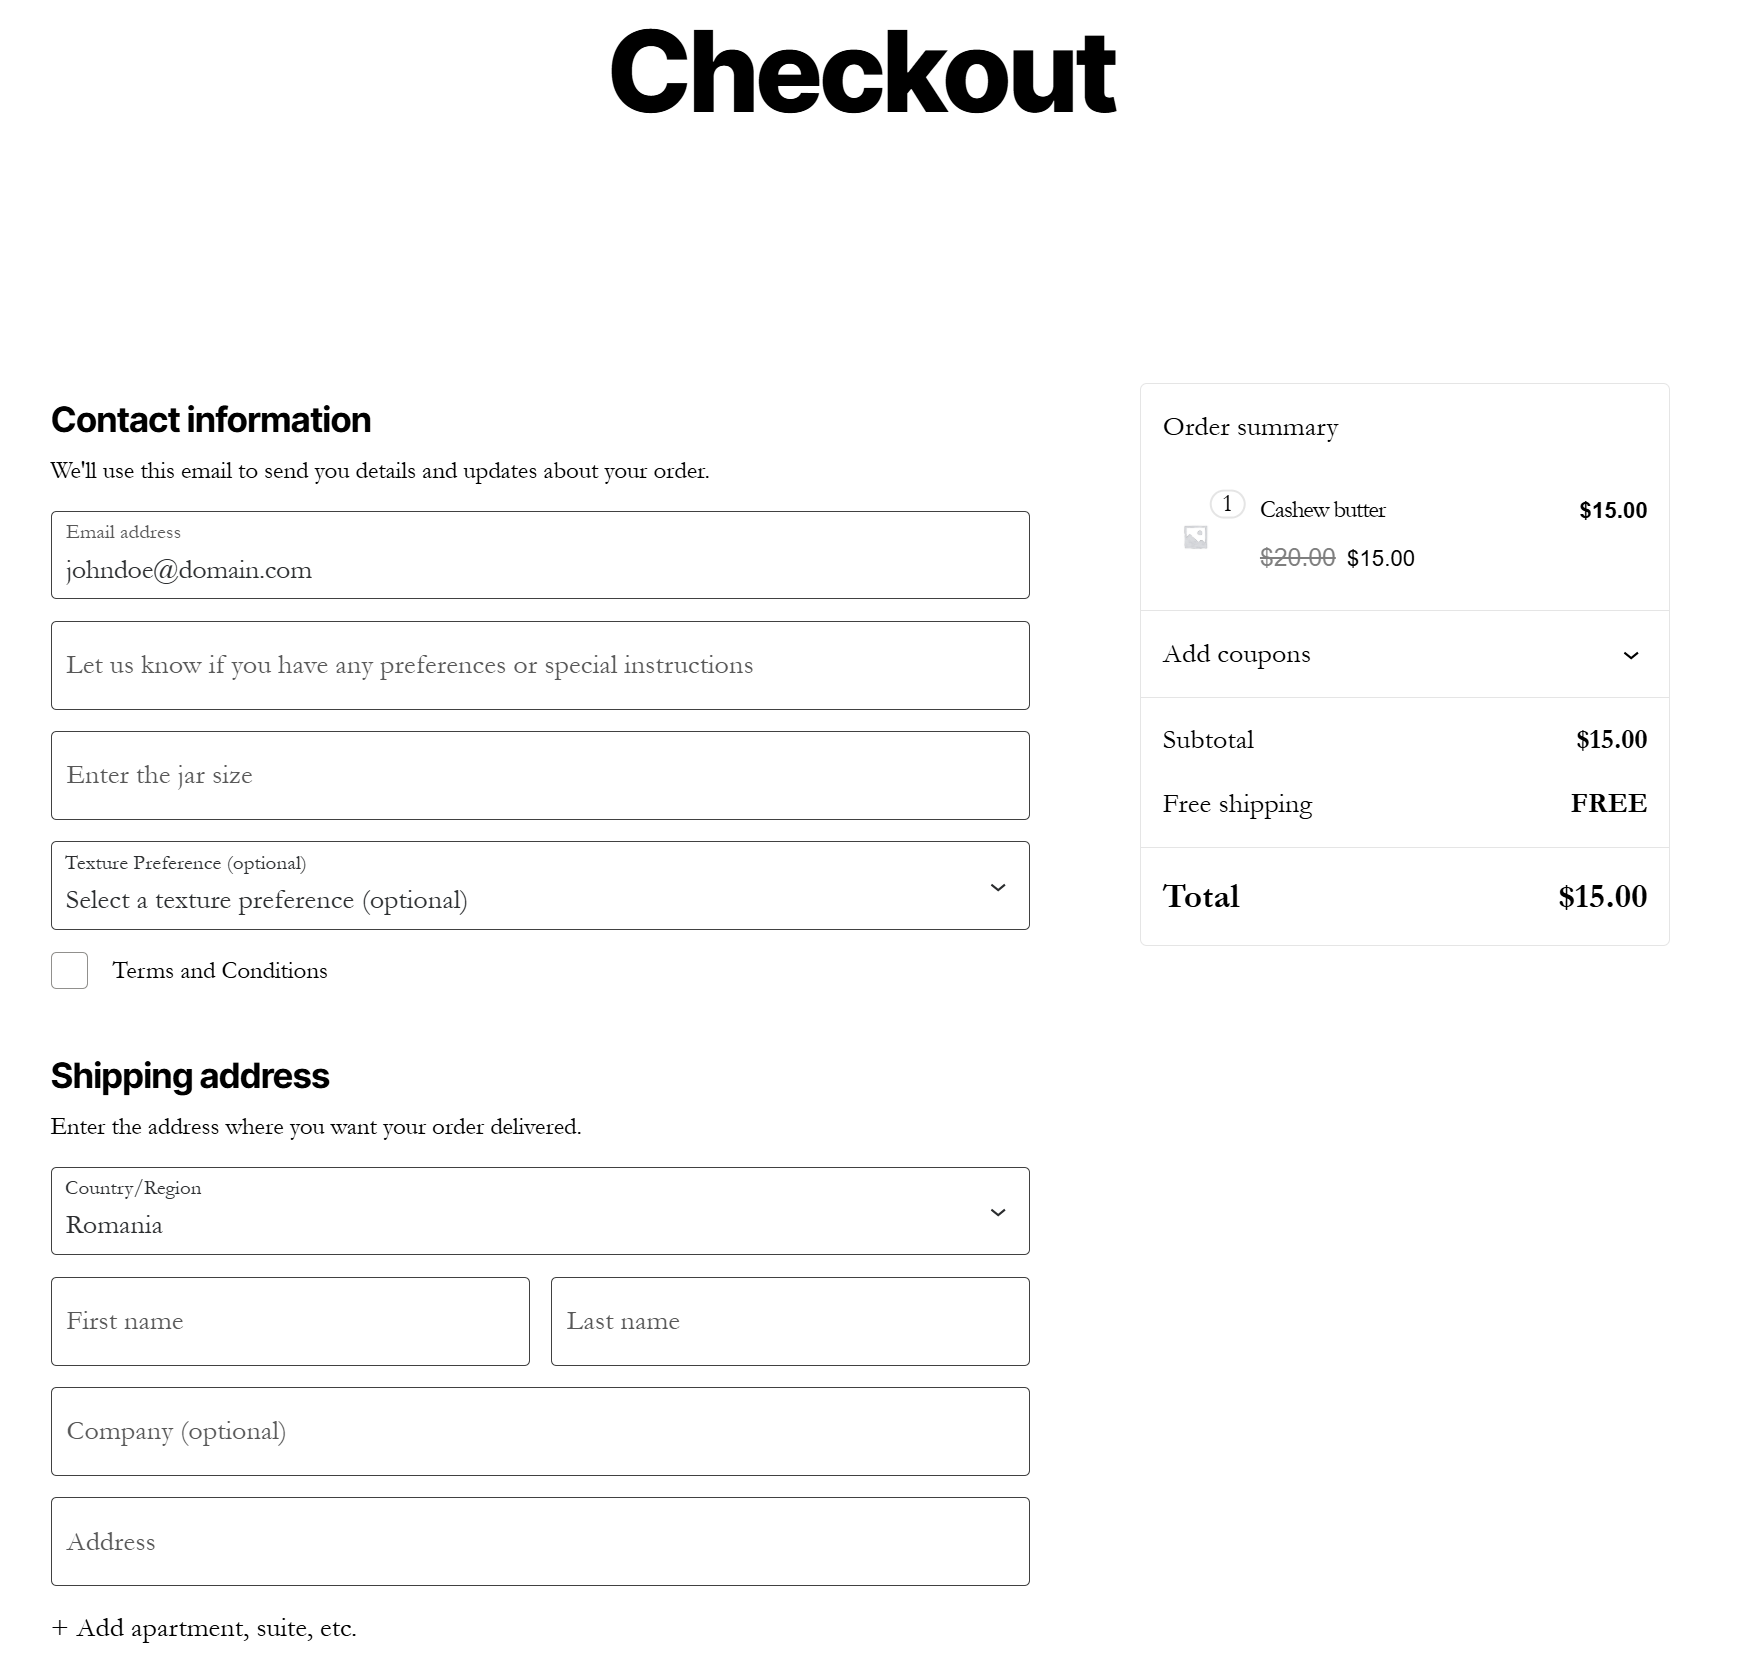
How it looks like in Frontend on the Checkout page:

WooSync allows you to use the conditional setup for user fields in Profile Builder to create advanced user profiles on the checkout page.
WooSync allows you to add repeater fields available in Profile Builder Pro version, directly on the checkout page.
The logic behind this integration is similar to the existing one, but it now supports the WooCommerce Checkout Block. Go to Profile Builder → Form Fields, edit the field you want to display, and enable the “Display on WooCommerce Checkout” setting.
And this is how it will appear on the Checkout page:
This is how the default WooCommerce My Account page looks like. In order to display the default WooCommerce Registration form we need to “Enable registration on the My Account page” from WooCommerce -> Settings -> Accounts -> Enable Registration.

In case you want to add more custom fields to the default WooCommerce Registration form you can easily integrate any Profile Builder Register form under My Account page in WooCommerce.
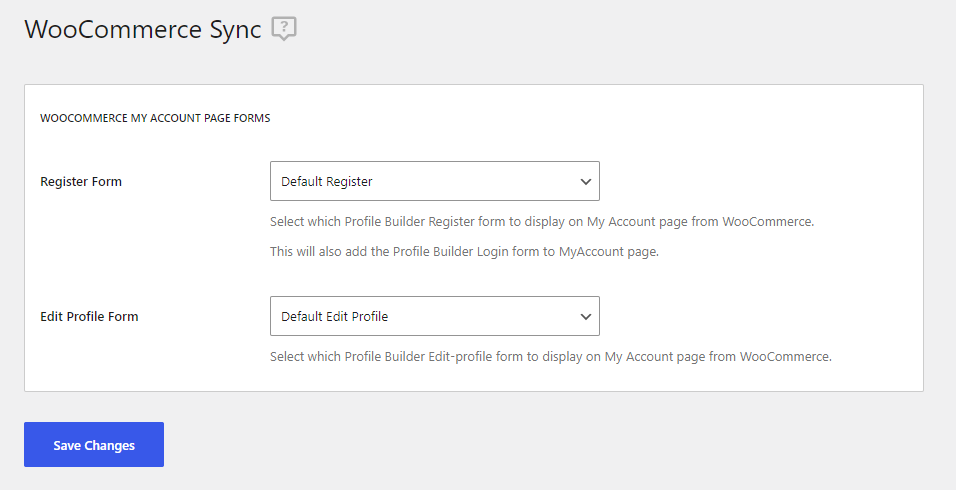
All you need to do is navigate to the WooCommerce Sync tab under Profile Builder. From there you can select which Profile Builder Registration form to display on the My Account page.
The WooCommerce Sync add-on makes it easy to add a custom Registration Form on the My Account page in WooCommerce.
First make sure you have WooCommerce Registration enabled on the My Account page by visiting WooCommerce → Settings → Accounts & Privacy -> “Account creation” section
The next step is to choose which Profile Builder Registration Form to display on the My Account page. We can choose the default Profile Builder Registration Form or a Custom Registration Form created with the Multiple Registration Forms module available in the Pro version.
This is done under WordPress Admin → Profile Builder → WooCommerce Sync.
This will allow you to collect extra information about WooCommerce customers on both the Checkout and My Account page.
Similar to adding a Registration Form, we can replace the default WooCommerce Edit Profile form with a custom Edit Profile form created with Profile Builder.
We can choose the default Profile Builder Edit Profile Form or a Custom Edit Profile Form created with the Multiple Edit Profile Forms module available in the Pro version.
You can replace the Edit Profile form in WordPress Admin -> Profile Builder -> WooCommerce Sync.
To view the Profile Builder Edit Profile form in frontend, you will need to log in and access the My Account page.
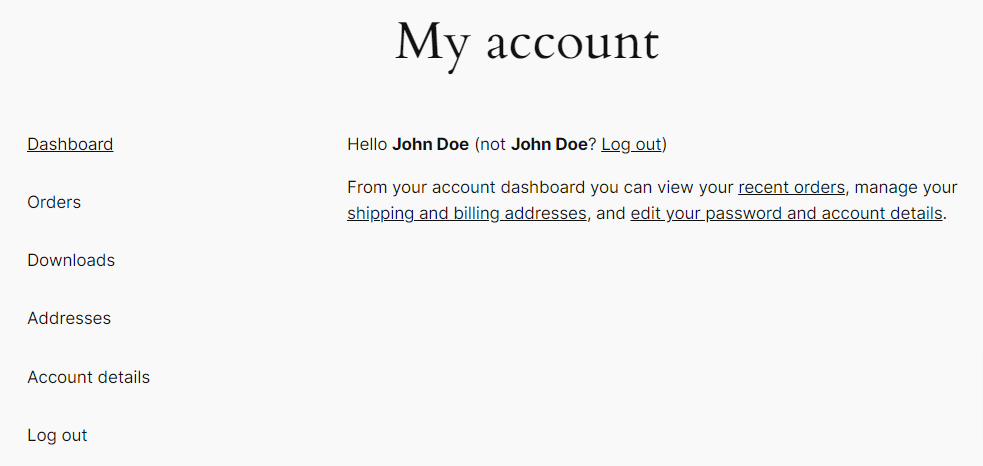
Clicking on the “edit your password and account details” or “Account Details” links will take the user to the Edit Profile form created with Profile Builder.
In order to integrate Profile Builder Pro with WooCommerce, you will need to have the following plugins installed and activated on your site:
First, you will need to go to Profile Builder -> Manage Fields to create the WooCommerce Customer Billing Address and WooCommerce Customer Shipping Address fields.
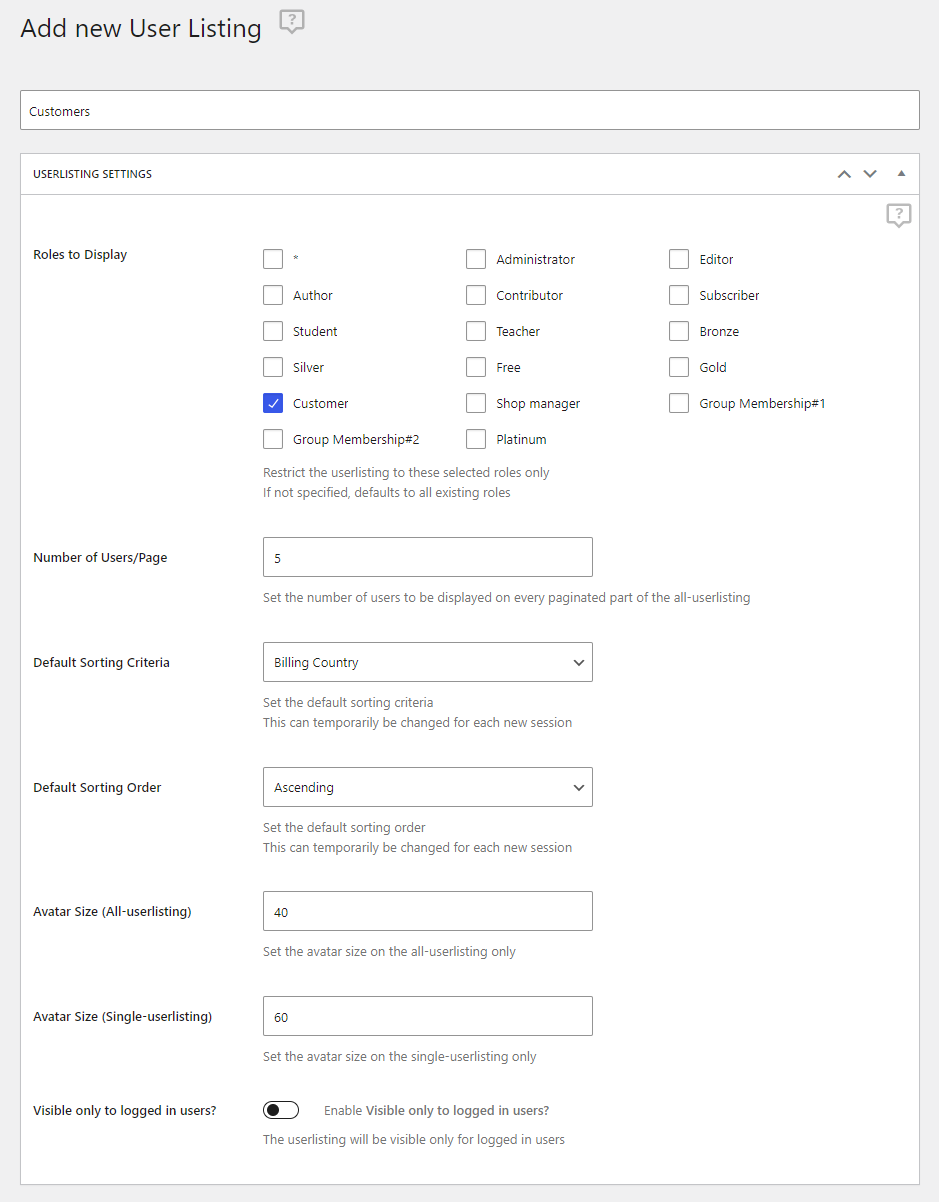
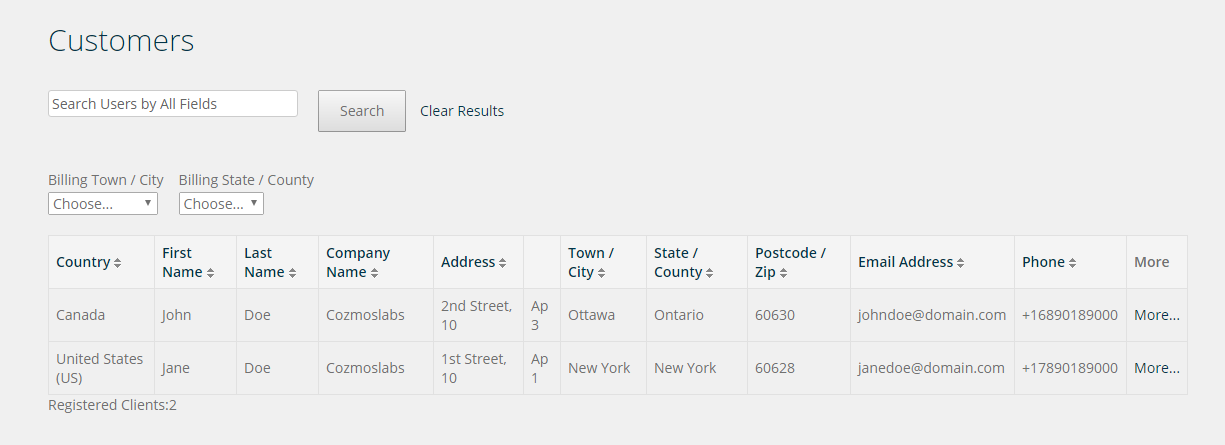
The next step is to setup the User Listing so go to Profile Builder -> User Listing -> Add New. In our case, we named our User Listing – “Customers”. We also checked, in the “Roles to Display” option, the Customer role.
By doing so only users with the “Customer” role will be displayed in the User Listing. This role is created by the WooCommerce plugin.
We also set the Default Sorting Criteria to “Billing Country” – Order Ascending. This option will list and sort the users ascending based on Country.
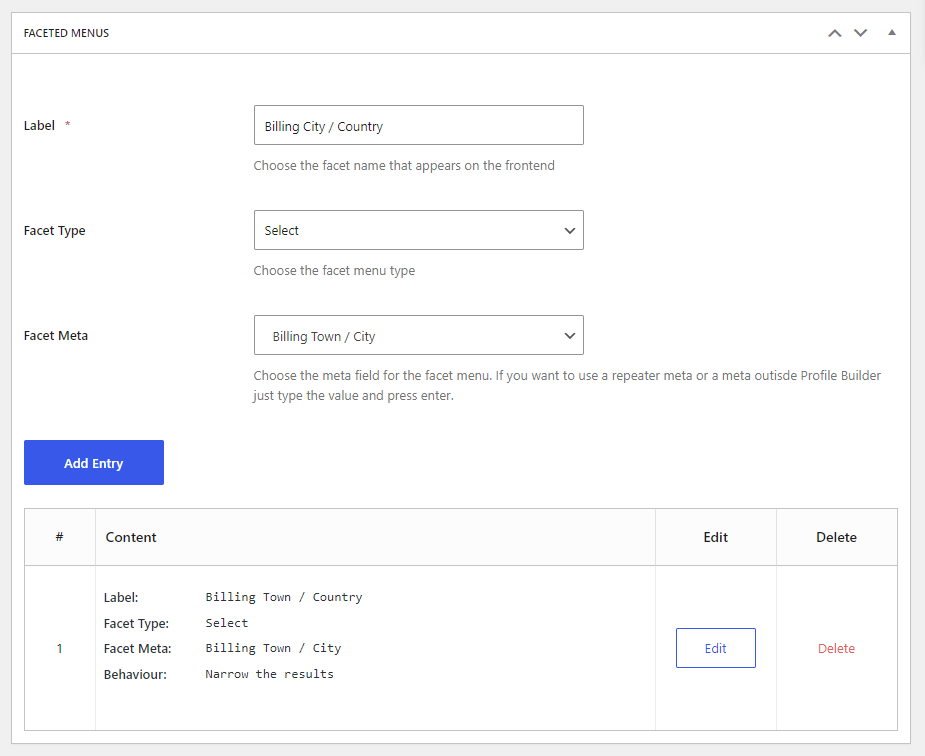
In the Faceted Menus section, we can add filters to further sort our User Listing based on WooCommerce fields. We added a filter based on Billing Town / City and another one based on Billing State / County.
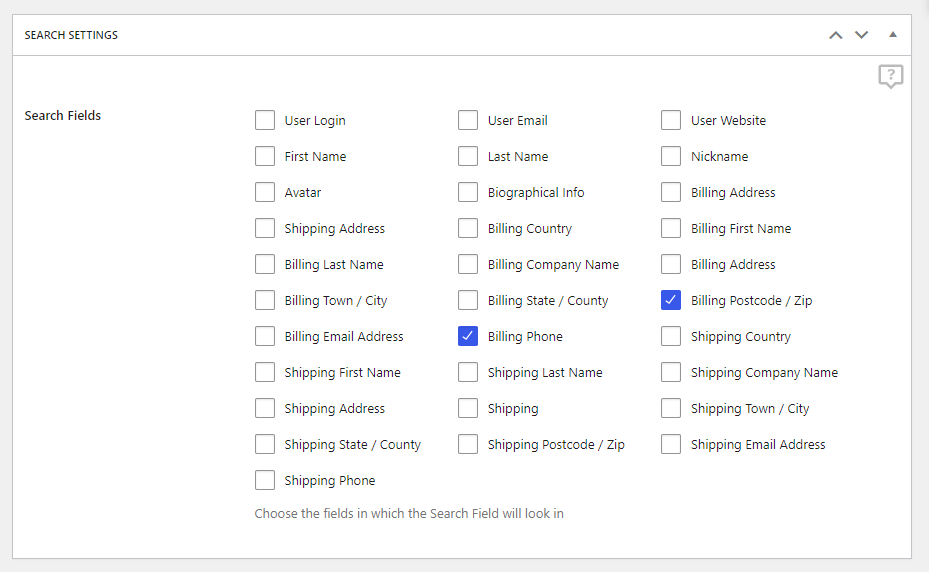
In the Search Settings tab, we can set in which fields should the Search Field look into. For example, we can allow to search based on Billing Postcode / Zip and Billing Phone.
In order to generate the Search field in Front End, in the User Listing, you will need to use the {{{extra_search_all_fields}}} tag, found in the Extra Functions tab, inside the All-Userlisting Template.
In the All-Userlisting Template, we can add all the WooCommerce fields by using the appropriate User Fields Tags.
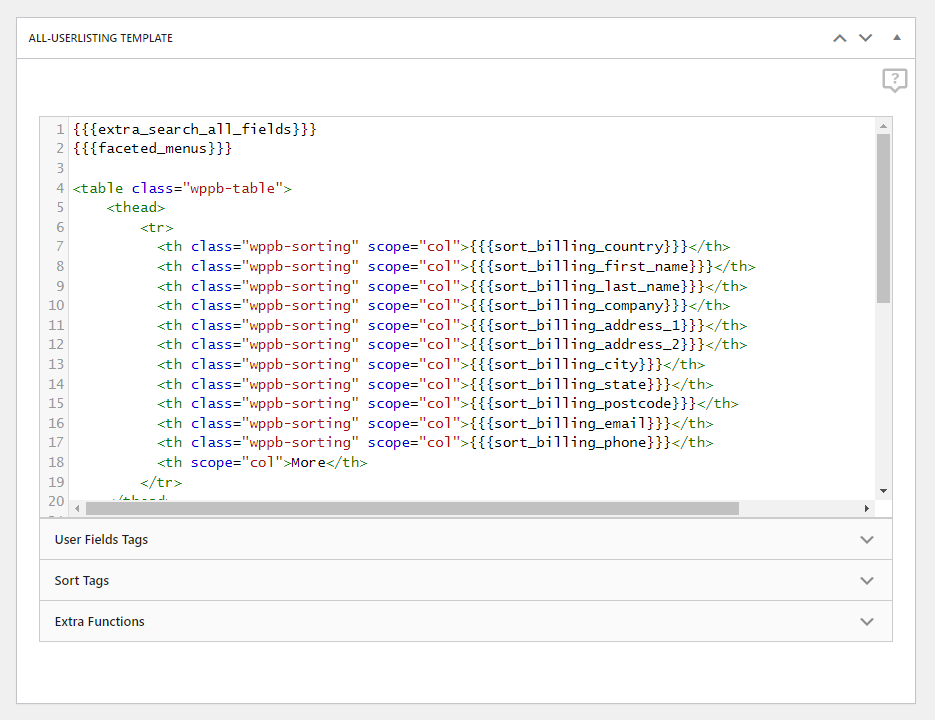
{{{extra_search_all_fields}}}
{{{faceted_menus}}}

<table class="wppb-table">
	<thead>
		<tr>
		  <th class="wppb-sorting" scope="col">{{{sort_billing_country}}}</th>
		  <th class="wppb-sorting" scope="col">{{{sort_billing_first_name}}}</th>
		  <th class="wppb-sorting" scope="col">{{{sort_billing_last_name}}}</th>
		  <th class="wppb-sorting" scope="col">{{{sort_billing_company}}}</th>
		  <th class="wppb-sorting" scope="col">{{{sort_billing_address_1}}}</th>
		  <th class="wppb-sorting" scope="col">{{{sort_billing_address_2}}}</th>
		  <th class="wppb-sorting" scope="col">{{{sort_billing_city}}}</th>
		  <th class="wppb-sorting" scope="col">{{{sort_billing_state}}}</th>
		  <th class="wppb-sorting" scope="col">{{{sort_billing_postcode}}}</th>
		  <th class="wppb-sorting" scope="col">{{{sort_billing_email}}}</th>
		  <th class="wppb-sorting" scope="col">{{{sort_billing_phone}}}</th>
	      <th scope="col">More</th>
		</tr>
	</thead>
	<tbody>
		{{#users}}
		<tr>
			<td class="wppb-billing-country" data-label="Billing Country">{{meta_billing_country}}</td>
			<td class="wppb-billing-first-name" data-label="Billing First Name">{{meta_billing_first_name}}</td>
			<td class="wppb-billing-last-name" data-label="Billing Last Name">{{meta_billing_last_name}}</td>
			<td class="wppb-billing-company" data-label="Billing Company">{{meta_billing_company}}</td>
			<td class="wppb-billing-address-1" data-label="Billing Address 1">{{meta_billing_address_1}}</td>
			<td class="wppb-billing-address-2" data-label="Billing Address 2">{{meta_billing_address_2}}</td>
			<td class="wppb-billing-city" data-label="Billing City">{{meta_billing_city}}</td>
			<td class="wppb-billing-state" data-label="Billing State">{{meta_billing_state}}</td>
			<td class="wppb-billing-postcode" data-label="Billing Postcode">{{meta_billing_postcode}}</td>
			<td class="wppb-billing-email" data-label="Billing Email">{{meta_billing_email}}</td>
			<td class="wppb-billing-phone" data-label="Billing Phone">{{meta_billing_phone}}</td>
			<td class="wppb-moreinfo" data-label="More">{{{more_info}}}</td>
		</tr>
		{{/users}}
	</tbody>
</table>
Registered Clients:{{{user_count}}} {{{pagination}}}
In the Single-Userlisting Template, we can add all the WooCommerce fields by using the appropriate User Fields Tags.
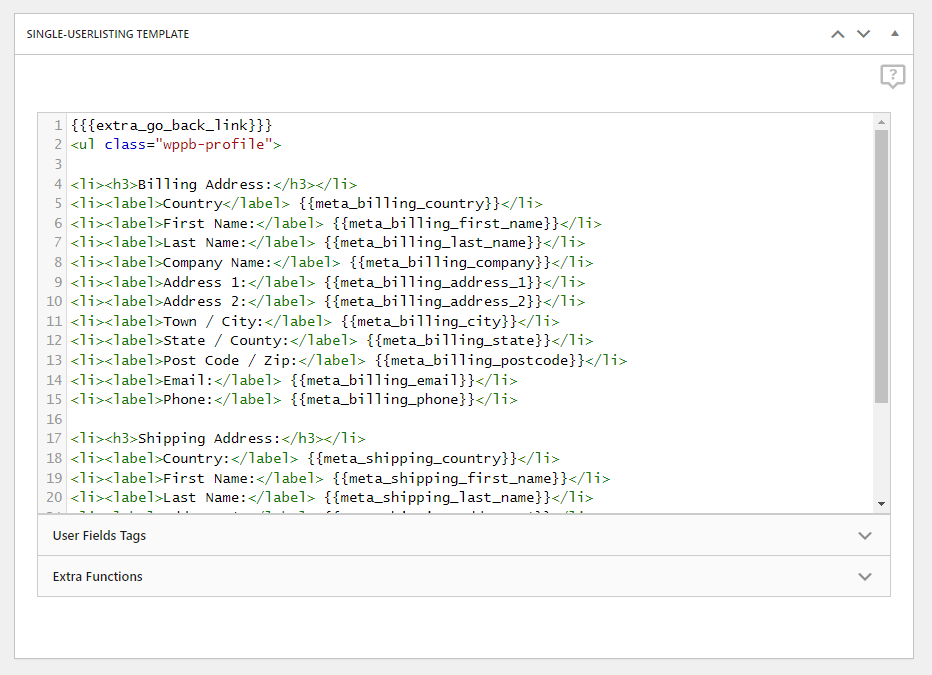
{{{extra_go_back_link}}}
<ul class="wppb-profile">


<li><h3>Billing Address:</h3></li>
<li><label>Country</label> {{meta_billing_country}}</li>
<li><label>First Name:</label> {{meta_billing_first_name}}</li>
<li><label>Last Name:</label> {{meta_billing_last_name}}</li>
<li><label>Company Name:</label> {{meta_billing_company}}</li>
<li><label>Address 1:</label> {{meta_billing_address_1}}</li>
<li><label>Address 2:</label> {{meta_billing_address_2}}</li>
<li><label>Town / City:</label> {{meta_billing_city}}</li>
<li><label>State / County:</label> {{meta_billing_state}}</li>
<li><label>Post Code / Zip:</label> {{meta_billing_postcode}}</li>
<li><label>Email:</label> {{meta_billing_email}}</li>
<li><label>Phone:</label> {{meta_billing_phone}}</li>

<li><h3>Shipping Address:</h3></li>
<li><label>Country:</label> {{meta_shipping_country}}</li>
<li><label>First Name:</label> {{meta_shipping_first_name}}</li>
<li><label>Last Name:</label> {{meta_shipping_last_name}}</li>
<li><label>Address 1:</label> {{meta_shipping_address_1}}</li>
<li><label>Address 2:</label> {{meta_shipping_address_2}}</li>
<li><label>Town / City:</label> {{meta_shipping_city}}</li>
<li><label>State / County:</label> {{meta_shipping_state}}</li>
<li><label>Postcode / Zip:</label> {{meta_shipping_postcode}}</li>
</ul>
{{{extra_go_back_link}}}
To view the User Listing in Frontend we will need to use the generated shortcode inside a page. In our case the shortcode will look like this: [wppb-list-users name="customers"]
This is how the User Listing will look in Front End.
WooCommerce Sync is an Advanced add-on, available with a Profile Builder Basic or Pro license.
Create beautiful front-end registration and profile forms with custom fields. Setup member directories, custom redirects, cutomize user emails & more using the all in one user management plugin.
Get Profile BuilderCombine the power of Profile Builder with Paid Member Subscriptions to set up user registration, memberships, and recurring revenue.
Get 25% off with the bundle
