

Table of Contents
There are numerous reasons why you might want to allow users to register for your website. However, the default login and registration forms that come with WordPress look outdated.
In addition to that, they aren’t easy to customize which means you can’t add or remove fields from the registration form unless you want to get your hands dirty with code.
Another problem with the standard WordPress registration is that it doesn’t do much to prevent spam and bot registrations out-of-the-box.
One of the ways to combat spam registration is to enable WordPress email verification. That’s precisely where the Profile Build Pro plugin comes in. The plugin has a free version that can be downloaded from the official repository. The free version has all the functionality you need to set up WordPress email verification.
There’s also a premium version of the plugin that comes with more advanced features such as custom redirects and email customization; to name a few.
In this tutorial, we’ll show you how to set up WordPress email verification to ensure your visitors entered a genuine email as well as to prevent spam registrations.
How to Build A Front-End Registration Form
The first step is to build a front-end registration form that will allow visitors to register for your website. This is the place where they will also be asked to insert an email address. Let’s go through this process, step-by-step.
Create Necessary Pages
Once you’ve purchased the Profile Builder Pro plugin, you can download the plugin files from your account area and save them on your computer in an easily accessible location.
Next, go to your WordPress website and log in to your dashboard. Install the Profile Builder Pro plugin by going to Plugins → Add new → Upload. Press the Choose file button and locate the zipped folders with the plugin’s contents on your computer. Press the Install button and once it’s installed, click on Activate. Repeat this for both downloaded archives.
You’ll be taken to the plugin’s dashboard where you’ll create the login, registration, and edit profile pages with a single click. To do so, click on the Create Form Pages.
The plugin will then create the necessary pages and take you to the Pages section where you can edit them as well as see how they look on the front end of your website.
Customize the Registration Form with Fields
You can customize the registration form by removing or adding new fields to it. To do so, go to Profile Builder → Form Fields. You can then delete any of the form fields you don’t need as well as add those that are better suited for your website.
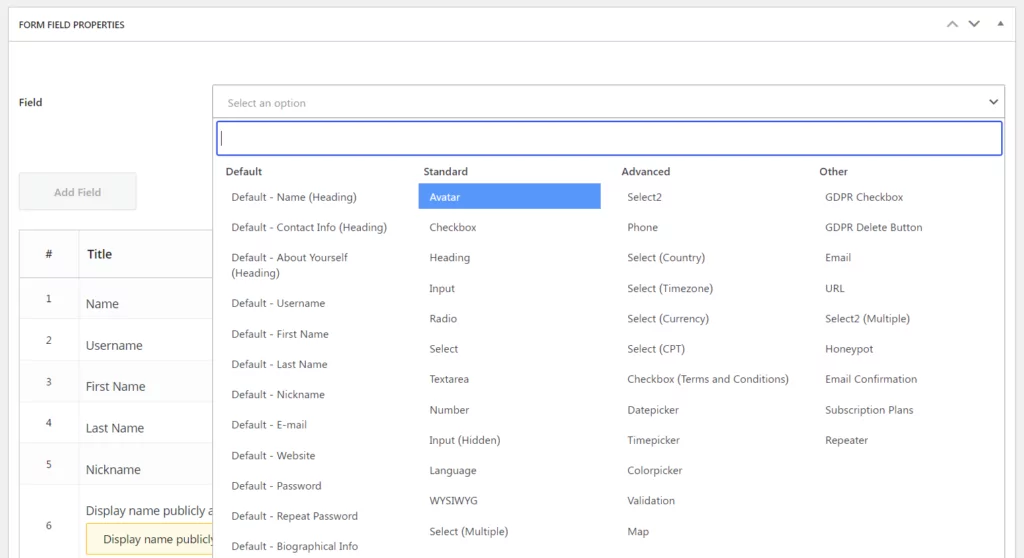
For example, maybe you want to allow visitors to upload their own profile photos. In that case, you can add the Avatar field which will allow them to upload a photo they want to display on their profile.
Or maybe, you want to add GDPR consent boxes. Profile Builder makes it easy to do so and you can even add custom fields.
In any case, the one field you’ll want to add here is the Email Confirmation field. Customize it with your own text and ensure the visitors know they have to re-enter their email address to make sure they didn’t make a mistake in their email address.
Redirect Default WordPress Registration and Login Pages
The last step is to redirect the default back-end WordPress registration and login to the front-end pages created with Profile Builder. This makes sure everyone trying to register or log in to our website won’t go through the basic and not-so-user-friendly WordPress registration process and will be redirected to our custom front-end forms instead.
After this, we can proceed to set up WordPress email verification and confirmation.
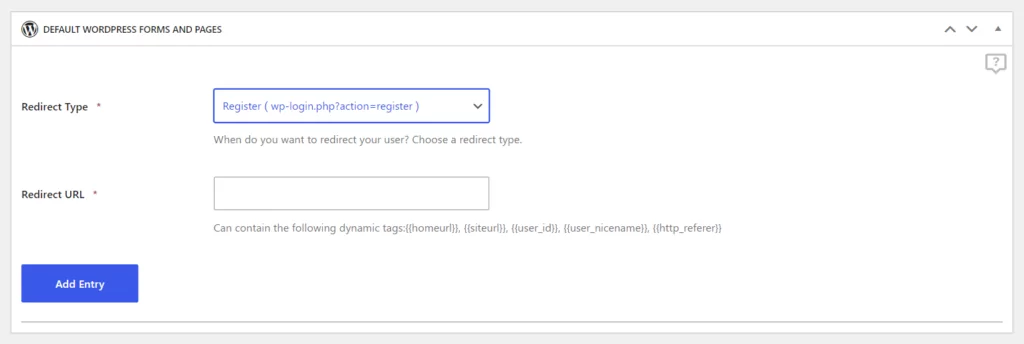
For this, you’ll need to redirect the default WordPress registration form to the registration form built with Profile Builder with the help of the Custom Redirects module. This is a premium module that’s available in the Pro version of the Profile Builder plugin.
Go to Profile Builder → Add-Ons and activate the Custom Redirects Module. Then, go to Profile Builder → Custom Redirects and scroll down to the section that allows you to redirect default WordPress posts and pages.

From the drop-down menu, select the default WordPress registration page and enter the URL for the registration page you’ve created with the Profile Builder Plugin. Click Add Entry. Then, repeat this process for the Login page.
Now that your form is customized and the default pages have been redirected, let’s set up email verification on the backend.
Setting Up WordPress Email Verification
The first thing you’ll want to do is go to Profile Builder → Settings and make sure that the Email Verification Activated is set to Yes. Save your changes. This will send a confirmation email to every user who registers on your website.
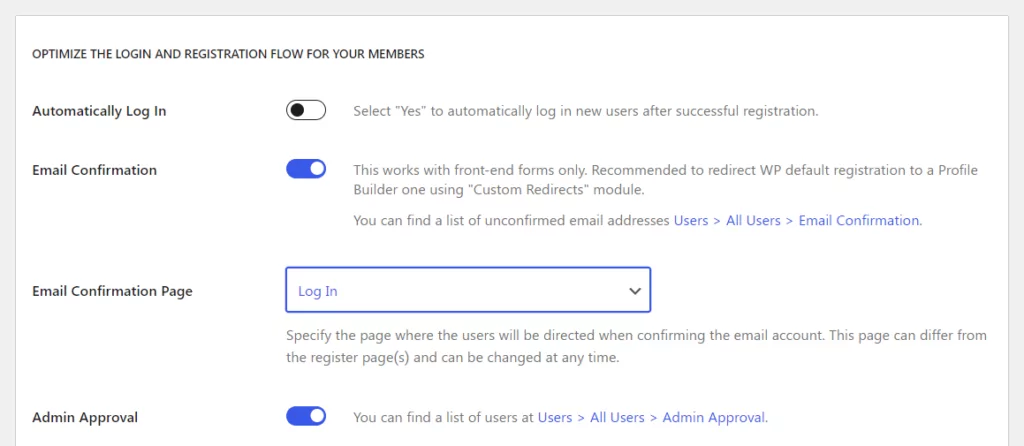
You’ll also want to set up an email confirmation landing page. This is where users will end up after they click the email confirmation link in the email.
You have a few options here. For example, you can set up a custom page with a simple confirmation message along with a link to login into their account.
Another option is to redirect them immediately to the login page so they can log in to their account and start editing their profile.
Keep in mind that if you don’t choose a page here, they will see the Profile Builder’s default email confirmation page. While this is not necessarily bad, it leaves your visitors hanging and unsure of what to do next.
As such, we recommend you set this to a custom confirmation page that welcomes them to your site. Use this page to tell them what the next steps are now that they have registered and confirmed their account.
Another thing to keep in mind is that you can change this page at any point in time. This is useful if you’re still working on your site and want to redirect your users to a temporary page.
When you’re done, click Save changes. You can now test your registration form and ensure everything is working as it should.
Additional Registration Form Settings For WordPress Email Verification
There are a few extra registration form settings worth looking into that will help make your forms more secure.

For starters, you can allow users to log in with their username, their email address, or both. You can find this setting under Profile Builder → Settings → General.
Another setting you can change is to set the minimum password length. You can enter the minimum characters that the password should have. If you leave it empty, the password can be any length.
The last setting you can change to make your forms more secure is to set password strength. This will prevent users from entering weak passwords that are easy to guess and make it harder to hack their accounts.
Dealing With Unconfirmed Email Addresses
So now you know how to build a custom registration form, set up registration and login pages, and make sure WordPress email verification is in place to prevent spam registrations.
However, in some cases, your users might not immediately verify their email addresses. They might even email you to ask how they can access their profile and access the content they’ve registered for.
There are a few ways to go about this.
Manually Confirm Unverified Email Addresses
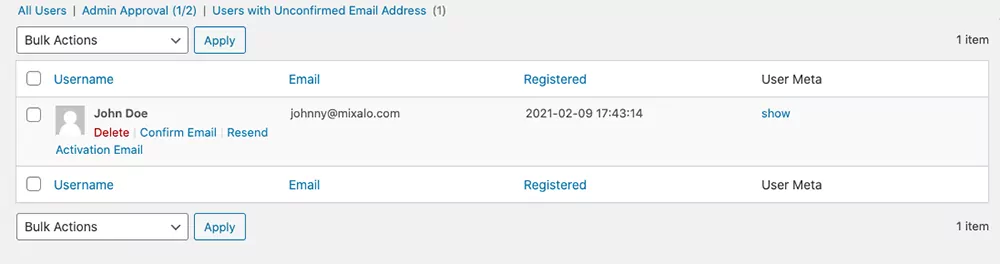
Option #1 is to manually confirm emails that were not verified. You can do this by going to Users → All Users. Then, click on the tab that says Users with Unconfirmed Email Address.
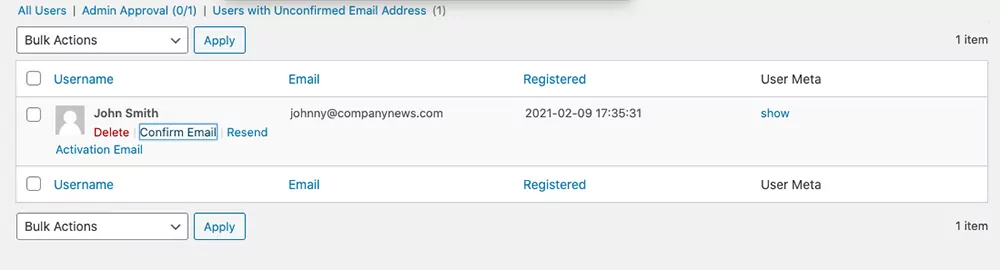
Hover over the user’s username and you’ll see the option to manually confirm their email address. You can also choose this option from the drop-down menu under Bulk Actions.
Once you click the option to Confirm email, you’ll see a popup asking you if you’re sure you want to confirm the email yourself. Click OK and the user’s email address will be confirmed instantly.
Manually confirming user emails is probably the easiest and quickest way to give registered users access to the website.
However, it can be time-consuming for you, especially if you get dozens or hundreds of new registrations each day. That’s where the second option comes in handy.
Resend Activation Emails
Another option is to resend activation emails. You can do this from the Users page by hovering over the username and clicking on the Resend Activation Email link.
You’ll see a popup prompting you to confirm you really want to do this so press the OK button and the activation email will be automatically resent to their email address.
Alternatively, select the option to resend the activation email from the drop-down menu under Bulk Actions. Press Apply and you’ll see a popup that will notify you the activation emails have been resent.
User Admin Approval
Before we wrap this tutorial up, there’s another option to consider. And that’s admin approval for who can be the user on your website. This step adds another layer of security and ensures that only legitimate users have registered for your site.

You can activate this under Profile Builder → Settings. Find the setting called “Admin Approval” Activated and ensure it’s set to Yes. Then, save your changes.
Once you’ve enabled this feature, you’ll be able to choose which user roles require admin approval upon registration and which user roles can register automatically.
The fastest way to approve users is from the Email Customizer tab under Profile Builder → Settings. Click on the Administrator Emails tab, scroll down to the Registration With Admin Approval section and you’ll be able to customize the administrator emails to include the approval link. All you have to do is add the {{{approve_link}}} tag to the email.
Adding this will add an approval link you can click to directly approve the user registration. After you click the link, the user will be notified and be able to log into the website.
Set Up WordPress Email Verification On Your Site Today
Verifying users’ email addresses will help you prevent spam registrations as well as ensure that the users are registering with a genuine email address. Setting up WordPress email verification is easy with the Profile Builder plugin and it gives you more control over the registration forms.
In addition to that, it helps you maintain brand consistency and create modern-looking registration and login forms that match the rest of your website.
If you’ve been thinking about enabling user registrations on your website, give the Profile Builder plugin a try. If all you need is a simple way to set up WordPress verification emails and create branded registration and login pages, take advantage of the free version of the Profile Builder plugin that’s available on the official repository.
But, if you want more advanced options, such as the ability to redirect users, customize the verification emails, add extra fields, and more; the Profile Builder Pro is the best choice. You can take it for a spin with a free demo, test the settings, and see the forms in action.
When you’re ready to purchase, choose your Profile Builder version and start customizing your registration and login pages. Good luck!
Profile Builder Pro
Create beautiful front-end registration and profile forms with custom fields. Set up member directories, custom redirects, customize user emails & more using the all-in-one user management plugin.
Get Profile BuilderDo you have any questions on how to set up WordPress email verification? Let us know in the comments section below.
Related Articles

How to Customize the WooCommerce Login Page (No Code Needed)
Searching for a solution to customize the WooCommerce login page and otherwise control login behavior on your WooCommerce store? If you allow (or force) registration on your store, you'll want to create a user-friendly login experience so that your shoppers can easily log in to their accounts and access other key features. In this post, […]
Continue Reading
8 Best WordPress User Registration Plugins
Not sure what WordPress user registration plugin to use for your project? Going through all the WordPress user registration plugins can be disorienting. You may have spent hours and hours searching for plugins and tutorials to help you with your project, and you’re still as confused as you were when you started. Imagine finding the […]
Continue Reading
How to Create a Custom Reset Password Page in WordPress
If you’re building a user-focused website, creating a WordPress custom reset password page is a no-brainer. Users forgetting the password to their accounts is inevitable, so it only makes sense to offer them a way to recover their password. In this post, you will learn everything there is to know about creating a WordPress reset […]
Continue Reading