

Table of Contents
There are many use cases for password-protected content in WordPress. For example, you might be a content creator who wants to monetize premium content in the form of subscriptions or memberships.
As with everything related to WordPress, password-protecting posts doesn’t have to be difficult. If you’re wondering how to password-protect WordPress content, posts, and even categories without having to mess around with code, all you need is a flexible user management plugin to get the job done in a few easy steps.
In this post, we’ll start by looking at the reasons why you may want to password-protect content. Then, we’ll show you how to do it using Profile Builder. Let’s get to it!
Why Password Protect Posts in WordPress?
There are many reasons to password protect posts in WordPress. For example, if you have a membership site, you may be looking to restrict premium content.
A membership website has premium content that is only made available to members in exchange for a fee. With this setup, website owners need to make sure that this content can only be accessed by its paying members.
This content may be a premium category with all the restricted posts or a few specific tutorials in the form of blog posts. Similarly, some WordPress websites sell posts bundled as a course.
You can also build a user base or premium community by making a few of your important posts private. This is different from password protecting an entire WordPress website though.
Regardless of the reason, our user and content management plugin, Profile Builder Pro, is here to save the day. However, if you run a membership website and want to restrict content for non-members, then you might want to check out Paid Membership Subscriptions, which is a complete WordPress membership site plugin.
Profile Builder Pro
Restrict and password protect posts in WordPress in a few easy steps and do much more with Profile Builder Pro.
Get Profile BuilderWe will get into more details below as we walk you through our step-by-step tutorial for password-protecting content, posts, and categories on your WordPress website.
How to Password Protect WordPress Content or Posts (In 4 Steps)
To password-protect any type of content on your WordPress site, you’ll need a way for your users to ask for access to restricted content.
This can be achieved by requiring visitors to register on your site in order to view this restricted content. This way, whenever a user stumbles upon a restricted post, they will be prompted to use their username and password to be granted access. This is where Profile Builder comes in handy.
Even though the paid version of Profile Builder Pro offers a wide range of content management functionalities, for this type of basic content restriction, the free version of the plugin works just fine. So let’s get started!
Step 1: Install the Profile Builder Plugin
As we mentioned, Profile Builder Pro is a complete user management plugin that offers a huge range of features. That includes the ability to password-protect certain areas of your WordPress website. You can easily restrict some of the posts on your website, or any other areas for that matter.
Then, you can deny access to everyone who doesn’t log in with their username and password. And, you can do all that for free!
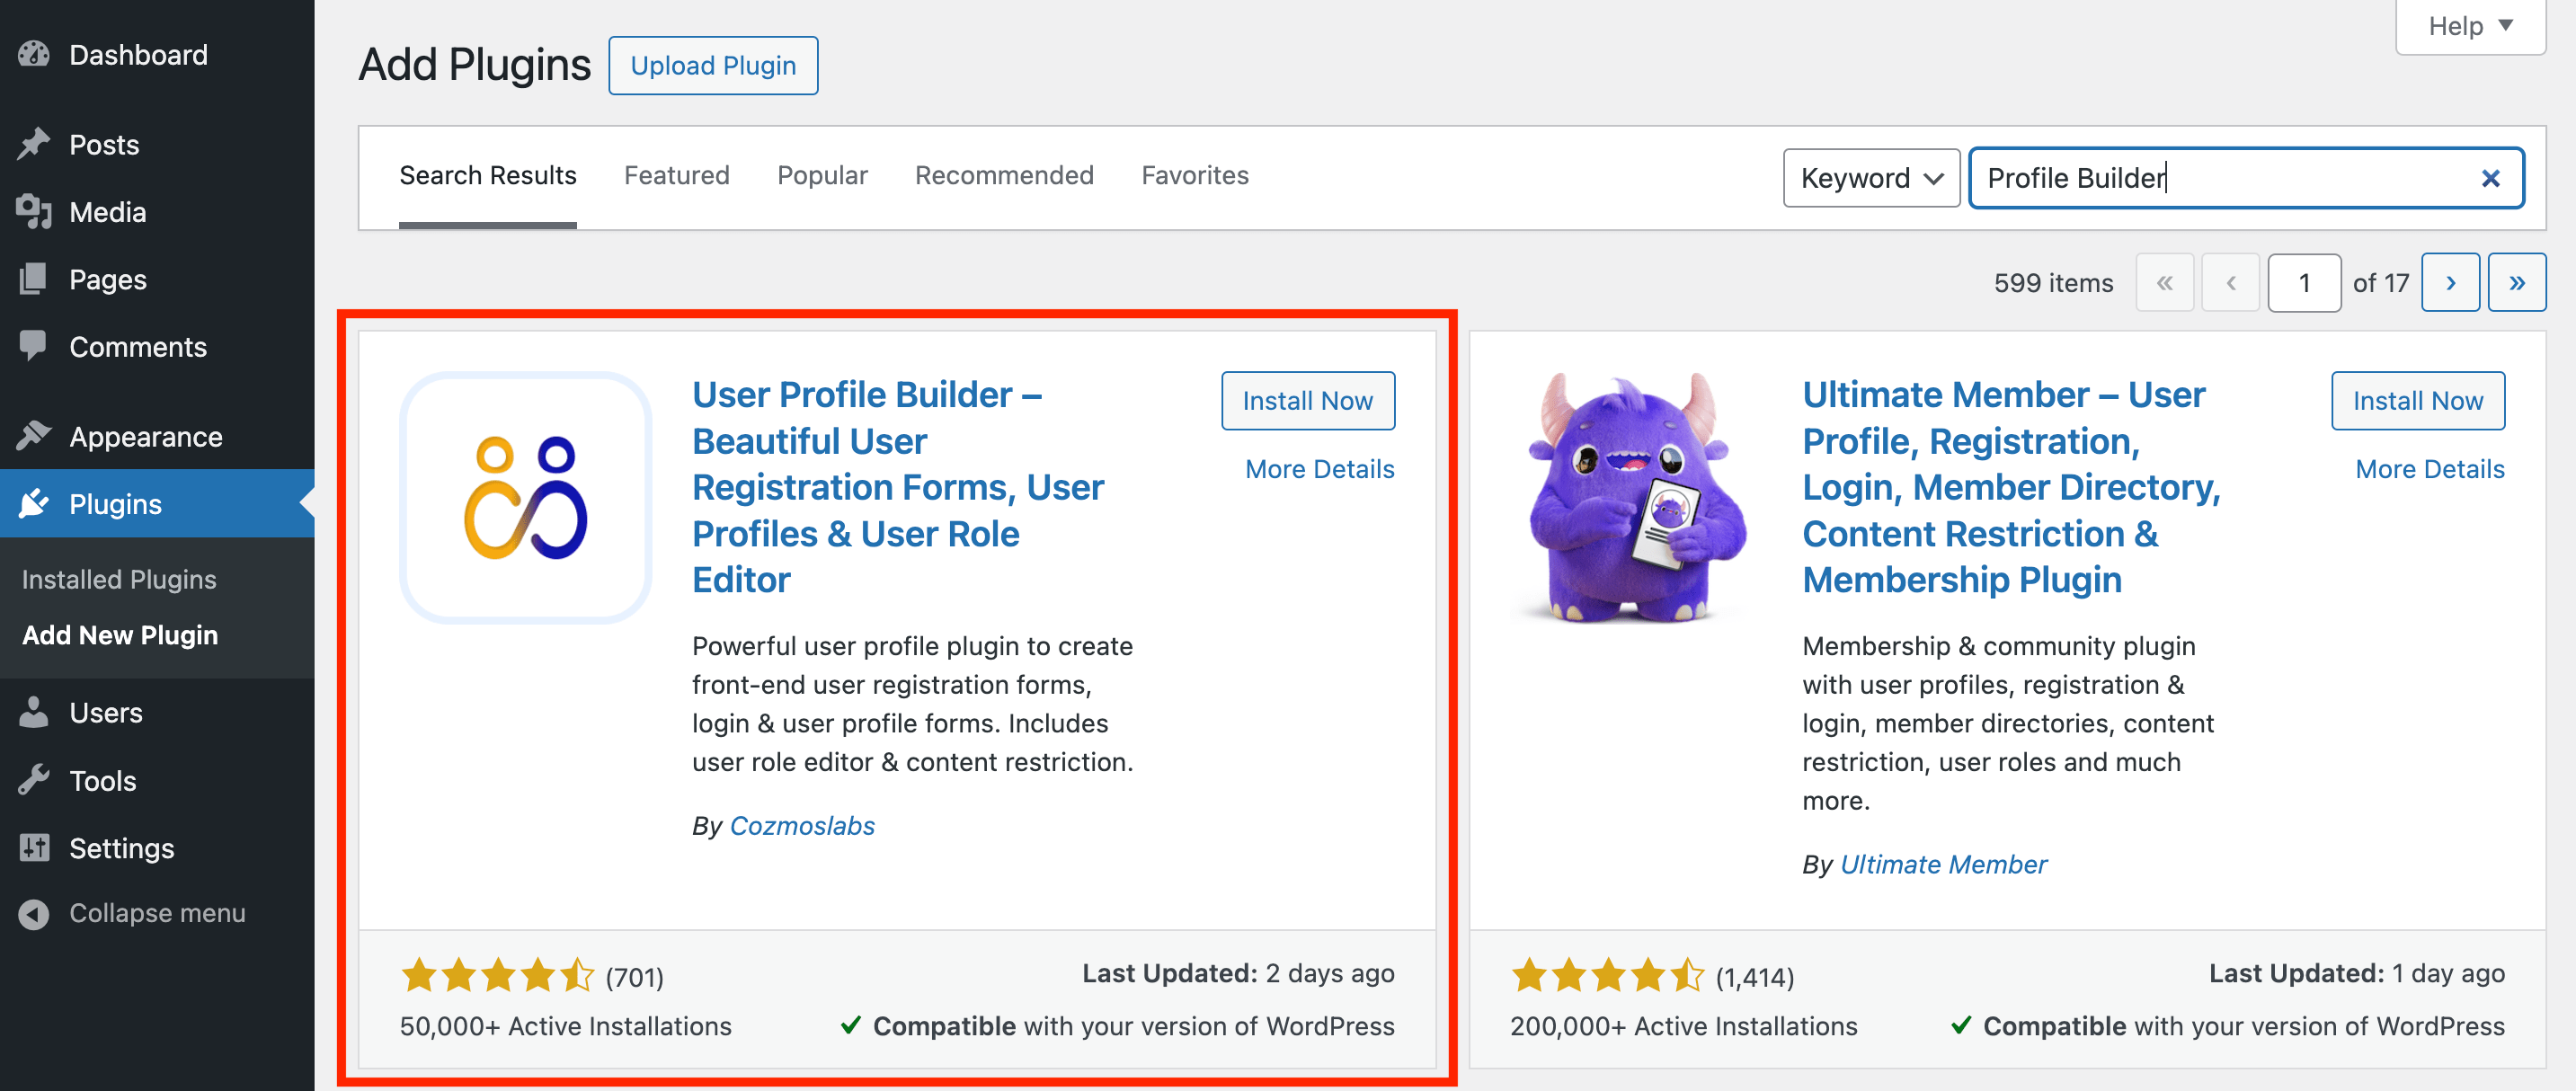
To start things off, you’ll need to download the free version of Profile Builder and upload it to your site. To do this, go to Plugins → Add New Plugin → Upload Plugin. Select the file you downloaded from WordPress.org. Then, hit Install Now followed by Activate.
Alternatively, you can find it directly in the WordPress dashboard. Simply go to Plugins → Add New Plugin → Upload Plugin and search for “Profile Builder”:
Next, install and activate the tool. You can now start using the password-protect functionality on your site.
Step 2: Create Custom Registration and Login Pages
When you’re setting up a password-protected post in WordPress, you will first need to create a registration page that visitors will use to sign up. You’ll also need a custom login page so that returning visitors can easily log back into their accounts.
The Profile Builder plugin makes this easy, as it provides you with both WordPress blocks and shortcodes that automatically generate these pages. In fact, you can even create multiple registration/login pages.
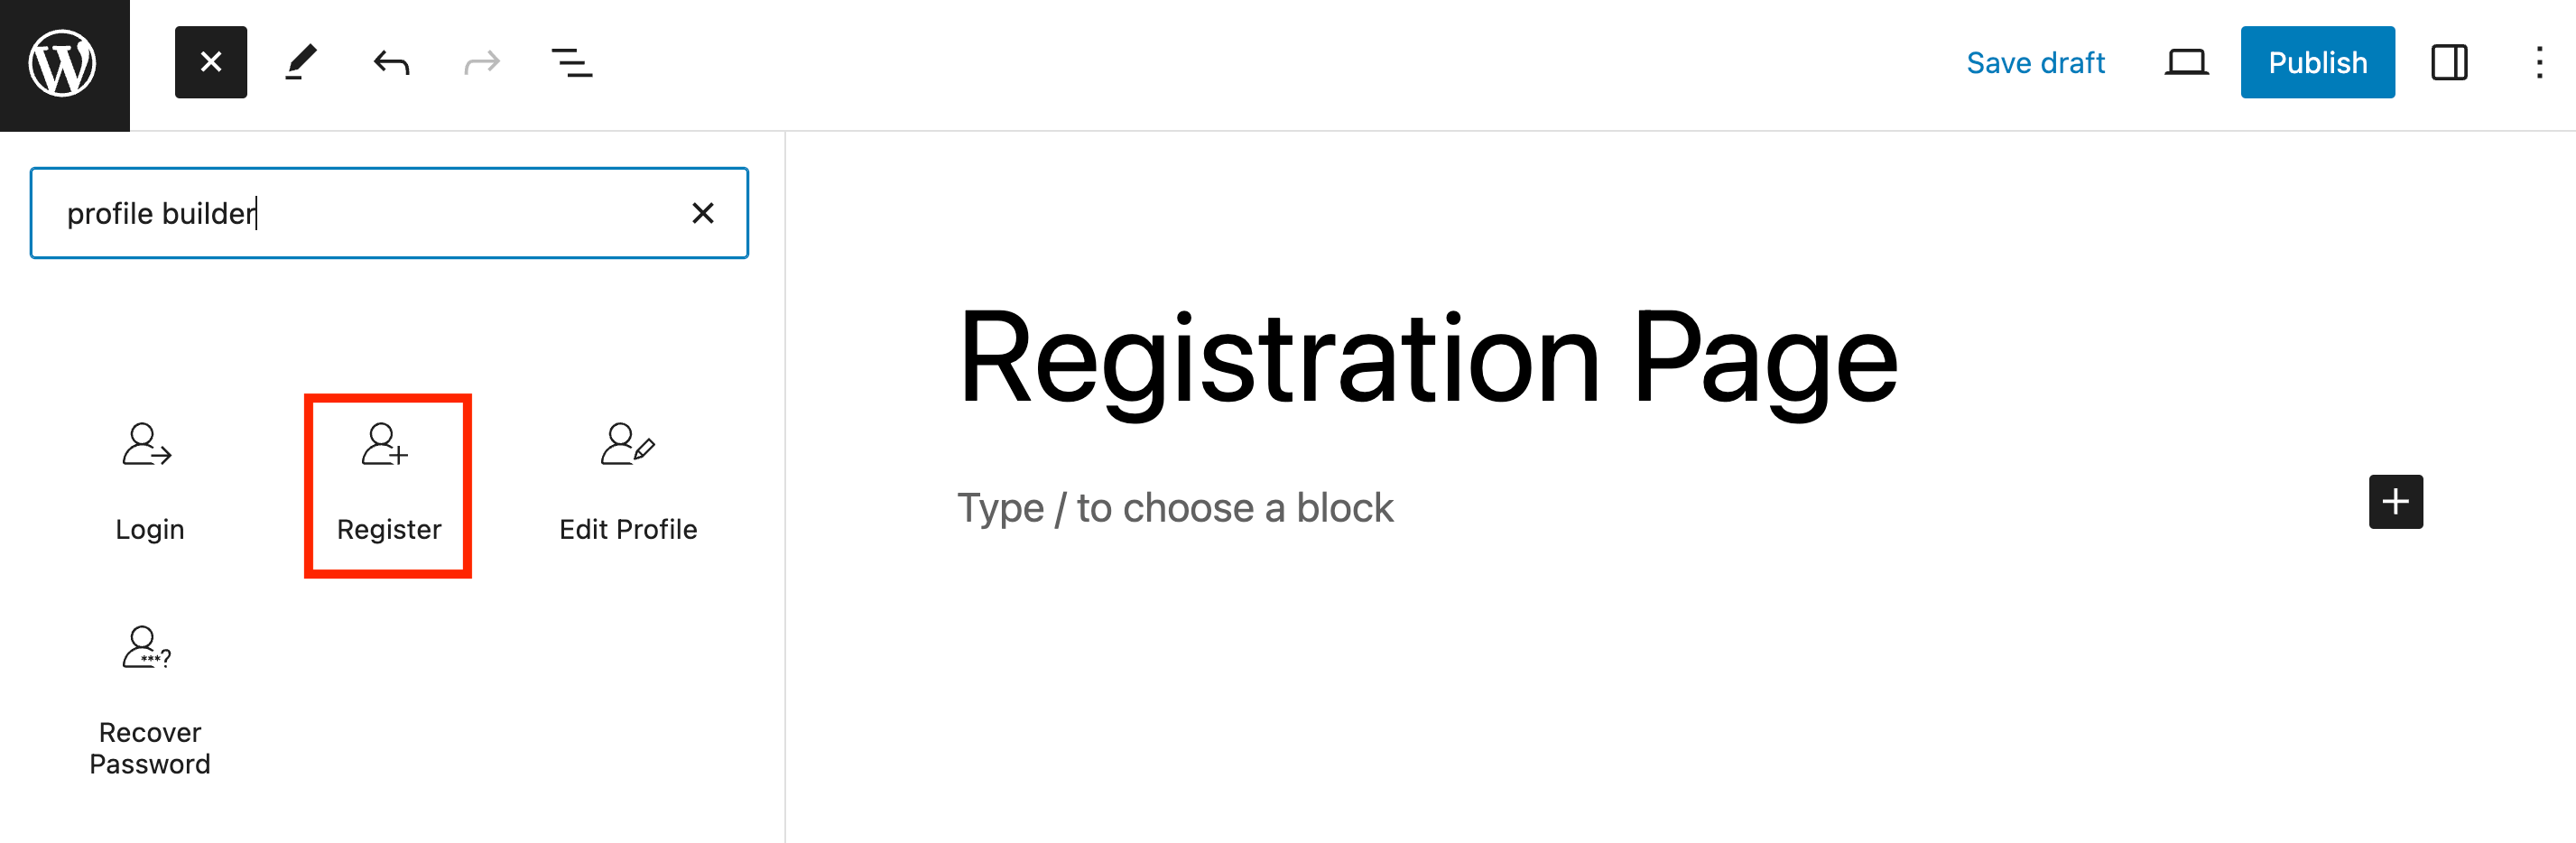
To do this, open the Block Editor and click on the plus symbol. Search for “Profile Builder” to see all the new blocks that you now have at your disposal. Then, click on the Register block to add it to your page:
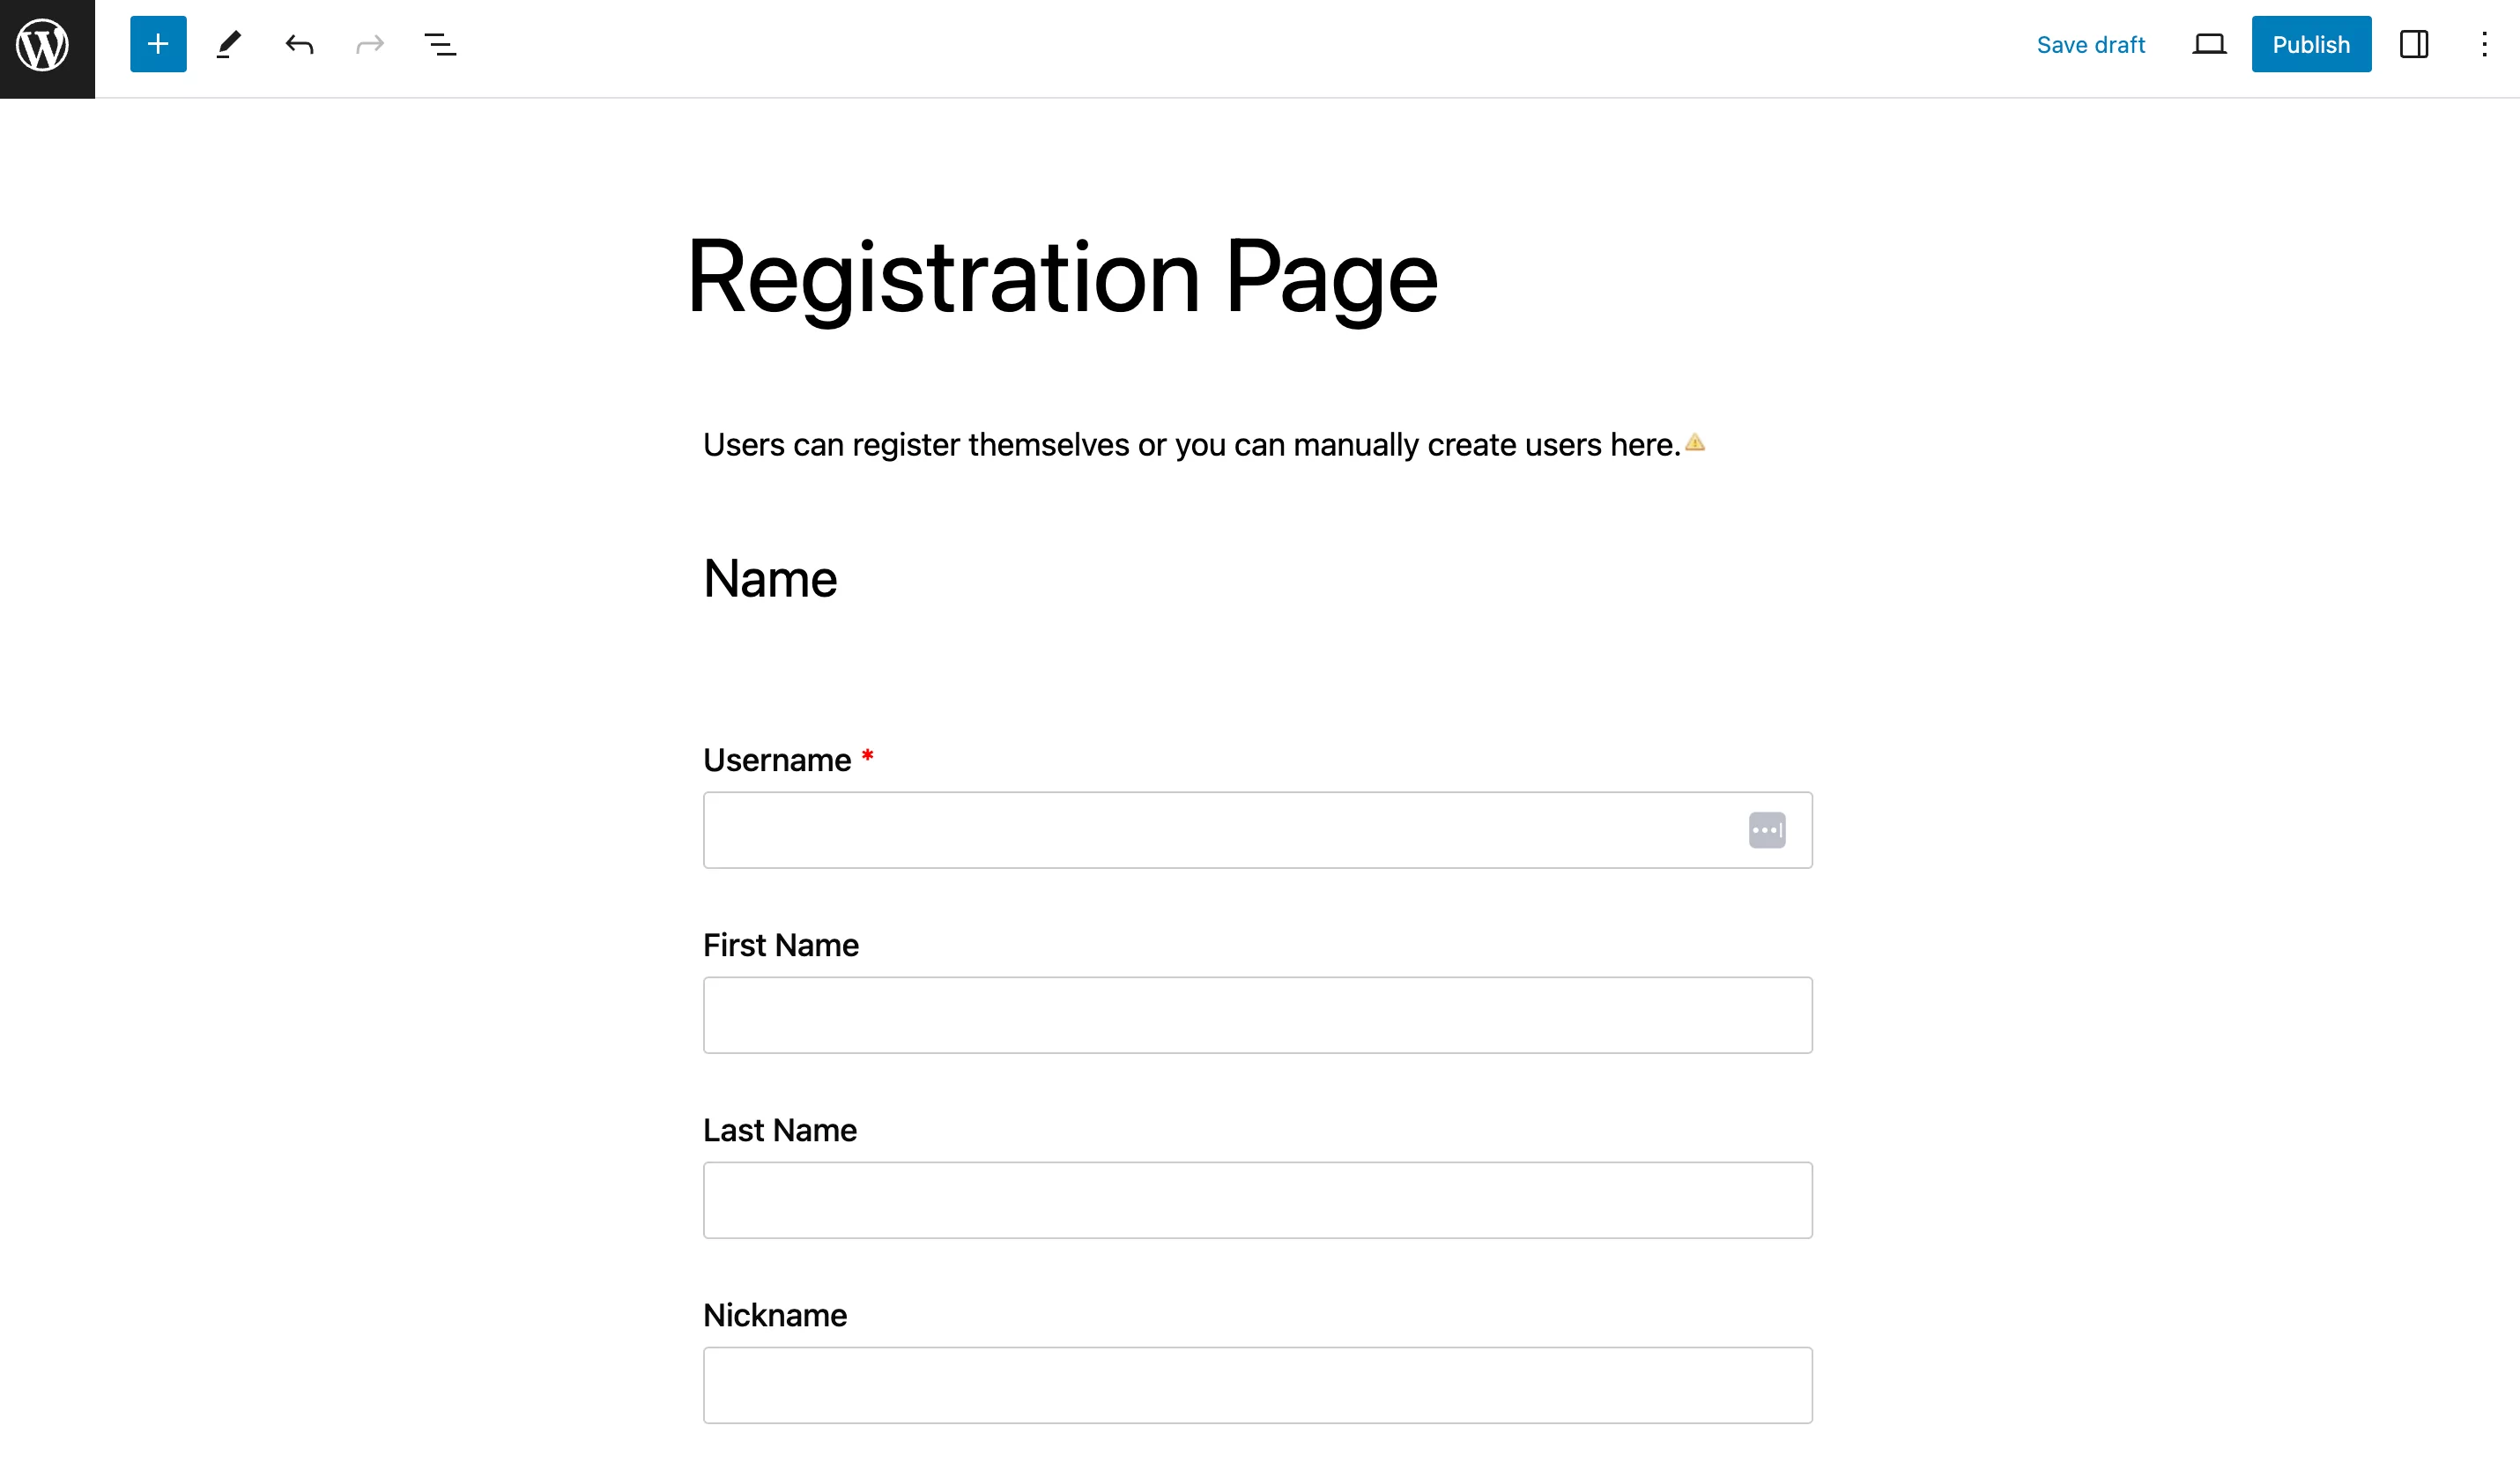
By default, this will generate a simple registration page that looks like this:
You can use your Block Settings on the right to further customize it:
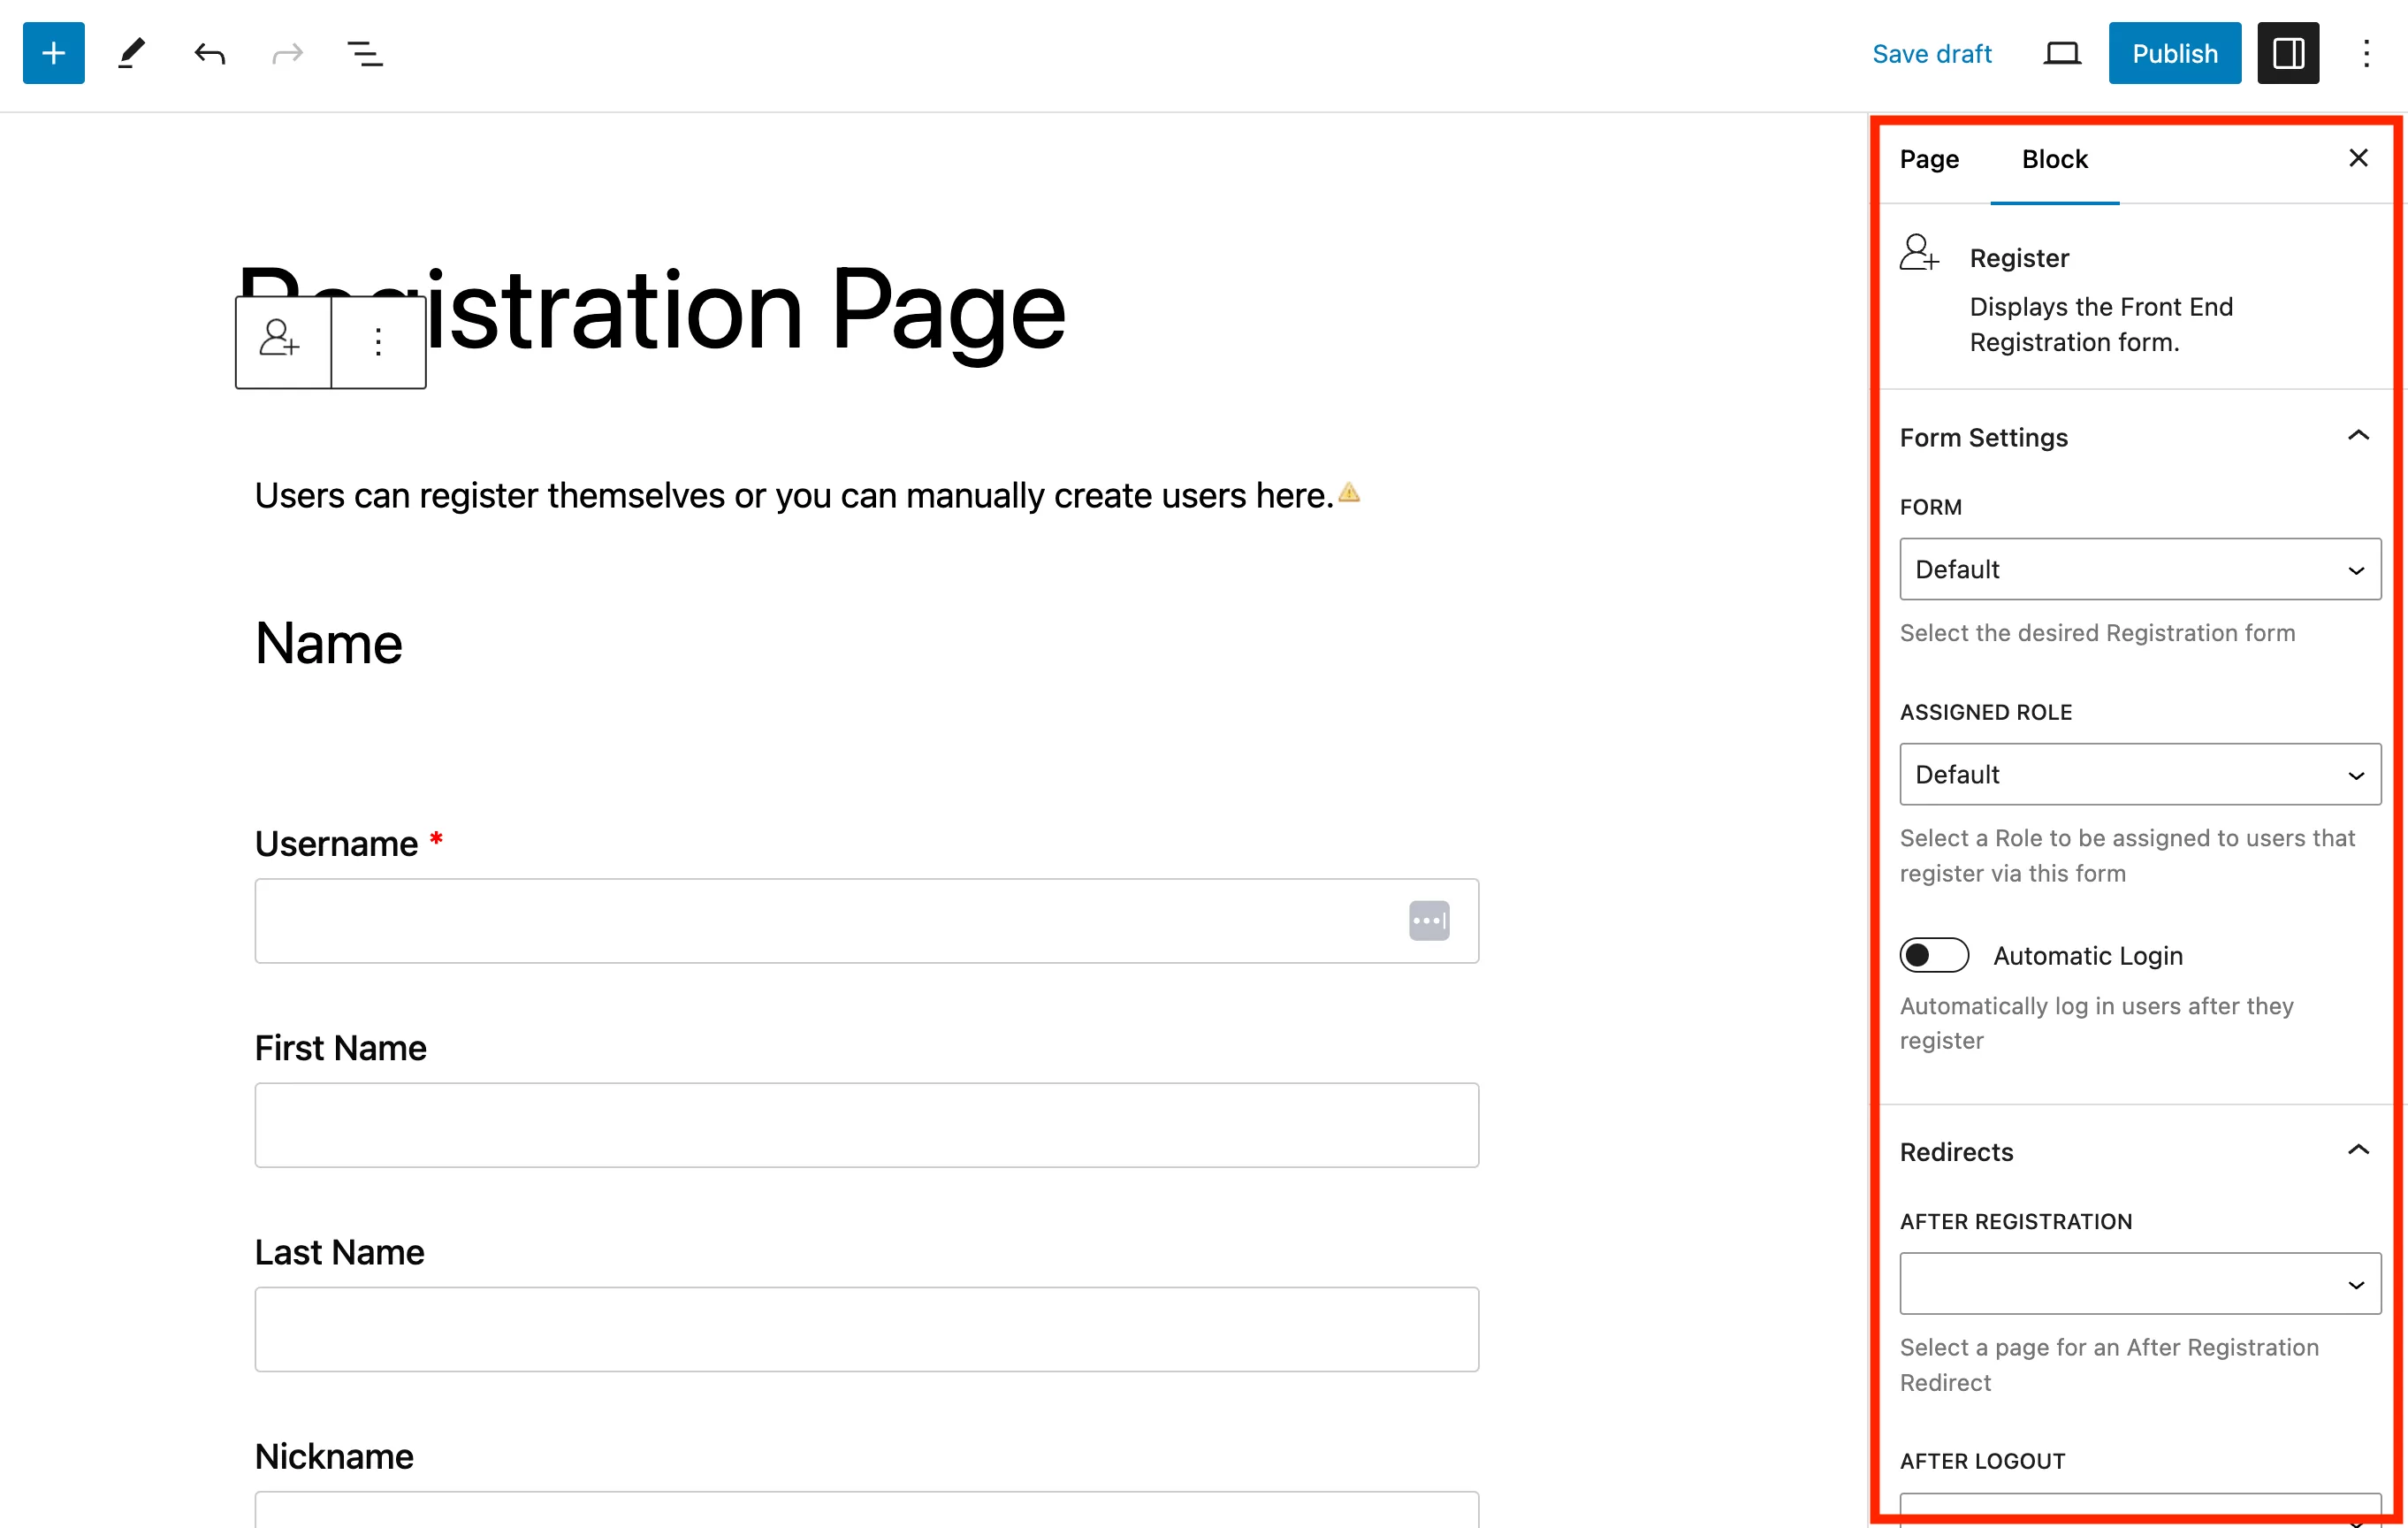
For instance, you can choose the Assigned Role upon registration, enable automatic login, and more.
When you’re happy with your registration form, click on Publish. The form will become available on the front end of your site:

Creating a custom login page is equally simple – just add the Profile Builder Login block in the WordPress editor.
Once again, you can easily customize and configure this page in the block Settings:
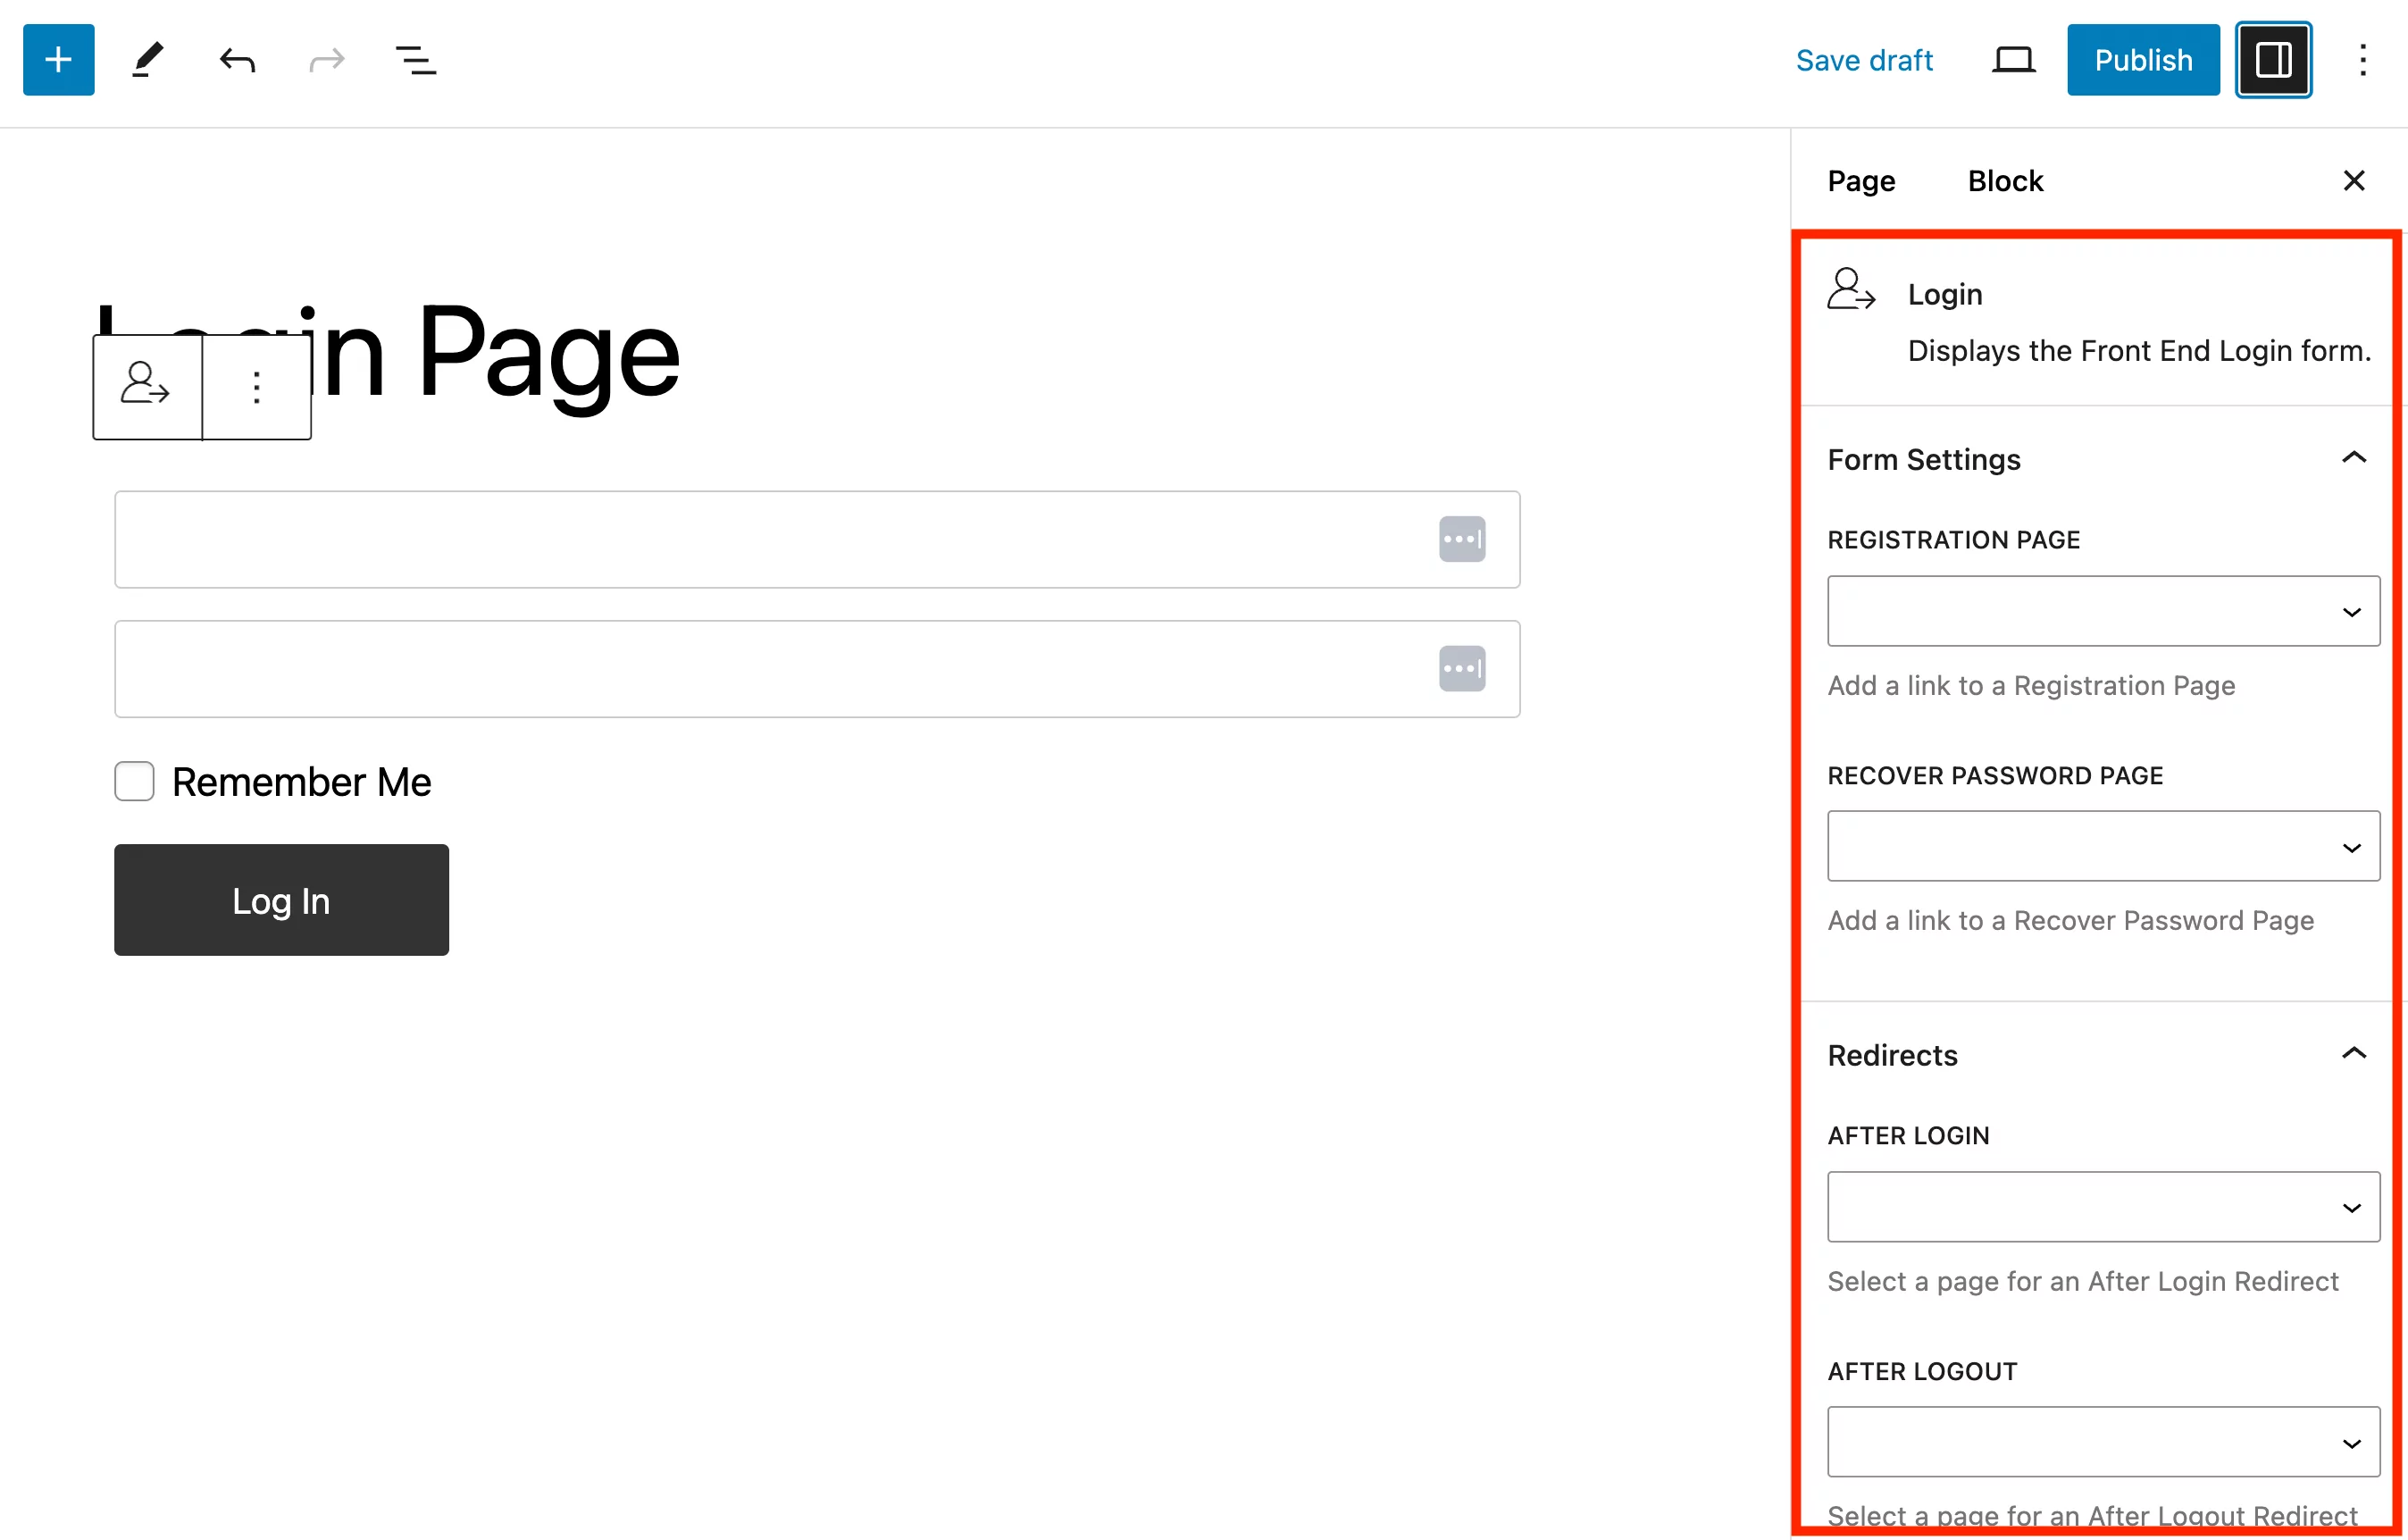
For instance, you can choose a Recover Password Page and set up custom redirects. Then, hit Publish to officially turn this into a front-end user login page.
If you prefer another approach, keep in mind that you can also use shortcodes to create these pages. To access them, simply go to Profile Builder → Dashboard. Then, scroll down until you see the Useful Shortcodes for Setup section:
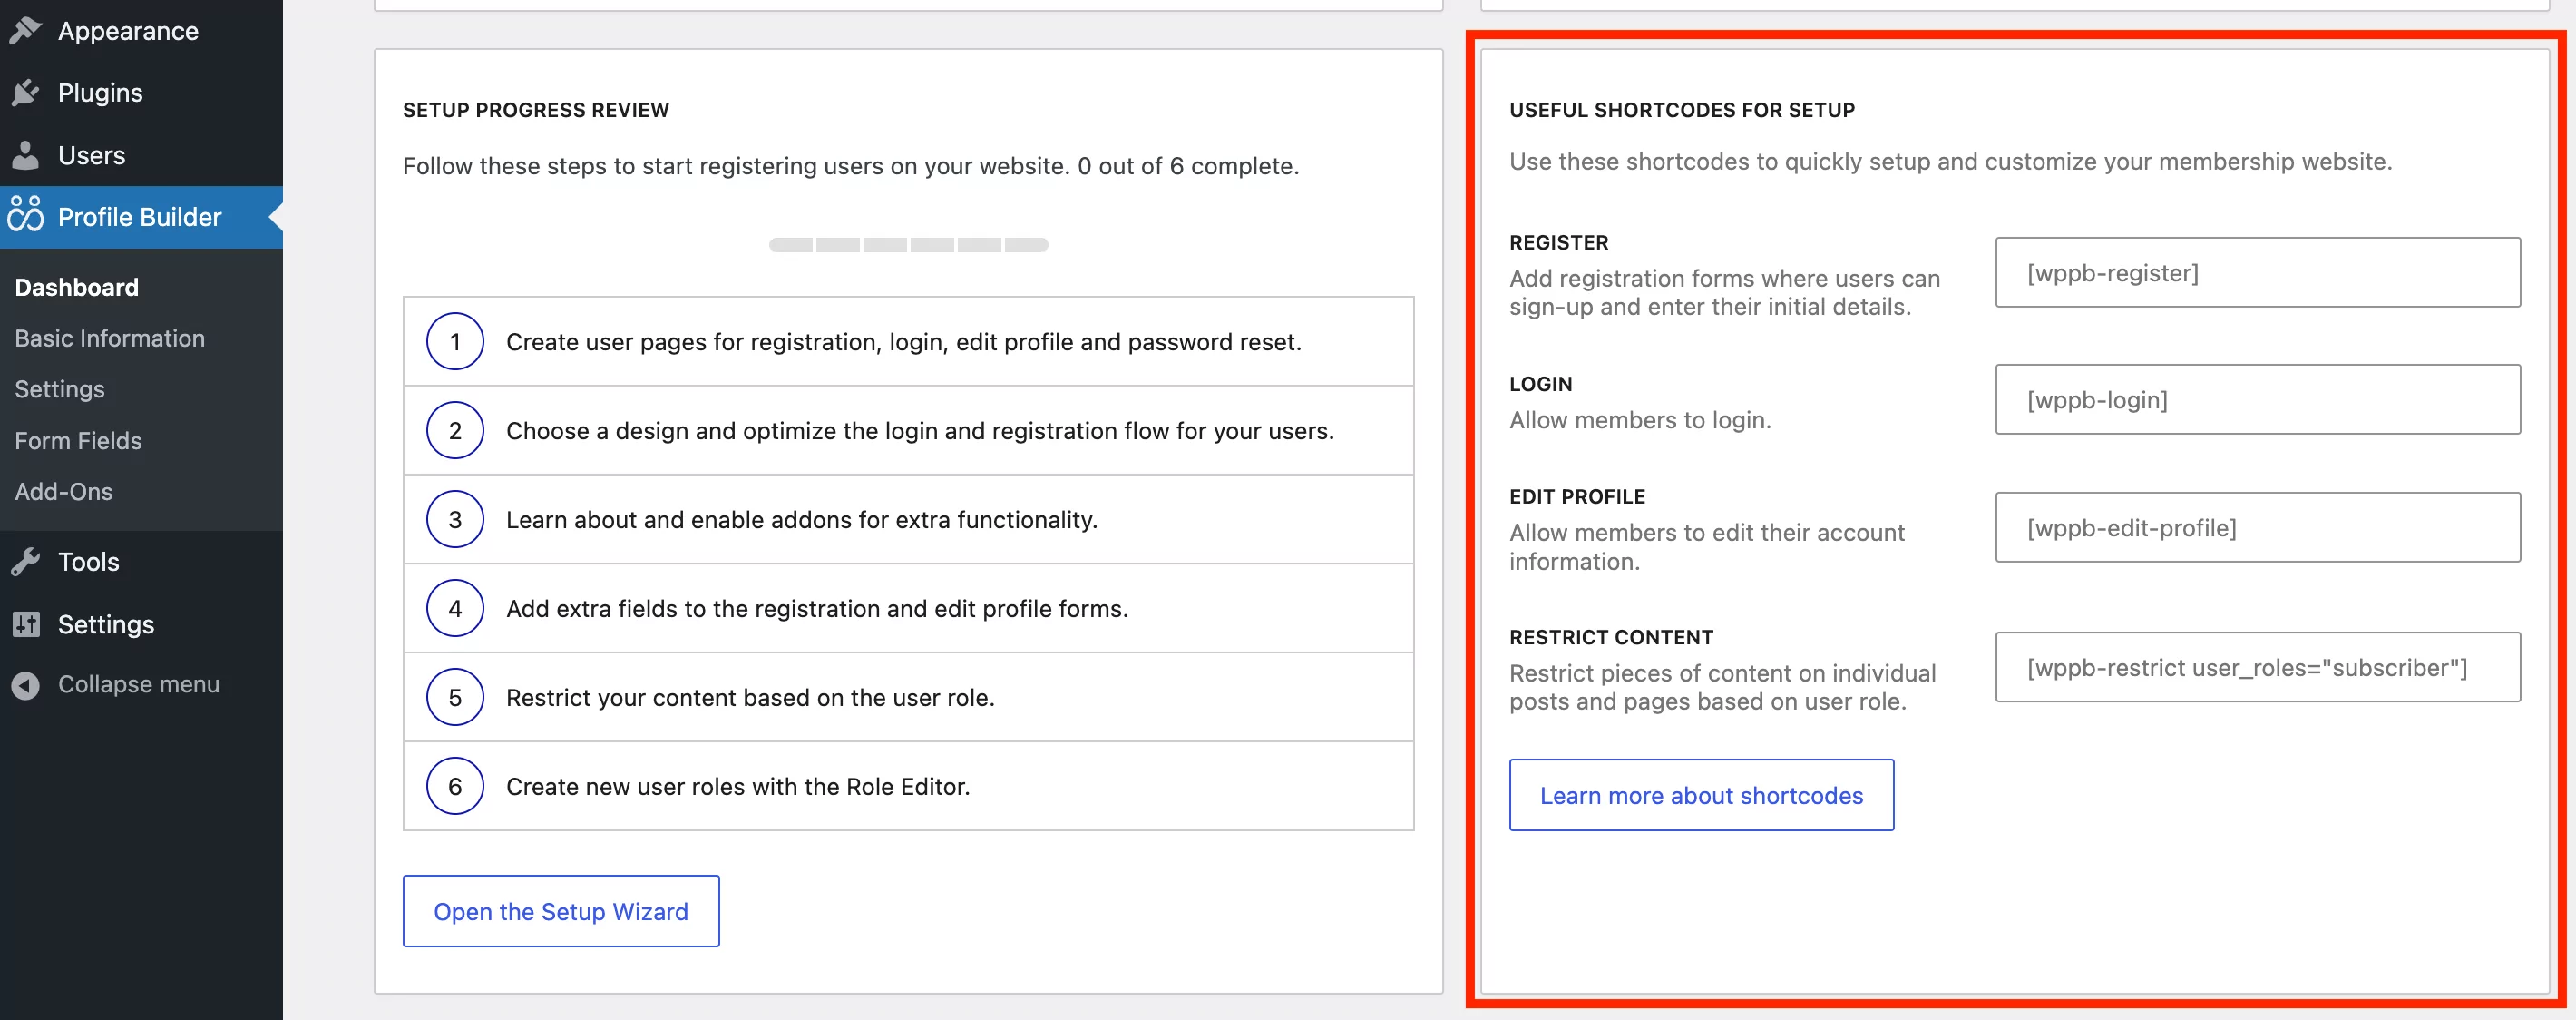
As you can see, here you have shortcodes for all the essential pages.
Step 3: Enable Content Restrictions for WordPress Password Protected Content
Now that you have a way for users to register and log in, it’s time to set up the password-protected posts on your WordPress website. You can password-protect as many posts as you want.
However, you’ll first need to activate Profile Builder’s content restriction functionality. To do so, go to Profile Builder → Settings and click on the Content Restriction tab:
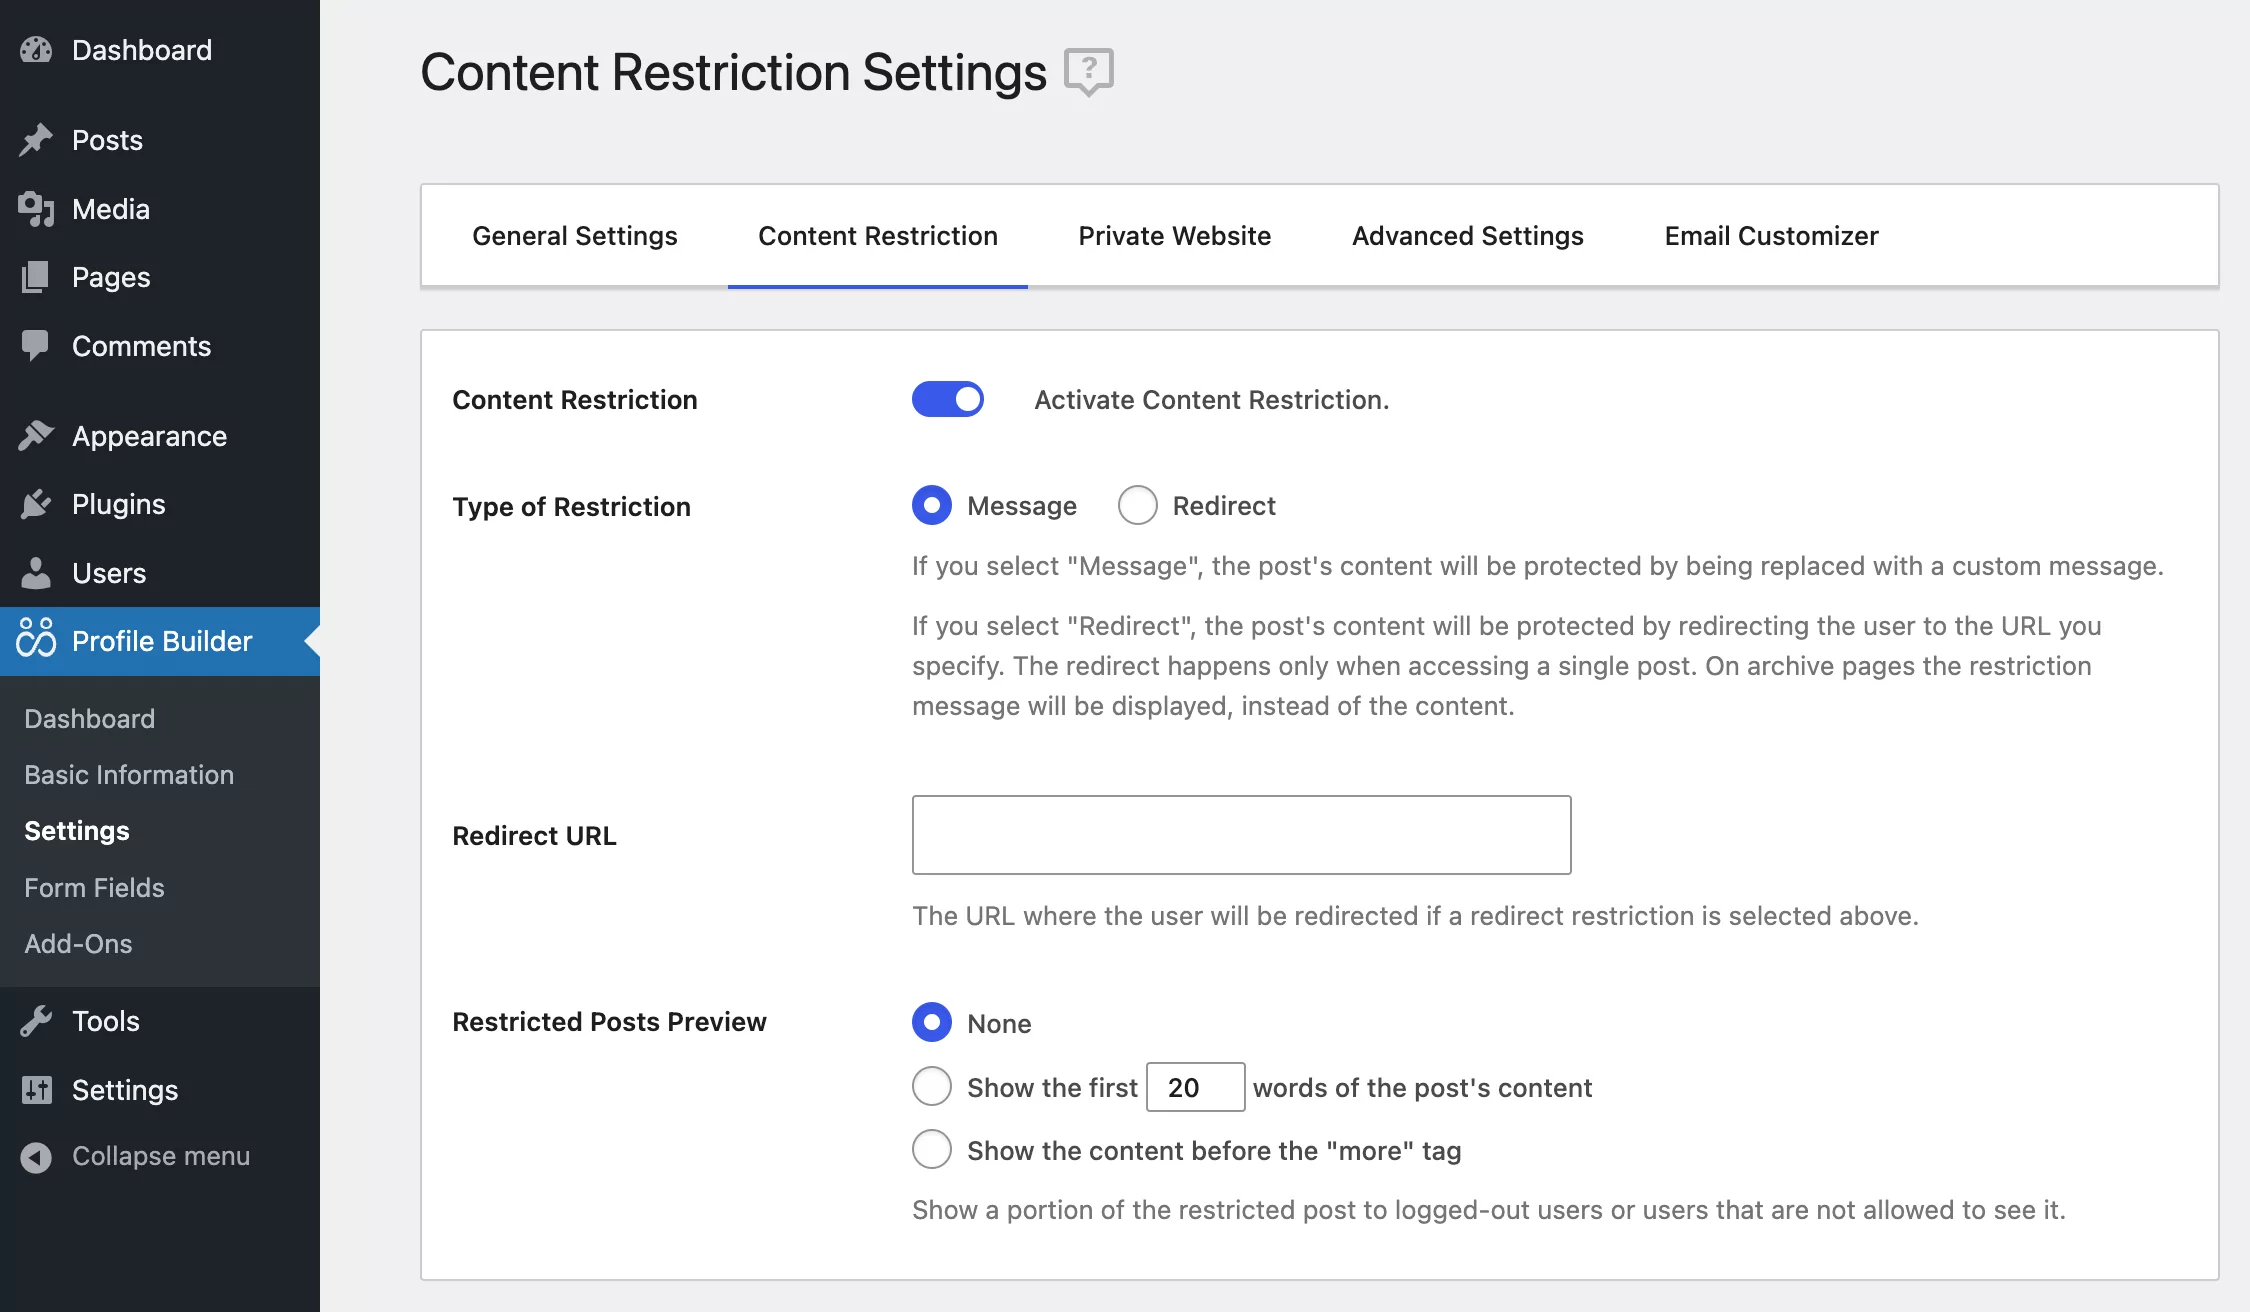
Just hit the first toggle button at the top to Activate Content Restriction. For Type of Restriction, you can leave it set to Message.
Keep in mind that these are going to be your default content restrictions settings. However, you can still overwrite them for individual posts if you ever need to.
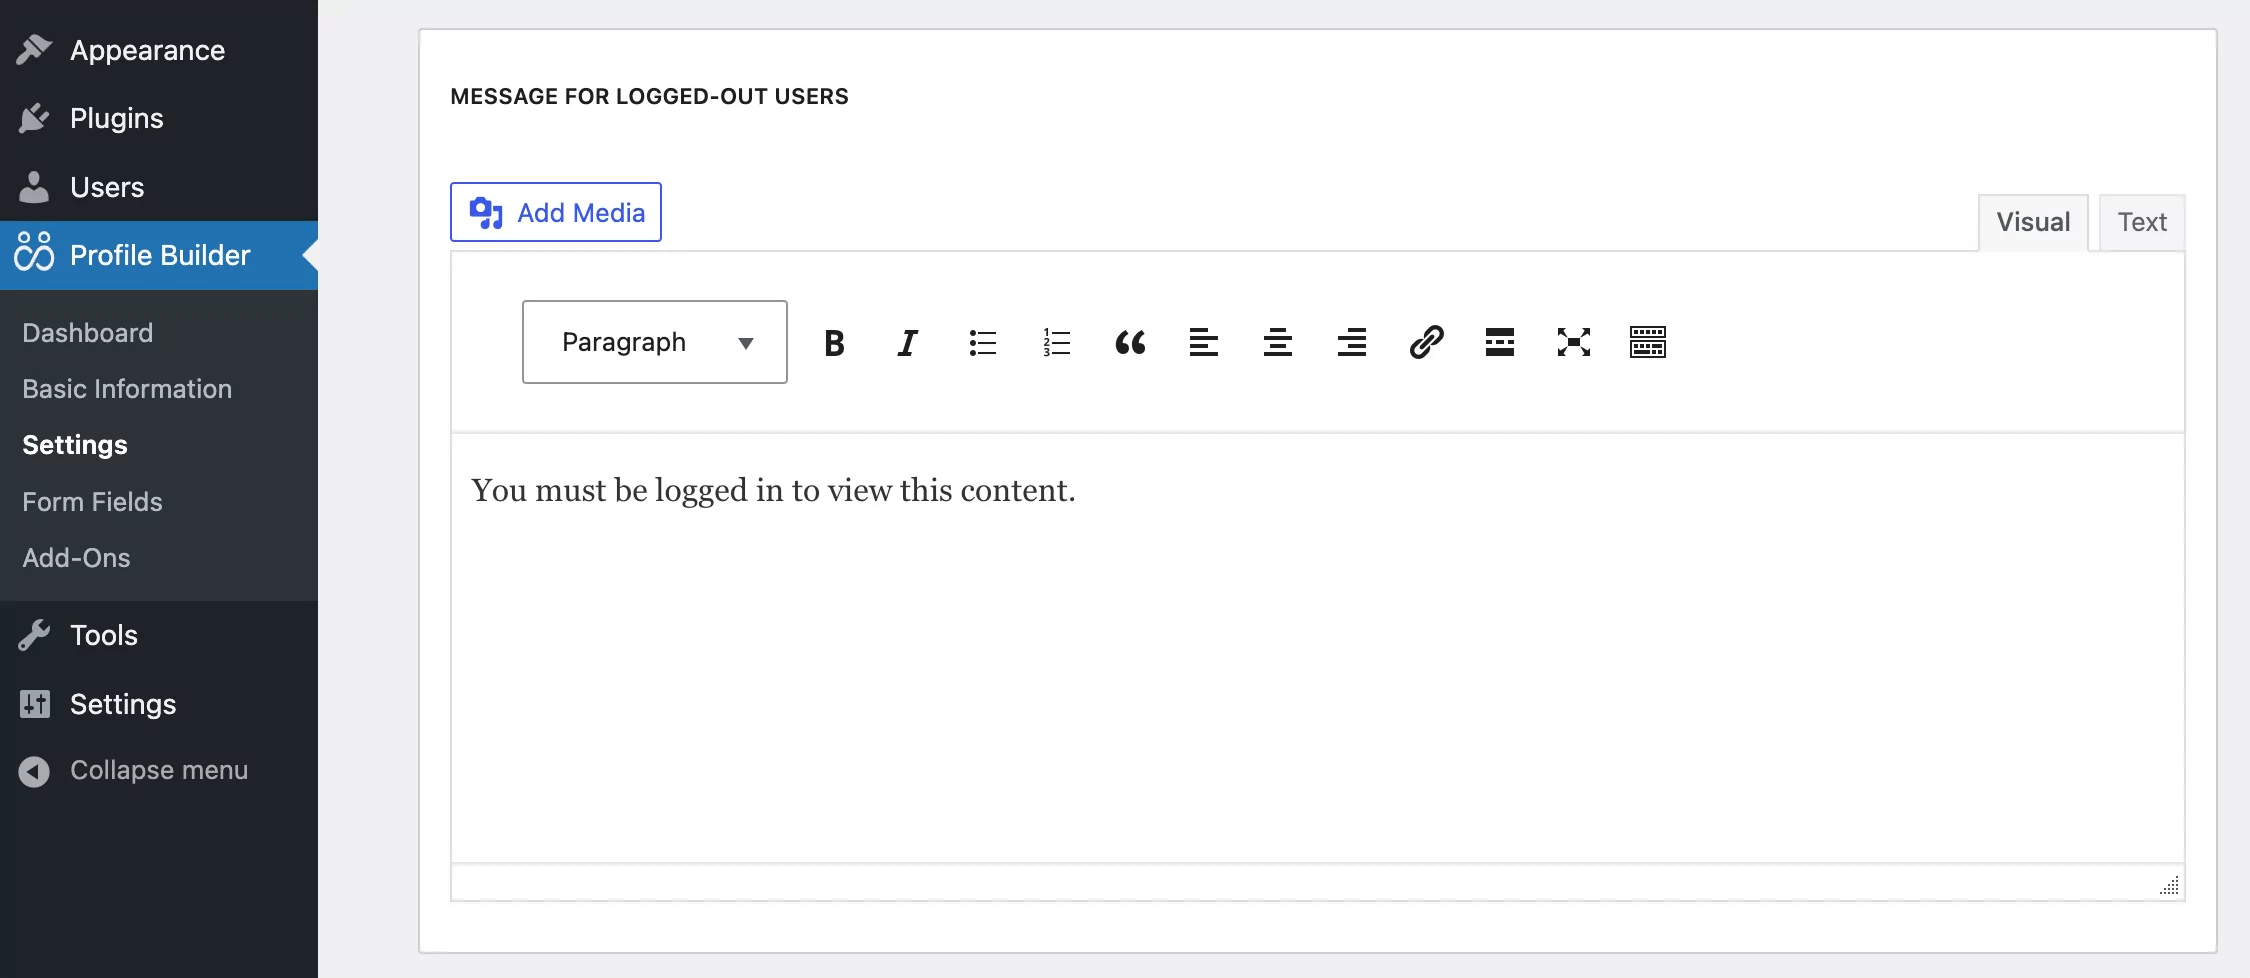
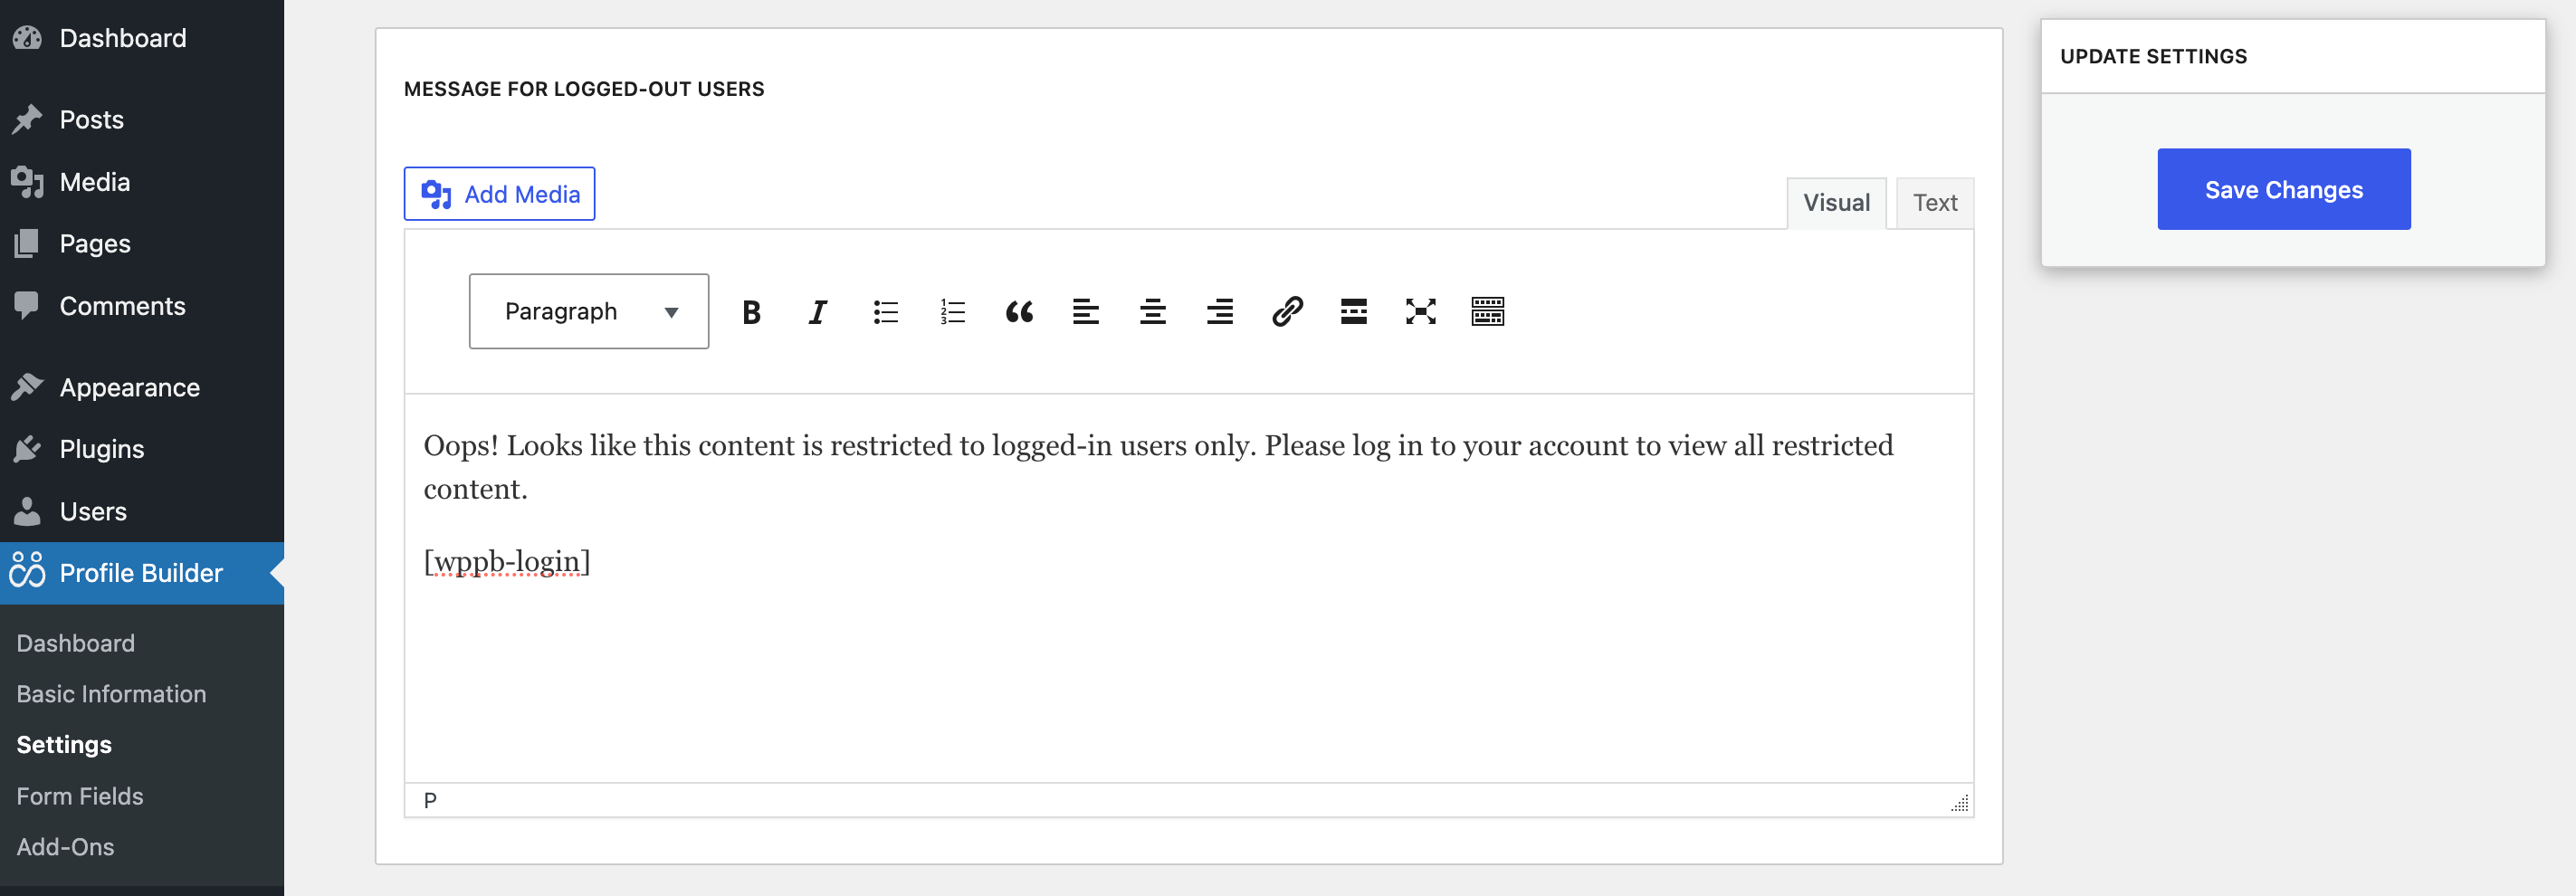
Now, if you scroll down a bit, you’ll find the section that allows you to write a message to be displayed to restricted users. By default, it just says “You must be logged in to view this content”:
However, it’s best to customize it to redirect users to your registration and login pages. This is where shortcodes can come in super handy.
For instance, you might want to write a custom message like the following:
If you haven’t already, it’s a good idea to add a register link and a lost password link to your login page. That way, it will appear here. You can do this in your block settings for the login page.
Or, if you prefer, you can add two extra arguments along with the shortcode to set this up here. In that case, the shortcode would be:
[wppb-login register_url="/register" lostpassword_url="/recover-password"]
When you’re ready, simply hit the Save Changes button.
Step 4: Password Protect WordPress Posts
Now you have everything set up to password-protect WordPress posts.
Simply navigate to a WordPress post you’d like to hide and scroll to the very bottom of the page. You should see the Profile Builder Content Restriction box:
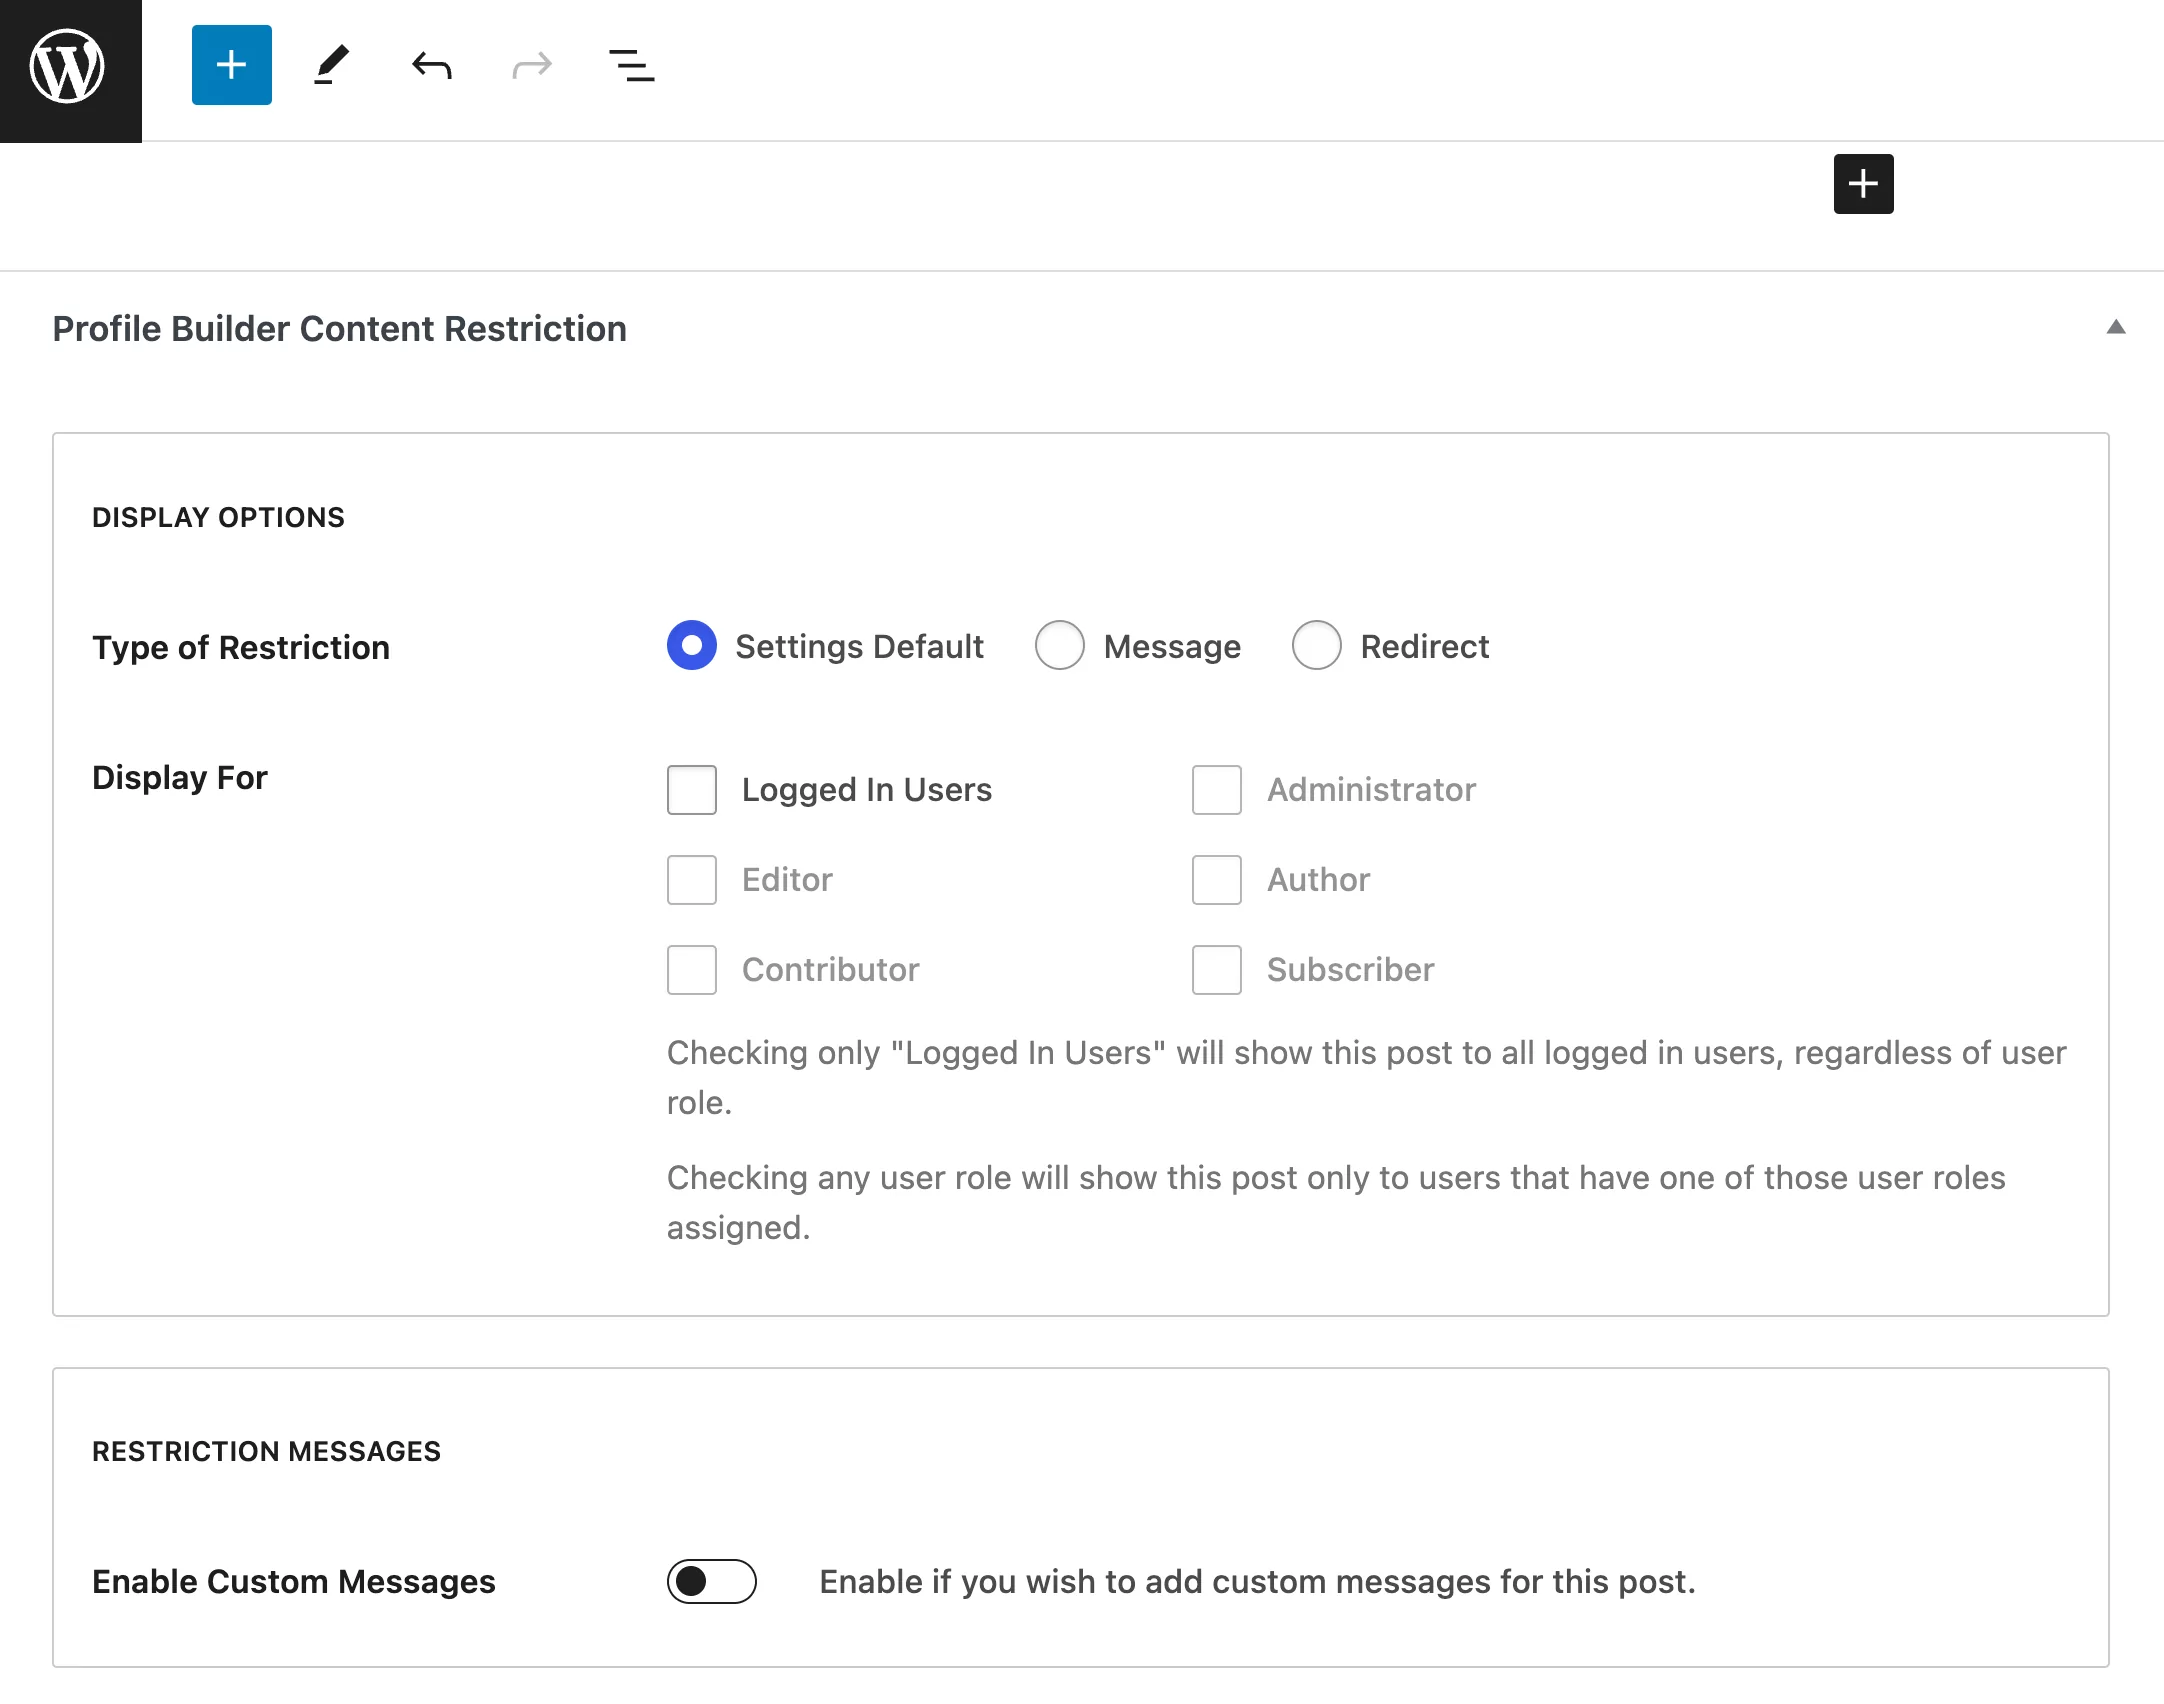
Since we have already set up the default content restriction settings in the main Profile Builder settings area, we don’t need to make any changes here except for checking the Logged In Users checkbox.
This will allow the website to ask logged-out users for a password when they land on a password protected post. So, once you’ve clicked on the Logged In Users checkbox, you can scroll back up and click on the Update button for that post.
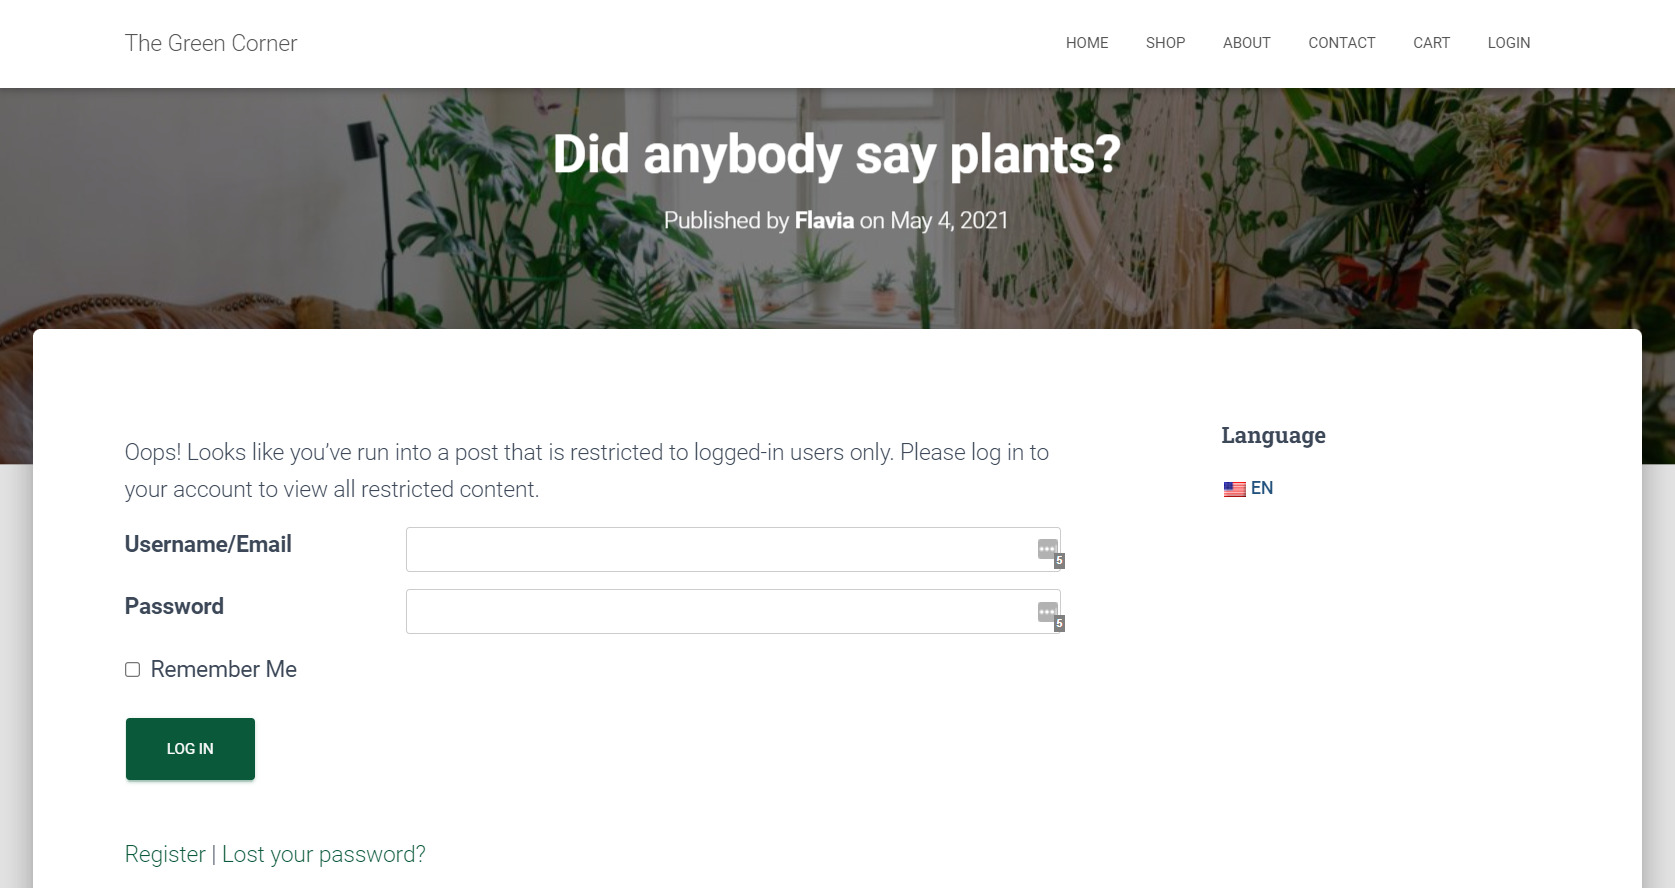
Now, when we try to view this particular post without logging in, we are greeted with our custom message and are required to enter our username and password to access the post. It’s as simple as that!
How to Password Protect WordPress Categories or Post Types (4 Steps)
As we have seen, Profile Builder works great if you want to password-protect WordPress content like individual pages or posts. But, you’re going to need a bit of extra help if you want to restrict entire categories or post types on your site.
That’s where Paid Member Subscriptions (PMS) comes in. This is one of the most complete and functional membership plugins for WordPress websites.
Paid Member Subscriptions Pro
Set up a fully functional membership website with restricted categories and premium content with ease.
Get Paid Member SubscriptionsWhether you’d like to start a full-on membership website, or simply restrict some specific post types or categories, using PMS is surprisingly simple and efficient.
Step 1: Install the Paid Member Subscriptions Plugin
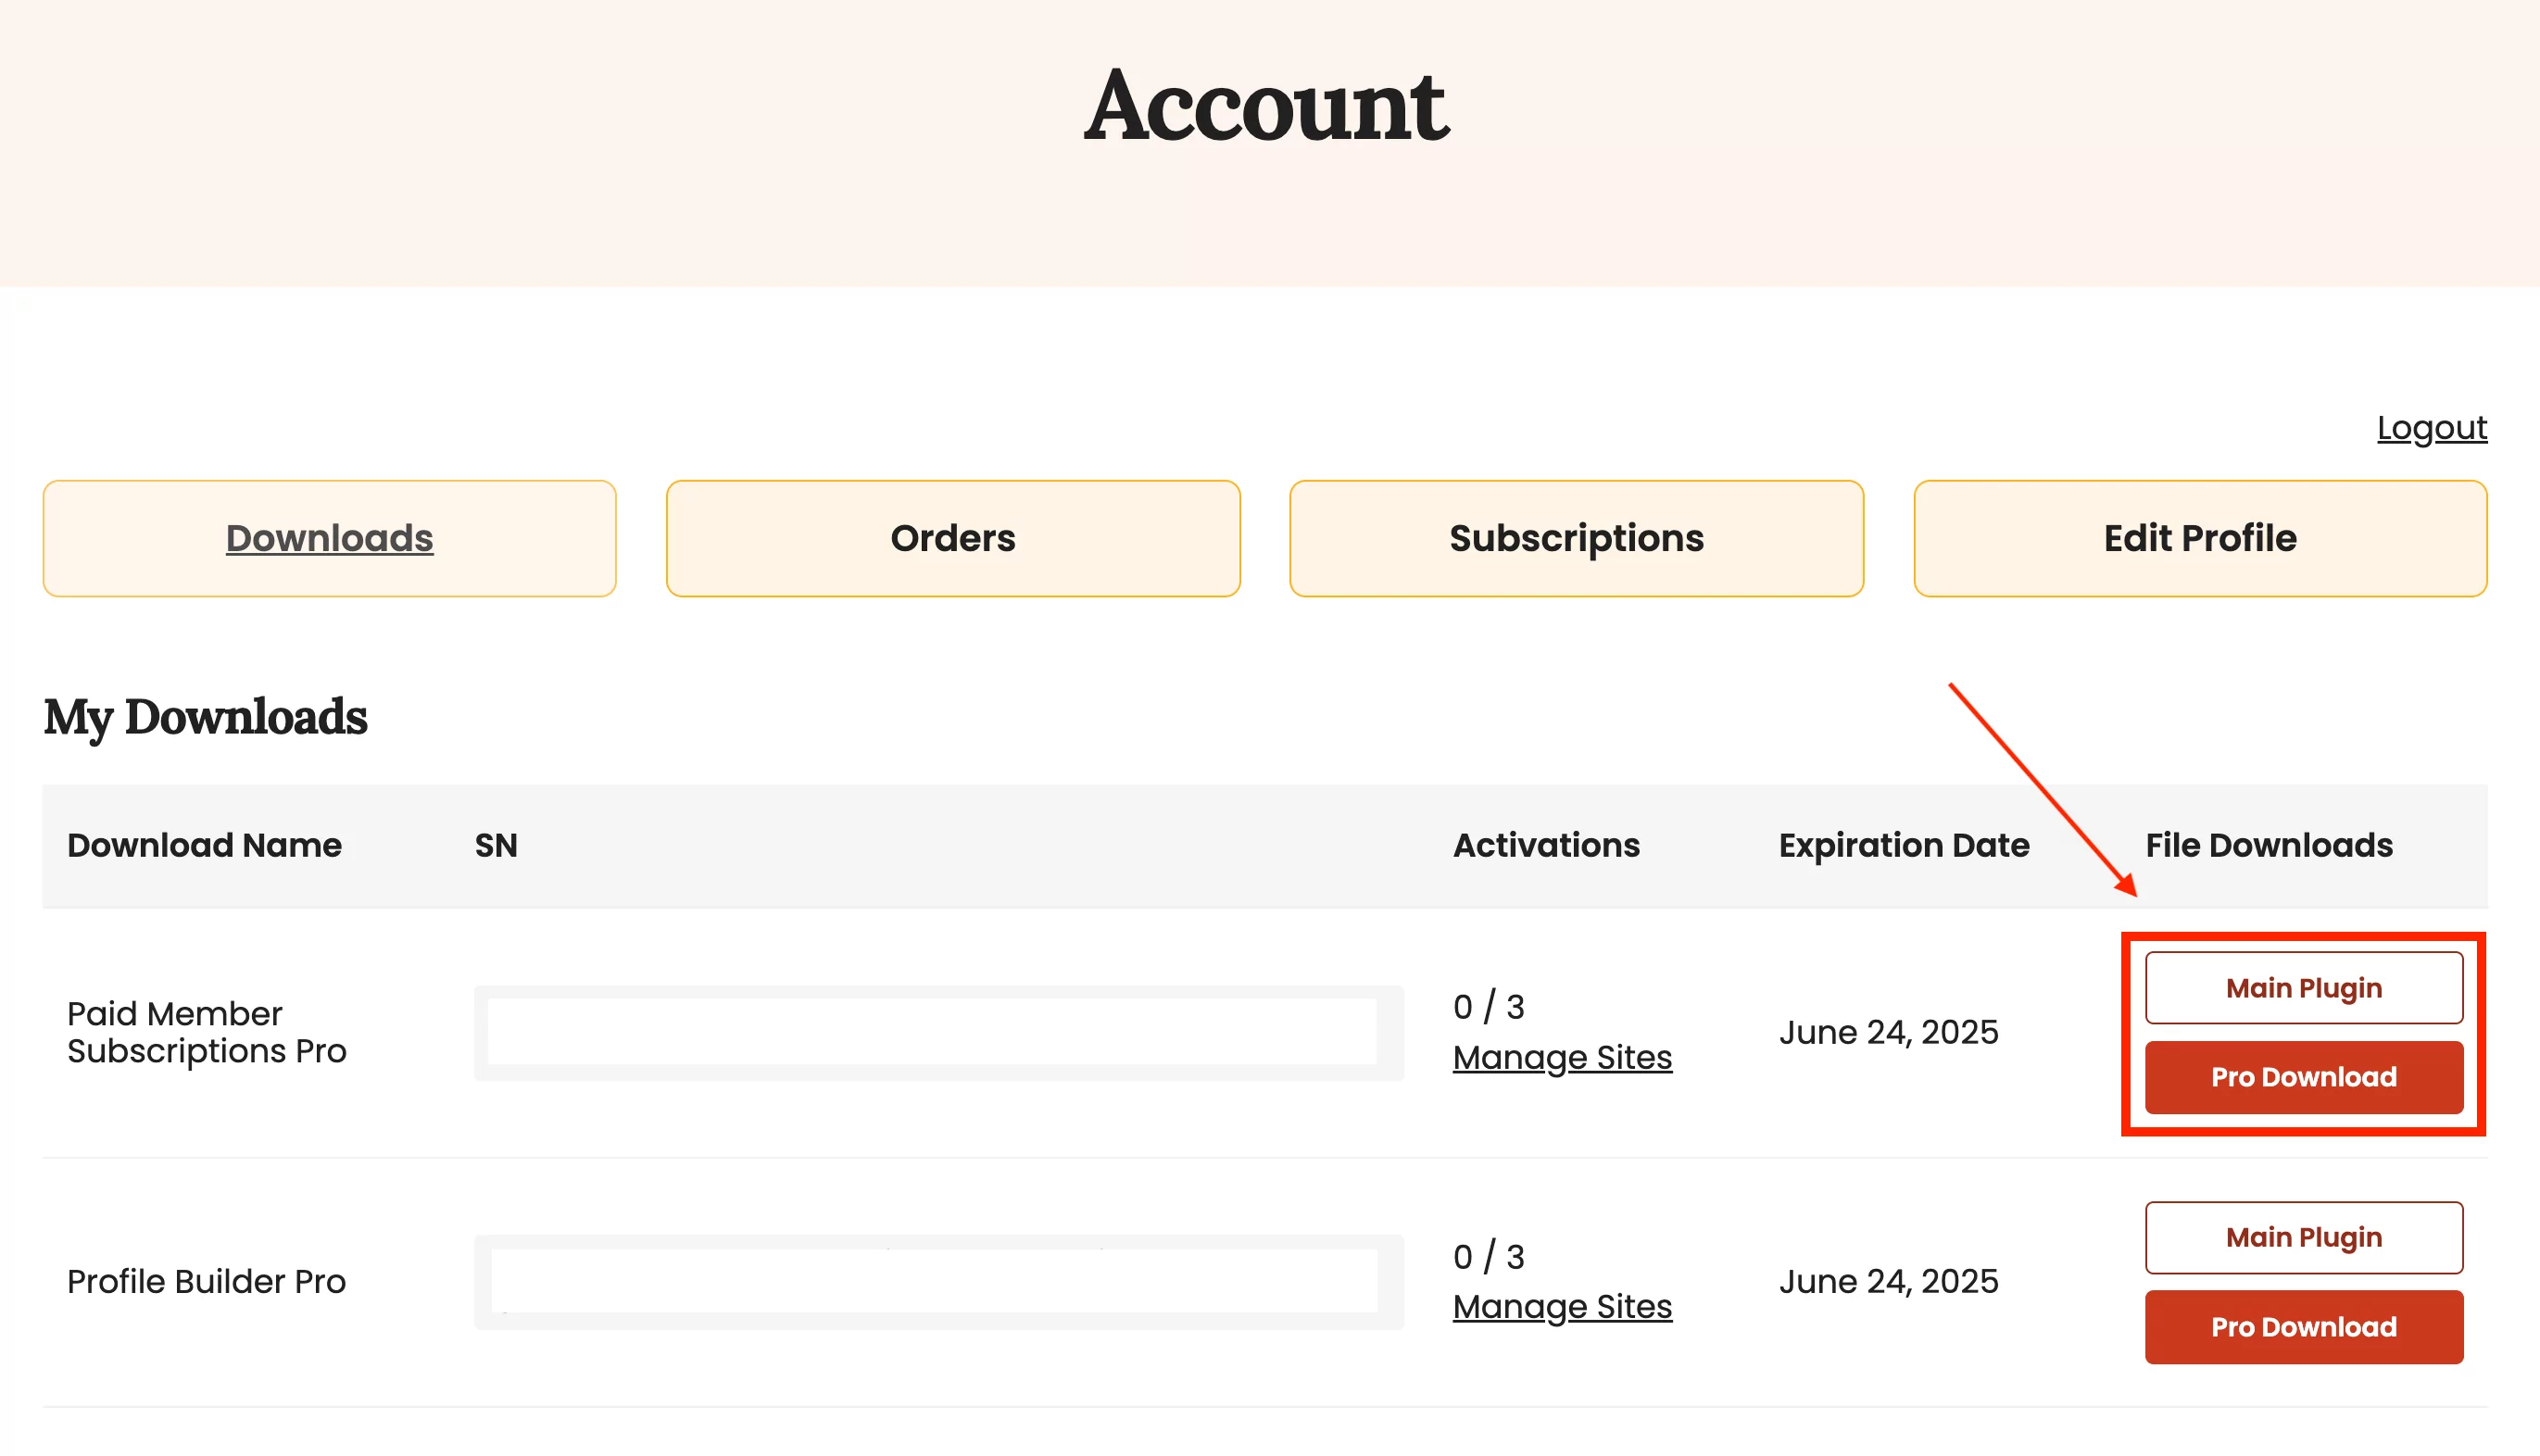
First, you’ll need to purchase and then download Paid Member Subscriptions Pro from your Cozmoslabs account page.
Make sure to download both the main plugin and the Pro extension from your account and then upload those zip files to your WordPress site:
To upload the plugin on your site, go to Plugins → Add New Plugin → Upload Plugin. Select the previously downloaded files and then install and activate them one by one. You’ll need to enter your unique license key to activate the pro tool.
Step 2: Enable Global Content Restriction
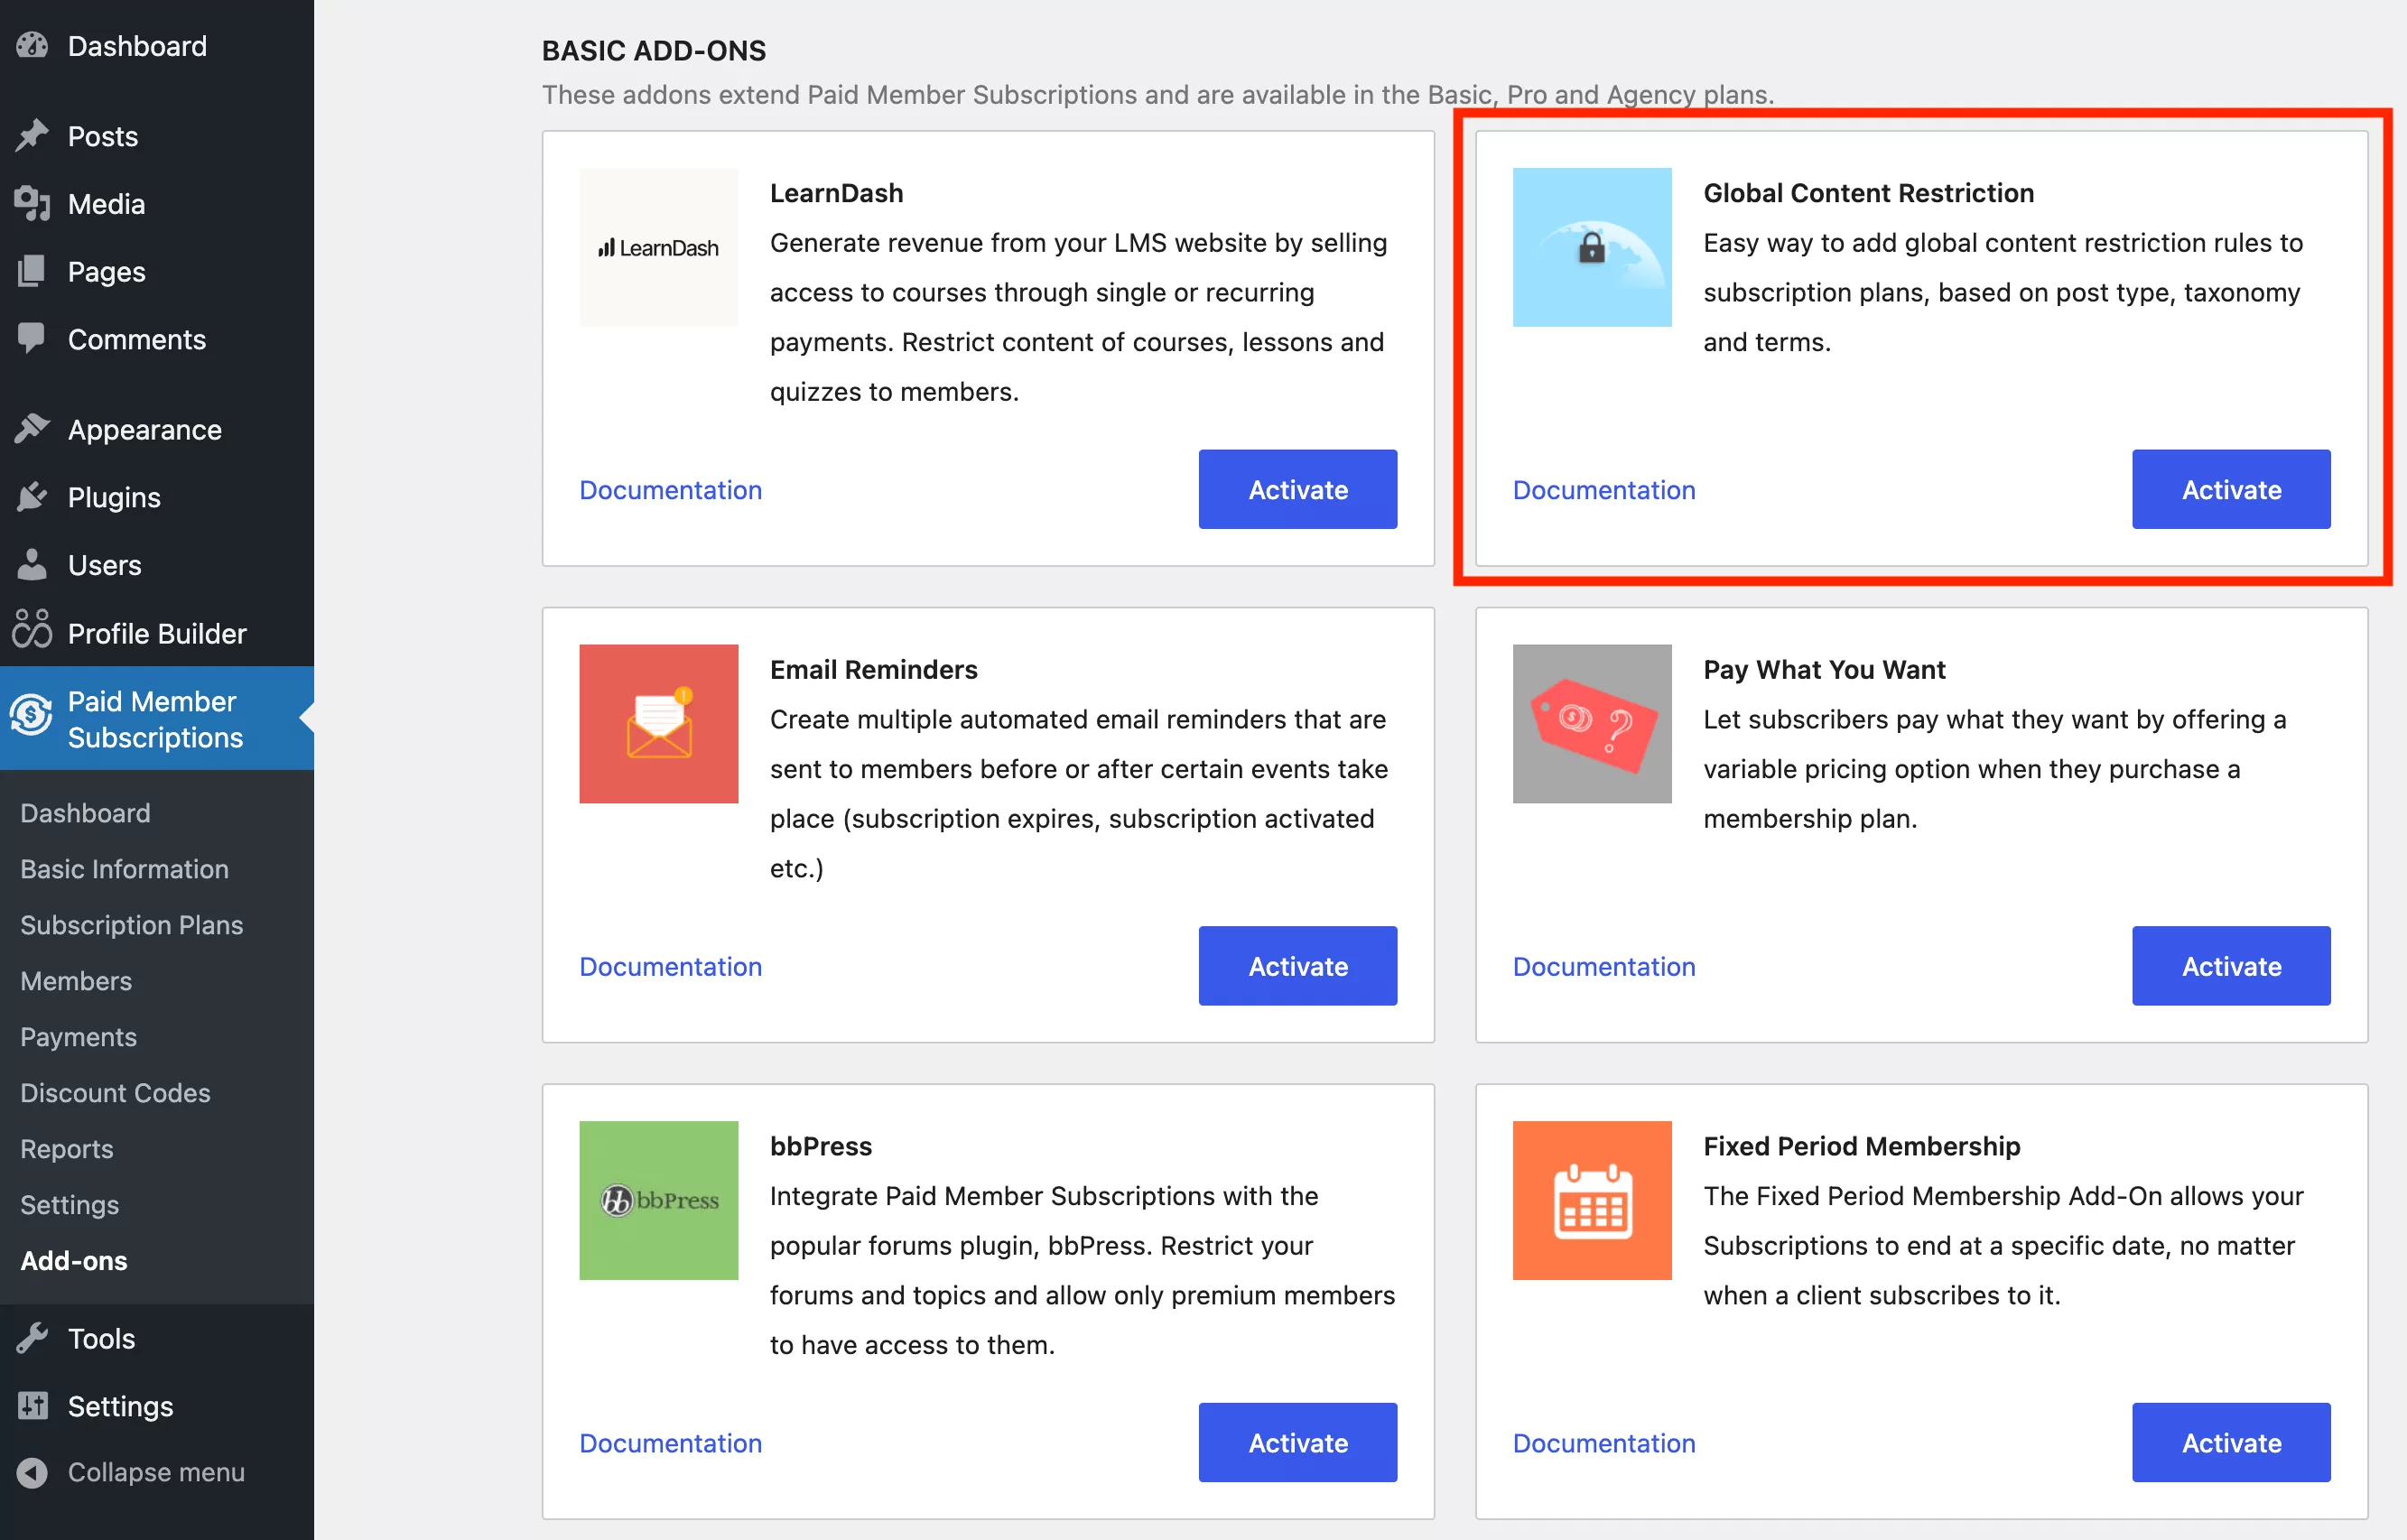
Next, you’ll need to activate the Global Content Restriction add-on, which is only available with the Paid Member Subscriptions Basic or Pro licenses.
Navigate to Paid Membership Subscriptions → Add-ons, find the Global Content Restriction in the add-on list, and then activate it:
Now, if you want to password-protect entire categories or post types, you’ll need to set up at least one subscription plan. You can make this plan free, so users only need to sign in to access restricted categories. Or, you can even charge a one-time or recurring fee.
This is what makes Paid Member Subscription such a great option for managing membership websites. It offers subscription plan setups bundled with customized content restrictions and lots of membership features, all in one place.
Step 3: Password Protect WordPress Categories
Next, let’s walk through the steps to set up a subscription plan and password-protect a category on your WordPress website.
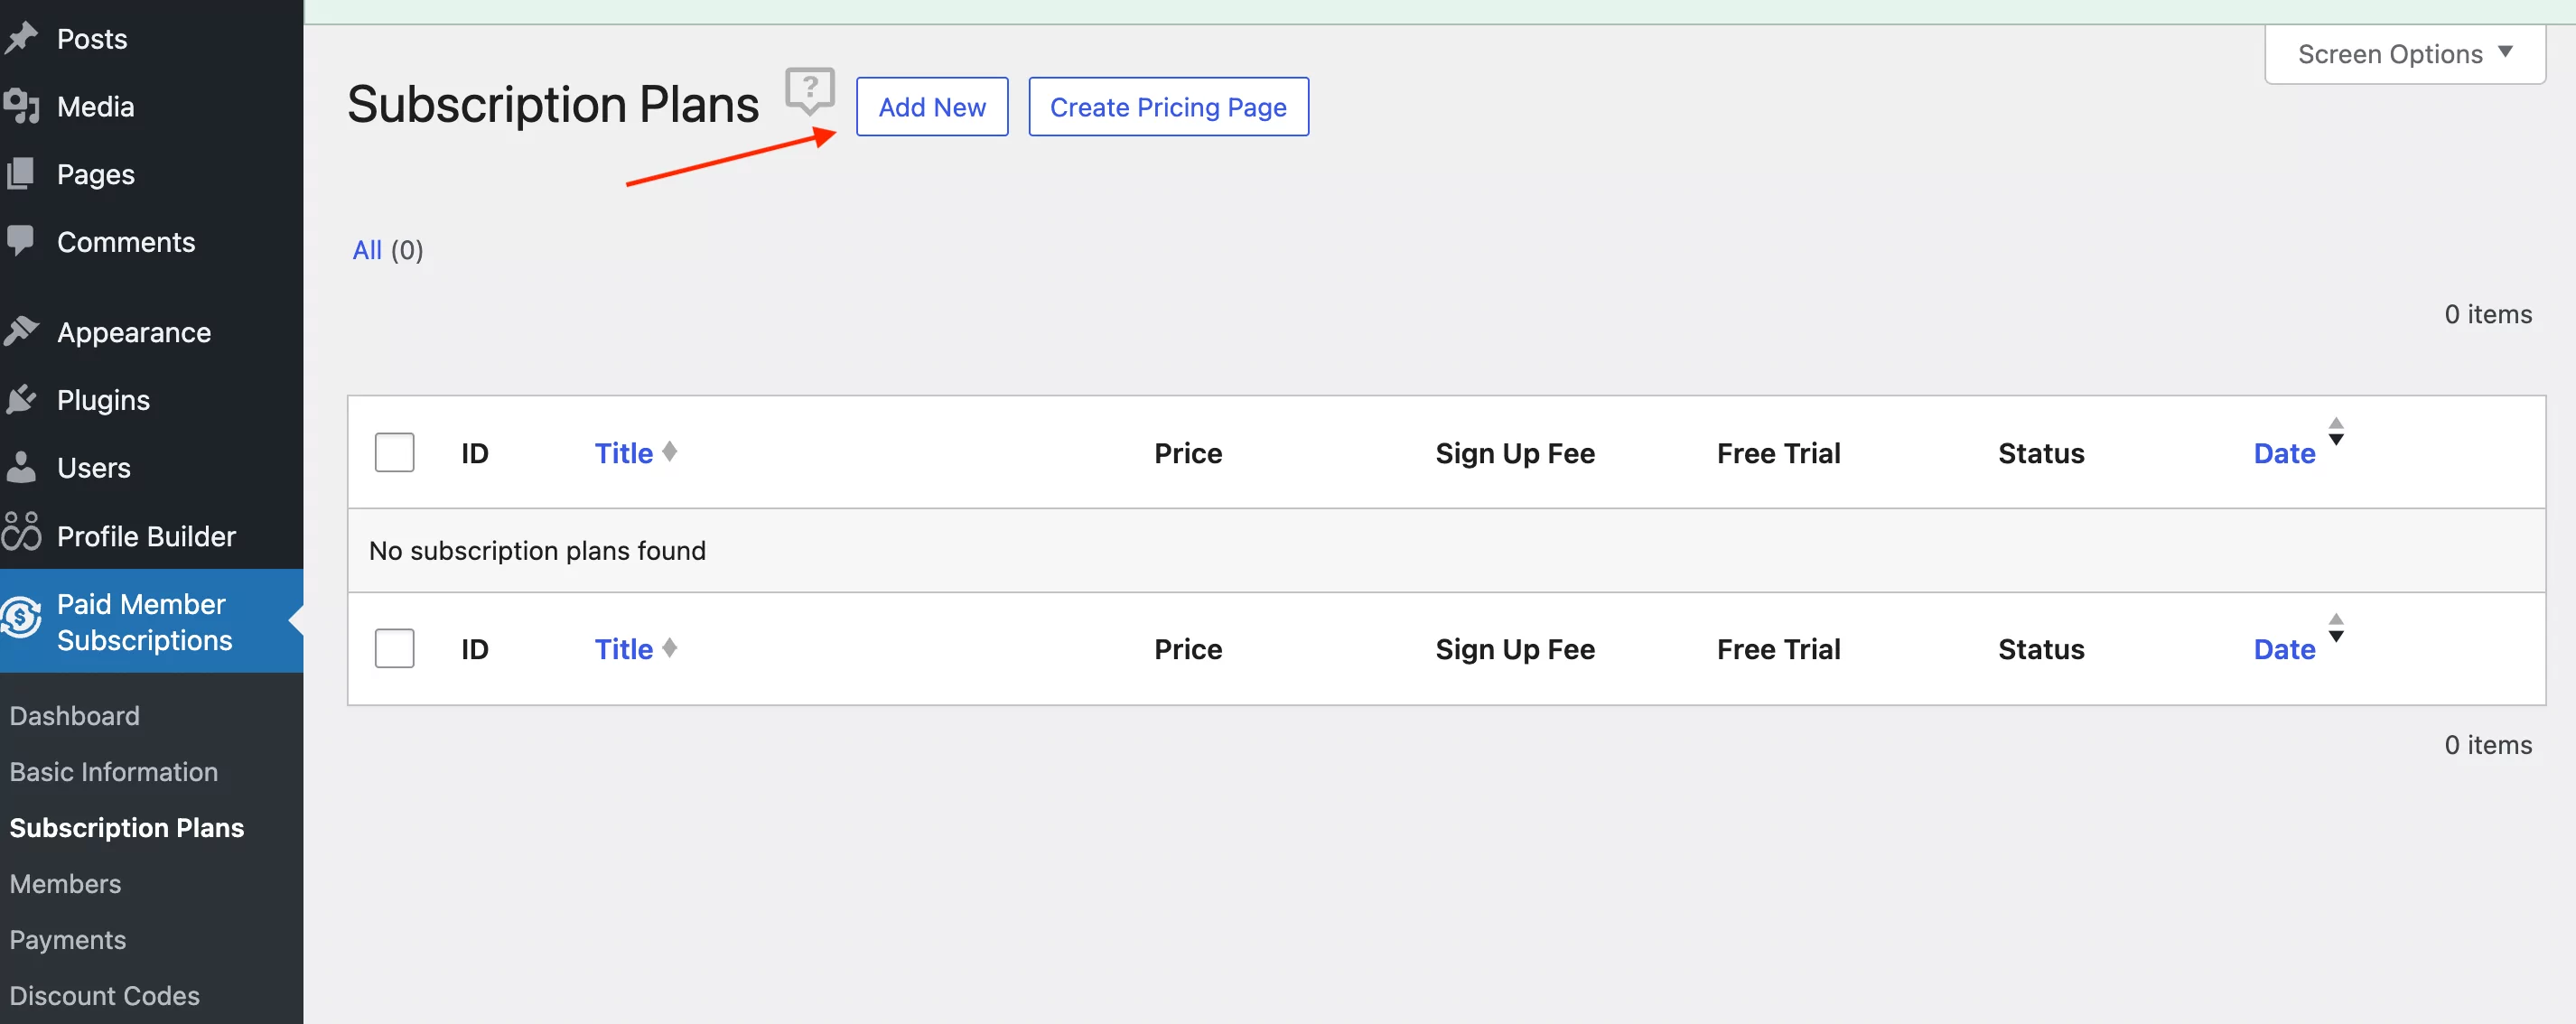
First, go to Paid Membership Subscriptions → Subscription Plans. Then click on the Add New button at the top:
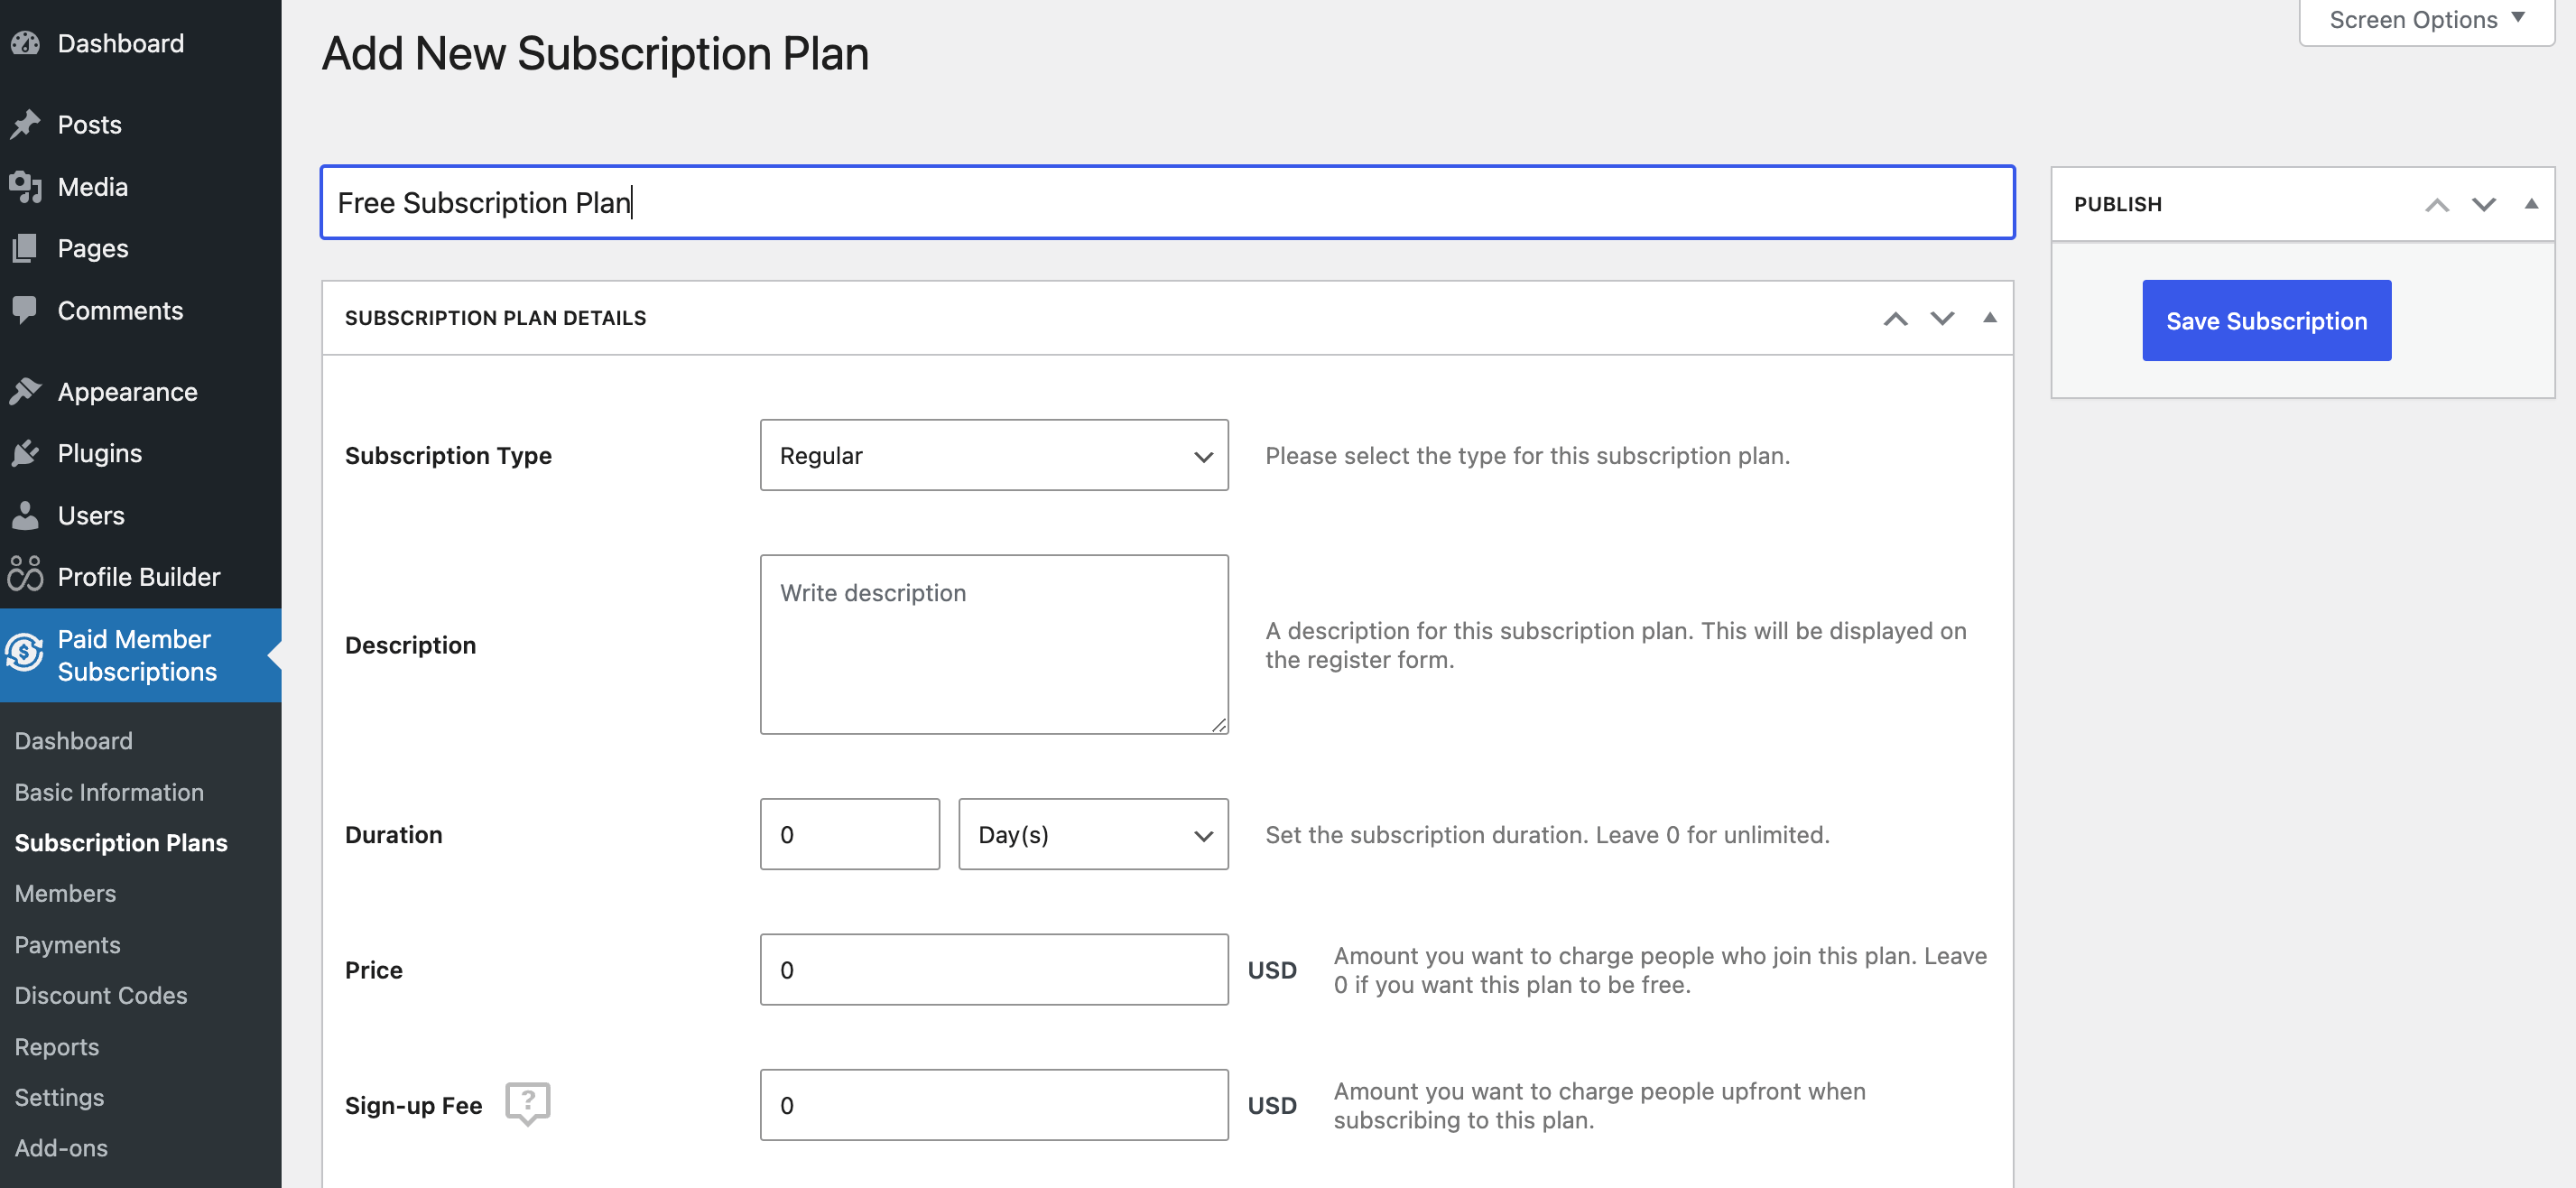
You’ll then land on the page where you can set up and customize your subscription plan. If you don’t want to charge users, simply add a name and leave the other default settings:
If you want to benefit from other membership features, here’s a detailed documentation on Subscription Plans and how to set them up the right way.
Next, scroll down to the bottom of the page, where you’ll see the Global Content Restriction section. This is where you’ll set up the password-protected categories in WordPress:
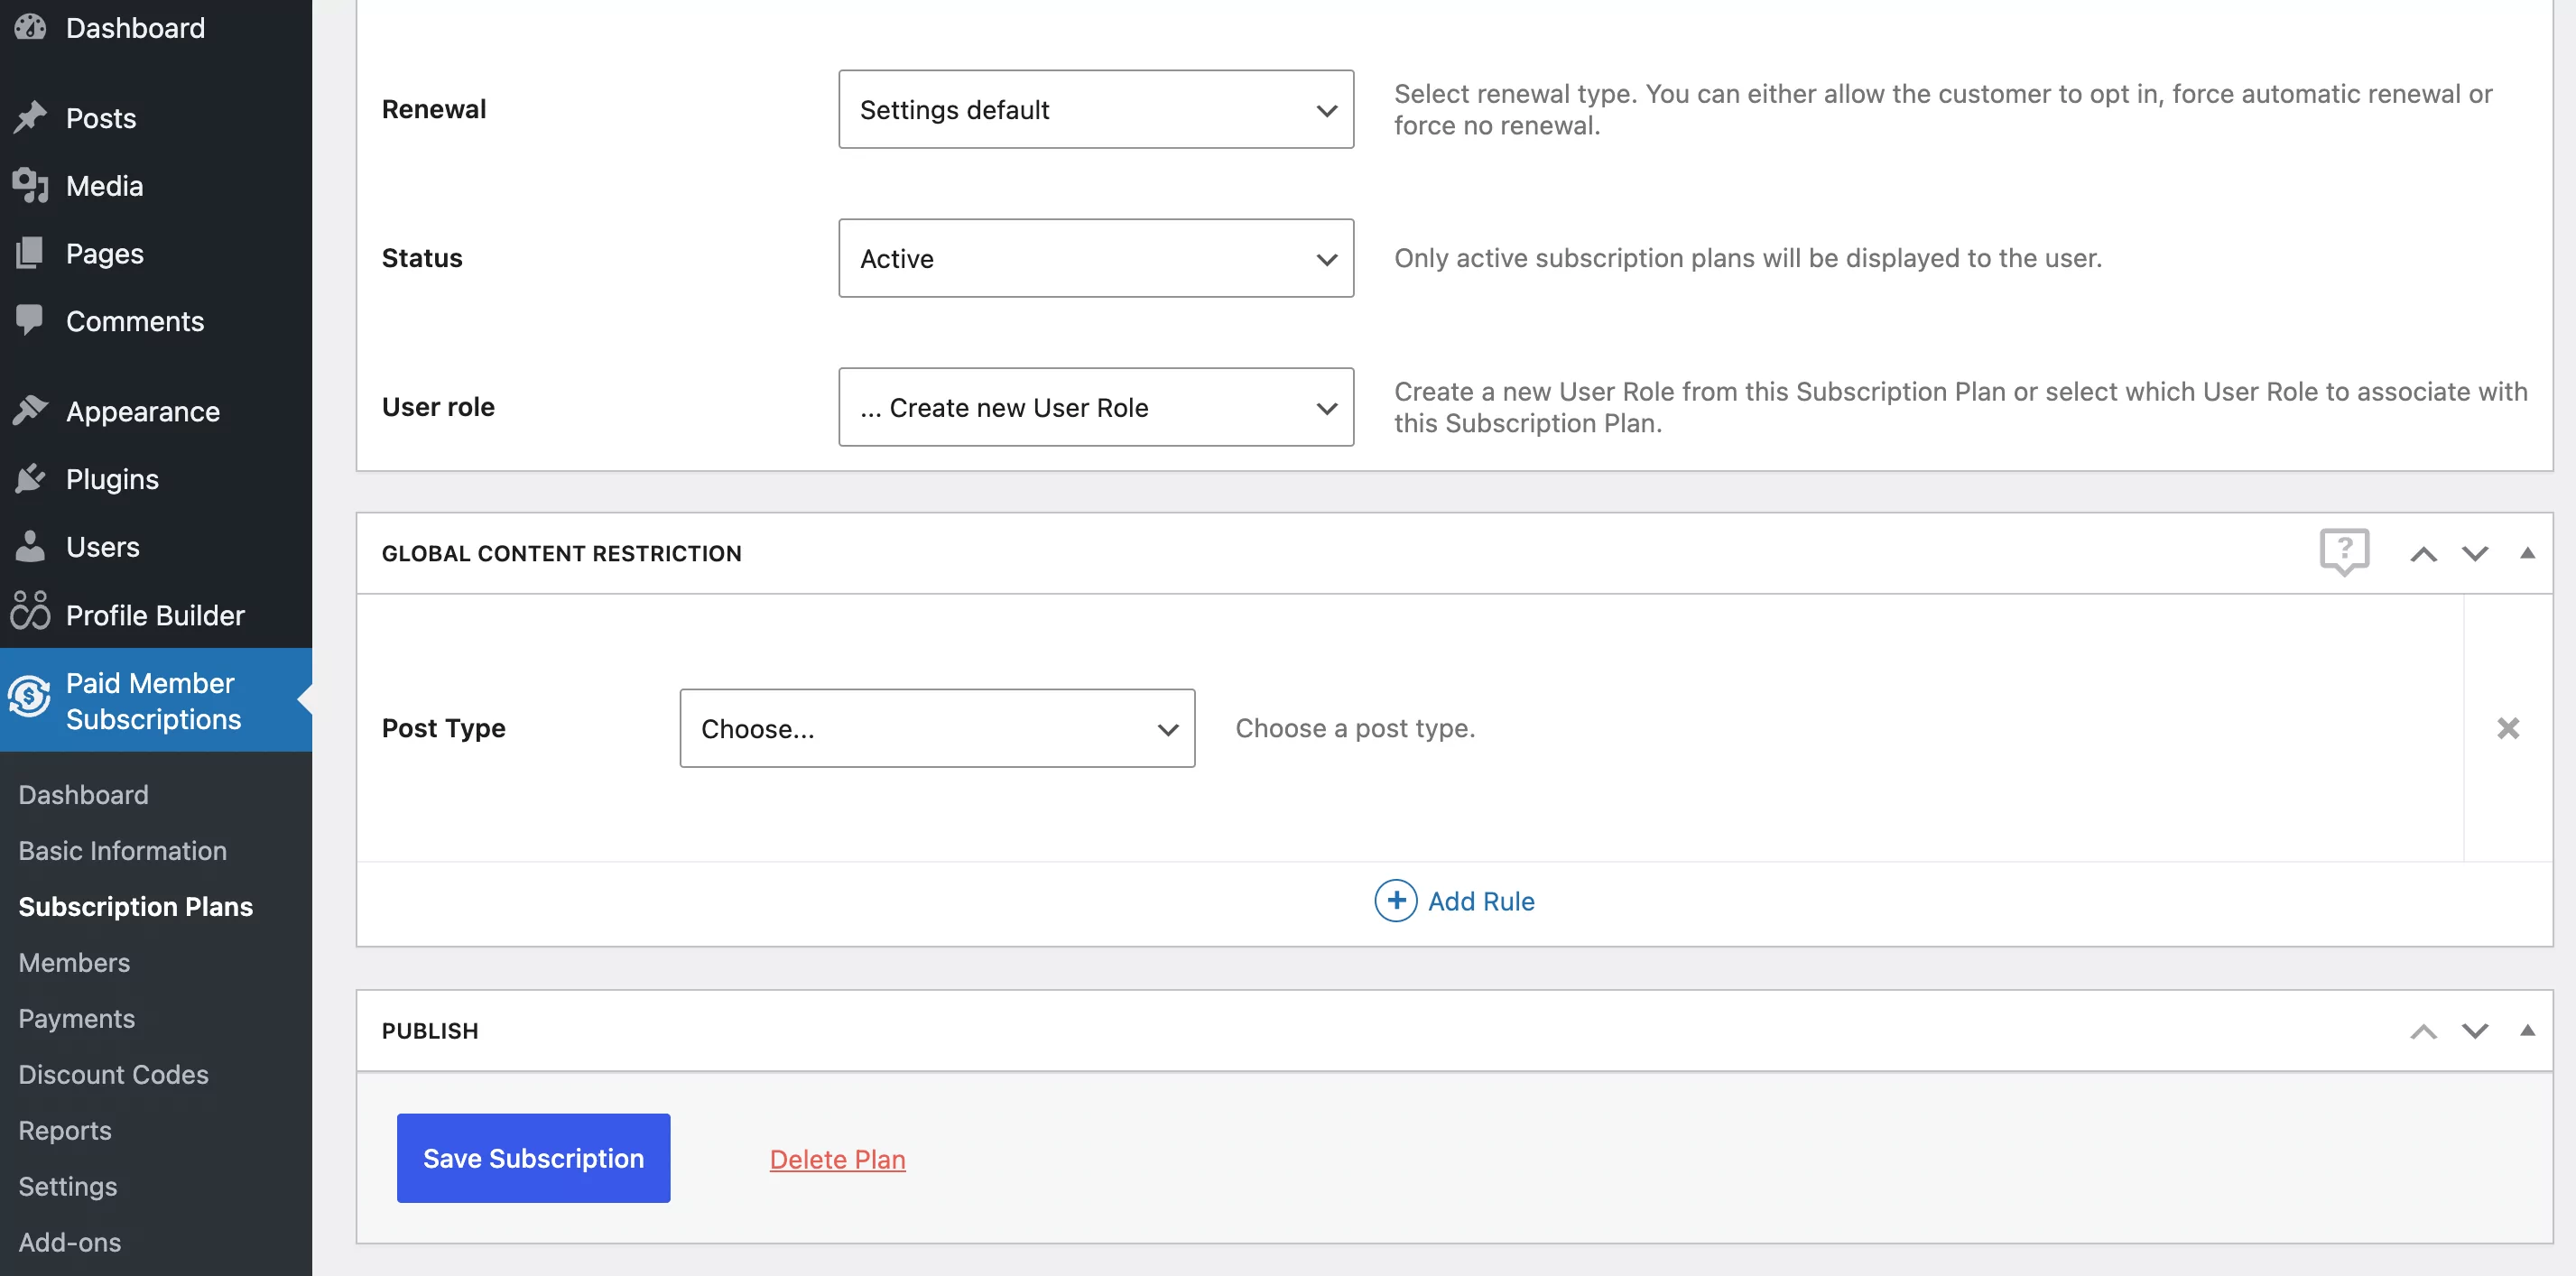
After that, choose the Post Type from the dropdown menu. For our use case, we’ll go with the “post” option since we want to password-protect an entire post category. Next, click on the Add Taxonomy link and choose the Category option from the dropdown menu that appears:
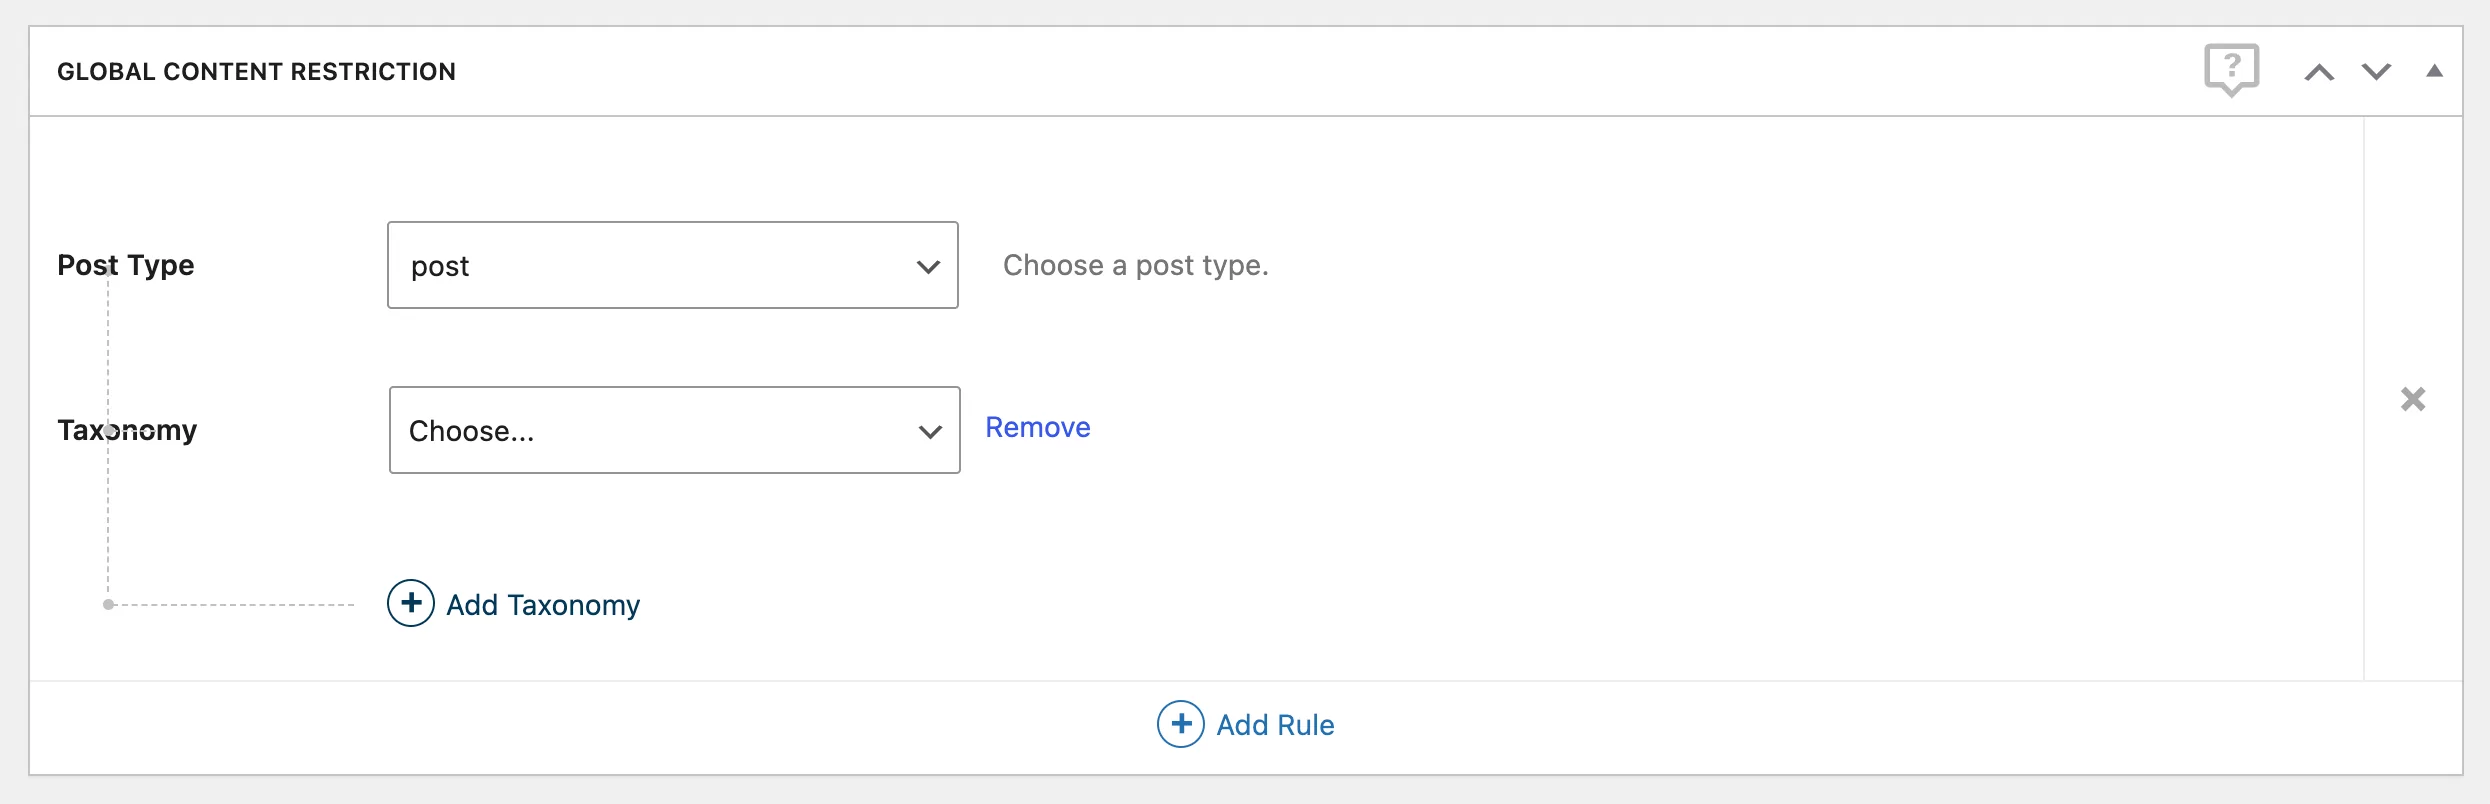
A list of all the categories available on our WordPress website should show up. You can choose the categories you want to restrict or password protect and then scroll back up to click on the Save Subscription button.
Step 4: Update the Registration Page
Now, in order for this restriction to work, there’s one more step you need to take. Remember the registration page you created at the beginning of this tutorial?
Well, in order for your users to have access to this type of restricted content, they need to sign up for a subscription plan as well. That means you’ll need to use a different sign-up form this time around.
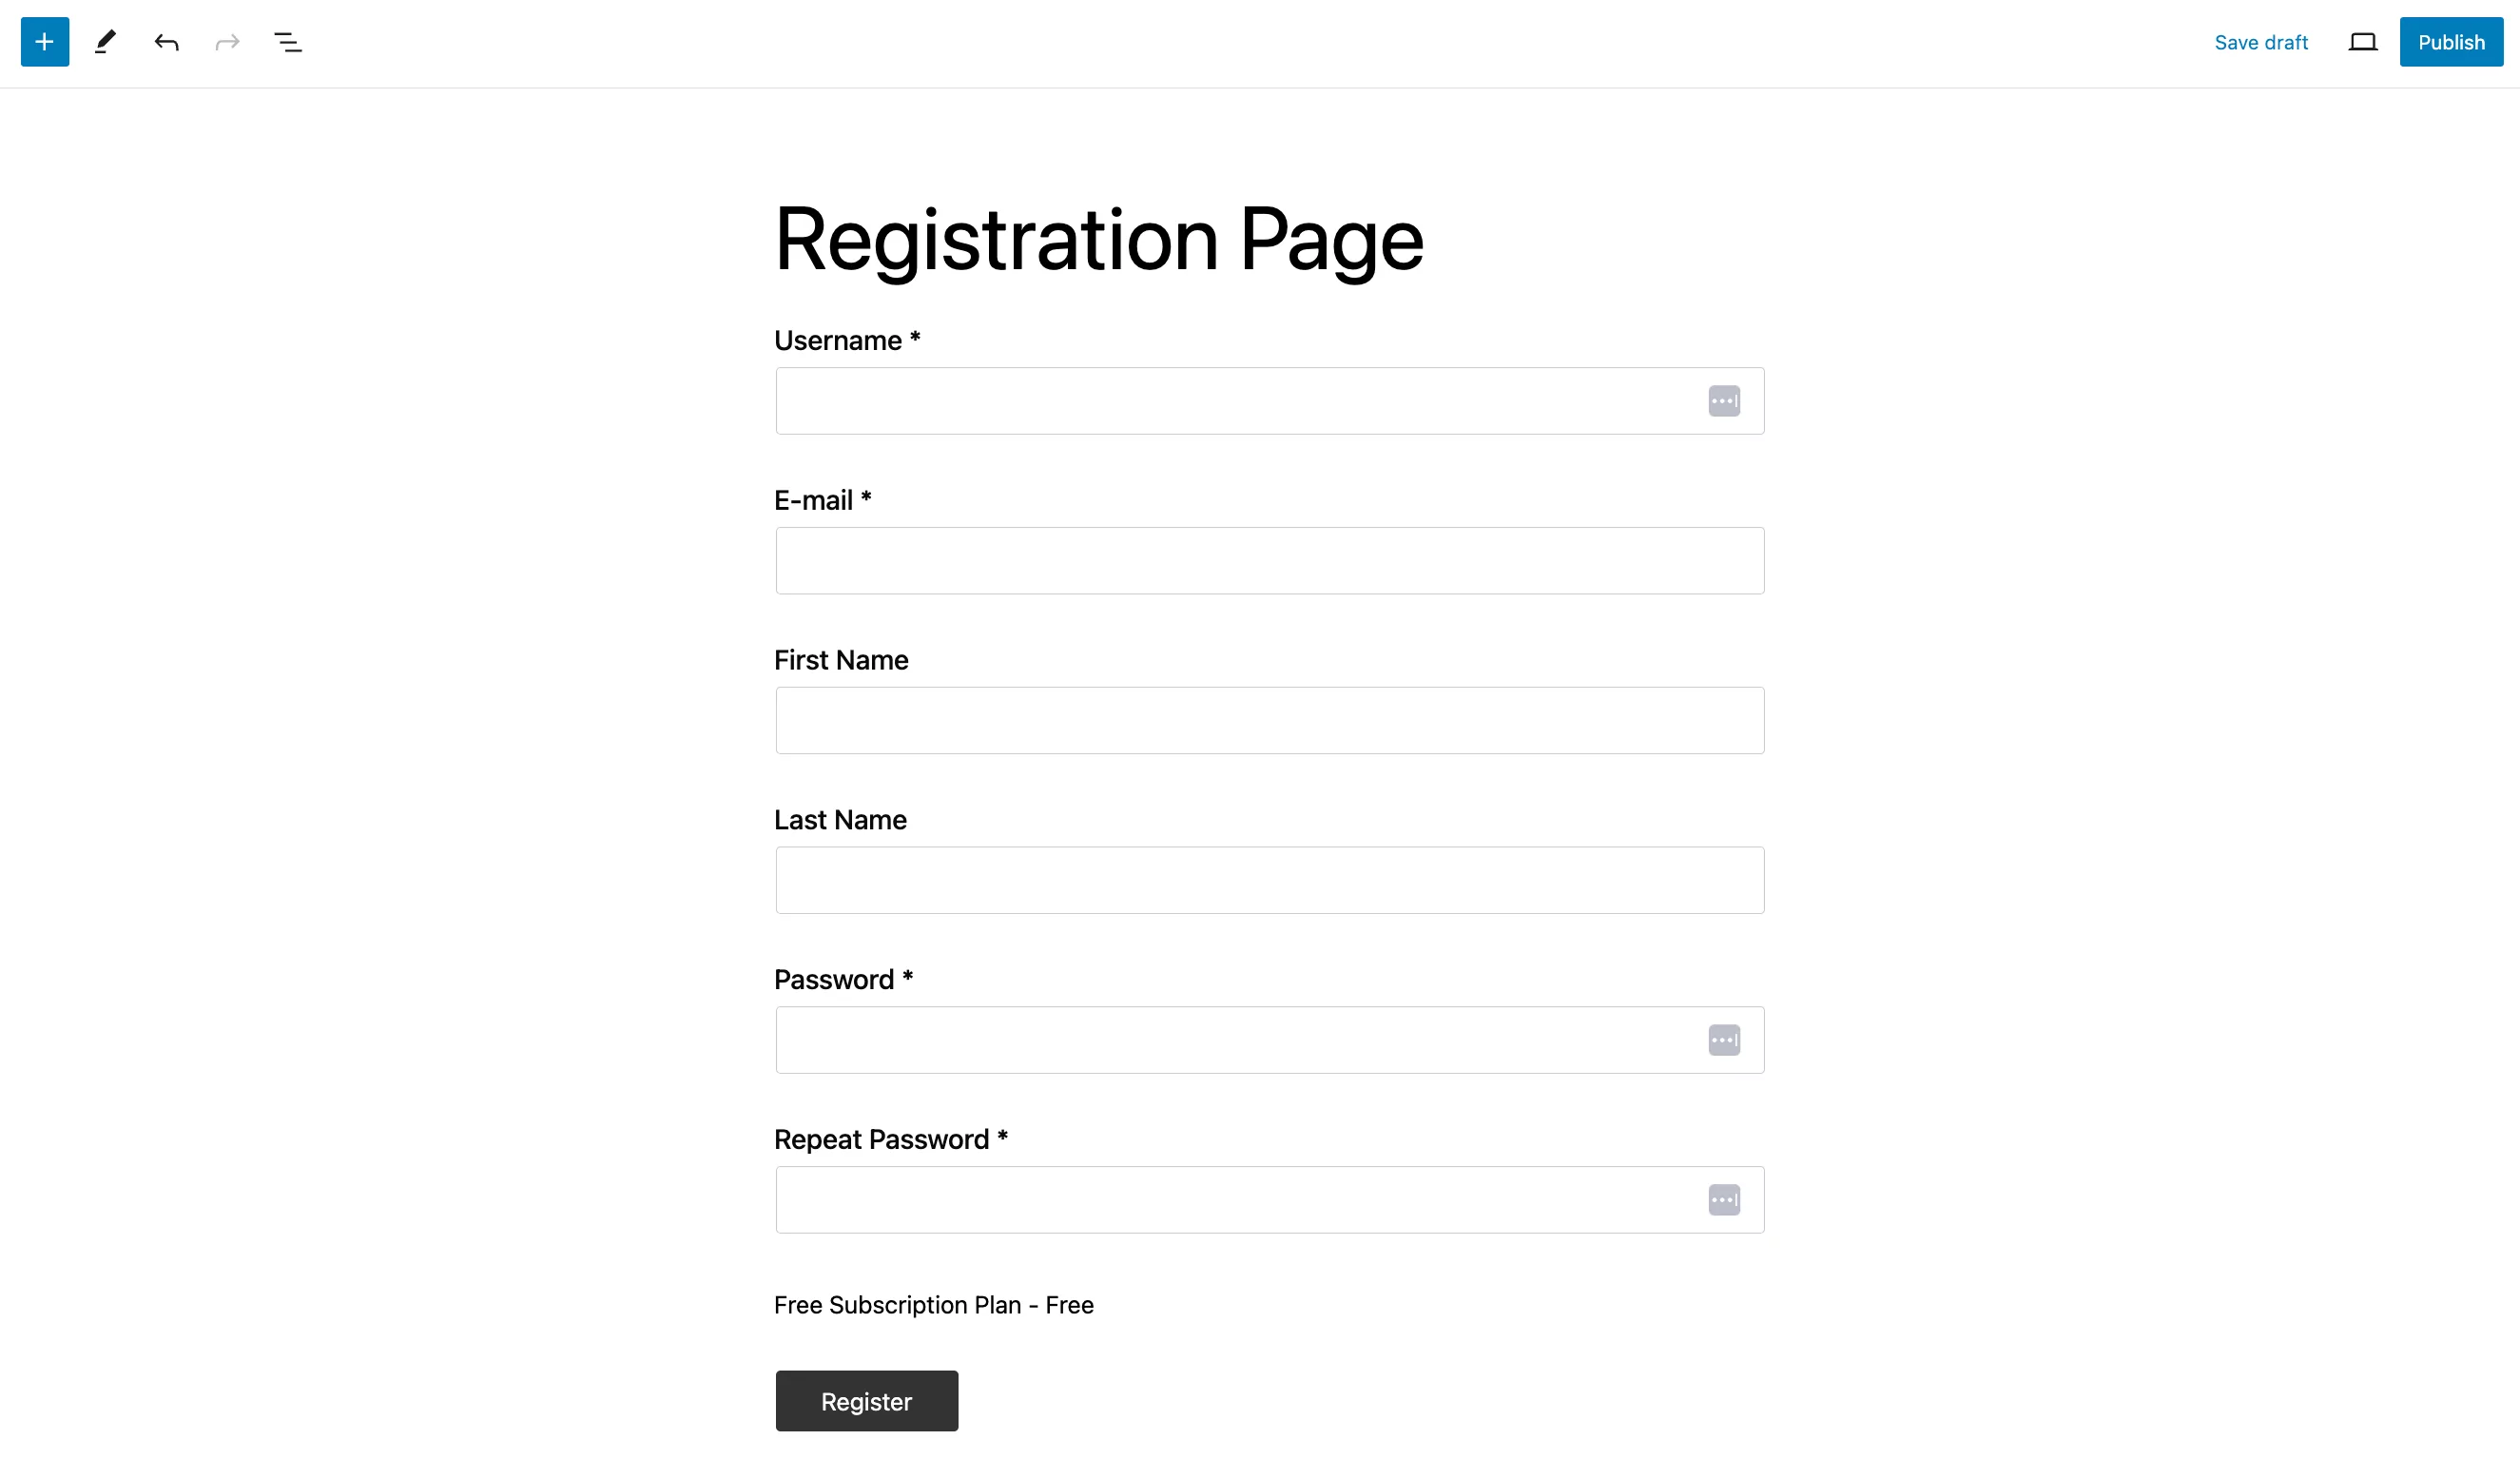
To do this, go back to the registration page you’ve already created with Profile Builder, and replace the Profile Builder Register block with the PMS Register block:
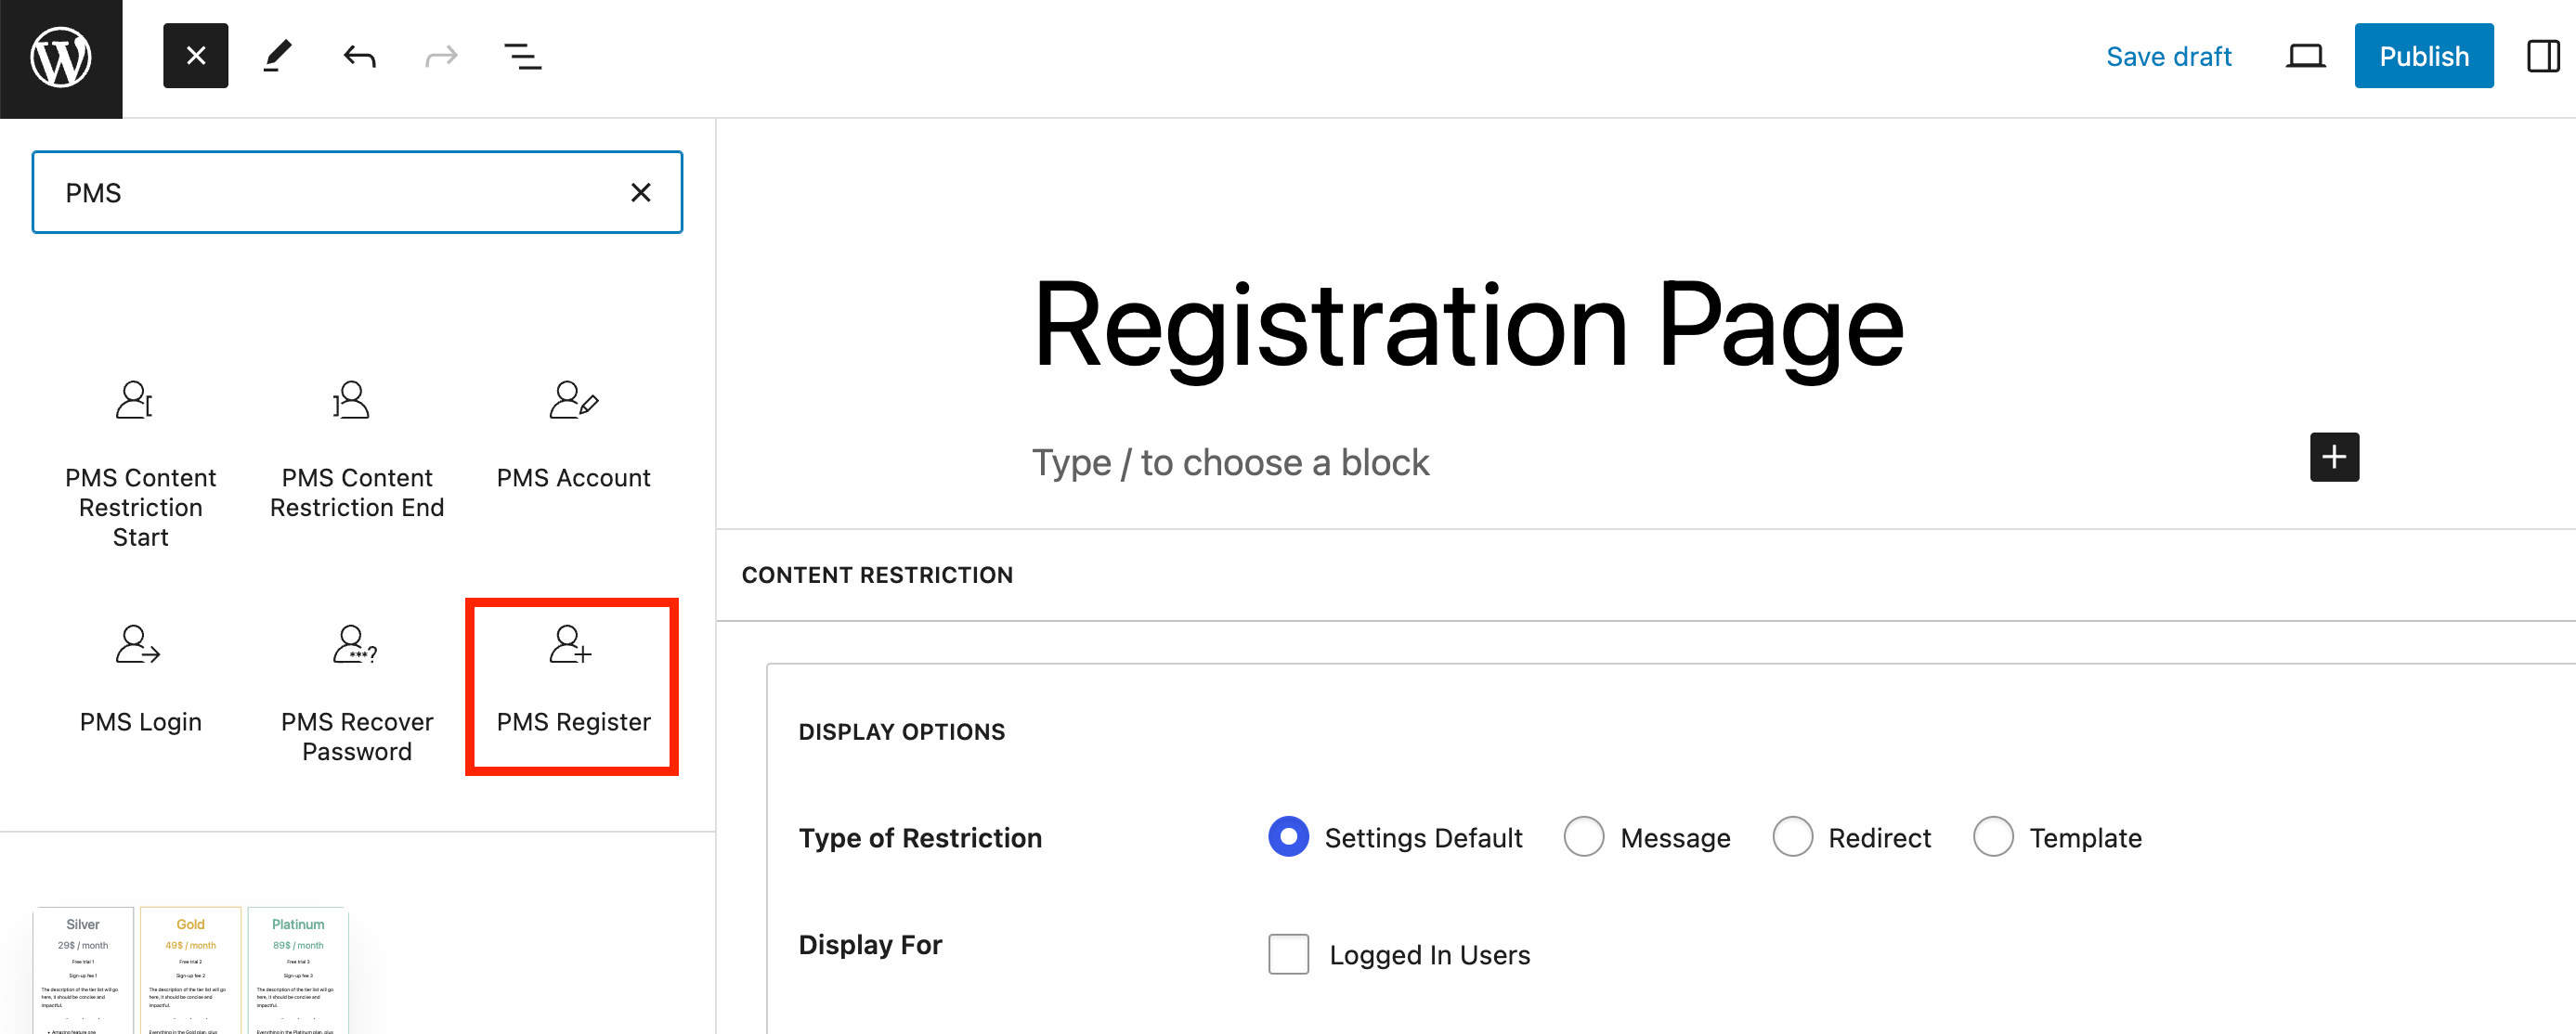
This new form will display a list of all the subscription plans you’ve created, right here on the registration page:
In our case, we’ve only created one free tier, so all new users will be automatically subscribed to this plan upon sign-up.
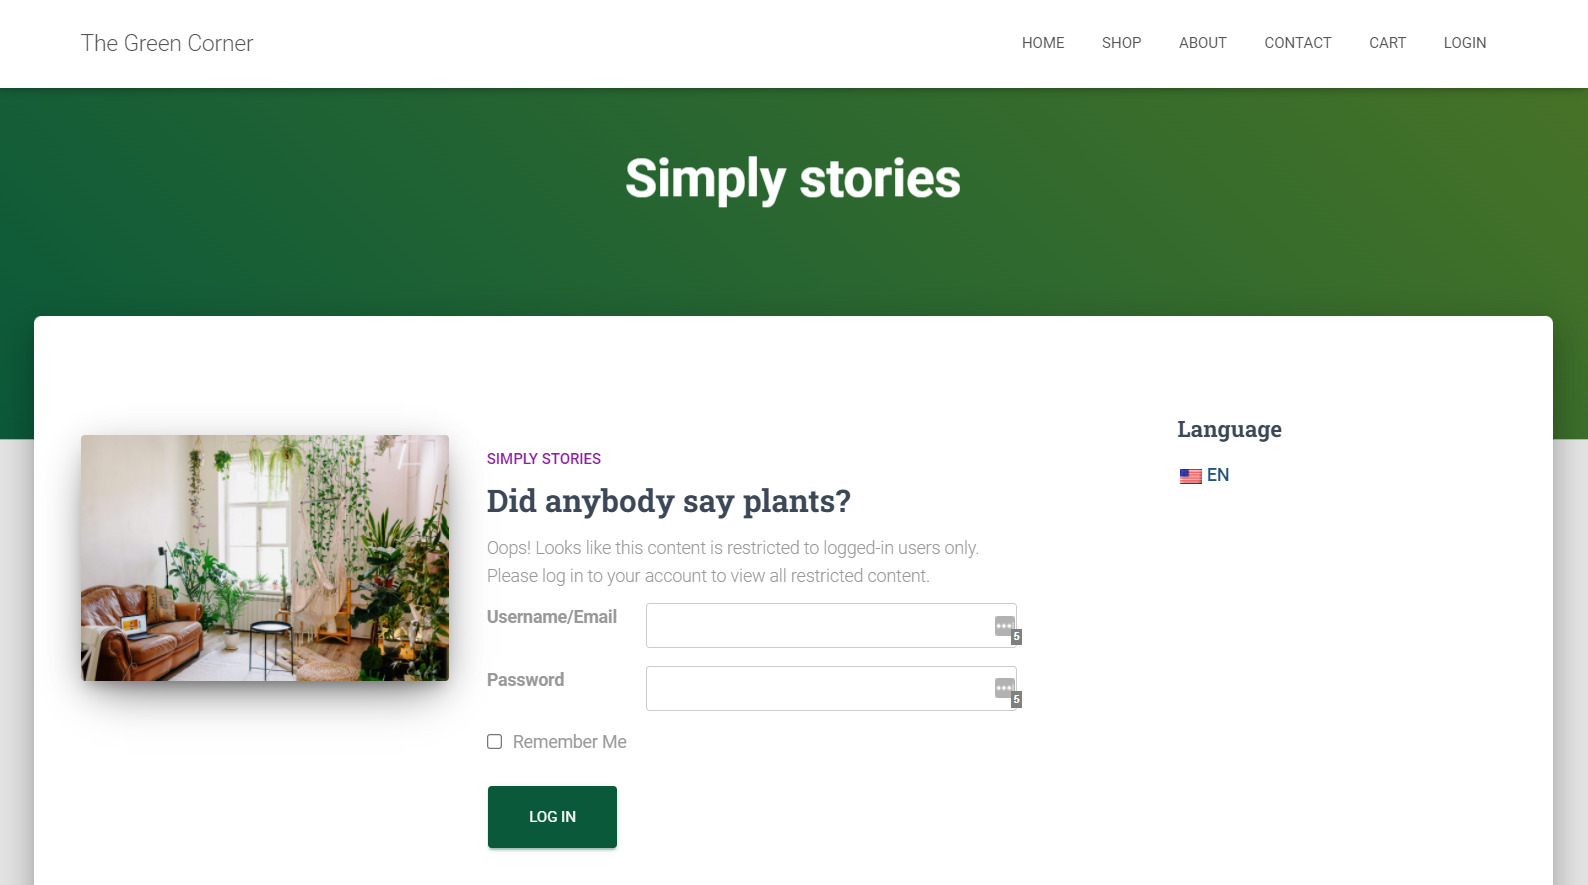
Now, all the posts under the restricted categories you selected in the previous step,will return the set restricted message and login form for non-logged-in users. Visitors will only be authorized to view posts from this category by using their username and password.
In order to customize the message shown here, you can apply the exact same steps you followed when setting up Profile Builder’s content restrictions.
Just go to Paid Member Subscriptions → Settings → Content Restriction tab, instead of Profile Builder’s Content Restrictions this time. You can even copy the exact same message and login form here as well.
Once again, if you prefer working with shortcodes, PMS (like Profile Builder) also has a handy list of them, which you can access by going to Paid Member Subscriptions → Dashboard. You’ll find them in the Useful Shortcodes for Setup section.
Password Protect Posts in WordPress in a Few Simple Steps
You should now have a pretty clear idea of how to go about password-protecting your posts in WordPress. If you’re a membership site owner, you can just as easily password protect entire categories in WordPress, or any other premium content for that matter, using Paid Member Subscriptions.
Just make sure you choose the right plugin for your needs and follow the simple steps we explained above. Then, you’ll be good to go with implementing fully customized content restrictions on your WordPress website.
Profile Builder Pro
A complete user management plugin that lets you restrict posts in WordPress in a fully customized way.
Get Profile BuilderDo you still have questions on how to password-protect content, posts, and categories in WordPress? Let us know in the comments!
Related Articles

WordPress Profile Builder: a Front-end User Registration, Login and Edit-Profile Plugin
Easily Login, Register and Edit your Profile Directly from the Front-end Profile Builder lets you add front-end forms that give your users a more flexible way to register, log in, and modify their profile information. If you allow public registration on your site, you don't want to force your users to use the backend WordPress […]
Continue Reading
5 Best WordPress User Management Plugins
By default, WordPress lets you add different types of users to your website. However, you might be looking for a more flexible way to manage the people who interact with your content. If this is the case, you can use a WordPress user management plugin to manage authors and contributors. With an efficient user management […]
Continue Reading
Top 10 Gravity Forms Alternatives You Need to Consider in 2026 (Free & Paid)
In the market for Gravity Forms alternatives? I think you will agree that finding the best online form builder is a bit tricky, especially with the many options out there. One such option is Gravity Forms, a well-known form builder in the game. But even with all the rave reviews, is it the best software […]
Continue Reading