Table of Contents
If you own a WordPress site that allows front-end user registration, you’re probably looking for an easy way to set up the WordPress redirect user after login or registration functionality. Not only does this let you keep users out of the WordPress dashboard, but it also enables you to send them straight to a specific page that you’ve optimized for them. Setting up a WordPress login redirect is also a great way to enhance user experience.
Using the complete Custom Redirects add-on in the Profile Builder plugin, you can easily set up a custom WordPress redirect after login, as well as login redirect for several other situations.
So, if you’re wondering how to redirect users, you’ve come to the right place!
In this tutorial, we’ll go through all the different types of WordPress custom redirects you can set up with this redirect plugin module.
Why redirect users after login into WordPress?
Many times, WordPress site owners run multi-user websites that require different people to log in and perform various tasks. For example, if you’re running a blog or magazine site, you might need authors, contributors, and editors to log in with their user accounts. Similarly, if you’re running a membership site, then you’ll have trainers and students logging in to manage the website and access exclusive content.
Setting up custom user redirect after login in WordPress ensures that people are redirected to the correct pages after they’ve successfully logged in to their user accounts. This way, they aren’t redirected to the default WordPress admin area, which delivers poor user experience.
You can create user-role specific pages and keep unauthorized users out of the WordPress dashboard by redirecting users after login. This way, you can rest assured that clients and customers don’t end up on the WordPress back-end. Instead, you can keep them on your site’s front-end.
WordPress redirect users after registration
And since we’re on the topic, let’s take it a step even further. Besides the login redirect, you can also benefit from redirecting users after registration as well.
This way you can send your visitors to a specific page right after they complete the registration process on your website. Maybe you want to take them to a dedicated page that thanks them for their registration or maybe you want to send them straight to their account page. Whatever you choose, the Custom Redirects add-on can help you implement it fast and easy.
What is the Profile Builder plugin?
If you’re not familiar with the Profile Builder WordPress plugin, it’s an easy-to-use plugin that lets you improve all aspects of your WordPress login and registration process. The plugin also works on WooCommerce stores, letting you set up login redirects.
You can create custom registration forms to collect additional information about your visitors, as well as front-end profile editing pages so that users can manage their profiles. You can also create a custom login page at a custom URL on your site.
And, with the Custom Redirects add-on, you can also easily set up a WordPress login redirect after successful login. The best part is that you don’t have to mess around with any code, it’s all done using an intuitive interface.
Profile Builder Pro
Create beautiful front-end registration and profile forms with custom fields. Setup member directories, custom redirects, cutomize user emails & more using the all in one user management plugin.
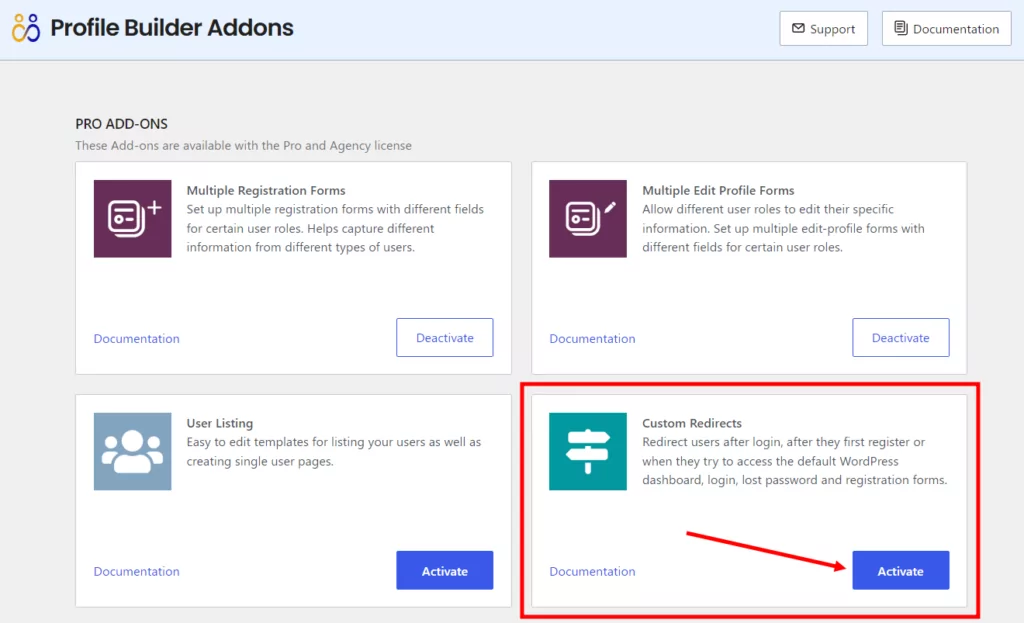
Get Profile BuilderOnce you install and activate the Profile Builder plugin just like any normal plugin, you’ll have to enable the Custom Redirects add-on on your WordPress website. Go to Profile Builder → Add-ons and click the Activate button next to the Custom Redirects add-on.
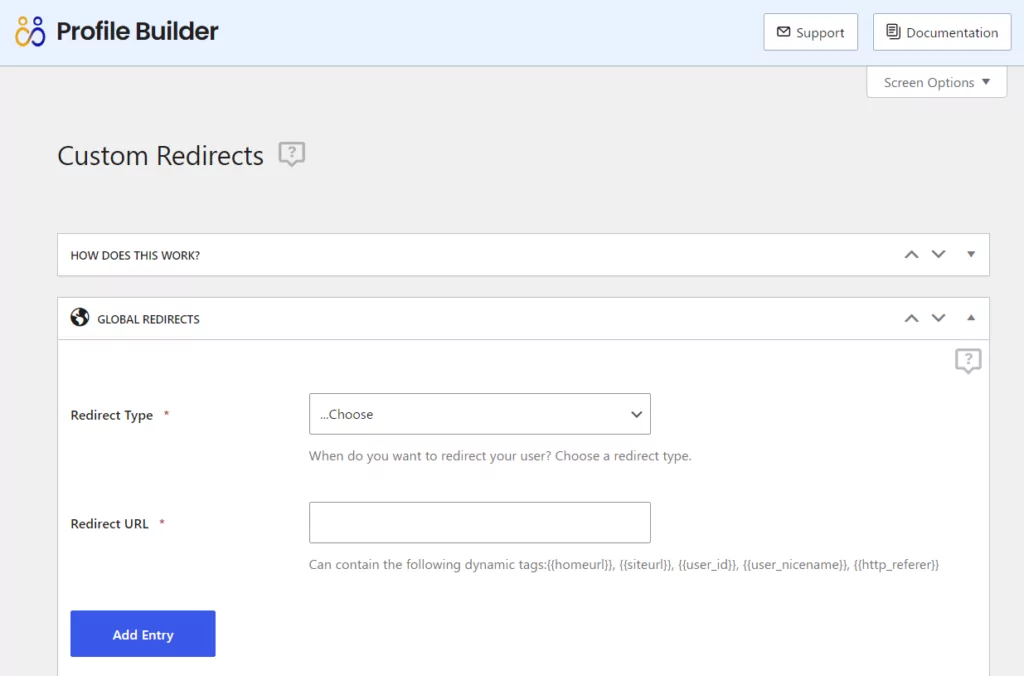
you can set up the WordPress user redirect after login functionality by going to Profile Builder → Custom Redirects from the WordPress admin dashboard:
Now, let’s cover the different types of WordPress redirects your can set up.
Types of WordPress User Redirects in Profile Builder
Now, you might be wondering how to redirect users after login. The Custom Redirects add-on in Profile Builder Pro gives you several redirection methods for various user actions related to login and registration.
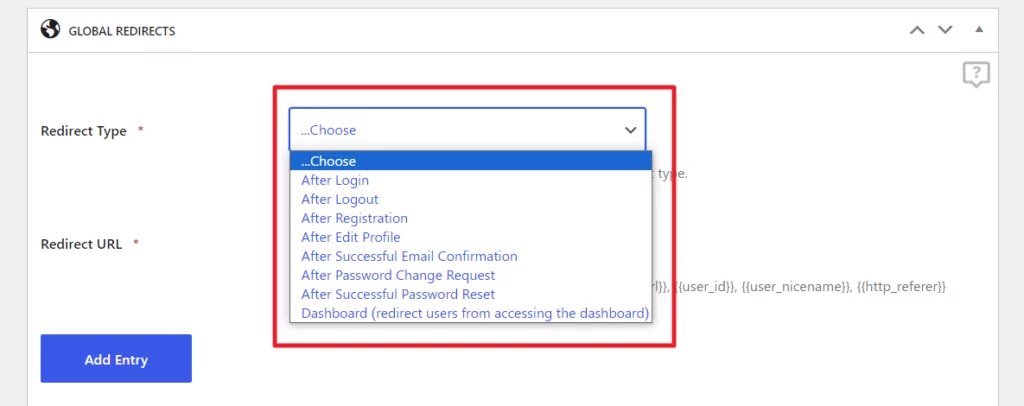
Here’s a quick breakdown of the different options available to you:
- After Login – redirect users to a custom redirect URL after successful login.
- After Logout – create a logout redirect to a custom URL when they log out.
- After Registration – redirect users after successful front-end registration by a new user.
- Dashboard – redirect users when trying to access the WordPress dashboard.
- After Edit Profile – redirect users to a custom page after they’ve edited their front-end user profile.
- After Password Reset – users should redirect to the selected page after they have successfully changed their password.
- After Email Confirmation – users should redirect to the selected page after confirming their email address.
Now that we listed the type of user actions where we can apply our custom redirects, we’ll look into how to use redirect rules to target only certain users, based on redirect filters like user role, username, or user ID.
WordPress Redirect After Login Based on Username or User ID
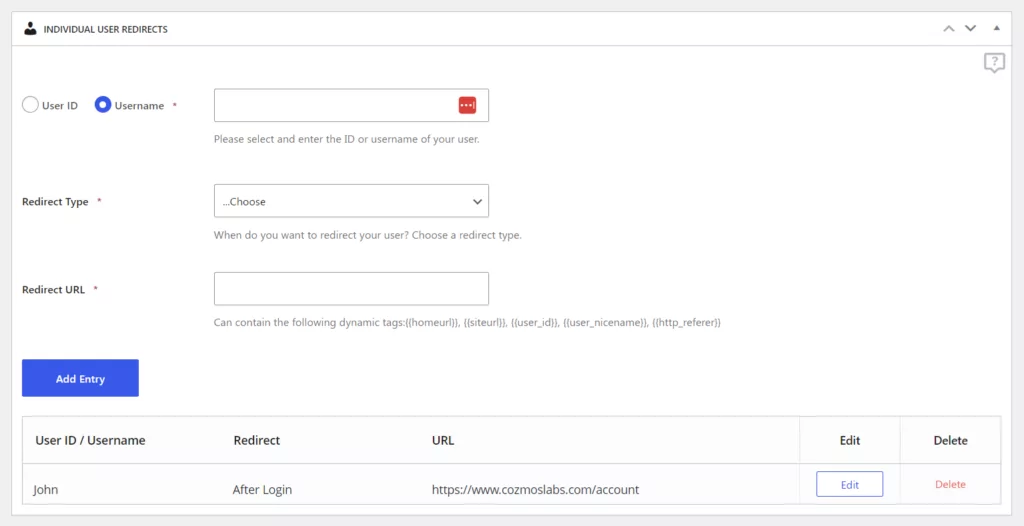
One of the most focused types of user redirects is when you need to target only a specific username or particular user IDs.
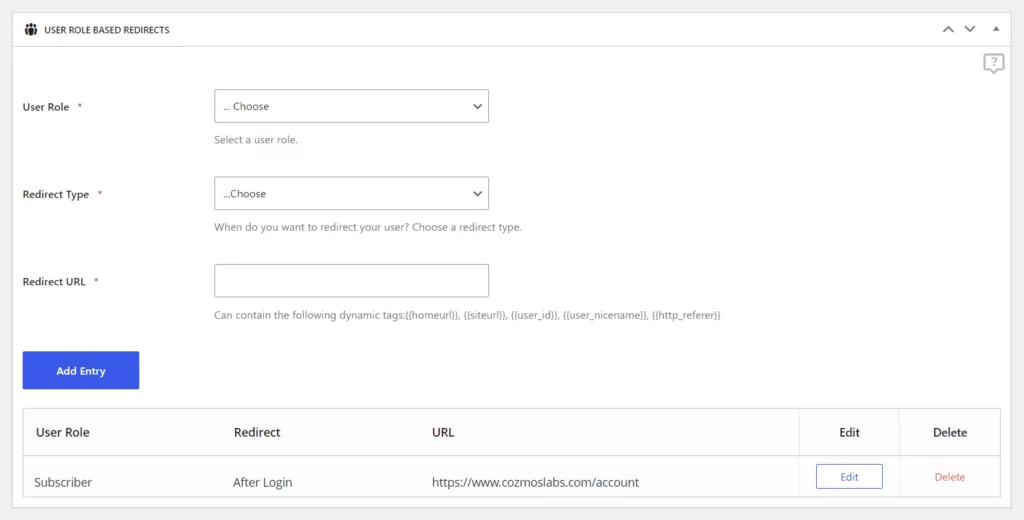
Under Custom Redirects → Individual User Redirects, you’ll be able to select which users are redirected to which link after a certain action. You can target a specific user by entering his username or user ID. This is great for websites that have a handful of users they’d like to redirect to a different page.
WordPress Redirect After Login Based on User Role
Let’s say you have a registration form where users can select their user role (using the User Role Select field), and you want users with different roles to be taken to different pages after registration.
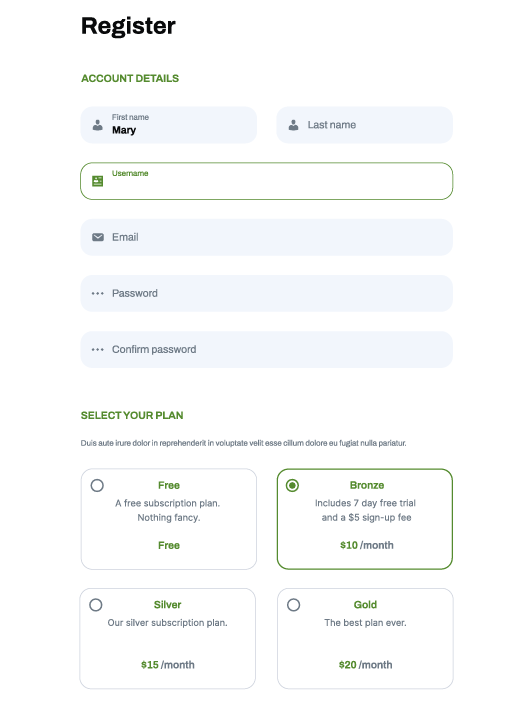
Or, in case you allow users to sign up for paid accounts using Paid Member Subscriptions in combination with Profile Builder, they will automatically get the user role of the selected subscription plan at registration. This means users selecting different plans will have different user roles.
By setting up custom redirects based on user role, you can choose where to redirect users based on which membership plan they applied for at registration. For example, you might want to redirect users who signed up for the Bronze plan to the Bronze Members landing page and users who signed up for the Gold plan to the Gold Members landing page.
As you can imagine, the use cases for redirecting users based on user roles are countless. And, with the Profile Builder Pro plugin, you can do this without adding code to your functions.php file. The plugin also works seamlessly with WooCommerce.
Global WordPress Redirects
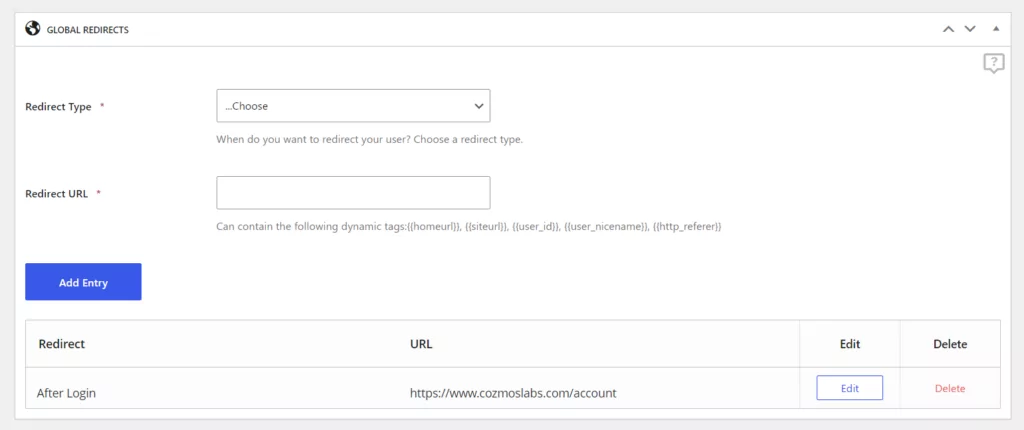
These redirect rules are applied globally, when there are no other more specific redirect rules defined, like redirects based on username or user role.
Redirect Users on Default WordPress Pages
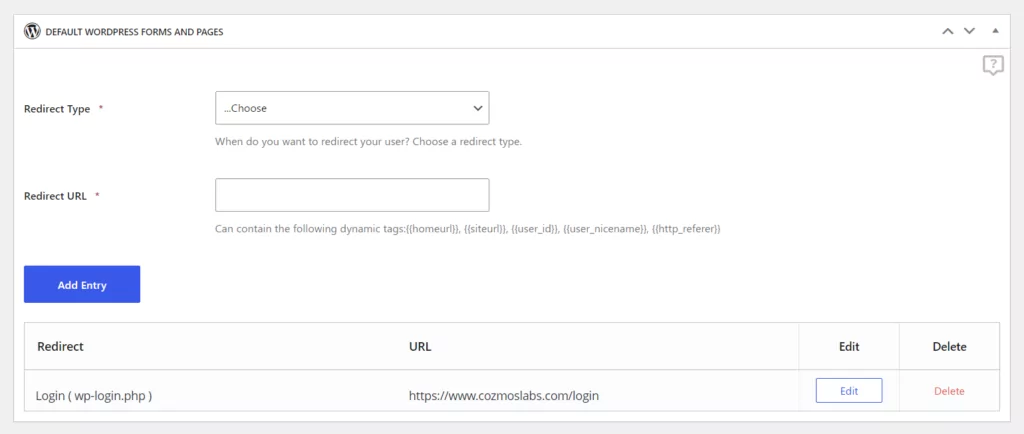
Besides the front-end user redirects listed above, you’ll probably want to keep your users from seeing or accessing the (back-end) default WordPress pages like:
- Login (wp-login.php) – redirect users to the front-end login form created with Profile Builder;
- Register (wp-login.php?action=register) – redirect users to the front-end Profile Builder register form;
- Lost Password (wp-login.php?action=lostpassword) – redirect users to the front-end lost password form;
- Author Archive (http://sitename.com/author/admin) – this has been a common request from Profile Builder users, to be able to redirect people trying to access an author archive to that author profile page, basically the single user listing template.
The Custom Redirects add-on from Profile Builder also has a list of available tags that can be used for creating dynamic URLs. Here are some of the available tags you can use to create dynamic URLs to redirect users to after successful login:
- {{homeurl}} – generates a URL of the current website homepage.
- {{siteurl}} – in WordPress the site URL can be different than the home URL.
- {{user_id}} – the ID of the user.
- {{user_nicename}} – the URL sanitized version of the username, the user nice name, can be safely used in URLs since it can’t contain special characters or spaces.
- {{http_referer}} – the URL of the previously visited page.
Custom Redirects Priority
You might be wondering how the redirect priorities are handled. Which redirect happens depends on the following priority:
- Individual User Redirects
- User Role based Redirects
- Global Redirects
- Individual redirects defined in shortcodes or in the Multiple Registration and Edit Profile form settings. (redirect_priority=”top” parameter can be added in any shortcode, then that shortcode redirect will have priority over all other redirects)
Set Up WordPress Redirect After Login Functionality Today
With Profile Builder Pro and the Custom Redirects add-on, you can easily set up the WordPress redirect user after login functionality or WooCommerce redirect after log in along with detailed redirect rules for specific usernames, user roles, and more.
To get started, purchase Profile Builder Pro and start setting up redirect after login WordPress for various user actions.
Profile Builder Pro
Create beautiful front-end registration and profile forms with custom fields. Setup member directories, custom redirects, cutomize user emails & more using the all in one user management plugin.
Get Profile BuilderRelated: Manage WooCommerce Customer Fields with Profile Builder
Related Articles

How to Customize the WooCommerce Login Page (No Code Needed)
Searching for a solution to customize the WooCommerce login page and otherwise control login behavior on your WooCommerce store? If you allow (or force) registration on your store, you'll want to create a user-friendly login experience so that your shoppers can easily log in to their accounts and access other key features. In this post, […]
Continue Reading
8 Best WordPress User Registration Plugins
Not sure what WordPress user registration plugin to use for your project? Going through all the WordPress user registration plugins can be disorienting. You may have spent hours and hours searching for plugins and tutorials to help you with your project, and you’re still as confused as you were when you started. Imagine finding the […]
Continue Reading
How to Password Protect Content, Posts, and Categories in WordPress
There are many use cases for password-protected content in WordPress. For example, you might be a content creator who wants to monetize premium content in the form of subscriptions or memberships. As with everything related to WordPress, password-protecting posts doesn’t have to be difficult. If you’re wondering how to password-protect WordPress content, posts, and even […]
Continue Reading

