

Table of Contents
Searching for a solution to customize the WooCommerce login page and otherwise control login behavior on your WooCommerce store?
If you allow (or force) registration on your store, you’ll want to create a user-friendly login experience so that your shoppers can easily log in to their accounts and access other key features.
In this post, we’ll show you step-by-step how you can customize the WooCommerce login page and other aspects of the WooCommerce login form using a free plugin.
We’ll cover a lot of different ways that you can customize the login process, but you’ll be able to pick and choose exactly which features you want to activate so that you can adapt everything to your store.
First, we’ll go over ways to adjust the actual login process including:
- Creating a custom WooCommerce login form that you can add anywhere on your site using a shortcode.
- Setting up redirects after users log in or out.
- Adding links to let people register or reset their passwords.
- Adding WooCommerce social login options so that shoppers can log in using Facebook, Google, or other networks.
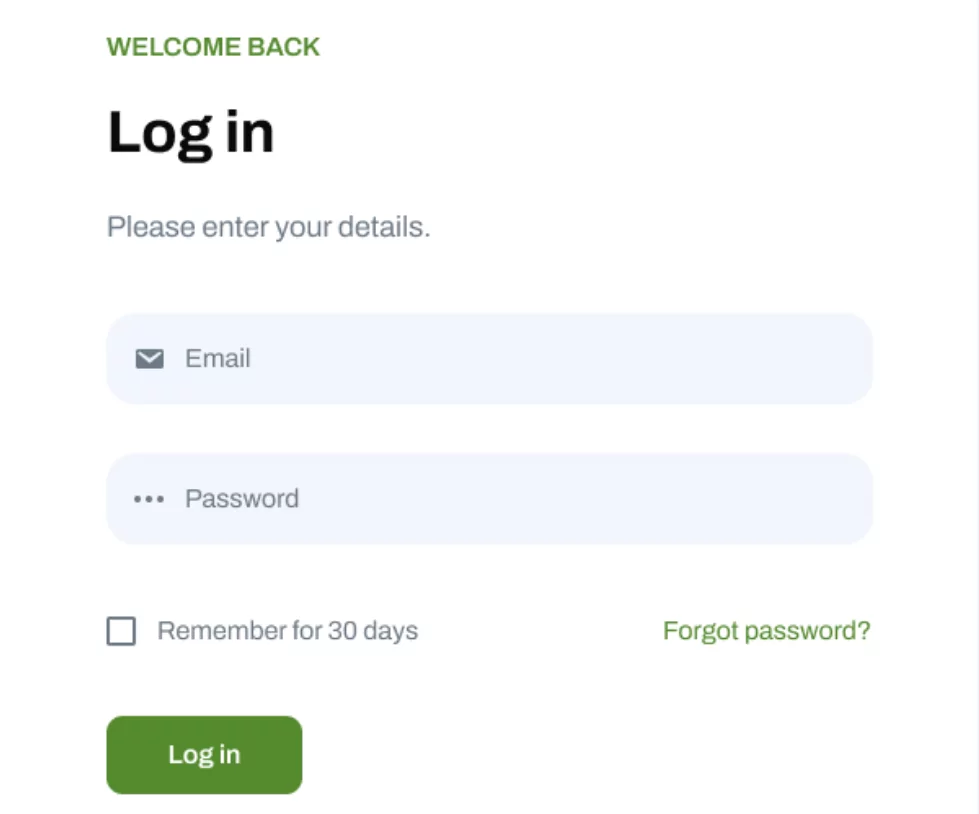
Here’s a simple example of the custom login form that you can place anywhere on your site:
Then, we’ll also cover some other options for customizing login and user profile behavior on your store including:
- Creating a custom WooCommerce registration form.
- Creating a custom WooCommerce edit profile form (including adding it directly to the regular WooCommerce “My Account” page).
- Restricting certain content/products so that only logged-in users can see it.
There’s a lot to cover so let’s dig in!
When to Consider Customizing the WooCommerce Login Page
Having a custom login page can come in handy in a few different scenarios – mostly these have to do with situations where you’re requiring or encouraging users to register and log in to shop on your store.
For example, if you require users to have an account in order to purchase stuff on your site, you should customize the login experience to optimize it for them. You could create a special login page and maybe even automatically redirect users to their carts or your shop page after they log in.
Or, if you have a private store, a custom login page is a must so that users can log in to their accounts to access your store. With the WooCommerce login plugin that we’ll show you in this tutorial, you’ll even get built-in features to restrict access to some or all of your products so that only logged-in users can see them.
Alternatively, you just might generally want to create a more user-friendly login experience for your visitors. You don’t get a WooCommerce login shortcode by default, which means you’re limited in how you can let shoppers log in. The plugin in this tutorial will change that and give you a shortcode that you can add anywhere on your site.
The Best WooCommerce Login Plugin
To customize the WooCommerce login page, you can use the Profile Builder plugin.
Profile Builder is a flexible plugin for customizing all aspects of user management on your site, including:
- Login
- Registration
- Profile editing
- Basic content restriction
Profile Builder also includes built-in integration features for WooCommerce so that you can easily add these features to your store.
For example, in addition to creating a custom login form, you can also customize the WooCommerce registration process (including the registration fields at checkout). You can also replace the default WooCommerce edit profile form in the “My Account” area with your own custom form.
Below, we’ll show you all the different ways that you can use Profile Builder to customize your store’s login, registration, and profile management.
Profile Builder Pro
The best WooCommerce login plugin to handle login, registration, and edit profile forms.
Get Profile BuilderHow to Customize the WooCommerce Login Page With Profile Builder
In this first section, we’ll show you a few different ways that you can use Profile Builder to customize your store’s login page.
You can create a basic custom login page using just the free version of Profile Builder at WordPress.org. However, if you want to customize the WooCommerce registration or edit profile pages (which we’ll cover in the next section), you’ll need to upgrade to the premium version of Profile Builder to access the WooCommerce Sync add-on. The premium version also gives you access to other features, such as WooCommerce social login.
As we go through the tutorials, we’ll be sure to note what you can do for free and what features require the paid version.
To get started, make sure to install and activate at least the free version of Profile Builder from WordPress.org. Or, you can purchase the premium version of Profile Builder to unlock all the features.
How to Add a Custom WooCommerce Login Form
By default, WordPress and WooCommerce don’t include options for adding new login forms to your site. To do this, you’ll need to use a plugin that enables you to add custom login forms using either shortcodes or blocks.
Profile Builder offers both options. If you want to go the shortcode route, you simply need to add the following code anywhere on your website, [wppb-login] shortcode where you want the form to appear:
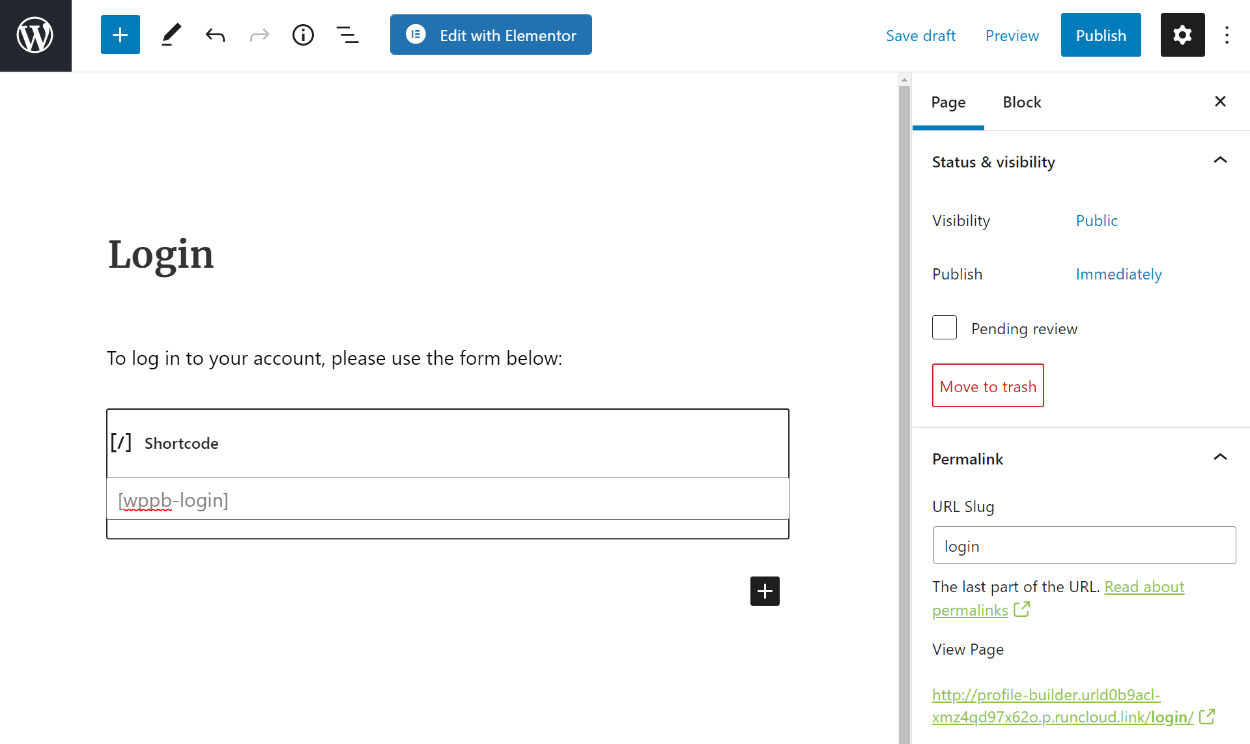
You can use the login shortcode to add multiple forms anywhere on the site. Each form you place is fully customizable. You can have multiple login forms on your site for different sets of users, such as shoppers and vendors if you’re running a multi-vendor store.
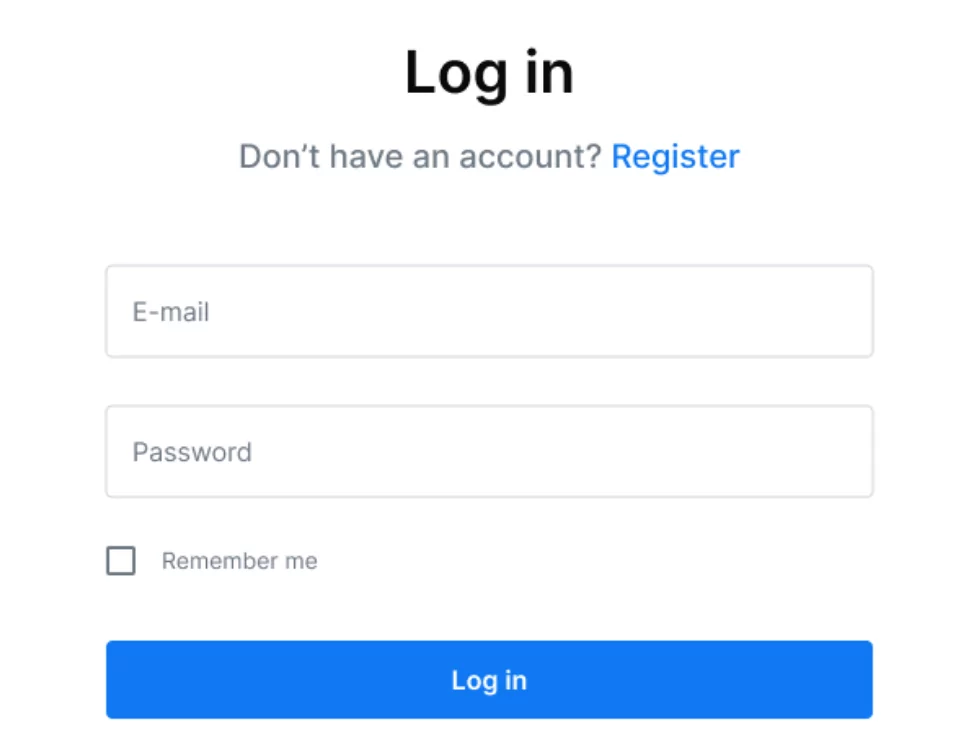
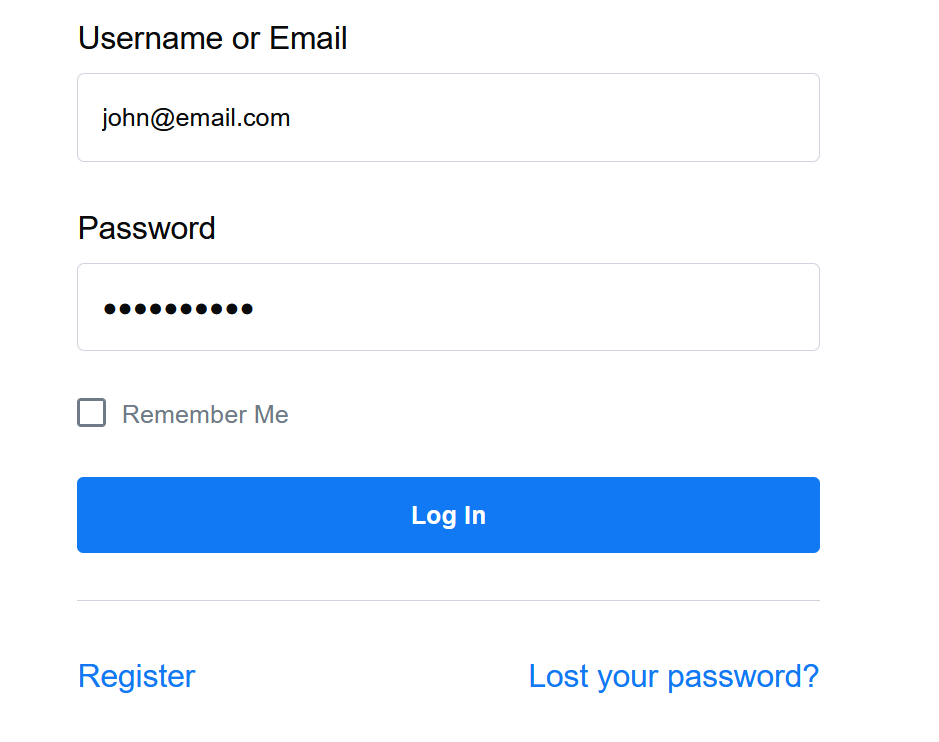
The login form will automatically adopt your theme’s styling. The example above would look something like this on the front-end using a minimalist theme:
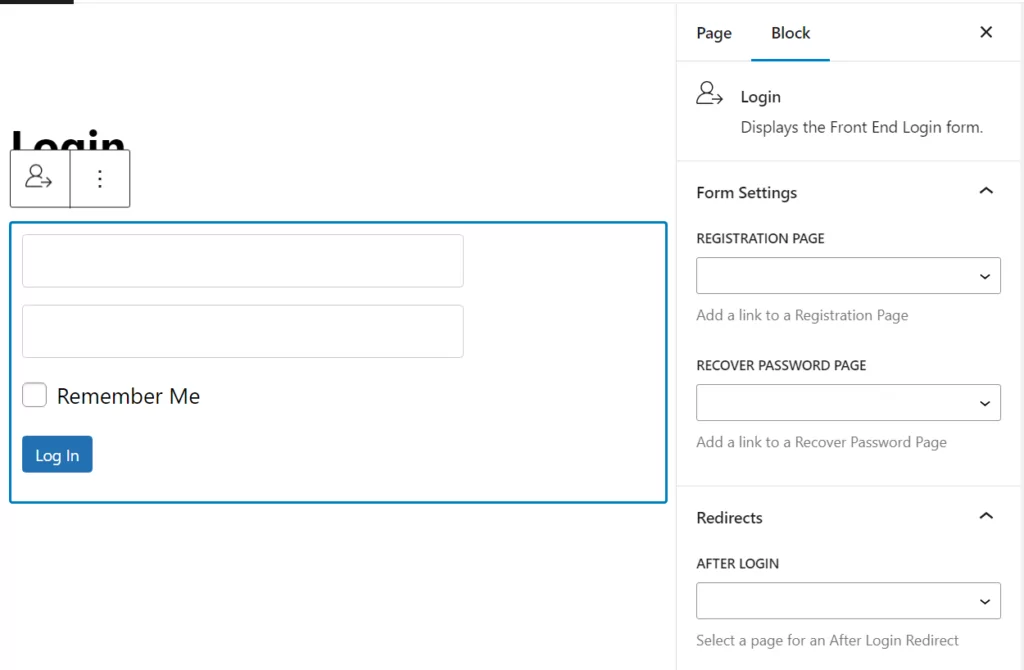
If you prefer using blocks, simply look for the Login option when using the Block Editor. This will add a login form on the page or post and enable you to customize it using the block settings options:
Using either shortcodes or blocks will get you the same results, so it’s a matter of preference. The upside to using blocks is that you get to customize the login form directly within the Block Editor.
How to Add Password Reset and Registration Links to Your Login Form
To make your login form a little more user-friendly, Profile Builder also lets you add dedicated links below the form to let people reset their passwords and/or go to the registration page (we’ll show you how to create a custom registration page later on if you want to use this option).
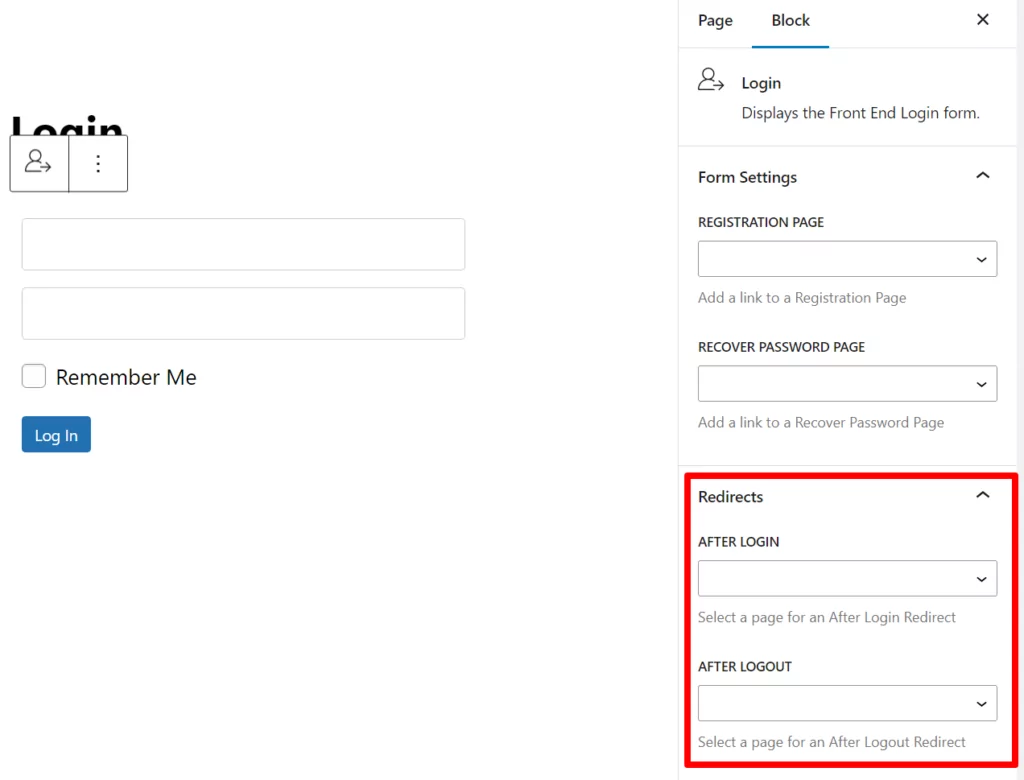
You can add password reset and registration links using either blocks or shortcodes. If you’re using a Login block, navigate to its settings after you place it using the Block Editor.
The block settings menu to the right of the screen includes options to manually add both registration and password recovery URLs to the form. You can also select what pages to link to from a list of existing options on your site:
If you prefer to use shortcodes, you’ll need to modify the base login form code we showed you in the last section. This shortcode will add the login form to a page and include registration and password recovery links alongside it:
[wppb-login register_url="/register" lostpassword_url="/recover-password"]
Make sure to replace the register and lost password links with your own site’s information. You can also remove one of the options if you don’t want to include both options. For example, to only show the password reset link, you could use this shortcode:
[wppb-login lostpassword_url="/recover-password"]
Here’s what it might look like with both options:
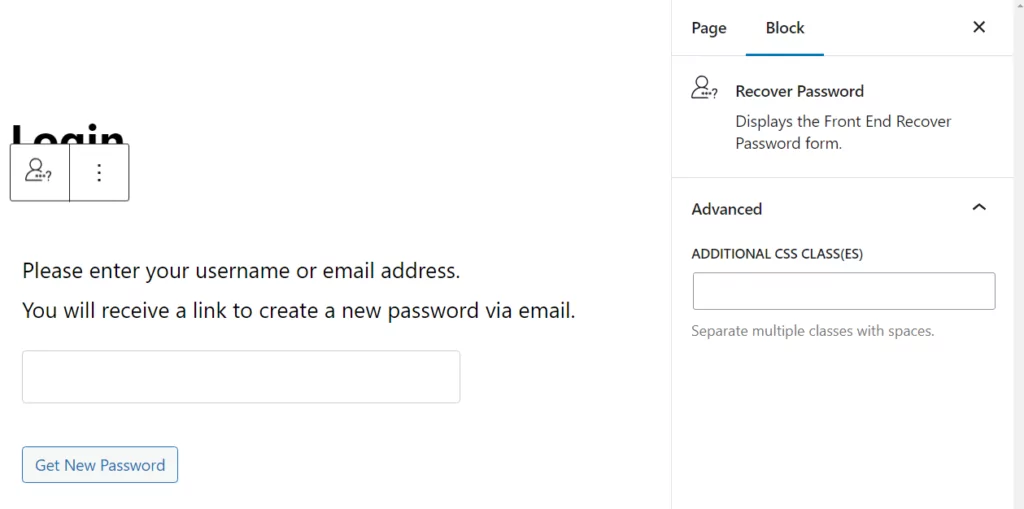
Profile Builder also includes both a shortcode and a block to help you create a dedicated password reset page. To use the block, select the Recover Password option when adding a new element using the Block Editor:
To use the shortcode instead, add the [wppb-recover-password] code where you want the password recovery form to appear. You’ll get the exact same form, which will adapt to your theme’s style.
How to Redirect Users After Login/Logout
Another useful modification you can make is to automatically redirect users to a specific page after they log in (or log out).
You can use this in a lot of different ways. For example, you could redirect people to a special seller page or buyer page. Combined with the content restriction features that we’ll detail later in this article, you could even restrict access to the page so that only logged-in users can see it.
As we mentioned above, you can also create multiple login forms, each with its own unique redirect rules. You can configure these rules using three approaches. The first is using blocks, the second with shortcodes, and the third with Profile Builder Pro’s plugin settings.
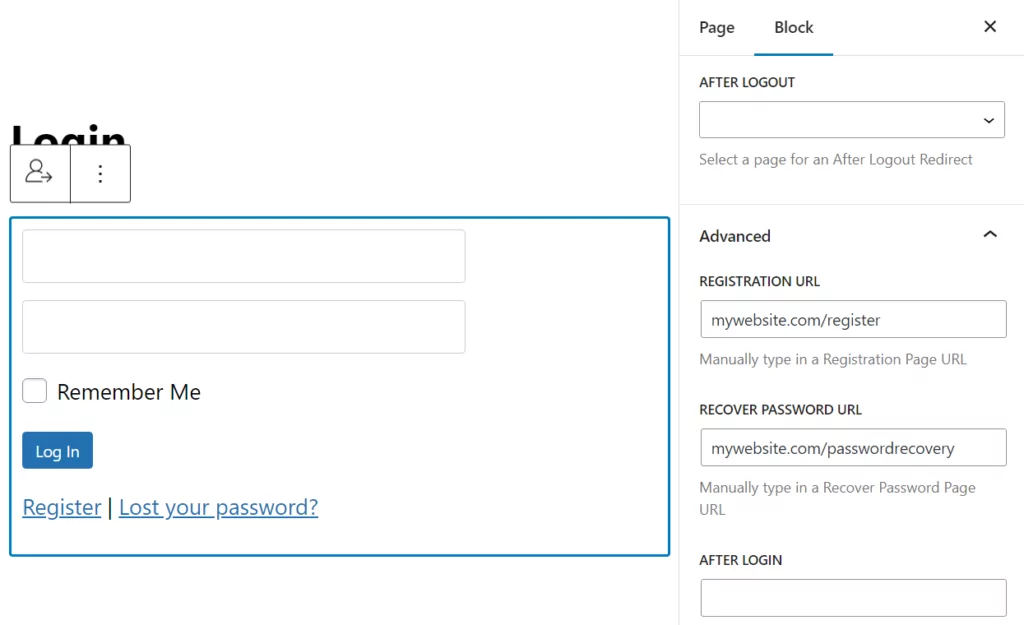
To use blocks, add a login form using the Block Editor. Select the form and open the block settings menu to the right side of your page. Find the Redirects settings tab and locate the AFTER LOGIN and AFTER LOGOUT fields:
To set up a custom redirect using shortcodes, you need to add another parameter to the base login shortcode like this:
[wppb-login redirect_url="https://www.yourdomain.com/page"]
Make sure to replace the example URL with the actual URL that you want to send people to. You can also add a redirect after a user logs out by adding the logout_redirect_url="https://www.yourdomain.com/page" parameter to the shortcode.
If you upgrade to the premium version of Profile Builder, you’ll also get access to a custom redirects feature that gives you even more control:
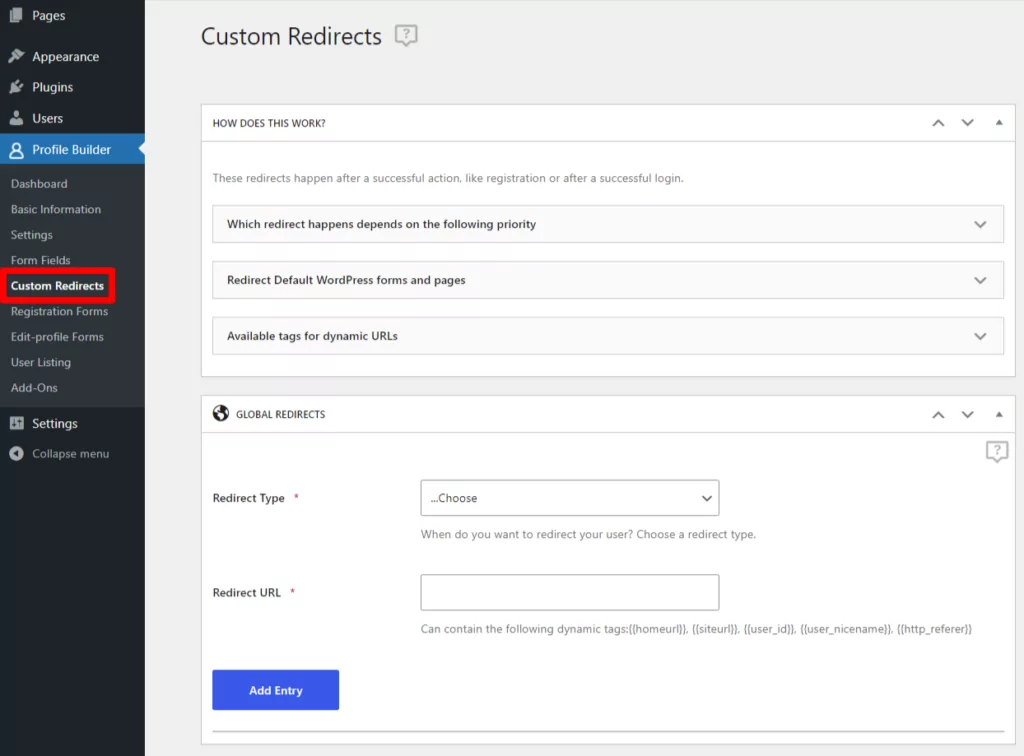
For example, you could set up unique after-login redirects based on a user’s role or even for individual usernames:
How to Add WooCommerce Social Login
Social login can be a great way to reduce the friction of your store’s login/registration process and make it easier for shoppers to get started. This is why most users prefer a social login solution to having to manually create an account or log in with their username and password.
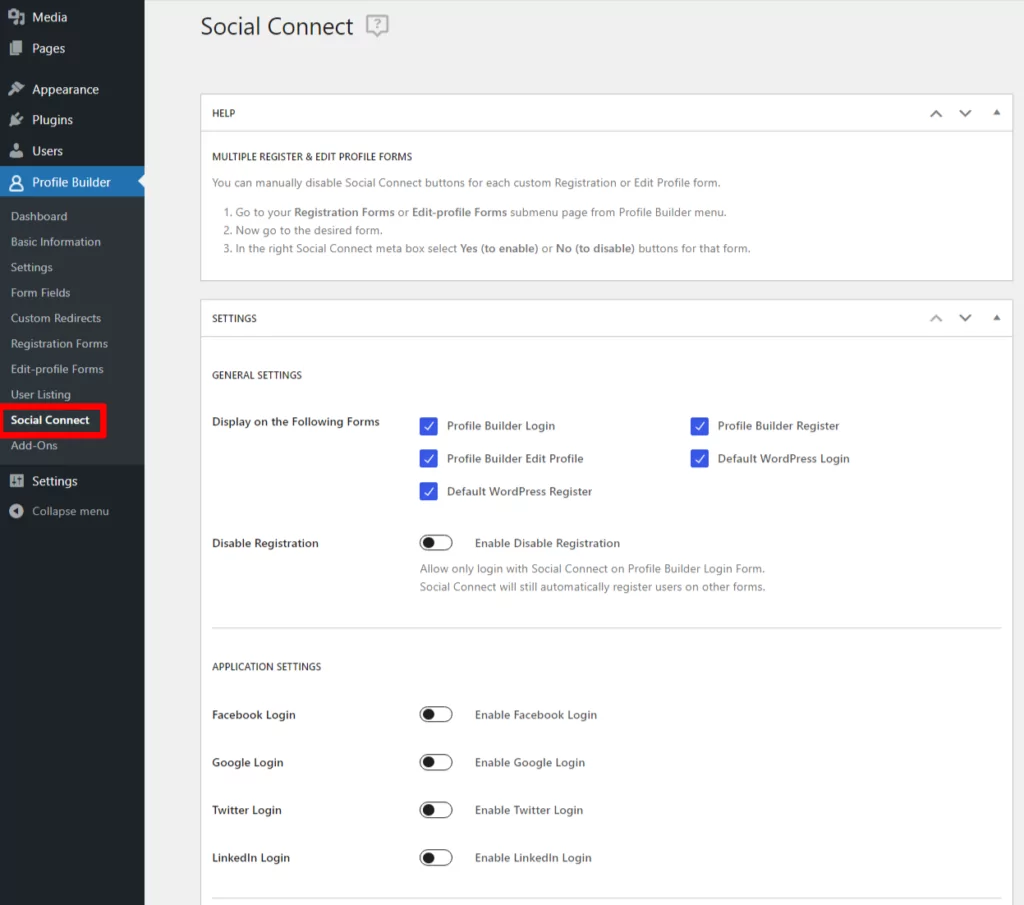
With Profile Builder’s Social Connect add-on, you can easily start offering social login on your WooCommerce store and automatically integrate it into the custom login page that you’ve already created.
To set this up, you’ll first need to install the Social Connect add-on, which you can access by purchasing the Hobbyist or Pro license of Profile Builder.
Once you’ve installed the add-on, you can go to Profile Builder → Social Connect to choose which social networks you want to enable and which forms you want to include those networks on.
Profile Builder supports:
You can also enable/disable social login in three different areas:
- Login form
- Registration form
- Edit profile form
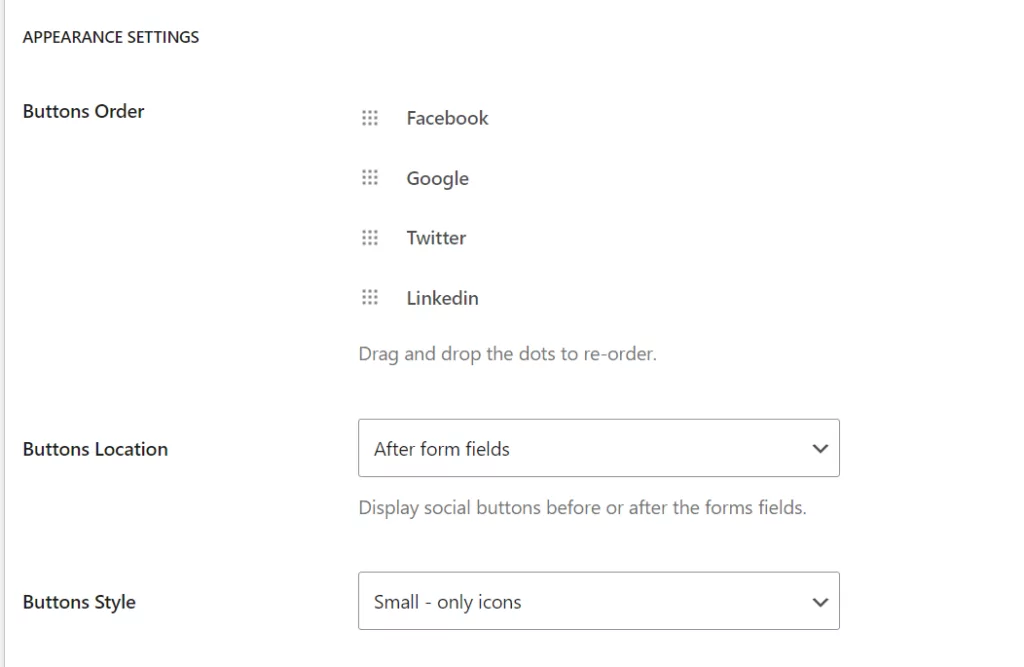
Further down the page, you can change the order of the enabled buttons as well as other configurations, such as their location and style:
In order to enable social login, you’ll need to create an app at all of the services that you want to enable. We have detailed tutorials for each service:
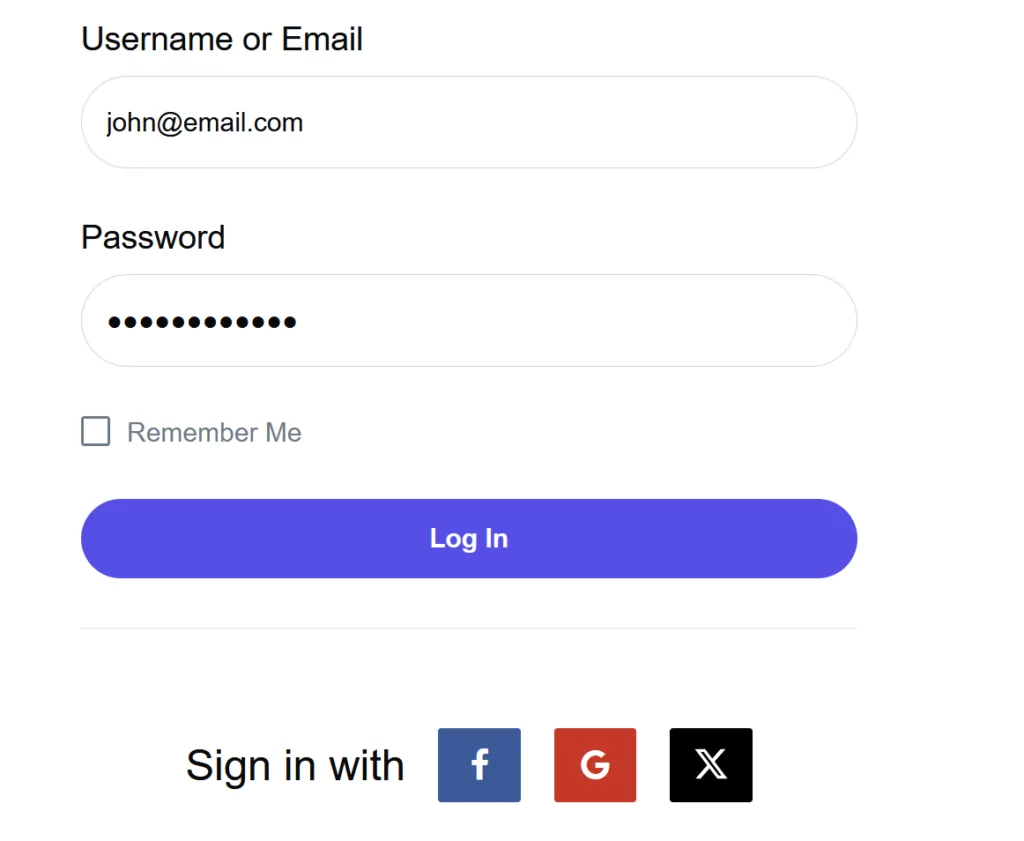
Once you connect the service(s), your social login buttons will appear underneath the login form:
How to Customize Other Parts of the WooCommerce Login Process
In addition to helping you customize the WooCommerce login page, Profile Builder can also help you control other aspects of your store’s user profiles, including the registration form and edit profile form. You even get access to content restriction features, which lets you restrict access to some/all of your products for logged-in shoppers (or even just specific WooCommerce user roles).
You don’t need to install any new plugins to set these features up – you can do everything with the Profile Builder plugin that you’ve already installed.
How to Create a Custom WooCommerce Register Form
By default, WooCommerce has options to let users register via the My Account page or as part of the checkout process.
If you want more control over this process, you can use Profile Builder to create your own dedicated registration form(s) complete with custom fields and also customize the registration form on the WooCommerce checkout.
One nice thing is that Profile Builder also lets you create multiple WooCommerce registration forms, including an option to customize each form’s behavior (like assigning different user roles to users who register via each form).
For a detailed look, check out our full post on customizing WooCommerce user registration, but we’ll cover the quick version in this section.
To use Profile Builder for WooCommerce registration forms, you’ll need to purchase the premium version so that you can access the WooCommerce Sync add-on, which lets you sync the fields in your custom form with WooCommerce user information (such as shipping and billing fields).
To control your registration form’s fields, you can go to Profile Builder → Form Fields. You can mix-and-match basic profile fields, WooCommerce fields, and even your own custom fields if needed:
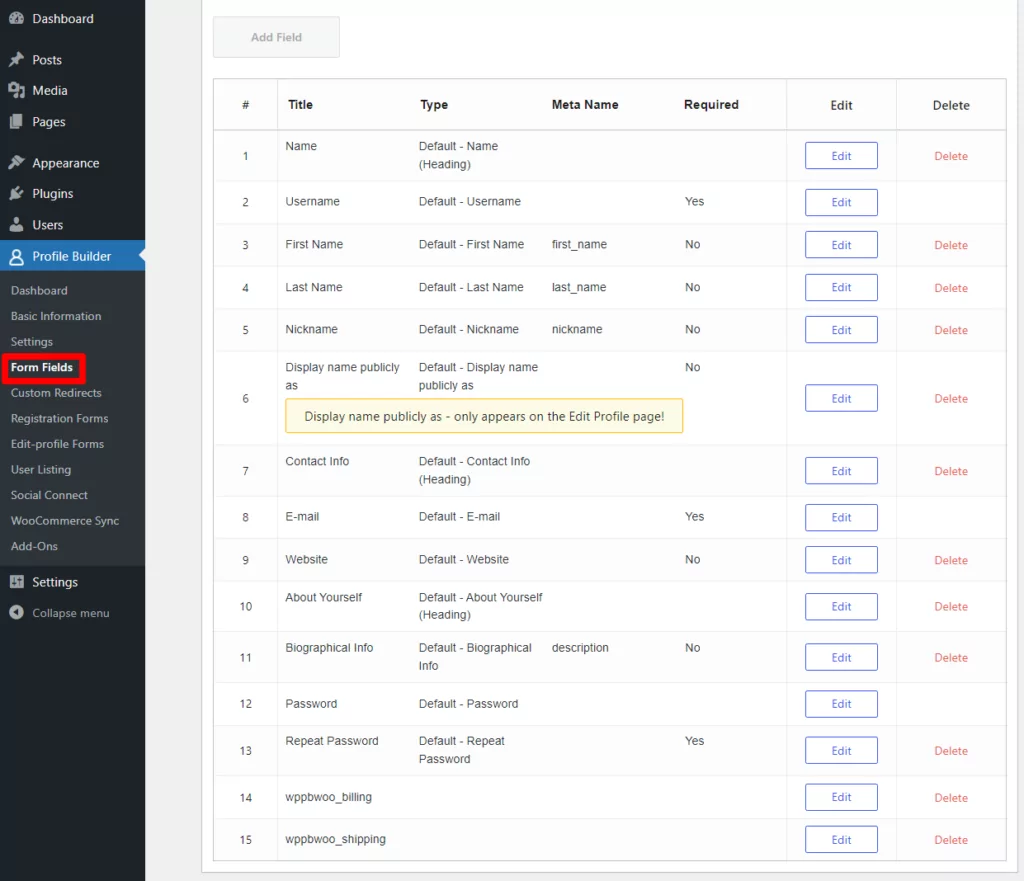
You’ll also be able to customize each field, including using advanced tactics such as conditional logic.
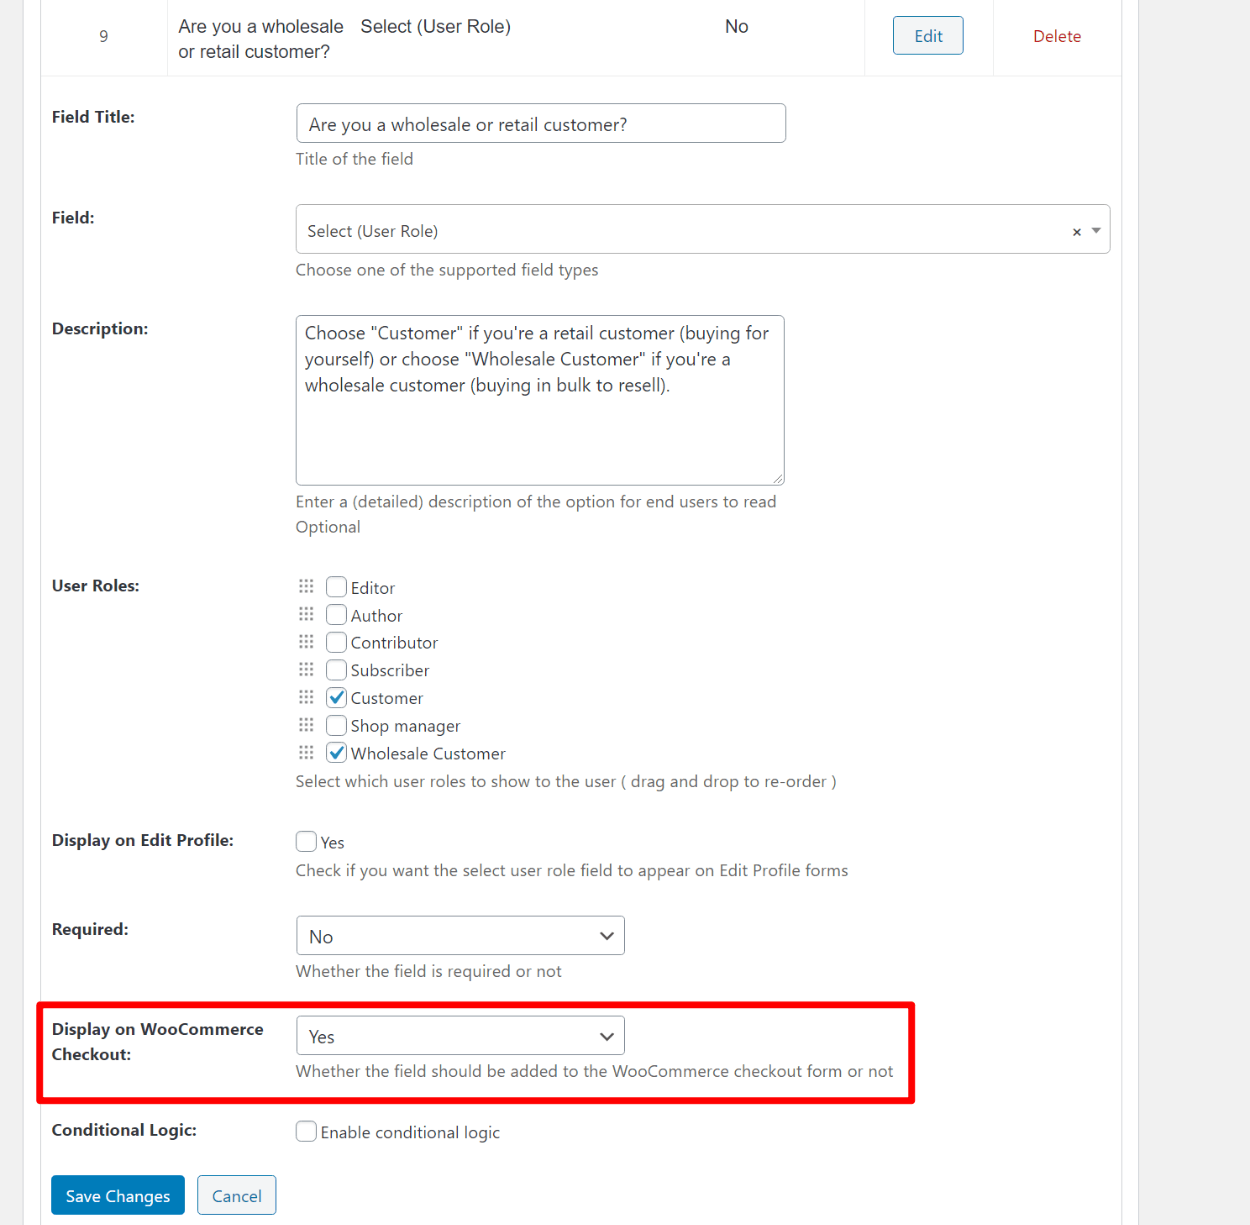
Additionally, you can enable certain custom fields on the WooCommerce checkout registration form if desired by using the Display on WooCommerce Checkout drop-down:
To display your registration form, you have two options:
- You can manually place the form anywhere on your site using the
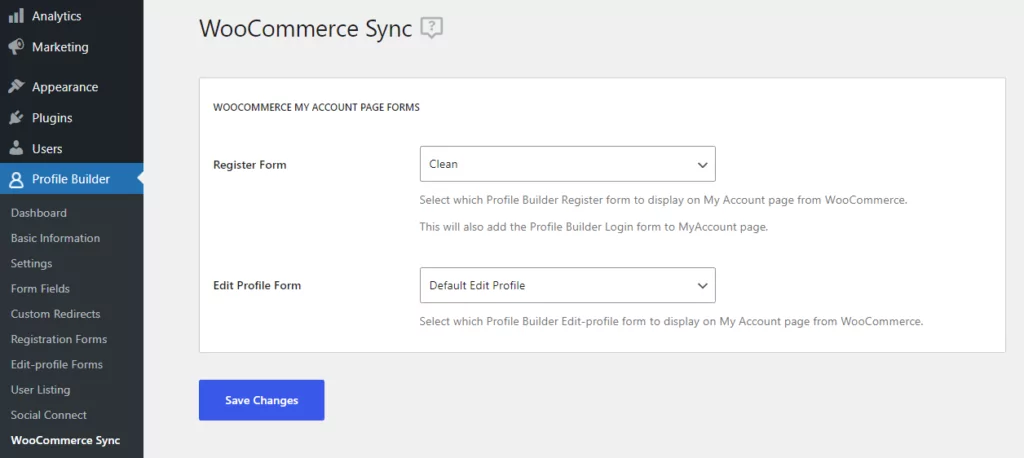
[wppb-register role="customer"]shortcode. If you have multiple WooCommerce user roles, you could replace “customer” with a different role. - You can replace the default WooCommerce registration form on the “My Account” page. To do this, go to Profile Builder → WooCommerce Sync and choose the form using the drop-down (pictured below).
You can also create multiple registration forms if needed. To do so, go to Profile Builder → Registration Forms to create additional forms.
How to Create a Custom WooCommerce Edit Profile Form
To go along with your custom registration forms, Profile Builder also lets you create your own custom edit profile forms that let shoppers edit some or all of the fields on your custom registration form.
By default, Profile Builder creates an edit profile form that matches the fields on your custom registration form. You can place it anywhere on your site using the [wppb-edit-profile] shortcode.
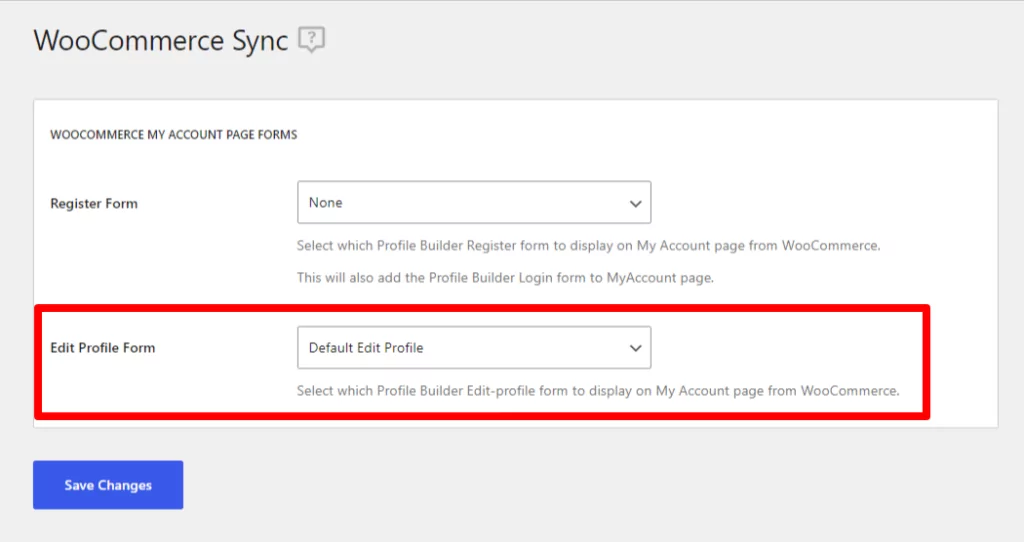
Or, you can also have Profile Builder replace the default edit profile form in the WooCommerce “My Account” area by going to Profile Builder → WooCommerce Sync and using the Edit Profile Form drop-down:
If you don’t want to give your customers access to edit all of the fields on your registration form, you can also create your own custom edit profile forms by going to Profile Builder → Edit-profile forms.
How to Restrict Access to Products for Logged-In Visitors
Profile Builder also includes features to let you restrict access to some or all of your store by requiring users to log in to view certain content/products. Or, you can also restrict content by specific user roles instead of just by logged-in status.
You could combine this with custom after-login redirects to send users straight to content that only they can see. Or, you can just restrict access to certain products so that only logged-in users can see them.
To set up content restriction, you’ll first need to enable the Content Restriction features. Go to Profile Builder → Settings → Content Restriction and toggle the button to Activate Content Restriction:
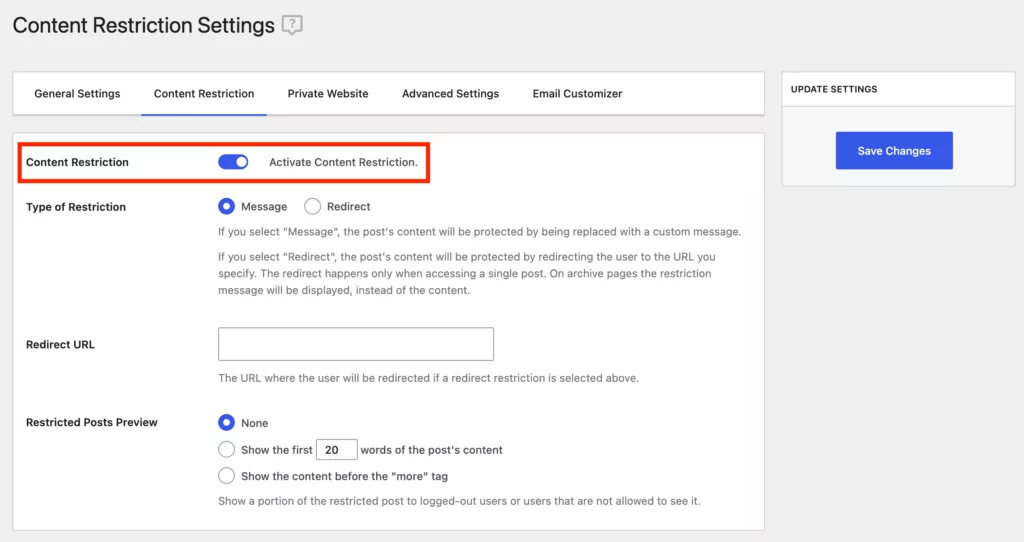
Then, click on Save Changes.
You’ll then get a new Profile Builder Content Restriction box under any WooCommerce product, post, page, or other post type. You can use the options to restrict access to all logged-in users or to specific WordPress user roles:
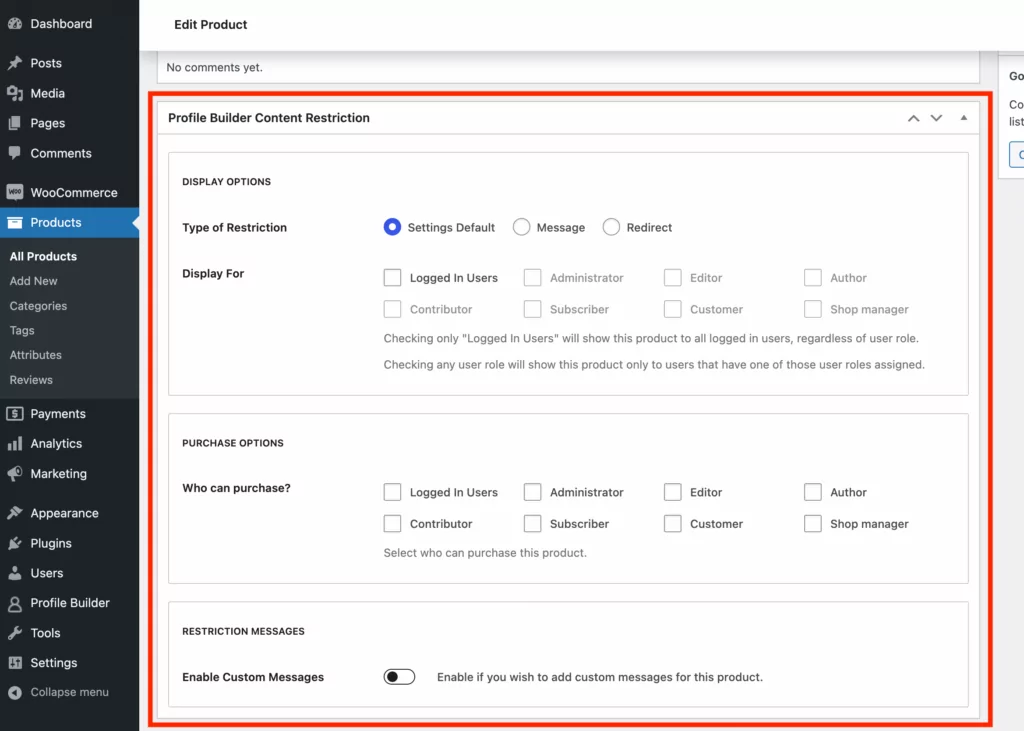
You can also enable custom restriction messages.
Create Your Custom WooCommerce Login Page Today
By default, you don’t get a WooCommerce login block or shortcode, which means you can’t customize the WooCommerce login page.
With Profile Builder, you get to add custom login forms anywhere on your site using either blocks or shortcodes. You also get lots of options to control how these forms work, such as adding custom redirects or enabling social login.
Profile Builder can also do a lot more than WooCommerce login forms. You can also customize registration and edit profile forms. Plus, you can even restrict access to some or all of your products.
To get started with a basic login form, you can use the free version of Profile Builder at WordPress.org. Then, upgrade to Profile Builder Pro to access even more useful features such as:
- WooCommerce social login for Facebook, Google, Twitter, and LinkedIn.
- Custom WooCommerce registration forms, including customizing the checkout registration form.
- Custom WooCommerce edit profile forms, including replacing the default edit profile form in the WooCommerce “My Account” area.
- More advanced redirect rules, like setting up unique after-login redirects for certain user roles or even individual users.
Profile Builder Pro
The best WooCommerce login plugin to handle login, registration, and edit profile forms.
Get Profile BuilderDo you still have questions about customizing the WooCommerce login page? Ask us in the comments and we’ll try to help!
Related Articles

WordPress Profile Builder: a Front-end User Registration, Login and Edit-Profile Plugin
Easily Login, Register and Edit your Profile Directly from the Front-end Profile Builder lets you add front-end forms that give your users a more flexible way to register, log in, and modify their profile information. If you allow public registration on your site, you don't want to force your users to use the backend WordPress […]
Continue Reading
How to Edit WooCommerce My Account Page (Add Fields + More)
Looking for a simple way to customize the WooCommerce account page to add extra user fields and let customers manage their data from the front-end? How about adding custom user fields to the WooCommerce checkout page? In this post, you'll learn how to easily customize the WooCommerce account page using the Profile Builder plugin and its WooCommerce Sync add-on.
Continue Reading
How To Customize WooCommerce Registration Form (2026 Ultimate Guide)
Customizing the WooCommerce registration form in WordPress is something you should consider doing if you want to get more from your WooCommerce store and from the customer registration process. However, the WooCommerce plugin only allows you to collect basic information about your new users. If you customize it using Profile Builder Pro, you can collect […]
Continue Reading