
Table of Contents
- 1 Reasons for Creating WordPress Redirects to Another Page, External URL, or a Subdomain
- 2 Using Profile Builder to Create WordPress Redirects to Another Page, External URL, and Subdomains
- 2.1 Profile Builder Pro
- 2.2 1. Install and Activate Profile Builder Pro
- 2.3 2. Enable the Custom Redirects Add-On
- 2.4 3. Create a WordPress User Redirect to Another Page Based on User Action
- 2.5 4. Create a WordPress Redirect to External URL Based on User Action
- 2.6 5. Redirect a WordPress Page to Subdomain
- 3 Profile Builder Pro Offers Every Type of Redirect You Will Ever Need!
There are different reasons WordPress site owners want to create WordPress redirects to another page, external URL, or a subdomain.
The redirect can be based on an important user action or set up to redirect all users landing on a particular page. Whatever the type or need of your redirect, WordPress offers the flexibility to implement it in a few easy steps in the form of a plugin.
But before we jump into that, let us go through some important reasons website owners create different types of redirects.
Reasons for Creating WordPress Redirects to Another Page, External URL, or a Subdomain
Different websites would have different reasons for creating WordPress redirects. So, let’s list and discuss a few of the common reasons below.
Redirects Based on Important User Actions Vs. Redirecting a Specific URL
Redirecting users based on their user actions is one thing, and redirecting all users landing on a specific page on your site is a completely different thing. The former can only be done for registered users on your site performing a particular user action.
But the latter can be done for all users landing on a particular page of your site. We will explain every detail about both these completely different types of redirects.
WordPress Redirect to Another Page on Your Own Site
The easiest way to increase conversion rate and sales on your website is to drive more users from other parts of your site to your commercial pages. You may have built a good audience for your site through content marketing, but if the users are not landing on your commercial pages then you’re leaving money on the table.
Creating a redirect that takes your users to a specific commercial page on login is an assured way of introducing your products and services to your audience. And increasing your conversion rate and sales in the process.
Redirecting a Specific URL to Another Page
At some point in time, almost every website needs to fix its URL structure. This is especially true for large websites which didn’t focus on a proper URL structure from the start.
Pages get deleted, and then the URLs lead to an error. This not only leads to a negative user experience but also a negative effect on your website’s rankings in the search engines.
These URLs need to be redirected to the right, relevant pages. If no pages have been created as a replacement for them, they need to be redirected to the homepage.
WordPress Redirect to an External URL
There are also certain cases where a website needs to redirect its users to an external URL. Maybe you’re promoting a product as an affiliate and want all your users to visit it.
Or maybe you have a landing page for one of your products or services hosted separately from your website. You would want your users who are registering themselves or logging in to your site to visit that page so that they can convert into customers.
Redirecting a Specific URL on Your Site to an External URL
You may find a resource on some other site that’s better than what you have created on your own site. In that case, you may want to redirect a page on your own site to an external URL in your users’ best interests.
However, a lot of affiliate websites also routinely redirect some of their pages to the affiliate offer they are promoting. This helps them increase the conversion rate since the users would land directly on the sales page of their vendor partner.
WordPress Redirect to a Subdomain
Just like an external landing page, you may also have your landing page hosted as a subdomain of your website. In that case, you may want to redirect your users to your subdomain.
Similarly, you may also have a subdomain to showcase all your products or services in one place. You can also choose to redirect your users to that page so that your products or services get more exposure.
Redirecting a Specific URL to a Subdomain on Your Website
In some cases, a website would also redirect to a subdomain linked to it. A lot of website owners want to declutter their sites and work on organizing their site’s categories.
They may choose to only keep the most relevant categories on their website. And create subdomains for each of the other categories that are not as relevant to the main topic or niche of their website.
This not only helps create a better website structure in some cases but also helps get an advantage from the search engines since niche relevancy is also an important factor in search rankings.
Now that you’re aware of some of the main reasons WordPress website owners create different types of redirects, let’s get to how to create each type of redirect mentioned above.
Using Profile Builder to Create WordPress Redirects to Another Page, External URL, and Subdomains
Just like for adding pretty much every functionality you want to your WordPress website, you will need a plugin to create WordPress redirects too. A good plugin will make it easy to create different types of redirects as well as offer useful customizations.
Profile Builder is one of the most complete user management plugins. It not only helps you create different types of WordPress redirects in a few clicks, but also manage other user management tasks like creating a customized registration page and a lot more.
Here are some of the other main functionalities of Profile Builder.
- Creating different pages like a customized login form and a lost password page in WooCommerce and WordPress;
- Using Profile Builder as a WordPress permissions plugin, a WooCommerce My Account customization plugin, and more;
- Password protecting content and posts in WordPress;
- Hiding a category in WooCommerce in a few clicks;
- Editing user roles as well as adding new user roles in WordPress and WooCommerce.
In other words, you can create all the important user pages and manage all user-related tasks on your WordPress website using Profile Builder.
Let’s now get back to where we started – creating different types of redirects. But before that, you will need to install and activate the Profile Builder Pro plugin.
Profile Builder Pro
Create many different types of redirects and control every aspect of user management on your site with Profile Builder Pro.
Get Profile Builder1. Install and Activate Profile Builder Pro
If you want all the features and functionalities of Profile Builder that we discussed above, including the ability to create custom redirects, you’ll need at least the Basic version of the plugin.
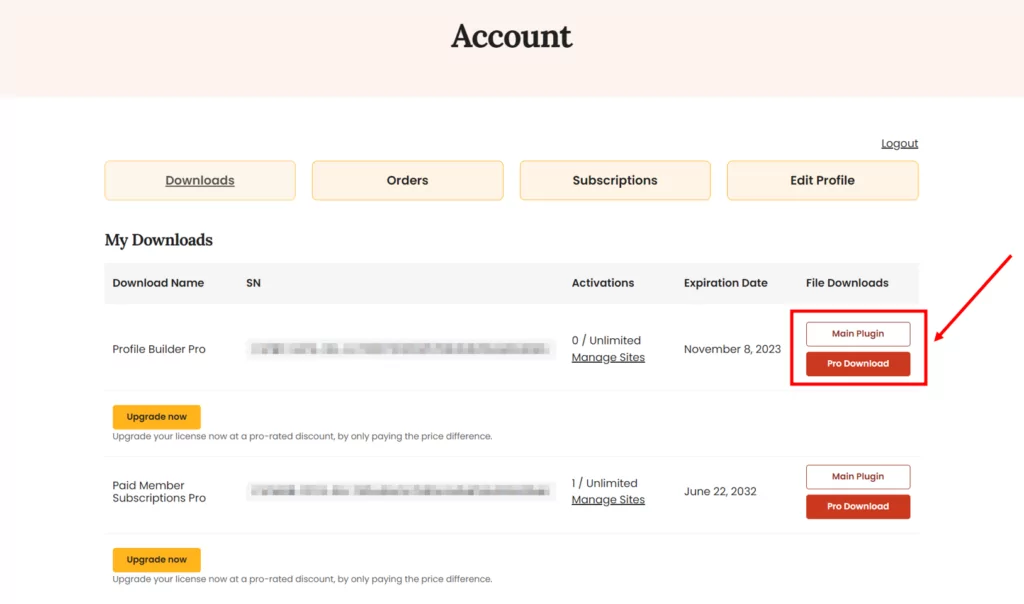
Now once you have purchased the Profile Builder Pro, you can download the main and the pro plugin by logging in to your account on Cozmoslabs.
Then go to the Plugins menu on your WordPress dashboard and click on the Add New button at the top. Then click on the Upload Plugin button.
Upload the plugin files one by one, clicking on the Install Now and then the Activate button each time. You now have both Profile Builder free and the pro version up and running on your WordPress website.
2. Enable the Custom Redirects Add-On
Next, you’ll need to enable the Custom Redirects add-on.
Click on the Add-Ons option under Profile Builder. Scroll down a bit and you will find the Custom Redirects add-on. Click on the Activate button beside it.

Once activated, you will also see a Custom Redirects option listed under the Profile Builder menu on your WordPress dashboard.
Now you’re ready to start creating different types of WordPress redirects. Let’s begin with the WordPress redirect to another page.
3. Create a WordPress User Redirect to Another Page Based on User Action
First things first, you can create many different types of redirects with Profile Builder Pro. Let’s take a quick look at them below:
- Redirects based on username or user ID: This option works for creating individual redirects for one or more specific users;
- User role based redirects: You can also set up redirects based on specific user roles, different from individual or general redirects;
- General or global redirects: A global redirect is a general redirect, and it would cover all users who do not fall under any of the other redirects listed above;
- Redirect for default WordPress pages: Profile Builder also allows you to redirect the default WordPress forms and pages.
Now, to create a redirect to another page on your own site based on a user action, simply head to the Custom Redirects page under Profile Builder.
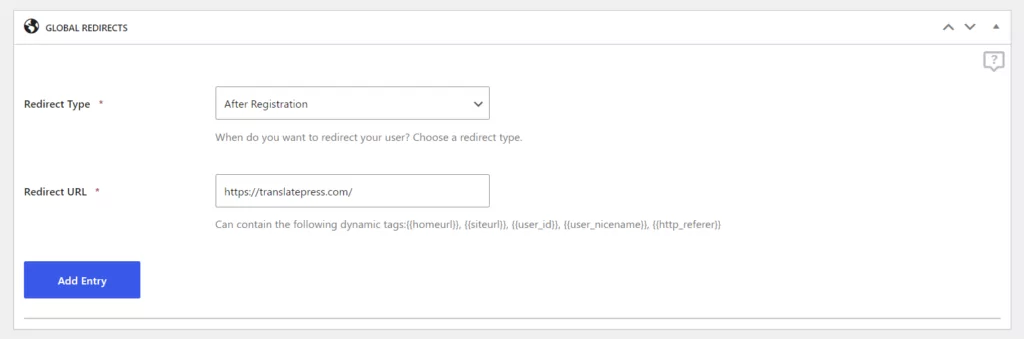
Assuming you want to set up a general redirect for all the users landing on a particular page, you need to create a global redirect. So, scroll down to find the Global Redirects option on the page.

Click on the Redirect Type dropdown menu. A list of all the redirect options will show up. Ranging from a login redirect in WooCommerce and WordPress to a WordPress logout redirect, as well as a redirect on registration, reset password, edit profile, and more, you can set up a redirect for pretty much every important user action.

In our case, we choose the login option. So Profile Builder will redirect all the users logging in to a page of our choice.
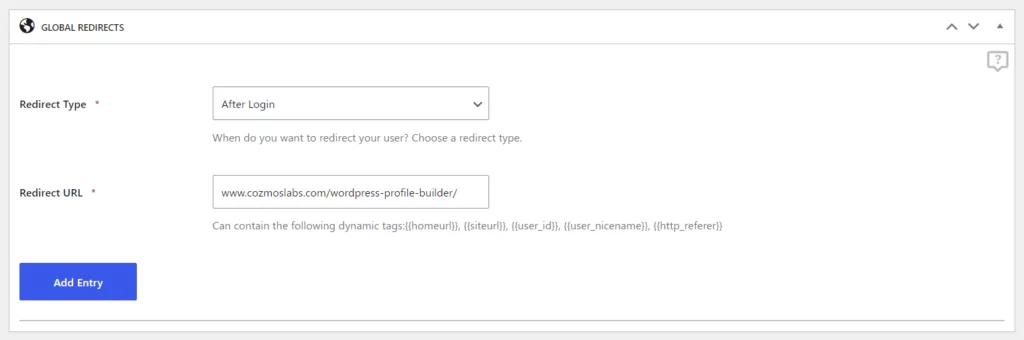
Once you have chosen the user action and the landing page for the redirect, you just need to click on the Add Entry button. So in our case, Profile Builder will redirect all users logging in to the URL you can see in the image above.

You can create a WordPress redirect to another page based on user roles or usernames in the same way. The only additional step would be to choose a user role or enter a username or user ID, respectively.
Redirect a Specific URL to Another Page on Your Site
The above method would allow you to redirect your users performing different important user actions to an external page. However, what about redirecting users landing on a particular page of your site to another page, including those not registered on your site?
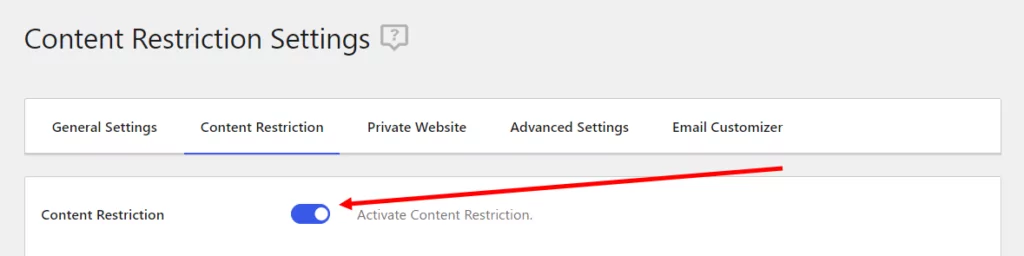
In other words, how to go about redirecting a page or URL on your site to another URL? Well, you will need to use the Content Restriction functionality of Profile Builder to do something like this.
Click on Settings under Profile Builder. Then click on the Content Restriction tab. Set the dropdown menu at the top that says Enable Content Restriction to Yes.
Scroll down to the bottom of the page and click on the Save Changes button.
Now go to the page or post you want to redirect to another URL. Next, scroll down to the part that says Profile Builder Content Restriction.
For the Type of Restriction, click on the Redirect option. Then make sure the Logged In Users checkbox is ticked.
Then click on the “Check if you wish to add a custom redirect URL for this post” option. Enter the URL you want to redirect that page to in the field below that option.
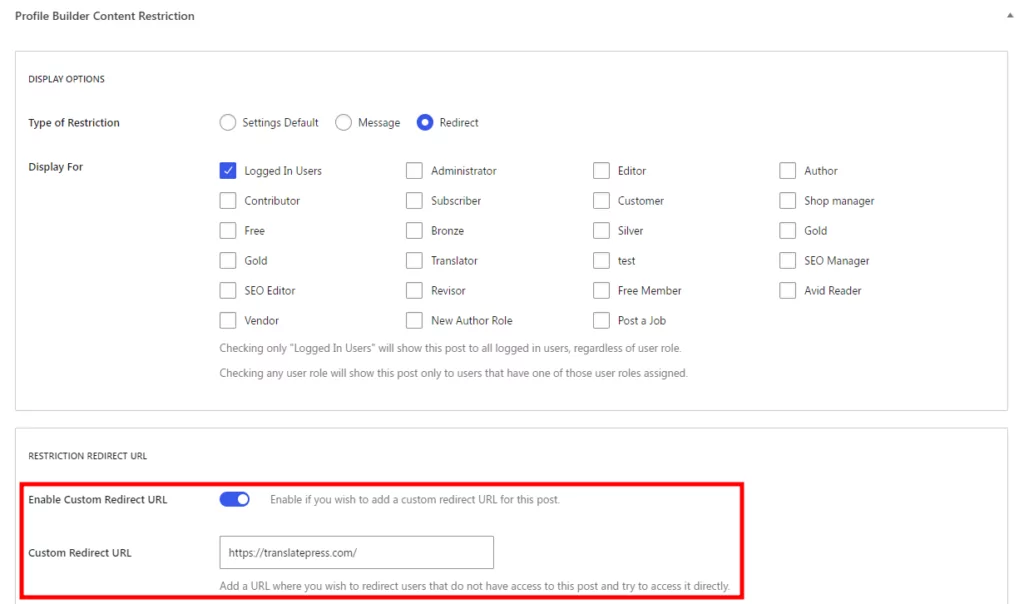
This will make Profile Builder redirect all users that are not logged in to the URL of your choice. If you want to redirect all users, no matter if logged in or out, you can check the Administrator role in the Display For section so that your user role would be the only one not redirected. Alternatively, if your site has multiple users with the Admin user role, you can create a new one that’s not being used by any other user on your site.
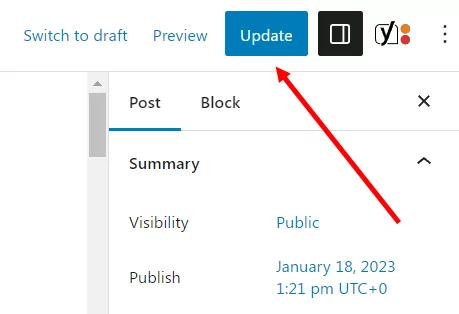
Then scroll back up and click on the Update button which you use to update the page or post in WordPress.
Now, all your users landing on the page you just updated will be taken to the URL you specified in the content restriction redirect URL field.
4. Create a WordPress Redirect to External URL Based on User Action
Creating a redirect to an external URL with Profile Builder Pro is as simple as creating a redirect to another page on your own site. You need to follow the exact steps we discussed above.
The only thing you need to do differently is when entering the redirect URL, enter the external URL instead of a URL on your own site.
So again, following the same steps we discussed above to set up an external redirect on this site, we would just enter the external URL in the Redirect URL field.
Clicking on the Add Entry button would bring this redirect alive.
Redirect a Specific WordPress Page to External URL
Again, if you want to redirect a specific page on your site to an external URL, you need to follow the same steps we explained for the redirect type covered above.
Just enter the external URL you want the users to be redirected to in the redirect URL field instead of a different URL on your own site. Your users landing on that particular page would then be redirected to the external URL.
5. Redirect a WordPress Page to Subdomain
If you only want to redirect registered users performing a particular user action on your site to a subdomain, you need to use the Custom Redirects functionality as explained above. Again, the only difference would be that your destination URL would not be another URL on your site, but the subdomain you want to redirect the users to.
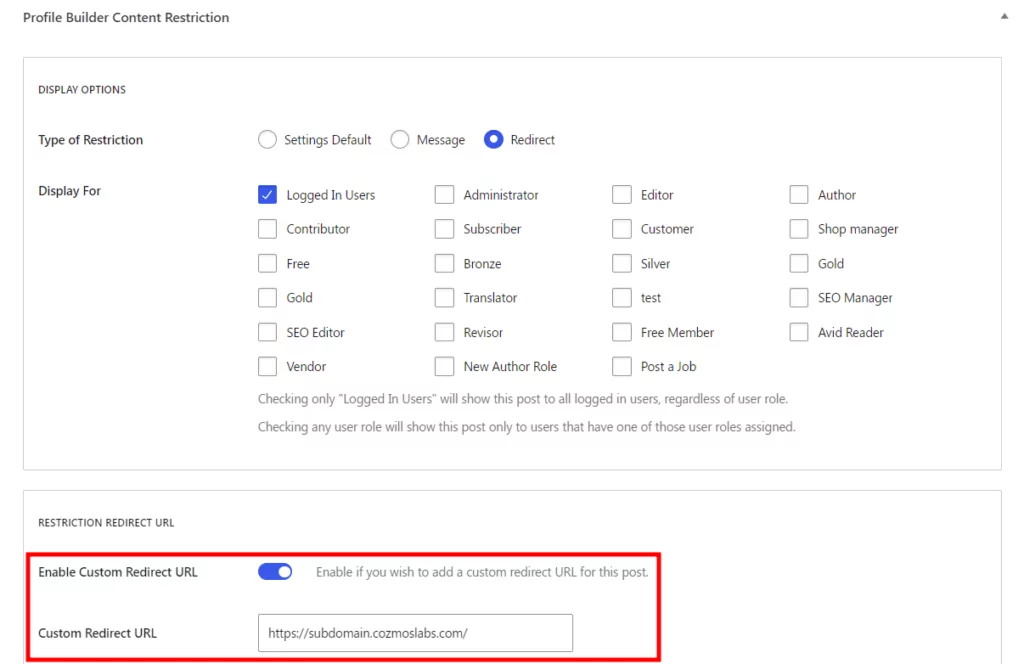
However, if you want to redirect a specific page to a subdomain of your website, then you’ll need to use the Content Restriction functionality of Profile Builder which we covered above.
Again, you need to restrict the page in the same way we explained for the other types of redirects above, but just enter your desired subdomain as the redirect URL. Just like something you see in the image below.
Profile Builder Pro Offers Every Type of Redirect You Will Ever Need!
After going through this detailed tutorial, I’m sure you understand that Profile Builder Pro offers every type of redirect you will ever need on your WordPress website. It can redirect users to another page, an external URL, or a subdomain based on important user actions, like registration or login.
Moreover, Profile Builder Pro can just as easily redirect all users landing on a particular page on your site to another URL, be it an internal, external URL, or a subdomain of your website. You’ll just need to use a different functionality for that.
Furthermore, it comes with a plethora of other useful user-related functionalities. The pro version of Profile Builder would help you control the entire user management of your WordPress website easily, conveniently, and effectively.
Profile Builder Pro
You can create every type of redirect imaginable with Profile Builder Pro while getting access to tons of other useful user management functionalities.
Get Profile BuilderPlease post a comment below if you have any questions about any of the steps we explained in this tutorial.
Related Articles

How to Customize the WooCommerce Login Page (No Code Needed)
Searching for a solution to customize the WooCommerce login page and otherwise control login behavior on your WooCommerce store? If you allow (or force) registration on your store, you'll want to create a user-friendly login experience so that your shoppers can easily log in to their accounts and access other key features. In this post, […]
Continue Reading
8 Best WordPress User Registration Plugins
Not sure what WordPress user registration plugin to use for your project? Going through all the WordPress user registration plugins can be disorienting. You may have spent hours and hours searching for plugins and tutorials to help you with your project, and you’re still as confused as you were when you started. Imagine finding the […]
Continue Reading
How to Customize WordPress Email Login Behavior (+ Registration)
Searching for a WordPress email login feature so that you can customize your site's login process, such as requiring users to use their email address instead of a username? By default, WordPress lets users log in with either their username and password or their email and password via the default login page. But if you […]
Continue Reading