
Table of Contents
- 1 What You’ll Need for WooCommerce Login Redirect
- 2 Types of WooCommerce Login Redirects
- 2.1 Login Redirect by Username or User ID
- 2.2 Login Redirect by User Roles
- 2.3 Global Login Redirects for WooCommerce
- 2.4 Login Redirect for Default WordPress Pages
- 2.5 Individual Redirects Defined in Shortcodes
- 2.6 Redirect after Registration for WooCommerce
- 2.7 Logout Redirect for WooCommerce
- 2.8 Redirect Priority
- 3 Set Up Login Redirect for WooCommerce Right Away!
The ability to redirect users after login is an important functionality for WooCommerce sites. It not only helps increase sales by redirecting customers to an optimized products or shop page, but also offers a better user experience overall.
If you don’t set up a login redirect for your WooCommerce store, users may end up on the back-end of your site and this may lead to poor user experience.
Profile Builder not only allows you to set up login redirects for WooCommerce, but it also helps you customize other important pages, like your registration and logout page.
So, let me walk you through the process of setting up different types of login redirects for WooCommerce using the Profile Builder Pro plugin.
What You’ll Need for WooCommerce Login Redirect
Profile Builder Pro is one of the best options available out there when it comes to user management. It comes with a plethora of features and functionalities to help you have full control over every user management-related area of your WordPress or WooCommerce website.
You can easily create custom redirects for different pages on your WooCommerce website using Profile Builder. However, you will need the Pro version of the plugin to be able to set them up using the Custom Redirects Add-on.
Profile Builder Pro
Create fully customized redirects after login for your WooCommerce store in the easiest and fastest way possible.
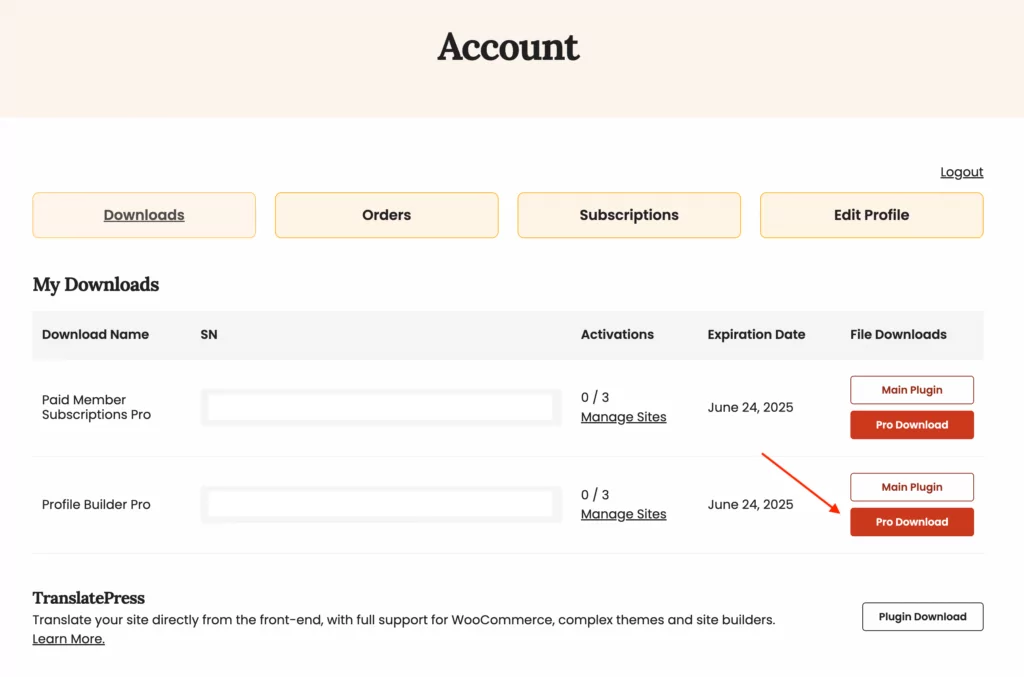
Get Profile BuilderOnce you’ve purchased a Profile Builder Pro license, you’ll be able to log in to your Cozmoslabs account and download your plugin from your account page. Just click on the Plugin Download button to download Profile Builder Pro and install the archive on your WooCommerce site by uploading it to the plugins area. Don’t forget to activate it once installed.
Activate the Custom Redirect Add-on
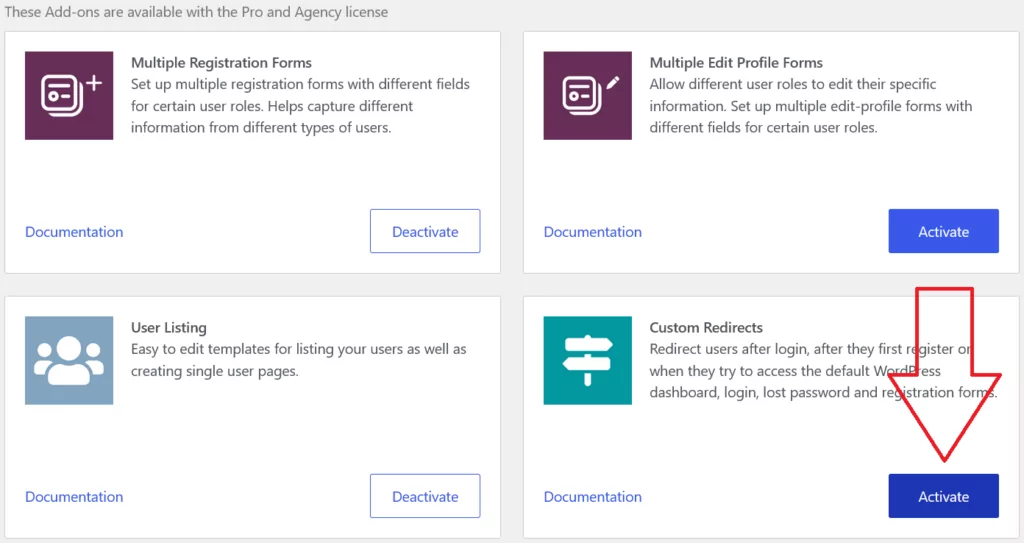
Now it’s time to activate the add-on. Hover your mouse on the Profile Builder menu and click on the Add-Ons option. Find the Custom Redirects add-on in the list and click on the Activate button.
Custom Redirects will now show up as one of the options under the Profile Builder menu. Click on it to set up login redirects for WooCommerce.
Types of WooCommerce Login Redirects
Profile Builder Pro offers a lot of customization to allow you to set up login redirects exactly the way you want them. The plugin helps you set up 5 different types of login redirects:
- Login redirects by username or user ID;
- Login redirects by user roles;
- Global redirects that basically work as general redirects;
- Login redirects specifically on the default WordPress forms and pages;
- Individual shortcode redirects.
So let’s dive deeper into these different login redirect setups.
Login Redirect by Username or User ID
If you want to redirect certain individual users after they log in to your site, you can set up a redirect specifically for them by using their username or user ID. Let me help you with the exact steps you need to follow below.
Hover your mouse on the Profile Builder menu and click on the Custom Redirects option under it. You will land on a page where you’ll be able to create all the types of redirects we listed above.
However, for setting up user-specific redirects, you’ll need to scroll down to the bottom of the page.
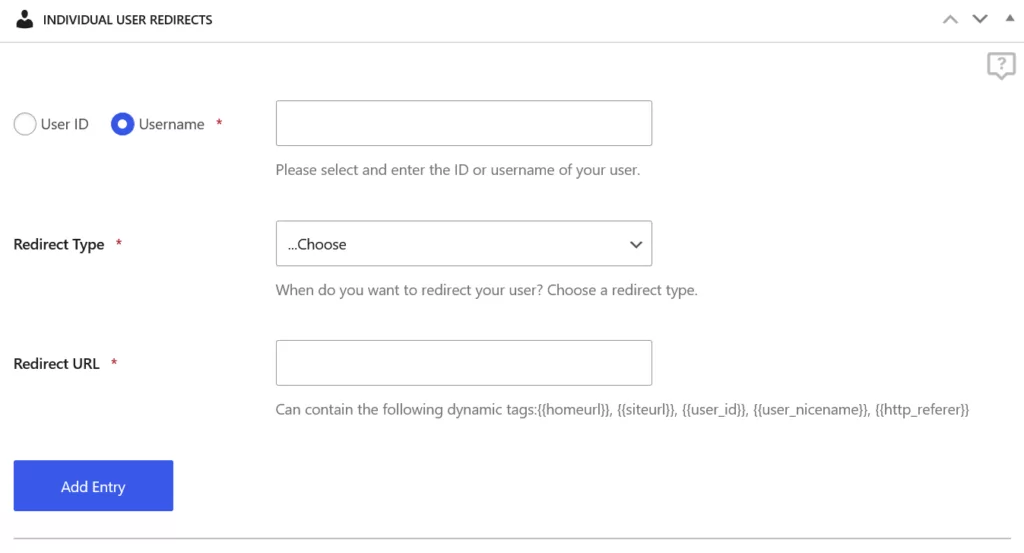
So, for example, if you want to redirect a user on your site with the username “Steve,” we will input Steve in the Username field.
Now, as we are redirecting this user on login, we will choose “After Login” as the Redirect Type. Finally, we need to put in the Redirect URL and click on the Add Entry button to create this redirect.

That’s it. Now, when the user “Steve” logs in to our site, he will be redirected to the URL we have put in the Redirect URL field.
As you can tell, you can set this redirect up using the user ID as well. You just need to click on the User ID checkbox and input the user ID instead of the username.
Login Redirect by User Roles
Redirecting users by user roles is just as simple. This is the most common type of redirect since it’s used by many WooCommerce sites to redirect different users, like customers, authors, store admins, and more.
So let me explain how to set up login redirect by user roles on your WooCommerce site.
First, click on the Custom Redirects under the Profile Builder menu. Scroll down a bit to find the User Role based Redirects section.
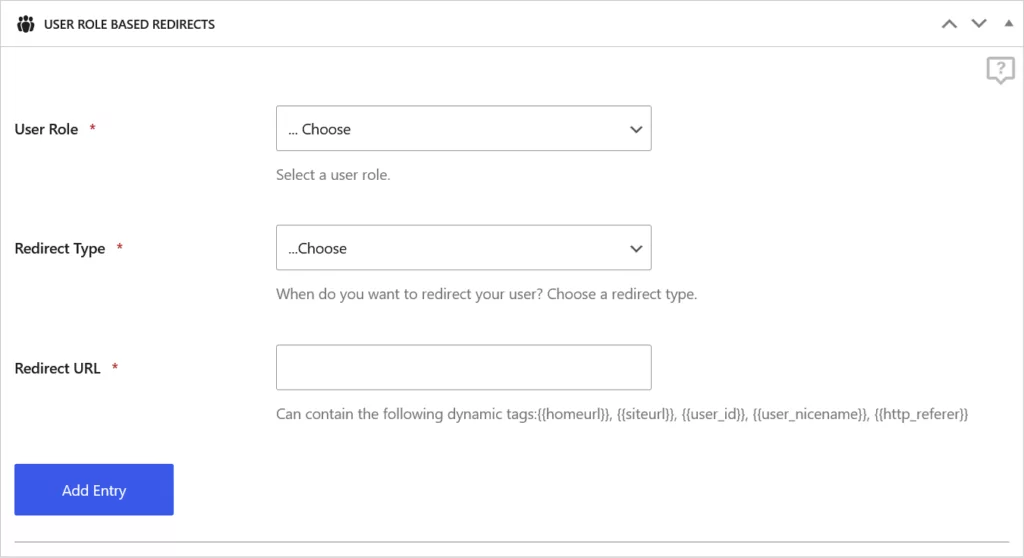
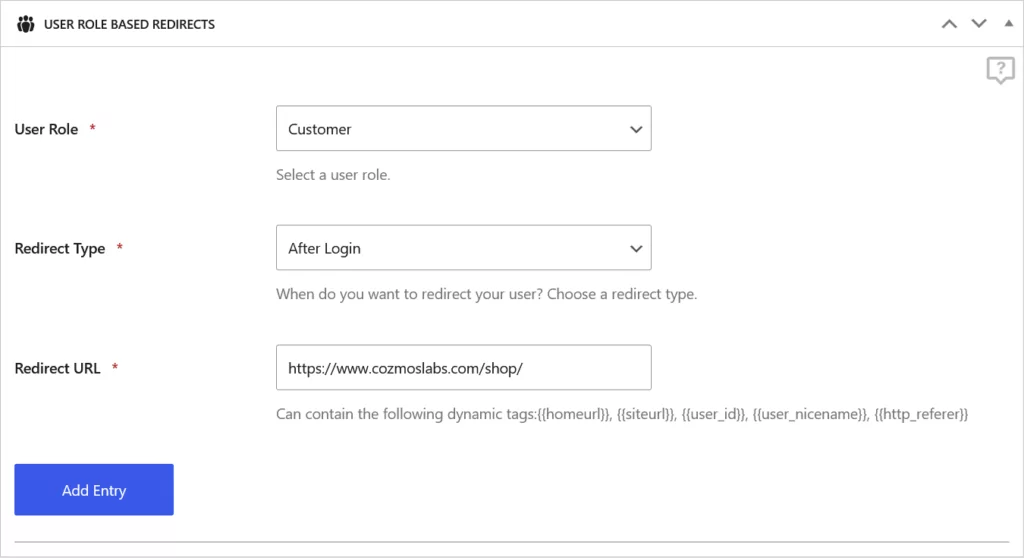
Choose the user role you want to redirect. I’ll choose the Customer user role in this case.
Click the Redirect Type dropdown menu and choose the “After Login” option. In the last field, enter the URL you want your customers to be redirected to upon login.
If Cozmoslabs was a WooCommerce store, the redirect URL for us would have probably been our shop page. So, I used that just as an example, as you can see below.
Here, you can create multiple login redirects for different user roles. So for example, if we also wanted to redirect our authors to our blog page on login, we can create a redirect for the Author user role too.
You will be able to find all the redirects you create below the respective section of that redirect type.

Global Login Redirects for WooCommerce
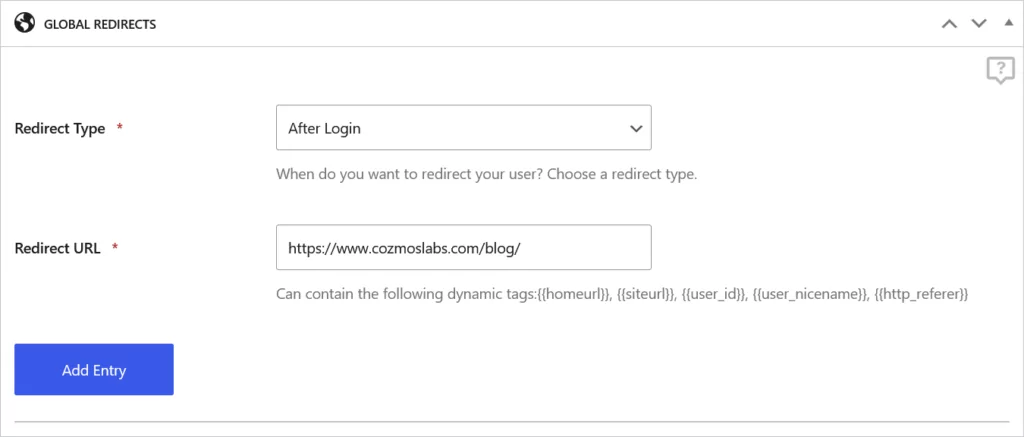
If you want to set up a general redirect that redirects all users who log in to your site to a specific page of your choice, you’ll need to use the Global Redirects section. You can find it right above the User Role based Redirects section.
Just choose the “After Login” option from the Redirect Type dropdown menu and enter the redirect URL on the next field. Then click on the Add Entry button and all users will get redirected to the URL you have entered.
Login Redirect for Default WordPress Pages
If you have created a custom login page for your WooCommerce store (which you should, if you haven’t already), you may not want your users to land on WordPress’ default forms and pages. The default WordPress pages include the WP login, registration, lost password, and author archive pages.
However, if you have a custom login and registration page, you may not want to keep the default WordPress login and registration pages accessible to your users. They are far too limited in their functionality and customization. Instead, you can create custom login and registration pages using Profile Builder’s form builder functionality.
With that said, let me show you the steps you need to perform to redirect the default WordPress login page to the custom one you have created on your WooCommerce store.
Scroll down to the Default WordPress Forms and Pages section on the Custom Redirects page. Let us redirect the default WordPress login page. Choose the Login (wp-login.php) from the dropdown menu as the Redirect Type, and then enter the custom login page URL in the Redirect URL field.

Once you click on the Add Entry button, no user will be able to access the default WP login page. They will get redirected to your custom login page instead. You’ll need to do the same for the registration page as well.
And if you don’t already know, Profile Builder Pro helps you create amazingly detailed and functional custom login pages as well. So you can design the kind of customized login page you want and redirect the default WordPress login page to that page.
Individual Redirects Defined in Shortcodes
If your website has even more specific needs, Profile Builder also offers the opportunity to set up individual redirects defined with shortcodes. Here’s a list of all the shortcodes available to implement this.
Using Tags for Dynamic Redirect URLs
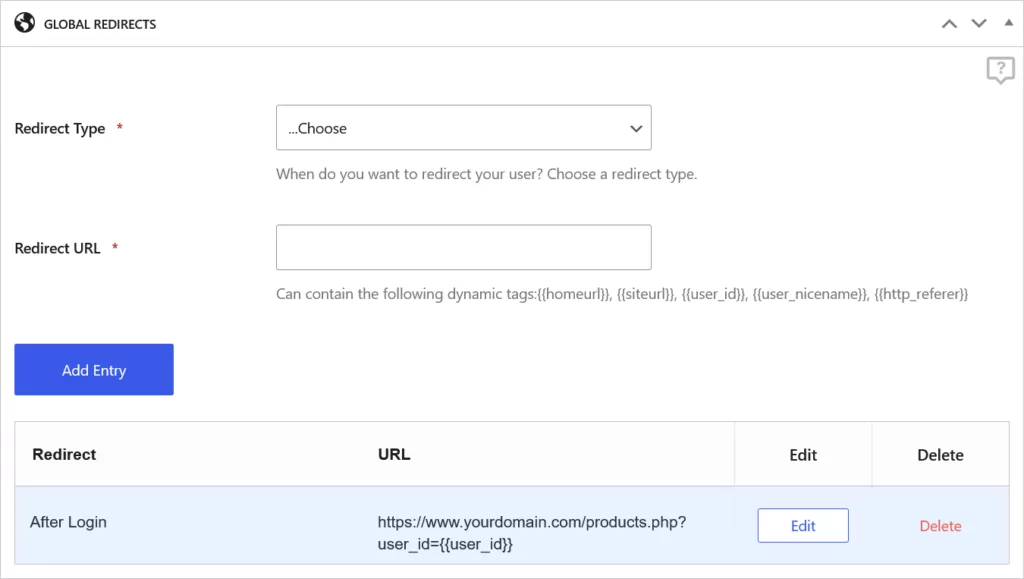
You will also find a section saying Available tags for dynamic URLs at the top of the Custom Redirects page. Click on it to find all the tags available for creating dynamic URL redirects.
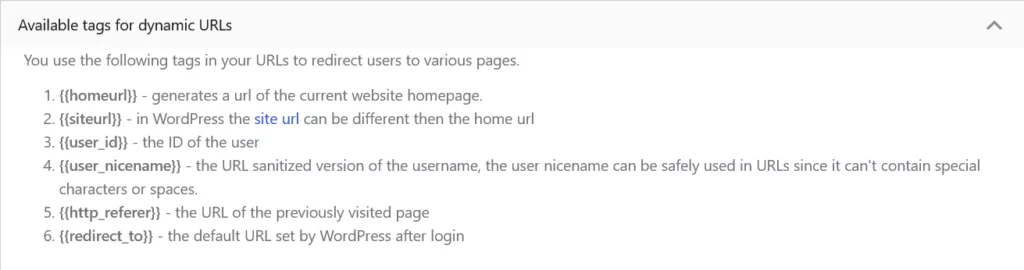
This functionality allows you to use tags to create dynamic redirect URLs for your users. So for example, you can use the {{user_id}} tag in the Redirect URL to redirect users After Login to your products page based on their user ID.
You can set up different dynamic URL redirects using this method. Let us cover some more important dynamic URL redirect setups below.
Redirect after Registration for WooCommerce
Just like with the login, you can also set up redirects after registration for your WooCommerce store. The process to do so is exactly the same, except that you have to choose the “After Registration” option from the dropdown menu instead of “After Login” as the Redirect Type.

As you can see in the image above, we will be redirecting the users to our website’s homepage after registration. We have used the homepage tag to redirect them. Once we click on the Add Entry button, this redirect will come into effect.

Logout Redirect for WooCommerce
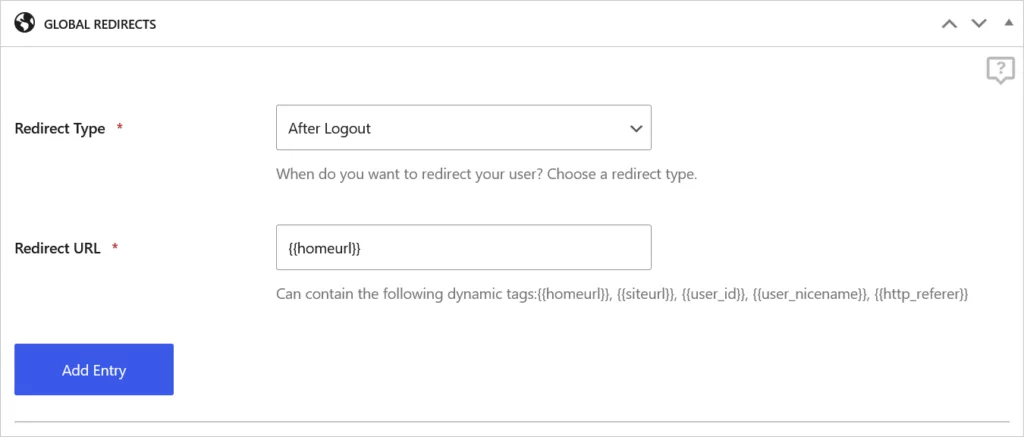
As you can see in the dropdown menus on the Custom Redirects page, there’s a long list of pages you can create redirects for. One of them is the logout page as well.
This is extremely useful when you want your users to still be engaged with your WooCommerce store even after they log out. If you don’t have a specific page to redirect them to after logout, you can at least redirect them to your website’s homepage. This will be a better option in terms of user experience instead of letting them land on the logout page.
Redirect Priority
As discussed above, there are a total of 5 different types of redirects you can create for different pages on your WooCommerce site, including the login, registration, and logout page.
However, what if you want to use multiple redirect types for different purposes? Maybe you want to redirect a few specific users and redirect a particular user role, while also setting up a global redirect for the rest of your users.
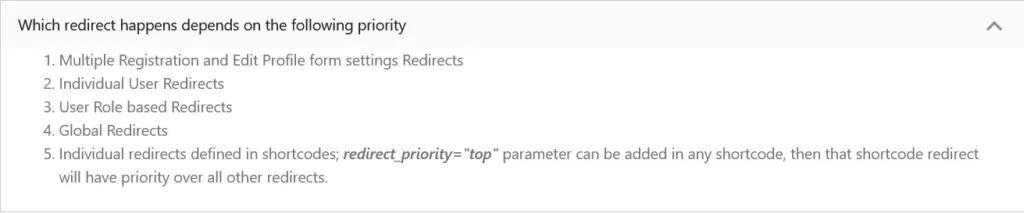
Well, Profile Builder takes care of this for you. There’s a well-thought-out redirect priority in place:
- User-specific redirects are given the topmost priority and the other redirect rules will be overridden for the users covered under this redirect;
- User role redirects come next, and they override the global redirect settings;
- Global redirect settings apply to users and user roles that are not covered under the above two types of redirect.
However, you can also customize these priority settings depending on your needs. If you want to have a particular topmost priority and override all the other redirect settings, you can simply add the following parameter to individual shortcode redirect:
redirect_priority="top"
Also, another thing to keep in mind is that if you’re using multiple registration or edit profile forms on your WooCommerce store and have chosen any redirect settings there, then they will be given the topmost priority by default and override all the other redirect settings.
Set Up Login Redirect for WooCommerce Right Away!
If you have gone through the above tutorial, you now know how easy it is to set up login redirects for your WooCommerce store using Profile Builder Pro. In addition, you can also set up redirects for the registration and logout pages just as easily.
However, you can do much more with Profile Builder Pro in terms of complete user management for your WooCommerce site. You could edit, add or remove user roles, create custom registration, login and edit profile forms, restrict access to content and much more.
Give it a try today and have full control over every aspect of your WooCommerce site’s user management.
Profile Builder Pro
Set up custom login, registration, and logout redirects for WooCommerce, in addition to a whole lot of other user management features.
Get Profile BuilderDo you still have questions on how to set up WooCommerce login redirects? Ask us in the comments section below!
Related Articles
How to Customize the WooCommerce Login Page (No Code Needed)
Searching for a solution to customize the WooCommerce login page and otherwise control login behavior on your WooCommerce store? If you allow (or force) registration on your store, you'll want to create a user-friendly login experience so that your shoppers can easily log in to their accounts and access other key features. In this post, […]
Continue Reading
8 Best WordPress User Registration Plugins
Not sure what WordPress user registration plugin to use for your project? Going through all the WordPress user registration plugins can be disorienting. You may have spent hours and hours searching for plugins and tutorials to help you with your project, and you’re still as confused as you were when you started. Imagine finding the […]
Continue Reading
How to Customize WordPress Email Login Behavior (+ Registration)
Searching for a WordPress email login feature so that you can customize your site's login process, such as requiring users to use their email address instead of a username? By default, WordPress lets users log in with either their username and password or their email and password via the default login page. But if you […]
Continue Reading