
Table of Contents
If you allow your customers to register as a user on your store, it’s a must to have a WooCommerce lost password page. And thanks to WordPress’ huge plugin collection, you can create one easily in a few clicks.
But before we get to the tutorial to create a reset password page, let’s take a quick look at some of the reasons why WooCommerce store owners want to have it on their site.
Why Do You Need a WooCommerce Lost Password Page?
If you run and operate a WooCommerce site, you know how important it is to build a connection with your users. Allowing your customers to register as users on your site goes a long way in driving up customer retention.
When you have a user registration page, it’s only natural that you will need a WooCommerce lost password page too. A lot of your users will forget the password to their account and need a way to reset it.
That’s precisely why you need a WooCommerce lost password page for your store. Some of the other things a lost password page would help with include the following:
- A better user experience;
- Ensure a higher level of security on your WooCommerce store;
- Avoid spam accounts since a lot of users who forget the password to their account may end up creating a new account and abandoning their old one;
- Easier user management.
It’s easy to understand the importance of a lost password page on your WooCommerce site. So, let’s now move to the part where we explain how you can easily create a WooCommerce lost password page using Profile Builder.
Using Profile Builder to Create a WooCommerce Lost Password Page
WordPress offers an easy way to implement any functionality on your WooCommerce site with all of its plugins. Likewise, there are plugins available that help you easily create a lost password page too.
However, Profile Builder is going to be an ideal plugin for the task. It not only lets you create a lost password page for your WooCommerce sites in a few easy clicks but also offers a plethora of other useful user management features as well.
Some of its important functionalities in addition to creating a WooCommerce lost password shortcode include the following:
- Shortcodes to create important user pages like the custom WooCommerce registration page;
- Ability to create a WooCommerce form with payment options if you only want to sell a single product;
- Build a functional WooCommerce private store;
- Allows you to implement the WooCommerce social login functionality on your store;
- Control spam registration by enabling the WooCommerce approve user registrations functionality;
- Work as a WooCommerce My Account customization plugin too.
There are tons more functionalities. Profile Builder is a complete user management plugin that will help you with every area of user management.
Profile Builder Pro
Create a lost password page in a few clicks, manage important user pages, add advanced functionalities to your store and do much more with Profile Builder Pro.
Get Profile BuilderSo let us walk you through the process of installing Profile Builder and then using it to create a lost password page.
Installing and Activating Profile Builder
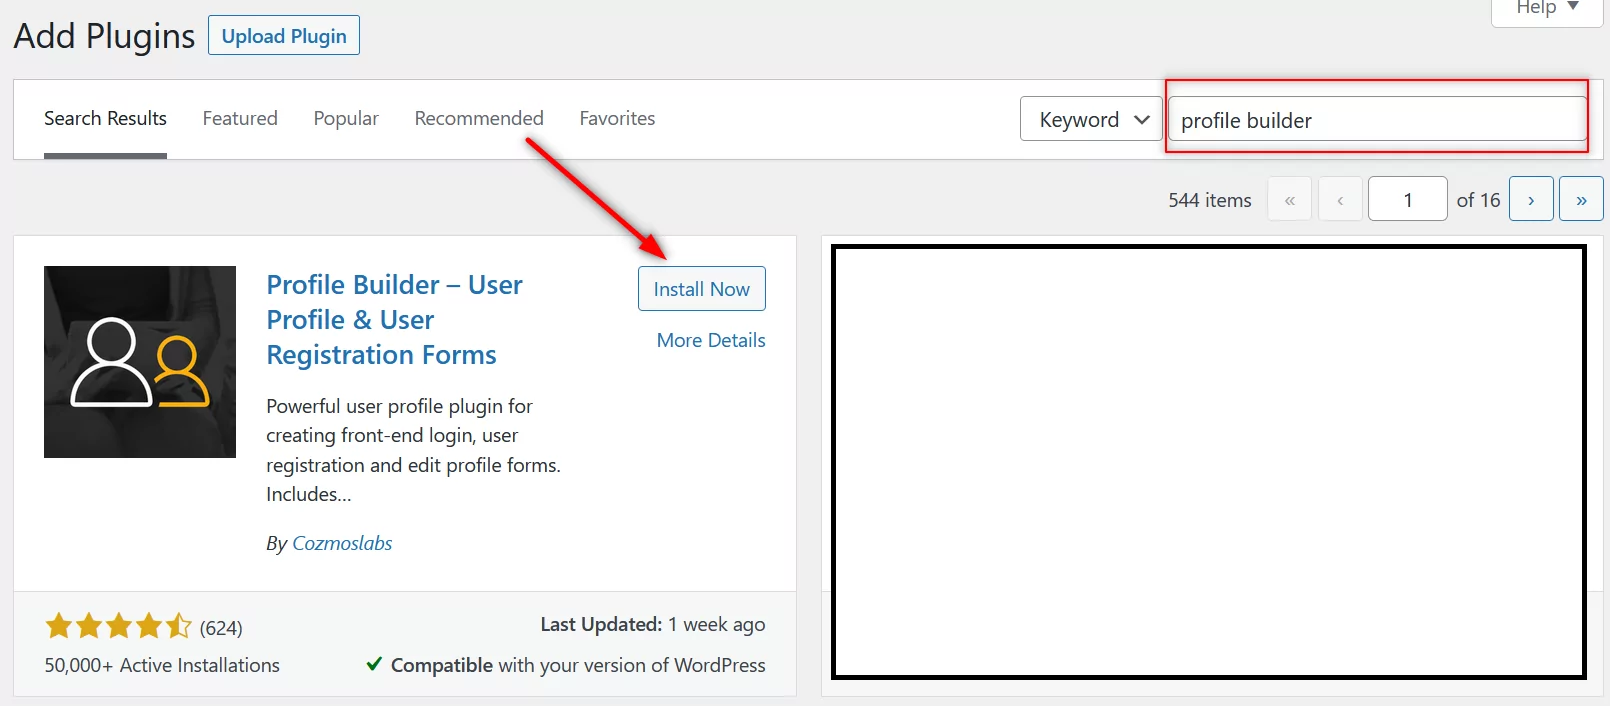
Go to your WordPress dashboard. Click on the Add New option under the Plugins menu. Type in “Profile Builder” into the search box.
When Profile Builder shows up in the search results, click on the Install button beside it. Once installed, click on the Activate button. Now Profile Builder should be up and running on your WooCommerce site.
However, please note that while you can create a lost password page using the free version of Profile Builder, you will need to purchase the pro version if you want a lot of other features including many of the ones we listed above.
After purchasing Profile Builder Pro, you can download it by logging into your account on Cozmoslabs.
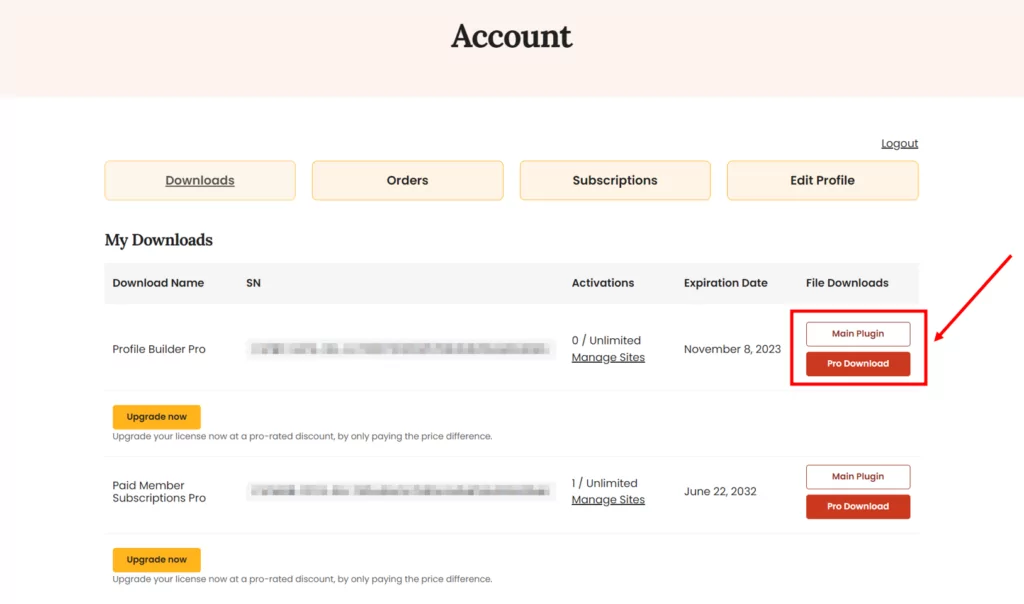
You can then install it by clicking on the Upload Plugin button at the top of the Plugins page and uploading the plugin files.
Creating a Page with the WooCommerce Lost Password Shortcode
The next step would be to create a page using the WooCommerce lost password shortcode from Profile Builder. The shortcode is [wppb-recover-password]. You can also find it on the Basic Information page under Profile Builder.
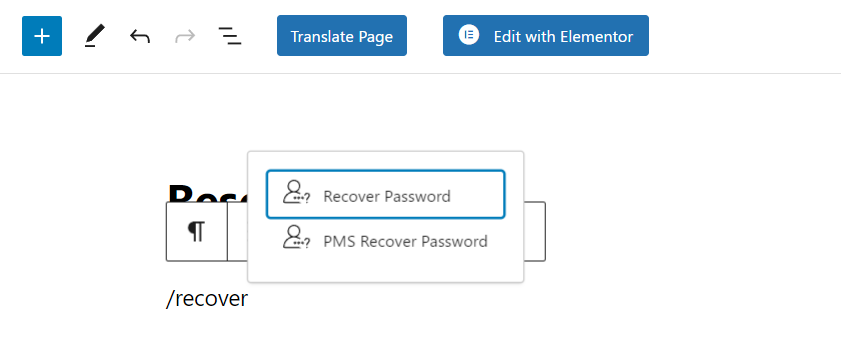
Now, click on the Add New option under Pages and copy this shortcode into a blank page’s content. Give it a title related to resetting the user password for clarity.
It works just as well in both the classic (older) WordPress editor as well as the new Gutenberg editor. However, if you’re using Gutenberg, you can also use the Recover Password dedicated block.
Don’t forget to click on the Publish button at the top-right of the screen when you’re done. Your WooCommerce lost password page should now be live.
This is how it would look on the front end:
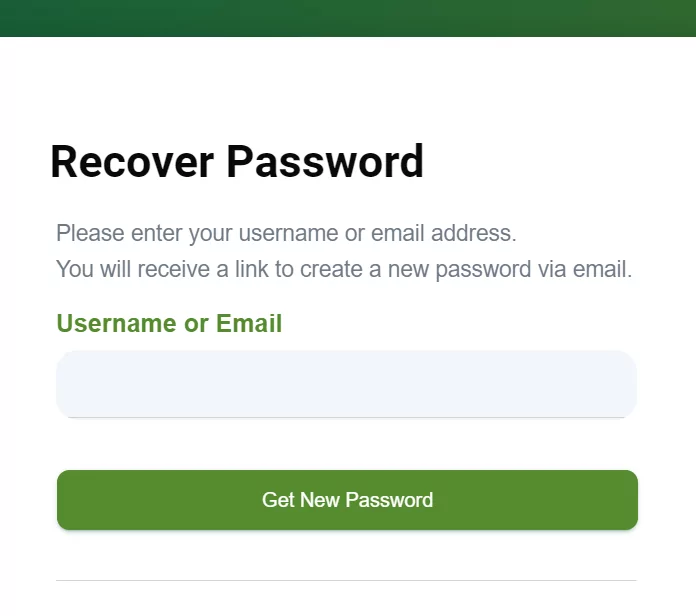
So now when a user puts in their username and clicks on the Get New Password button, they would be sent an email with a link to reset their password.

The user would then simply need to log into their registered email account and click on the link in the password reset email.
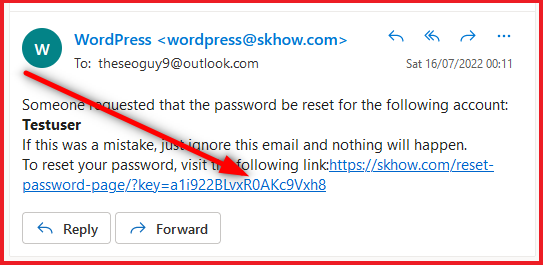
Once they click on the link, they will be redirected to the page where they can enter a new password.
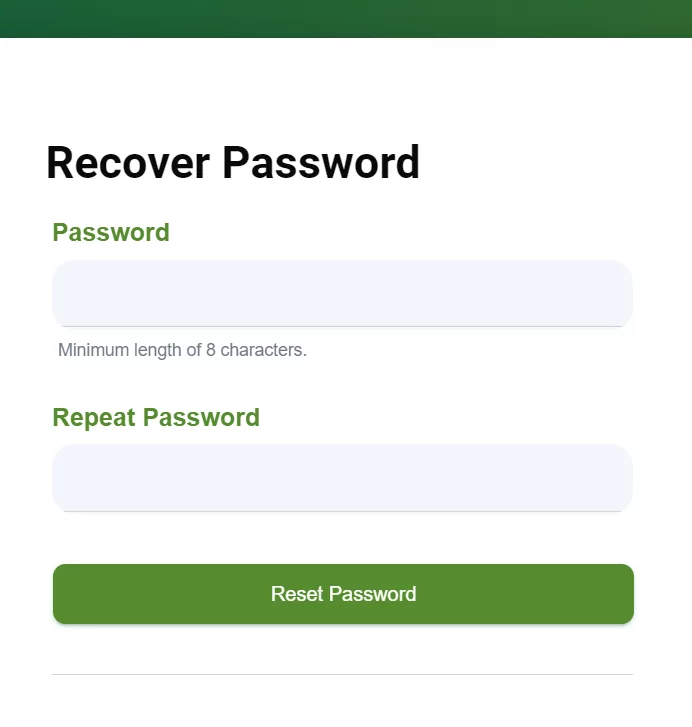
Entering the password and then the same password again in the second field and clicking on the Reset Password button would reset their password. If you have WooCommerce password strength requirements set on your site though, then their password would need to meet those requirements.
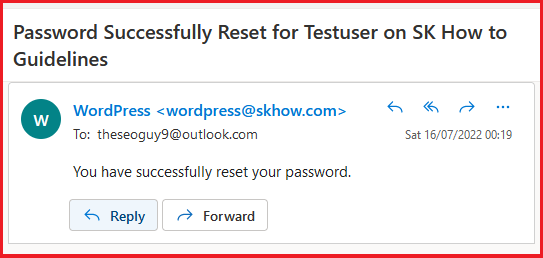
Once they set their new password and click on the Reset Password button, their password would be successfully reset.
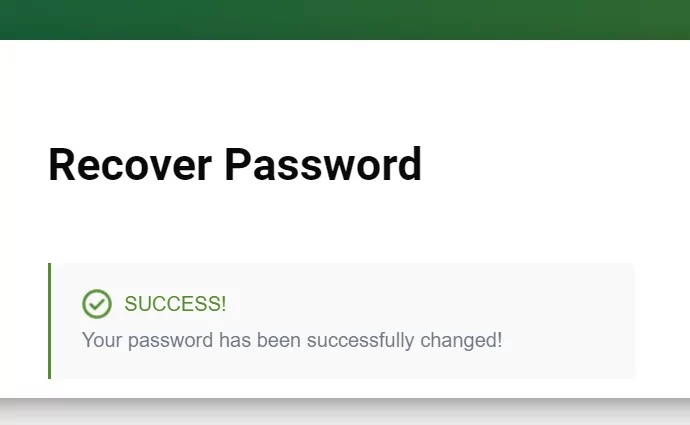
They would also get an email notifying them about this.
Linking to WooCommerce Lost Password Page from Your Login Page
So, you’ve created your WooCommerce lost password page. But how would your users find it?
Profile Builder allows you to link to your WooCommerce lost password page from the login page itself. You need to have a link to your reset password page in WordPress on your login page since that’s where most users would realize that they forgot the password to their account.
You simply need to go to your login page and replace your WooCommerce login shortcode with this one: [wppb-login lostpassword_url="/recover-password"]. You can also create a login form using this shortcode or the Login block if you don’t have a login page on your site yet.
However, keep in mind that you need to replace the /recover-password part in the above shortcode with the URL slug of your own reset password page. Please note that you do not need to put the entire URL, but only the specific part of the page URL that follows after your site URL.
So in our case, this shortcode would become [wppb-login lostpassword_url="/reset-password-page/"].
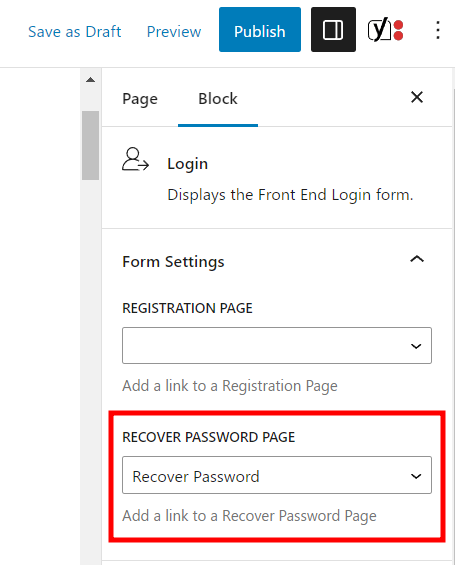
Alternatively, if you’re using the dedicated Login block, you can choose to display the password reset page from the right-hand sidebar.
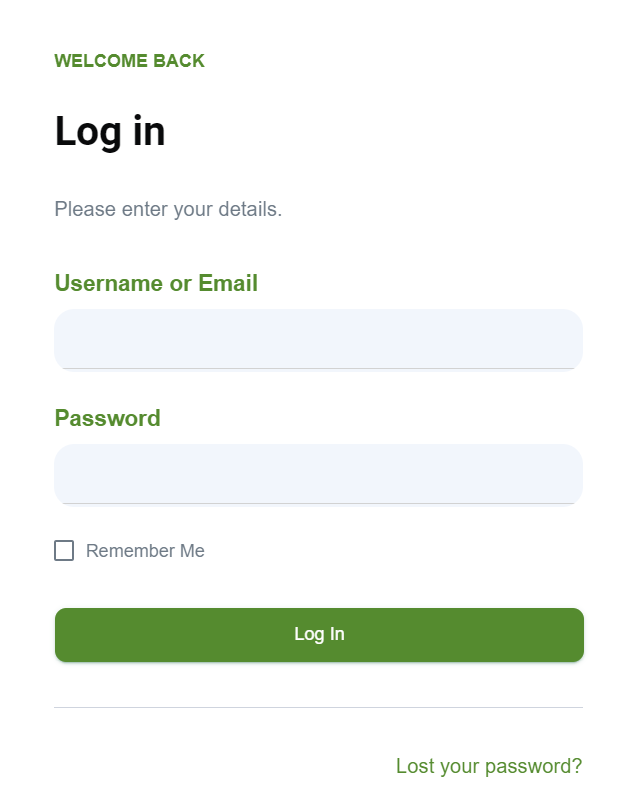
This is how your login form would look like:
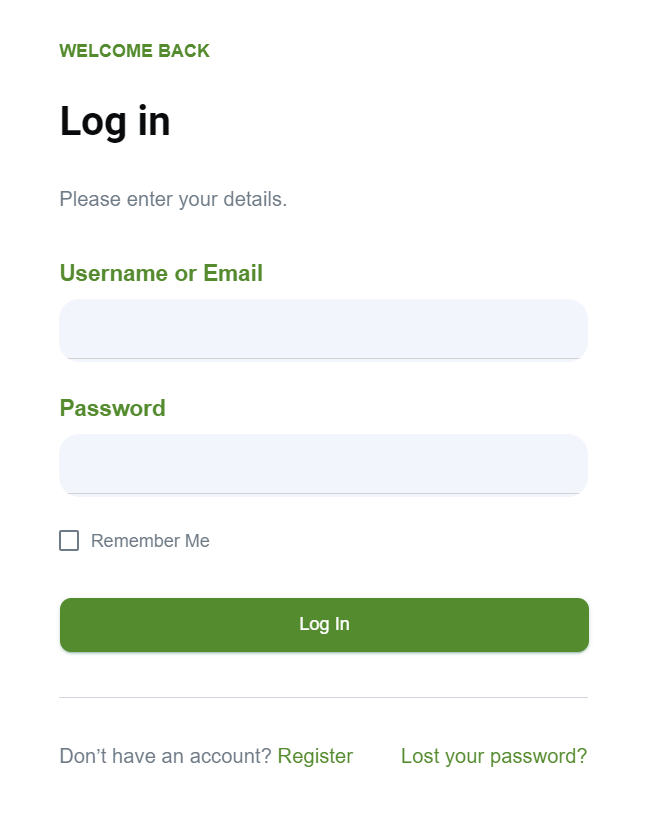
On a side note, you can actually have links to both your reset password and user registration page on your login page. You just need to add another argument to the shortcode: [wppb-login register_url="/register" lostpassword_url="/recover-password"]. Here, you’ll have to replace both the URL slugs for your registration page and the password recovery page.
Again, if you’re using the block editor, you can just add the registration page to your form from the block’s sidebar.
Create and Manage a WooCommerce Lost Password Page in a Few Clicks
Profile Builder makes it incredibly easy to create a WooCommerce lost password page. Furthermore, it also allows you to easily link to it from your login page, making it very easy for users to find your reset password page.
Moreover, Profile Builder Pro comes with a plethora of other useful functionalities. The plugin functions as a complete user management system for your WooCommerce site.
So go ahead and purchase Profile Builder Pro now and control every aspect of user management of your WooCommerce store!
Profile Builder Pro
Profile Builder Pro is a complete user management system in itself that also allows you to create a lost password page easily.
Get Profile BuilderDo you have any questions regarding any of the steps covered in this tutorial? Please feel free to let us know in the comments below.
Related Articles

How to Create a Custom Reset Password Page in WordPress
If you’re building a user-focused website, creating a WordPress custom reset password page is a no-brainer. Users forgetting the password to their accounts is inevitable, so it only makes sense to offer them a way to recover their password. In this post, you will learn everything there is to know about creating a WordPress reset […]
Continue Reading