

Table of Contents
- 1 Best Platform to Build an Online Community – What You Need
- 2 Online Community Examples and Ideas
- 3 How to Create an Online Community Website With WordPress
- 3.1 1. Set Up Your Basic WordPress Website
- 3.2 2. Set Up Paid Member Subscriptions
- 3.3 Paid Member Subscriptions Pro
- 3.4 3. Create Your Membership Levels
- 3.5 4. Restrict Access to Content
- 3.6 5. Customize Your Registration Pages (and Other Member Pages)
- 3.7 6. Extend With Other Plugins If Needed
- 3.8 7. Perform Some Other Housekeeping and Go Live!
- 4 Create Your Online Community Today
Are you trying to create an online community website but not sure where to start?
Building an online community platform is a great way to bring together a group of members around a specific topic. And by creating your own platform, you can fully own the relationship with your members so that you’re never at risk of getting cut-off by a third party (looking at you, Facebook!).
But if you’re not a super techie person, you might not be sure how to get started.
Don’t worry—we’re here to help.
In this tutorial, we’ll cover step-by-step how to build a community website using the massively popular WordPress software and an easy-to-use WordPress plugin, called Paid Member Subscriptions.
You do not need any special technical knowledge to follow this guide and your community website will have tons of useful features including member management, free or paid membership levels (or donations), restricted content, and more.
If needed, you can also add other features like discussion boards, social profiles, private messaging, and more.
Here’s everything that we’ll cover in this detailed guide:
- The best platform to build an online community;
- Some real-world examples of successful online communities;
- How to build an online community site—no code required.
And here’s a real example of the type of online community site you’ll be able to build:
Let’s dig in!
Best Platform to Build an Online Community – What You Need
If you want to build an online community that’s set up for lasting success, you shouldn’t build your community on someone else’s platform—e.g. Facebook.
Instead, you should set up your own website where you control your community’s data and your relationship with your members.
And when it comes to setting up a self-owned website, WordPress is by far the most popular option. It powers a whopping 43%+ of all the websites on the internet, including a number of online communities. We’ll give you some real examples in the next section.
The advantage of WordPress is its flexibility. The free WordPress software provides the foundation for your website and then you can add community functionality using a plugin.
More specifically, you can use the Paid Member Subscriptions plugin.
When you add Paid Member Subscriptions to WordPress, you’ll get access to the following essential features of an online community:
- Member management – members can register on your site and you can easily keep track of all your registrations. You can also customize the registration page to collect additional information from your members if needed.
- Paid memberships or donations – if you want to monetize your online community or accept donations from members, you can charge users for membership. You can either charge a one-time fee or you can have a recurring membership fee on any schedule. Or, you can combine the two. For example, you could charge a $200 one-time signup fee plus $50 per year to maintain the membership. You can also change the text to frame these as donations if it better meets the needs of your community.
- Content restriction – if you’re creating a community, you probably want to have some private content that’s only available to community members. You can easily set this up and restrict as much or as little content as needed.
You can also use the massive library of other WordPress plugins to add even more features.
For example, let’s say you want to add a forum or discussion board to your online community. You can set this up with just a few clicks—all you need to do is install the free bbPress plugin.
Better yet, the Paid Member Subscriptions plugin integrates with bbPress so that you can connect its features. For example, you could create a special forum board that’s only available to some/all of your community members.
Here are some more examples of the types of features that you can easily add to your online community using other WordPress plugins:
- Private messaging between members;
- “Friends” functionality so that members can become friends with one another;
- Social media-style activity streams;
- Member groups to create sub-communities within your community;
- Social media-style notifications so that community members can keep track of what’s happening.
Basically, whether you need your online community to be simple or complex, you can set it up using WordPress and Paid Member Subscriptions.
Online Community Examples and Ideas
The nice thing about creating an online community website with WordPress and Paid Member Subscriptions is that you have a lot of flexibility for what you build.
Here are some examples of what you can build your online community around:
- Interests – e.g. you could connect people who are interested in art;
- Characteristics – e.g. you could create a community for people from a certain minority group or people who just immigrated to a country;
- Illnesses/diseases – e.g. you could create a community to connect people who are suffering from a certain type of cancer. Or, you could create a community for the family members of those people;
- Causes – e.g. you could create an online community dedicated to cleaning up the environment in your local area;
- Professional Associations – e.g. you could create an association website for barbers. We’ll show you a real-world example of this below;
- Hobbies – e.g. you could build an online community around a certain sport, such as a community for tennis players.
These are just a few ideas—you can certainly get creative and build your own unique membership community.
Let’s look at a few real examples of community sites, all of which are built using the method that we’ll teach you in this post.
American Barber Association Website

As the name suggests, the American Barber Association website is a website built around professionals in the hair care industry.
Barbers can become a member and join the online community to get recognition and also access special member benefits such as business and learning resources.
The American Barber Association website is built using WordPress and the Paid Member Subscriptions plugin for community functionality.
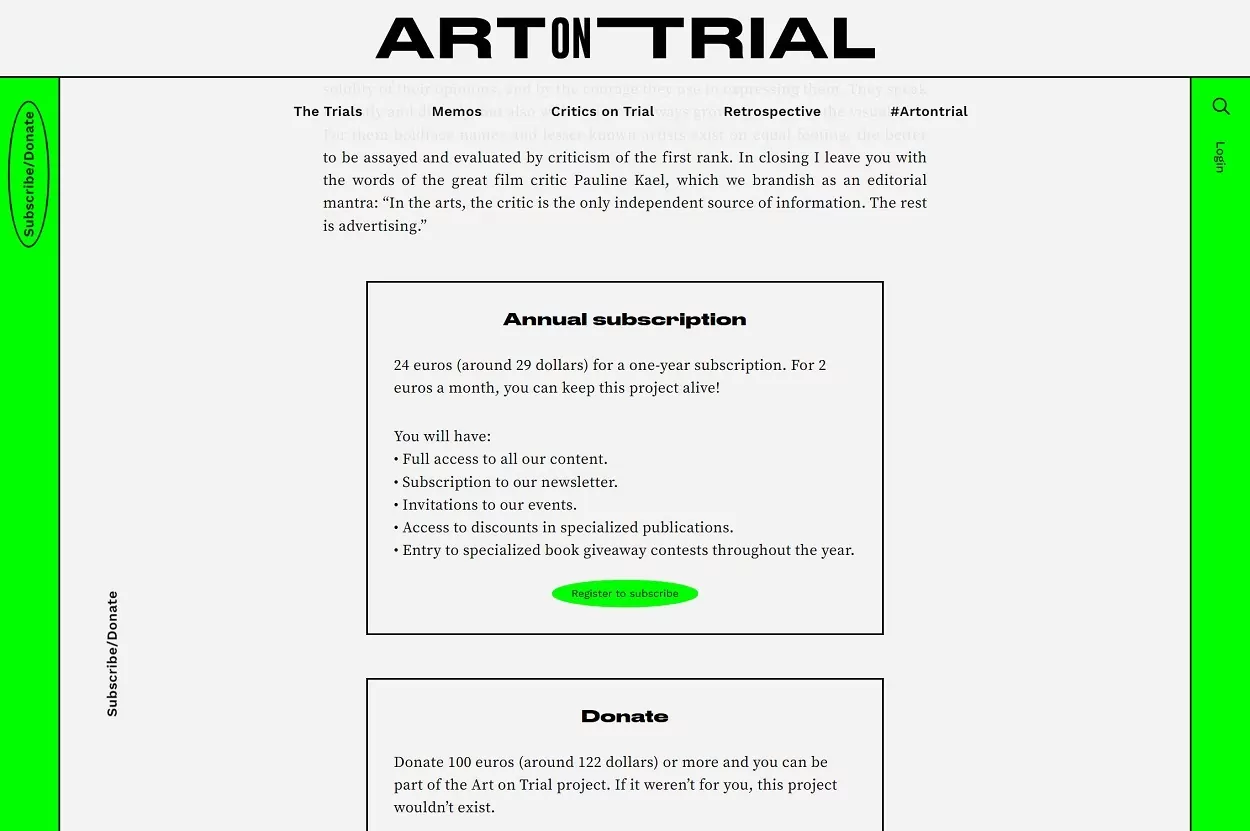
Art on Trial Website
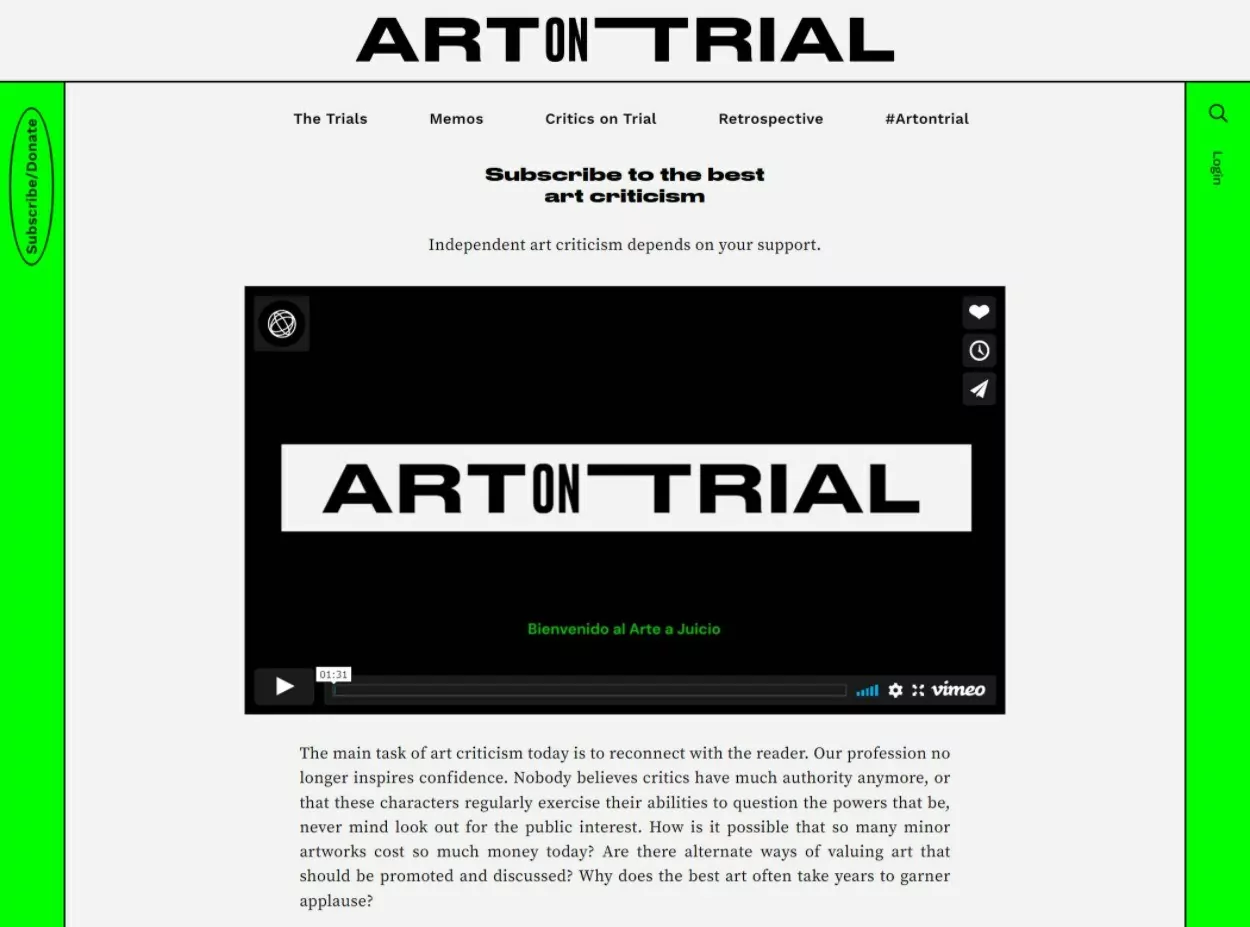
Art on Trial is an online community site built around a common interest and profession—art criticism.
Community members can subscribe to the community to donate to the cause. As members, they get full access to all content and invitations to special events.
The Art on Trial website is built using WordPress and the Paid Member Subscriptions plugin.
The Blockchain Association of Canada Website

As you can probably guess from the name, The Blockchain Association of Canada is a non-profit focused on growing and enhancing the blockchain community in Canada.
People who are interested in joining the community can become members for $5 per month, which gets them access to special news, a members-only discussion forum, and invitations to meetings/symposiums. This community site is also based on WordPress and Paid Member Subscriptions.
How to Create an Online Community Website With WordPress
Now, let’s get into how to create an online community using WordPress and the Paid Member Subscriptions plugin.
1. Set Up Your Basic WordPress Website
Our tutorial is mostly focused on building an online community platform on top of WordPress. But before you can do that, you first need to set up your basic WordPress site if you haven’t done so already.
We won’t spend too much time here, but we will quickly run over the basics of setting up your WordPress site.
To begin, you’ll need to purchase hosting and a domain name and then install the WordPress software.
If you’re not sure where to start, SiteGround makes it easy to purchase your hosting and domain in one spot. Once you sign up, SiteGround also has a very simple WordPress installer tool that can help you set up your WordPress installation with just a few clicks.
Once you’ve installed WordPress, you’ll need to pick a WordPress theme. Your theme controls the design of your online community. Then, you’ll add the actual functionality of your community using plugins.
There are tons of great WordPress themes out there, but here are some of our recommended picks to get you started:
Once you set up your theme, you’ll need to add the content of your online community. This includes the public content that will be available to all visitors as well as the private content that will only be available to members of your community.
You can start adding the content now. Or, you can wait until you get a bit further in the tutorial. For example, you might want to wait to add the members-only content until you get to the content restriction part of the tutorial, which is step #4.
2. Set Up Paid Member Subscriptions
Now, you’re ready to install the Paid Member Subscriptions plugin, which is what adds most of the online community-focused features to your site.
First, you’ll want to install and activate the Paid Member Subscriptions plugin.
There is a free version of the plugin available that you can use for simple online communities. However, we’re going to use the Pro version for this tutorial because it gives you access to useful features such as automatic recurring payments and bulk content restrictions.
With that being said, you can still use the free version of the plugin and follow most of this tutorial.
You can install the plugin by going to Plugins → Add New:
- For the premium version, upload the zip file that you can download from your Cozmoslabs dashboard.
- For the free version, you can install it from WordPress.org by simply searching for it in the repository.
Paid Member Subscriptions Pro
The best WordPress plugin to build a community site or association website.
Get Paid Member SubscriptionsRun the Paid Member Subscriptions Setup Wizard
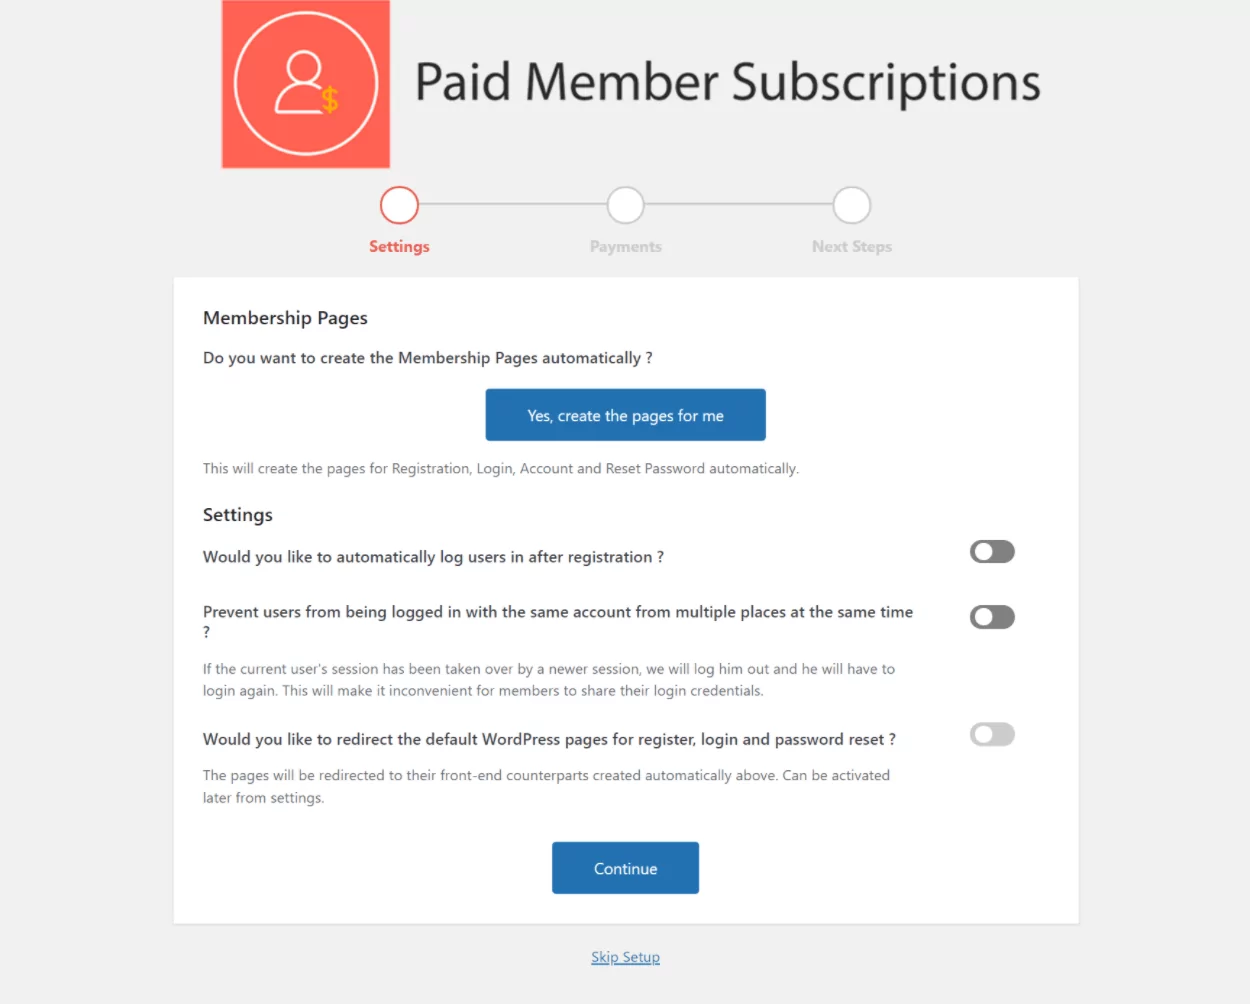
Once you’ve installed and activated the plugin, it should automatically launch the setup wizard. If it doesn’t launch automatically, you can manually activate it by going to the new Paid Member Subscriptions area in your WordPress dashboard and clicking the Open Setup Wizard button.
On the first page of the setup wizard, click the button to have the plugin create core community pages for you. Then, you can also configure a few other settings about how your community will function:
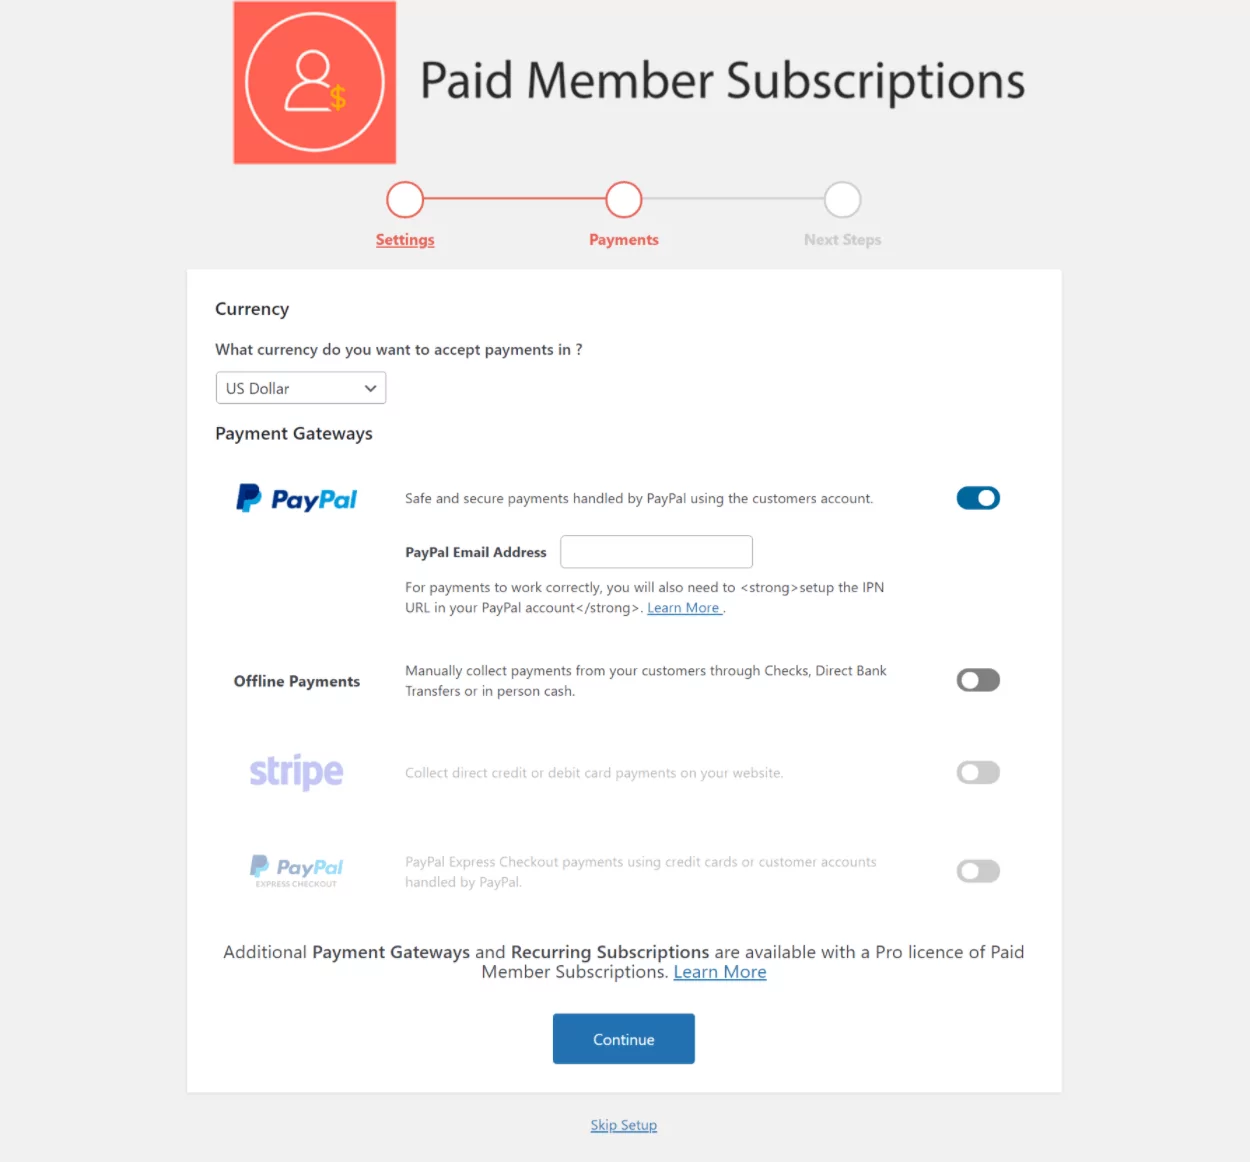
On the next page, you can configure your community’s payment gateway if you want to accept payments/donations. However, we’re going to configure this separately in the next section, so just go ahead and click the Continue button for now:
And that’s it for the setup wizard!
Enable Premium Add-Ons (If Needed)
If you’re using the premium version of Paid Member Subscriptions, your next step is to enable some of the plugin’s premium add-ons that will be handy for your community site.
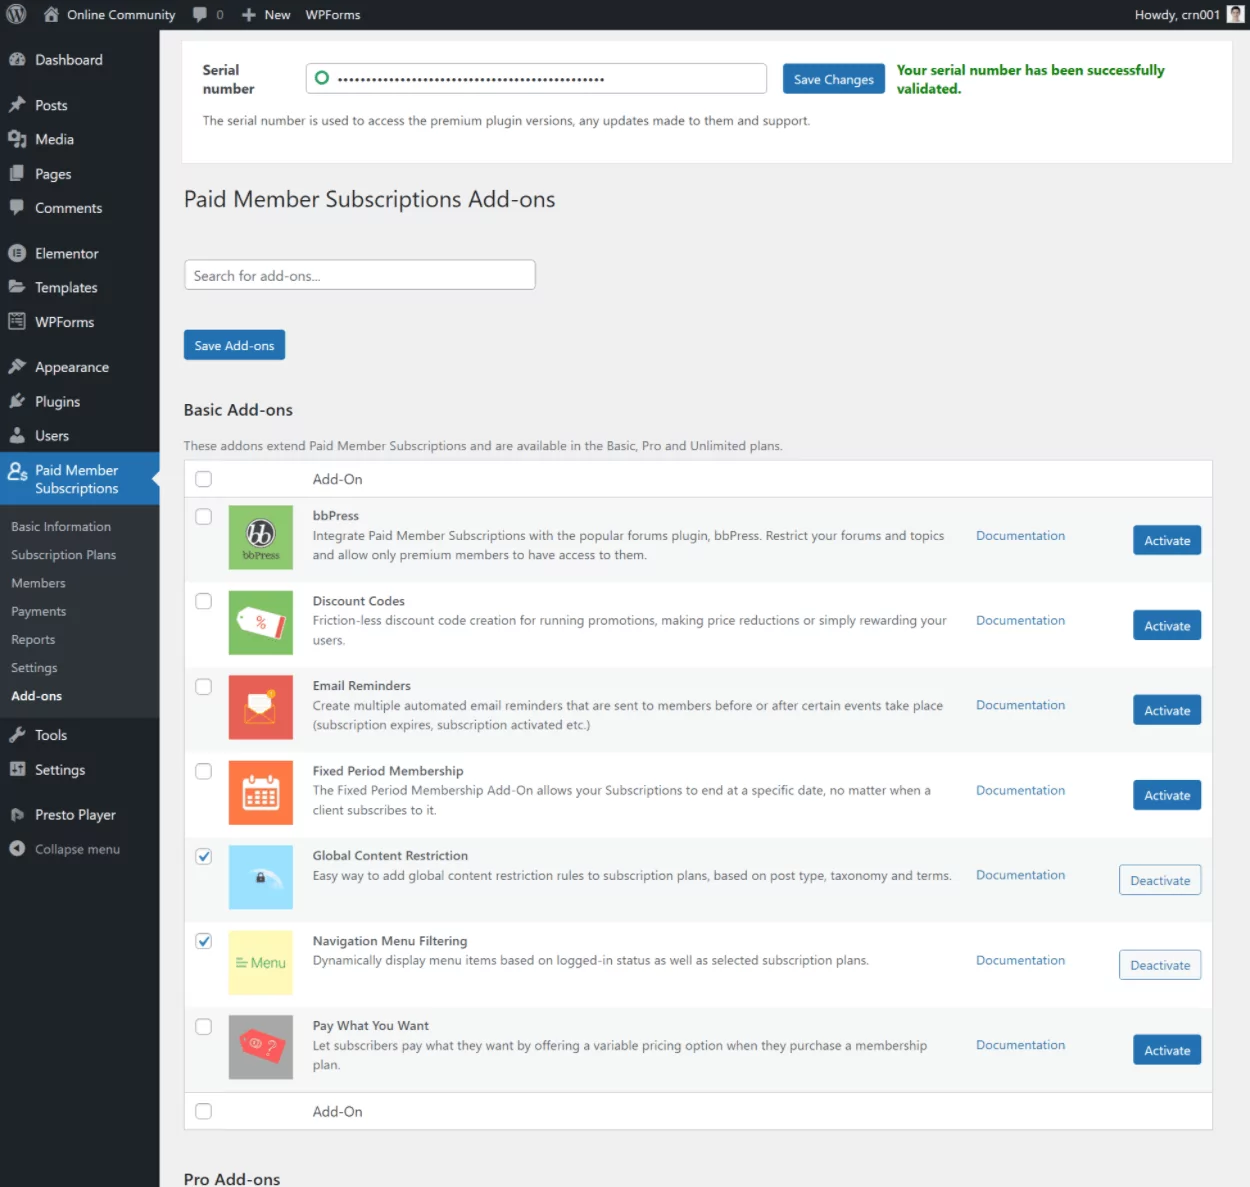
To do this, go to Paid Member Subscriptions → Add-ons.
Note: you’ll need to add your license key at the top of the interface, which you can get from your Cozmoslabs account dashboard.
You can enable any add-ons that sound like they’ll be helpful for your community. However, here are some of the add-ons that we specifically recommend for online communities:
- Global Content Restriction – this add-on makes it easy to bulk restrict access to content on your site;
- Navigation Menu Filtering – this add-on lets you display different navigation menu items to community members;
- Payment Gateway add-on – activating one of the Pro payment gateway add-ons will let you collect recurring payments/donations. You can choose from Stripe, PayPal Express, or Recurring Payments for PayPal Standard;
- Invoices – this is useful if you need to provide PDF invoices/receipts to community members.
If you want to add a discussion board to your community, you might also want to consider the bbPress add-on.
Configure Payment Gateways
Next, you’ll want to circle back and set up your payment gateway. Go to Paid Member Subscriptions → Settings → Payments.
Then, use the Activate Payment Gateways list to choose which payment gateways you want to use, as well as a few other basic settings for how payment gateways will function:
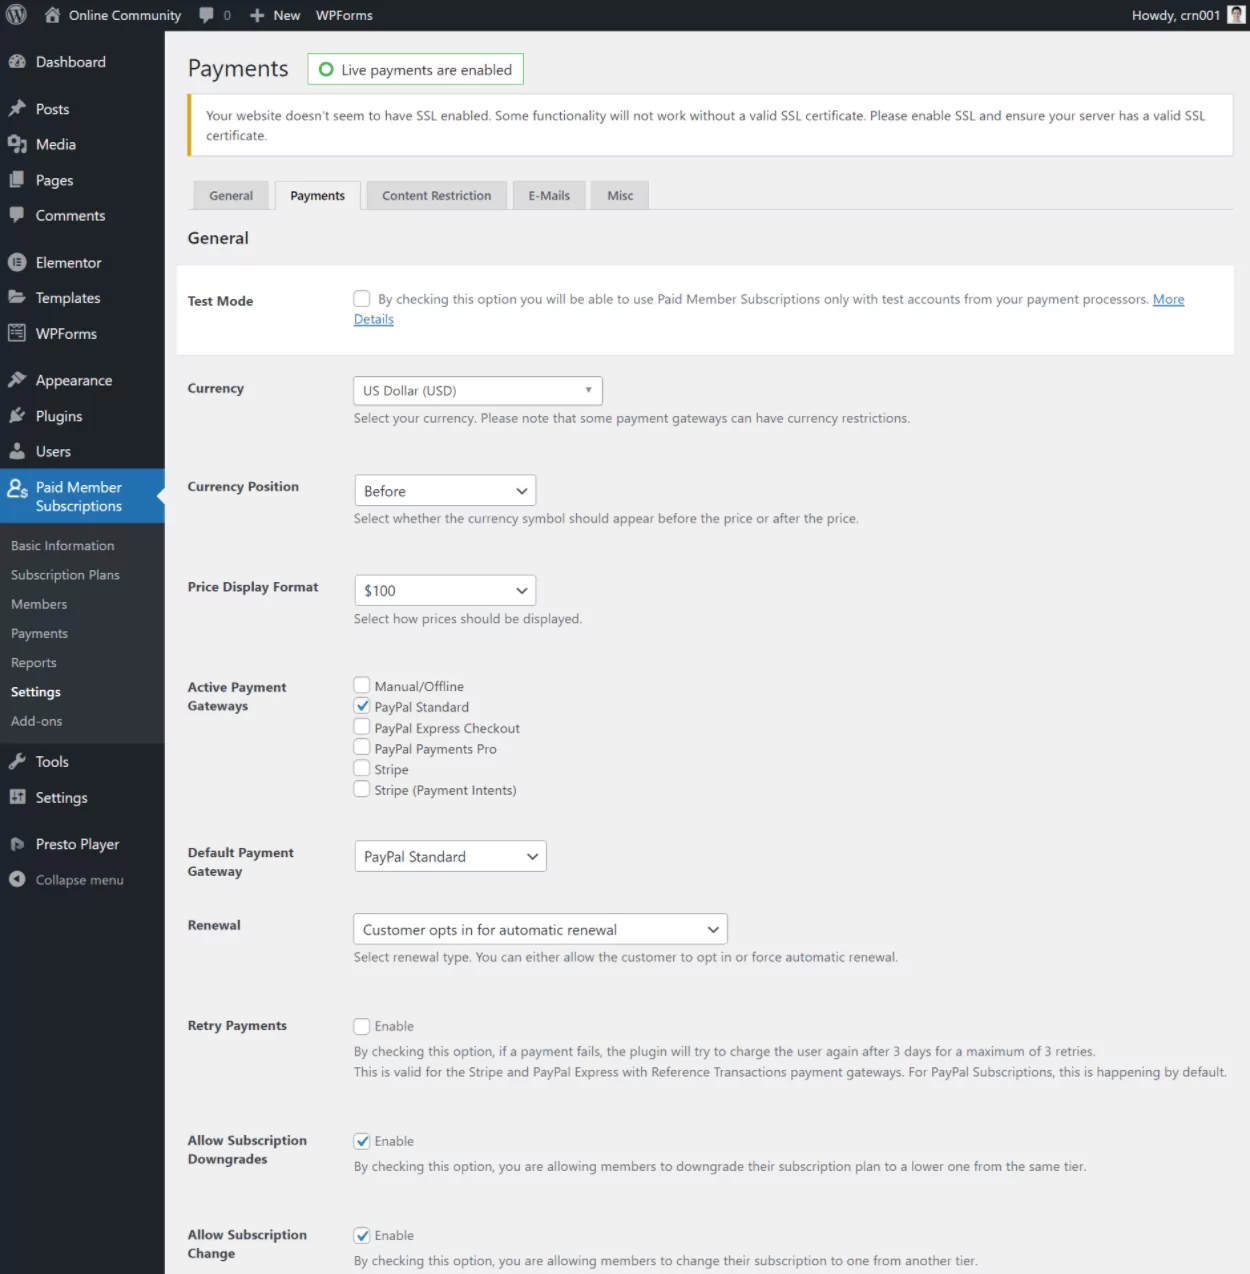
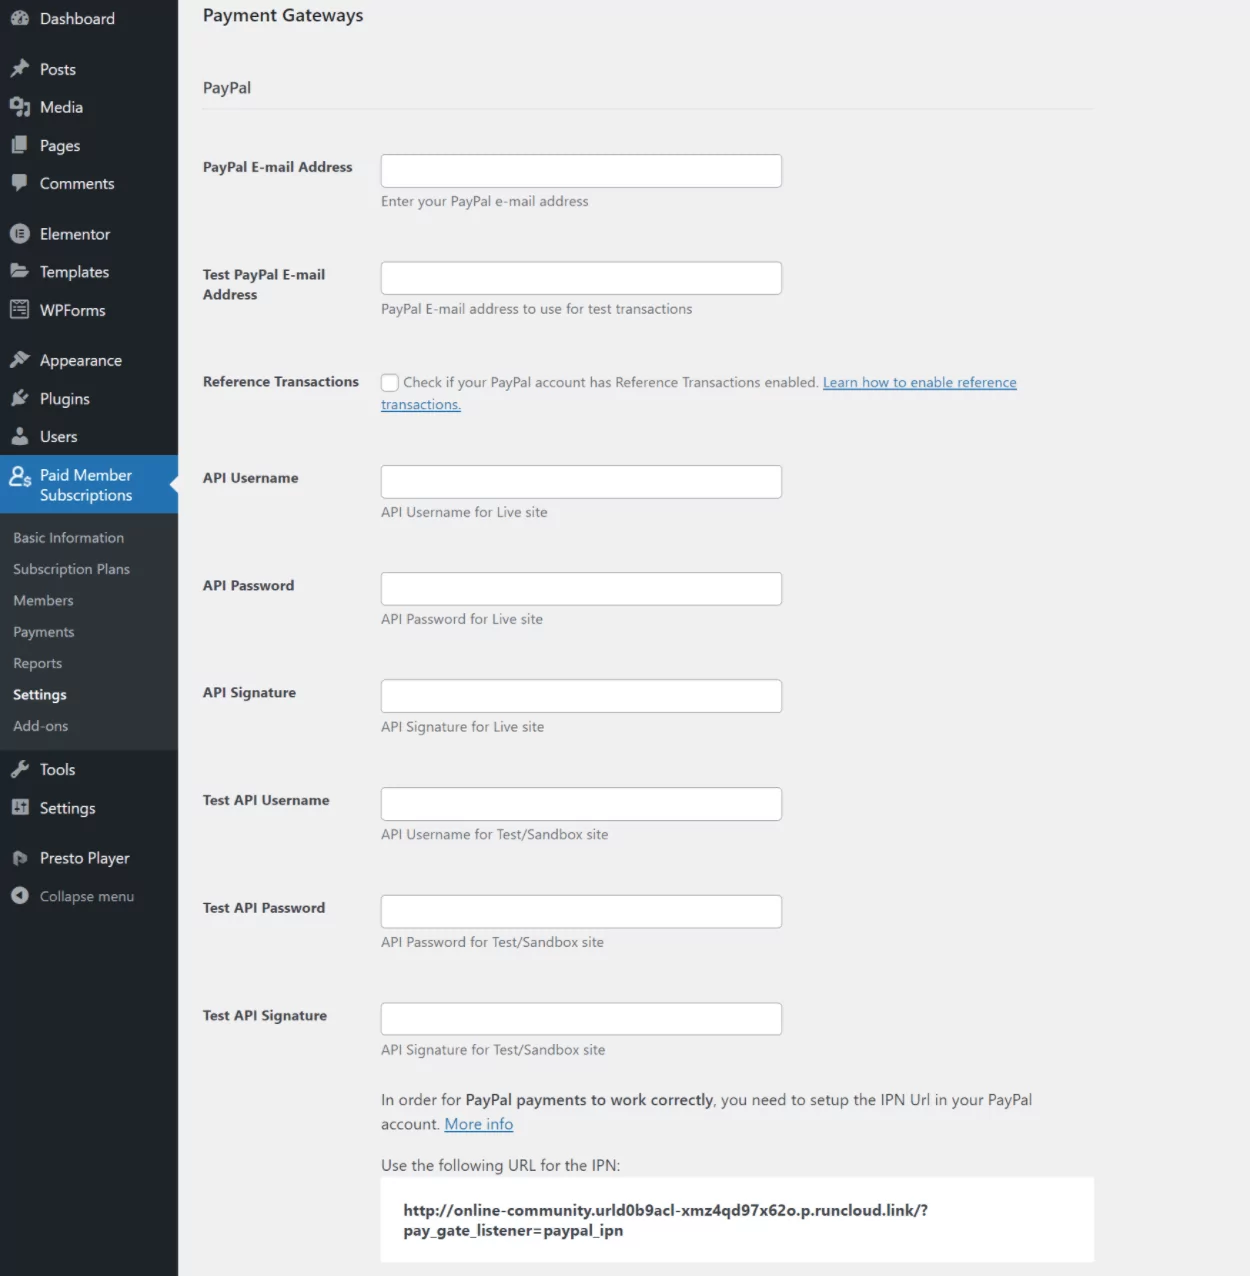
Further down the page, you’ll need to enter the credentials to connect your website to that payment gateway. Paid Member Subscriptions maintains documentation for how to connect to all of the gateways that it supports:
3. Create Your Membership Levels
Once you’ve configured the basic settings in Paid Member Subscriptions, you’re ready to start setting up your membership levels.
For a simple online community where all members have the same details, you might only have a single membership level. However, if you want to have multiple pricing/donation tiers and/or give different types of members access to different community content, you’ll want to create multiple membership levels.
You can also mix-and-match free and paid levels. For example, you could have a free membership tier that gives basic access and then one or more paid levels that give exclusive access.
To create your first membership level, go to Paid Member Subscriptions → Subscription Plans → Add New.
First, enter a name for your subscription plan. This is the name that members will see on the registration page. If you’re not sure what to put here, we have a whole guide on naming membership levels.
You can also enter a description below, which will also be displayed on the registration form.
Below that, you can enter the duration and payment details of the membership level (if applicable—you can also make it free).
Feel free to configure all of the pricing and duration fields as needed. However, for the User role field, just leave it as the default:
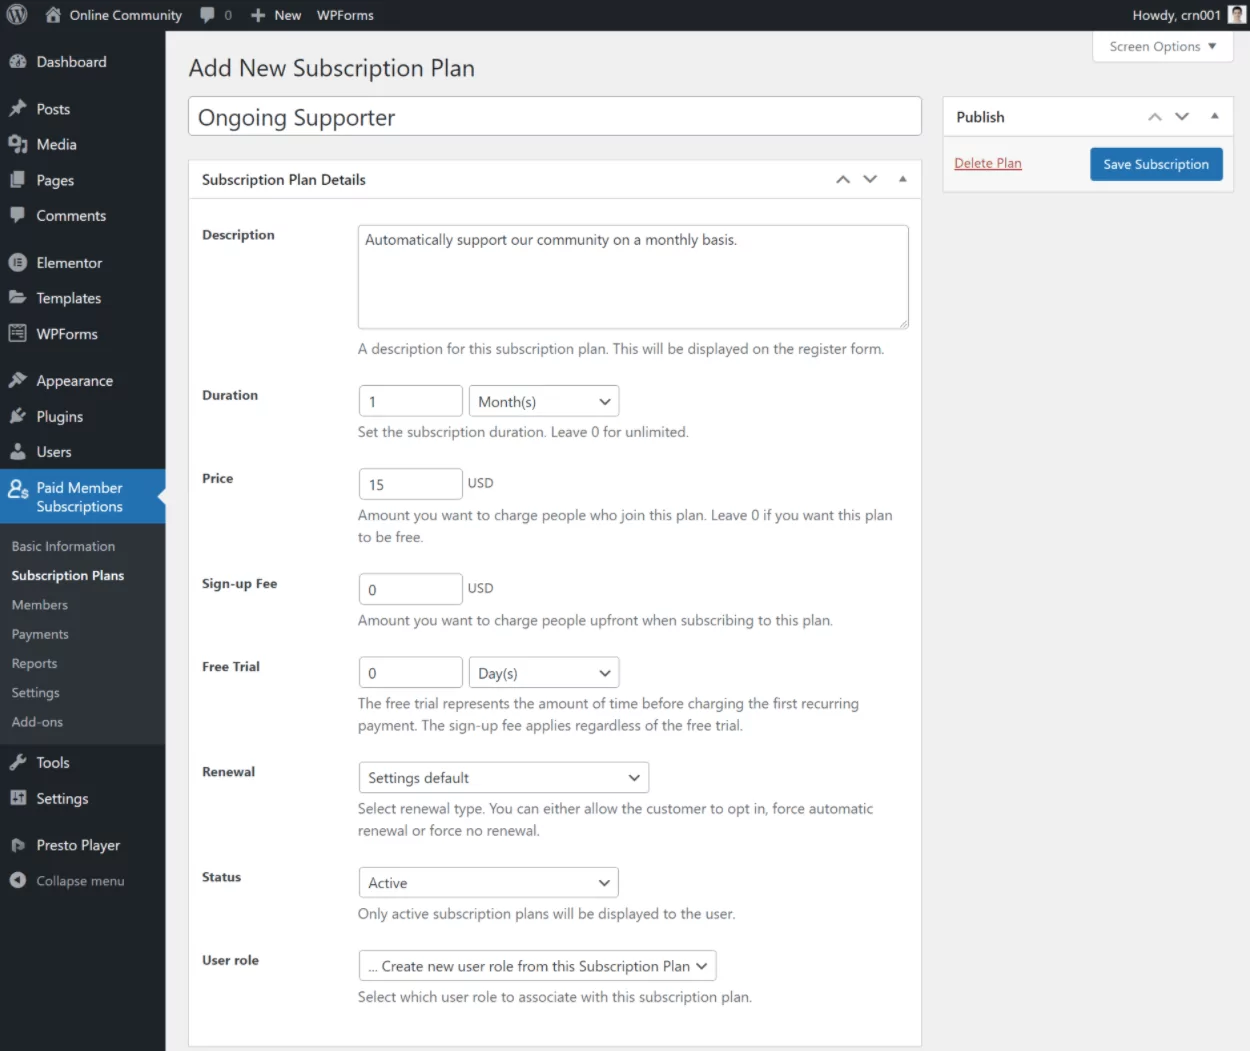
As an alternative to having fixed-price membership levels, you can also activate the Pay What You Want add-on to let community members enter their own prices. This is especially useful if you’re accepting donations rather than charging for access to make a profit as it lets members donate any amount that they’re comfortable with.
Once you’ve made your choices, click the Save Subscription button.
Repeat As Needed to Create Additional Plans
If needed, you can now repeat the same process above to create additional plans that your community members can choose from.
You have two options for adding more plans. You can…
- Create new standalone plans that are separate from the other plans;
- Create “hierarchical” plans that are connected to other plans in an upgrade/downgrade track. If you do this (and you enable the ability for people to change their subscriptions), your community members will be able to upgrade and downgrade between the different tiers in that track.
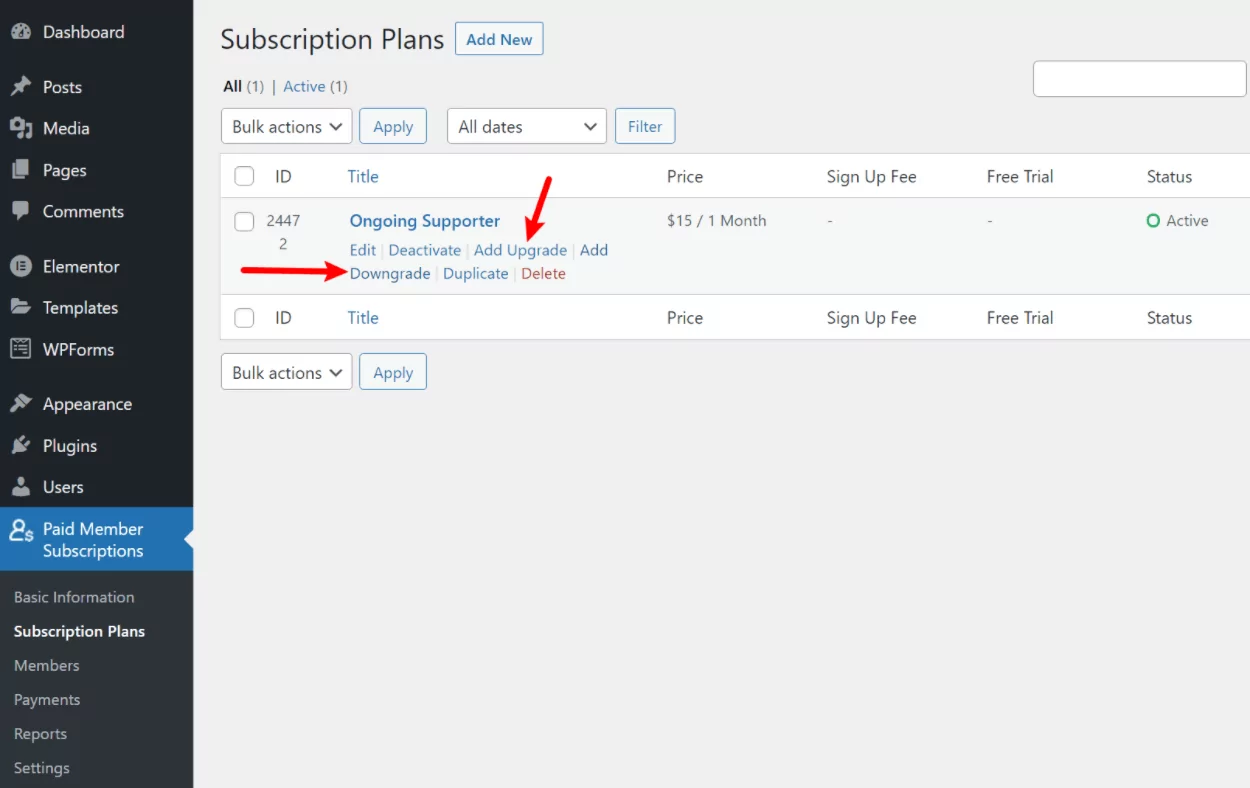
To create standalone plans, just click the Add New button again.
To create upgrade or downgrade plans, hover over your existing plan and click the Add Upgrade or Add Downgrade links, respectively:
4. Restrict Access to Content
Once you’ve created your membership levels, you’re ready to restrict access to content.
When you restrict access to content, that content will only be visible to members who are logged in to your community and have one of the eligible subscription plans.
Other visitors, such as anonymous visitors, will see a customizable prompt. Or, you can redirect unauthorized visitors straight to your registration page to encourage them to join.
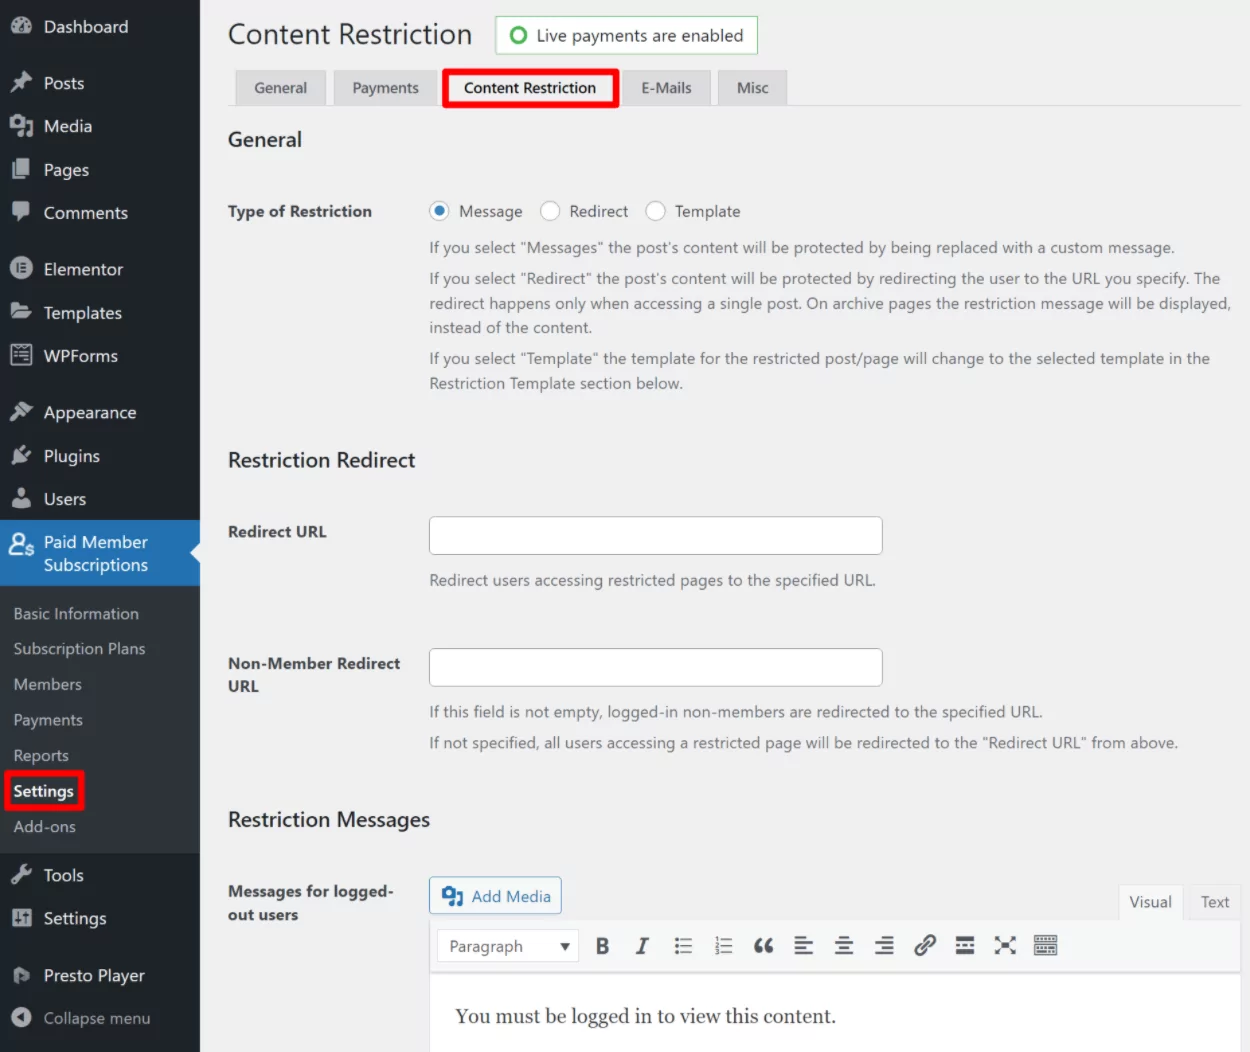
How to Set Up Your Restricted Content Behavior
To set up what to do if an unauthorized user tries to view a piece of restricted content, go to Paid Member Subscriptions → Settings → Content Restriction. Here, you have three options:
- Show a custom message;
- Redirect users to a different page (e.g. your registration page);
- Choose a custom page template.
You can also choose whether or not to show a preview of the restricted content. If you do want to show a preview, you can choose how many words to include in the preview.
Note: you’ll also be able to override these default settings for specific pieces of content as needed.
How to Restrict Access to Individual Pieces of Content
Paid Member Subscriptions gives you two options for restricting content:
- You can manually restrict individual pieces of content, which is available in both the free and paid versions of the plugin;
- You can bulk restrict access to content based on its category, tag, post type, custom taxonomy, and more. This requires the Global Content Restriction add-on in the premium version of the plugin.
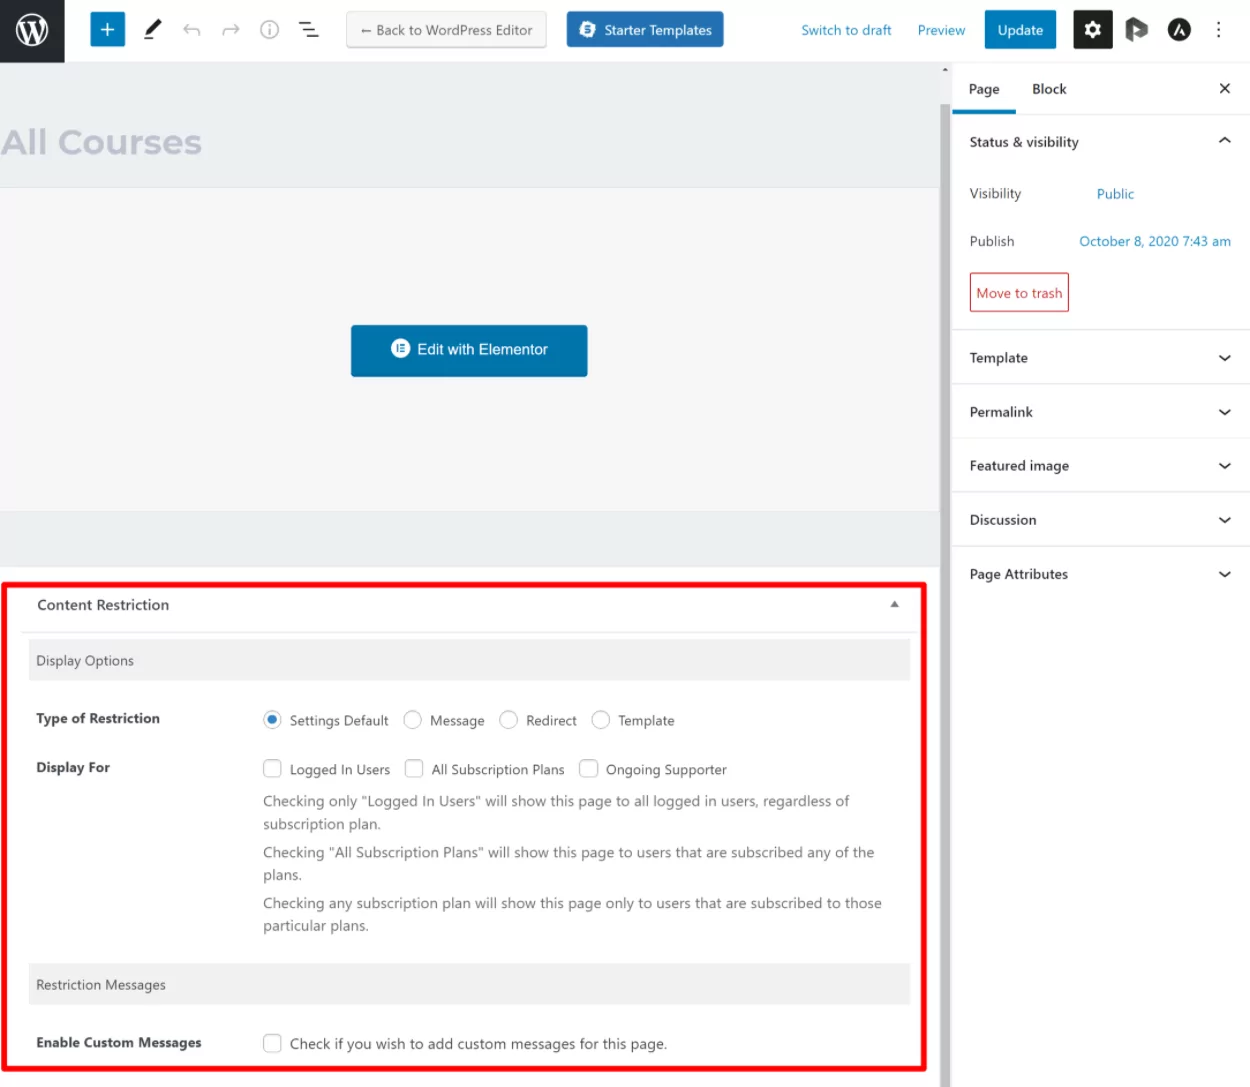
To restrict an individual piece of content, all you need to do is open the editor for that piece of content. Below the editor, you’ll get a new Content Restriction box where you can restrict access for all logged-in users or specific membership levels:
How to Bulk Restrict Access to Content
To bulk restrict access to content, you’ll need the premium version of Paid Member Subscriptions and you’ll also need to make sure that you’ve enabled the Global Content Restriction add-on (go to Paid Member Subscriptions → Add-ons to do this).
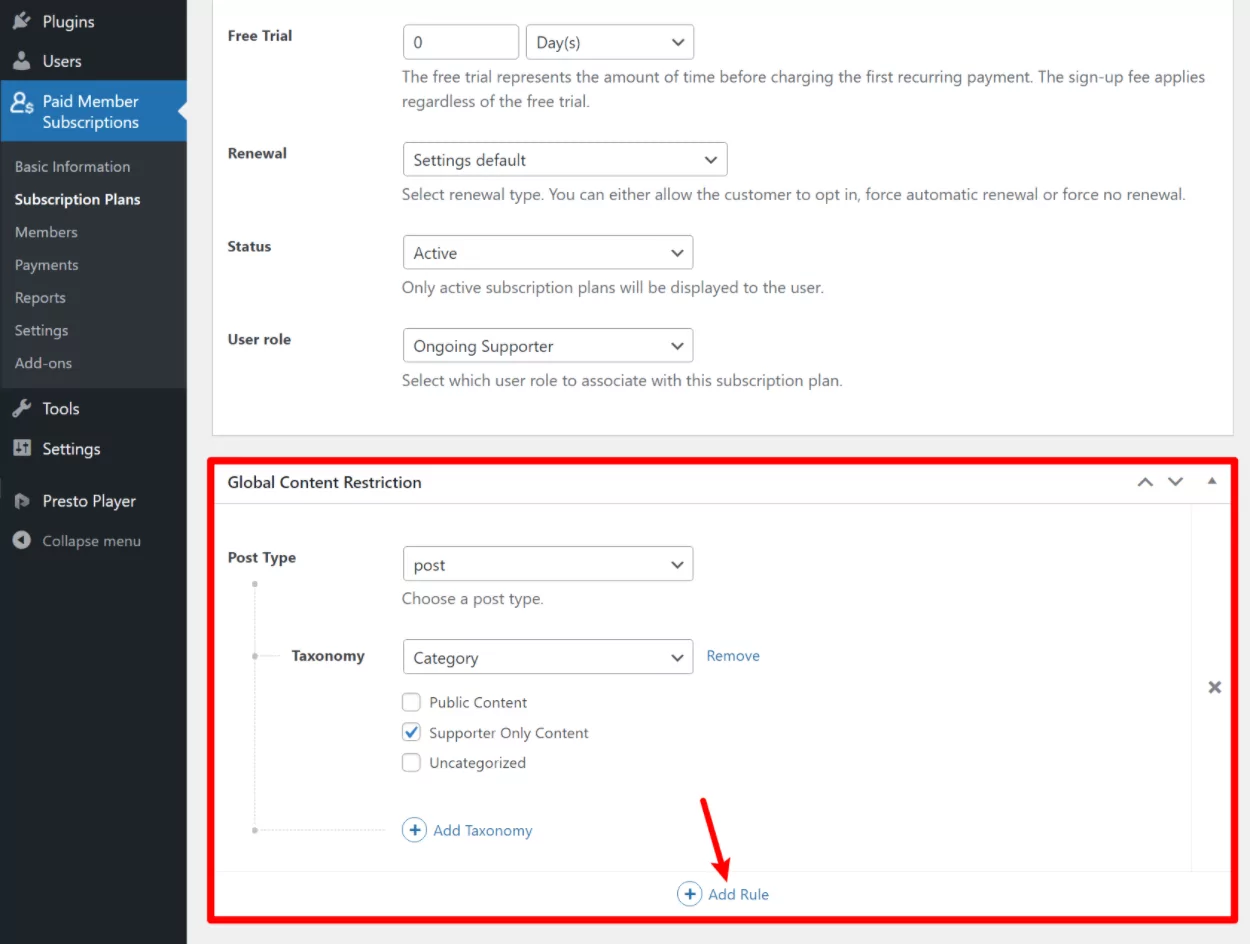
Once you’ve enabled the add-on, go to Paid Member Subscriptions → Subscription Plans and edit the plan for which you want to add a bulk content restriction rule.
Below the plan’s details, you’ll see a Global Content Restriction box that lets you set up one or more rules.
For example, if you select post as the post type and target the “Supporter Only Content” category, then all the blog posts in that category will automatically be restricted.
If you need to add multiple rules, all you need to do is click the Add Rule button:
5. Customize Your Registration Pages (and Other Member Pages)
When you went through the Paid Member Subscriptions setup wizard, the plugin automatically created pages for key user actions such as registration, login, and account management.
However, you might want to edit these pages to include additional content that’s specific to your online community.
To do this, go to the normal WordPress Pages list and edit the relevant page. Here’s the full list of pages that the plugin creates:
- Login
- Password Reset
- Register
- Account
You can then use the WordPress editor to add content as needed. Or, you can also use your favorite page builder plugin.
Just make sure to leave the [pms-register] shortcode, as this is what will actually display your registration form (or the equivalent shortcode for the page that you’re editing):

If you want to collect additional information from your members, you can also integrate Paid Member Subscriptions with the Profile Builder plugin.
Profile Builder comes in both a free and a paid version and it lets you customize the registration page to add or remove user input fields as needed. For example, if you want to collect some custom information from members when they join, you can use Profile Builder to do that.
To learn more about using the plugin, you can read our guide on how to create a custom registration form. If you’re using Elementor, we also have a guide on using Elementor to create a custom registration form.
Finally, there’s also a help article that explains how the Profile Builder – Paid Member Subscriptions integration works.
6. Extend With Other Plugins If Needed
This step is 100% optional. However, you might want to add some additional features to your community such as:
- Discussion boards;
- Private messaging between members;
- Social profiles;
- Etc.
If you do want these features, we recommend considering two additional plugins, both of which integrate well with Paid Member Subscriptions:
- bbPress – use this if you want to add a private forum/discussion board to your community. Learn more about Paid Member Subscriptions’ bbPress integration;
- BuddyPress – use this if you want to add a variety of social media-style features to your community. It also works great with Paid Member Subscriptions, though there’s no dedicated integration.
7. Perform Some Other Housekeeping and Go Live!
At this point, you’re pretty much ready to make your online community website go live. You should have all the important functionality that you need, including registration, membership levels, content restriction, and more.
However, there are also a lot of smaller settings in the Paid Member Subscriptions plugin that you might want to explore to set your community up for success.
You can check these out by browsing the add-ons and then going to Paid Member Subscriptions → Settings to explore all of the settings.
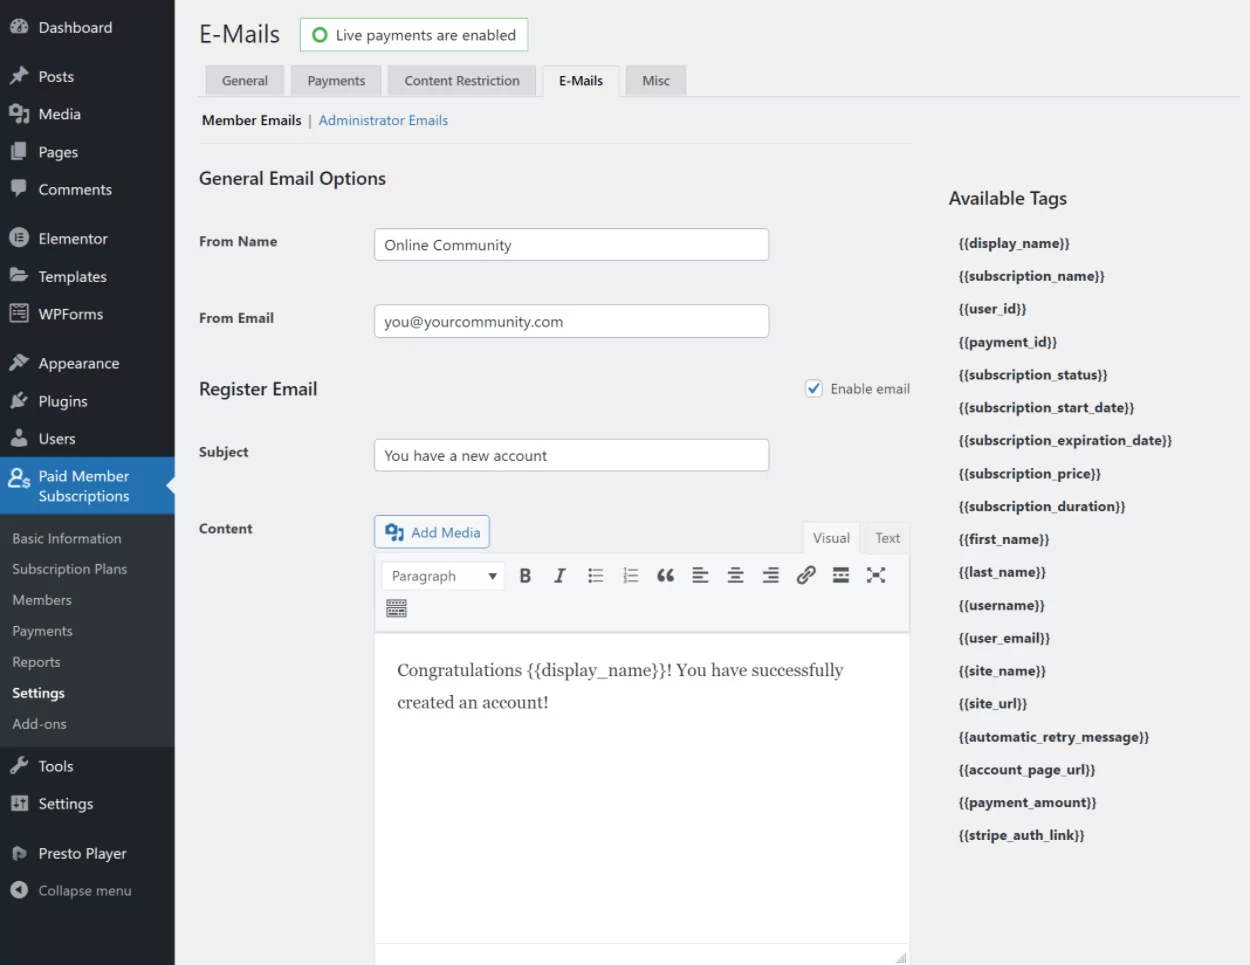
For example, the E-Mails tab of the settings area lets you configure the emails that your site sends to your community members when they register, activate a subscription, and more:
Once people join your online community, you’ll also be able to manage those users by going to Paid Member Subscriptions → Members.
Create Your Online Community Today
That wraps up our guide on building an online community platform with WordPress and the Paid Member Subscriptions plugin.
With these two tools, you can build your own 100% self-owned community website.
You’ll have a direct connection to all of your community members, which means you’re never at the whims of another platform like Facebook.
What’s more, this method doesn’t require any technical knowledge and it’s a lot more affordable and flexible than some of the hosted software community platforms that you might find.
For a simple community site or association website, you can get started with the free version of the Paid Member Subscriptions plugin.
Then, consider upgrading to the premium version of the plugin to access tons of useful features including:
- Automatic recurring payments/donations (vs one-time payments in the free version);
- Flexible membership levels, such as one-time signup fees or free trials;
- Global content restriction (whereas the free version only lets you restrict one piece of content at a time);
- More payment gateway integrations;
- Pay what you want membership levels (great for donation-powered communities);
- …and lots more!
Paid Member Subscriptions Pro
The best WordPress plugin to build a community site or association website.
Get Paid Member SubscriptionsDo you still have any questions about how to build a community website with WordPress? Let us know in the comments and we’ll try to help!
Related Articles

How to Set Up WooCommerce Stripe Subscriptions with Recurring Payments (3 Methods)
Are you searching for a way to set up WooCommerce Stripe subscriptions? Setting up recurring subscriptions is a great way to build regular, dependable revenue for your website. And when it comes to processing payments, Stripe is one of the top options thanks to its competitive fees and flexible feature set. However, WooCommerce doesn't include […]
Continue Reading
5 Best WooCommerce Subscription Plugins
Subscriptions are a very common payment model, but WooCommerce doesn’t natively support recurring payments out of the box. This is where the power of using a WooCommerce subscription plugin comes into play. With this tool, you can start selling memberships, subscriptions, and product bundles. This way, you can increase your income through renewal fees and […]
Continue Reading
Subscription Business Ideas: 10 Ways to Make Money in 2026
Are you after brilliant subscription business ideas to spark your imagination, get your creative juices flowing, and make money in 2026? If that's a yes, you came to the right place. The subscription-based business model has gained tremendous popularity in recent years. According to a report by Statista, e-commerce sales via the subscription model in […]
Continue Reading