

Table of Contents
WordPress lets the website owner determine what each user can do on the site by assigning specific WordPress user roles. These are the WordPress user permissions (or capabilities) assigned to each default user role out of the box.
More specifically, WordPress user permissions define what different user roles can and cannot do on the site. This way, users have varying privileges to add content or administer the site behind the scenes. In addition to this, user permissions prevent a random user (or malicious bot) from logging in and exploiting your site. In this way, user permissions are also essential to your site’s security.
Additionally, WordPress user permissions can also be used to define what custom user roles can do on your website. For example, users with the Moderator user role might have more privileges than those with the custom Member user role.
The easiest way to manage WordPress user permissions and roles is by using a dedicated plugin like Profile Builder Pro’s Roles Editor module.
In this post we’ll go through the basics behind user role and permissions management in WordPress.
- What are WordPress’s default user roles?
- What are WordPress user permissions?
- How to change user permissions?
- How to create custom user roles?
- Is there a user role editor for WordPress?
Let’s take a look.
Profile Builder Pro
Edit permissions for existing WordPress user roles with the Roles Editor from Profile Builder Pro - all in one user management plugin.
Get Profile BuilderDefault User Roles and WordPress User Permissions
WordPress defines six basic user roles in a basic installation. These user roles come with specific permissions to perform up to 60 separate tasks on the site. These permissions are coded into the platform. Some directly relate to the task of publishing web content, others are more concerned with managing what’s on the site. These include:
Super Admin
A Super Admin is the CEO or president of the company site, the one who makes all the big decisions about what the site looks like, what functionality it has, the image the company presents to the world. The Super Admin might be a technical person, but is always the ultimate decision-maker. Super Admins have the power to do anything on the site. For most websites, the Super Admin user looks after all network management on a WordPress Multisite install. These include:
- Add content
- Add new users
- Remove other users
- Select user roles
- Decide what the look and feel of the site is via a theme or custom CSS
- Choose plugins to enhance the site’s functionality
- Edit their user profile
Administrator
The Administrator is usually the technical person who handles the day-to-day administration. The administrator role covers pretty much the same function over the site as the Super Admin, short of taking a site offline. These user permissions include:
- Installing, activating, updating and removing themes and plugins
- Import and export whole sites when changing site hosts
- Add and remove users
- Change a user’s role
- Remove posts, pages and any other content on the site
- Edit their user profile
Editor
As with newspapers, magazines and other traditional media, the WordPress editor role is the gatekeeper who decides what content appears on the site. Depending on the business, and the type of site, the Editor could be a marketing manager, sales director (especially for an e-commerce platform), or customer service professional. They can assign pieces of content to Authors and Contributors. They can also write, publish and delete posts too. Editors also get to moderate comments that come into the site. A WordPress Editor’s user permissions include:
- Creating posts and pages
- Editing posts and pages written by others, before or after publication
- Manage the categories that help readers understand what they can find on the site
- Delete posts and pages, before or after publication
- Edit files, including any image or file in the media library
- Manage links
- Moderate comments
- Edit their user profile
Author
You can think of users in the Author role as being similar to the floor managers in a warehouse-sized store. They can be a public face of the business if they get bylines on their content. An Author’s user permissions are more limited than the other roles we’ve discussed so far. They are:
- Write and edit posts
- Publish their own posts
- Edit posts they’ve written, before or after publication
- Upload files to the media library
- Delete posts they’ve written, even after publication
- Edit their user profile
Contributor
On a WordPress site, Contributors can write posts and articles but don’t have the right to click Publish or change already published posts. Depending on the workflow of the site, Authors or Editors (perhaps both) review a Contributor’s work before the public gets a chance to see it. A Contributor’s user permissions consist of these three:
- Read content on the site
- Write posts to be published
- Delete posts they’ve written before publication
- Edit their user profile
Subscriber
Unlike the other roles listed here, people in this role have very limited access to the WordPress Dashboard. Sites that allow comments on their content typically require some identification before they can comment. Subscribers have completed that identification. Having this category puts up a barrier to bots and spammers. People with the Subscriber user role have the following user permissions:
- Read content on the site
- Edit their user profile
Adding New Users
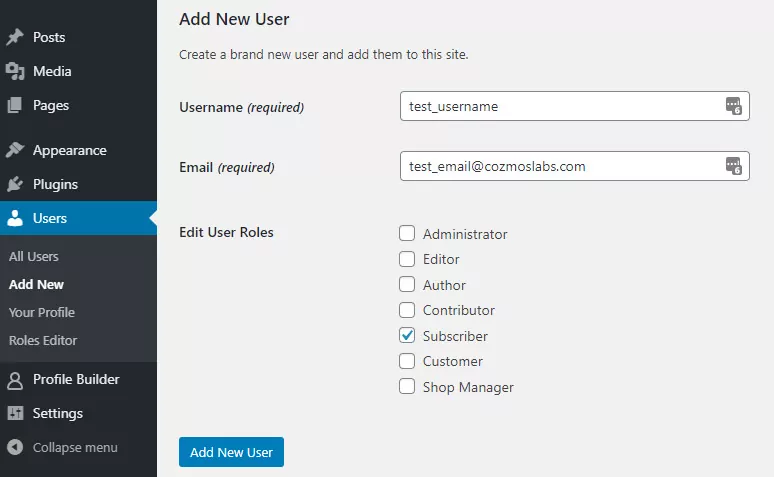
Adding a new user to your site lets you define their role too. Go to Users → Add New. Scroll to Edit User Roles and use the menu to assign the user role you want for that specific user.
You can change the default user role in Settings → General. Scroll down to New User Default Role. Use the drop-down menu to select the role any new user takes on.
You can’t change WordPress user permissions for any of the default user roles. You can promote a Contributor to an Author, but you can’t simply give a Contributor the ability to publish posts or to other capabilities.
You can however use a user role plugin to create custom roles and assign them exactly the permissions you want.
Using Profile Builder for managing User Roles and Permissions
Profile Builder is an all in one WordPress user registration and profile solution, packing a wide variety of user management features, including a built in Role Editor module. Using the plugin you can:
- Create beautiful front-end registration forms for your site
- Gather more information about your users to serve them better
- Create user profile pages and simplify the process of users updating their account information
- Customize and restrict content available to different types of users
- Create a front-end member directory, listing all user profiles
- Setup custom redirects, customize user emails & more
Profile Builder is incredibly easy to setup. For this tutorial you can start out with the free version, which also includes the Role Editor module. The premium version however will give you access to a lot more features and integrations. Go ahead with installing and activating the plugin.
Once the plugin has been activated, you should see the Roles Editor page under Users or under Profile Builder.
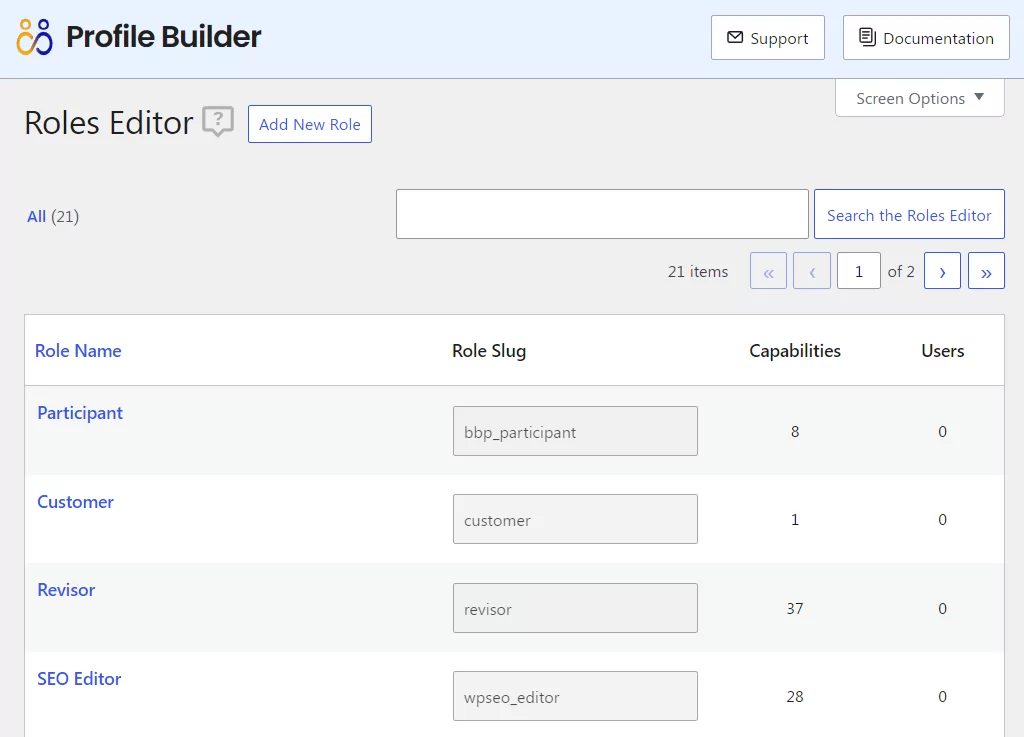
Profile Builder Pro’s built-in Roles Editor module is intuitive and easy to use. You can use it to:
- Edit existing user roles
- Create custom user roles giving them the permissions you want
- Clone or duplicate user permissions to a new user role
- Delete user roles
In addition to this, the plugin also gives you the option to edit the user role slug and add (or remove) the capabilities assigned to a particular WordPress user role using its built-in capability manager.
Adding WordPress User Permissions to a Role
Let’s say as the website admin you might want to give your editors additional capabilities. Here’s how you can do that with Profile Builder:
- In your WordPress Dashboard, go to Users → Roles Editor.
- Click the Edit link under the “Editor” user role. The Edit Role page opens.
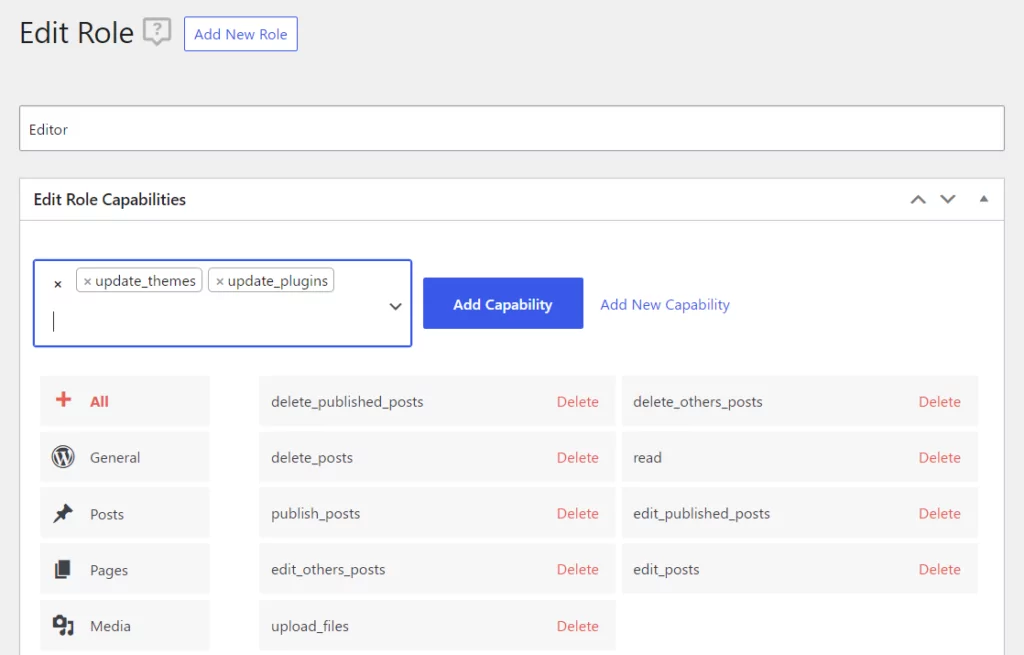
- You want to give the Editor role the ability to update the site when a theme or plugin fixes a security issue or adds new functionality. Click in the Select Capabilities edit box, just under Edit Role Capabilities. A drop-down menu appears listing all available capabilities.
You can scroll through the list to find the power you want to give your editors (update_plugins and update_themes in this case), or start typing in the item; if you type update, you’ll discover that a third capability, update_core, is also available. Note that Roles Editor will gray-out any ability the role already has. - Click Add Capability when you’re done. You’ll see the list of all capabilities that the Editor role has. Notice that the Update items that you just added are in blue. That means you’re not done yet.
- Should you want to remove some abilities from the Editor, click Delete next to the existing capabilities.
- When you’re done editing the existing role, click Update on the right side of the page to confirm your changes.
Creating a New (Custom) User Role
While the original set of user roles is pretty comprehensive, you may wish to create unique roles and permissions that perfectly fit your website needs.
Profile Builder offers two ways to create a new user role. You can click Add New Role at the top and start identifying permissions. If you see a default role whose permissions look almost right for this new role, Profile Builder will let you clone WordPress user permissions. In this example, we’ll play with the Contributor role.
- On the main Roles Editor page, place the mouse on the Contributor role. Click Clone. The Add New Role page appears.

- Name the new role. You’ll notice that the Contributor capabilities are already listed in this new role’s capabilities list. Let’s add to this list.
- In the Add Capability edit box, type “page.” Items affecting WordPress pages appear in the drop-down menu.
- Control-click the items you want to give the new role. Let’s say this person should have the ability to read everything on the site, edit their own output, and edit anyone else’s output. Don’t let them delete any content in the process or publish.
- When you’re done adding Page-related activities, type “post” and repeat the same rules.
- Click Add Capability, and all the added items appear on the list, once again in blue.
- Click Publish.
Conclusion: WordPress User Permissions
Having the right WordPress user permissions in place will make your job much easier. WordPress user roles and permissions offer powerful tools to control the set of tasks that each user role is allowed to perform.
The Profile Builder Pro plugin comes with the Roles Editor module that gives site owners more power and flexibility in setting up and managing user roles.
Profile Builder Pro
Edit permissions for existing WordPress user roles with the Roles Editor from Profile Builder Pro - all in one user management plugin.
Get Profile BuilderYou can better define “who does what” in your organization and map those roles to WordPress’ structure giving different user roles the permissions they need to do their jobs. All this, while also maintaining control and increasing security on your website.
Related Articles

8 Best WordPress User Registration Plugins
Not sure what WordPress user registration plugin to use for your project? Going through all the WordPress user registration plugins can be disorienting. You may have spent hours and hours searching for plugins and tutorials to help you with your project, and you’re still as confused as you were when you started. Imagine finding the […]
Continue Reading
How to Customize WordPress Email Login Behavior (+ Registration)
Searching for a WordPress email login feature so that you can customize your site's login process, such as requiring users to use their email address instead of a username? By default, WordPress lets users log in with either their username and password or their email and password via the default login page. But if you […]
Continue Reading
How to Password Protect Content, Posts, and Categories in WordPress
There are many use cases for password-protected content in WordPress. For example, you might be a content creator who wants to monetize premium content in the form of subscriptions or memberships. As with everything related to WordPress, password-protecting posts doesn’t have to be difficult. If you’re wondering how to password-protect WordPress content, posts, and even […]
Continue Reading