

Table of Contents
- 1 An Overview of How to Create a WordPress Demo Site with Multisite
- 2 Creating a Demo Subdomain to the Main Domain
- 3 Installing WordPress Multisite
- 4 Setting up Available Plugins, Widgets, and WordPress Theme Options for the Network
- 5 Replacing the WordPress Sign-Up Form with a “Create Demo” Button
- 6 How to Create a WordPress Demo Site with Multisite
- 7 How to Further Improve Our WordPress Demo Site Setup
- 8 Conclusion
Creating a WordPress demo site with Multisite is a smart way to let potential customers try out your WordPress theme, widget, or plugin. This can be much more effective than presenting screenshots and descriptions of how your plugins or themes work. That’s because a demo site gives potential buyers and customers the option to test these tools in real-life environments.
Setting up a demo site for WordPress plugins and widgets or WordPress themes can be as simple as installing WordPress and giving everyone a demo account. You could also set different theme options for a specific experience. This approach, however, comes with several drawbacks, including the following:
- Anyone can overwrite what the other testers did, which can lead to a messy demo site
- You have to reset or delete demo sites periodically to avoid having dozens or hundreds of sites
- Demo sites can impact your SEO negatively, depending on how you set them up (we’ll show you how to avoid this)
- Your contact forms might start getting more spam
Alternatively, you can use a plugin to set up demo sites. However, this approach can be limiting since you depend on the features and user management tools the plugin provides. With that in mind, we went ahead and developed an in-house solution, which we’ve also made available as a plugin.
With our approach and WordPress Multisite, you can let users modify, delete, or upload content on a demo site. The sites are unique to each user and they can do some level of customization on the sites.
Keep in mind that other WordPress demo solutions can sometimes limit what users can do in the dashboard. That means they might not be able to test plugins, themes, or widgets adequately.
An Overview of How to Create a WordPress Demo Site with Multisite
- Creating a demo subdomain to the main domain
- Installing WordPress Multisite
- Setting up available plugins and themes
- Replacing the complex WordPress sign-up with a simple “Create Demo” button (custom plugin) that will:
- Further improving our setup by hiding certain back-end menus and using a site template so all new WordPress demo sites are all the same
- Update: Delete sites after 24 hours
- Conclusion
To see how demo sites work with our solution, check the Profile Builder and Paid Member Subscriptions demo pages. There are options to launch demos for either plugin on their respective pages. These demos launch in fully functional WordPress sites, with all of the plugin’s features available.
Those demo sites are using the code we’re sharing with you in this article. We’re also sharing the plugin version if you prefer not adding code to the site. With that in mind, let’s go over how to create demo sites!
Creating a Demo Subdomain to the Main Domain
Let’s start by discussing how you can create a demo subdomain to the main domain.
Since this is fairly dependent on the hosting you currently have, we’re not going into much detail here. If you use a hosting plan that offers a cPanel setup, here’s an overview of how the process works:
- Open cPanel and create a new sub-domain
- Give it a name such as ‘demo’
- Create a database and a database user
- Update the DNS to demo.yoursitename.com
cPanel offers great documentation on how to set up a subdomain. Check it out if you need more guidance on this process.
If your web host uses a custom hosting control panel or other commercial solution, these steps will change. In that case, you’ll need to check the control panel’s documentation to see how setting up a subdomain works.
Installing WordPress Multisite
This tutorial will only work if you’re using WordPress Multisite. This section will contain quick instructions for setting up a Multisite network. However, we won’t go in depth, as we don’t want to make this a guide about how to use Multisite for new users.
If you’re new to Multisite, you can read about how WordPress site networks work in the WordPress Developer Resources handbook. When you’re ready, we can get to work on getting a Multisite setup up and running.
Most WordPress web hosts enable you to use a Multisite setup. If your web host sets up WordPress for you, they might offer an option to do a Multisite install instead of a regular one.
If you already have a WordPress website you want to turn into a Multisite setup, you’ll need to edit the wp-config.php file to enable the feature. To do this, you can connect to the site via FTP, navigate to the root folder and look for the file inside. Once you locate the file, add this code to it before the line that says “That’s all! Stop editing!”.
/* MultiSite */
define( 'WP_ALLOW_MULTISITE', true );
Note that we recommend using a new WordPress installation if you plan on enabling Multisite. This can make the process much easier. That’s because it reduces the chances that the main website will present technical issues.
Once you enable Multisite, you’ll want to define its permalink structure, what plugins other sites get access to and what themes (we’ll also cover this in the next section). If this is your first time using Multisite, check out this section on Multisite network administration from the WordPress Developer Resources documentation, which covers the basics.
Setting up Available Plugins, Widgets, and WordPress Theme Options for the Network
Our Profile Builder and Paid Member Subscription demos include all the add-ons available for the plugins. That means you get to use the Pro versions of those plugins (with the best license available) including all the advanced features and add-ons they offer. Plus, we also make other plugins available for testing with our products.
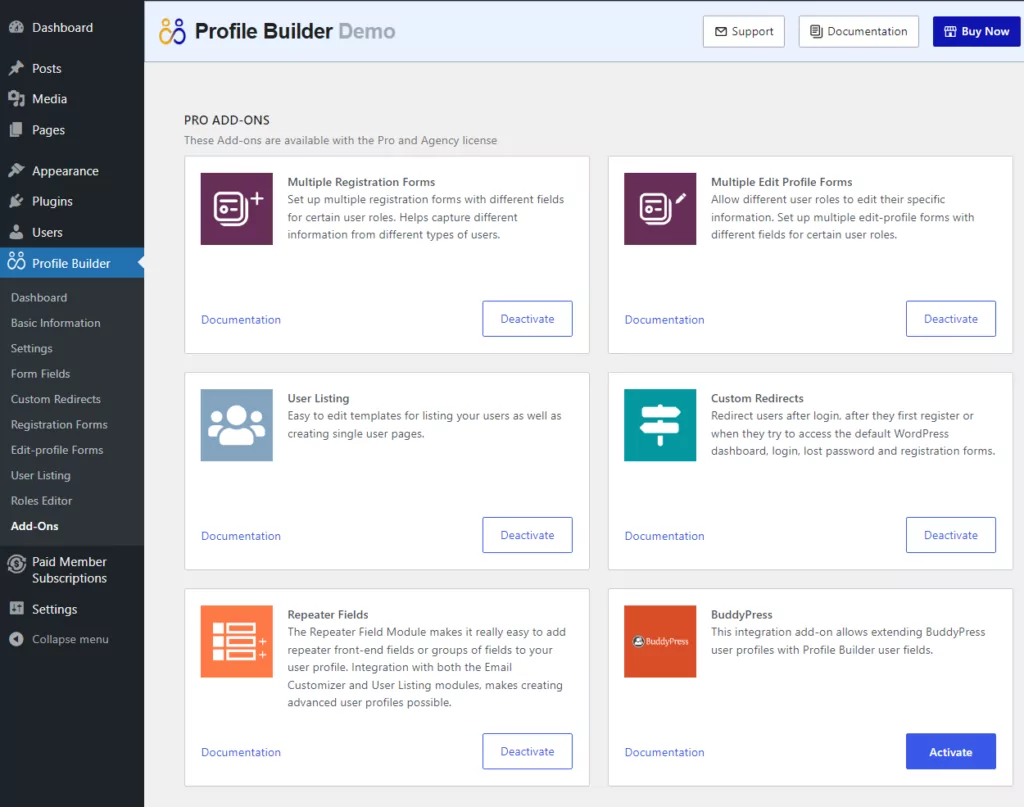
That includes plugins such as WooCommerce, bbPress, BuddyPress, Elementor, TranslatePress, and more. Here’s a quick look at what the Plugins screen looks like in one of our demo sites:
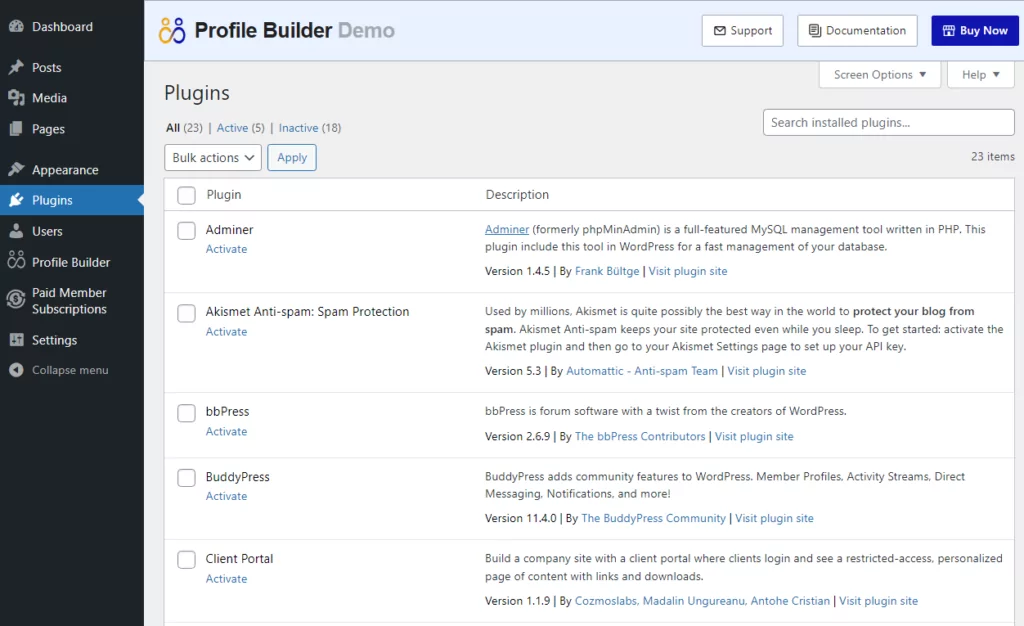
Other sites in the Multisite network don’t have control over what plugins they can install. They can activate or deactivate plugins, but the network administrator is in charge of deciding what plugins and themes are available to them in the first place.
This gives you a great deal of latitude in how you set up these demo sites. You can restrict what tools users get access to, to avoid running into technical errors. Alternatively, you can let users do what they want. In any case, even though users can’t decide what plugins to install or what themes to use, they can configure the options you enable them to use.
Profile Builder Pro
Create beautiful front-end registration and profile forms with custom fields. Setup member directories, custom redirects, cutomize user emails & more using the all in one user management plugin.
Get Profile BuilderReplacing the WordPress Sign-Up Form with a “Create Demo” Button
Users need to interact with a form to set up a demo site and test either Profile Builder or Paid Member Subscriptions. This is a necessary step as using only links could lead to abuse of the demo pages. The form, in this case, acts as a kind of CAPTCHA.
How complex these forms are is up to you. In our case, we decided not to use a traditional signup form to enable users to set up demo sites. That’s because, with a traditional form, users might need to fill out multiple fields, configuration options, and maybe even click on a confirmation link from an email afterward.
Instead, we decided to keep things simple and pose a basic math question to users who want to set up a demo site. If you solve the problem and click on Create Demo, we’ll set up a demo site on the spot for you:
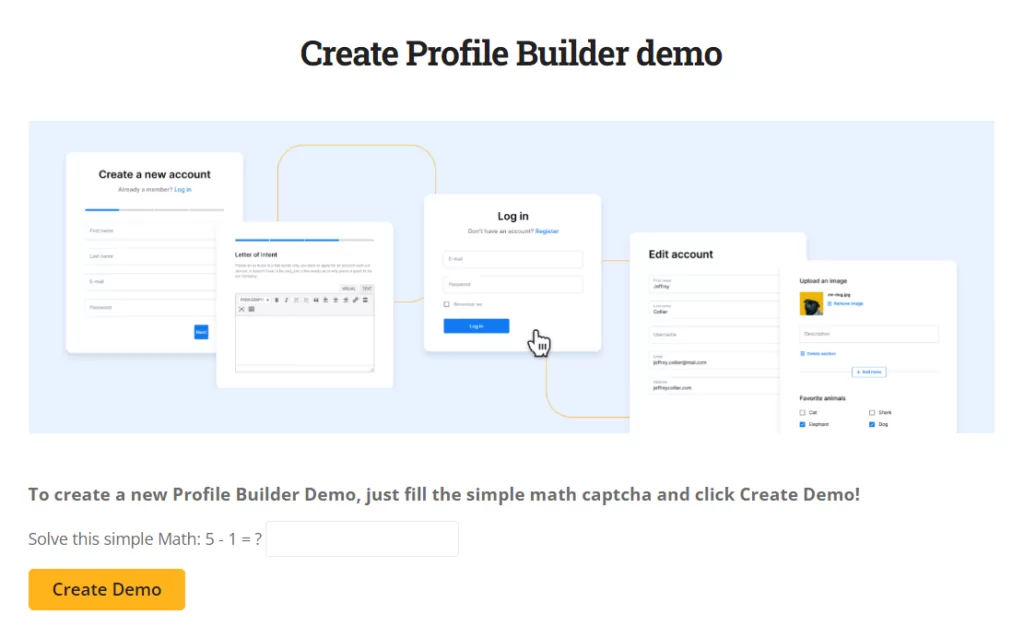
Simplifying the demo creation process can also encourage users to test this option. Complex setup forms can be overwhelming for some users, so you want to set as low a barrier to entry as possible.
How to Create a WordPress Demo Site with Multisite
For this guide, we’re going to go over how to create a WordPress demo site with Multisite using a plugin. Then we’ll explain how the plugin works and what its code does since we developed it ourselves.
If you want to use the finished plugin, you’ll find a link to it in the following section. If you want to put the code into action yourself, keep reading until you get to the breakdown of how it works.
Use The “Create Demo Sub-Sites” Plugin
If you don’t want to go through all the hassle of creating a custom plugin and copy-pasting the code, you can download a working version of the plugin from this link:
Download Create Demo Sub-Sites
That plugin uses the same code you’ll see throughout the rest of the tutorial.
You can then add the [cds_register] shortcode in your main network site through a page builder which helps your SEO by keeping all of your demo content fast. You can update the styling in the customizer.
How the Code for the “Create Demo Sub-Sites” Plugin Works
The plugin contains four main parts:
- The register shortcode where we create the new user and subsite
- A function to login new users into their respective demo sites automatically (so they don’t have to deal with login screens)
- The math-CAPTCHA library and a few small functions to glue everything together
- Deleting the site automatically after a while
If you’re not comfortable dealing with code, we recommend that you use the plugin we’ve made available. This next section is geared toward users who want to set up a custom plugin and perhaps make changes to our code to fit their needs.
The “Create Demo Site” Shortcode
The main functions on which we’re relying are wpmu_create_user and wpmu_create_blog. These are functions specific to WordPress Multisite:
// Add a Simple Math CAPTCHA
include_once('MathCaptcha.php');

// Need sessions for the Math CAPTCHA
add_action('init', 'cds_start_session');
function cds_start_session(){
	session_start();
}

// Create the shortcode that will output the Create Demo button.
add_shortcode('cds_register', 'cds_register');
function cds_register(){

	$cpa = new MathCaptcha();
	if(( 'POST' == $_SERVER['REQUEST_METHOD'] ) && ( $_POST['cbs_action'] == 'cbs_demo' )){
		$captcha_val = $_REQUEST['captcha'];

		if( ! $cpa->validate($captcha_val) ){
			return '
Incorect Captcha. Please try again. You will be redirected in 3 seconds

'; } // MultiSite domain $main_site = DOMAIN_CURRENT_SITE; do { $rand = 'demo' . cbs_rand_string(); if( is_subdomain_install() ) { $newdomain = "{$rand}.$main_site"; $path = '/'; } else { $newdomain = $main_site; $path = PATH_CURRENT_SITE . "{$rand}/"; } } while( username_exists($rand) && domain_exists($newdomain, $path) ); // Create the new user $username = $rand ; $email = $rand . '@mailinator.com'; $password = 'demo'; $user_id = wpmu_create_user( $username, $password, $email ); if( is_wp_error( $user_id ) ){ return '

The new demo account could not be created. Please try again. (You will be redirected in 5 seconds)

'; } // Create the new sub-site $title = 'Demo'; $blog_id = wpmu_create_blog( $newdomain, $path, $title, $user_id , array( 'public' => 1 ) ); if( is_wp_error( $blog_id ) ){ return '

The new demo account could not be created. Please try again. (You will be redirected in 5 seconds)

'; } $location = get_site_url( $blog_id ); $nonce = wp_create_nonce( 'cds_autologin-'.$user_id.'-'.(int)( time() / 60 ) ); $location .= "/?cds_autologin=true&uid=$user_id&_wpnonce=$nonce"; return " window.location.replace('$location'); "; } else { $cpa->reset_captcha(); ob_start(); ?>
What we’re doing here is:
- Check to see if the button has been clicked ($_POST[‘cbs_action’] exists and it’s cbs_demo).
- Randomly generate the username and the domain name by verifying again and again until we find a pair that doesn’t exist in our install.
- Create the username. The email of the demo admin account is a mailinator.com account, so it’s easy to test emails sent by the WordPress website.
- Create the WordPress demo e-commerce site.
- If everything is successful (the CAPTCHA is correct and we could create both the user and the domain), redirect the user to the newly created demo WordPress website. Here we’re constructing a nonce that’s based on the new user ID and contains the current UNIX time in minutes.
With that function ready, let’s move on to discussing automatic user logins. That is an exciting feature because it means you won’t have to set up login forms for users.
Set Up Automatic User Logins
We’re doing this by using the wp_set_auth_cookie that takes as a parameter the user ID we’re sending in the $_GET request as a parameter.
Now, we don’t want to let everyone log in just by adding ?$uid=2134 in the URL, so we’re relying on the nonce setup after a successful user and demo content creation.
if ( ! ( wp_verify_nonce( $nonce , 'cds_autologin-'.$uid.'-'.(int)( time() / 60 ) ) || wp_verify_nonce( $nonce , 'cds_autologin-'.$uid.'-'.(int)( time() / 60 ) - 1 ) ) ){
	wp_redirect( $current_page_url );
	exit;
}
Basically, if there’s been more than one minute since the initial nonce creation in the shortcode, we’re not logging in the user. Since nonces are unique, it’s practically impossible for somebody else to randomly login to the site, even on mobile devices.
/*
 * Setup Autologin after creation of demo site
 */

/* Set action for automatic login after registration */
add_action( 'init', 'cds_autologin_after_creation' );
function cds_autologin_after_creation(){
	if( isset( $_GET['cds_autologin'] ) && isset( $_GET['uid'] ) ){
		$uid = $_GET['uid'];
		$nonce  = $_REQUEST['_wpnonce'];

		$arr_params = array( 'cds_autologin', 'uid', '_wpnonce' );
		$current_page_url = remove_query_arg( $arr_params, cds_curpageurl() );

		if ( ! ( wp_verify_nonce( $nonce , 'cds_autologin-'.$uid.'-'.(int)( time() / 60 ) ) || wp_verify_nonce( $nonce , 'cds_autologin-'.$uid.'-'.(int)( time() / 60 ) - 1 ) ) ){
			wp_redirect( $current_page_url );
			exit;
		} else {
			wp_set_auth_cookie( $uid );
			wp_redirect( $current_page_url . 'wp-admin/' ) ;
			exit;
		}
	}
}
These are the two functions at the core of the plugin. However, there are also other issues that need to be addressed, such as what happens to the demo sites after users are done with them.
Deleting Sites After 24 Hours
If you enable users to create demo sites on demand, you’ll end up with a lot of them. Most users will move on after testing the features they need. That means you can safely delete these sites after a while without worrying too much about it.
While you can do this manually from the Multisite Admin dashboard, it makes more sense to automate the process. In our case, we set up an hourly cron that will call a function to delete subsites older than 24 hours. The cron is registered on plugin activation and removed on plugin deactivation.
Keep that last part in mind when debugging. If your plugin is already active when you are adding this code, then deactivate the plugin and activate it back.
The function that does the deleting makes two checks for each subsite in order to decide if it should be removed:
- If 24 hours have already passed since the site creation;
- If the super admin is not a member of the site. This will ensure that the sites created by the super admin, such as the main blog or any other subsites you wish to keep alive, are safe from removal.
If these 2 conditions are true, the subsite is deleted. Now here’s the code:
/**
 * Schedule event hourly to delete old subsites
 */
register_activation_hook( __FILE__, 'cds_cron_to_delete_subsites_activation' );
function cds_cron_to_delete_subsites_activation() {
	wp_schedule_event( time(), 'hourly', 'cds_check_subsites_hourly_event' );
}

register_deactivation_hook ( __FILE__, 'cds_cron_to_delete_subsites_deactivation' );
function cds_cron_to_delete_subsites_deactivation() {
	wp_clear_scheduled_hook( 'cds_check_subsites_hourly_event' );
}


/**
 * Delete subsites registered for more than 24 hours
 *
 * Only deletes subsites where super-admin is not part of the site's users
 */
function cds_check_subsites_for_deletion() {

	require_once( ABSPATH . 'wp-admin/includes/admin.php' );
	// get sites
	global $wpdb;
	$args = array(
	    'network_id' => $wpdb->siteid,
	);
	$sites_array = wp_get_sites( $args );
	$current_time = current_time( 'timestamp' );

	foreach ( $sites_array as $site ){
		// get each blog's users and check if super-admin is the creator so that it will not be deleted
		$user_args = array(
			'blog_id'		=> $site[ 'blog_id' ],
			'fields'		=> 'ID',
		);
		$users = get_users( $user_args );

		$delete_this_site = true;
		foreach ( $users as $user ){
			if ( is_super_admin( $user ) ) {
				$delete_this_site = false;
				break;
			}
		}

		$register_time = strtotime( $site[ 'registered' ], current_time( 'mysql' ) );
		$time_since_registration = $current_time - $register_time;

		// if the site has been created for more than 86400 seconds = 24 hours, delete it
		if ( $delete_this_site && ( $time_since_registration > 86400 ) ) {
   			if( ! function_exists( 'wpmu_delete_blog' ) ) return;
			wpmu_delete_blog( $site[ 'blog_id' ], true );
		}
	}
}
add_action( 'cds_check_subsites_hourly_event', 'cds_check_subsites_for_deletion' );
With that code in place, you have all the main functions that power the plugin. Now it’s time to move on to the smaller details, such as generating names and users for the demo sites on demand.
Tying All the Functions Together
The rest of the code consists of the function that generates the random username/domain name and a function that finds the current URL so we can redirect to it in order for the login cookie to take effect and the user to be logged in.
// A simple and almost random string generator
// We don't really need 100% random strings, so SHA1 will do just fine
function cbs_rand_string($length = 8)
{
	return substr(sha1(rand()), 0, $length);
}


function cds_curpageurl() {
	$pageURL = 'http';

	if ((isset($_SERVER["HTTPS"])) && ($_SERVER["HTTPS"] == "on"))
		$pageURL .= "s";

	$pageURL .= "://";

	if ($_SERVER["SERVER_PORT"] != "80")
		$pageURL .= $_SERVER["SERVER_NAME"].":".$_SERVER["SERVER_PORT"].$_SERVER["REQUEST_URI"];

	else
		$pageURL .= $_SERVER["SERVER_NAME"].$_SERVER["REQUEST_URI"];

	if ( function_exists('apply_filters') ) apply_filters('wppb_curpageurl', $pageURL);

	return $pageURL;
}
That’s it! If you have problems with the code, remember that you can download a working version of the plugin from the previous section.
How to Further Improve Our WordPress Demo Site Setup
We now have a very nice setup where users can create new WordPress demo sites on the fly, without having to enter username/passwords/emails, etc. Instead, they just have to answer a simple math puzzle.
This a great start. However, if you want to offer a more polished demo experience, there are other things you can do. That includes offering things like WooCommerce integration and the ability to use the Customizer.
It’s also a good idea to have some kind of support team in place for when users have questions. They can help users test out product pages, use the demo importer, and choose the best theme and theme Customizer. A couple of themes to consider include Divi and Elementor.
That said, we’re now going to go over two simple ways to improve your WordPress demo setup.
Create a WordPress Demo Site Template
New WordPress sites tend to look very barebones. That may be alright for some demo sites, but you can offer a much more impressive user experience by using “templates”.
By a template, we mean a design that will apply to all new demo sites created through your website. That way, every user will get to tinker with a demo site that not only includes the WordPress tools they’re interested in, but that also looks great.
For this, we’ve used the Multisite Cloner WordPress plugin. It hasn’t been updated in quite some time, however, it still works great for what we need, like copying the settings, pages, posts, widgets, and menus to every new WordPress demo site created and can be used in your page builder, like Elementor.

The plugin is fairly easy to configure. Once you activate it, go to Settings → Multisite Cloner. Here’s the plugin’s settings page:
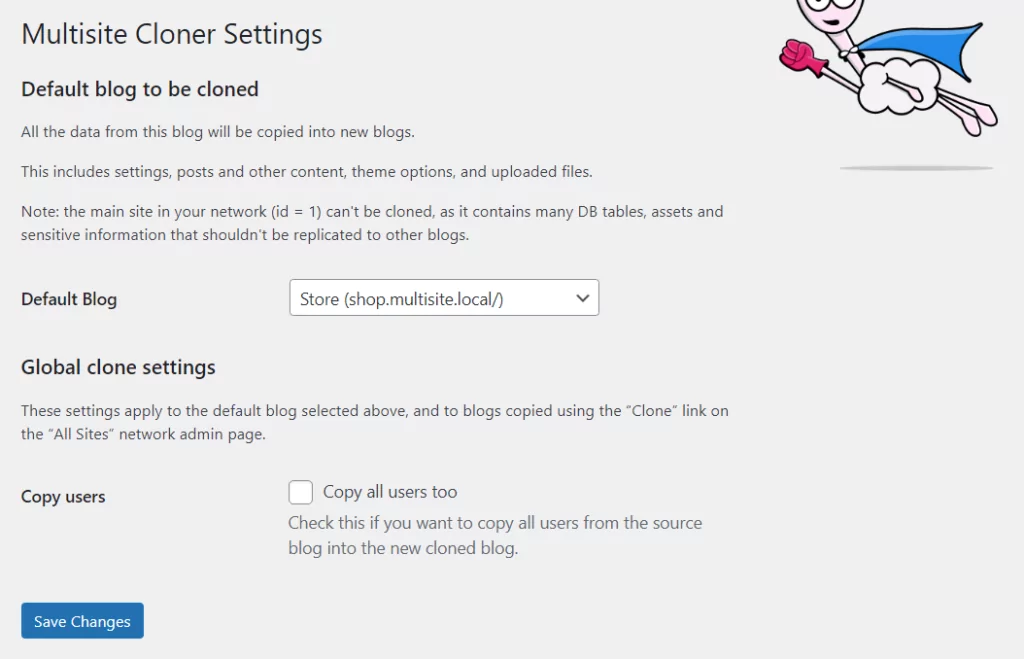
You only need to configure the setting that says Default Blog. The drop-down menu for this setting will include a list of the sites in the network. Select a site to use as a template and that’s it. Every time you add another site to the network, it’ll automatically use the template you set with the plugin.
Hide Back-End Menus from the Demo Site
Now, let’s talk about hiding some dashboard menu items for demo users. Demo users might need the full set of WordPress features. Or, you might wish to remove some of them to avoid technical issues down the line (users breaking things).
We recommend removing the menu option that enables users to switch between sites. Aside from that, which dashboard items to remove is up to you. We recommend using the Menus plugin for this. Here’s the plugin in action:

You can find the menu selection screen by navigating to Settings → Network Settings. Note that while the plugin hasn’t been updated for a while, it works perfectly and it integrates well with the rest of our solution.
Conclusion
WordPress enables you to do incredibly cool things, such as creating demo sites on demand using a Multisite network. This kind of functionality sounds complicated, but if you take a look at the code we’ve shared, you’ll notice that it comes down to a few key components.
If you want to offer your users or customers the option to create demo sites on demand, you need to solve the following problems:
- Fast and easy demo content creation (with the help of the custom plugin explained above)
- New demo sites should be based on a template
- Hiding admin menus you don’t want/need to be seen (using the Menus plugin)
- Automatic demo site removal after a few days since creation (using a cron)
The Create Demo Sub-Sites plugin enables you to do all of that (except for hiding menu items). We’ve shared the code that powers this plugin in this article. You can choose to download a fully working version of the plugin or take the code and customize it for your needs.
Do you have any questions about how to create WordPress demo sites? Let’s talk about them in the comments section below!
Related Articles

8 Best WordPress User Registration Plugins
Not sure what WordPress user registration plugin to use for your project? Going through all the WordPress user registration plugins can be disorienting. You may have spent hours and hours searching for plugins and tutorials to help you with your project, and you’re still as confused as you were when you started. Imagine finding the […]
Continue Reading
Roundup of WordPress ecosystem #1 – January 2017
After writing the article "Overview of the WordPress Community in 2016" and getting feedback for the article on various platforms, I decided to continue writing them, but I changed its name into "Roundup of WordPress ecosystem". This is the first article from a monthly series that will showcase what happened around the whole ecosystem in […]
Continue Reading
Roundup of WordPress ecosystem #2 – February & March 2017
There were two interesting months within the WordPress ecosystem with events that are here to impact the course and development of the platform. We saw WordPress getting important security updates and a brand new design for the plugin repository and also witnessed to a significant acquisition. With this being said, let's dive into the summary […]
Continue Reading
Thanks for this amazing article!
Agreed!
Is it possible to create a demo user that can see what an administrator sees but all changed they made get deleted from the database after say 60mins?
Hi Adam,
That’s exactly what this tutorial walks you through. All demo sites log you in as an administrator.
You can check out our own demo site for Profile Builder to see how that works: https://demo.cozmoslabs.com/profilebuilder/
Hello Cristian, thanks for the article and plug-in. Because Replicator plug-in does not work anymore is there another plug-in which works together with your plug-in?
Because now on my multisite there is a new demo user/site created with your plug-in but without all the settings from the original site. Hope this is clear to you what I mean. Thanks!
Hi Damiaan,
Can you please tell me what doesn’t work? We’re using it for our https://demo.cozmoslabs.com/ and it’s still working fine.
Can you check to see if there’s something that’s not configured correctly? Or if the Replicator plugin is active?
Great article!
We have build a service for this purpose, it’s free for a limited capacity.
I hope I am allowed to post the link: https://wpdemo.cloud/
thanks for this article!
I just don’t understand one thing. In your https://demo.cozmoslabs.com/ you have three products to demo. Do you have a multisite installation for each of those?
Or you just have one multisite installation (with subdomain ‘demo.’) and then three pages from where to create the demo websites for each product? In the latter case how do you set WordPress to create new sites with different templates for each of these three products?
I set up everything but I miss this bit, basically how to get the following scenario:
demo.wp.com
demo.wp.com/plugin-a/ (will create based on template `plugin-a`)
demo.wp.com/plugin-a/demo121a
demo.wp.com/plugin-a/demo122a
demo.wp.com/plugin-b/ (will create based on template `plugin-a`)
demo.wp.com/plugin-b/demo123b
demo.wp.com/plugin-b/demo124b
demo.wp.com/plugin-c/ (will create based on template `plugin-a`)
demo.wp.com/plugin-c/demo125c
demo.wp.com/plugin-c/demo126c
Thanks again anyway!
Yes, there’s a multisite for each individual one of those!
So this tutorial duplicated three times 🙂
Hi Cristian, thanks for replying!
I see, after I wrote you I started changing everything tweaking your plugin to have each demo domain prefixed the product slug, such as:
demo.wp.com/plugin-b/ (will create based on template `plugin-b`)
demo.wp.com/plugin-b–demo123b
demo.wp.com/plugin-b–demo124b
demo.wp.com/plugin-c/ (will create based on template `plugin-c`)
demo.wp.com/plugin-c–demo125c
demo.wp.com/plugin-c–demo126c
What do you think? DO you see any benefit of having one multisite (like in this case) or having one multisite for each product (like in your current website)?
When I realised I needed a ‘network of networks’ I thought to go for the ‘–‘ slug solution to organize the demos, and then in the homepage demo.wp.com I just list each products.
I would be curious to hear your thoughts!
best
If you can make it work so that one demo site works for all of your products, great! Honestly I haven’t thought of that. Might have been easier this way to manage then 3 multisites.
The bottom line is, figure out what works for you best. We’ve added demos to our products in sequence, so it was easy to just duplicate a multisite in another folder then to write code to take care of different demos in the same instance.
Hey Kuus, If you need to create demos for different products from one multisite network, you can try a ready-made demo builder solution if you want, I recently reviewed it: https://www.getmotopress.com/plugins/demo-builder-plugin-for-wordpress/
If you read this message in time (if cozmoslabs post it), you can actually get is half discounted in terms of Black Friday sale.
Hi,
Nice article. I am going to try this. Just have one question, this will go on creating multiple sites. Is there a way to auto delete the new demo site and user ? Can not find that info here.
Hello Pallavi,
I have updated the article with the full code on how to automatically delete demo sites after 24 hours. Check out the appended update about this topic!
Hi,
Wow..thanks a lot.
Will check that.
Hi,
Is there a way to direct the user to the home page instead of the admin section? I want to demo a page builder so it makes more sense if you go straight to home page.
Hello Luis,
In the cds_autologin_after_creation() function, if you remove the ” . ‘wp-admin/’ ” part from the line ” wp_redirect( $current_page_url . ‘wp-admin/’ ) ; “, it should keep you on the homepage after the demo site is created.
Great article. I have used your method. 1 drawback, images. What are your suggestions on replicating media of site? Does replicator do that, or maybe my hosting service WP Engine is pointing to right directory.
Also, just realized that plugin only works if I had previously logged in as admin. When I use another browser or incognito mode, i get a CAPTCHA invalid error and get redirected.
https://trywpbpm.com/?page_id=1106
Just tested this out and it redirected me correctly at https://demo46bb25b3.trywpbpm.com/wp-admin/
Perhaps there’s something else going on there?
Thanks for this very useful article!
I have one question: why the autologin of the new user is done after a redirection (create user and blog –> redirection –> autologin –> redirection to wp-admin) and not directly after that the new blog has been created (create user and blog, autologin –> redirection to wp-admin).
And for your information: in order to use a template site to create the demo sites, this plugin can be used: https://wordpress.org/plugins/multisite-cloner/. It is free 😉
I guess it could work just fine, doing the autologin immediately after redirection. It might be an oversight on the logic in the article. I think the autologin functionality is borrowed from our other plugins are doing auto-login in a similar fashion for reasons that are not really needed in this application.
There’s also the possibility if I remember correclty, but I don’t have time to test this right now, that the autologin exactly after blog creation fails with caching in place, even though it’s unlikely we’ll have any sort of caching enabled on a demo site.
Unfortunately I don’t think we have time to rethink this, so it will stay as this for the foreseeable future, as it is working.
As for the Multisite Cloner, it does look like it’s the right plugin for the job and actively supported. So I’ve updated the article with it as a suggested alternative. Thanks a lot!
Now that I think about it, this is the only way it would work as the wp_set_auth_cookie( $user_id ) function needs to setup headers from PHP, and if you do this immediately after blog creation, you’ll get the Headers Already Sent PHP fatal error. So it just won’t work any other way.
Thanks for the reply. On top of a great article, you offer a great support!
Hi,
Recently, I’ve seen your article and read it carefully. You’ve explained very good. I really liked it. So, keep up the good work.
Hi, thanks for the article but I have a problem with the Replicator plugin, I can’t access the site. I there any other plugin i can use to replace the Replicator plugin?
Use the Multisite Cloner
Hello Cristian,
Thank you for this great article.
Just one question, I saw that in your demo site some plugins are not available to site admins like “Create Demo Sub-Sites” plugin, please let me know how you do it?
I want to do not allow site admins to see “Create Demo Sub-Sites” and “Multisite Cloner” plugins.
Thanks.
Sounds promising, any chance to auto create user page on sign up process with auto login, the easy way?
Thanks 😉
Hello Cristian,
Thank you for this great article.
Great plugin! Unfortunately, the Captcha is not working for me. I do the math correctly and it says invalid answer. What could be causing this?
Auto login is not working.
The query strings are not being recognized in the function cds_autologin_after_creation so the cookie is not set and the redirect is not happening.
Everything else is working fine.
Never mind I figured it out, it;s working perfectly.
Thanks this piece of code was very helpful.
Hello Cristian, thank you very much. A great post!
Could you tell me how to indicate the subsite you want to copy, with its content and options?
There is a small update in the article:
UPDATE:We recommend you also have a look at the Multisite Cloner plugin from wordpress.org that is working and actively developed: https://wordpress.org/plugins/multisite-cloner/
Thanks for your quick answer but how to create automatic copies with cloner?
thanks for this article help me a lot!!!
Nice Informative post. Thanks for sharing your great ideas with us.
Thanks for sharing! This is so much clearer than other tutorials I’ve been read so far.
This is great, I’m going to give it a try (paying customer of yours btw).
This demo, the captcha doesn’t work: https://pb-demo.cozmoslabs.com/#topmenu
Your PMS demo does still work tho. =)
Hi Alex, just tried it and it works for me.