

Table of Contents
- 1 Customize WordPress emails using Profile Builder Pro
- 2 General settings
- 3 Email confirmation option
- 4 Admin approval option
- 5 Decide how you want users to log in
- 6 Set password length and security level
- 7 Customize WordPress emails – the templates you can use
- 8 Customize WordPress emails with ease
- 9 Customize the WordPress new user registration email template
- 10 Customized WordPress email
- 11 Customizable WordPress email templates for users
- 11.1 WordPress new user registration with a confirmation email
- 11.2
- 11.3 New user registration email with admin approval
- 11.4
- 11.5 User approval notification email
- 11.6
- 11.7 An unapproved user notification email
- 11.8
- 11.9 User password reset email
- 11.10
- 11.11 User password reset success email
- 11.12
- 11.13 A user requested to change their email address notification
- 11.14
- 12 Customizable email templates for admins
- 13 Setting up the custom redirects
- 14 Wrapping up
In this article, we’ll be looking at how to customize WordPress emails of different types, so you can control each type of email you need to send to your users.
Trying to customize WordPress Registration Email normally means copy-pasting a custom function into the functions.php file and then modifying it to fit your project.
But what often happens is that you’re not sure how to implement this because you’re not a developer and you’re not sure how to use the filters that are set up in place.
Now imagine that you can customize the:
- WordPress Registration Email
- The email sender and body text with the info from the fields on the registration form
- Override the from address so that it is the name of the business
- Customize the Admin Email sent when a new user is registered so the email content matches your brand
- Enable WordPress User Registration Email verification
All without touching a single line of code, directly from an intuitive email customization interface.
This is now possible by using the Email Customizer module from Profile Builder Pro. It allows you to modify default WordPress emails sent to both the administrator, as well as new users.
Customizing registration emails this way gives you full control over the way you communicate with your users. Having the ability to edit WordPress email content gives you full control over the user experience.
Ready to learn how to customize WordPress registration emails? Let’s dive in…
Customize WordPress emails using Profile Builder Pro
Before we get into the exact steps for customizing emails, there are a few plugin settings you need to adjust. Let’s take a look at them.
Creating the ‘Form Pages’ for your website
The first thing to do is create the front-end forms users use to register and interact with your site. You’ll find these in the Basic Information section.
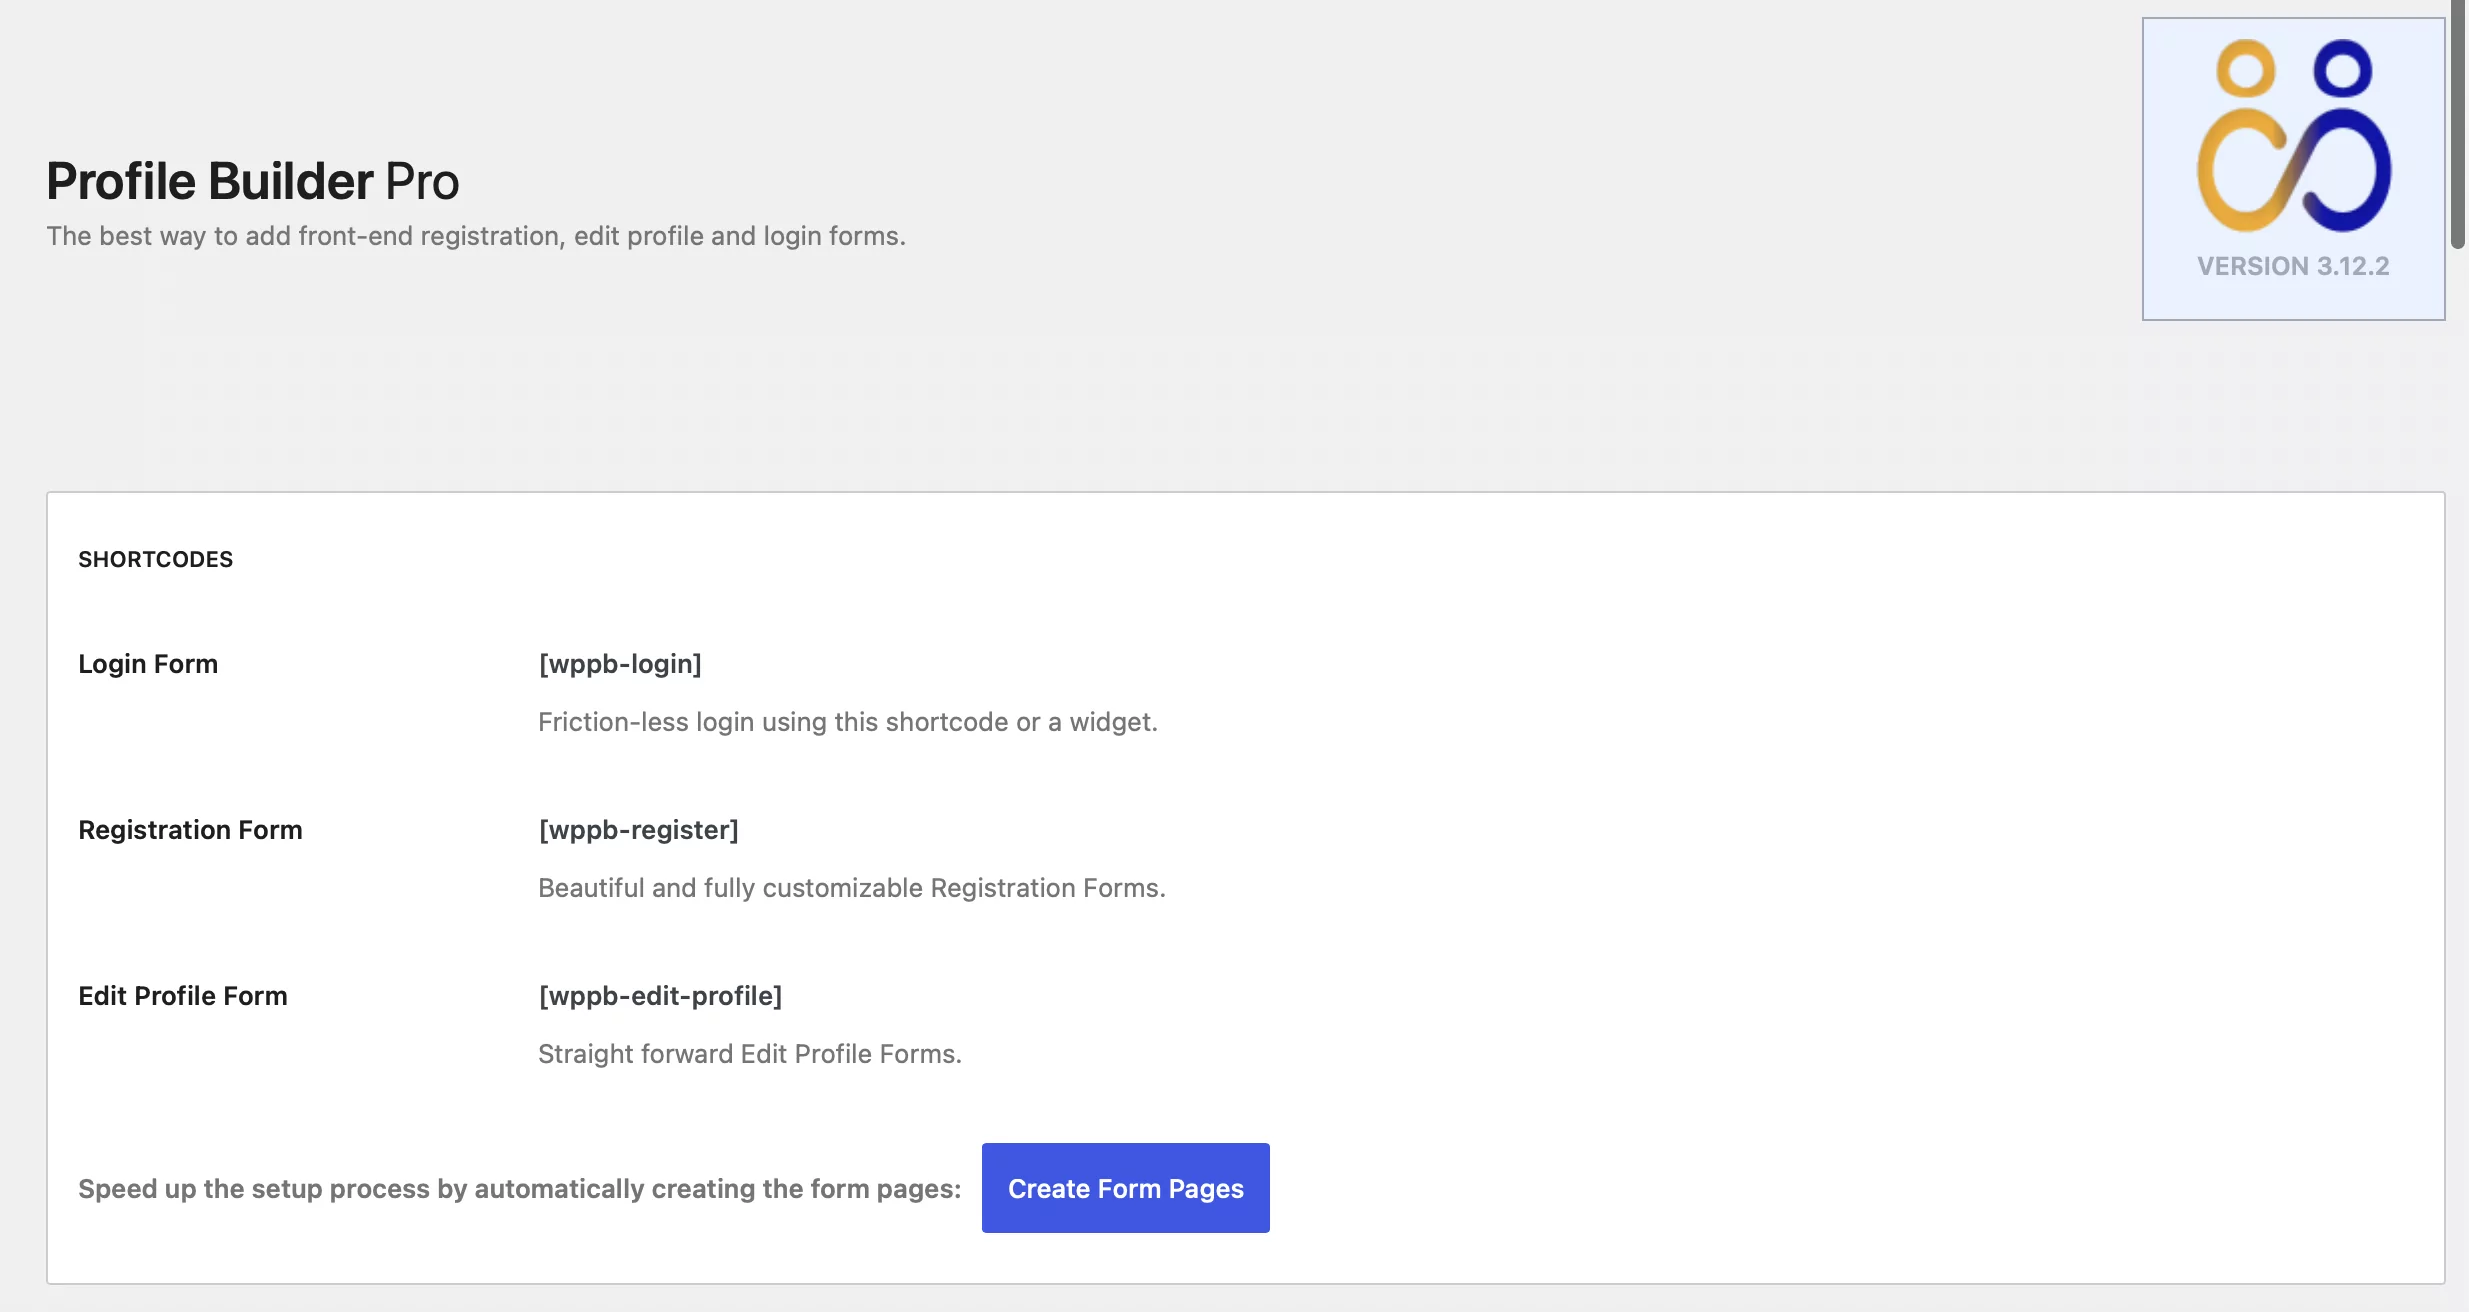
Click on the blue button to create three forms for your WordPress site. The plugin creates three pages: Login, Profile, and Register. These pages contain shortcodes that output content to the front-end user.

You don’t need to do anything else with these pages at this stage.
General settings
Now, let’s click on Settings in the main menu to access the General Settings tab. You’ll land here by default.
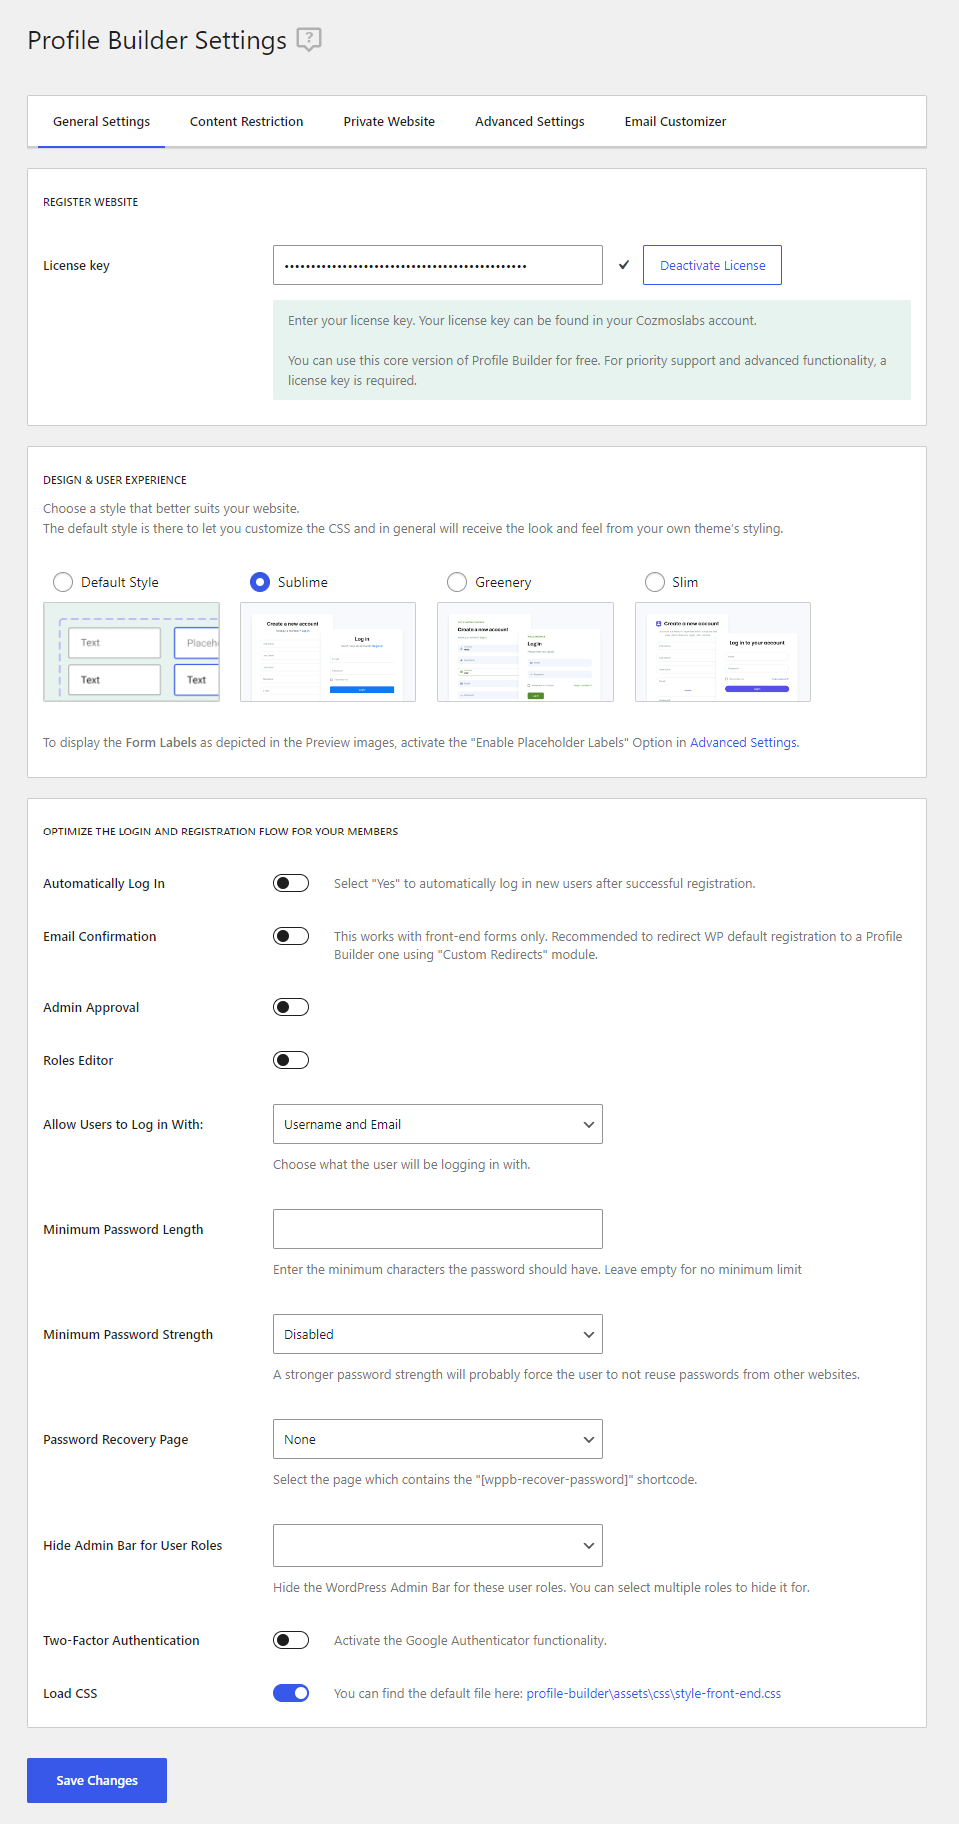
Email confirmation option
There are a number of settings here that you need to define for your website. The first one is “Email Confirmation”. You can choose to turn it off or on.
If you leave in turned off, the user isn’t required to verify their email address. WordPress creates the account so the user can log in straight away.
If you choose to turn it on (the user must confirm their email address before the account is created), you’ll also have to choose an “Email Confirmation” landing page.
Should you ask for email verification? I think so. Given the high number of spammers out there and the vulnerability of some WordPress setups, it makes sense to have newly registered users verify their email address before granting them access to your site. At least you know the email is active.
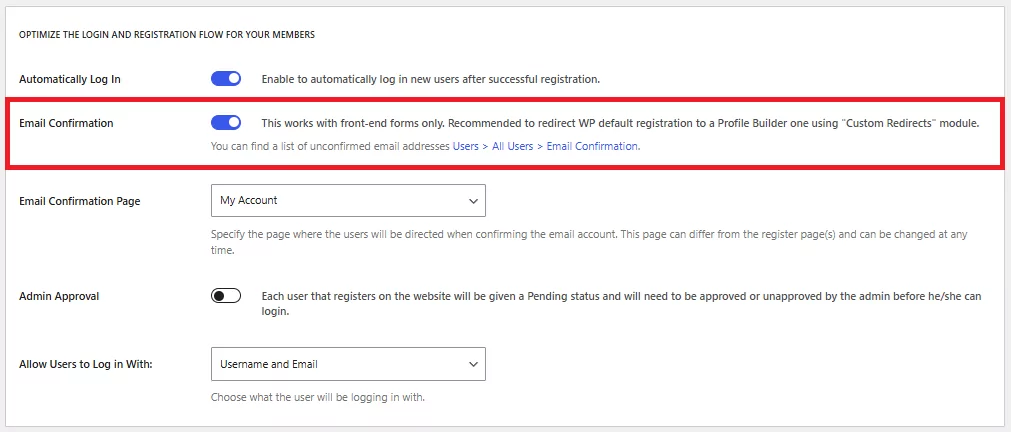
The default setting for this option is blank because it redirects people to a simple built-in confirmation page.
Instead of doing that, you might want to direct them to a ‘Welcome’ page, a download page or perhaps a ‘Start Here’ page. It’s easy to set up – just choose a published page from the drop-down menu.
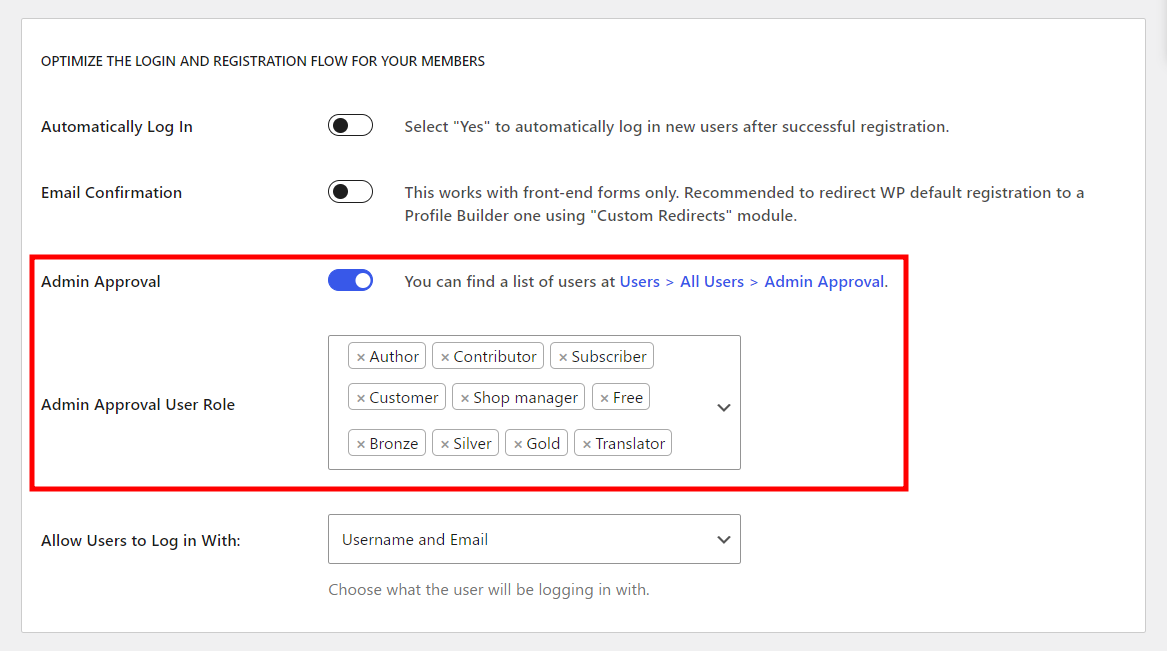
Admin approval option
The Admin Approval feature is useful if you want to vet requests from new users before allowing them access. You can choose to approve all users or only select certain roles. You can approve users from the admin dashboard or via email.
Decide how you want users to log in
In the next step, decide if you want to let users log in with their Username and Email or just Username or Email.
If you leave it in its default state, users can log in with either their username or email address and their password. If you alter it you’re specifying the user must use either their username or their email address and password.
People may struggle with this if they have lots of accounts on multiple websites so giving them two options to log in is recommended.
Set password length and security level
And finally, set the minimum password length and strength. The default setting for password strength is disabled so new users can use whatever they want. Depending on how strong the security is on your site, you might want to change this to stop people using obvious passwords such as password or 12345678.
Now that we’ve defined the settings, move over to the Email Customizer tab to customize the emails sent to users and administrators. The tab to enter this section is on the right side of the menu.
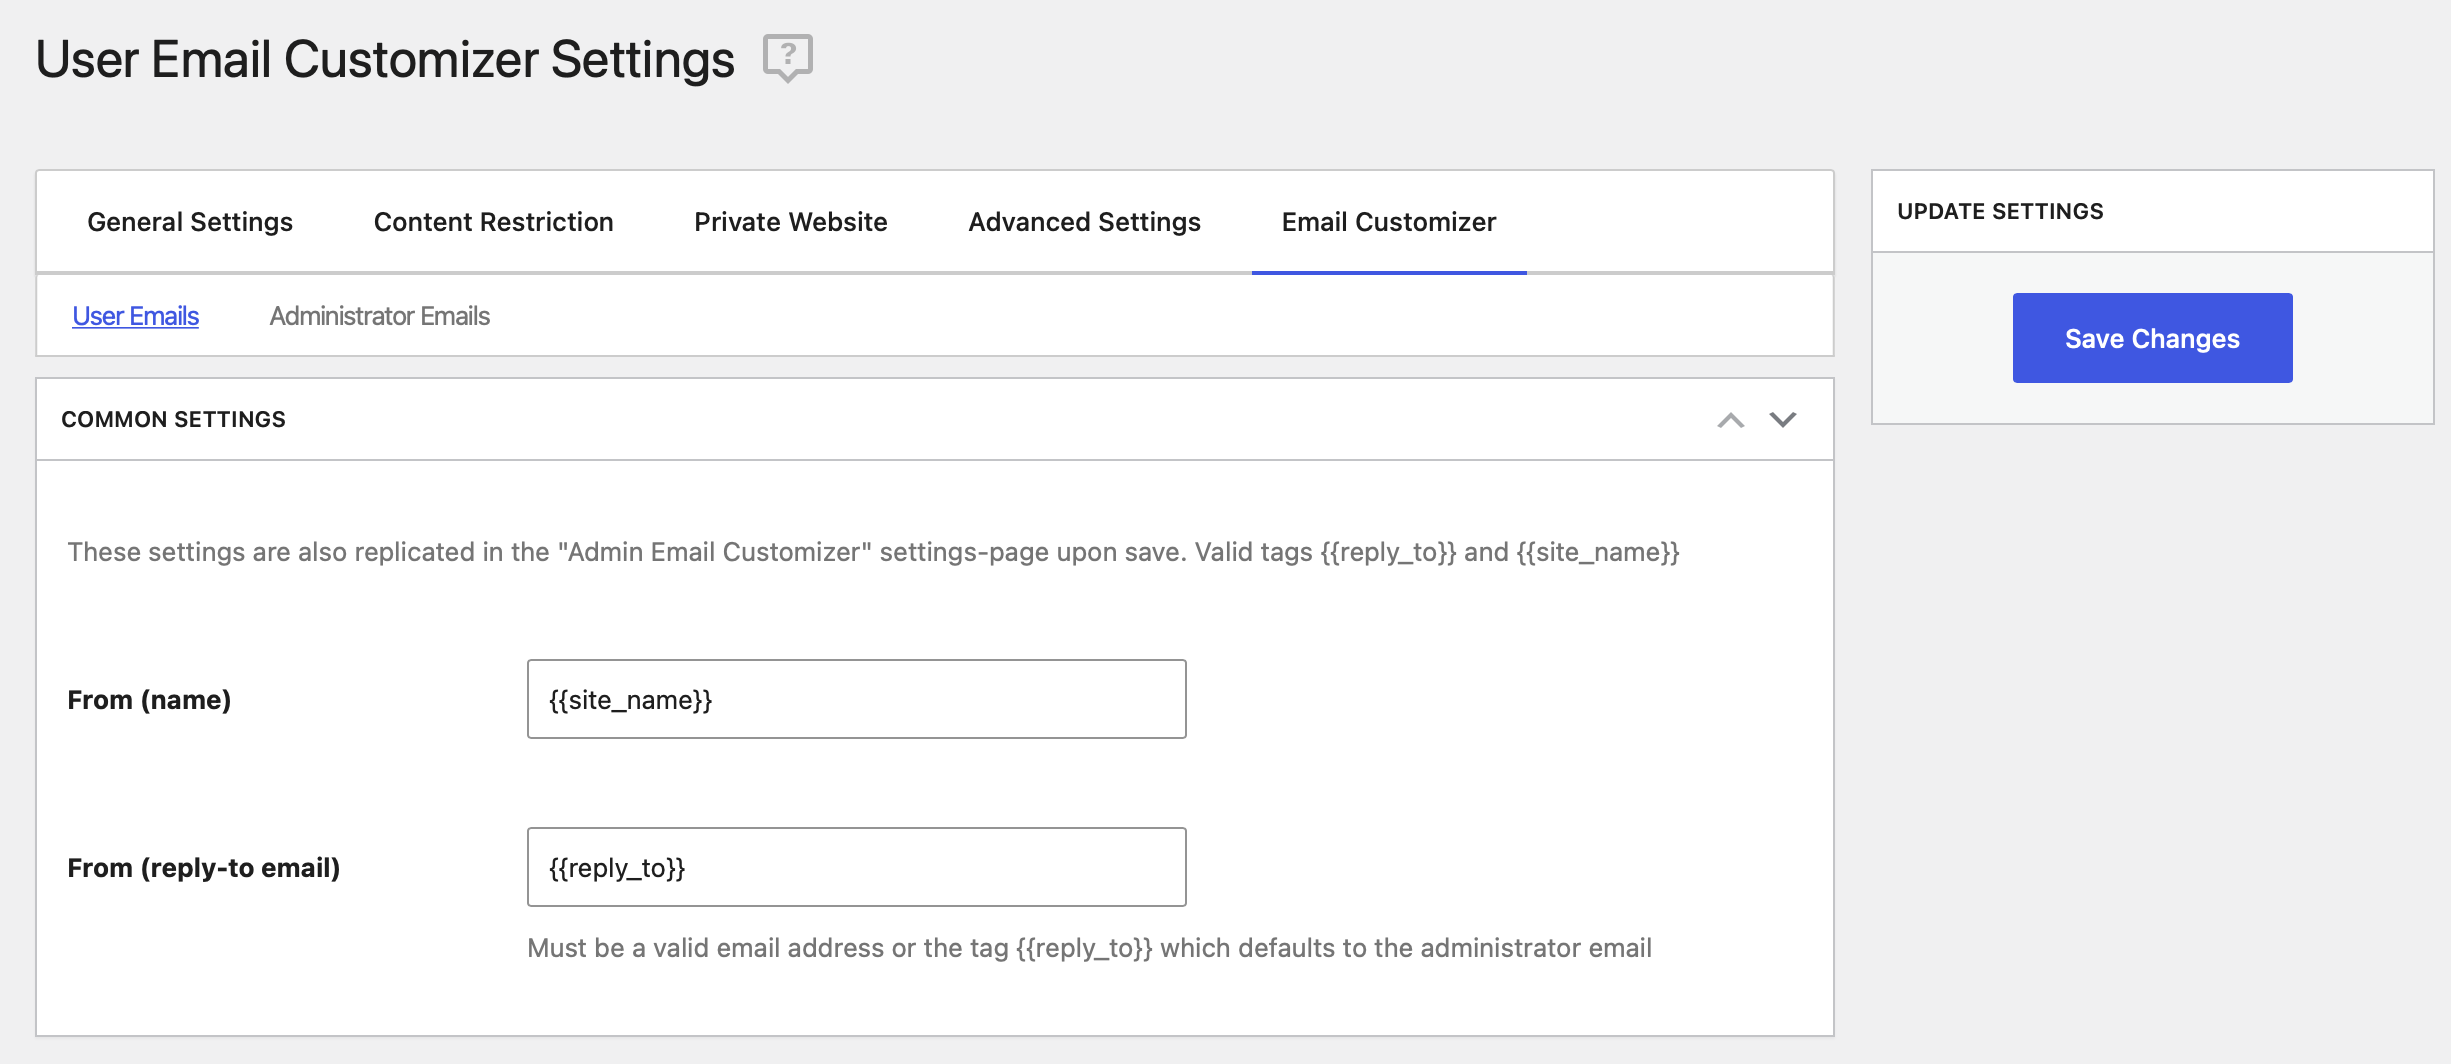
In this section, you edit the User Emails and Administrator Emails sent by your website. It defaults to User Emails.
At the top of the page, you’ll find the Common Settings box. This includes your site name and uses the Admin email address in all correspondence.
Customize WordPress emails – the templates you can use
The rest of the page is divided into a number of sections so you can control each type of email you need to send to your users. The sections are:
- Default Registration – A simple variation of the registration email sent to new users that includes their username and password
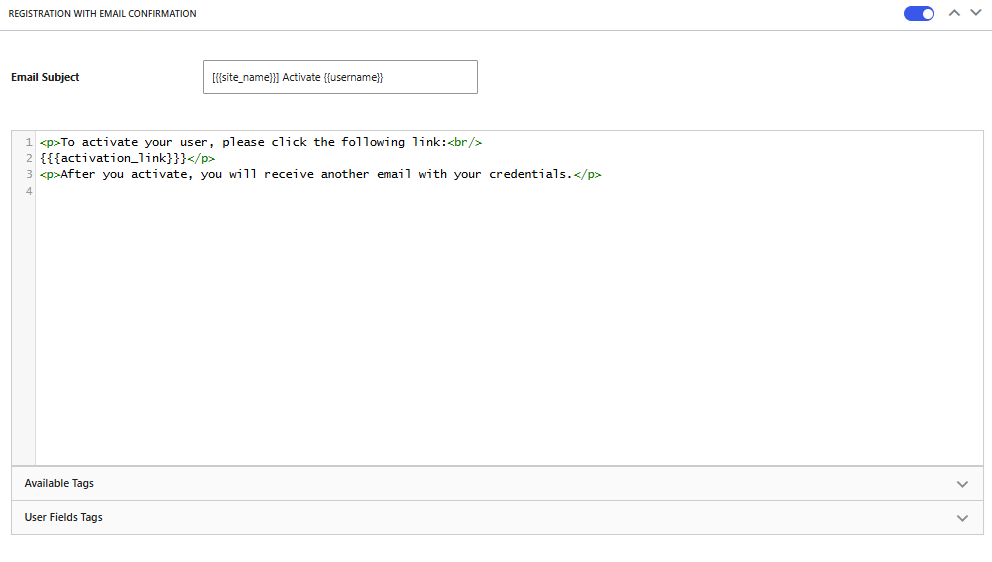
- Registration with Email Confirmation – New users will be required to click a link to verify their email address, thus ensuring they’re using an active email address. Once they’ve verified their email address, they’ll be sent a ‘success’ email confirming their account is created
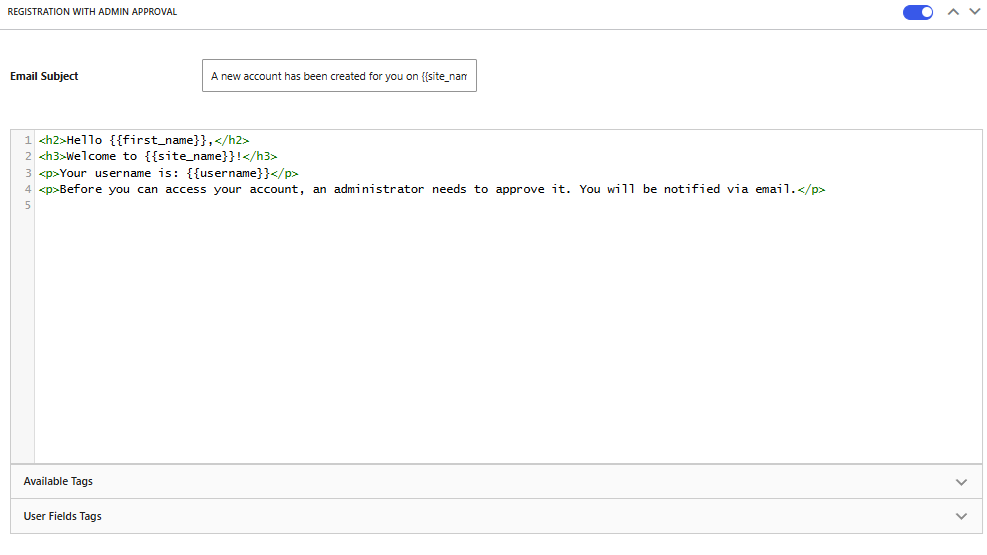
- Registration with Admin Approval – If you’re using the admin approval setting, new registrants will receive an email informing them they’re account needs approving at the admin level before they can use it. This lets users know their request is received but may take time to become active
- User Approval Notification – This is the email a user receives when an admin approves their account
- Unapproved User Notification – This is the email a user receives when an admin doesn’t approve their account
- Password Reset Email – A simple password reset email
- Password Reset Success Email – The email a user receives after their password has been successfully changed
- Changed Email Address Notification – An email template for letting users know their registered email address has changed
Each section has default content so if you decide to activate the module but don’t have time to customize it, your new and registered users won’t receive blank emails from you. You also have the option to individually disable each email by unchecking the Enable Email checkbox in the right corner.
Customize WordPress emails with ease
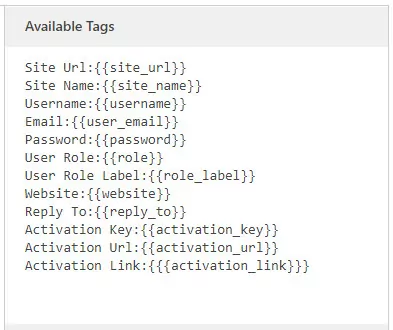
Let’s take a look at each of the sections to see how you customize them to suit your audience. It’s super-easy because you use custom tags instead of code. These tags take data from your site and convert that data into text you can use to personalize the emails you send.
Customize the WordPress new user registration email template
This is the default registration box. The first of the custom templates available within the plugin.
Let’s start at the top with the Email Subject line. The default setting is good for starters but you might want to adapt it to fit your brand’s personality, especially if you use certain words in your social media and other online communications. It makes sense to use them here as well.
The section under the Email Subject line contains the content that appears in the body of the email.
You can see it starts with a <h3> header tag followed by <p> paragraph tags. You can also use <br> tags to break up long lines. You can write whatever you like in this section, and personalize it using the Available Tags you see on the bottom of the tags. Be sure to keep the content within the appropriate HTML tags.

The tags convert to:
- Site URL
- Site Name
- User ID
- Username
- Password
- User Role
- User Role Label
- Website
- Reply-To
Customized WordPress email
Here’s a customized version of the same welcome email using additional text and tags. As you can see, it really allows you to take full control of the message and create a custom email to suit your audience.
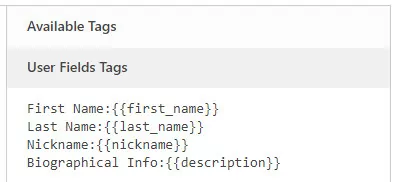
There’s another section called User Field Tags which you click to toggle to reveal and use to really personalize your emails, as these fields use details specific to the user you’re emailing.

The tags convert to:
- First Name
- Last Name
- Nickname
- Biographical Info
- Subscription Name
- Subscription Status
- Subscription Start Date
- Subscription Expiry Date
To use the tags in your email, simply copy and paste them where needed.
Each of the following boxes follows the same format – subject line, email body content and appropriate tags for the email you’re sending.
Now that you know how one works, you can easily go through the rest (be sure to save your changes as you work your way through the various sections). Remember though, this isn’t obligatory. What I’m demonstrating here is the flexibility this module gives the plugin and how you can customize every part of it to suit your needs. It works just as well out of the box.
Customizable WordPress email templates for users
So you can see exactly how the email templates work, here is a screenshot of each one you send to your users.
WordPress new user registration with a confirmation email
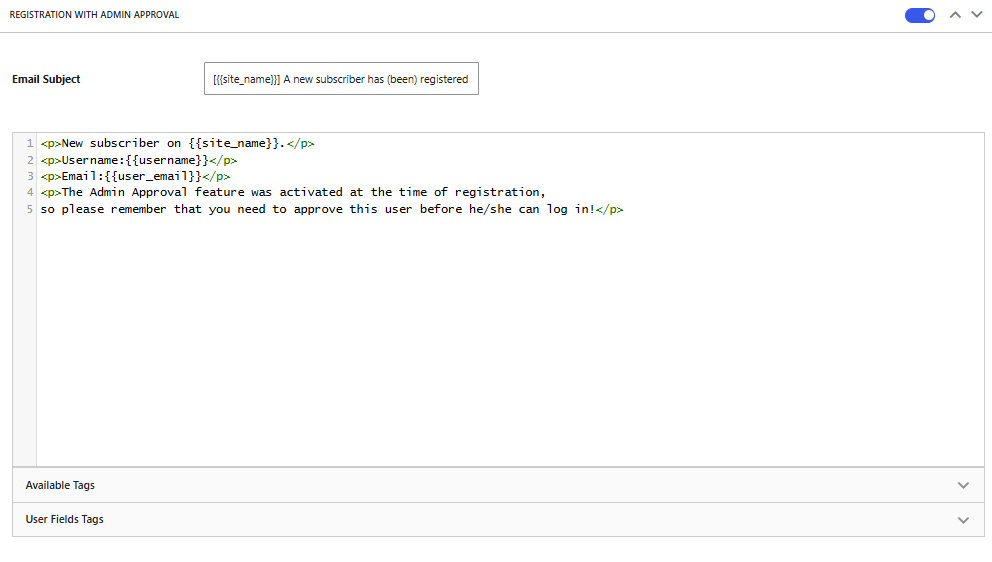
New user registration email with admin approval
User approval notification email

An unapproved user notification email

User password reset email

User password reset success email

A user requested to change their email address notification

The final steps of the process involve creating URL redirects to make sure users are redirected away from the built-in registration and login pages to the pages created by the plugin. The ones that contain the shortcode for the forms.
Customizable email templates for admins
Now it’s time to take a look at customizable Administrator email templates. There are three. These emails are sent to the administrators when a user performs an action on the site. The email templates cover:
- Default Registration & Registration with Email Confirmation – A simple email letting admins know when a new user account is created
- Registration with Admin Approval – The email template for requesting admin approval on new accounts
- Admin Notification for User Password Reset – An email letting admins know when a user changes their password
The tags for these emails are different from the user section as they’re used internally.
The tags convert to:
- Site URL
- Site Name
- Username
- Password
- User Role
- User Role Label
- Website
- Reply To
- Activation Key
- Activation URL
- Activation Link
The additional section for User Field Tags converts to:
- First Name
- Last Name
- Nickname
- Biographical Info
Here are screenshots of the three customizable email templates for admin users so they receive an email notification when somebody registers or changes a password.
Default registration & registration with email confirmation

Registration with admin approval
Admin notification for a user password reset

Setting up the custom redirects
The final stage of the process is setting up the Custom Redirects to redirect users from the default WordPress pages to the ones we created at the start of this tutorial.
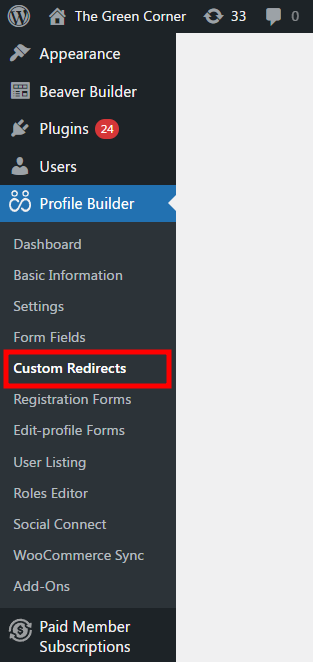
Start by activating the Custom Redirects add-ons in the Profile Builder Pro plugin. Go to Profile Builder > Add-ons and activate the Custom Redirects add-ons.
Then, click on Custom Redirects on the menu.
Scroll to the bottom of the page in search of the Redirect Default WordPress Forms and Pages widget.

Click on the …Choose the drop-down menu to select the page you want to redirect. Then, enter the new URL into the box below and click Add Entry.
After that, you should see a new entry.
Repeat the process for the Register page.
Once you’ve added the additional page it’s time to test everything’s working as expected.
The best way to do this is to register as a new user (using a test email not associated with your admin account) to experience each step of the signup process from their side.
You might discover something isn’t quite working properly or that some part of the registration process needs adjusting slightly.
As you’re the admin for your site, you’ll also receive different email notifications letting you know about the actions of the user you’re testing, letting you test the system from both sides.
Wrapping up
As you can see from this guide, using the Profile Builder Pro plugin gives you complete and full control over each and every part of the way you communicate with your users via email. The plugin is usable straight out of the box, but customizing emails to reinforce your brand and speak to your users in the language you and they typically use, gives you a huge advantage.
Having the ability to vet registrants before creating accounts (via the admin approval feature) and ensuring only people with active email addresses can register (via the confirmation email feature) eases worries about spam accounts set up by bots. You can be more confident that the email addresses are connected to real people who want to join your community.
You don’t need to be a technical whizz or hire a developer to set it up either. The plugin uses shortcodes to output the content on the front-end and tags to create the templates on the backend, so there’s no need for you to dig into code. Just follow the instructions in this guide and you’ll have everything set up in no time. And when you want to change something, just log into the settings area to make the changes.
Profile Builder Pro
Customize front-end registration and profile forms in WordPress. Create registration email notifications, user approval notifications, password reset emails & more using the all-in-one user management plugin.
Get Profile BuilderProfile Builder Pro is a powerful, yet easy to use plugin to help you easily customize WordPress emails and communicate with your users.
Related Articles

How to Customize the WooCommerce Login Page (No Code Needed)
Searching for a solution to customize the WooCommerce login page and otherwise control login behavior on your WooCommerce store? If you allow (or force) registration on your store, you'll want to create a user-friendly login experience so that your shoppers can easily log in to their accounts and access other key features. In this post, […]
Continue Reading
8 Best WordPress User Registration Plugins
Not sure what WordPress user registration plugin to use for your project? Going through all the WordPress user registration plugins can be disorienting. You may have spent hours and hours searching for plugins and tutorials to help you with your project, and you’re still as confused as you were when you started. Imagine finding the […]
Continue Reading
How to Customize WordPress Email Login Behavior (+ Registration)
Searching for a WordPress email login feature so that you can customize your site's login process, such as requiring users to use their email address instead of a username? By default, WordPress lets users log in with either their username and password or their email and password via the default login page. But if you […]
Continue Reading