
Table of Contents
- 1 How to Prepare a CSV File of WooCommerce Products With Images
- 2 How to Import WooCommerce Products With Images Without a Plugin
- 3 How to Import WooCommerce Products With Images Using a Plugin
- 4 How to Import Amazon Products to WooCommerce Without API
- 5 Optional: Restrict Access to Imported Products
- 6 Start Importing WooCommerce Products Today
Are you searching for the easiest way to import WooCommerce products with images? Naturally, you have the option to do this manually, but it can be very time-consuming.
Instead, you can import WooCommerce products with images automatically. This way, you can move items from one store to another, upload many items quickly, or migrate from a different eCommerce platform like Shopify.
In this post, we’ll show you how to prepare the CSV file for the import. Then, we’ll discuss the different ways to import WooCommerce products with images (with and without plugins).
Beyond that, we’ll also share dedicated sections for how to import Amazon products to WooCommerce, including reviews. This use case gets its own section because the optimal process is a little different. You can use it for Amazon affiliate marketing or other use cases.
Let’s get started!
How to Prepare a CSV File of WooCommerce Products With Images
Regardless of the method you choose to import WooCommerce products, you’ll need to collect them in a CSV file before you can run the import. If you already have a CSV file of products, you can click here to skip ahead to the first tutorial.
How you create your WooCommerce product CSV will depend on what products you want to import. We’ll go through two different scenarios:
- How to create a CSV of products from an existing WooCommerce store
- How to manually create a CSV file
If you want to import Amazon products to WooCommerce, you’ll usually use a different method. If that’s what you need, you can jump ahead to our guide on importing Amazon products without the API.
Existing WooCommerce Store
If you have an existing store with products that you want to import to a new store, you can export a CSV of your existing products using WooCommerce’s built-in CSV exporter tool. This is a lot easier than trying to manually re-create the CSV.
Here’s how to get started:
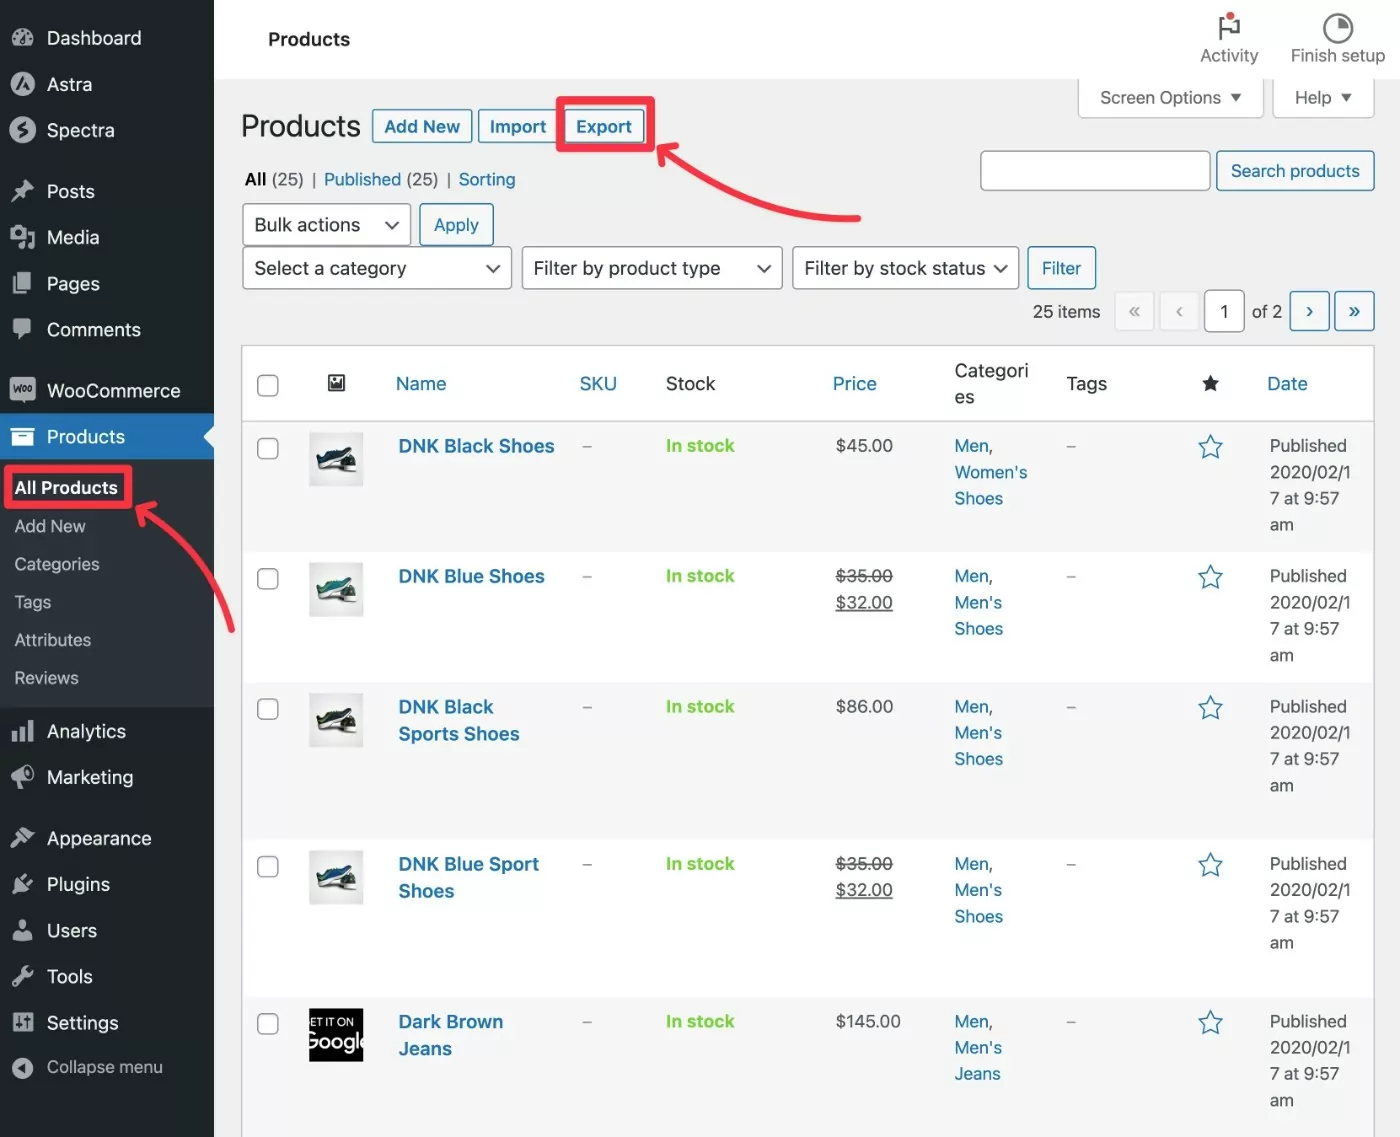
- Open the WordPress dashboard for the store that you want to export products from.
- Go to Products → All Products.
- Click on the Export button at the top.
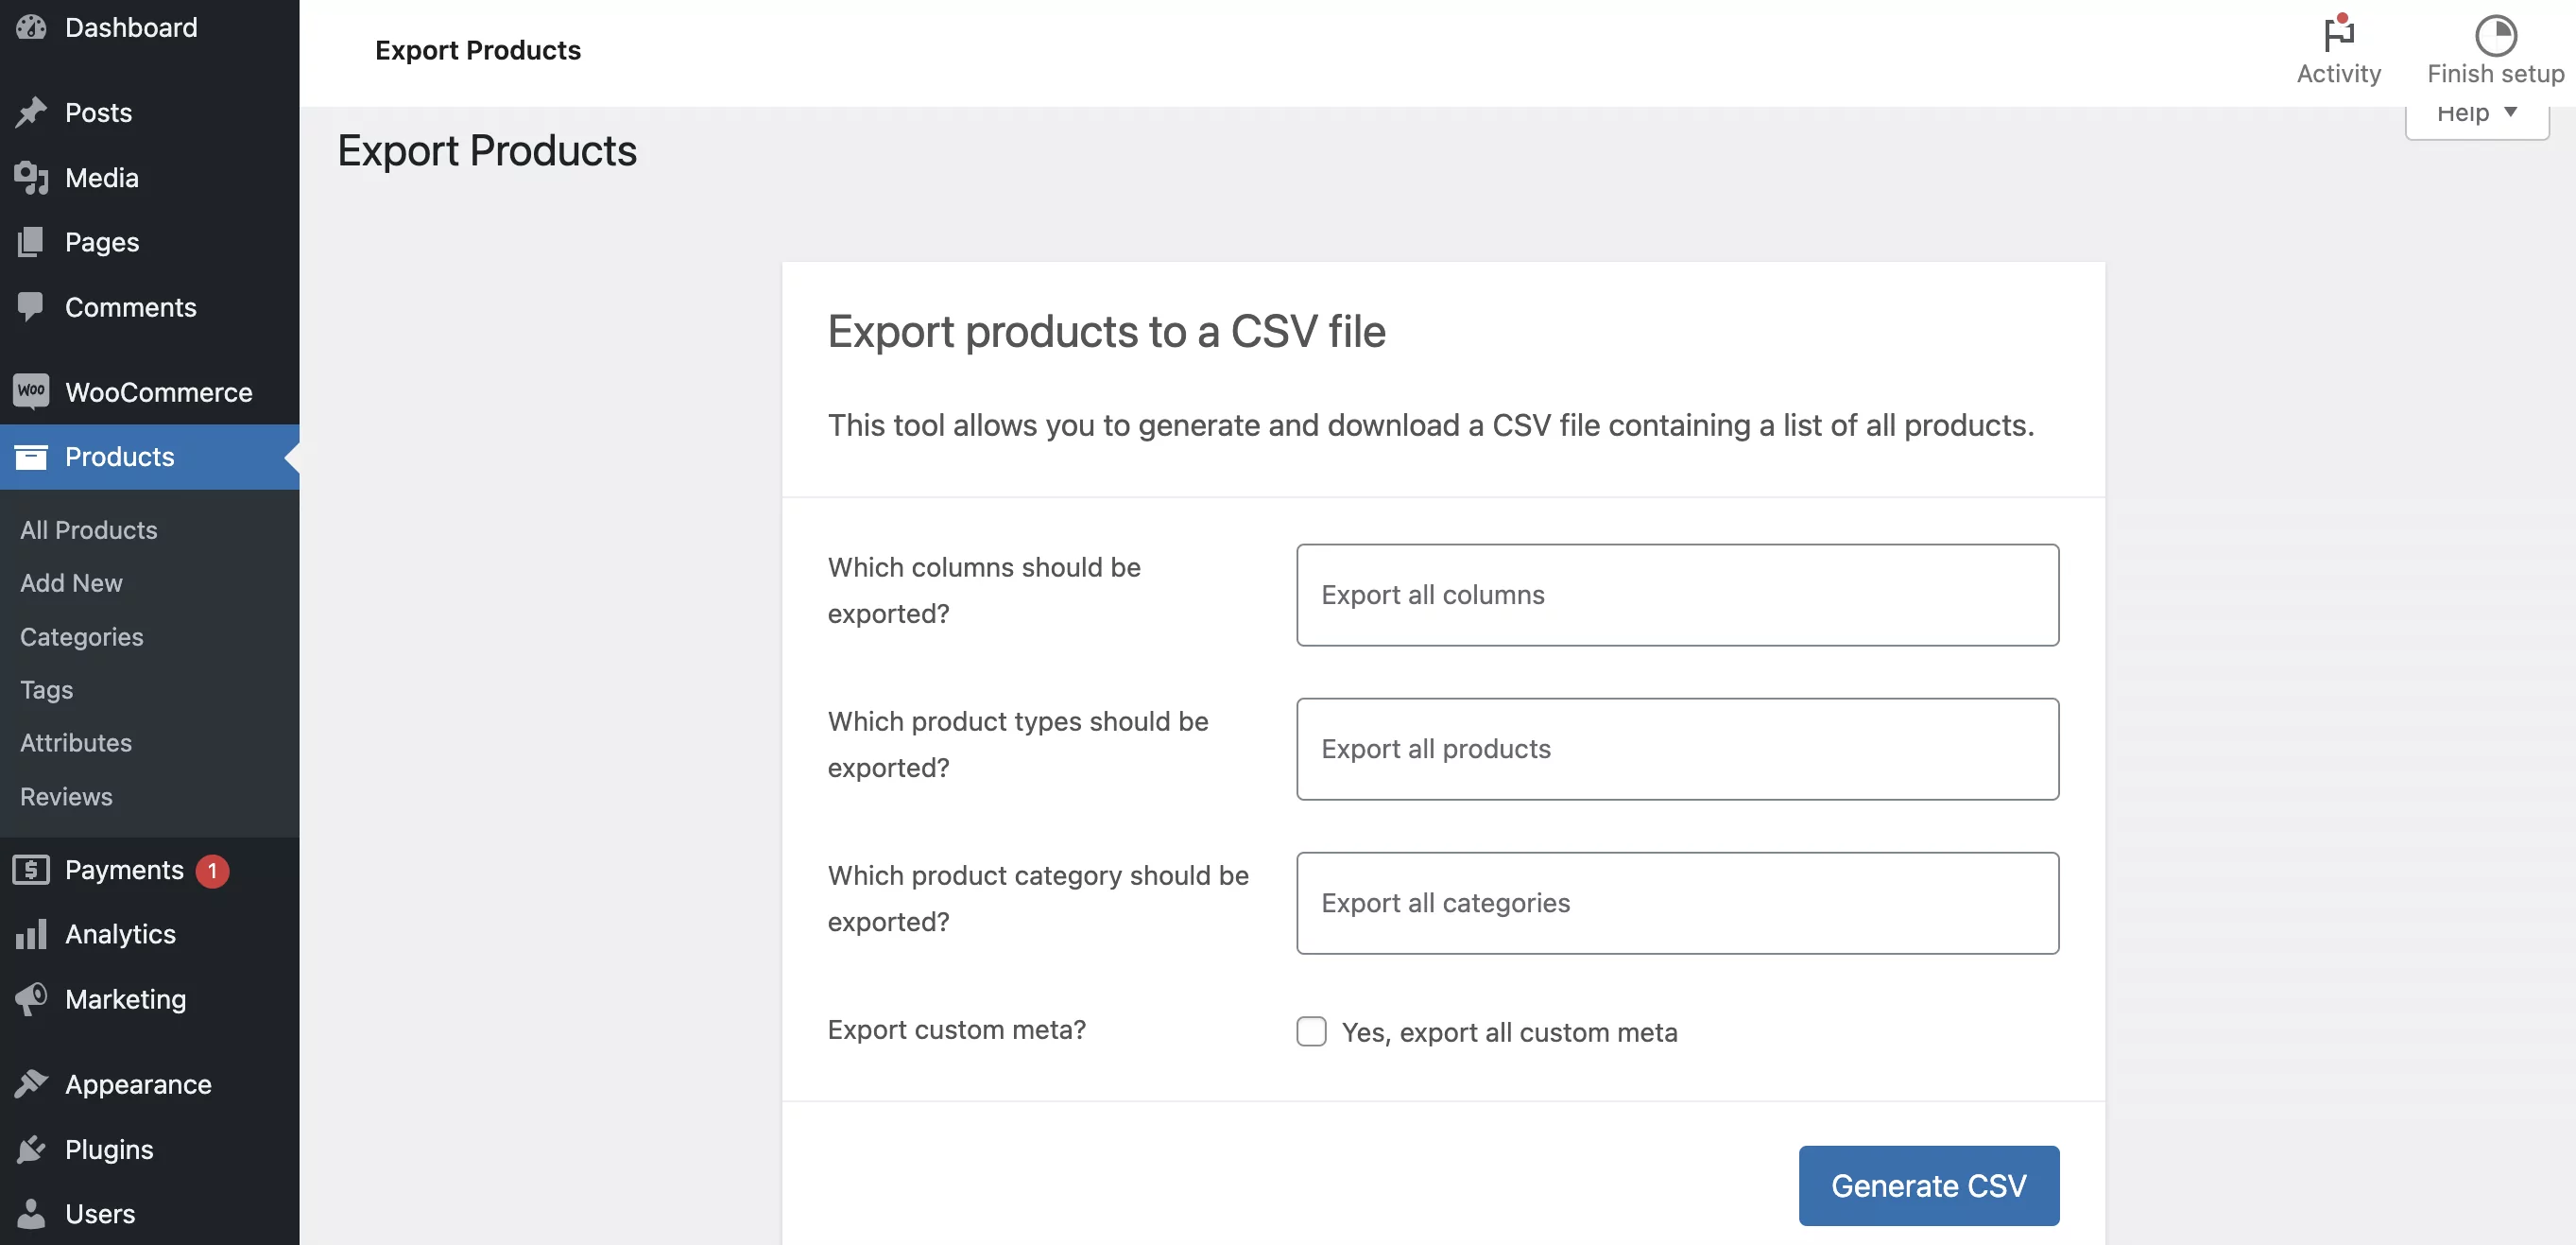
This will open a new screen to configure the export details. If you want to run a full export, leave the options at the defaults (“Export all …”). However, if you only want to export certain products and/or product data, you can edit the settings as needed.
To generate the CSV file, click on the Generate CSV button at the bottom:
This will download a single .csv file to your computer, which is what you’ll use when importing products to your WooCommerce store in the next steps.
Manually Create a CSV
If you aren’t moving products from an existing store, you can also manually create your product CSV file. To do this, you can use Microsoft Excel, Google Sheets, or any other capable CSV editor.
To save some time and better understand the format for this CSV file, you can use this WooCommerce sample products CSV file from GitHub. Here’s what you’ll need to do:
- Download the sample_products.csv file from GitHub. Then, right-click on the Raw button and choose Save Link As to download it to your local computer. If you’re using macOS, you might need to manually change the file extension to .csv.
- Open the file in your preferred editor (e.g. Google Sheets or Microsoft Excel).
- Look at the existing product information to get an understanding of the format.
- Once you feel comfortable with the format, you can replace the existing information with the details for your products. Note that you don’t need to fill out every single column for each product (and some of the columns might not apply). If you leave a column blank, it will just be empty/filled with the default.
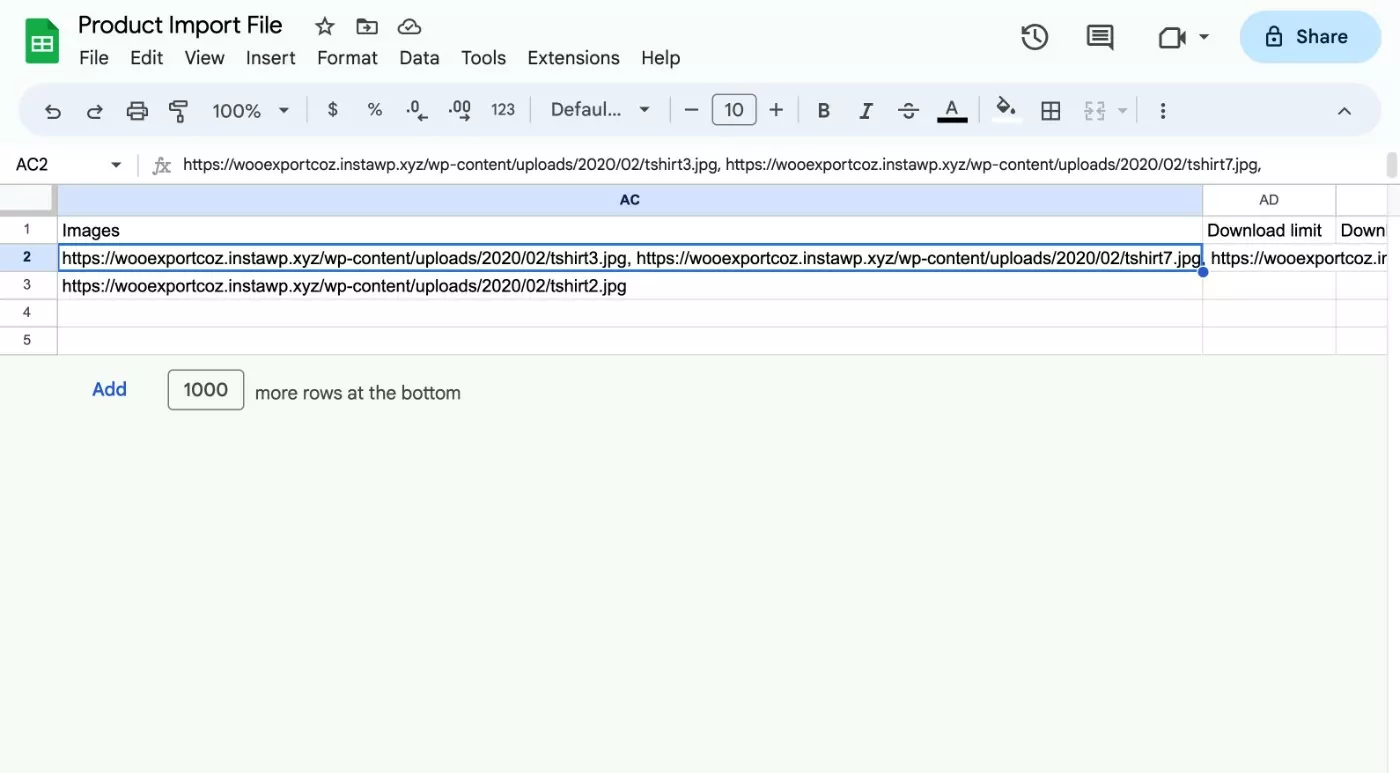
- If you want to include product images, make sure to add full links to the hosted image files in the Images column. You can include multiple images by separating each image link with a comma. You cannot upload the images from your local computer as part of the bulk import process – the product images must be hosted at a publicly available URL.
- Save the finished CSV file to your local computer.
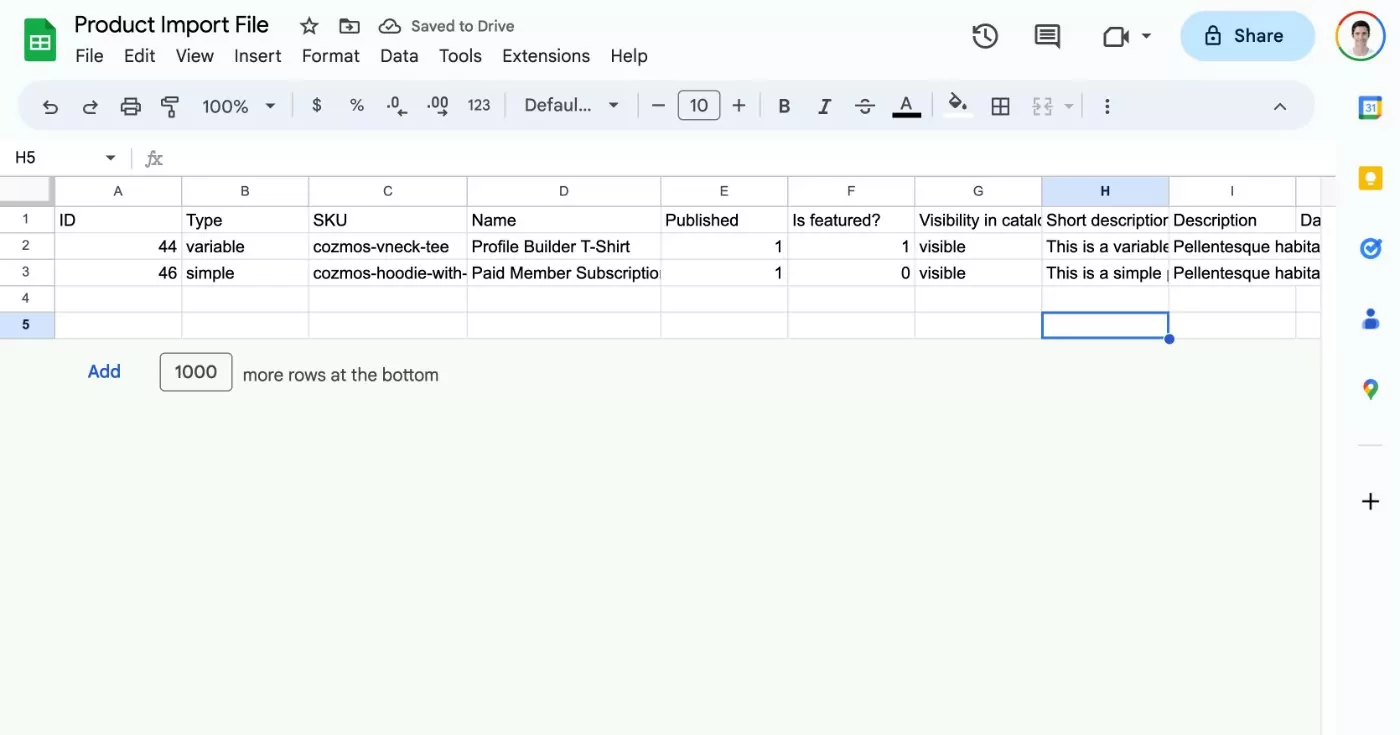
Here’s an example of what the file might look like in Google Sheets:
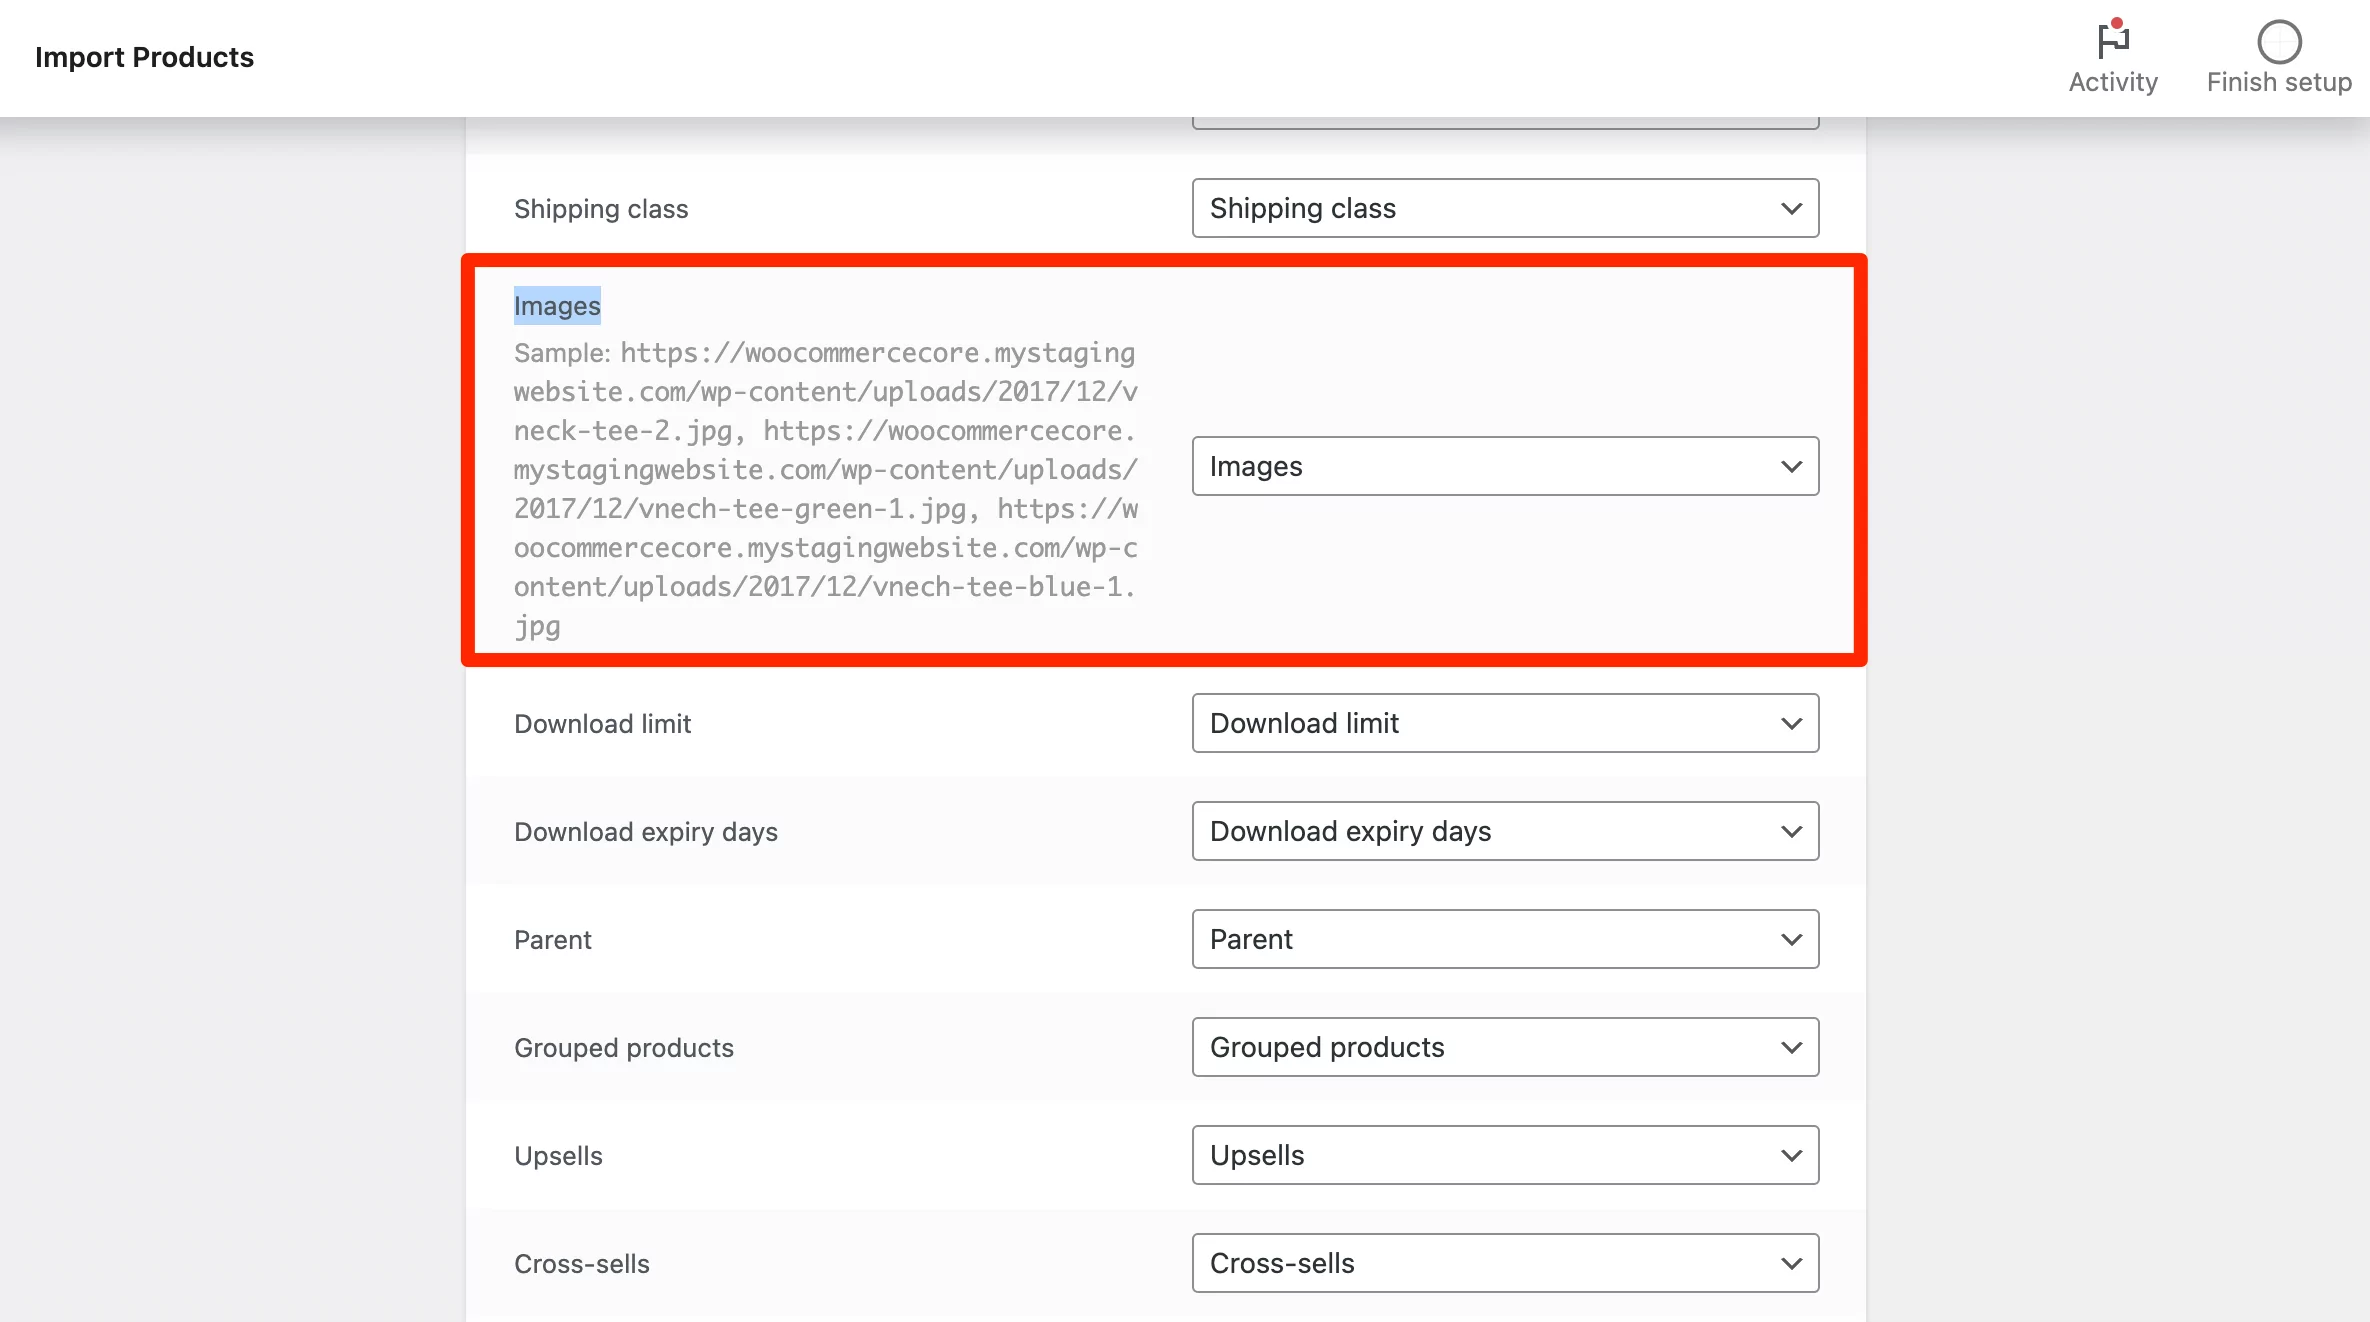
And here’s a look at the Images column specifically. Again, make sure to include full links to the image files on a publicly accessible server:
Once you have a CSV file of your product details, you’re ready to proceed.
How to Import WooCommerce Products With Images Without a Plugin
In this first section, we’ll go over how to import WooCommerce products with images using the built-in WooCommerce importer tool. This is the simplest option because it doesn’t require you to install a plugin.
1. Open the WooCommerce Product Importer Tool
Before we get started, we’ll assume that you’ve already installed WooCommerce on the site where you want to import your products. Then, you can follow these steps:
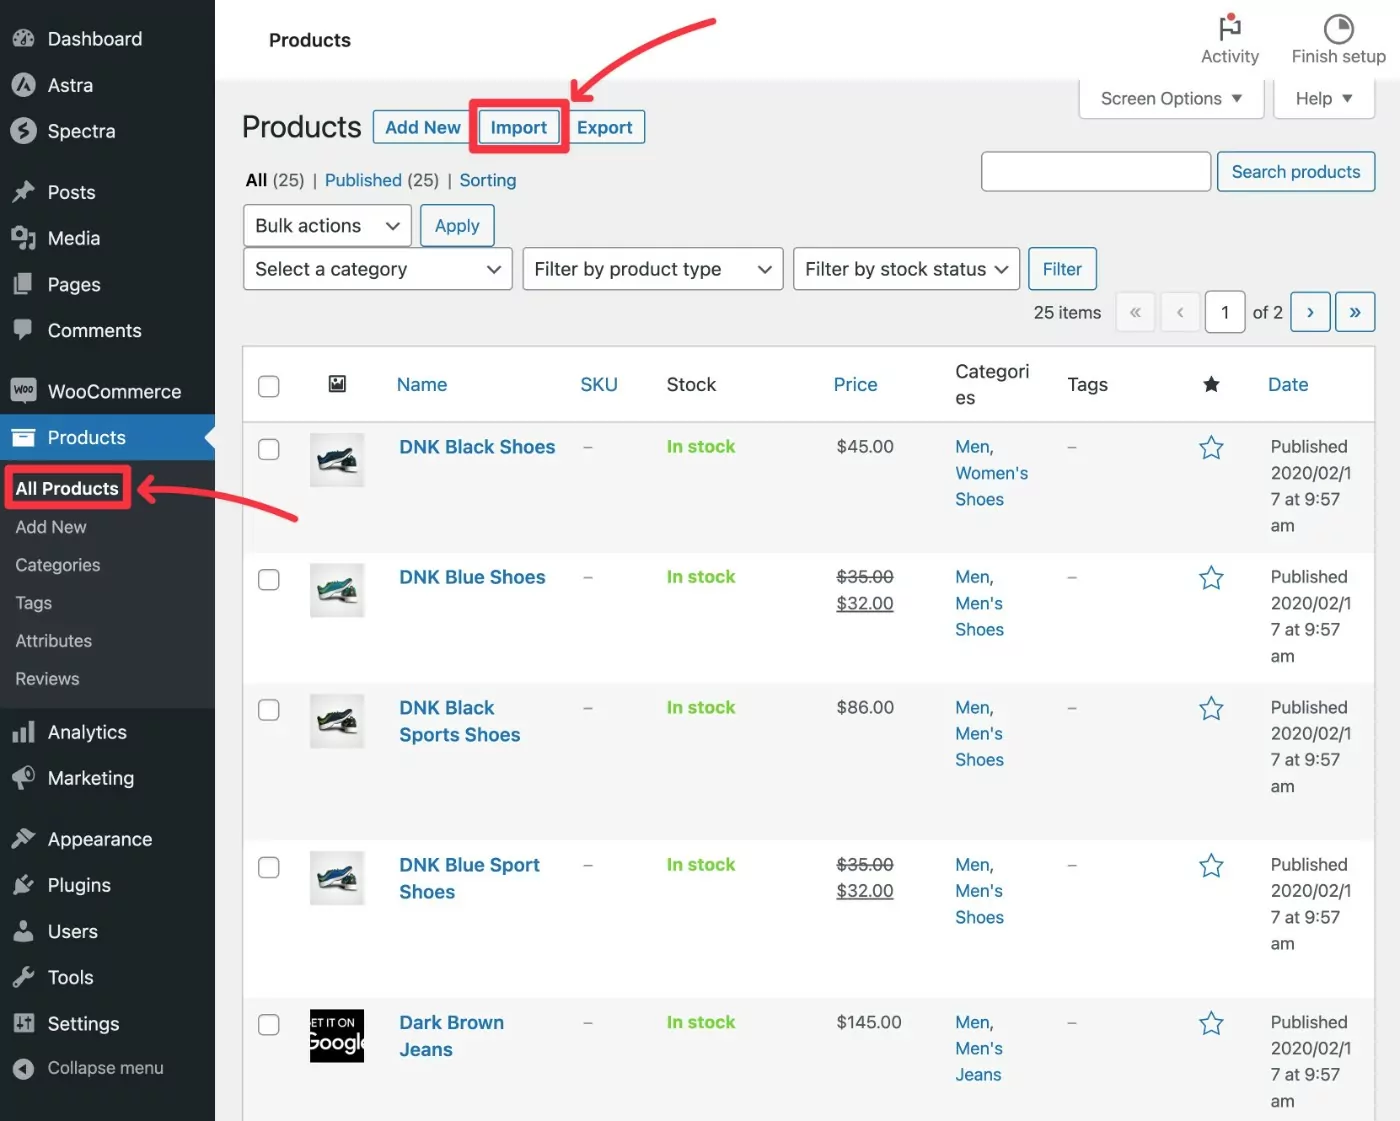
- Open your WordPress dashboard for the site where you want to import products with images.
- Go to Products → All Products.
- Click on the Import button.
Here’s what the process looks like:
Now, WooCommerce will launch the importer interface.
2. Choose Your Product CSV File
To start the import, you’ll need to select your product CSV file using the Choose file button. You can also choose how to handle updating existing products, if applicable:
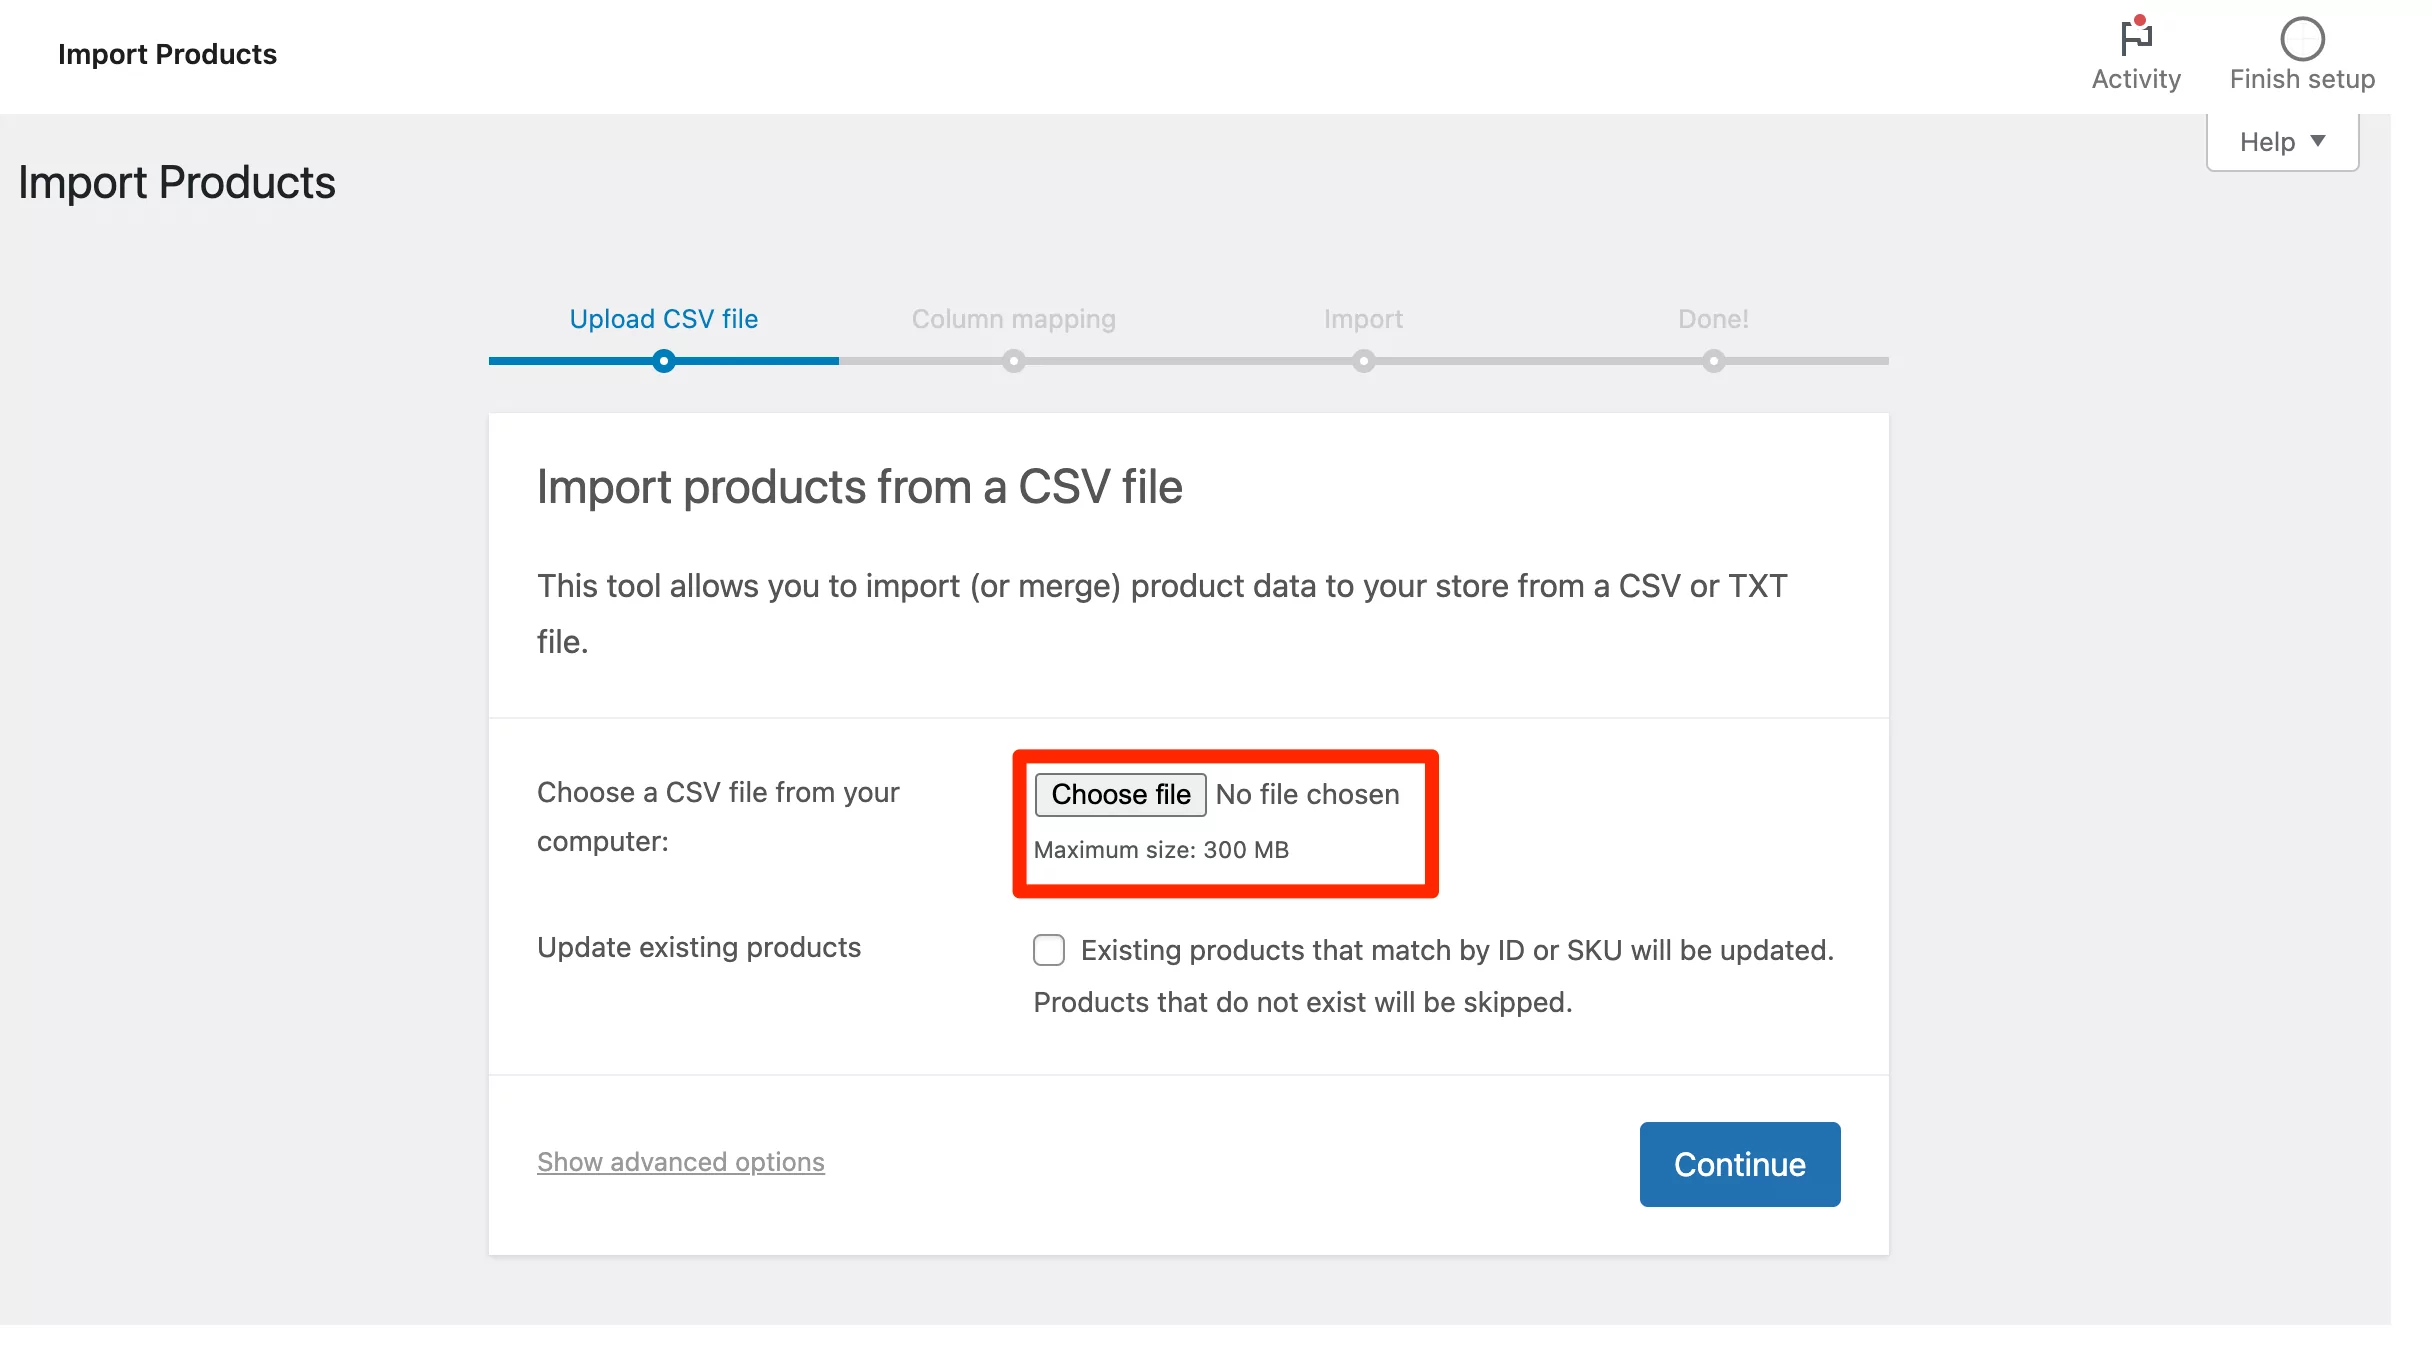
Click on Continue to proceed.
3. Map CSV Columns to WooCommerce Product Data
Next, you’ll need to map the columns from your product CSV to product fields in WooCommerce. If you created your CSV using the methods outlined earlier, WooCommerce should detect everything automatically.
However, we still recommend verifying that everything looks right. You’re also free to adjust things if needed. But again, you shouldn’t need to make any adjustments most of the time.
For each column/field, WooCommerce will show you an example from your actual CSV file (pulled from the first product data row in the file):
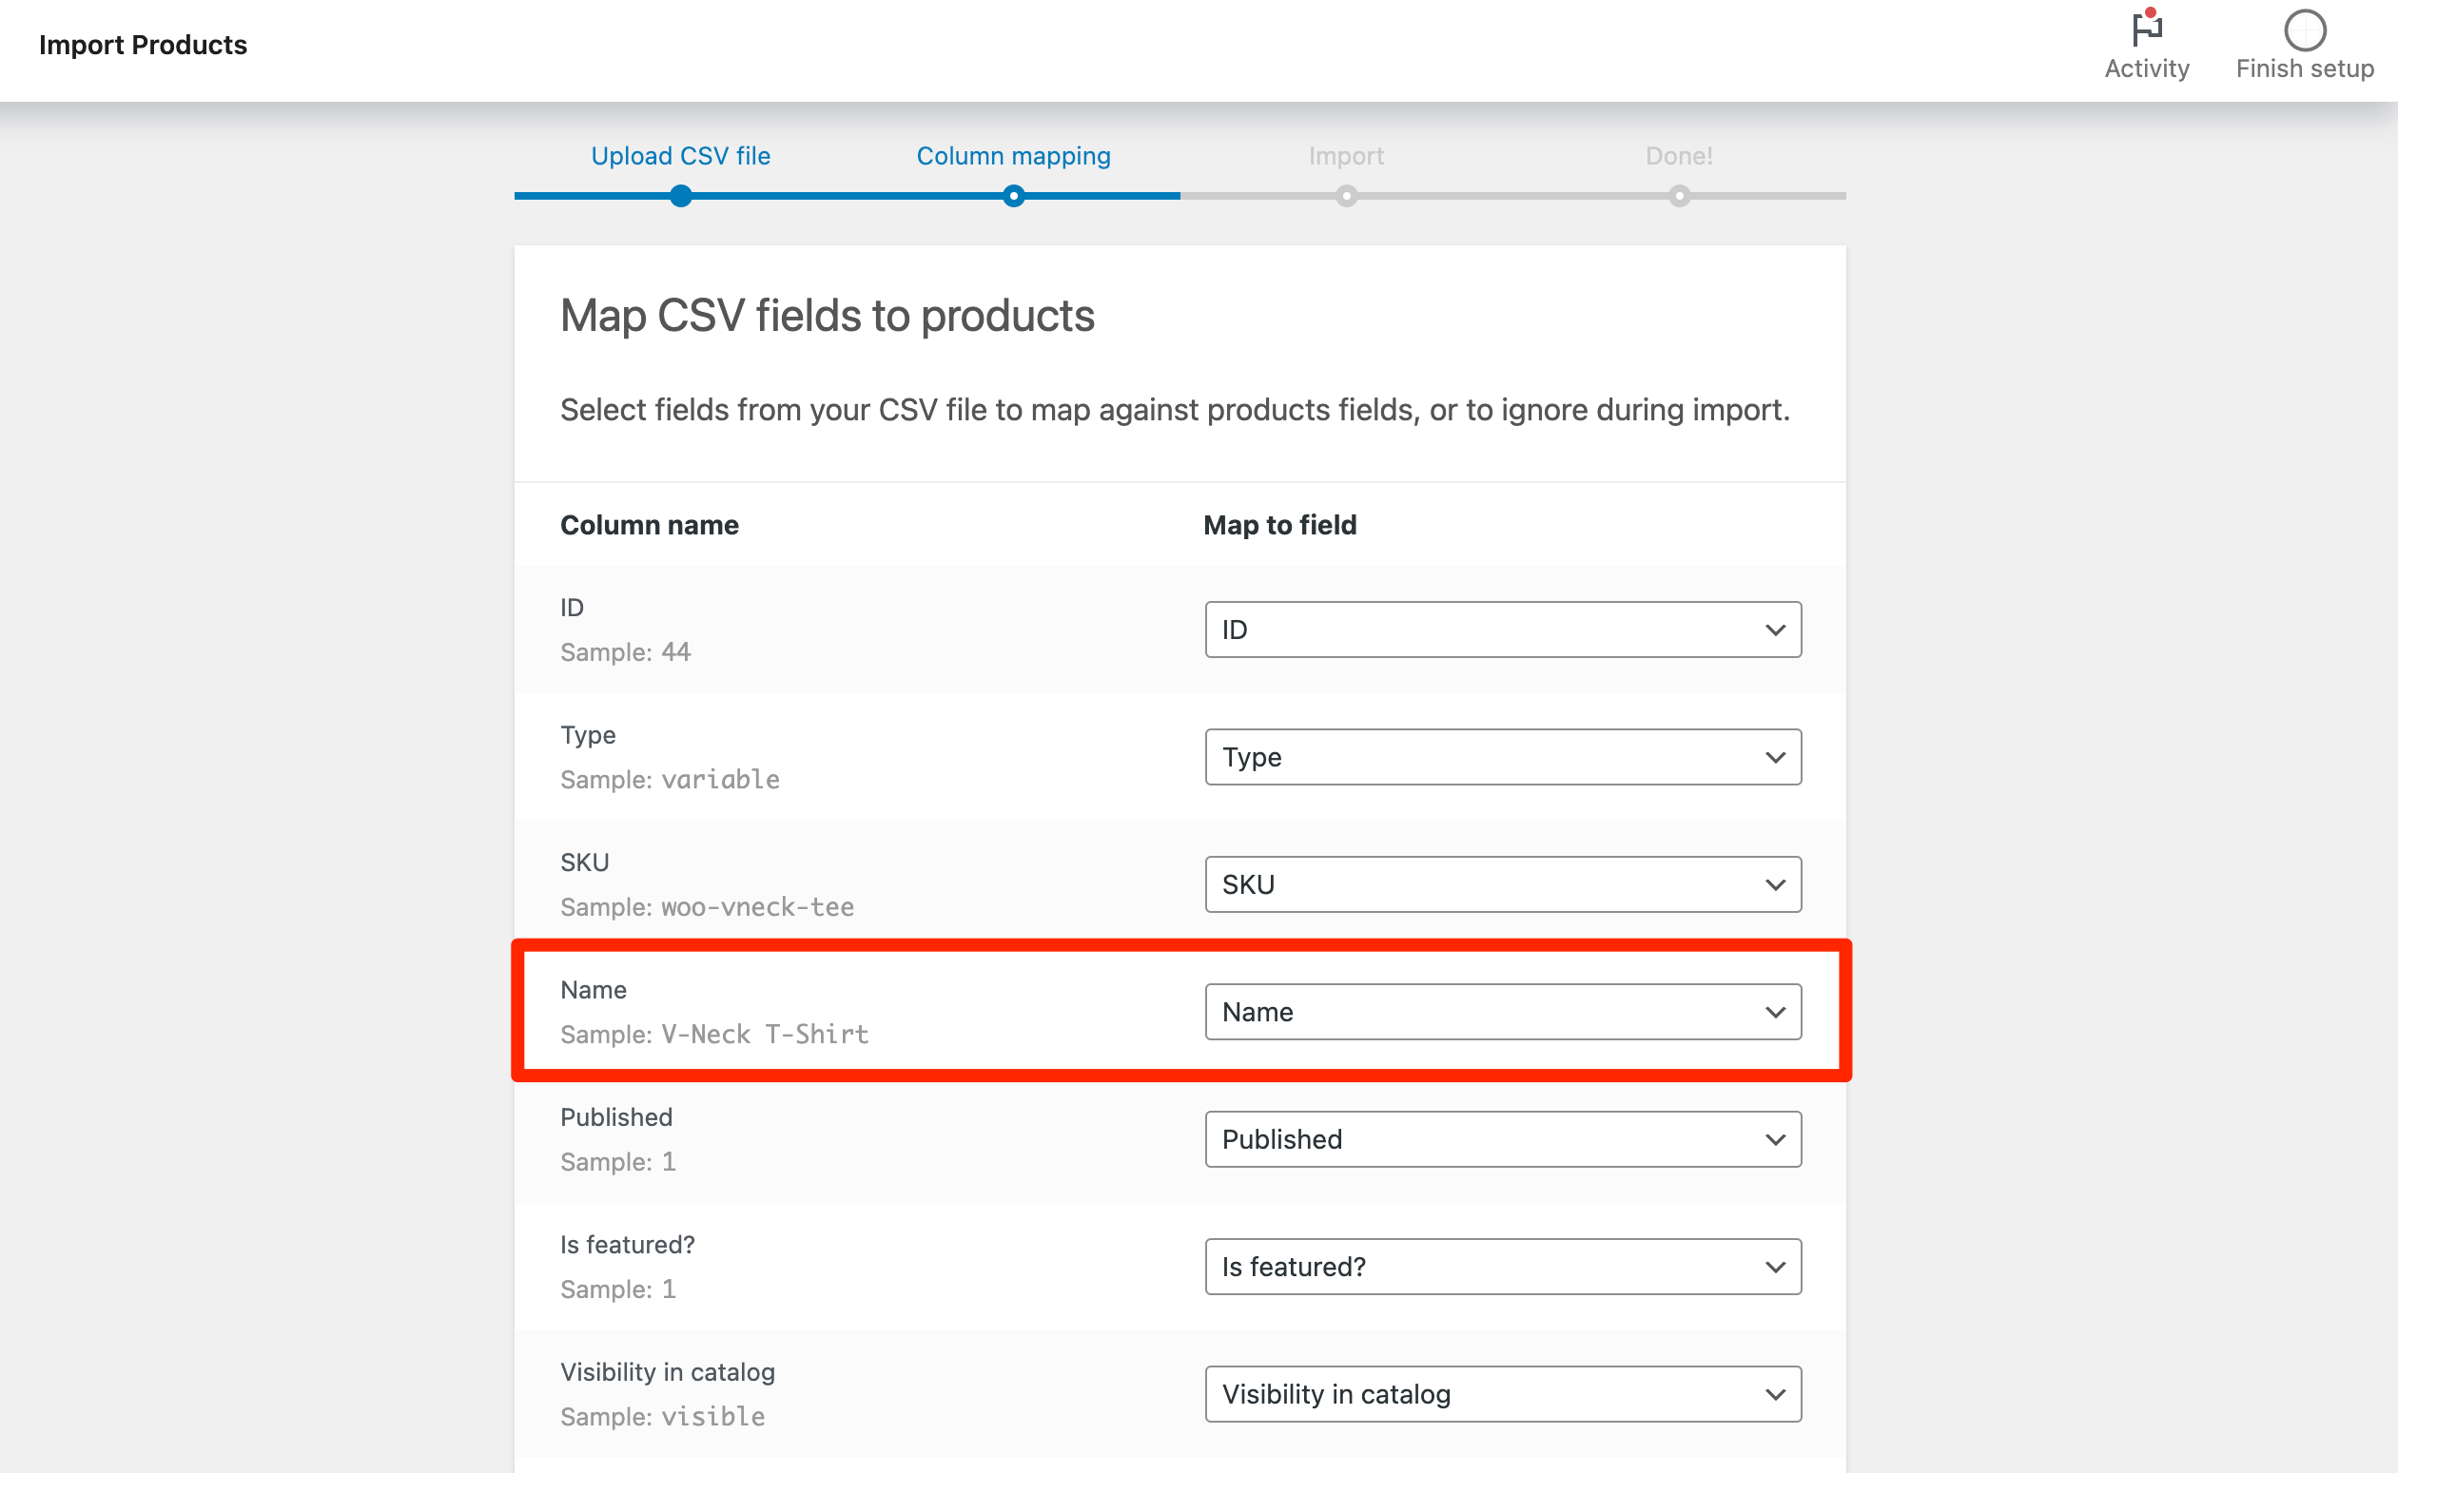
To make sure WooCommerce is detecting your product images, look out for the Images column. You should see the URLs to your product images in the sample:
Once you’ve verified that everything is correct, click on the Run the importer button at the bottom of the page. This will start the product import which may take a few minutes.
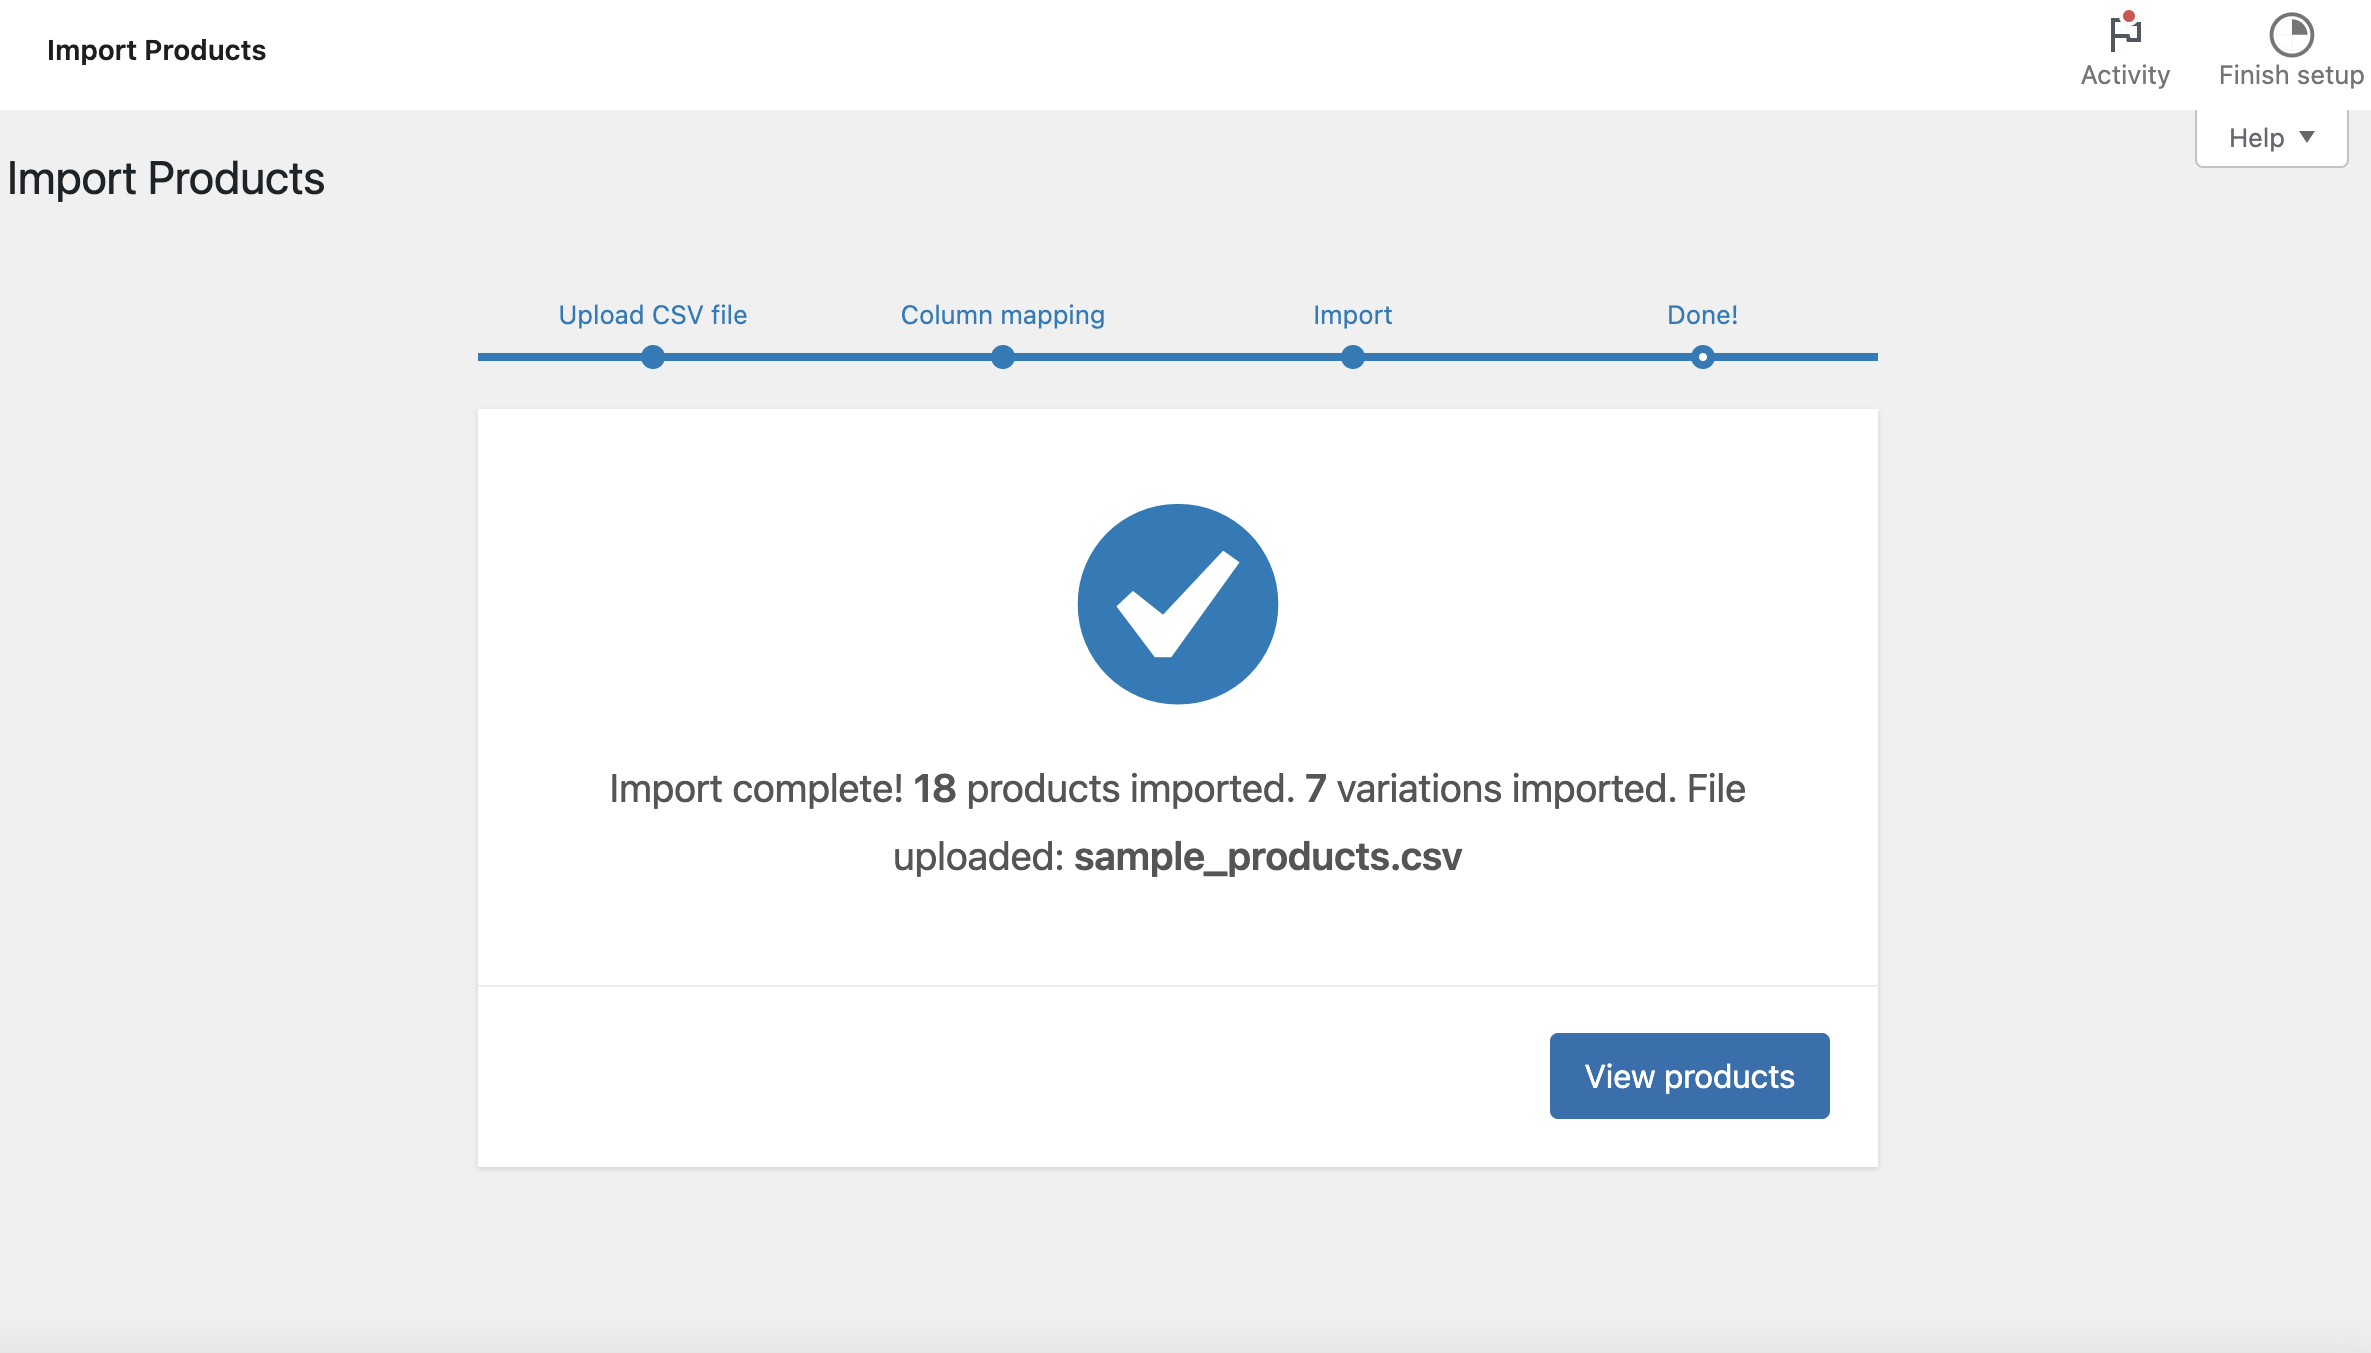
4. Check Your Imported Products and Images
After a short wait, you should see a success message to let you know that your product import is complete. To verify that everything worked right, click on the View products button:
Here, you can see that WooCommerce successfully imported the products, including the product images:
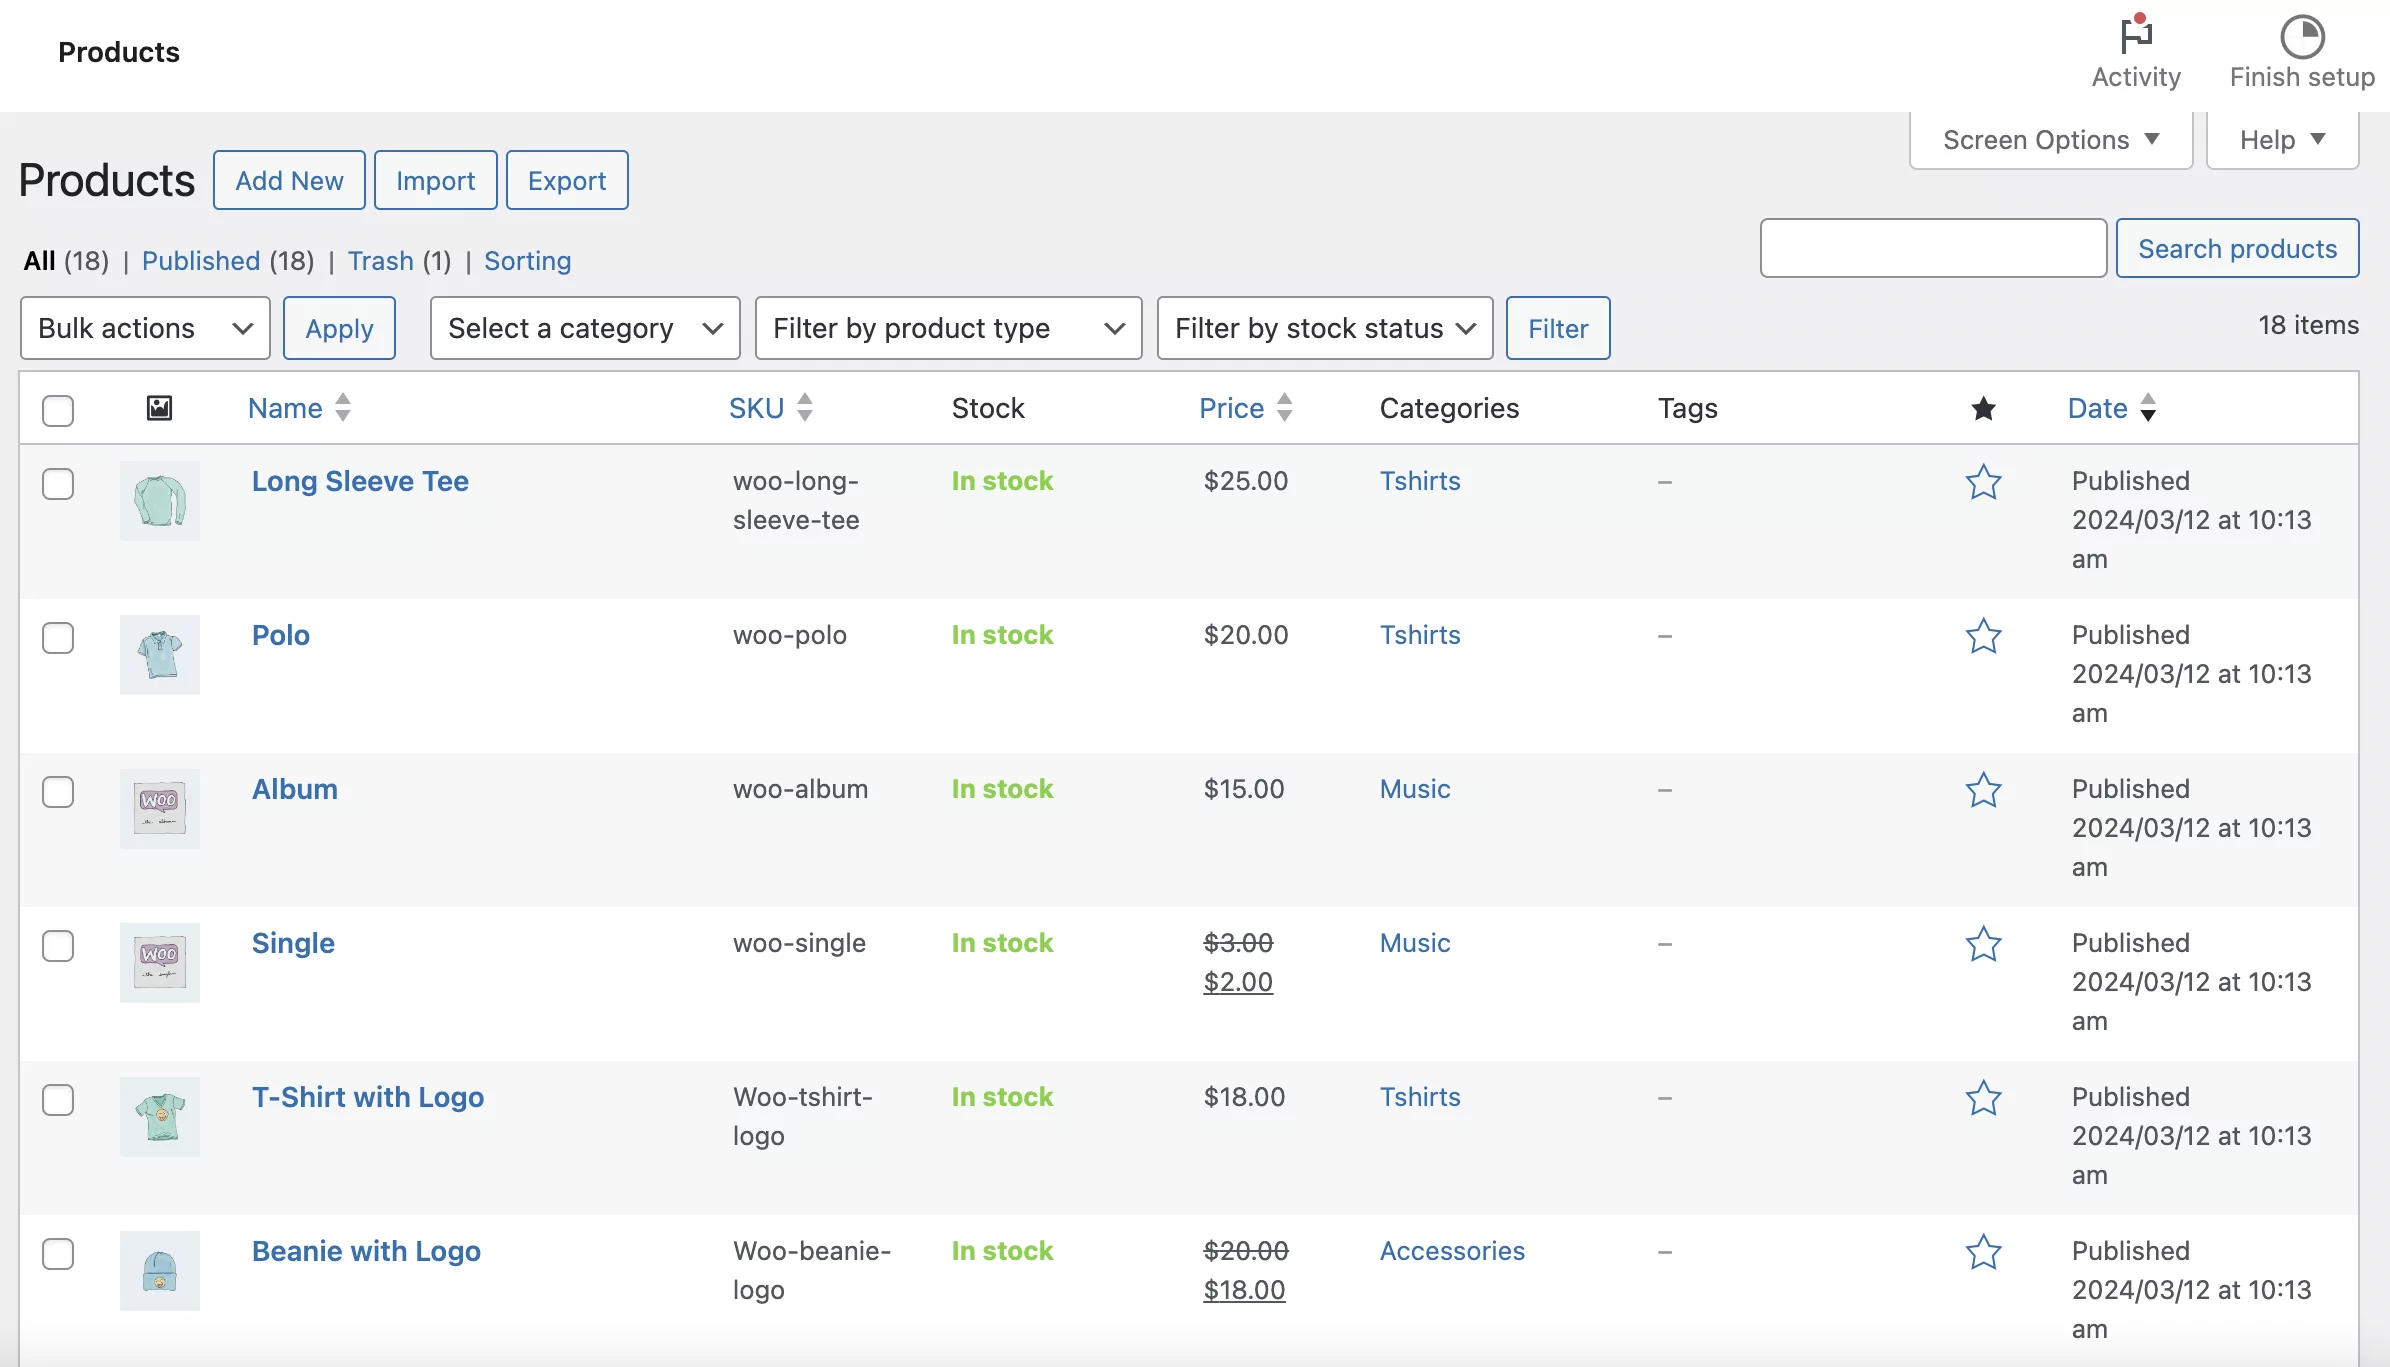
And that’s it! You’re all done.
How to Import WooCommerce Products With Images Using a Plugin
Now, let’s go over another WooCommerce import product with images tutorial. While this method requires a third-party tool, it gives you a little more flexibility.
We’ll be using the free Product Import Export for WooCommerce plugin. This way, you can perform transformations when importing product data (such as reducing the price by 10 percent).
However, it’s important to note that the built-in WooCommerce product importer will work fine for most stores. In fact, this plugin works very similarly, so we won’t go too in-depth with the tutorial.
That being said, here are the steps to follow:
- Install and activate the free Product Import Export for WooCommerce plugin.
- Go to WebToffee Import Export (Basic) → Import.
- Choose Product as the post type in Step 1.
- Upload your CSV file and choose Advanced Import in Step 2.
- Set up column mapping in Step 3. If you want to perform transformations, click on the arrow icon (pictured below).
- Finalize the import in Step 4.
If you do want to perform transformations (like changing the regular price), you can simply find the correct product field and click on the arrow icon to the right:
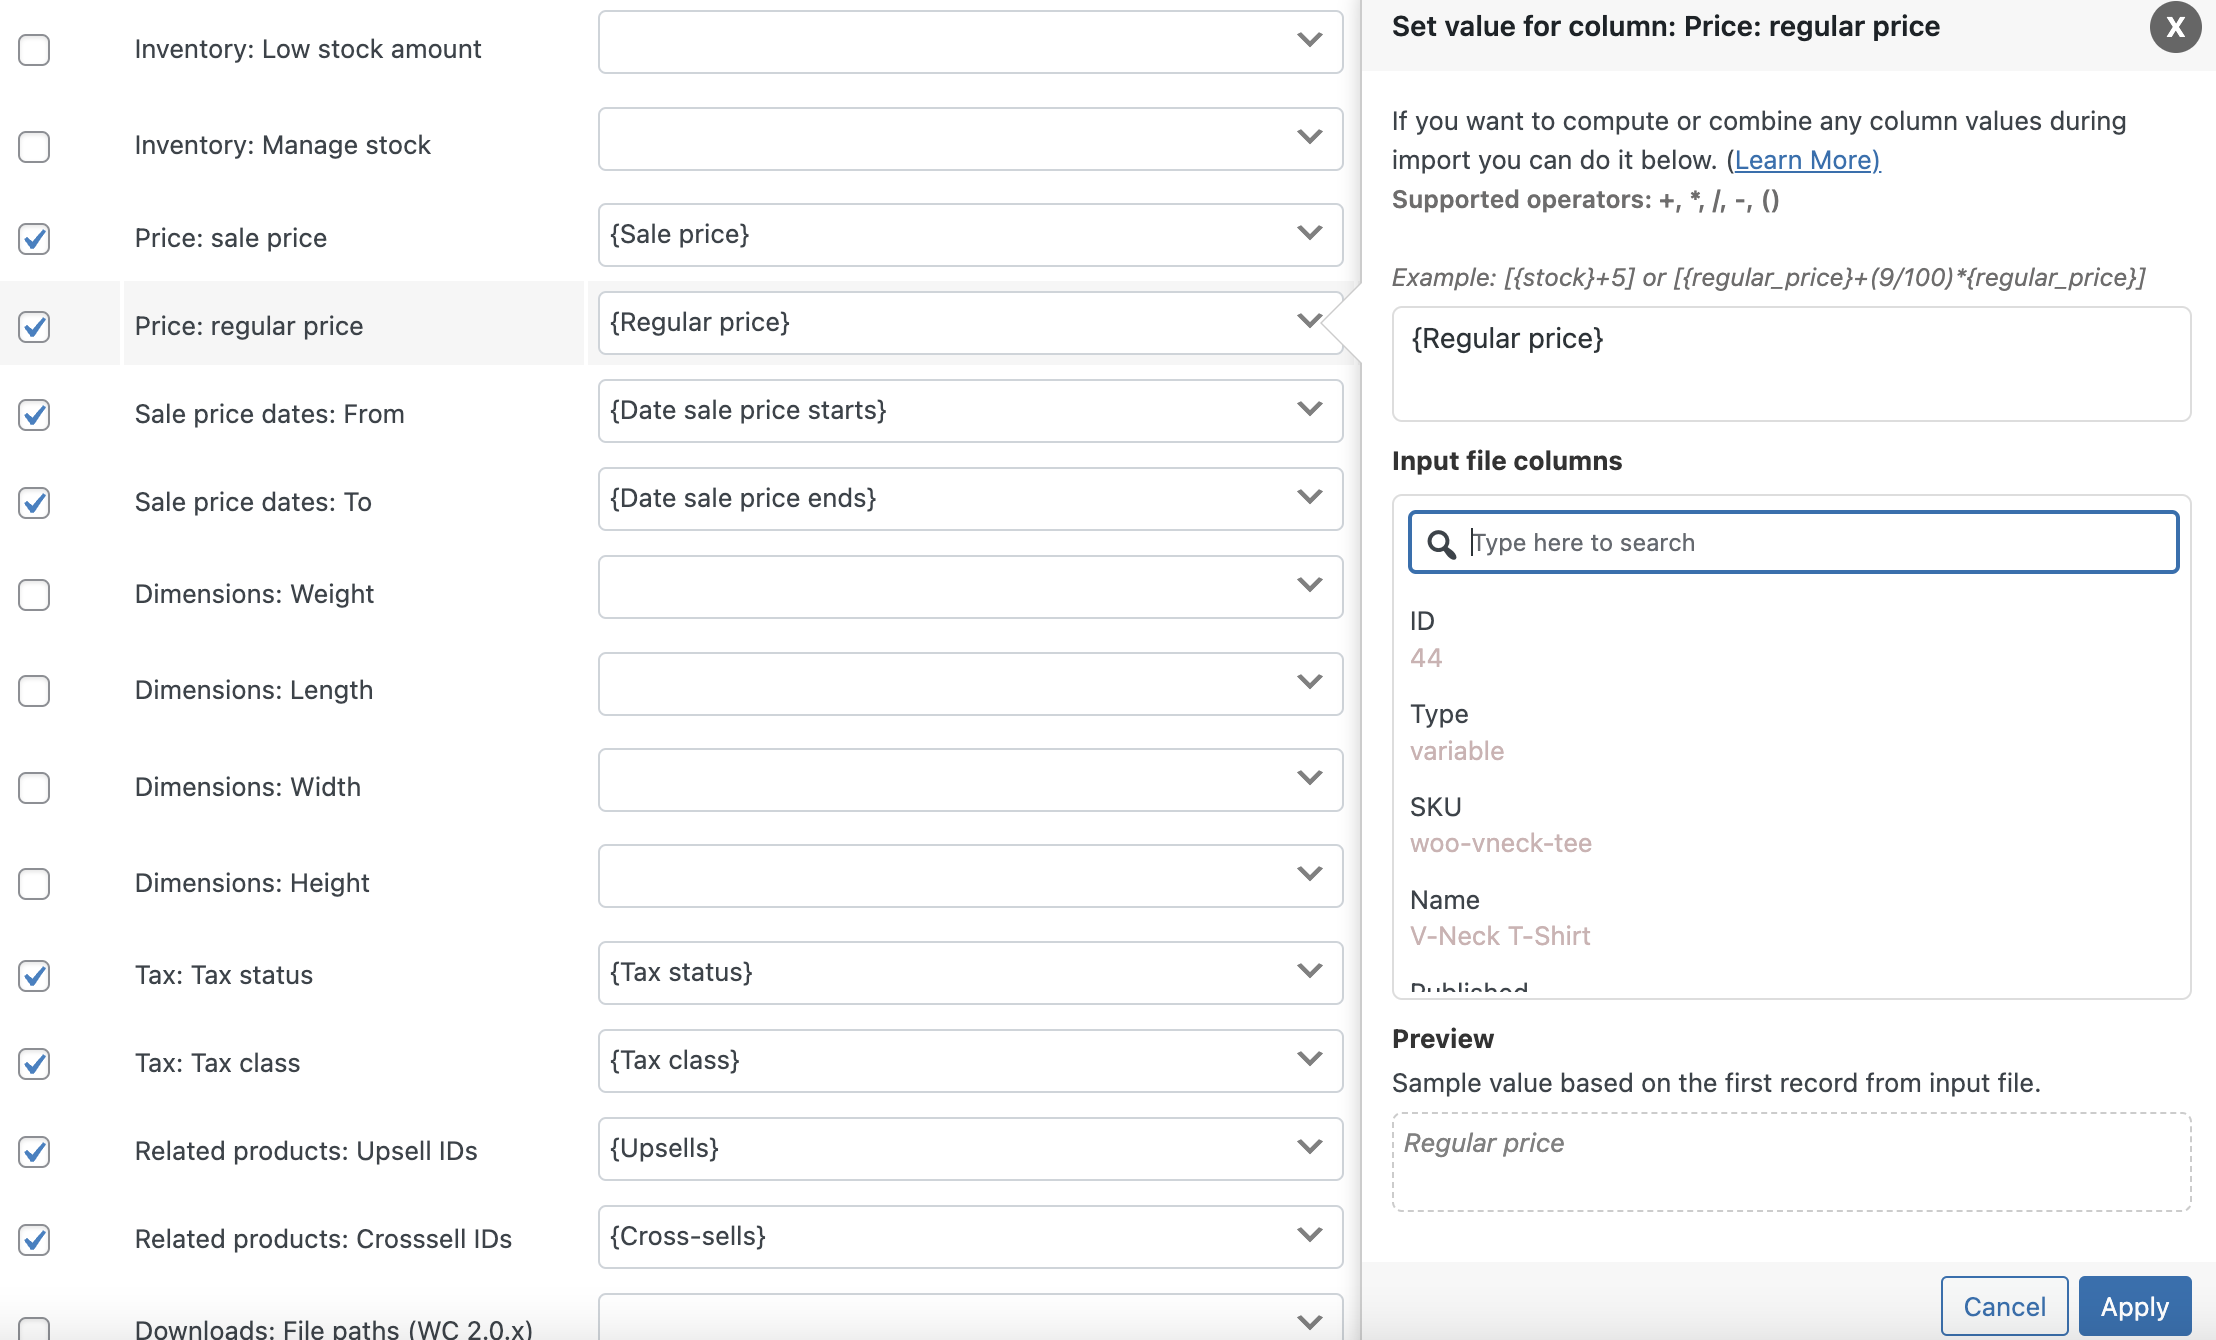
Once you’ve made your edits, click on the Apply button at the bottom of the popup.
How to Import Amazon Products to WooCommerce Without API
If you specifically want to import Amazon products to WooCommerce without the Amazon API, you have two options:
- You can add Amazon product details to a CSV file and then import that CSV file using one of the methods above. This works great for general product details but it will not work for Amazon product images.
- You can use a premium plugin to import all Amazon product details including images. This will also let you import Amazon reviews to WooCommerce, along with your products.
Let’s take a look at both methods.
How to Import Amazon Products to WooCommerce Using CSV
If you’re okay with manually adding product images after you import Amazon products, you can use the same CSV method from above. Here are the steps to follow:
- Create your product CSV file per the instructions above. You could add the product data manually or you could use some type of scraping tool to automatically scrape product data and add it to your CSV. If you want to link to Amazon for affiliate marketing, you can set the product type to “virtual” and add your affiliate link as the URL.
- Use the built-in WooCommerce importer tool to import your CSV.
- Manually add images to the products.
For affiliate marketing, it’s important to make sure you have the right to use the images. Amazon doesn’t let affiliates self-host product images that you download from Amazon (you need to use the API if you’re an affiliate).
How to Import Amazon Products to WooCommerce With Images
If you want to import Amazon product images and reviews to your store, you can use the paid Amazon Product Importer & Affiliate plugin. This is a third-party plugin, though you can purchase it from the WooCommerce Extensions Marketplace for $49 per year (or $4.09 monthly).
With the plugin, you can use a Chrome browser extension to choose which products to import while browsing Amazon. Then, the plugin helps you fully import those selected products to WooCommerce, including product images and customer reviews.
Here’s a quick guide on how it works:
- Purchase and install the Amazon Product Importer & Affiliate plugin in your WooCommerce store.
- Install the Advanced Importer Chrome extension on your web browser. You must use Chrome or some other Chromium-based browser.
- Add the Import Link and Secret key from the plugin’s settings to the Chrome extension’s settings. You can find these by going to Products → Importer Configuration in your WordPress dashboard.
- Open Amazon.com (or your local Amazon site) and browse the product page for a product that you want to import to WooCommerce.
- Click on the Advanced Importer Chrome extension icon in your browser bar. This will open a popup that lets you choose which product details to import to your store.
Once you click on the Import Now button, the product should show up on your WordPress site:

Then, you can repeat the process to import more Amazon products to WooCommerce.
Optional: Restrict Access to Imported Products
In some cases, you might want to import products that are only available to certain users on your site. For example, you might be bulk importing WooCommerce products to create a wholesale store (or wholesale versions of your existing products).
As part of that, you might want to restrict access to those products so that only authorized shoppers can view/purchase them. To set up these types of WooCommerce product restrictions, you can use the Paid Member Subscriptions plugin:
Paid Member Subscriptions Pro
The best plugin to offer members-only discounts and/or restrict access to WooCommerce products after you import them
Get Paid Member SubscriptionsPaid Member Subscriptions is a full-service WordPress membership plugin that lets you create unlimited free or paid membership levels. Better yet, the plugin includes a tight WooCommerce integration that enables you to do the following:
- Control which users/membership levels can view some/all of your WooCommerce products
- Control which users/membership levels can purchase some/all of your WooCommerce products (for example, you could make it so that anyone can view your imported products, but only authorized users can actually make a purchase)
- Offer members-only discounts, either sitewide or for specific products
- Sell one-time or recurring membership plans using WooCommerce
If you’d like to learn more about adding this type of membership functionality to your imported products, we have lots of posts on using Paid Member Subscriptions with WooCommerce:
- Creating private WooCommerce products.
- Setting up a members-only WooCommerce store.
- Hiding WooCommerce product categories.
- Creating a private WooCommerce store.
- Setting up WooCommerce role-based pricing.
- Understanding WooCommerce user roles.
Or, you can head to the Paid Member Subscriptions homepage to learn more about how the plugin can help you control access to your imported WooCommerce products.
Start Importing WooCommerce Products Today
If you’re moving items between stores, or migrating from a different eCommerce platform, it’s useful to import WooCommerce products with images. This way, you don’t have to do it manually, which makes it much more efficient.
To recap, here are three ways to import WooCommerce products with images:
- Use the WooCommerce built-in importer tool.
- Use a dedicated WooCommerce importer plugin like Product Import Export for WooCommerce.
- Use a dedicated solution to import Amazon products like the paid Amazon Product Importer & Affiliate plugin.
Regardless of how you import products to WooCommerce, you can also consider using the Paid Member Subscriptions plugin to restrict access to those products or offer special members-only prices.
Do you have any questions about importing WooCommerce import products with images? Let us know in the comments below!
Related Articles

How To Create a Divi Membership Site
If you’re thinking of building a membership site in WordPress, you’ll need a solid theme and a membership plugin that pairs well with it. In this complete guide, we’ll show you how to create a Divi membership site using the popular Divi theme in combination with the Paid Member Subscriptions plugin.
Continue Reading
How to Hide Products by User Roles in WooCommerce?
Do you want to easily hide products by user roles in WooCommerce? Some WooCommerce store owners have a unique requirement where they want to hide certain products from all but a few specific groups of users. There may be many reasons for this, including selling exclusive products only to the more loyal customers, with a […]
Continue Reading
How to Create WordPress Redirects to Another Page, External URLs, or a Subdomain
There are different reasons WordPress site owners want to create WordPress redirects to another page, external URL, or a subdomain. The redirect can be based on an important user action or set up to redirect all users landing on a particular page. Whatever the type or need of your redirect, WordPress offers the flexibility to […]
Continue Reading