
Table of Contents
- 1 What Are WordPress User Roles and Capabilities?
- 2 What Are the Default WooCommerce Roles and Capabilities?
- 3 How to Create New Roles With a WooCommerce User Roles Plugin
- 4 How to Register Users for Your Custom WooCommerce User Roles
- 5 How to Customize Your Store Using WooCommerce Roles
- 6 Get Started With WooCommerce User Roles Today
Interested in how you can use WordPress and WooCommerce user roles to enhance your eCommerce store?
At a basic level, WooCommerce roles let you control what store admins and shoppers can do while on your WordPress site. For example, roles, and their companion capabilities, are what let store admins manage and edit products, but not your actual shoppers (who can’t even access the WordPress dashboard).
However, you can also use WooCommerce roles in more advanced ways to segment your shoppers into groups and even restrict certain users from buying/viewing your products or offer special discounts to certain classes of users.
In this post, we’re going to cover everything that you need to know about WordPress and WooCommerce user roles and capabilities:
- What are WordPress and WooCommerce roles in general?
- How to create your own custom WooCommerce roles
- How to manually or automatically assign roles to certain customers upon registration
- How to customize your WooCommerce store using roles, such as restricting access or offering special discounts
What Are WordPress User Roles and Capabilities?
In order to help you understand WooCommerce user roles and capabilities, we’re first going to start by discussing roles and capabilities in a general WordPress sense.
In a nutshell, WordPress roles and capabilities let you control what registered users can do on your site. The two concepts are closely linked:
- Capability – this is a single, specific action that a user can take. Examples of individual capabilities include “Publish blog posts”, “Install plugins”, “Disable plugins”, “Edit other users’ blog posts”.
- Role – this is a collection of capabilities that you can assign to users.
For example, if you wanted to register an account for a blog writer on your site, you could assign their account the Author role. The author role would grant that user the individual capabilities to perform actions such as creating new posts, editing their own posts, uploading media files, publishing their own posts, etc.
By default, WordPress sites come with five roles:
- Administrator – gives you every single capability. This is your default role if you’re the person who set up WordPress.
- Editor – can publish/edit all the content on your site, even from other users.
- Author – can publish/edit their own content, but not content from others.
- Contributor – can add their own content, but cannot publish it to the live site.
- Subscriber – has no special capabilities other than their user account.
For WordPress multisite networks, WordPress adds a sixth default role – Super Administrator. This is the administrator for the entire network, whereas the regular Administrator role can only control individual sites.
You can view a detailed comparison in the official WordPress roles vs. capabilities table.
What Are the Default WooCommerce Roles and Capabilities?
WooCommerce roles and capabilities follow the exact same concept, but are specific to WooCommerce stores.
These new capabilities include individual actions such as “View WooCommerce reports”, “Manage WooCommerce settings”, “Manage WooCommerce products”, “Add coupons”, etc.
To help you control these capabilities and organize your customers, WooCommerce also adds two more default roles to your site:
- Customer – this is the default role for shoppers. Users are assigned this role when they register at checkout or via your store’s signup process. This role is roughly equivalent to the default Subscriber role, but it also gives shoppers the option to view their past/present orders.
- Shop Manager – this is a useful role to give authorized users access to important backend WooCommerce processes without making them a full Administrator. They’ll be able to manage WooCommerce settings and products and view reports, but they won’t get the ability to install plugins and access other key Administrator tasks.
How to Create New Roles With a WooCommerce User Roles Plugin
Now, let’s move away from the theory and get into some actionable ways that you can use WooCommerce user roles on your store.
We’ll start at the beginning with how to create new custom WooCommerce user roles, complete with their own sets of custom capabilities if needed.
For example, let’s say your store has two types of customers:
- Retail customers
- Wholesale customers
To better organize these customers and also optimize the experiences for each type of customer, you might want to split them into two different user roles. So instead of just using the default “Customer” user role that WooCommerce uses, you could have separate “Retail Customer” and “Wholesale Customer” roles. In the next section, we’ll show you how you could automatically assign the proper role to each type of customer.
To create custom WooCommerce roles (or edit the existing ones), you can use the free Profile Builder plugin. In addition to letting you work with WordPress roles, it will also let you create custom user registration forms, which will come in handy in the next section.
To get started, install and activate the free Profile Builder plugin from WordPress.org. Then, here’s how to use it…
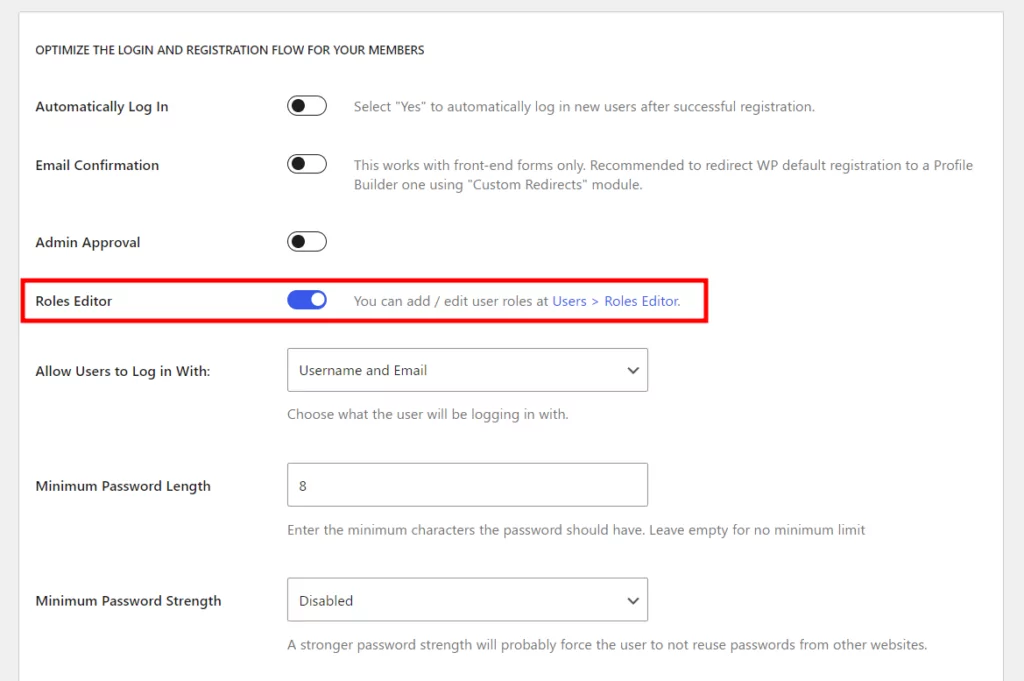
1. Activate Roles Editor Module
To enable the role editor, go to Profile Builder → Settings. Then scroll down, find the Roles Editor option, and activate it.
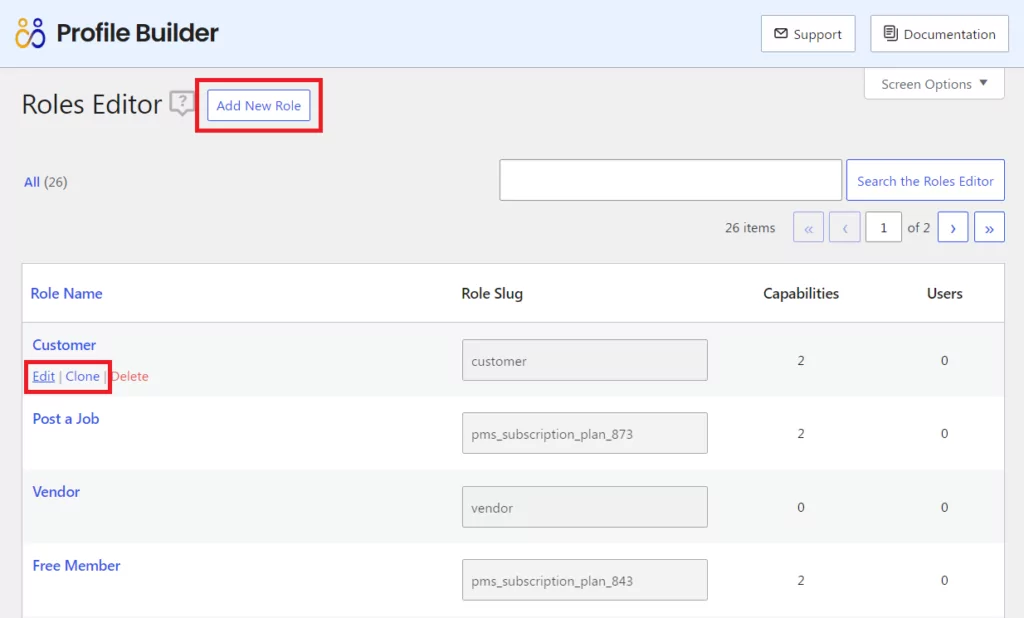
2. Create, Clone, or Edit Roles
Once you’ve activated the roles editor module, you can go to Users → Roles Editor to edit your site’s existing roles or create new WooCommerce roles.
You should see the five default WordPress roles as well as the two roles that WooCommerce adds. You’ll also see a list of the number of capabilities that each role has.
You can either:
- Hover over an existing role to edit it.
- Hover over an existing role to clone it. This creates a new role that starts with all the same capabilities as the role you cloned.
- Click the Add New Role button to create a new role from scratch.
No matter which option you choose, you’ll end up in the same interface to manage capabilities.
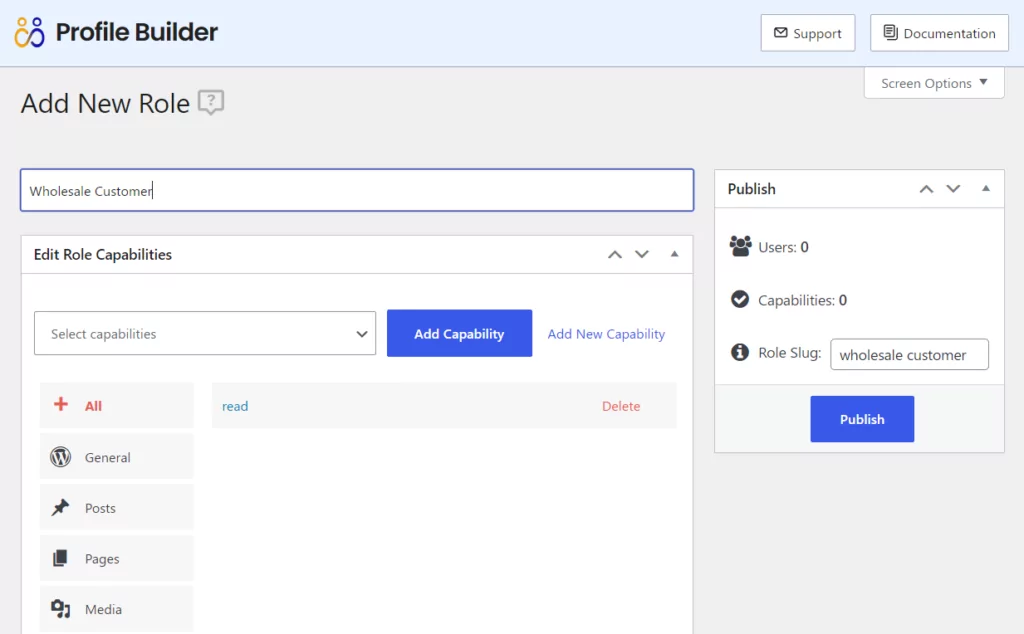
For this example, let’s say you want to create a new Wholesale Customer role. The simplest way to get started would be to clone the existing Customer role:
3. Edit Role Capabilities
Now, you’ll be able to manage the individual capabilities for the role that you’re creating/editing.
The default “Customer” role has a single capability – “read”. By cloning that role, your new “Wholesale Customer” role will start off with that same capability:
If you wanted to add more capabilities, you could do that by searching for them in the box. For example, here you can see some of the many WooCommerce-related capabilities that you can add:
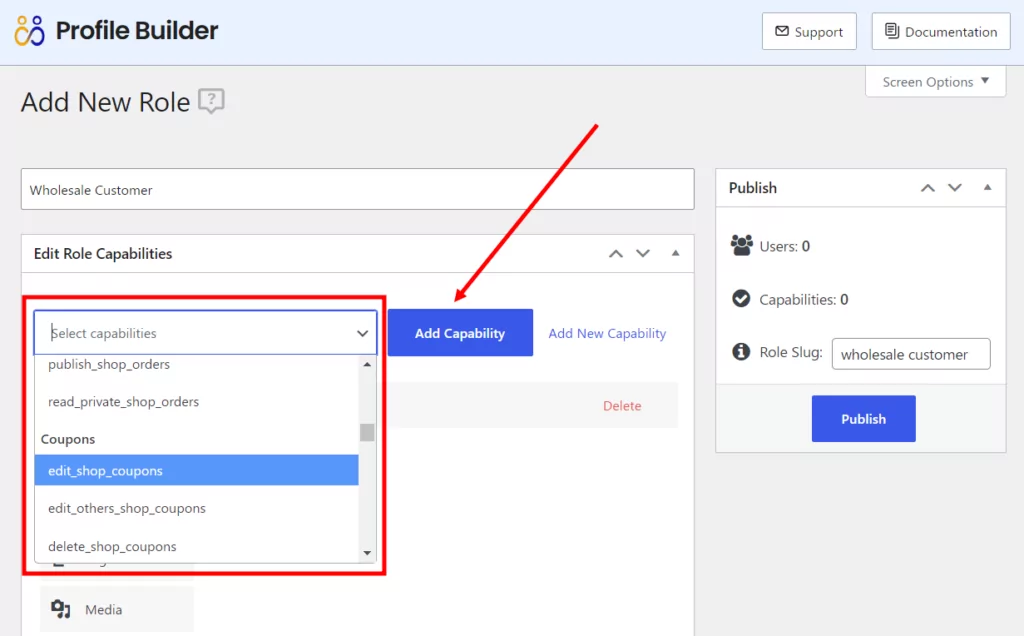
For this example, you probably wouldn’t want to add any new capabilities to a “Wholesale Customer” role. However, you might have situations where it does make sense to grant new capabilities.
For example, you might want to create a more limited store manager role that can only edit products and not access other store settings.
Once you’re happy with how things look, click the Publish button to make your new role live.
Now, let’s talk about some of the ways that you can start assigning your new role to your store’s users.
How to Register Users for Your Custom WooCommerce User Roles
Once you’ve created your custom WooCommerce user roles, you can manually assign them to users by editing their profiles. With the Profile Builder plugin active, you’ll even be able to assign multiple roles to a single user (normally WordPress only lets you choose a single role):
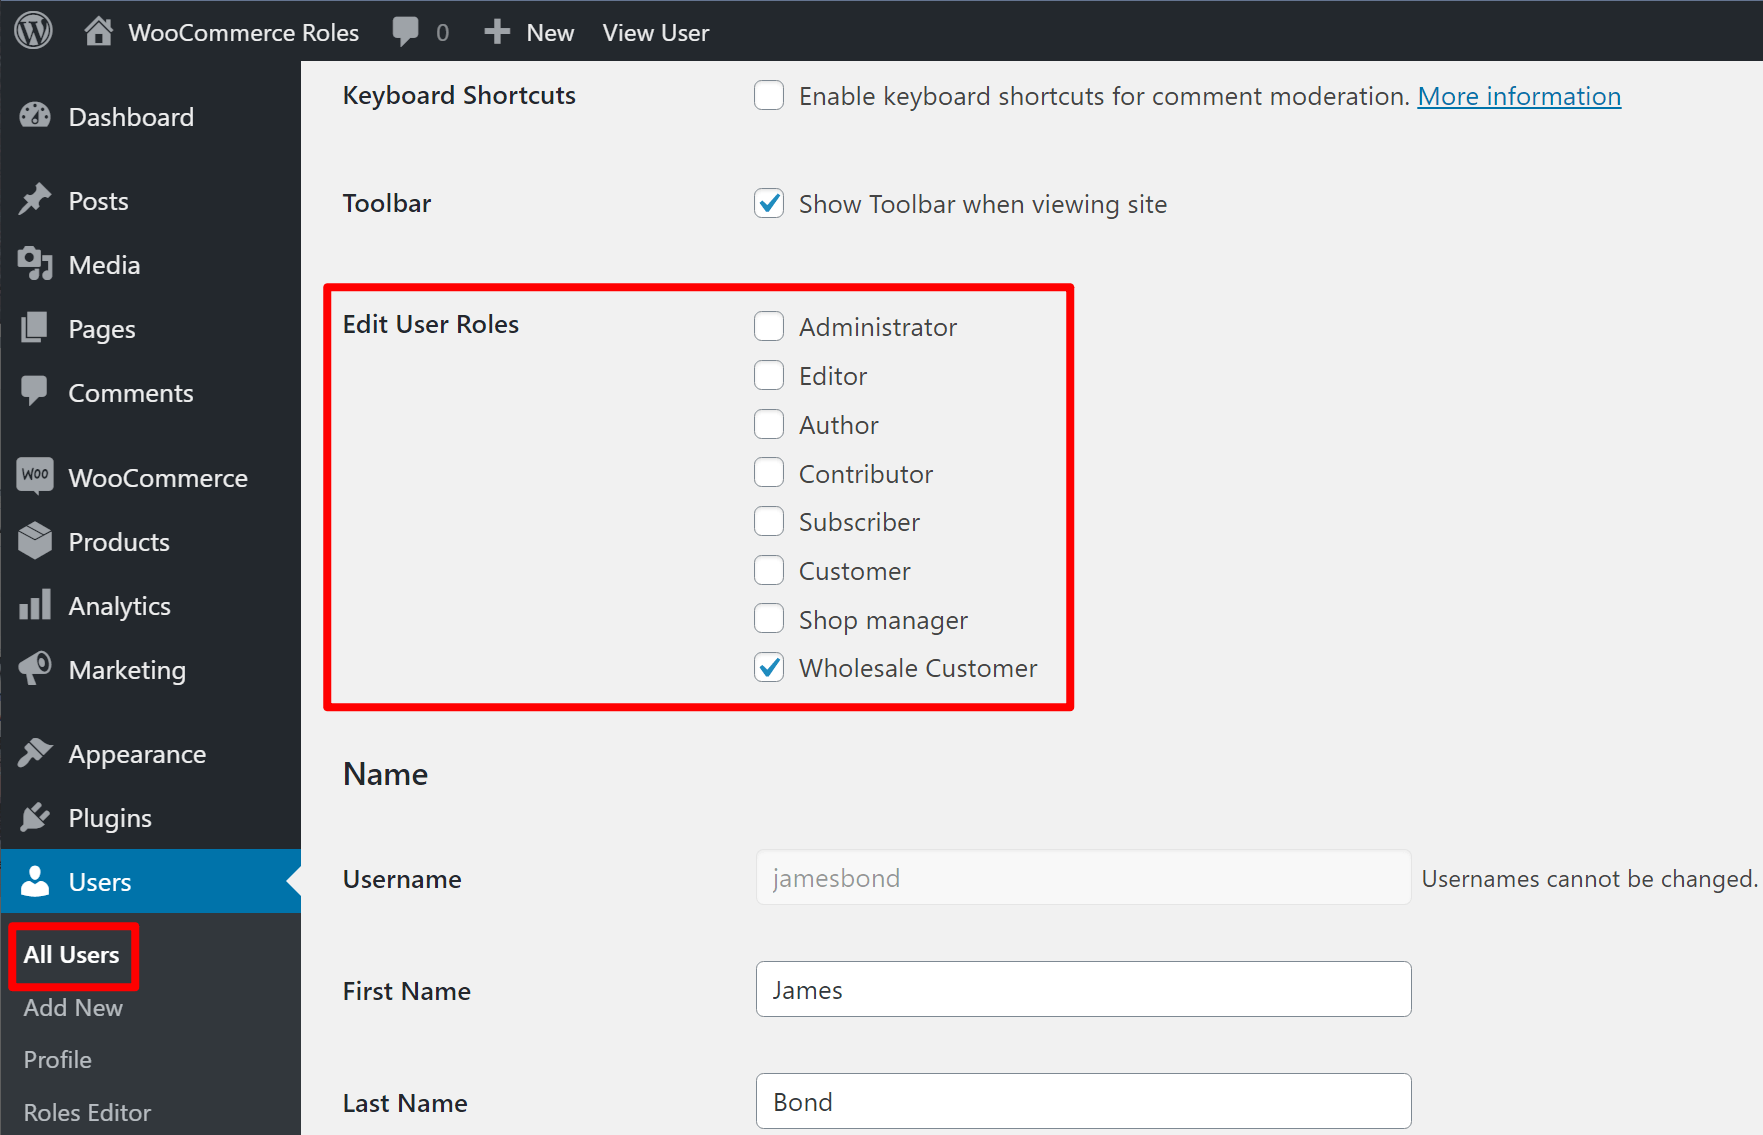
However, you’ll likely want a more automated solution than manually editing roles for each user.
Here, the Profile Builder plugin can help by letting you create custom user registration forms. You can then assign users to different roles based on the registration form they use or even how they answer a single registration form.
We’ll start by showing you a simple implementation that you can set up with the free version of Profile Builder. Then, we’ll showcase a more flexible use case that you can achieve with the premium version of Profile Builder.
Profile Builder Pro
The best WooCommerce user roles plugin to create/edit roles, create registration forms, and restrict access to products.
Get Profile BuilderMethod 1: How to Create a Registration Form That Assigns Users to Role
With the free version of Profile Builder, you can create a single custom registration form.
Then, when you’re adding the shortcode for your Profile Builder registration form, add the “role” parameter to control the user role for people who use that form. For example, to add all people who submit a form to the Wholesale Customer role, you would use this shortcode:
[wppb-register role="wholesale_customer"]
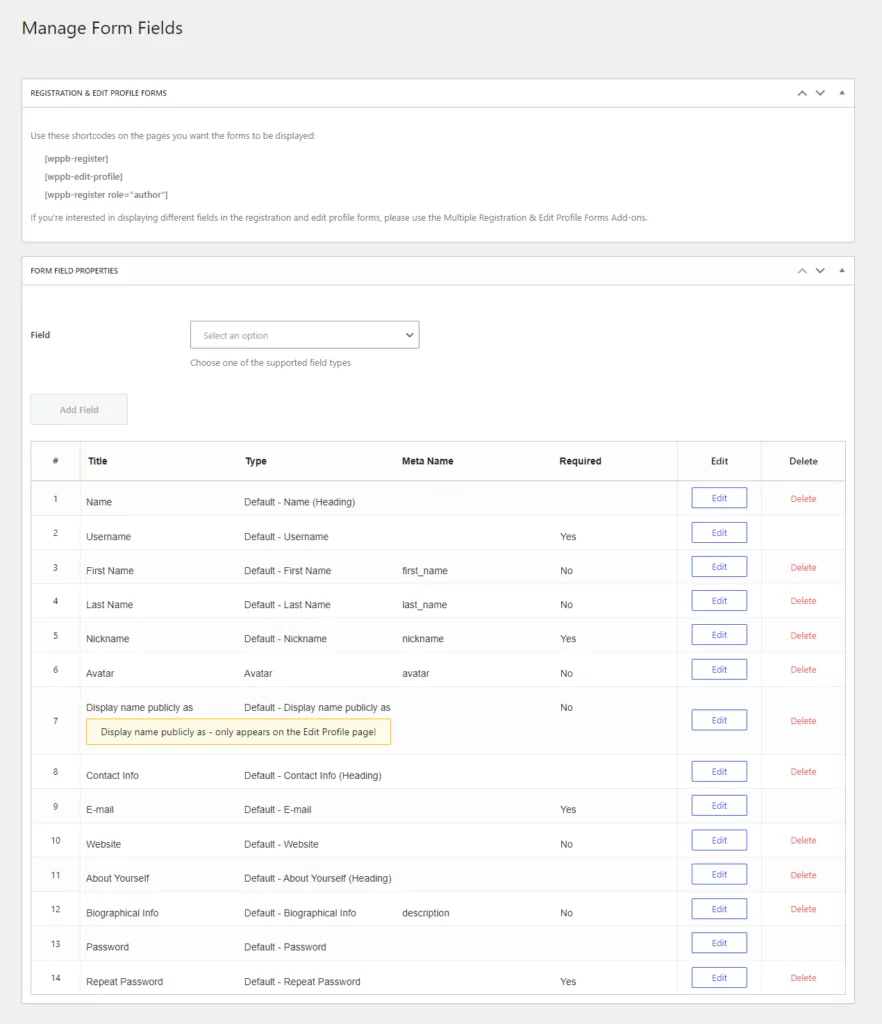
To control the fields that display in your form, you can go to Profile Builder → Form Fields:
Method 2: How to Let Users Choose Role and Require Admin Approval
With the premium version of Profile Builder, you can create a much more user-friendly form and also enhance your backend processes.
With this method, you can create a single unified registration form. On that form, users can choose whether they’re retail customers or wholesale customers. Then, if they choose the wholesale customer option, you can require manual admin approval for their account. You could also use conditional logic to show extra fields for wholesale customers.
Or, the premium version also lets you create multiple registration forms, which lets you create completely separate forms for each user role, each with different registration fields.
1. Create a Form
To get started, go to Profile Builder → Form Fields.
First, you can edit the basic fields on your registration form. Then, to let users choose their WooCommerce role, you can add a Select (User Role) field:
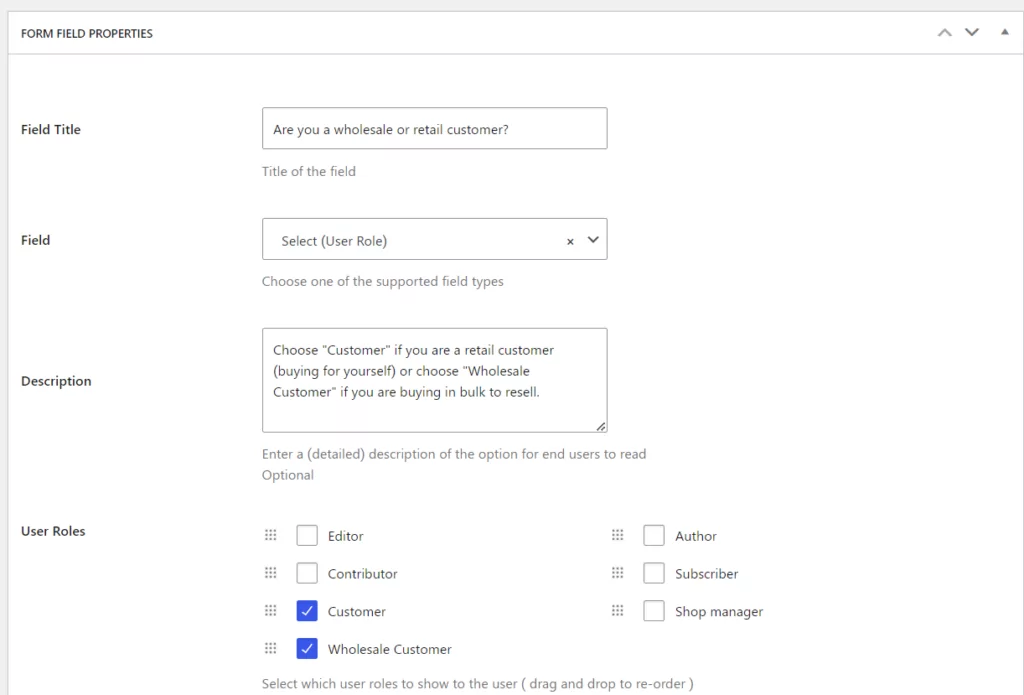
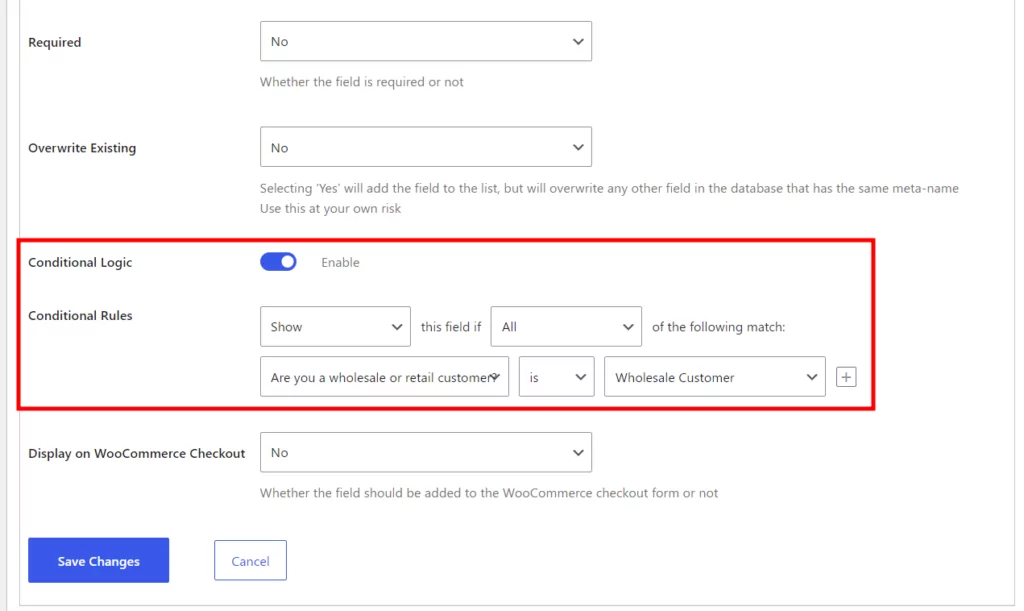
If you wanted to go further, you could optionally use conditional logic to add extra fields that only display if a user selects “Wholesale Customer”. For example, you could collect additional information about their business to verify their wholesale status, like a business phone number. For this, you’ll have to create another custom field, a “Phone” field, and enable Conditional Logic on it. You should then set the Conditional Rules to only show this field if the user chose “Wholesale Customer” in the previous field.
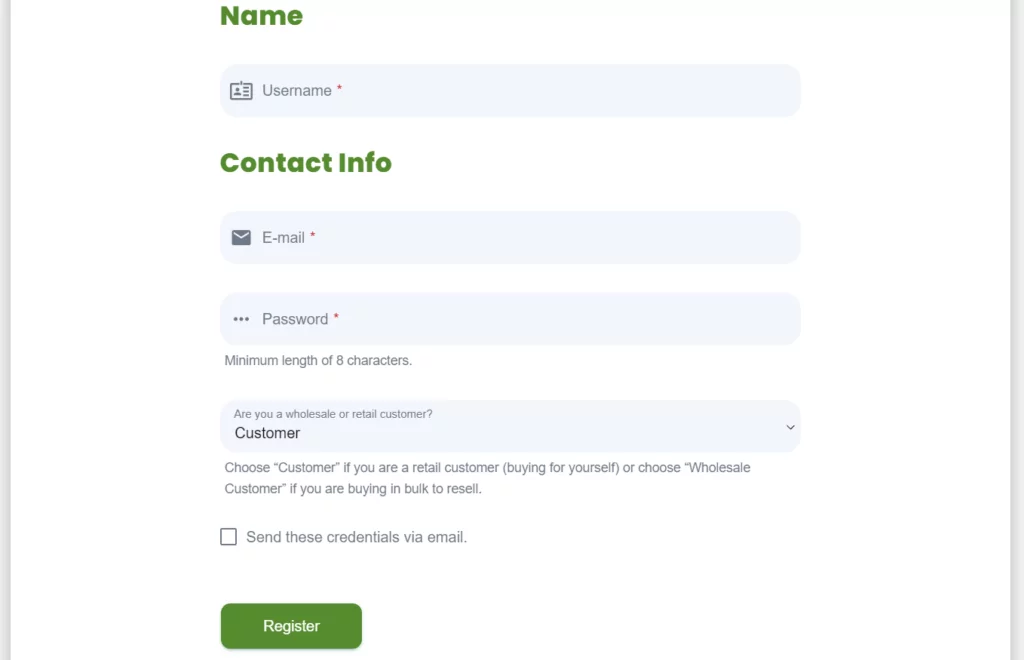
Now, when you add your custom registration form, users will have the option to choose their role:
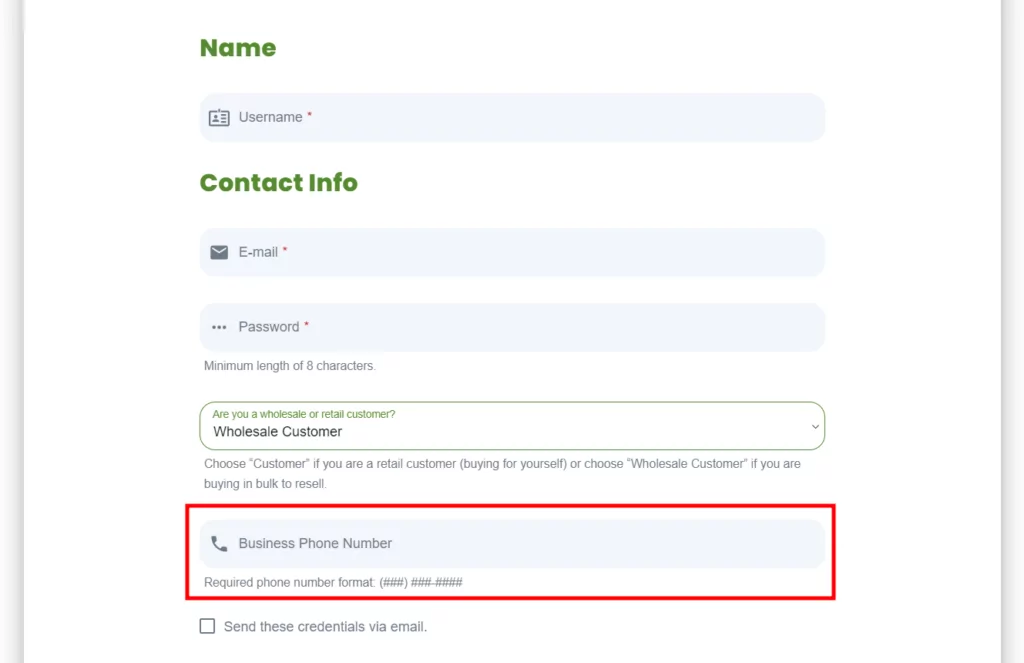
If they select “Wholesale Customer”, they’ll be prompted to enter additional information:
When users submit the form, they’ll be automatically added to the role that they selected.
2. Require Admin Approval (Optional)
You might have situations where you don’t want just anyone to be able to access a certain user role. For example, in our “Wholesale Customer” use case, you wouldn’t want to let just any user sign up as a wholesale customer without verification.
To adjust for this, the premium version of Profile Builder lets you require manual admin approval for certain roles. Users can still register for any role that you selected. However, if they choose a role that requires admin approval, their account won’t be active until you confirm it yourself.
To enable this feature, go to Profile Builder → Settings. Turn the admin approval feature on. Then, use the checkboxes to mark the specific roles for which you want to require admin approval:

How to Customize Your Store Using WooCommerce Roles
Once you’ve registered shoppers for your custom WooCommerce roles, let’s talk about some of the ways that you can customize and enhance your WooCommerce store based on those roles.
We’ll cover a few different scenarios:
- Restrict viewing WooCommerce products based on role to create a members-only store for some/all of your products;
- Restrict purchasing WooCommerce products based on role;
- Give special discounts to users based on role.
1. Restrict Viewing Products Based on Role
In addition to helping you create custom WooCommerce roles and registration forms, Profile Builder can also help you restrict access to any content on your site by user role, including your WooCommerce products.
If you use this feature, only customers with specific WooCommerce roles will be able to see the products that you restrict.
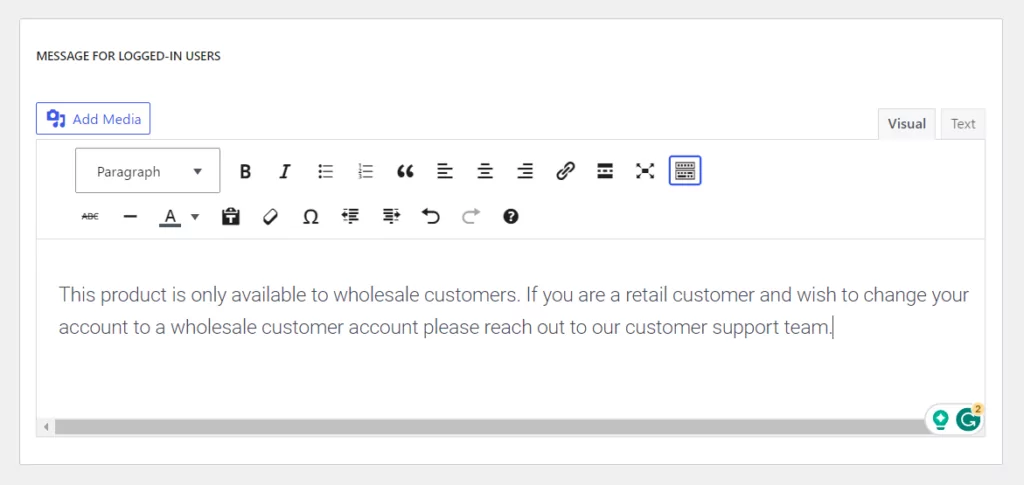
To get started, go to Profile Builder → Settings → Content Restriction and enable the content restriction feature.
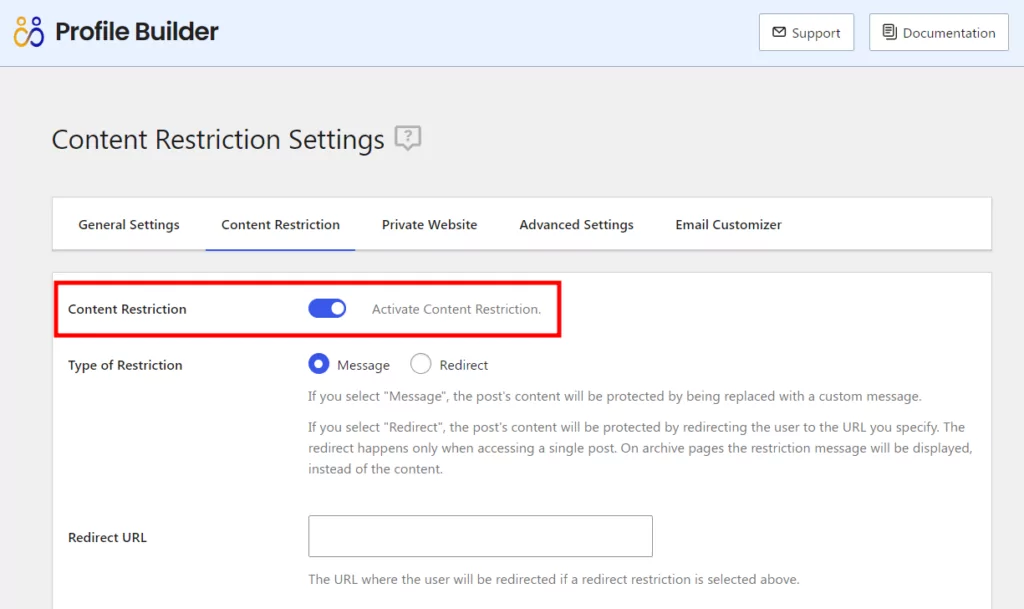
In this settings area, you can also configure the message that users see if they don’t have permission to view a restricted product:
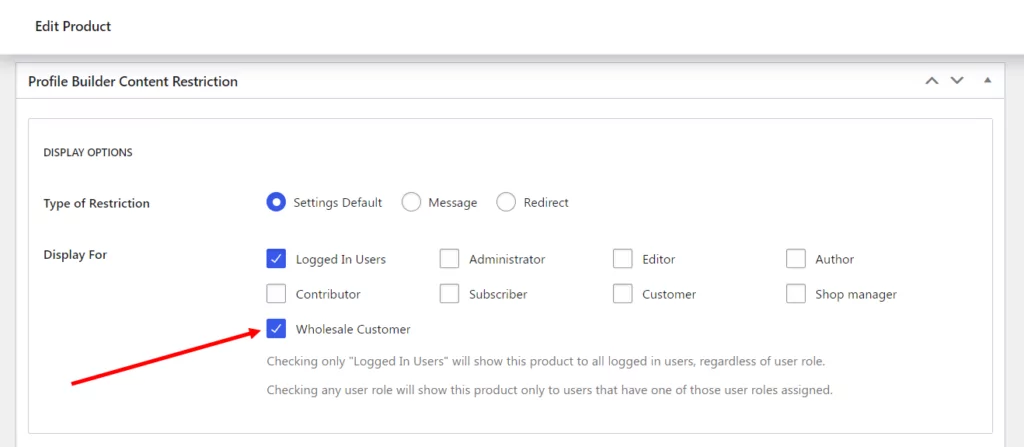
Next, edit the product that you want to restrict. Somewhere below the Product data box, you’ll find a new Profile Builder Content Restriction box. You might need to scroll down a little bit.
Use the Display For setting to check Logged In Users. Then, choose which user role(s) should be able to see this product. If a shopper doesn’t have one of these roles, they’ll see the restriction message instead:
2. Restrict Purchasing Products Based on Role
With just the Profile Builder plugin, you can restrict access to who can view your WooCommerce products.
If you want even more control, though, you can add the Paid Member Subscriptions plugin, which integrates perfectly with all of the Profile Builder features that we’ve discussed so far.
Paid Member Subscriptions Pro
The best WordPress plugin to create website restrictions based on membership plans.
Get Paid Member SubscriptionsWith this plugin, you can restrict both viewing and/or purchasing. For example, you could make certain products visible to all users, but only purchasable by users with certain roles.
To set this up, you’ll need the $69 Hobbyist license for Paid Member Subscriptions to access its WooCommerce integration.
Create a Subscription Plan for WooCommerce Role
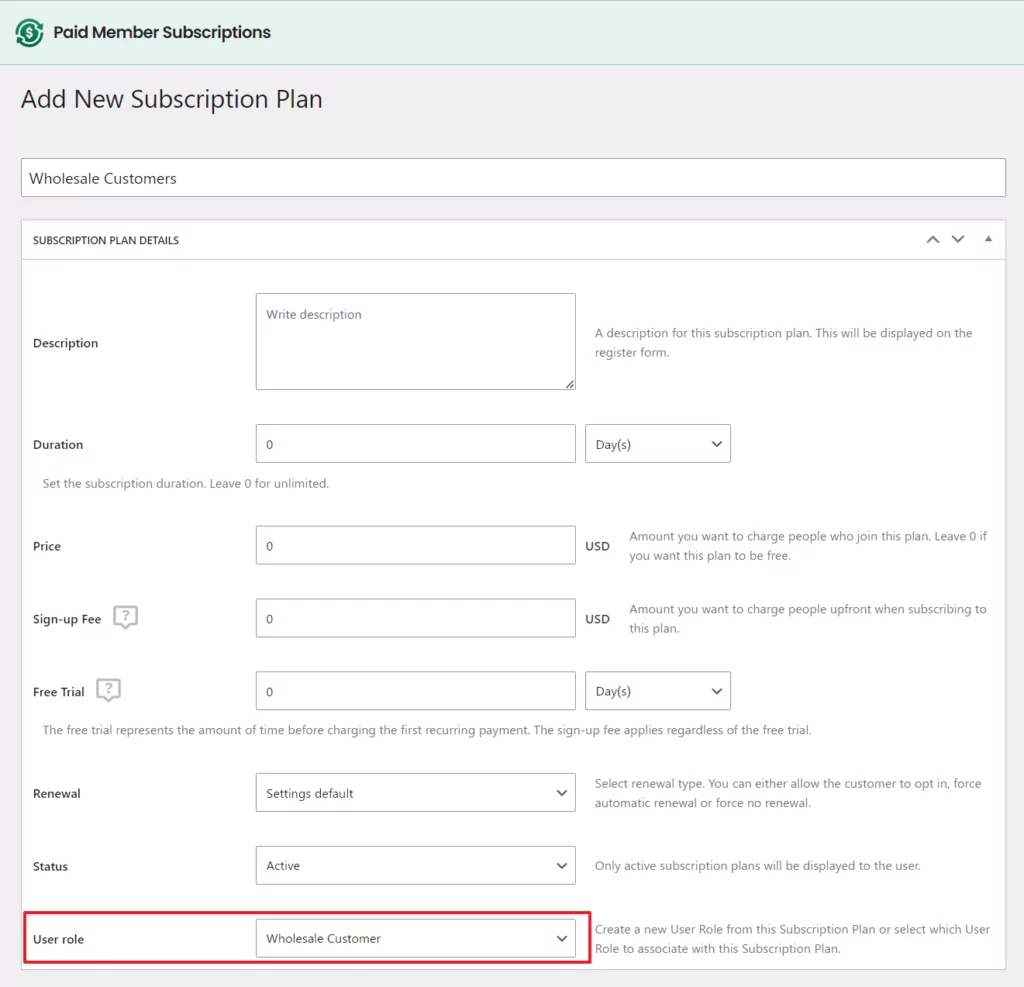
To get started, you go to Paid Member Subscriptions → Subscription Plans → Add New to create a membership level. You can either make the plan free or charge for access. For example, you could charge a $50 setup fee for wholesale members.
Make sure to set the User role box equal to the custom user role you created above.
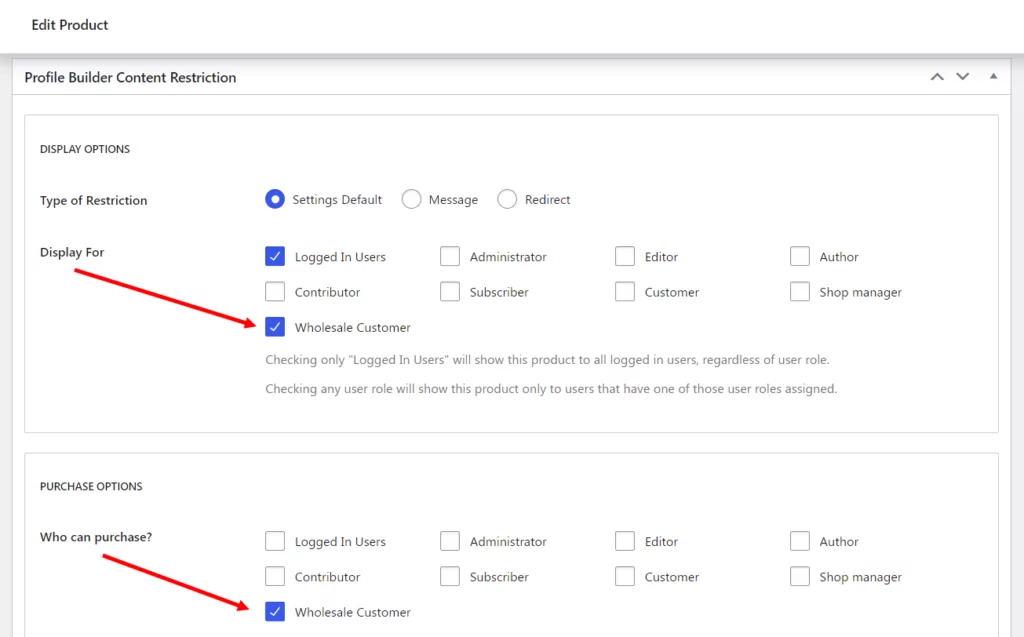
Restrict Access to Products
Once you’ve created your subscription plan, edit a product that you want to restrict. You can use the Content Restriction meta box to control who can both view and/or purchase the product:
3. Offer Special Discounts Based on Role
With the Paid Member Subscriptions plugin, you can also offer special discounts to certain WooCommerce user roles. For example, you could automatically give wholesale customers a 25% discount off the retail prices.
To get started, make sure that you’ve created a subscription plan per the instructions in the previous section.
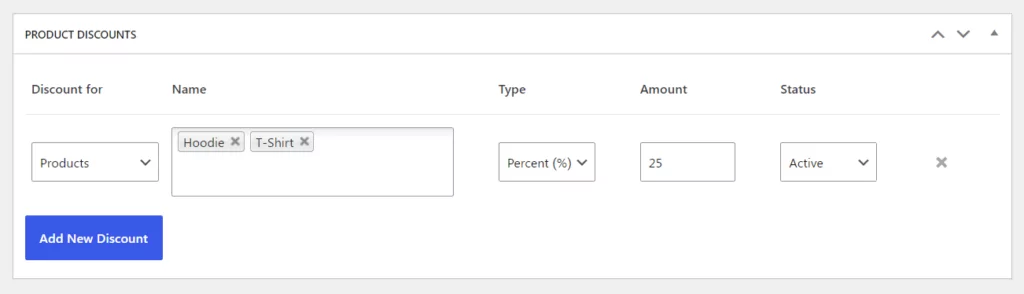
Then, edit the subscription plan and use the Product Discounts box to add a discount for either individual products or entire categories of products:
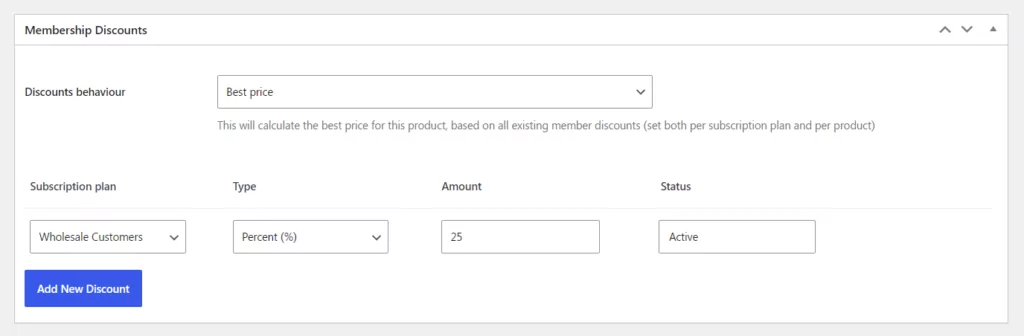
Another way you can approach this is by editing individual WooCommerce products and adding a discount from the Membership Discounts meta box under the product.
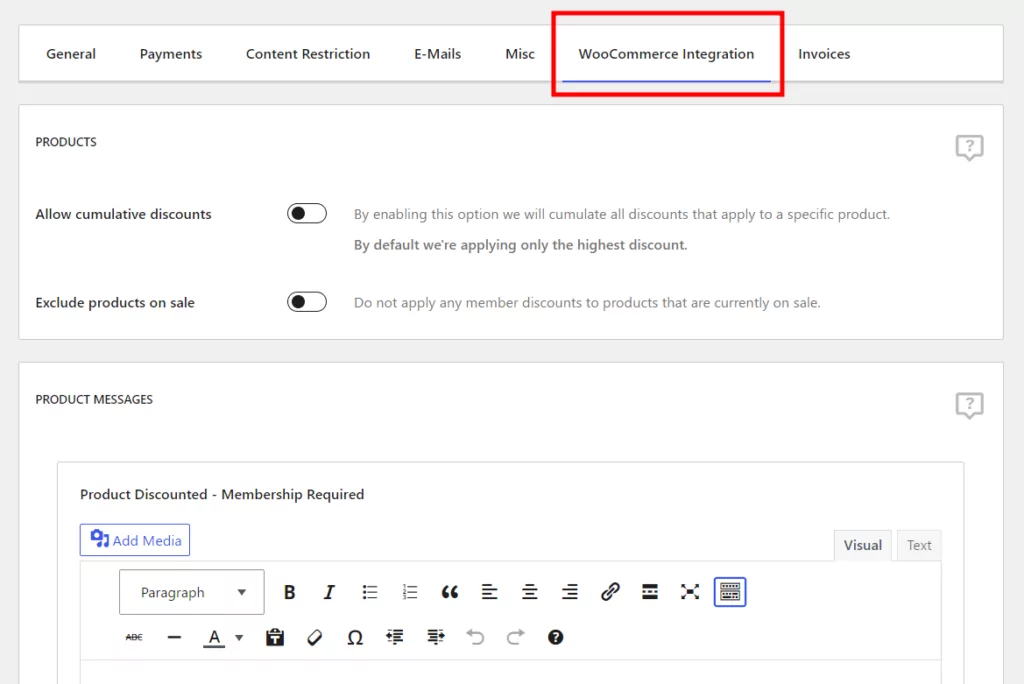
You can also go to Paid Member Subscriptions → Settings → WooCommerce Integration to control important settings such as whether or not a user can stack role-specific discounts with general discounts (such as a coupon code) and whether the member discount is valid for sale products:
Get Started With WooCommerce User Roles Today
WooCommerce roles are a useful tool to organize your users/shoppers and also control which actions they can perform.
One common use case would be to divide your customers into different groups – e.g. “Retail Customers” and “Wholesale Customers”. However, WooCommerce roles are quite flexible, so you can come up with your own use cases as well.
To create and customize your own roles, you can use the free Profile Builder plugin. Then, Profile Builder can also help you create custom registration forms that automatically add users to certain roles.
With the premium version of Profile Builder, you can let users select their own role (from a list that you choose), require admin approval for certain roles, use conditional logic, and more.
Once you’ve set up your role-based system, you can use your WooCommerce roles to customize your store, such as restricting access to certain products based on role, offering special discounts to certain roles, and more.
To get started with the best WooCommerce user roles plugin for everything from creating roles to registration forms and content restriction, purchase Profile Builder today.
Profile Builder Pro
The best WooCommerce user roles plugin to create/edit roles, create registration forms, and restrict access to products.
Get Profile BuilderDo you still have questions regarding WooCommerce user roles? Ask them in the comments section below!
Related Articles

How To Create a Divi Membership Site
If you’re thinking of building a membership site in WordPress, you’ll need a solid theme and a membership plugin that pairs well with it. In this complete guide, we’ll show you how to create a Divi membership site using the popular Divi theme in combination with the Paid Member Subscriptions plugin.
Continue Reading
How to Hide Products by User Roles in WooCommerce?
Do you want to easily hide products by user roles in WooCommerce? Some WooCommerce store owners have a unique requirement where they want to hide certain products from all but a few specific groups of users. There may be many reasons for this, including selling exclusive products only to the more loyal customers, with a […]
Continue Reading
How to Create WordPress Redirects to Another Page, External URLs, or a Subdomain
There are different reasons WordPress site owners want to create WordPress redirects to another page, external URL, or a subdomain. The redirect can be based on an important user action or set up to redirect all users landing on a particular page. Whatever the type or need of your redirect, WordPress offers the flexibility to […]
Continue Reading