

Table of Contents
- 1 Why Would You Need to List Your Userbase?
- 2 How to Set Up WordPress User Listing on Your Site (In 5 Steps)
- 3 Set Up WordPress User Listing Today
Whether you need a member listing, a students and teachers directory, a patient platform, or anything in between, having an easy way to display your user base on your site can come in handy. To do this, you’ll have to install a dedicated WordPress plugin.
A WordPress user listing plugin gives your site members the ability to view information about each other. It also enables them to connect and learn about the community that they are a part of.
In this blog post, we’ll discuss some scenarios when you might want to list your user base. Then, we’ll walk you through the process of creating a WordPress user listing for your site, with the help of a user-friendly plugin. Let’s get started!
Why Would You Need to List Your Userbase?
There are several reasons why you might decide to list the users of your website. Here are some common scenarios:
- If you own a forum or an online community, having your user base on display enables members to contact each other easily.
- If you run a membership site, you could list your premium users to highlight their contributions.
- Creating a member directory of professionals from a certain niche can be another way to monetize your membership site. For example, you could create a platform for people looking for the best photographers in their area and charge photographers a fee to display their services on your list.
- You could also create a team page for your business, where you bring attention to the professionals in your company.
- As an eCommerce business owner, you might want to have a list of your customers.
- You might own an educational platform where you’d like to list your teachers, students, and staff.
- You might manage a medical platform where a list of all the medical professionals is essential.
WordPress makes it easy to implement any of the above. So, without further ado, let’s get into the tutorial!
How to Set Up WordPress User Listing on Your Site (In 5 Steps)
The easiest way to build your WordPress user listing is by using a plugin. For this tutorial, we’ll use the Profile Builder plugin to create a list of users.
Profile Builder is a complete user management solution, so you can also use it for other user-related tasks. For example, you might create custom user roles or restrict certain pages or content from non-logged-in users.
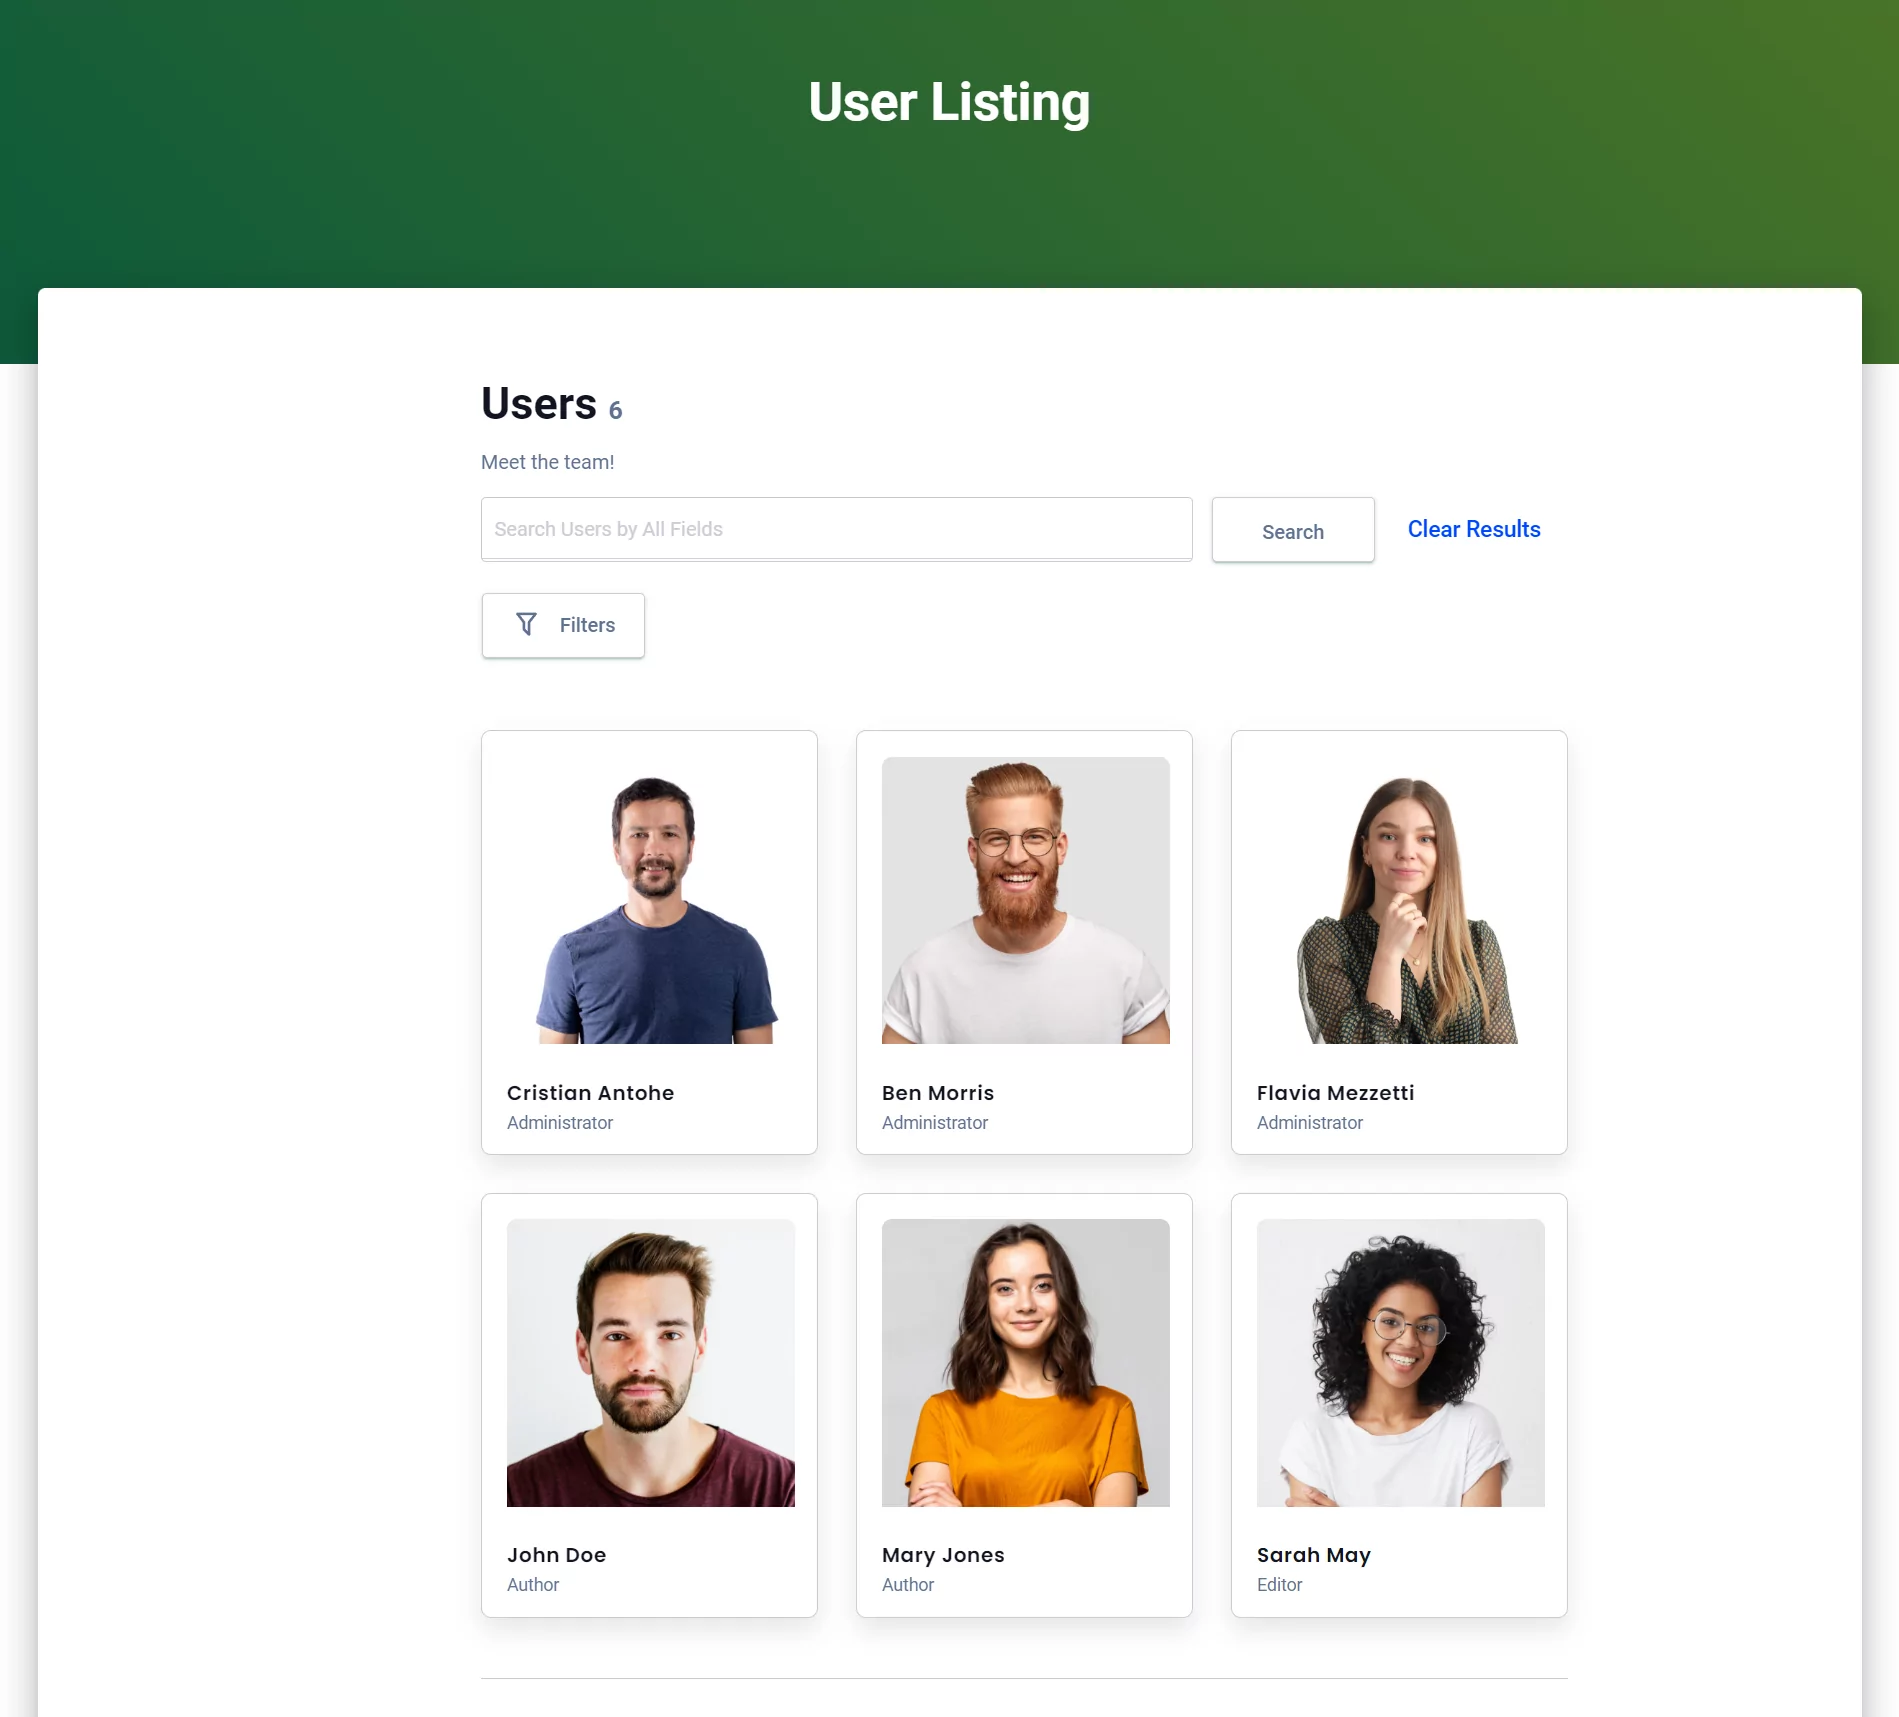
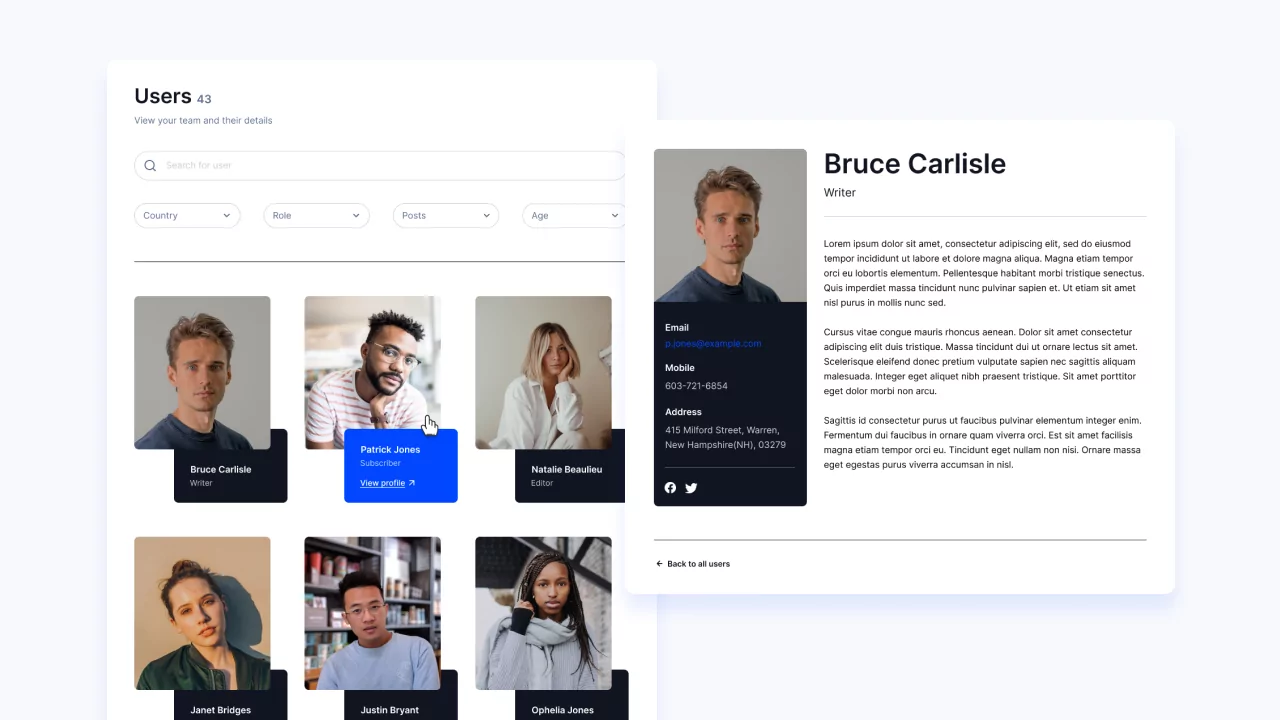
By the end of this tutorial, you should be able to create something that looks like this:
There’s no code involved in the process. As you will see, you can set up your listings in just a few clicks.
1. Install and Set Up Profile Builder
First, you’ll need to install the Profile Builder plugin on your site.
Profile Builder Pro
The easy way to manage user-related functionalities on your WordPress site.
Get Profile BuilderChoose your preferred plan. After purchasing the plugin, you’ll be able to download it from your Account page.
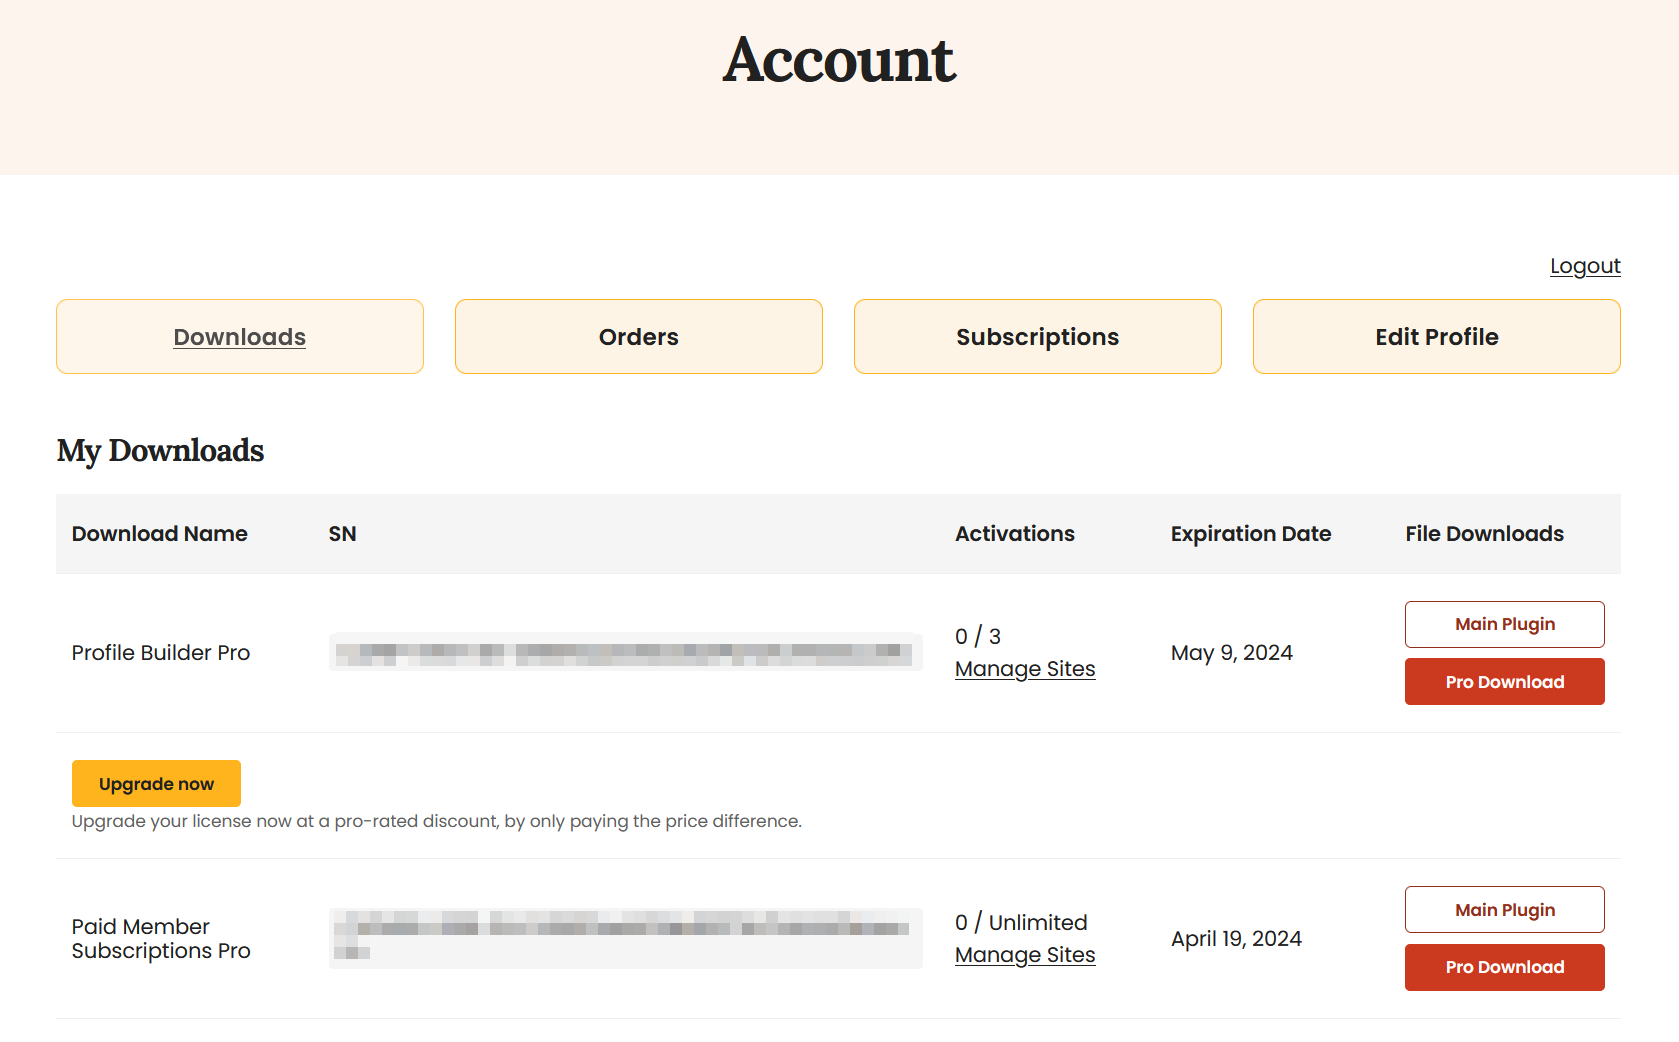
You’ll need to download both the main plugin and the pro version.
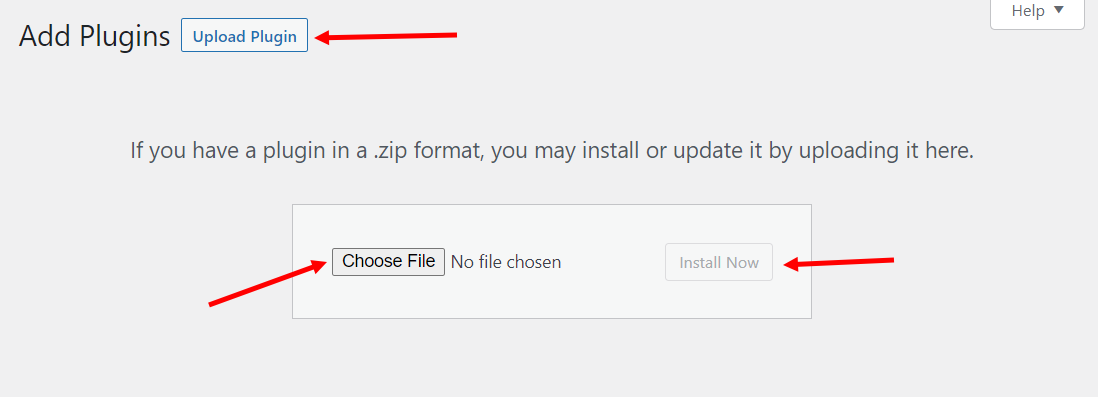
In your WordPress website, navigate to Plugins → Add New and hit the Upload Plugin button at the top.
Choose your downloaded files and hit Install Now. Note that you can only install one plugin at a time:
Also, you’ll need to hit Activate once your plugins have been installed.
2. Create a Registration Form
When you install the Profile Builder plugin, some core pages are automatically created for you. This means that your registration page has already been created – you’ll just need to customize it to your liking.
For example, you might create additional fields in the registration form. To do this, go to Profile Builder → Form Fields:
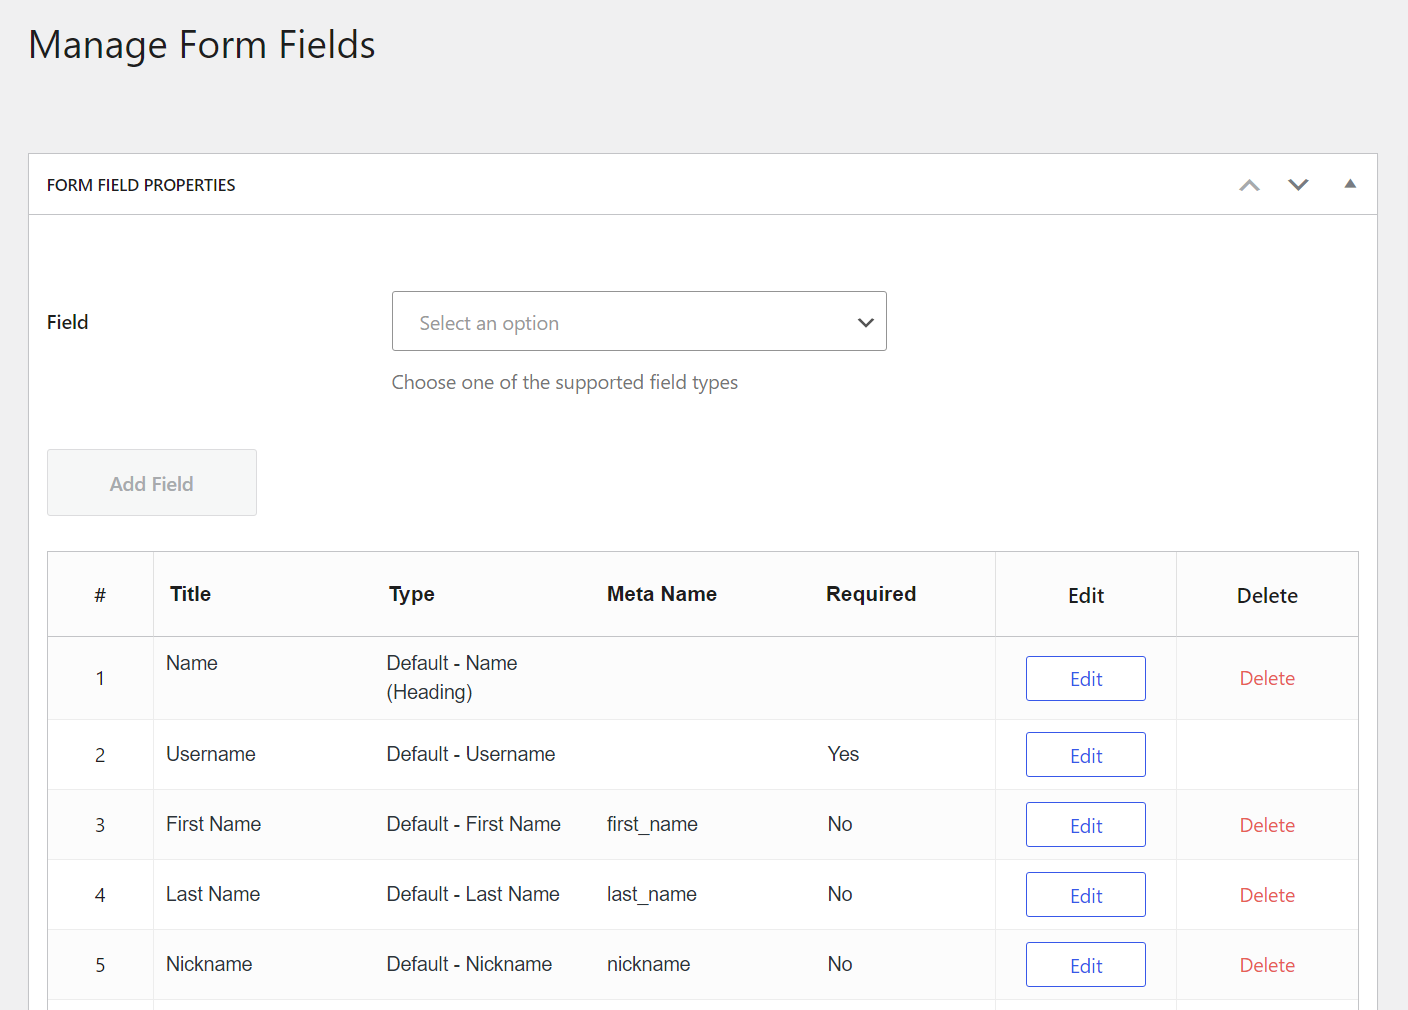
Here, you’ll see some default fields the plugin has already added. You can add lots of new fields and even remove ones that you don’t need.
Click on the Select an option drop-down to see a list of available fields:
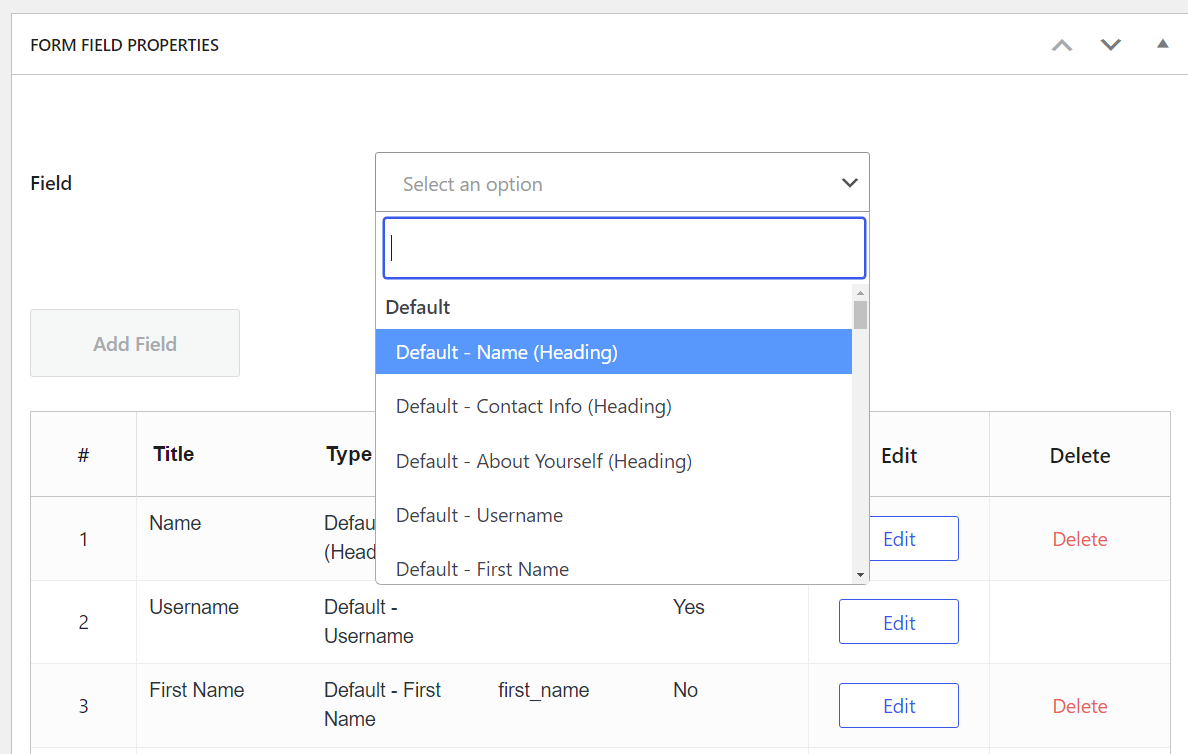
Pick your desired field and customize it. When you’re ready, click on the Add Field button.
You’ll want to add fields that are relevant to your member directory. For example, if you’re creating a staff directory, you might want to ask registrants to enter their occupation and contact information.
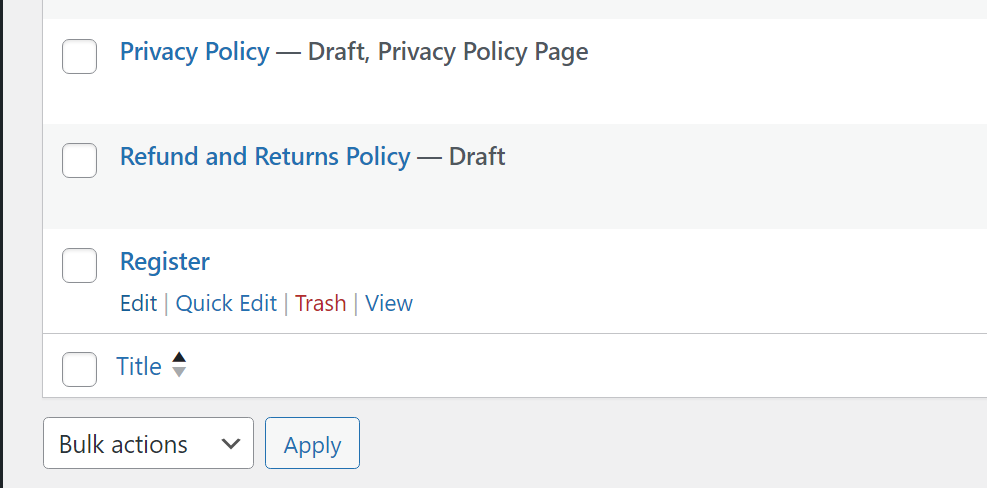
To see your new registration form, go to Pages → All Pages, look for the registration page, and click on the View button that appears on hover:
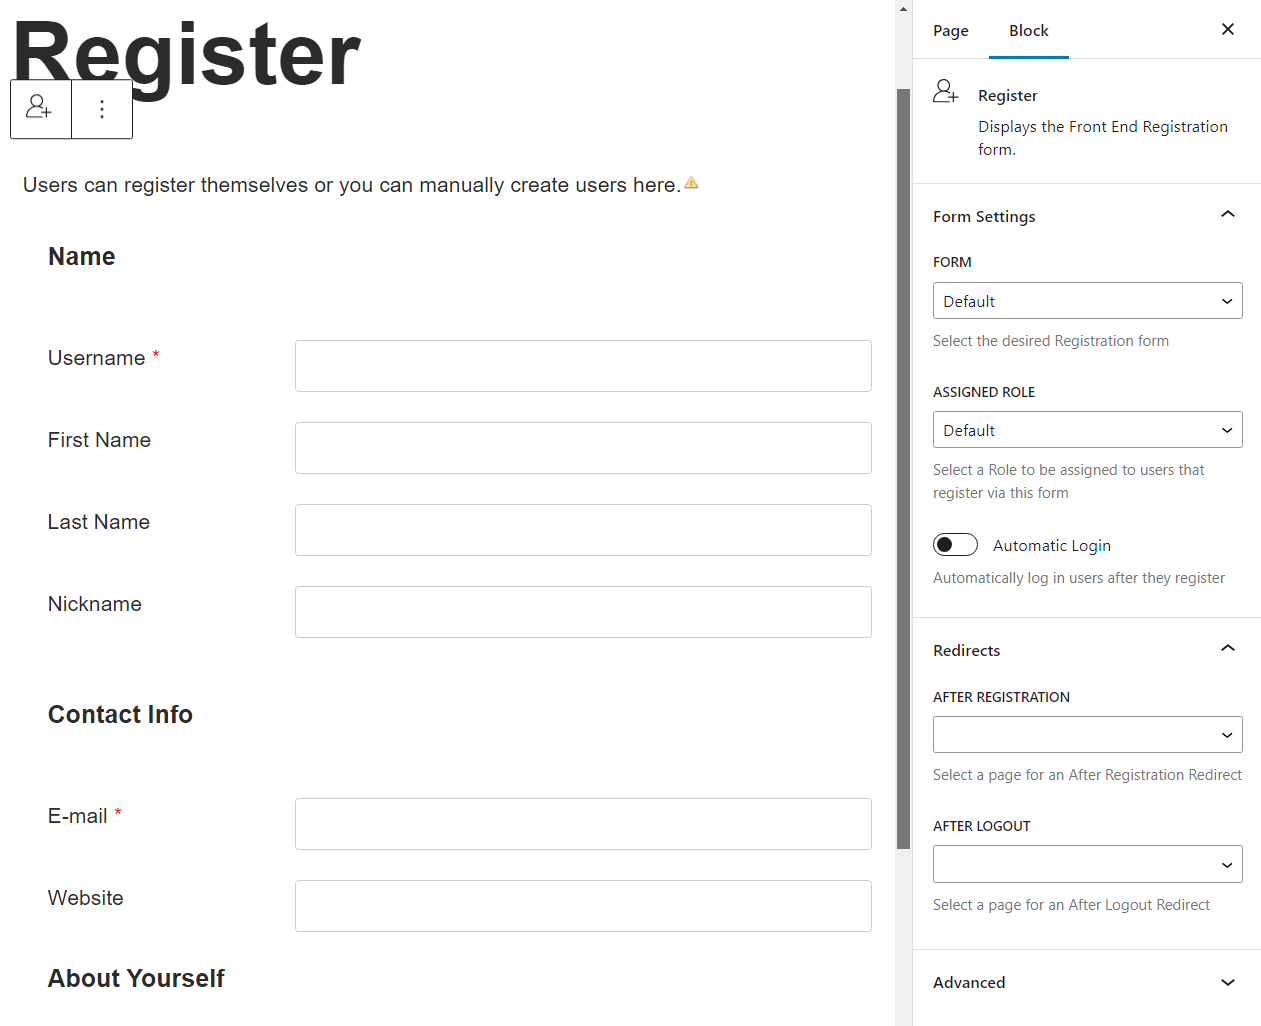
If you can’t find the pre-made registration page, you can always create a new one. To do this, go to Pages → Add New. This will open a blank page with the Block Editor.
A basic registration page only needs a title and the form itself. To add the form, select the Register block and place it on the page:
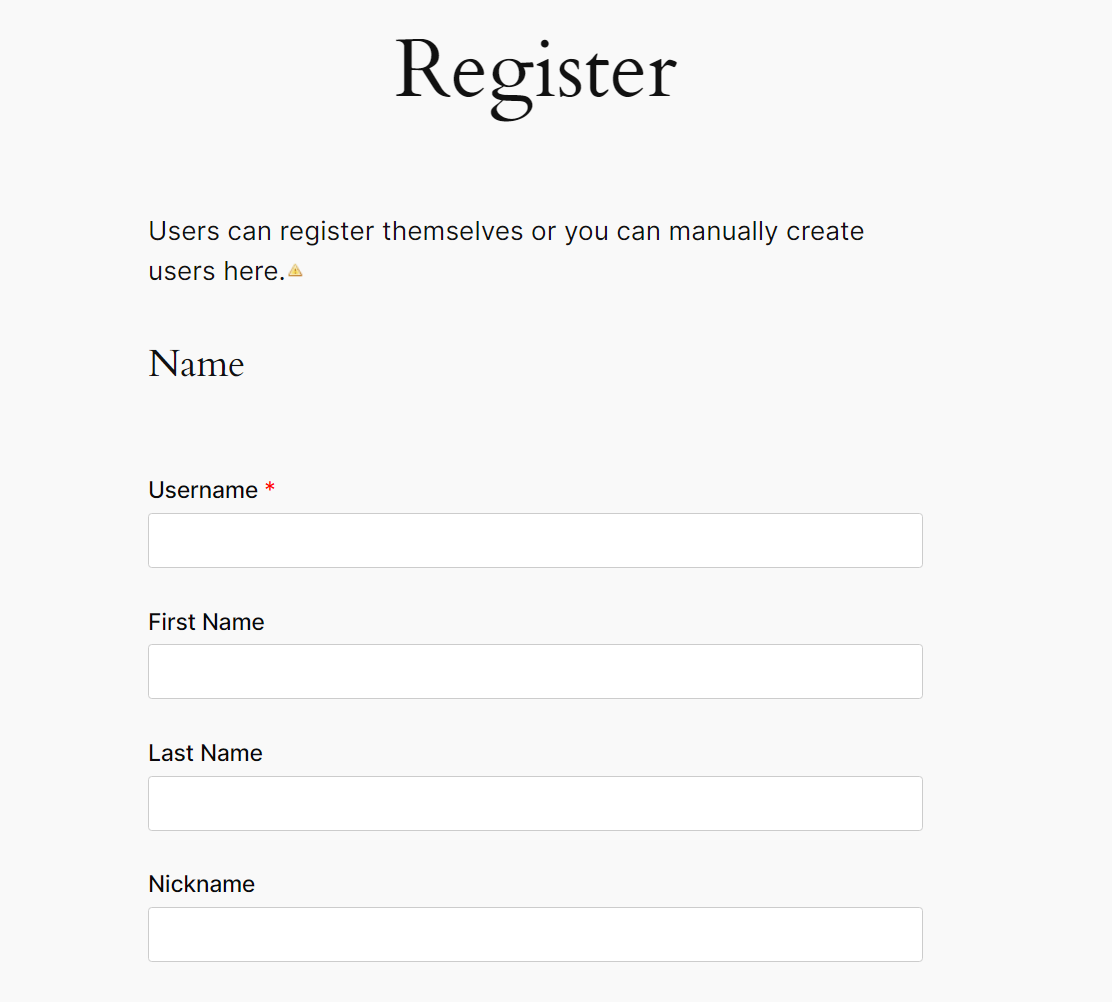
Your registration page will look something like this when you see it from the front end. Note that the style of the page will vary depending on what WordPress theme you use:
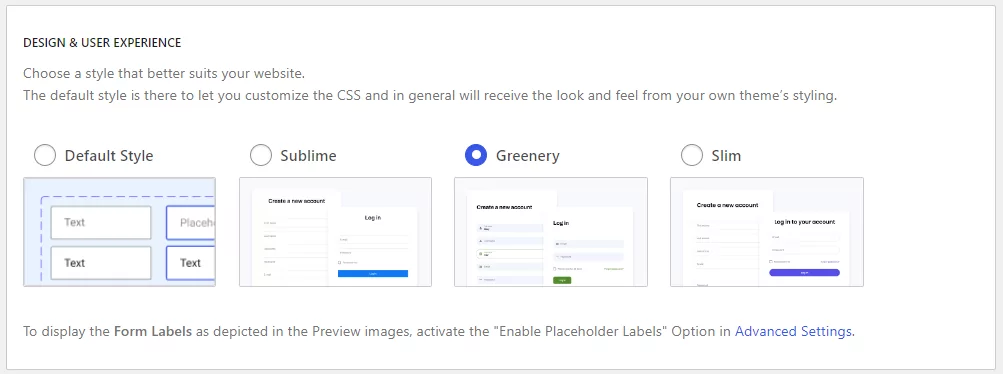
However, if you go to Profile Builder → Settings, you’ll also be able to choose a form style:
Once you’re happy with your registration form, you can move on to creating your user listing.
3. Create a WordPress User Listing
Basic Setup
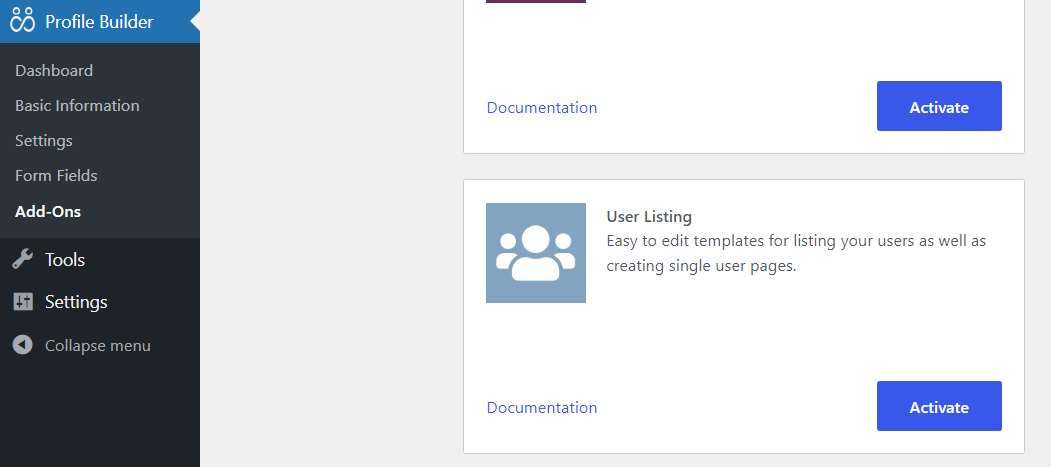
In order to create the list of users, you’ll need to enable the User Listing add-on. Navigate to Profile Builder → Add-ons. Then, scroll to find the add-on and click on the Activate button:
Now, you should be able to see a new menu item titled User Listing under Profile Builder in your WordPress dashboard. Click on it and you’ll be prompted to create a new user listing.
Click on the Add New button to start creating your first list:

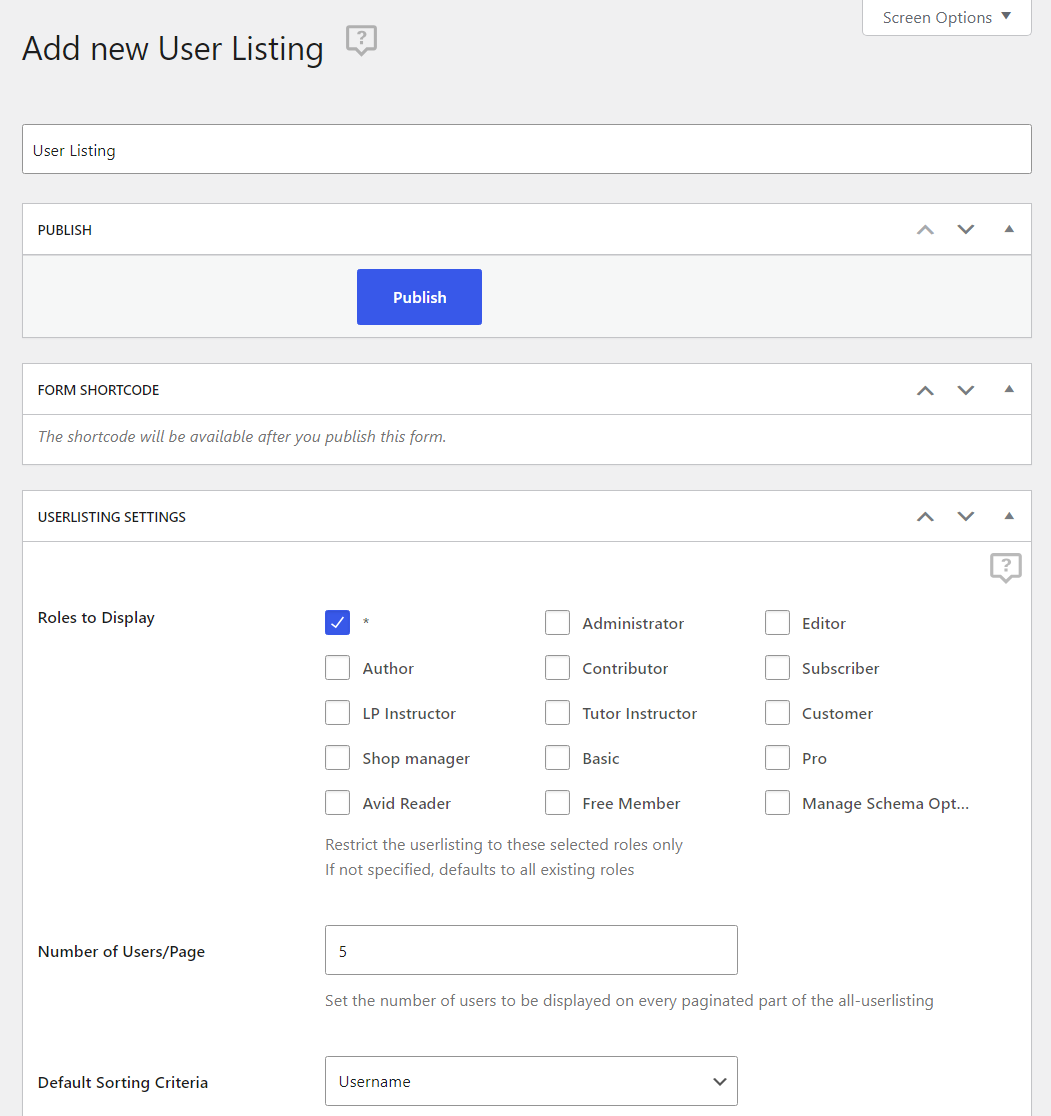
Once you give your user listing a title, you can configure some basic settings For example, you can choose which user roles to include, and how they’ll be displayed in the user listing:
You can even hide the listing from non-logged-in users so that only your members can see each other:
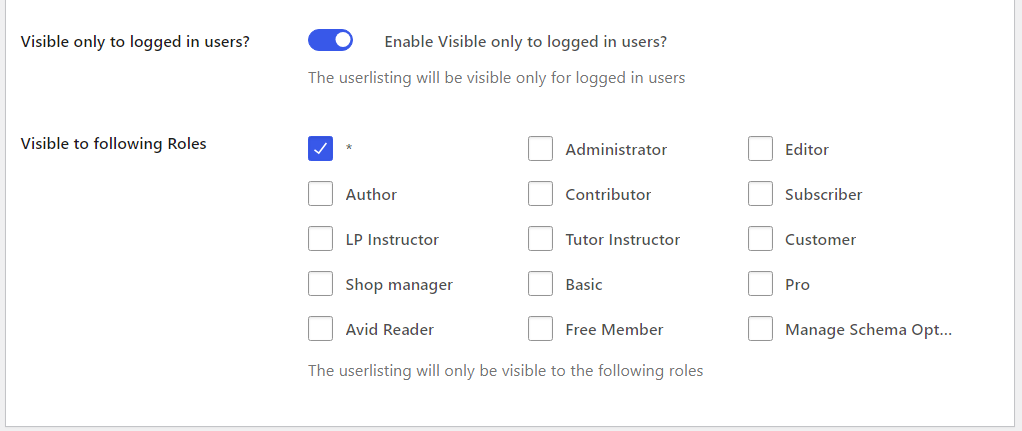
You also have the option to select the specific user roles that will have access to the listing.
Adding Filters
Let’s move on to the next section: Faceted Menus. Here, you can choose what filters will be available on your user listing page.
For example, you could allow your site visitors to filter the user base by location, role, age, or anything else you might need.
Let’s say you want to sort users by occupation. First, you’ll need to enter Occupation as the label you want to display on the page.
Then, choose Checkboxes as the Facet Type (if you want people to be able to select multiple options simultaneously) and select the Role field as a source for the filter (or “facet meta”):
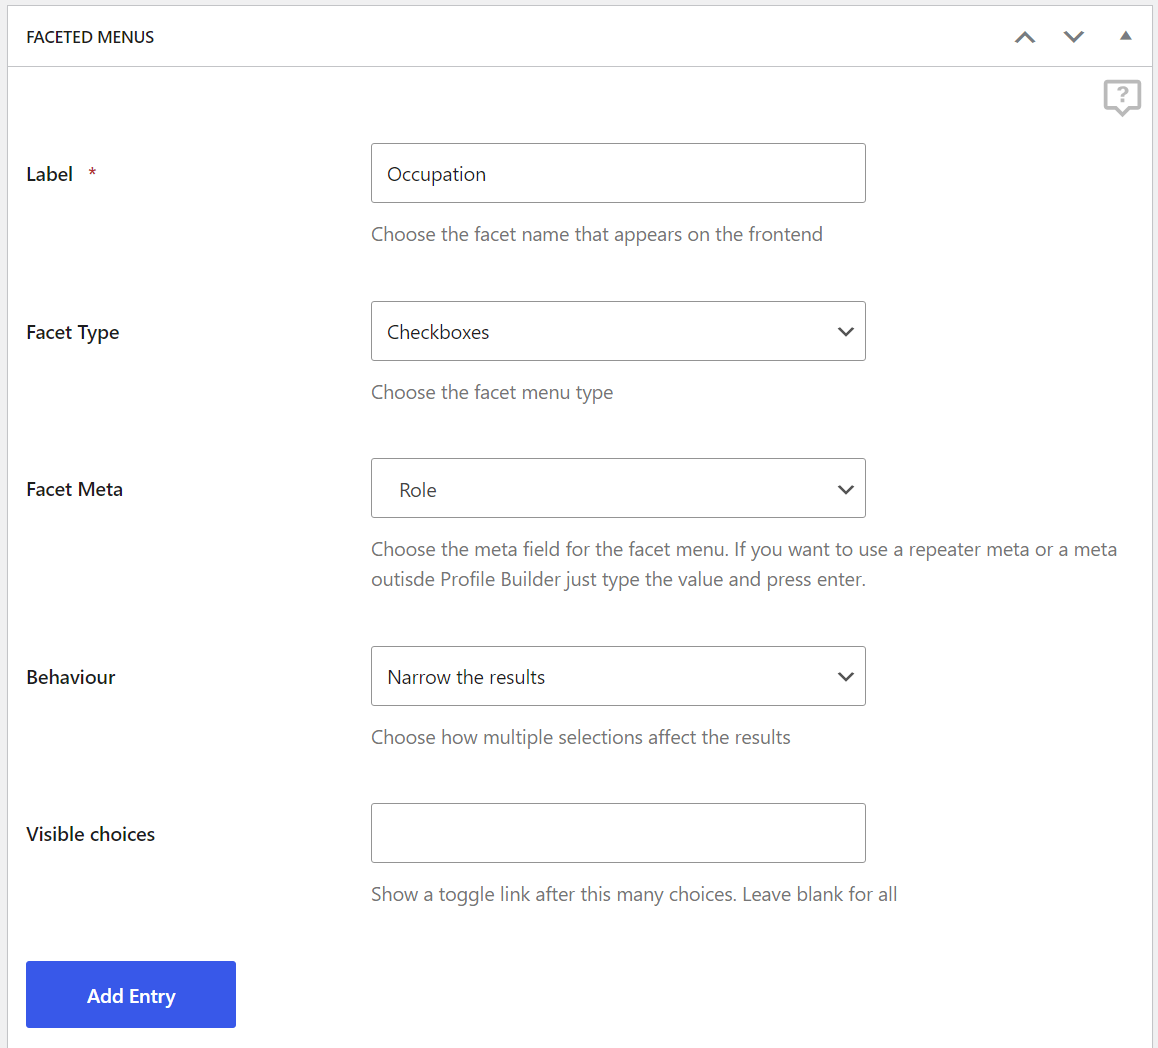
If you want all the roles to be included, you can leave the Visible choices field blank. When you’re ready, click on Add Entry.
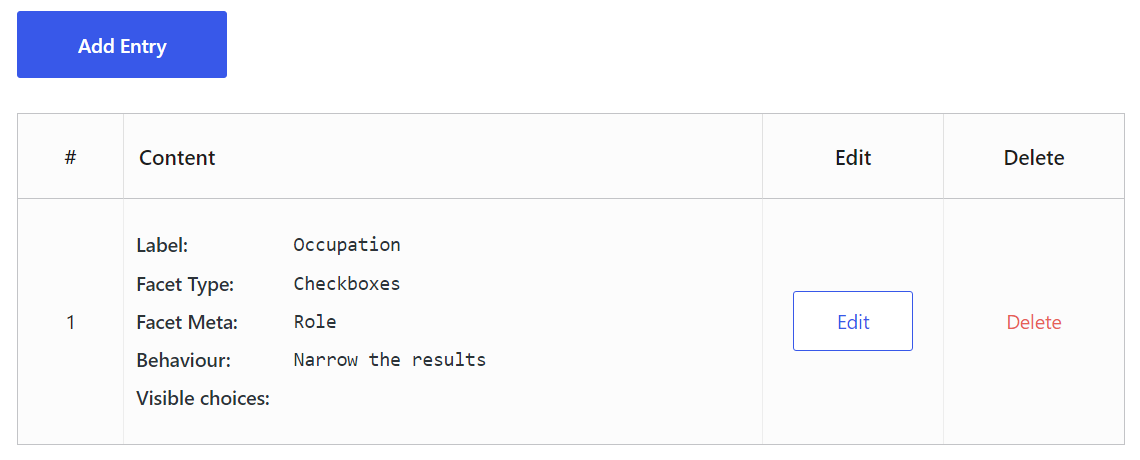
Now you can repeat the same steps for adding as many filters as you want. Here’s what your filters should look like once ready:
And here’s what your filters should look like on the user listing page on the front end:
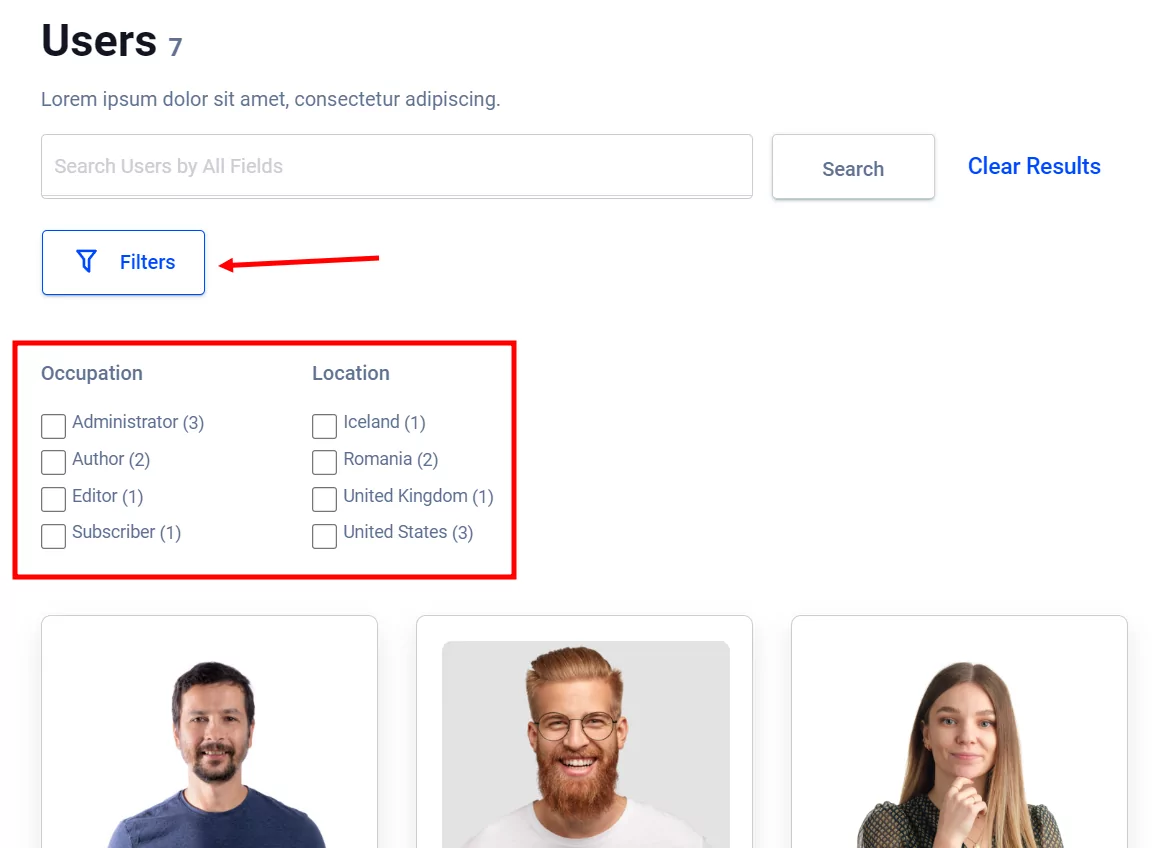
Once a user clicks on the Filters button, the filter fields you’ve added will be displayed right beneath.
Next, you can choose how the search function works. Select the information that you want to be scanned when a visitor searches for a keyword in the search bar:
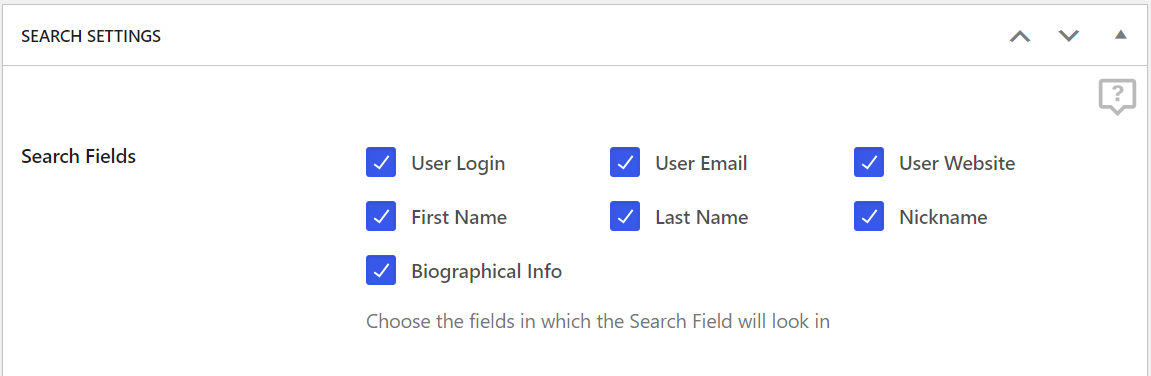
This may include first and last names, user website, bio, and more.
4. Choose a Template for the User Listing
Now, it’s time to design your user listing page.
You can choose one of the five pre-designed themes for your user listing page, just like this one:
Profile Builder offers you one default theme and 4 custom ones. When you hover your mouse over one of the available themes, you’ll see a button to Preview the theme and one to Activate it:
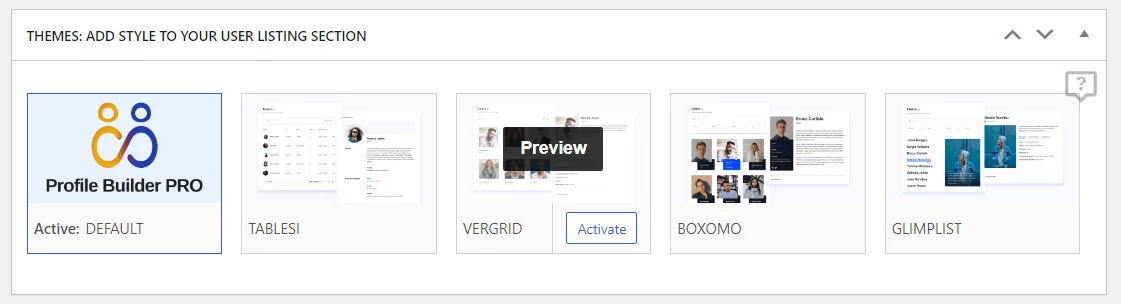
Pick the one that best suits your website design. But don’t worry, you’ll be able to customize it even further.
Once you’ve chosen a template, you can customize the user information you want displayed on the front end. If you’re okay with the default fields, you can just leave everything as is.
When you activate a theme, the HTML for both the single-user and the all-users page is automatically updated with the new styling.
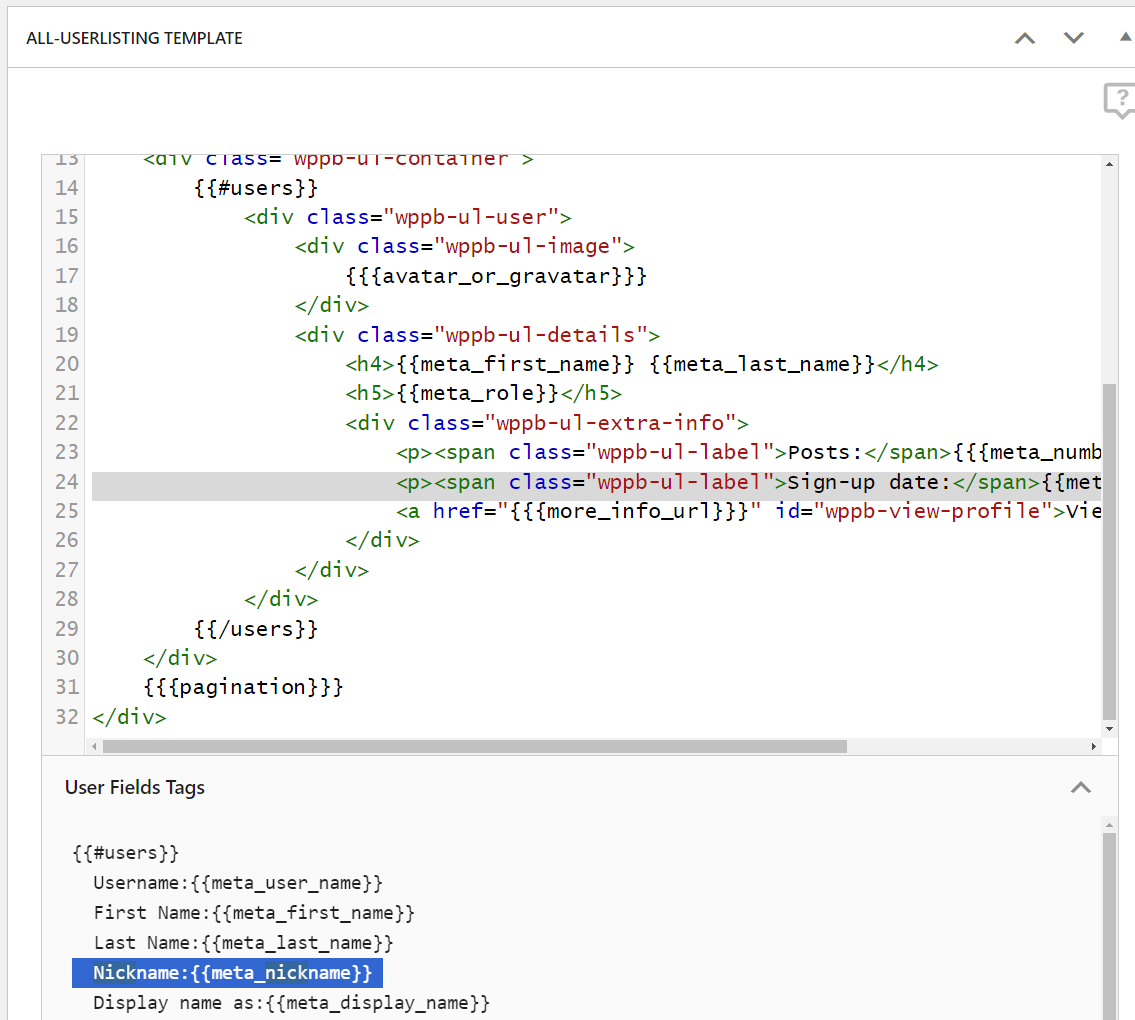
Using the tags provided with the template code, you’ll be able to customize the content that will be displayed in your user listing. All you have to do is copy and paste the tags you want.
For instance, let’s say you want to replace the Sign-up date field in the single-user page with the Nickname. All you have to do is copy the address label and tag from the menu below the HTML field and paste it to replace the Sign-up date span values:
Feel free to browse the tag list and see what information is relevant to your users and your own user listing page.
Important: Make sure to ask for that specific information in the registration form, so that users will provide you with the details you want to display in your user listing right from the start.
For example, if you want to include a phone number field in the user listing, you should also have a phone number field in the registration form.
Reset WordPress User Listing to Default Settings
The plugin lets you restore your user listing to its default settings. So, if something goes wrong along the way, you can simply go back to the templates section and hover over the active theme. You’ll see that a Reset Data button is now available:
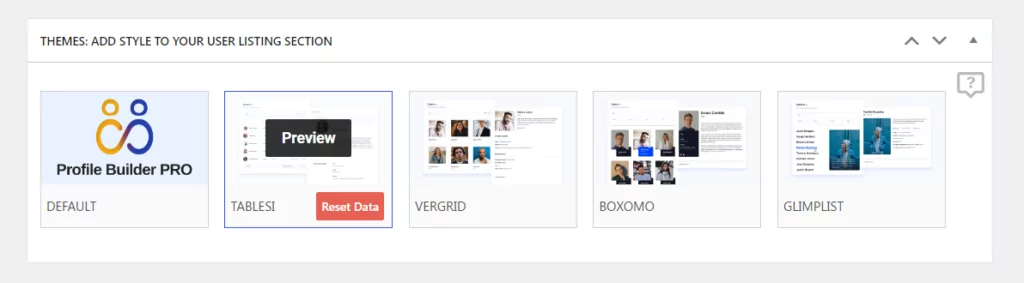
Once you click on that button, you’ll be able to select which setting you want to reset. You can choose to reset the general Userlisting Settings, the All-userlisting Template, the Single-userlisting Template, or even all of the theme data:
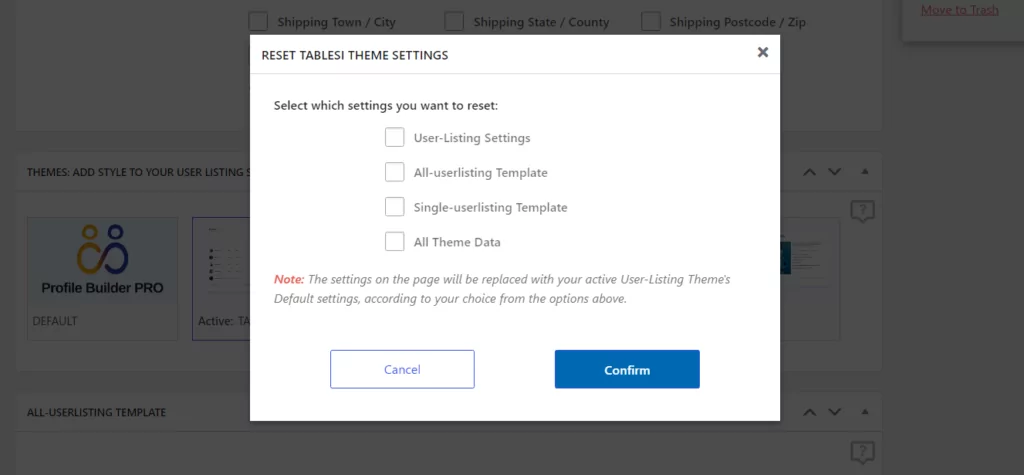
Just click on the Confirm button to apply these changes.
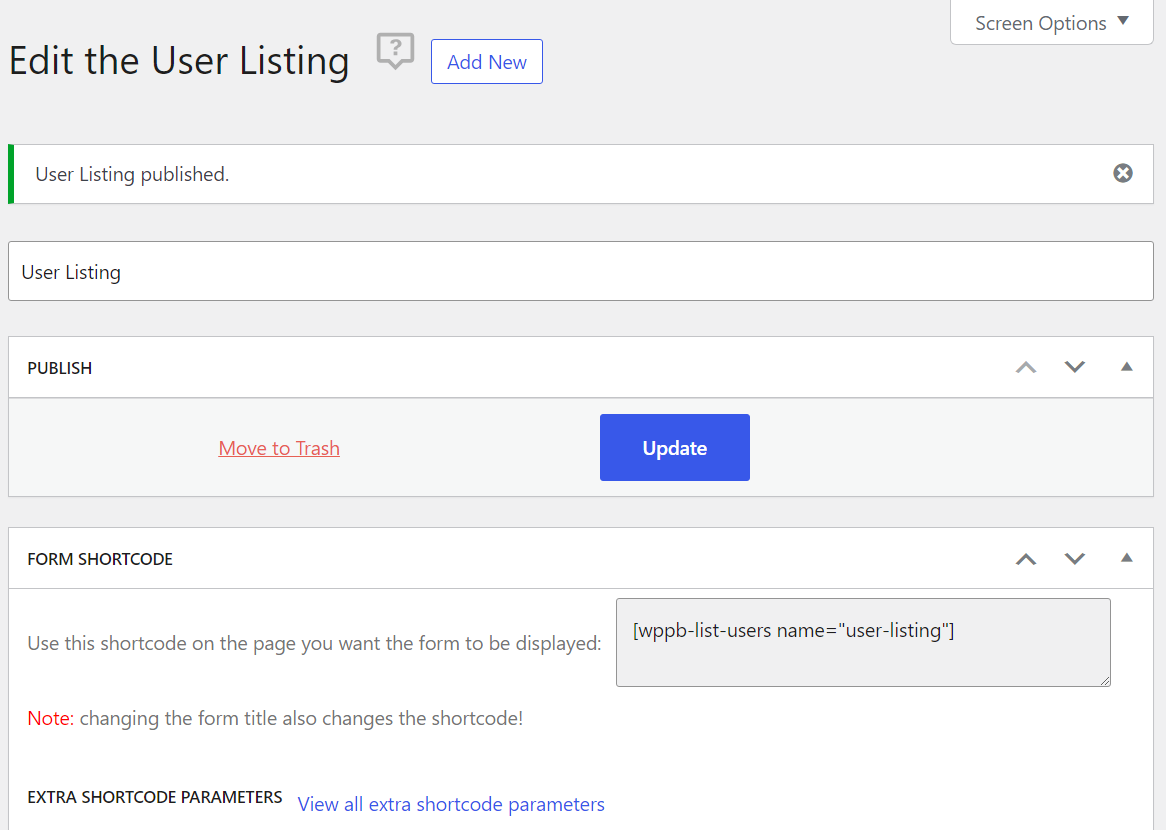
5. Publish the WordPress User Listing
When you’re happy with your customizations, you can go ahead and click on the Publish button at the top. This will generate a shortcode for your user listing, which you can paste on any page on your site:
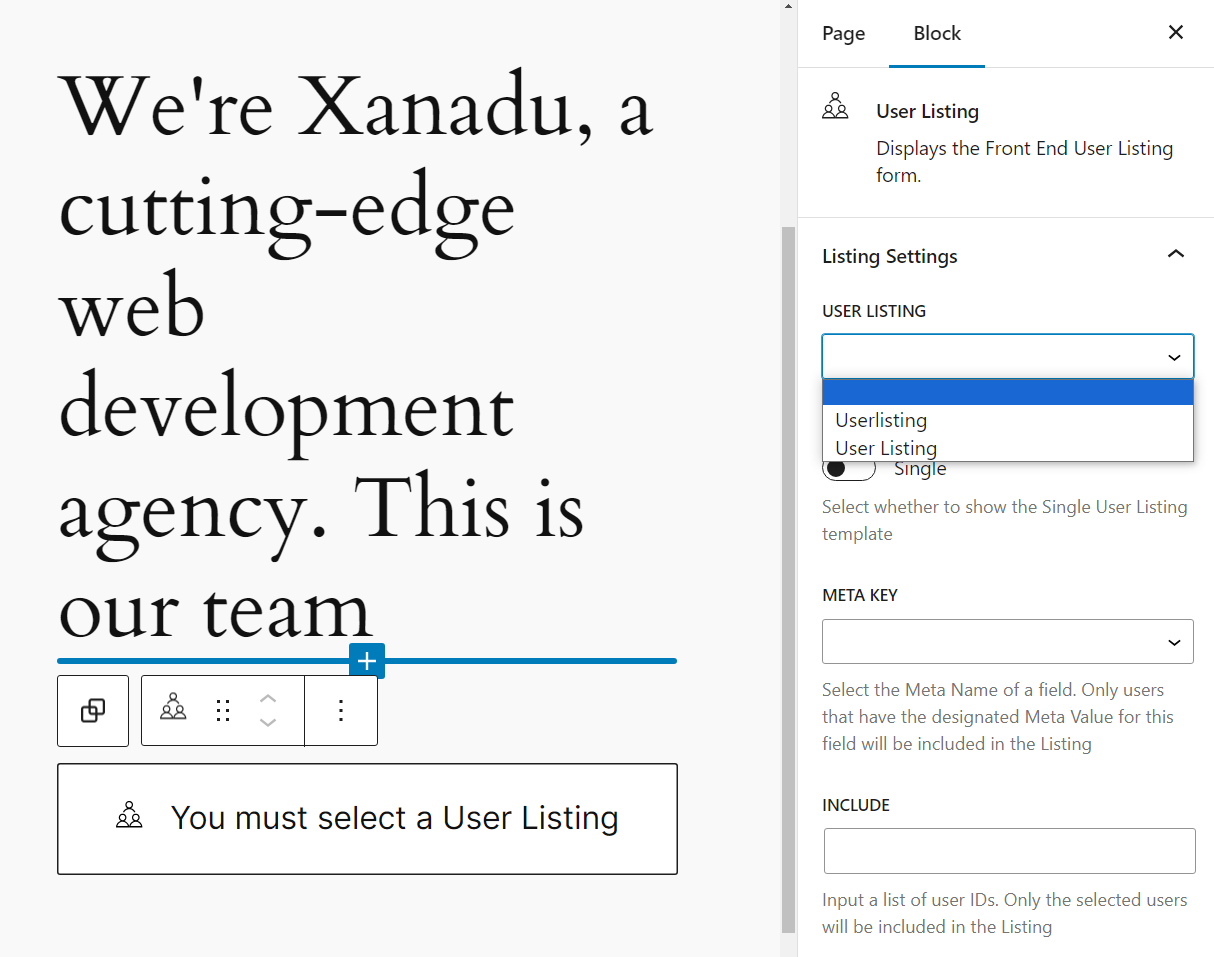
However, you don’t need this shortcode if you have access to the Block Editor.
Instead, you can create a new page and add the User Listing block. The block will tell you to select a listing from the settings menu to the right:
After you select a user listing, save the page. Here’s what ours looks like on the front end:
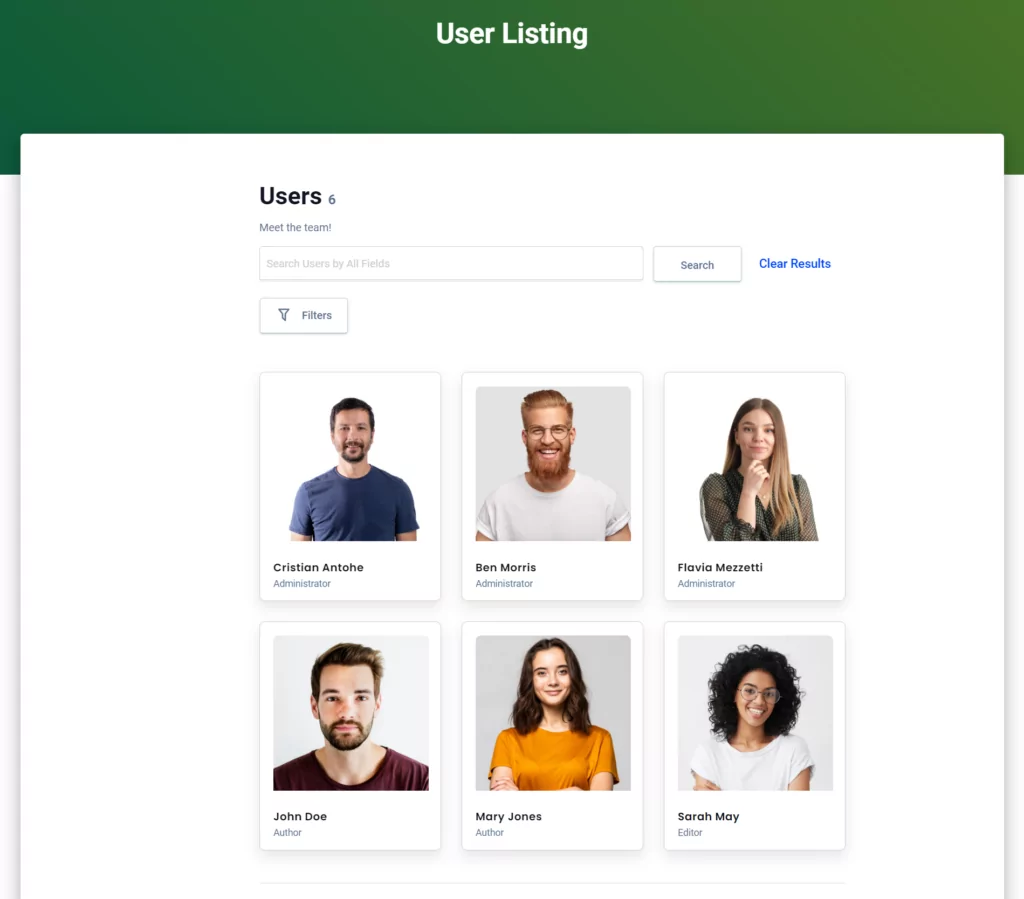
When you click on a certain user, you’ll be able to see the single-user page:

That’s it – you now have a user listing page on your website!
Set Up WordPress User Listing Today
Whether you need a member directory, staff listing, student and teachers directory, or any other way to list your user base, Profile Builder can help. This complete user management plugin gives you lots of functionalities.
Besides using Profile Builder to create user listings, you can also add, edit or remove user roles, create login forms, lost password requests, and other user-related pages, restrict content based on user roles, and much more. You can download Profile Builder for free from the WordPress repository. But if you want the full package, including the user listing templates, you’ll need to purchase the premium version.
Profile Builder Pro
The easy way to manage user-related functionalities on your WordPress site.
Get Profile BuilderDo you have any questions on how to create a WordPress user listing page? Let us know in the comments section below!
Related Articles

How to Customize the WooCommerce Login Page (No Code Needed)
Searching for a solution to customize the WooCommerce login page and otherwise control login behavior on your WooCommerce store? If you allow (or force) registration on your store, you'll want to create a user-friendly login experience so that your shoppers can easily log in to their accounts and access other key features. In this post, […]
Continue Reading
8 Best WordPress User Registration Plugins
Not sure what WordPress user registration plugin to use for your project? Going through all the WordPress user registration plugins can be disorienting. You may have spent hours and hours searching for plugins and tutorials to help you with your project, and you’re still as confused as you were when you started. Imagine finding the […]
Continue Reading
How to Customize WordPress Email Login Behavior (+ Registration)
Searching for a WordPress email login feature so that you can customize your site's login process, such as requiring users to use their email address instead of a username? By default, WordPress lets users log in with either their username and password or their email and password via the default login page. But if you […]
Continue Reading
Great article.
I have created two different user listings. The first one is visible to the public and shows only a list of users. The second has the “More info” link and displays the single user details, but only to logged-in users with certain roles.
But how can you get a user-listing to send you to the corresponding single-user listing when you click on “More info” and restrict it to those logged-in users ?
Thank you.
Hi there,
The {{{more_info}}} tag is added in the All-Userlisting Template and is coded to redirect you to the Single User Listing page.
To restrict the {{{more_info}}} tag, you need to use the [wppb-restrict] shortcode in the All-User listing Template. An example would be:
<td  data-label="More" class="wppb-moreinfo">
   [wppb-restrict user_roles="Subscriber" message=" "]
   {{{more_info}}}
   [/wppb-restrict]
 </td>
For more infromation regarding the [wppb-restrict] shortcode please check the following page: https://www.cozmoslabs.com/docs/profile-builder/shortcodes/#Restrict_Content
Is it possible to add tailored fields, such as “Likes sports cars” (Y/N), “Club membr since” (date) etc.?
Hello. Yes, you can create custom fields that the user completes on registration or can edit on an edit profile form and then you can display those fields inside the Userlisting.