

Table of Contents
- 0.1 Monetizing Your Membership Site
- 0.2 Creating a Community of Members
- 0.3 Communicating with Members
- 0.4 Using a Membership Plugin to Build a Membership Site
- 0.5 Paid Member Subscriptions Pro
- 1 How to Use Paid Member Subscriptions to Create a Membership Site on WordPress
- 2 Taking Your WordPress Membership Site to the Next Level
- 3 Summary
Creating a membership site on WordPress means you can provide a service to your website community or make money by charging for membership. Whether you’re looking to build a profitable business or not, a membership website will turn your WordPress site from a simple blog into a community resource that gives its members much more.
Monetizing Your Membership Site
There are two ways a membership site can help you make money. First, you can offer paid membership tiers with access to premium content. Second, adding a membership to a store lets you give extra value to your members and create a community of customers. This gives them a sense of belonging, which will enhance brand loyalty.
Creating a Community of Members
If your site supports a community of users, adding membership gives them access to exclusive content and can encourage them to interact with each other, meaning you create an engaged, interactive community of users who keep coming back to your WordPress membership site.
Communicating with Members
You can also use a membership site on WordPress to communicate with your customers and users, by growing an email list and sending out updates when you have new content or products they’ll be interested in.
Using a Membership Plugin to Build a Membership Site
If you’re using WordPress, the best way to setup a membership site is by using a dedicated membership plugin. A membership plugin will let you add all the membership functionality required, from setting up membership plans, accepting payments to restricting content, all without having to write a single line of code.
Paid Member Subscriptions makes it easy to create a WordPress membership site with no technical skills. It has a free version and a premium version which gives you access to extra features.
Paid Member Subscriptions Pro
Accept (recurring) payments, create subscription plans and restrict content on your website. Easily setup a WordPress membership site using Paid Member Subscriptions.
Get Paid Member SubscriptionsPaid Member Subscriptions includes features to help you provide an excellent service to your members. You can create login and account management pages, as well as a registration page designed to encourage people to sign up and pay to become members. You can also offer benefits such as restricted content and member discounts in your WooCommerce store. And you can keep in touch with your members and grow your relationship with them.
In this article, we’ll guide you through adding a membership to your WordPress site and show you how a membership site plugin can help you to grow your business and support your customers.
How to Use Paid Member Subscriptions to Create a Membership Site on WordPress
Creating your WordPress paid membership site consists of a few steps:
- Setting up membership tiers, including free and premium tiers.
- Creating restricted content for members on different membership levels.
- Creating an engaging signup and pricing page to encourage people to join your site.
- Creating pages for logging in and account management.
- Integrating with WooCommerce if you run a store with your membership site.
Let’s look at each of these steps in turn.
Setting up Membership Levels for Your Paid Membership Site
Once you’ve installed and activated the plugin, the first step is to set up your membership tiers.
You can create as many levels as you want, at different pricing levels. In your WordPress admin, go to Paid Member Subscriptions > Subscription Plans.
To add a new plan, click the Add New button.
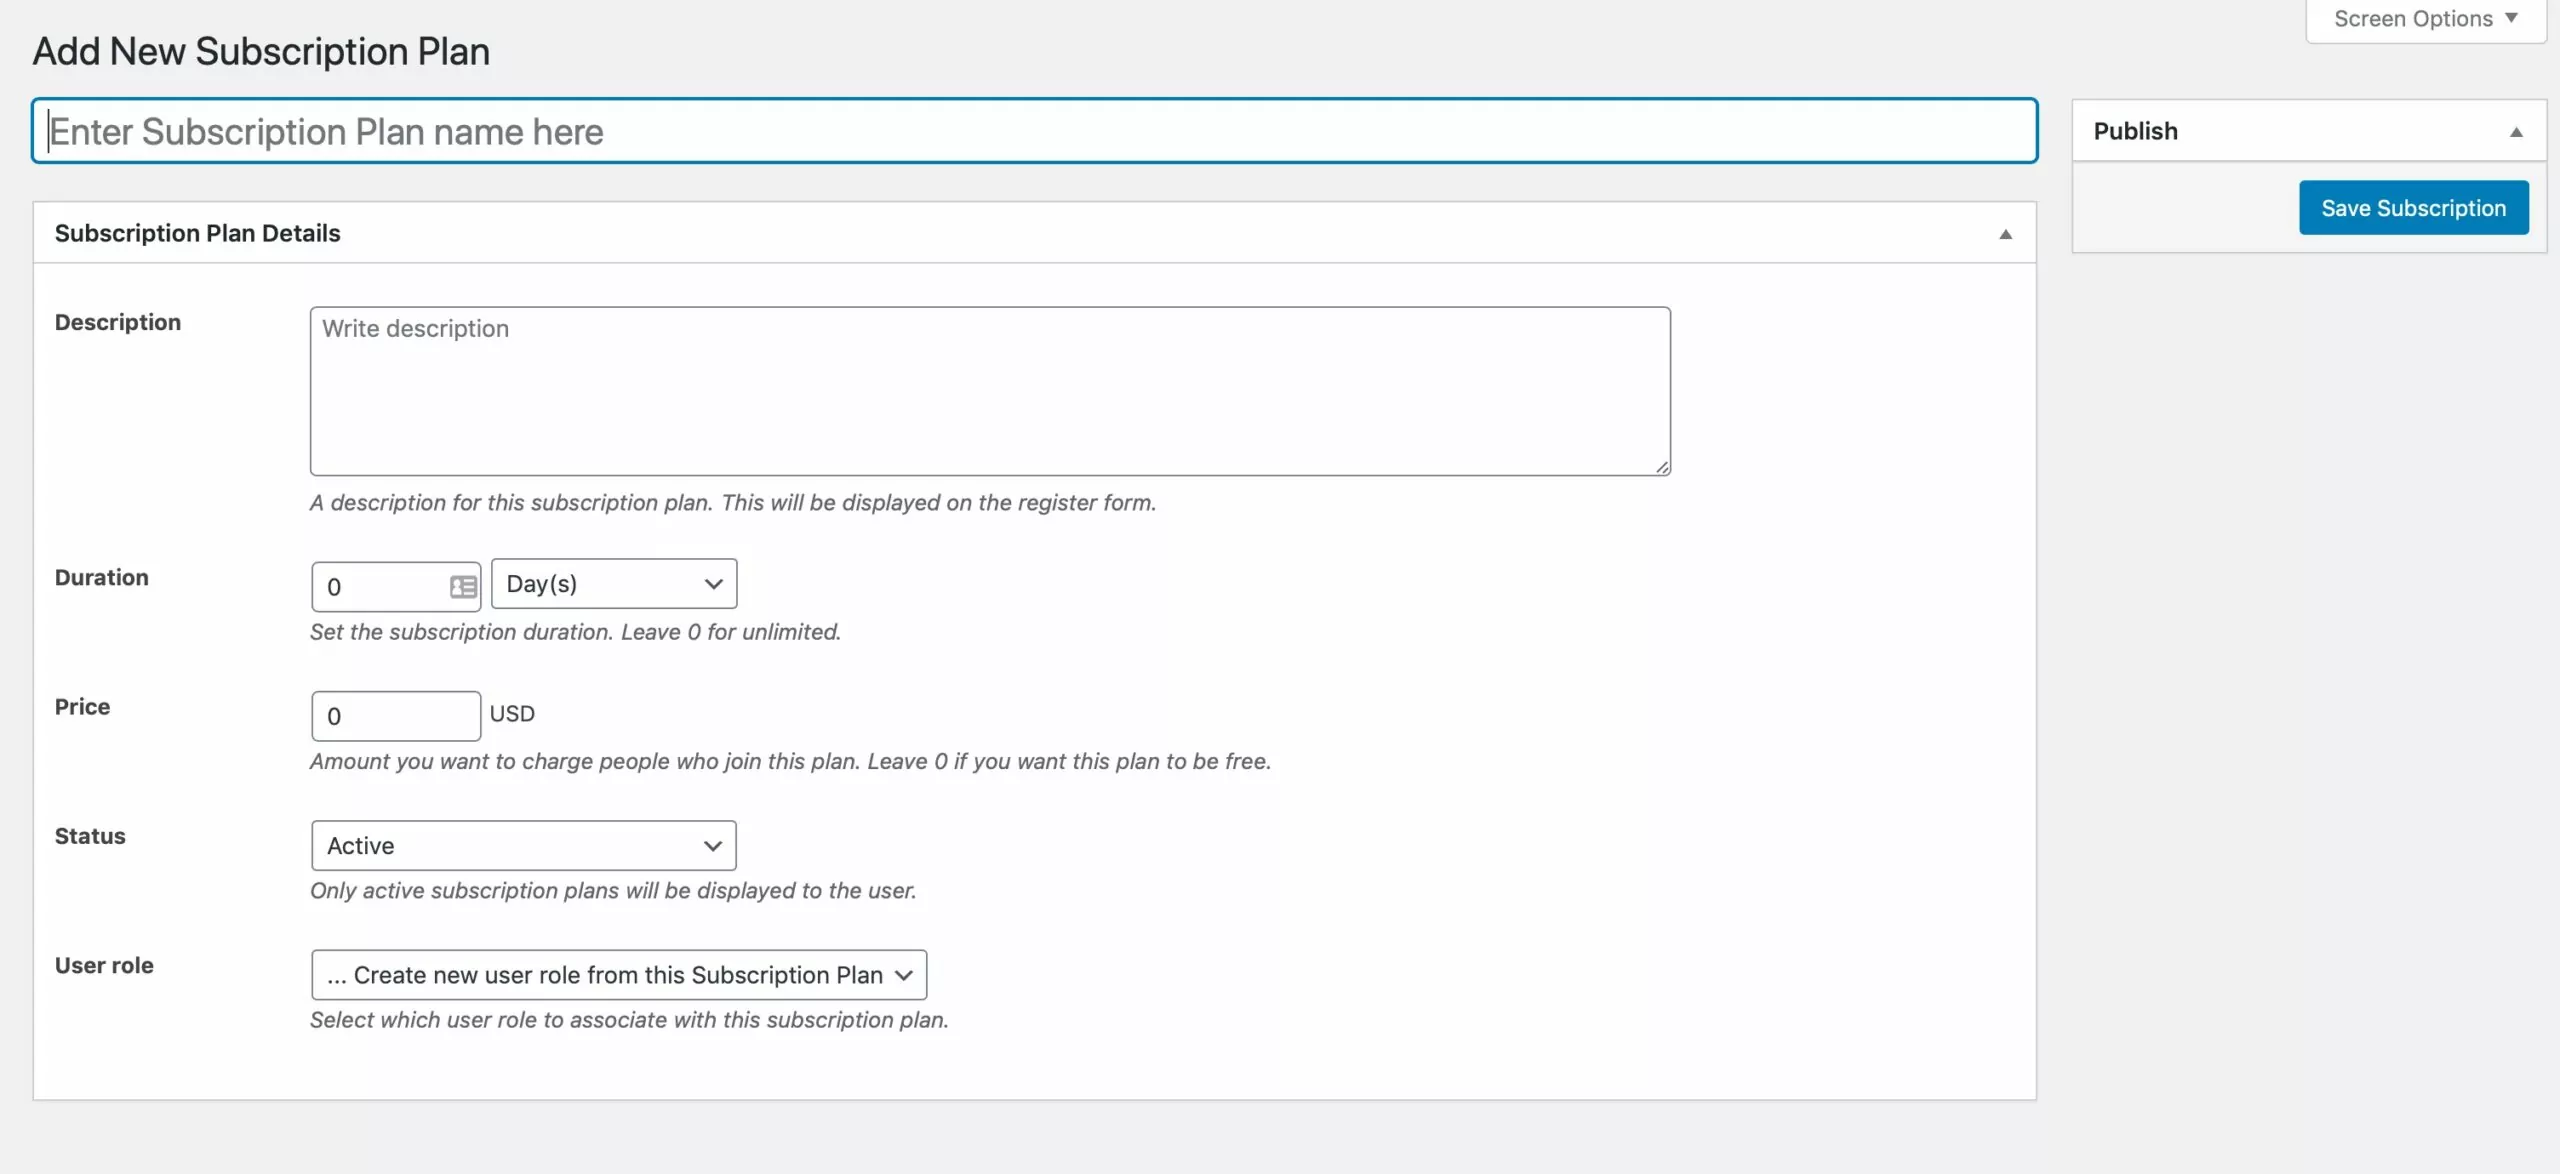
Here you can name the new plan and define how it will operate. Options you have are:
- Name: give it a name that makes sense to users.
- Description: Use this to tell users what they will get if they sign up to this plan.
- Duration: How regularly will members have to resubscribe? You can set up recurring payments later to automatically take payments each time renewal comes around.
- Price: Price for the defined duration.
- Status: Active or Inactive. Only active membership plans will be available for members to sign up for.
- User role: You can create a new WordPress user role to correspond to your membership tier, but you don’t need to if all you want to do is restrict content.
Type in all the details and click the Save Subscription button. Repeat this process until you have all the membership levels you need for your site. You can always come back and edit these later on or add new ones if you need to: the plugin gives you unlimited membership levels.
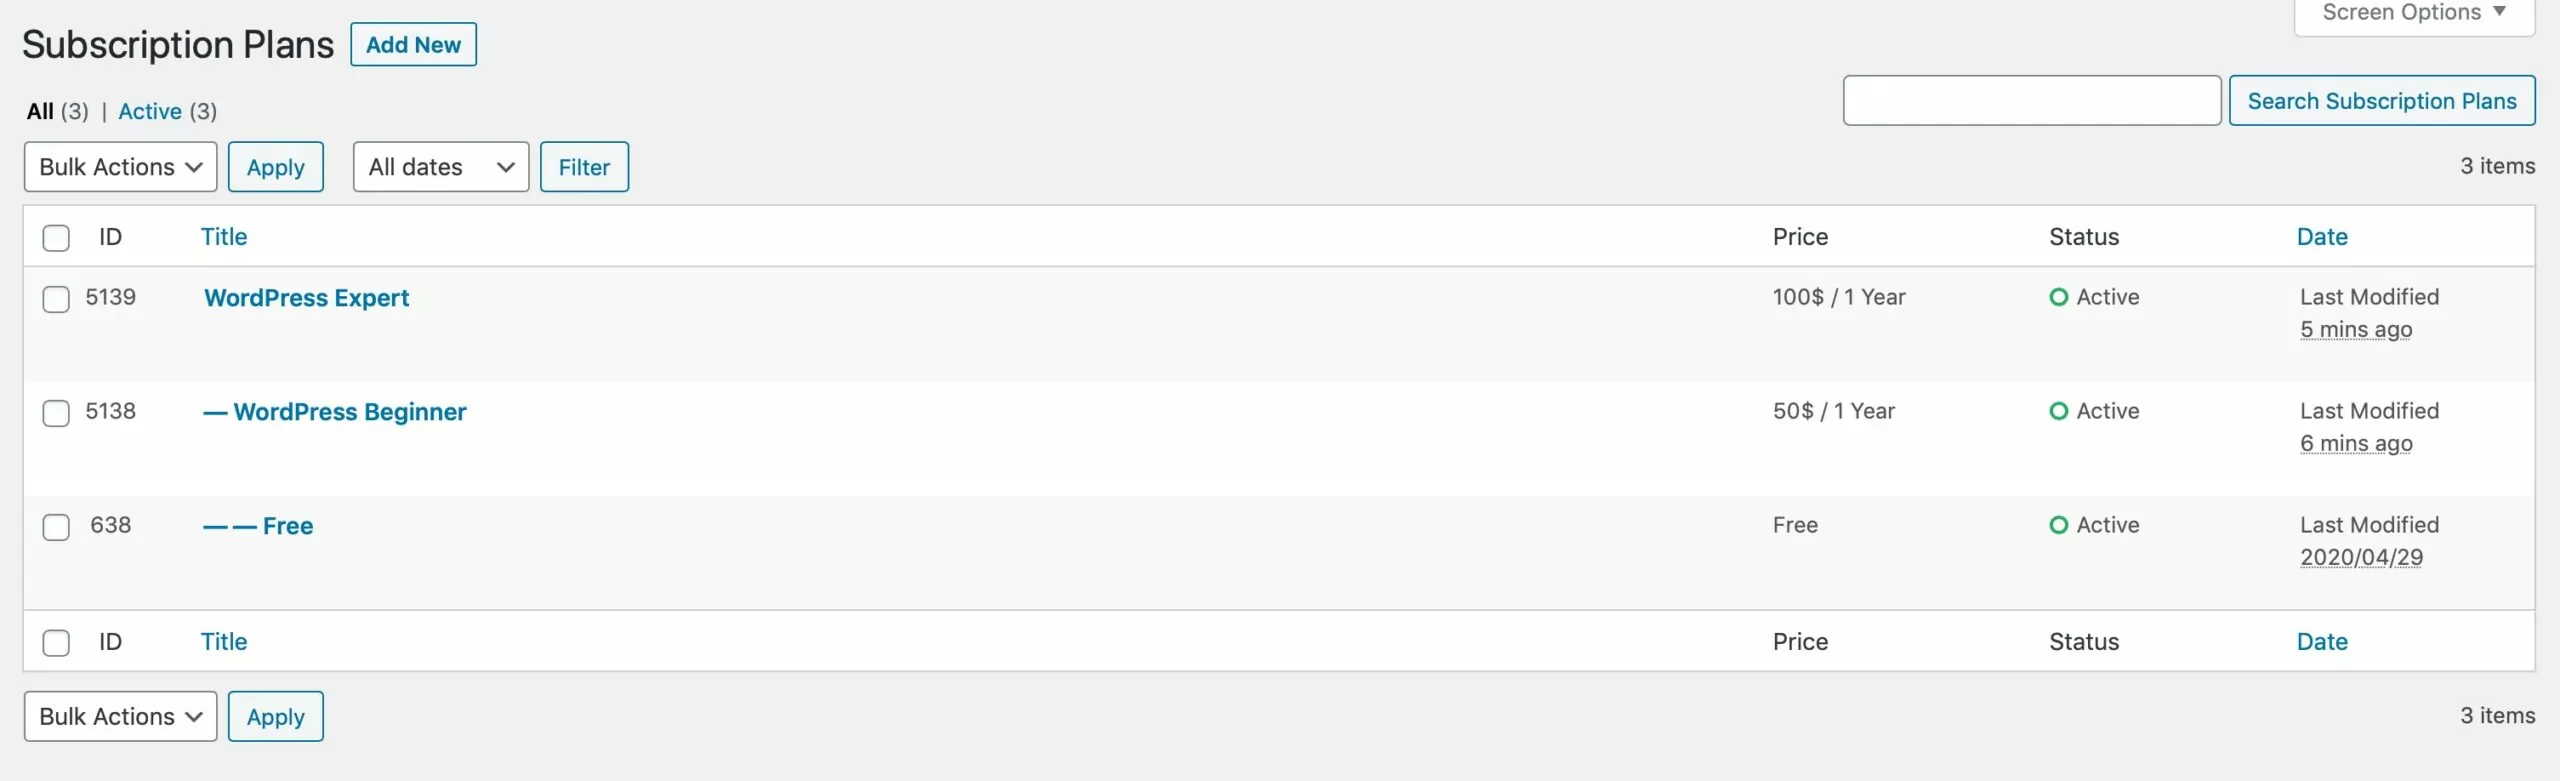
If you want your membership plans to have a clear progression so that people can upgrade or downgrade between them, you can set them up as upgrades or downgrades. Hover over the first membership level you added and click on the Add Upgrade or Add Downgrade link. Then set the level up in the same way you did the first one. When you view your membership levels, the hierarchy will be shown on the admin screen.
You’ll now have a range of membership tiers that you can use for creating your membership site on WordPress. Your members have multiple payment options via the major payment gateways including Stripe and Paypal and you can set up recurring payments to ensure you don’t lose members when renewal comes around.
Creating Restricted Content for Members
Once you have membership tiers configured, you can start restricting your content to those tiers.
You can restrict a post to just one membership level or to multiple levels: so for example, if you have bronze, silver and gold levels you might restrict gold content to just the gold level, silver content to silver and gold levels, and bronze content to all three levels. A post that’s restricted to all your levels will be invisible to visitors who aren’t members of your site.
To restrict content, create your post then scroll down to the Content Restriction section of the editing screen.
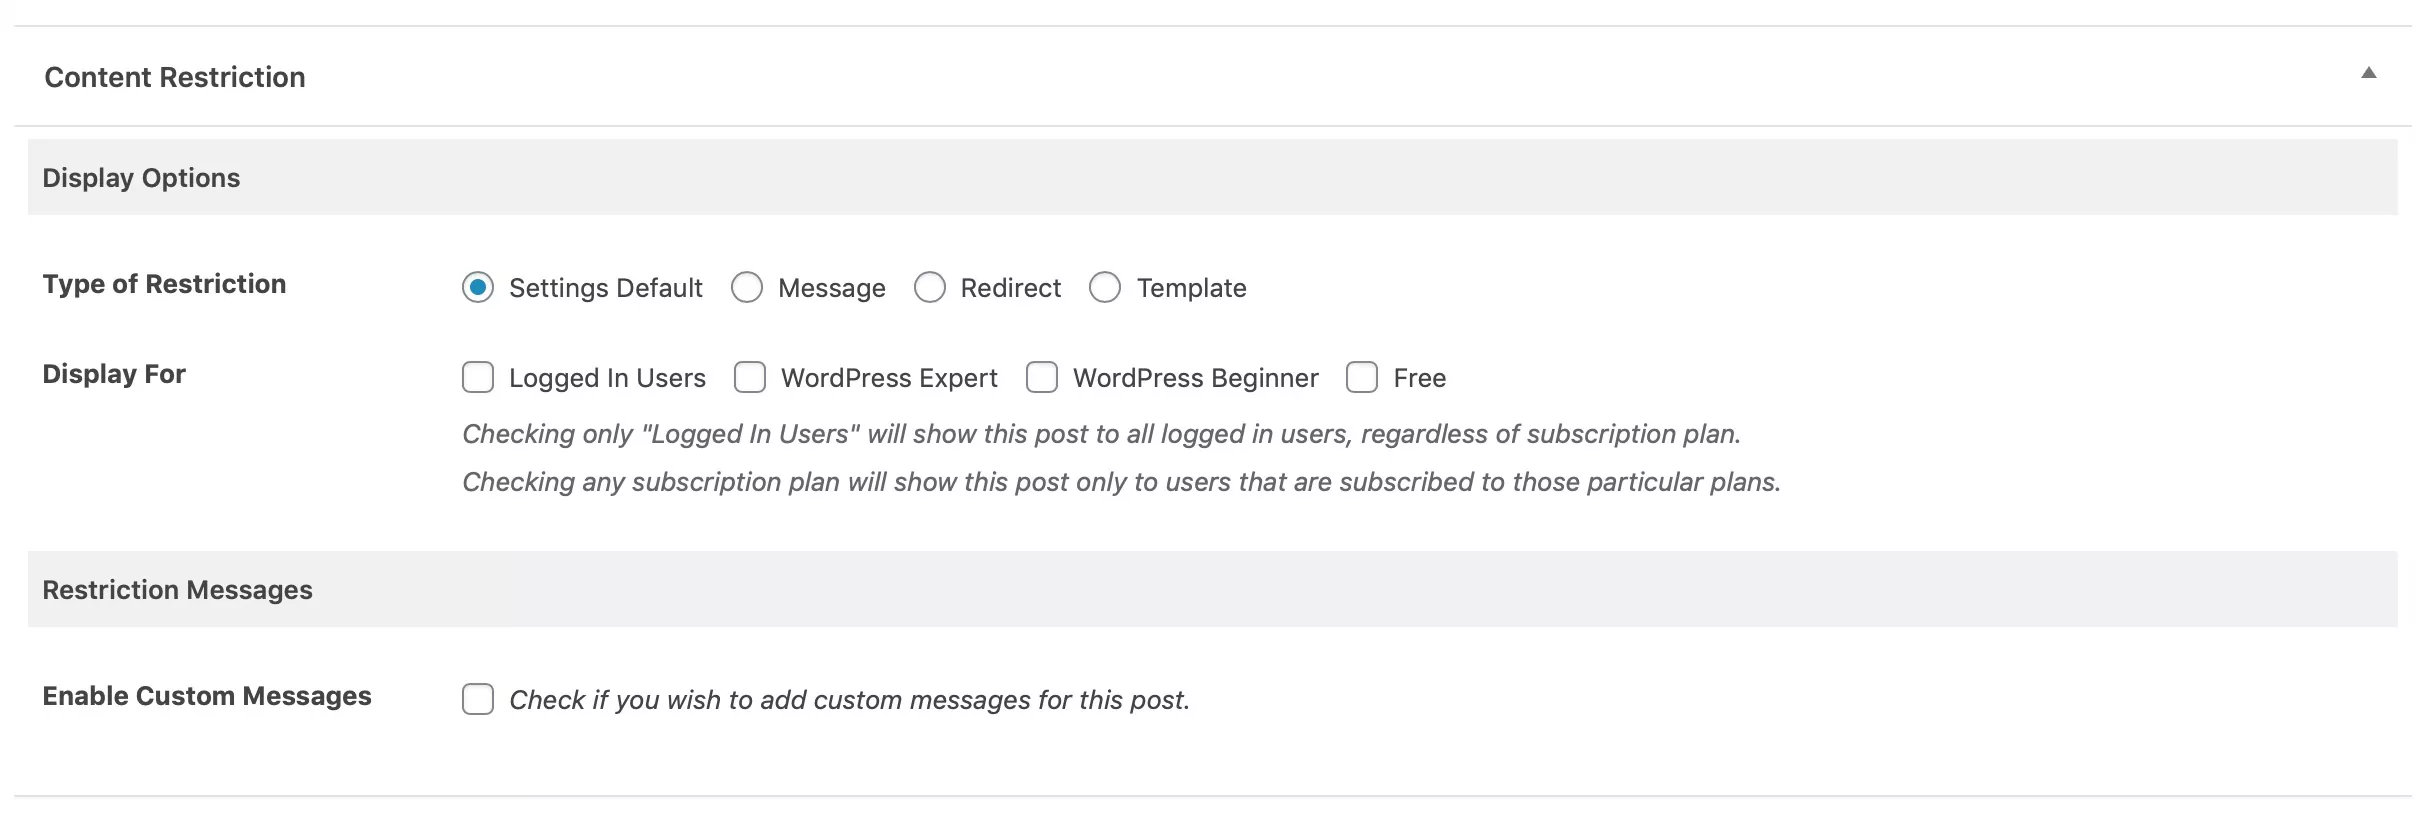
Check all of the levels you want to have content access. If you don’t check any of the boxes, it will be publicly visible. It’s a good idea to have some public content so that potential members can get a taste for the kind of posts they’ll have access to when they join.
You can also add a custom message for people who can’t see the post, telling them why it’s restricted.
Update or publish your post and you’ll find it’s only accessible to people on the relevant tier(s) of membership. If you try to access it without being logged in, you’ll see your message.
If you’d prefer to save time and create a default message for all your restricted content, go to Paid Member Subscriptions > Settings and select the Content Restriction tab. Here you can create a message telling people why they can’t see this content and encouraging them to join your site to access it.
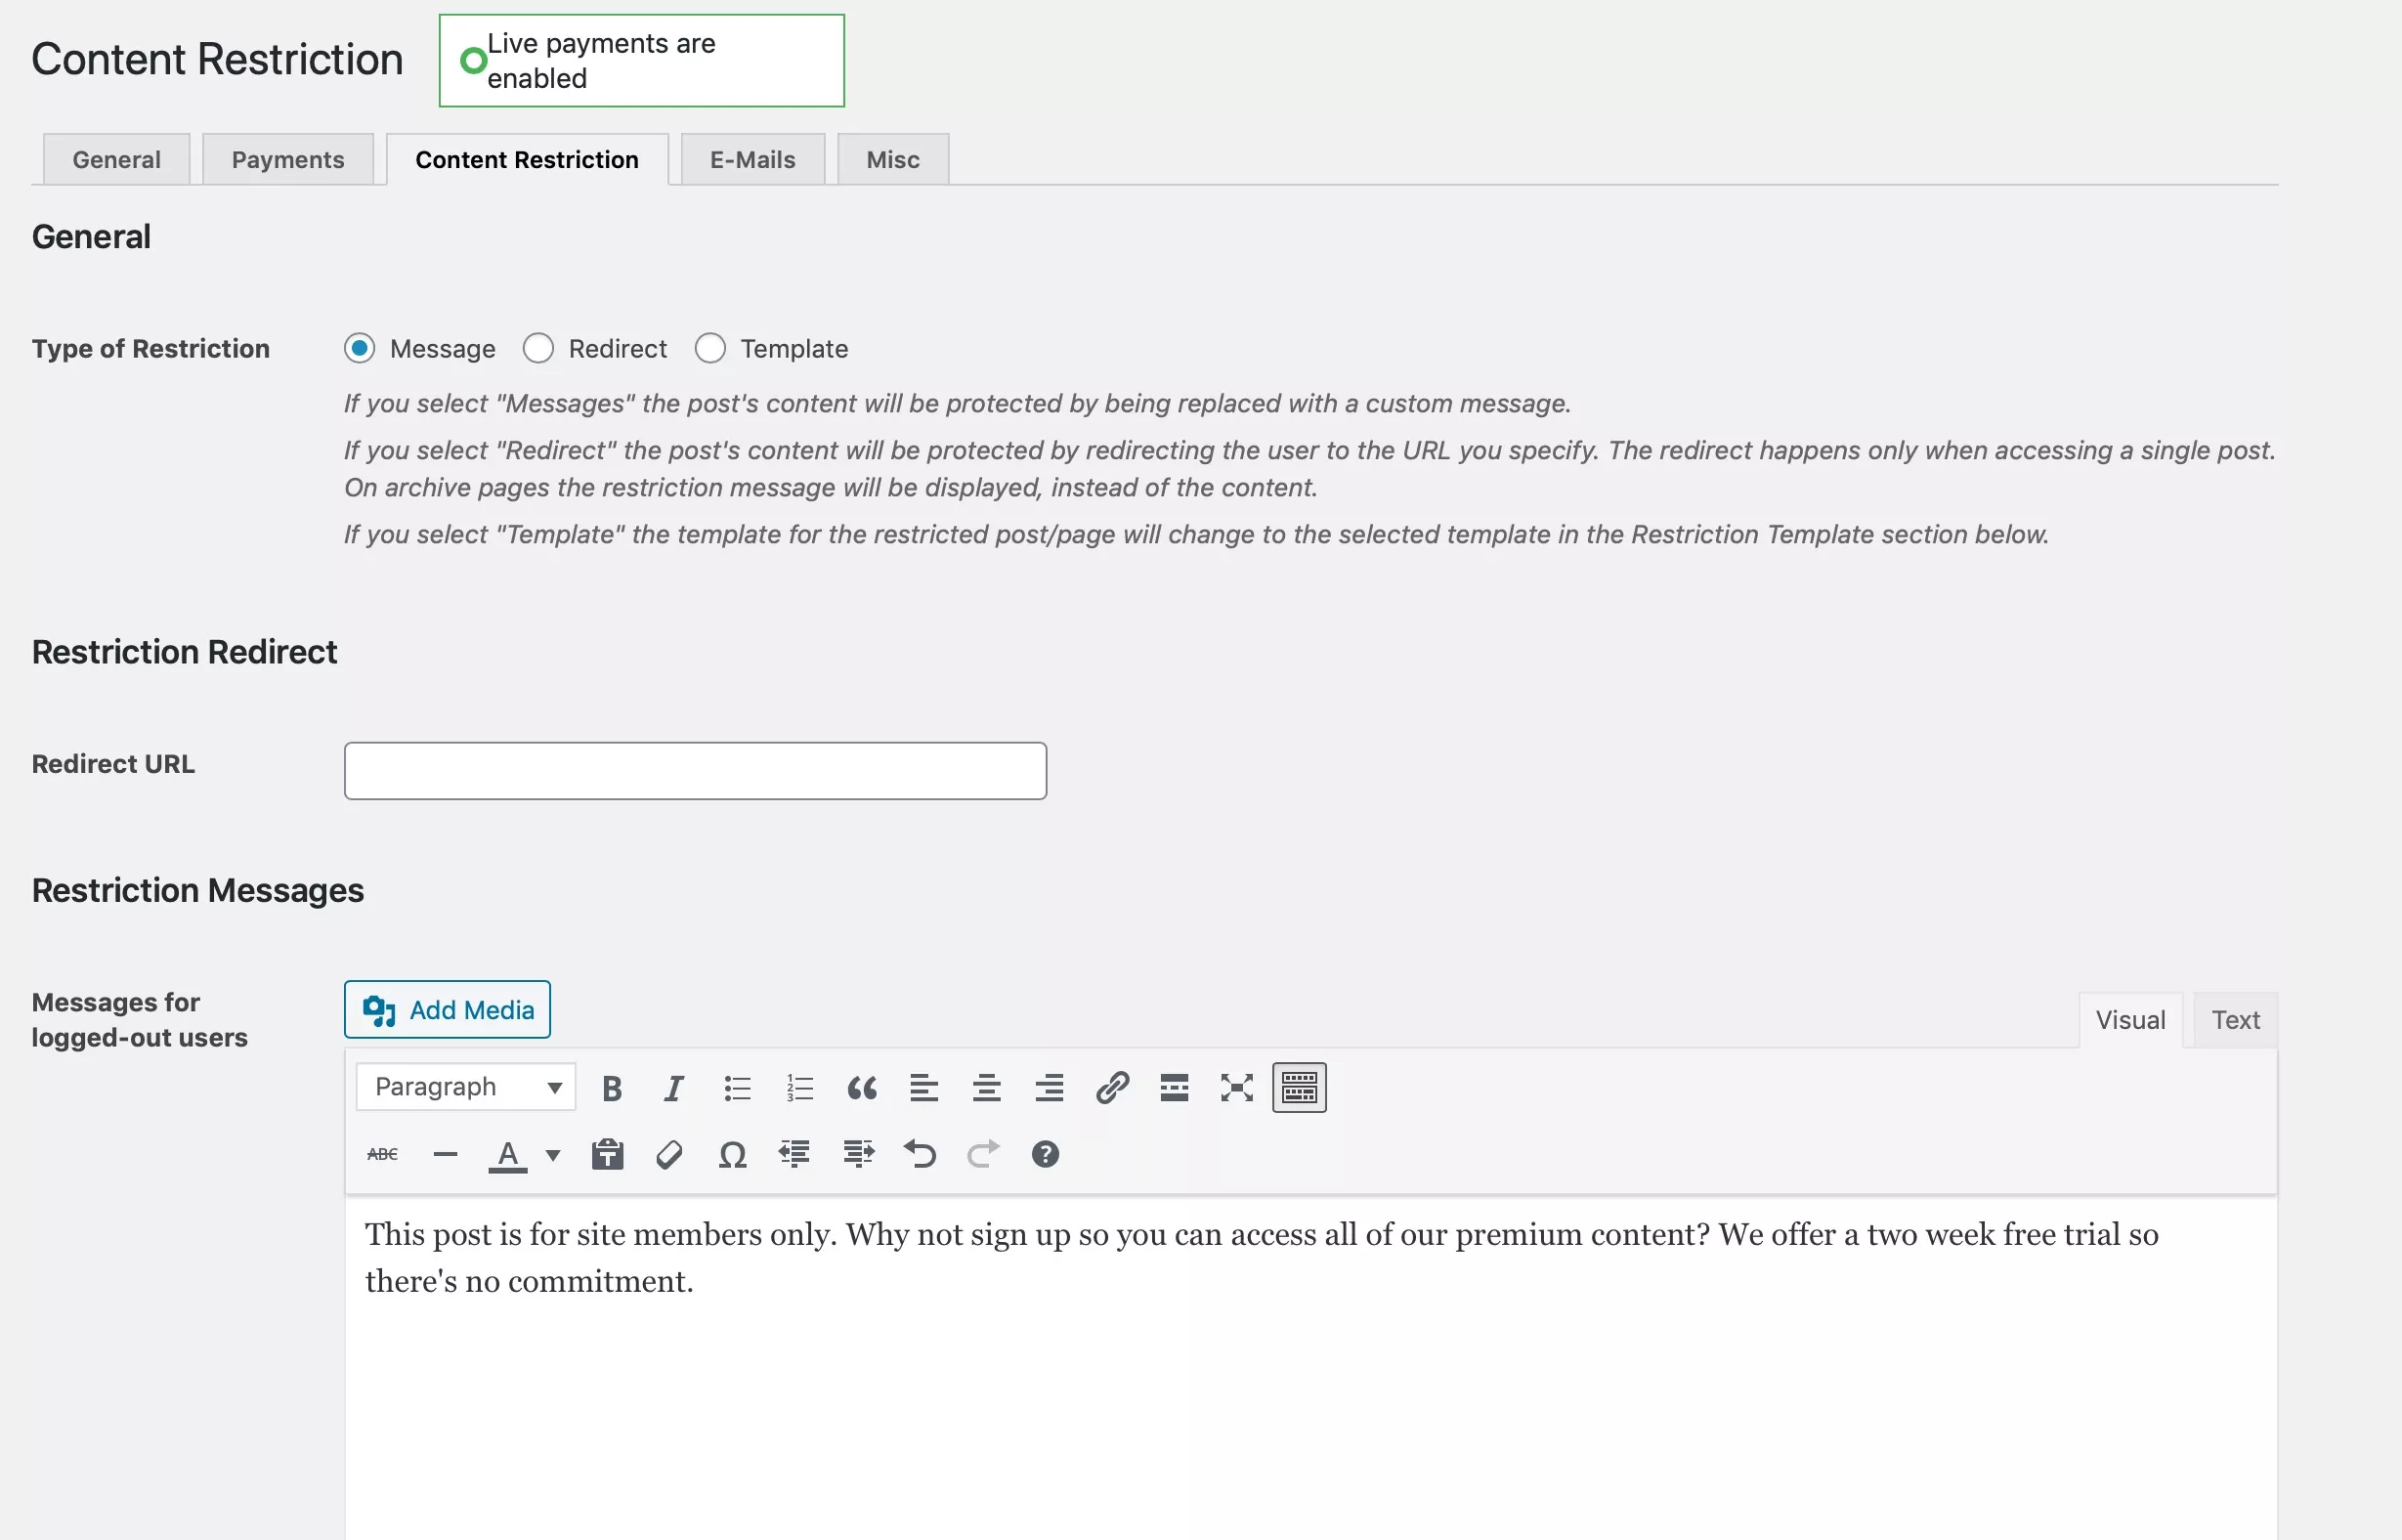
Alternatively, you can redirect people when they try to access the content they don’t have access to. Add the page you want to redirect them to in the Redirect URL field. This might be the signup page or you could create a special page that includes the signup form and pricing information as well as information on what membership gives people.
If you want to simplify content restriction, you can restrict content by post type or taxonomy using the Global Content Restriction add-on.
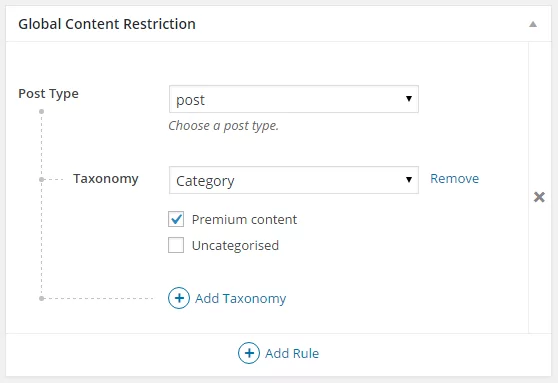
This lets you assign a post type, category or taxonomy term to each membership plan and automatically restrict all posts with that taxonomy term or post type. Just give the post that term and it’ll be restricted without you having to scroll down to the Content Restriction section.
Creating a Signup and Pricing Page for Your WordPress Membership Site
Now you have membership tiers and restricted content, you need a page where people can sign up and become members.
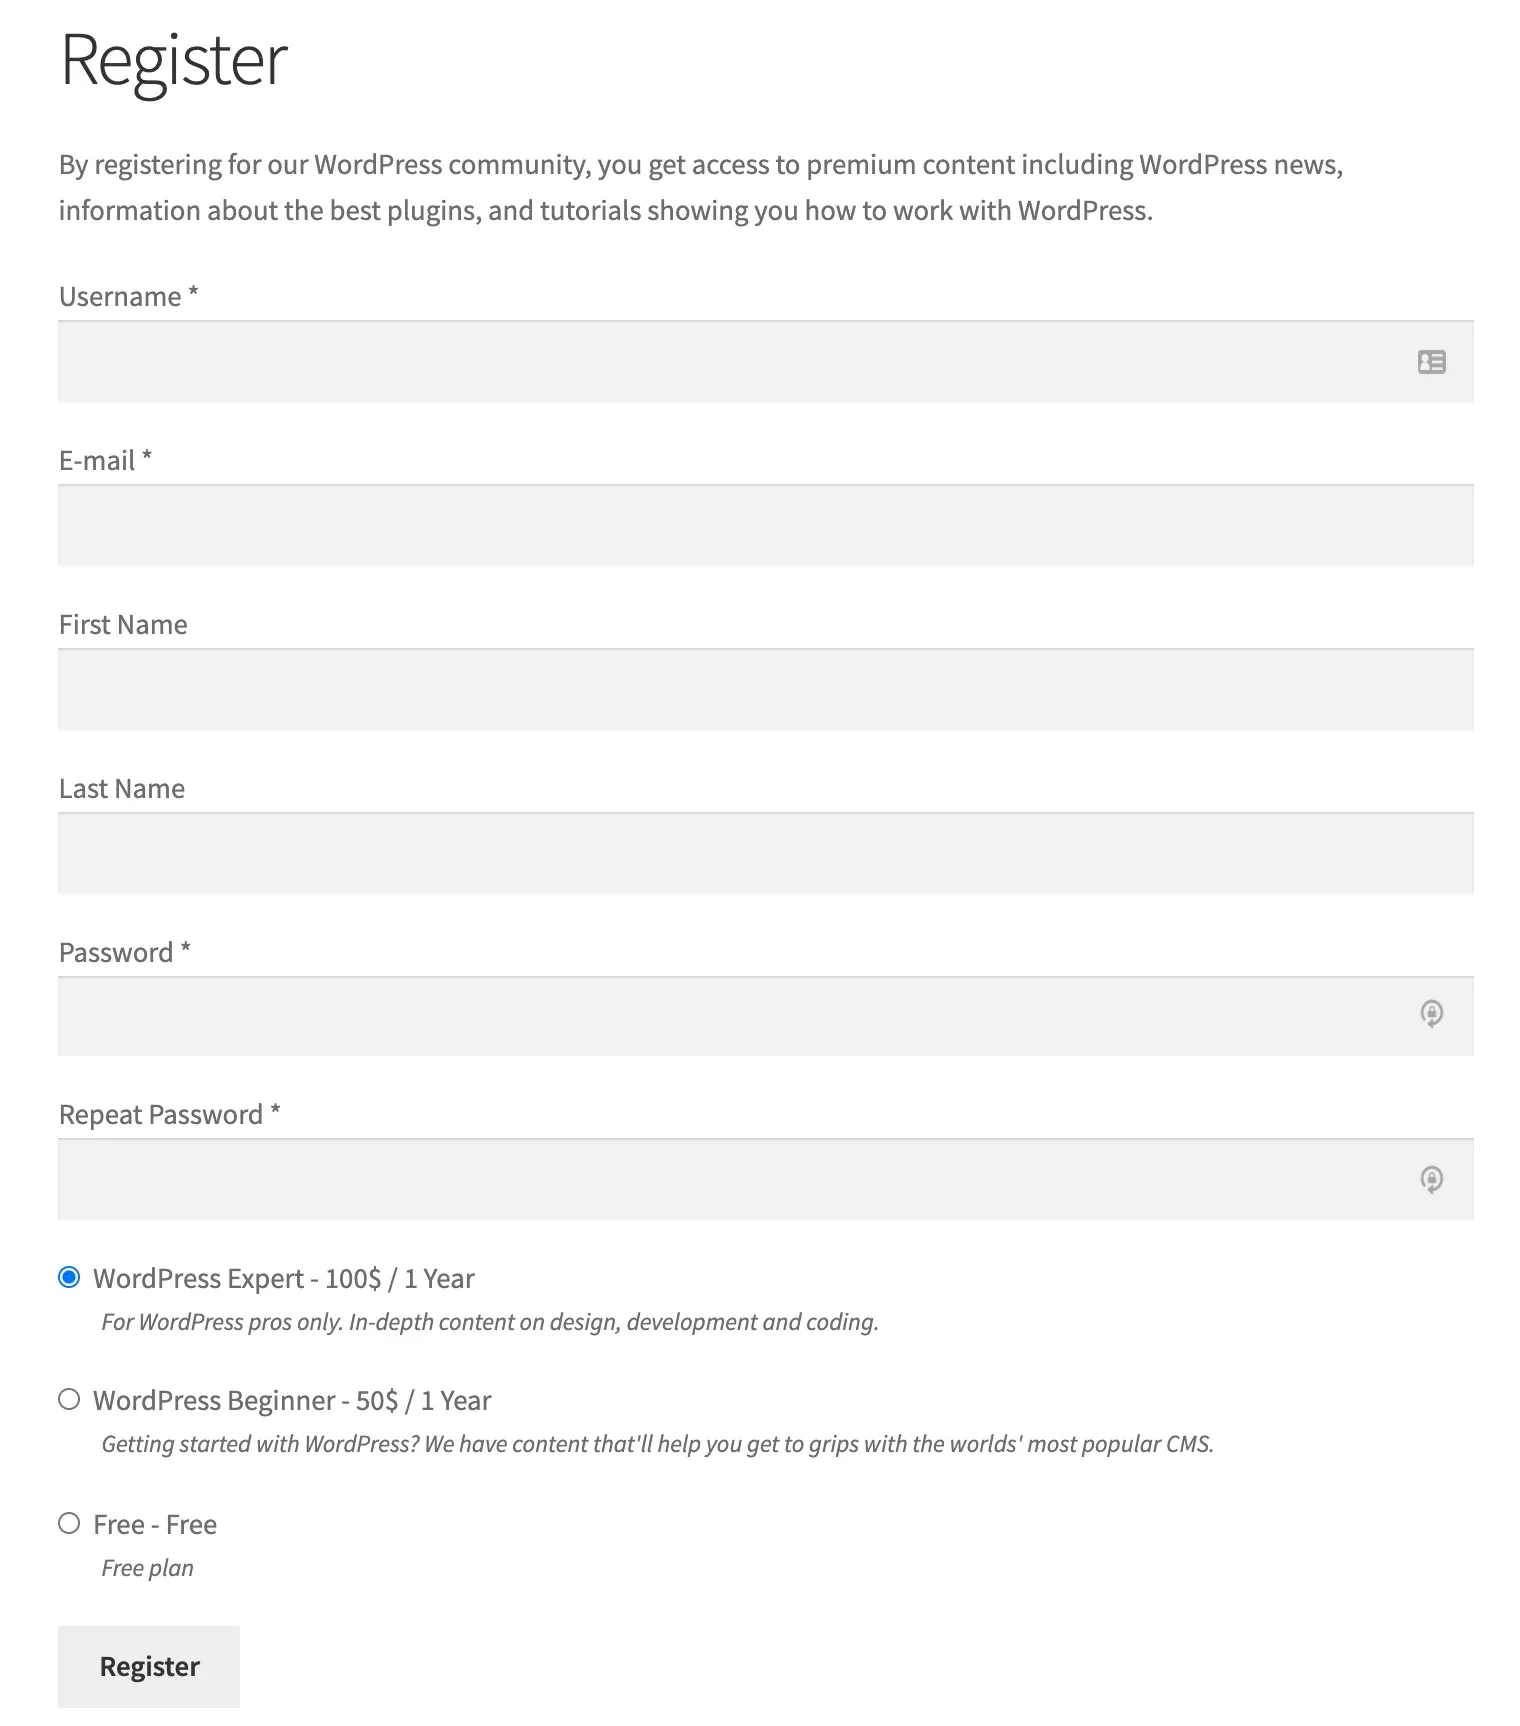
You create this by creating a page in WordPress and then adding the registration form shortcode.
Create a new page in your WordPress admin, add information about your membership site to it and then add the [pms-register] shortcode.
Save the page and view it to see the default registration form.
The form is customizable by adding parameters to the registration form shortcode.
So to add the pricing plans to the top of the form and automatically select one of them, you would use this shortcode:
[pms-register plans_position=”top” selected=“5138”]
Note: The last parameter, 5138, is the ID of the subscription plan: you can find these in the Subscription Plans screen.
Now when you view the screen, plans are at the top with the most popular one selected to encourage people to sign up for that.
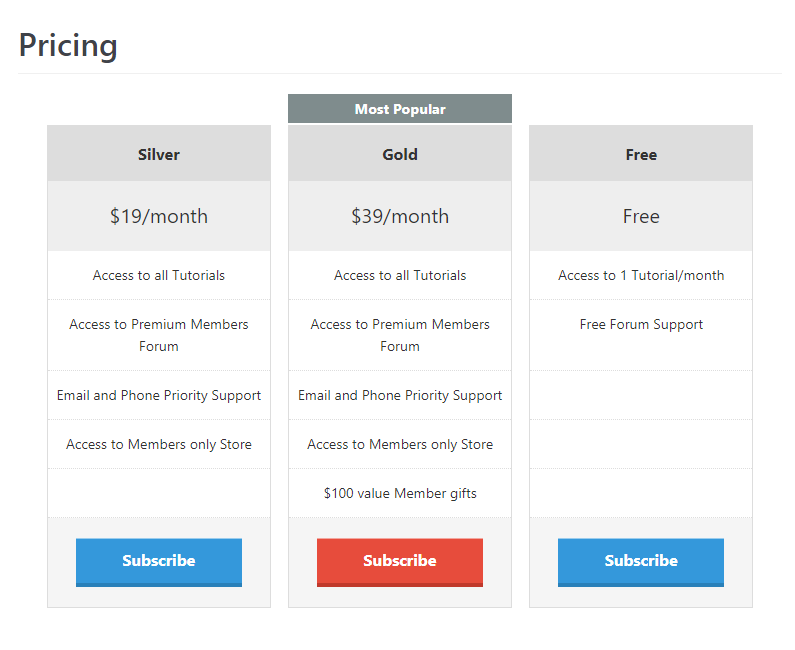
You can also set up a membership pricing table to highlight the benefits of each subscription plan, allowing people to compare them before choosing the one that fits best.
Creating Login and Account Management Pages
You can create a login page for your WordPress membership site as well as a membership management page where members can edit their settings.
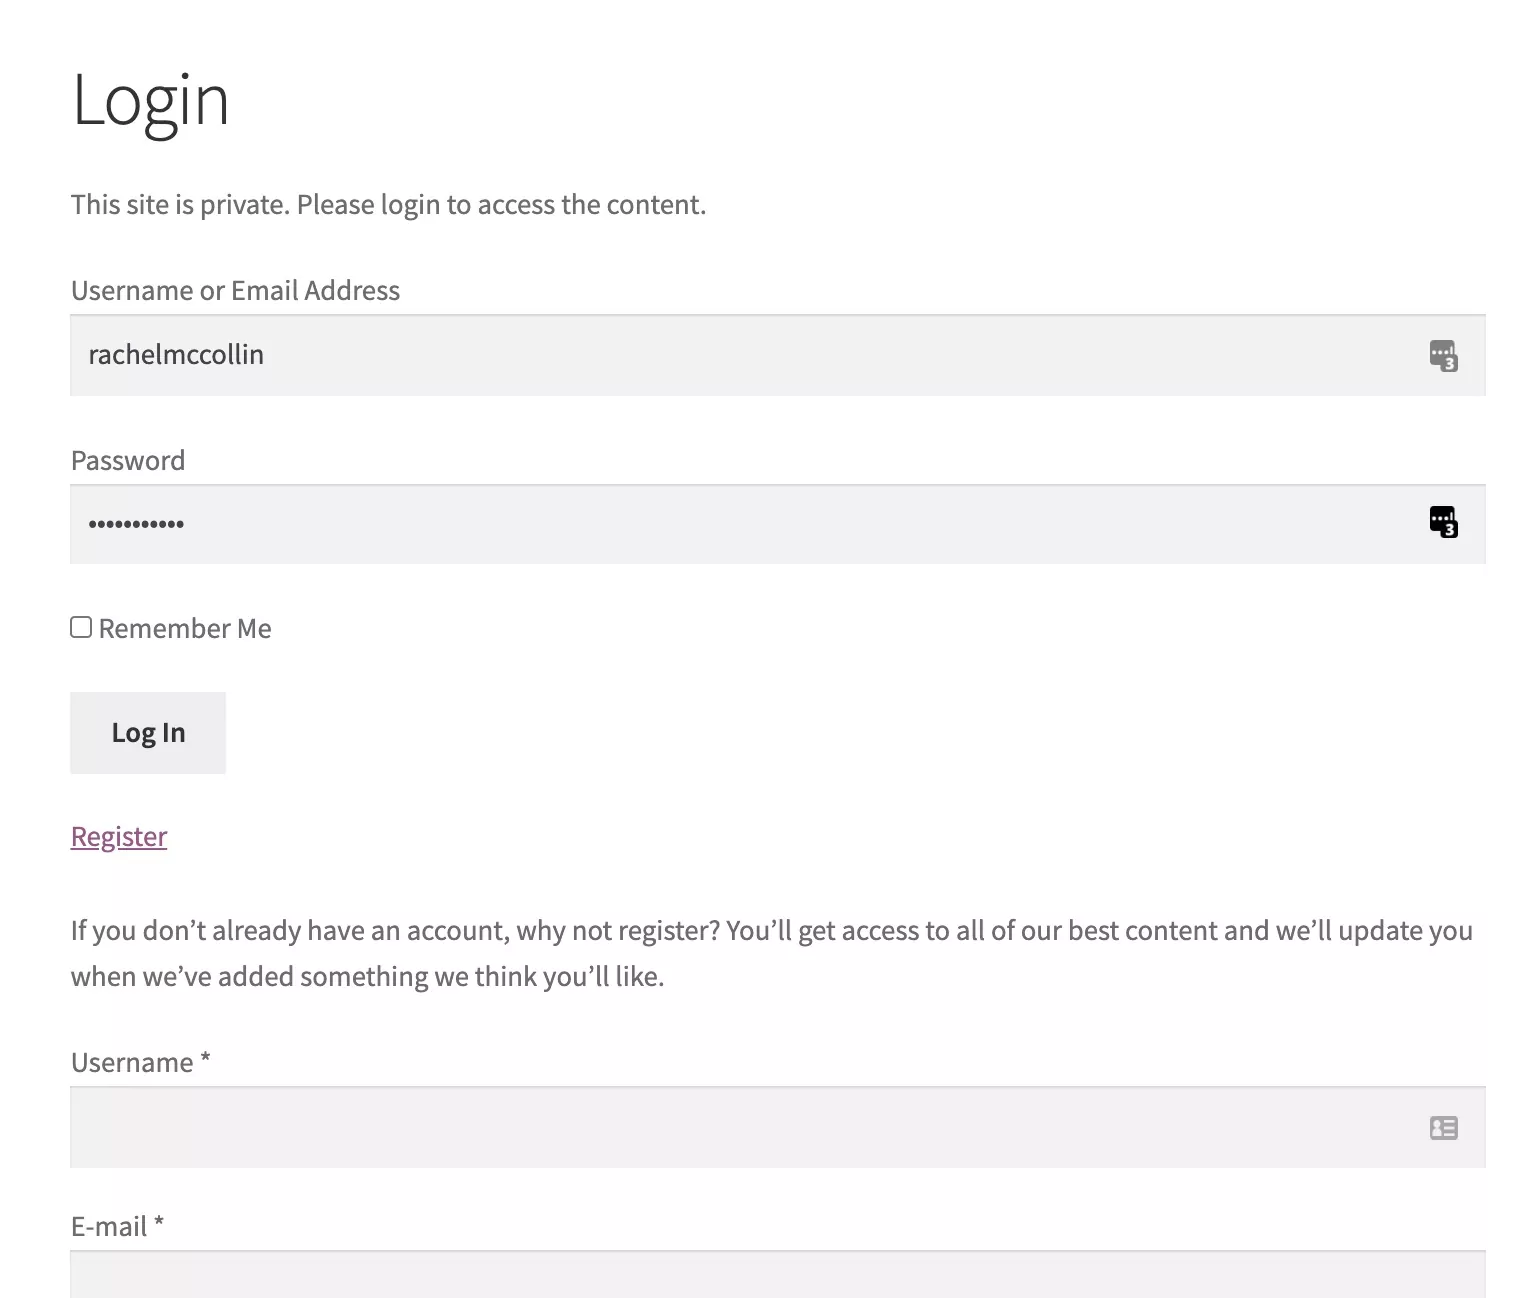
To create a login page, start by creating a page in your WordPress admin for the login. Then add the [pms-login] shortcode.
On this page, there isa user registration form too – if someone comes to this page but doesn’t have an account they can easily register from here.
An account management page is helpful for members who want to view and update their details. Again, you create a dedicated page for it and use a shortcode.
Create a new page and add the [pms-account] shortcode to it.
Here’s how the page looks on the frontend site:
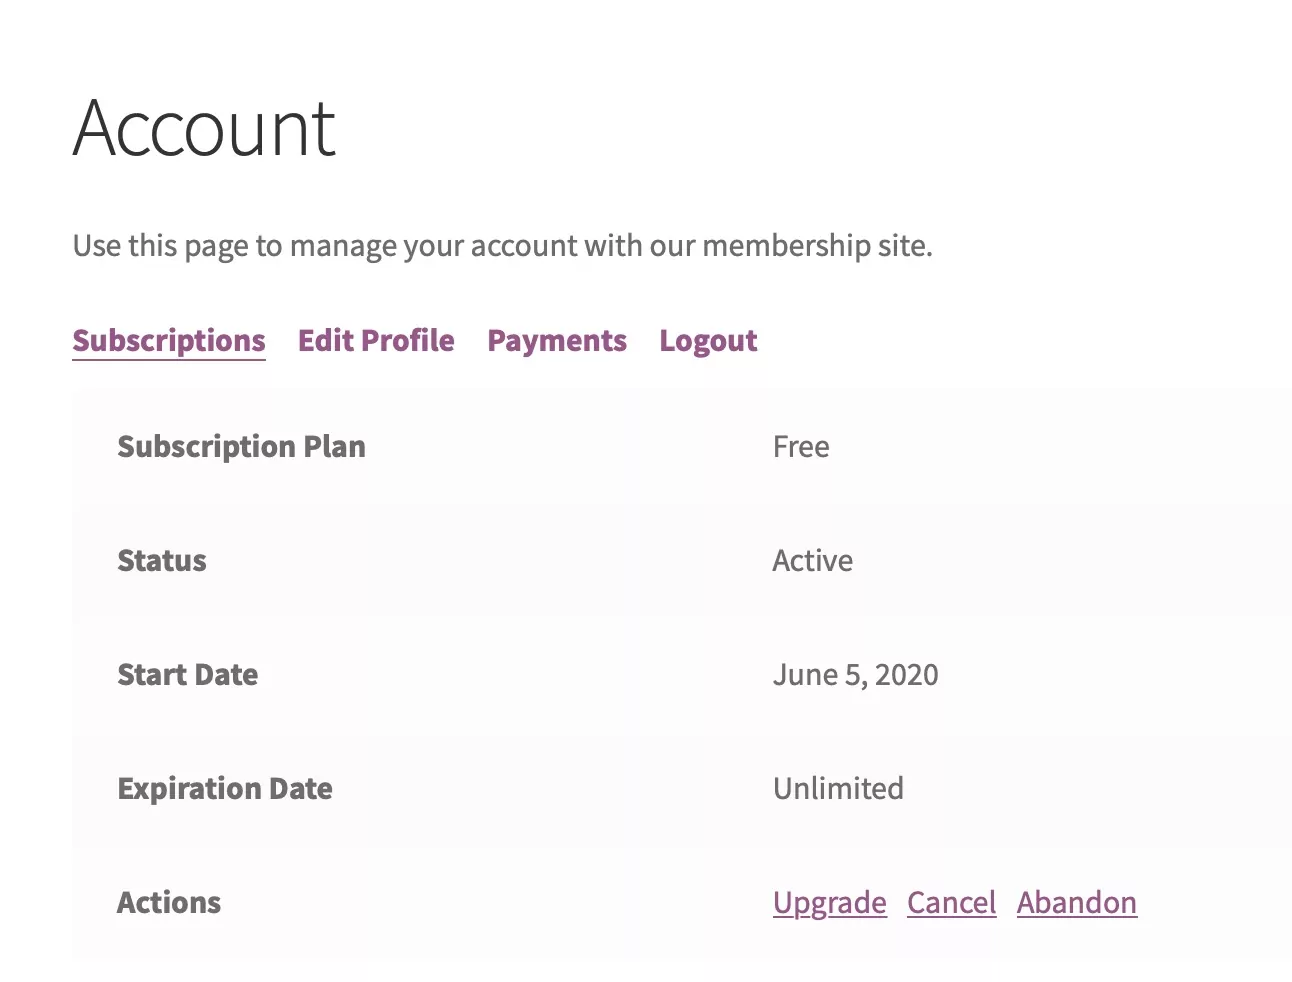
From here, members can edit their profile, view payments and upgrade.
Once you’ve added all your pages, make sure you add them to your site’s navigation menu so members can access them.
Integrating Your WordPress Membership Site with WooCommerce
Integrating Paid Member Subscriptions with WooCommerce means you can set up a members-only store or restrict certain products to your members. You can also offer member-only discounts on selected products.
This way, you can give even more benefits to your members and create a truly exclusive store.
To integrate WooCommerce with your membership subscriptions, you’ll need WooCommerce installed and activated, as well as Paid Member Subscriptions.
This will give you access to the WooCommerce Integration tab in the Paid Member Subscriptions settings screens.
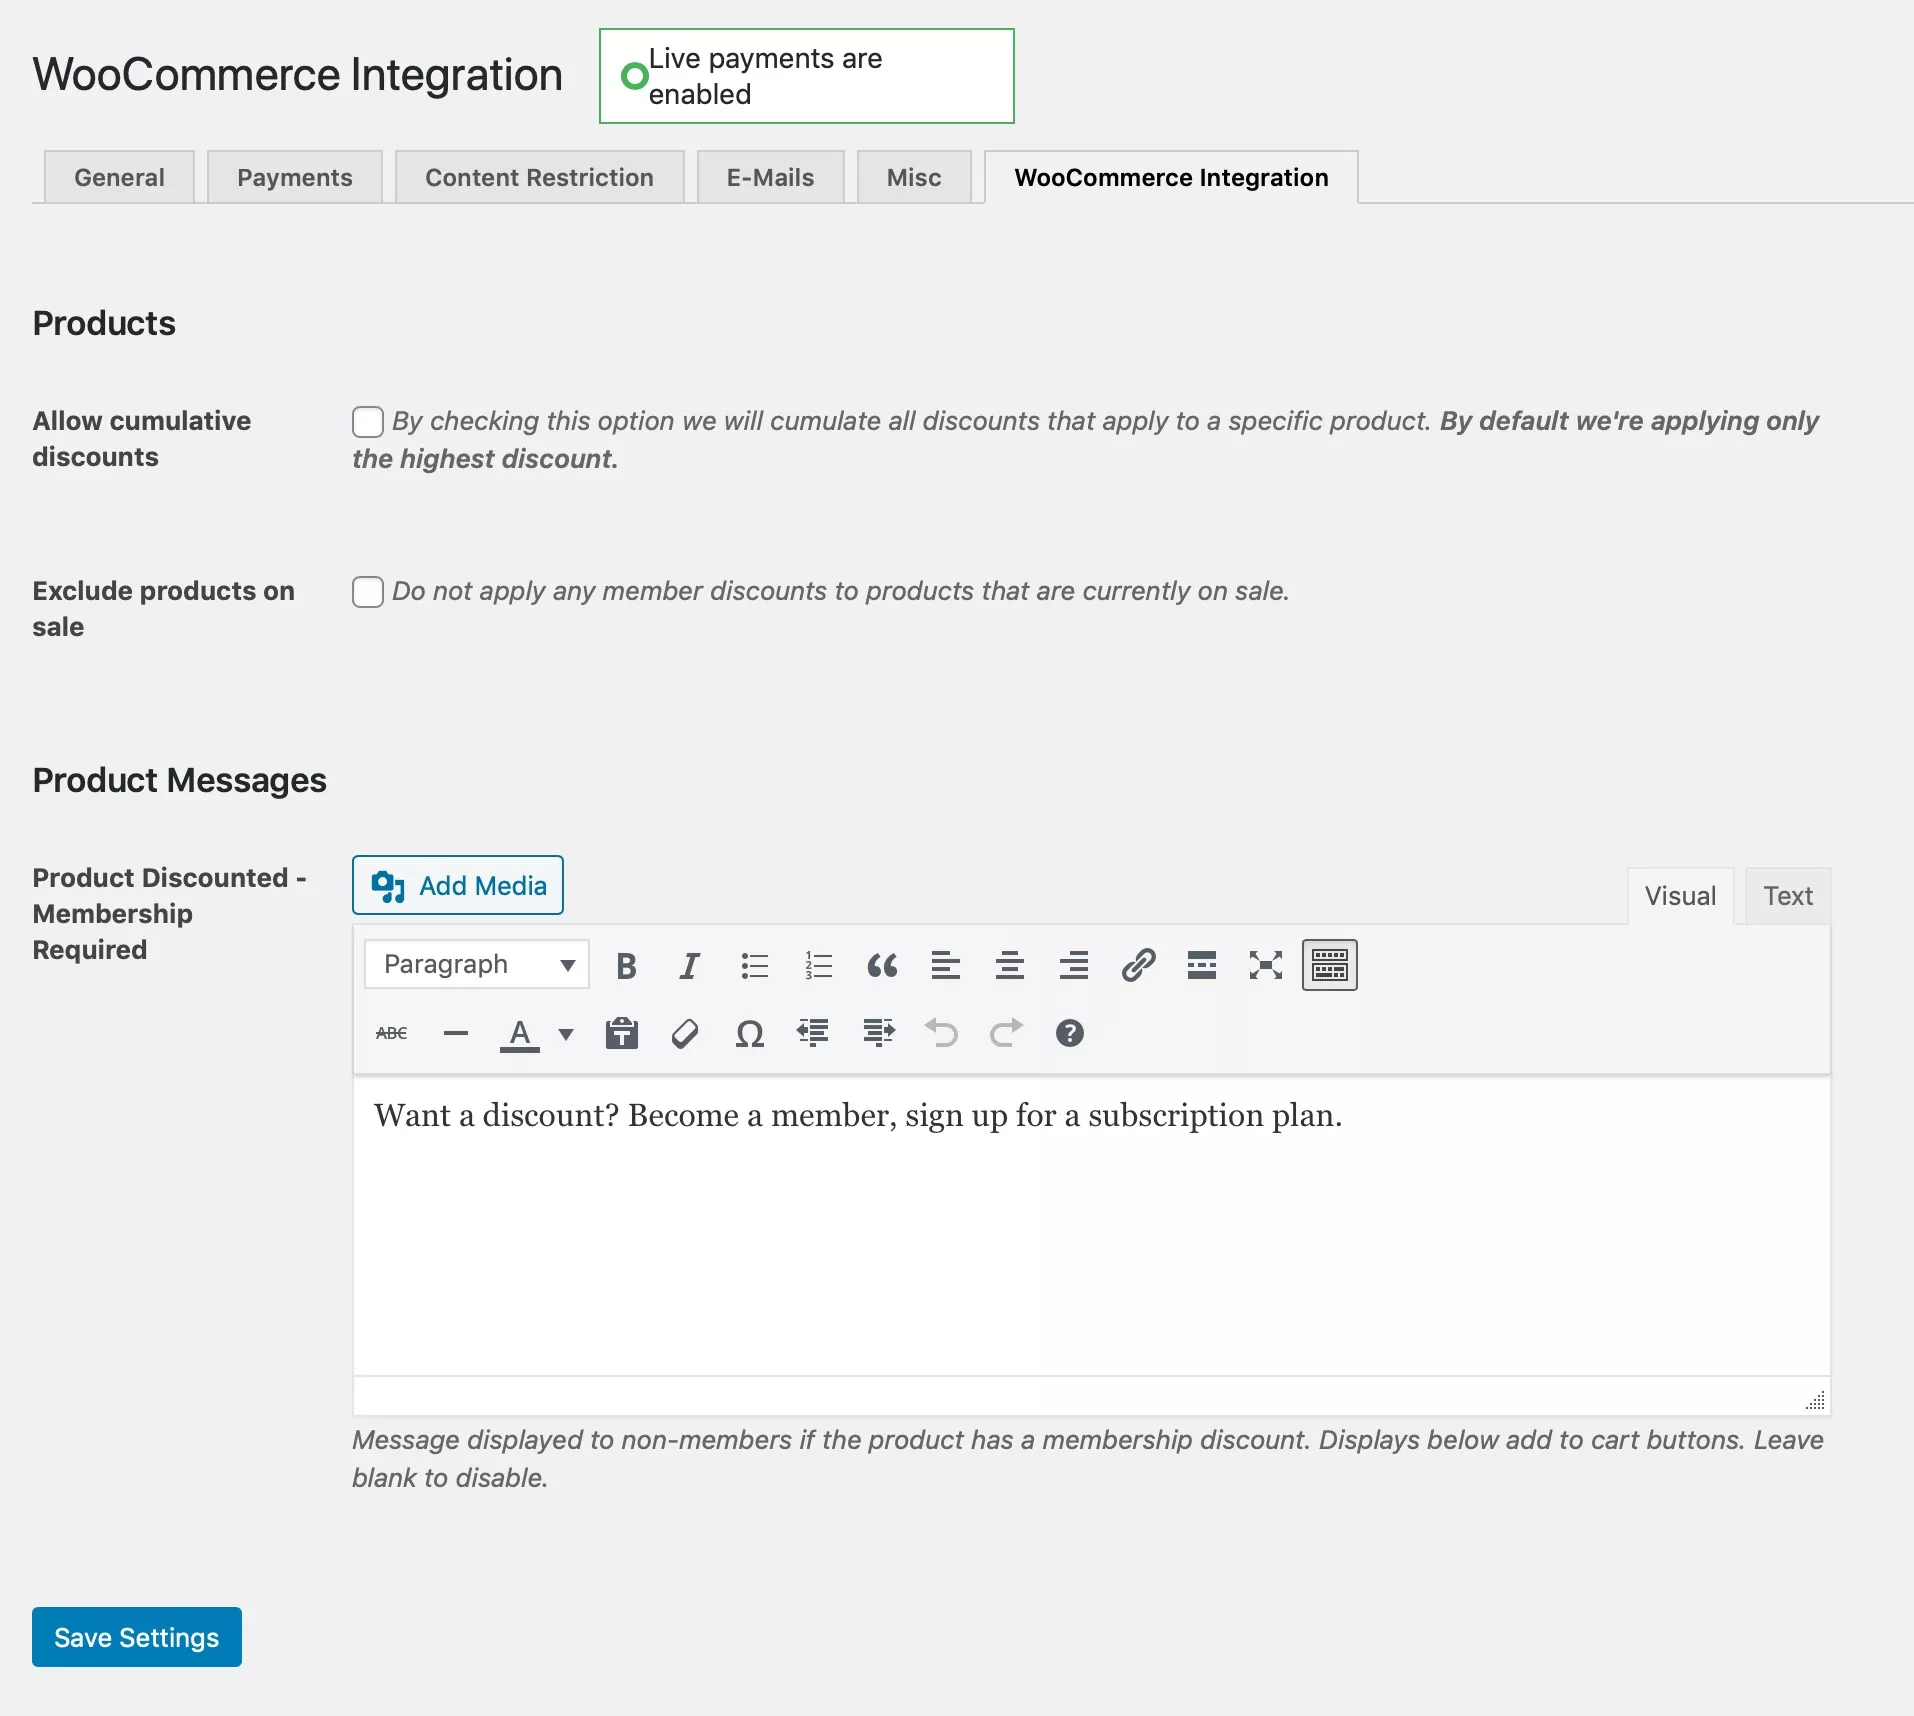
Here you can configure settings for your entire store, including cumulative discounts, excluding on-sale products from member discounts, and a message encouraging people to sign up for discounts.
To offer member-only discounts on a product, open the product editing screen and scroll down to the Membership Discounts meta box.
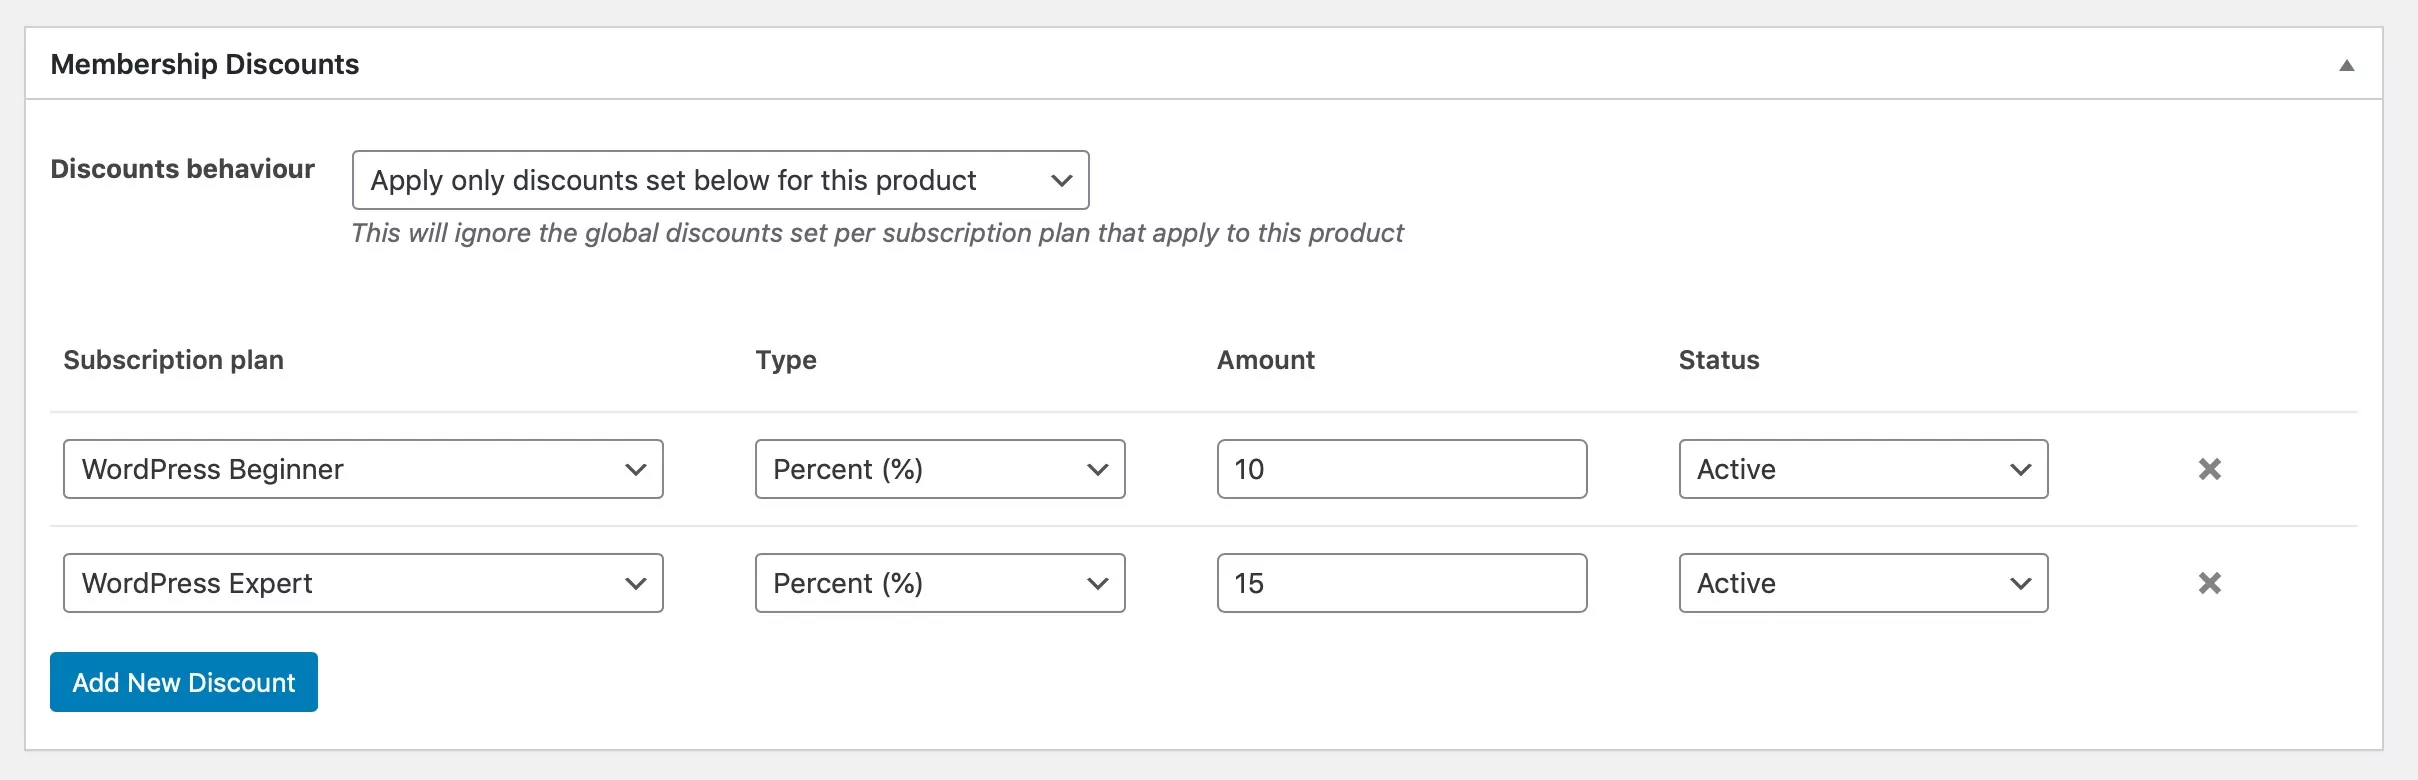
Click the Add New Discount button to add a discount for each membership tier you want to offer discounts for. Don’t forget to save your product by clicking Update or Publish after you do this, as the discount won’t be saved until the product is saved.
To restrict individual products to members, scroll down to the Content restriction section.
Here you can choose to hide products from non-members or display them but only make them available to purchase for members. You can also add a custom restriction message if you don’t want to show the store-wide one.
Taking Your WordPress Membership Site to the Next Level
We’ve shown you how creating a membership site on WordPress can add value for your customers, can help you make more money for your business, and is easy to set it up.
But you can take your WordPress membership site even further with add-ons for Paid Member Subscriptions Pro.
Offer Flexibility and Make More Money with Pay What You Want Membership
The Pay What You Want add-on lets people decide how much they will pay for membership, instead of you setting pricing. They pay what they think membership is worth.
Some businesses that offer this kind of pay what you want model have seen increased revenue, as some customers will pay more, and others will be more likely to sign up at a rate they choose.
Offer Fixed Period Membership that Ends at a Specified Time
For some membership sites, the service you offer spans a fixed time and isn’t related to the date that users sign up. Or maybe you have premium content that you only want to make available for a fixed time, no matter when people sign up.
If you want all your memberships to run from January to December for example, it’s helpful if you can offer memberships that expire in December and renew for a year in January.
The Fixed Period Membership add-on lets you add this to your WordPress membership site.
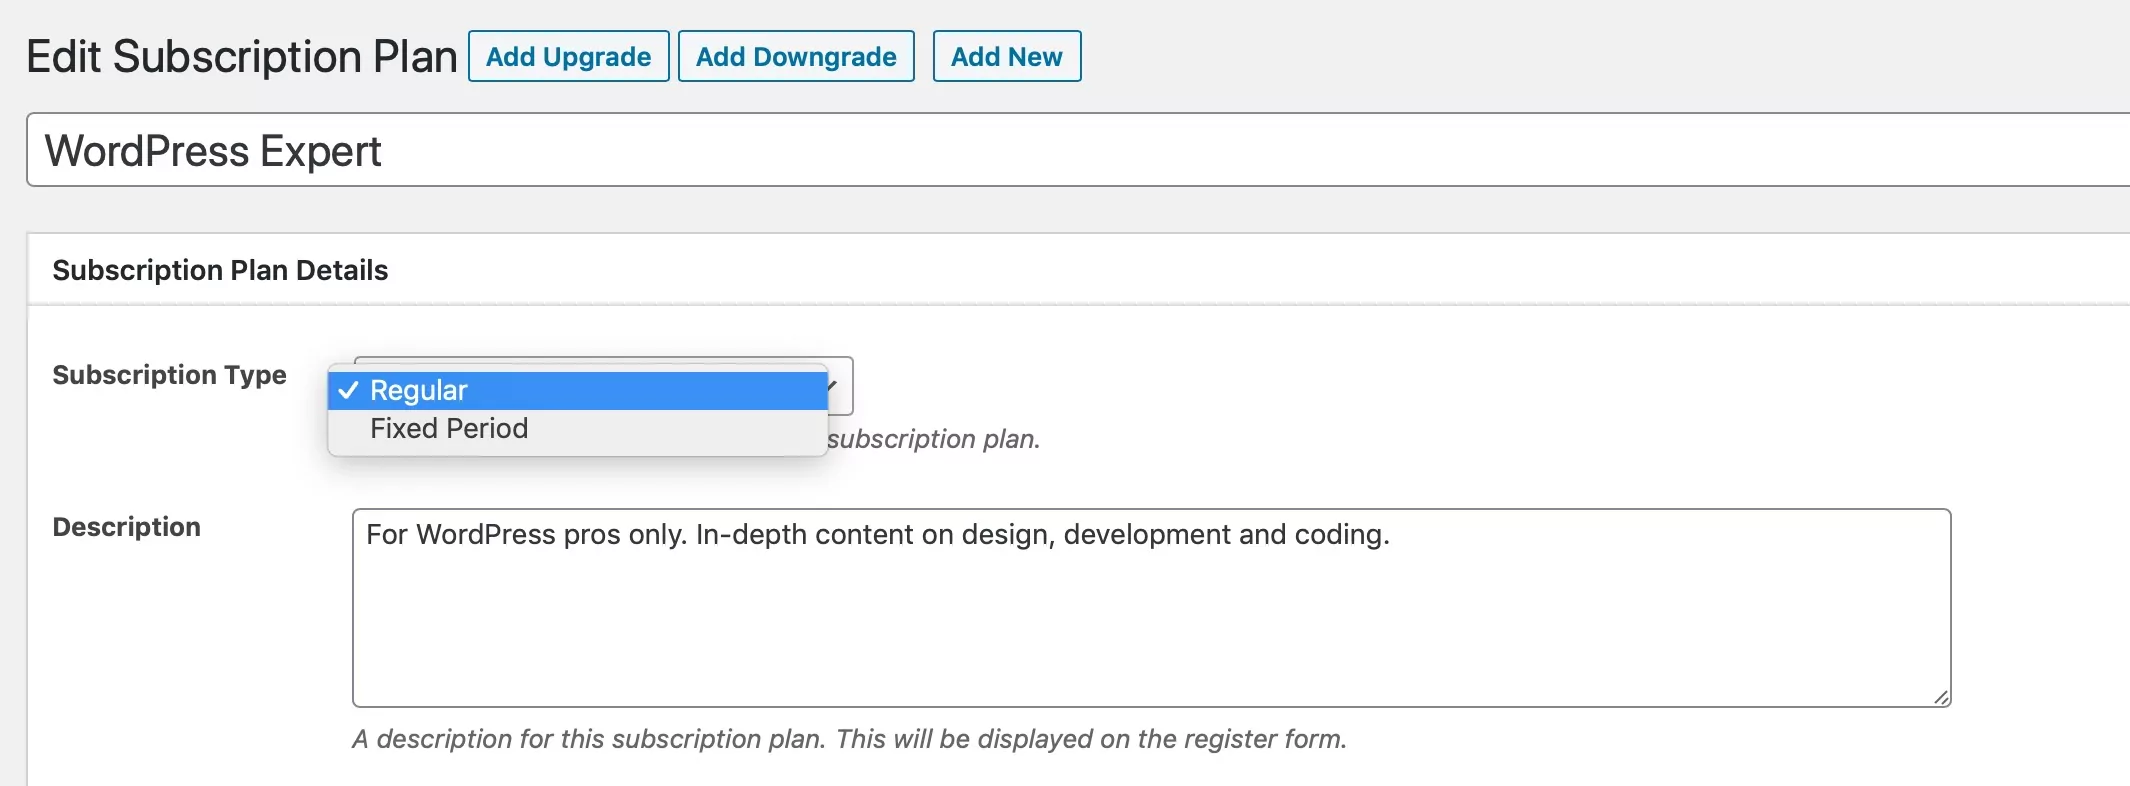
You can specify which plans will be regular and which will have a fixed membership period, so you can have a mix of the two. For fixed period membership, you can choose when the membership ends and whether it will renew when it’s over.
Don’t Lose Potential Members with Email Reminders
Sometimes people start the process of signing up to a membership site and they don’t finish it. Perhapsthey got distracted, or they need an extra nudge to encourage them to sign up. Sometimes people don’t renew their subscription, and might be happy to rejoin if you reminded them.
These are warm leads, and it pays to keep in touch with them.
The Email Reminders add-on lets you contact these people so you don’t lose them.
The add-on helps you with email marketing by letting you send emails to people who’ve abandoned the signup process or who haven’t renewed, as well as people who’ve just registered or renewed their subscription. You can use these emails to hold on to those members and to build a relationship with them, meaning they’ll be more loyal to your site.
Give Members More Value with Discount Codes
The WooCommerce integration lets you set member discounts on your products. But another way to approach this is to offer discount or coupon codes to your members that they can use across your ecommerce store, using the Discount Codes add-on.
This saves you having to configure discounts on individual products and means you can change the discount rate for each membership tier when you need to.
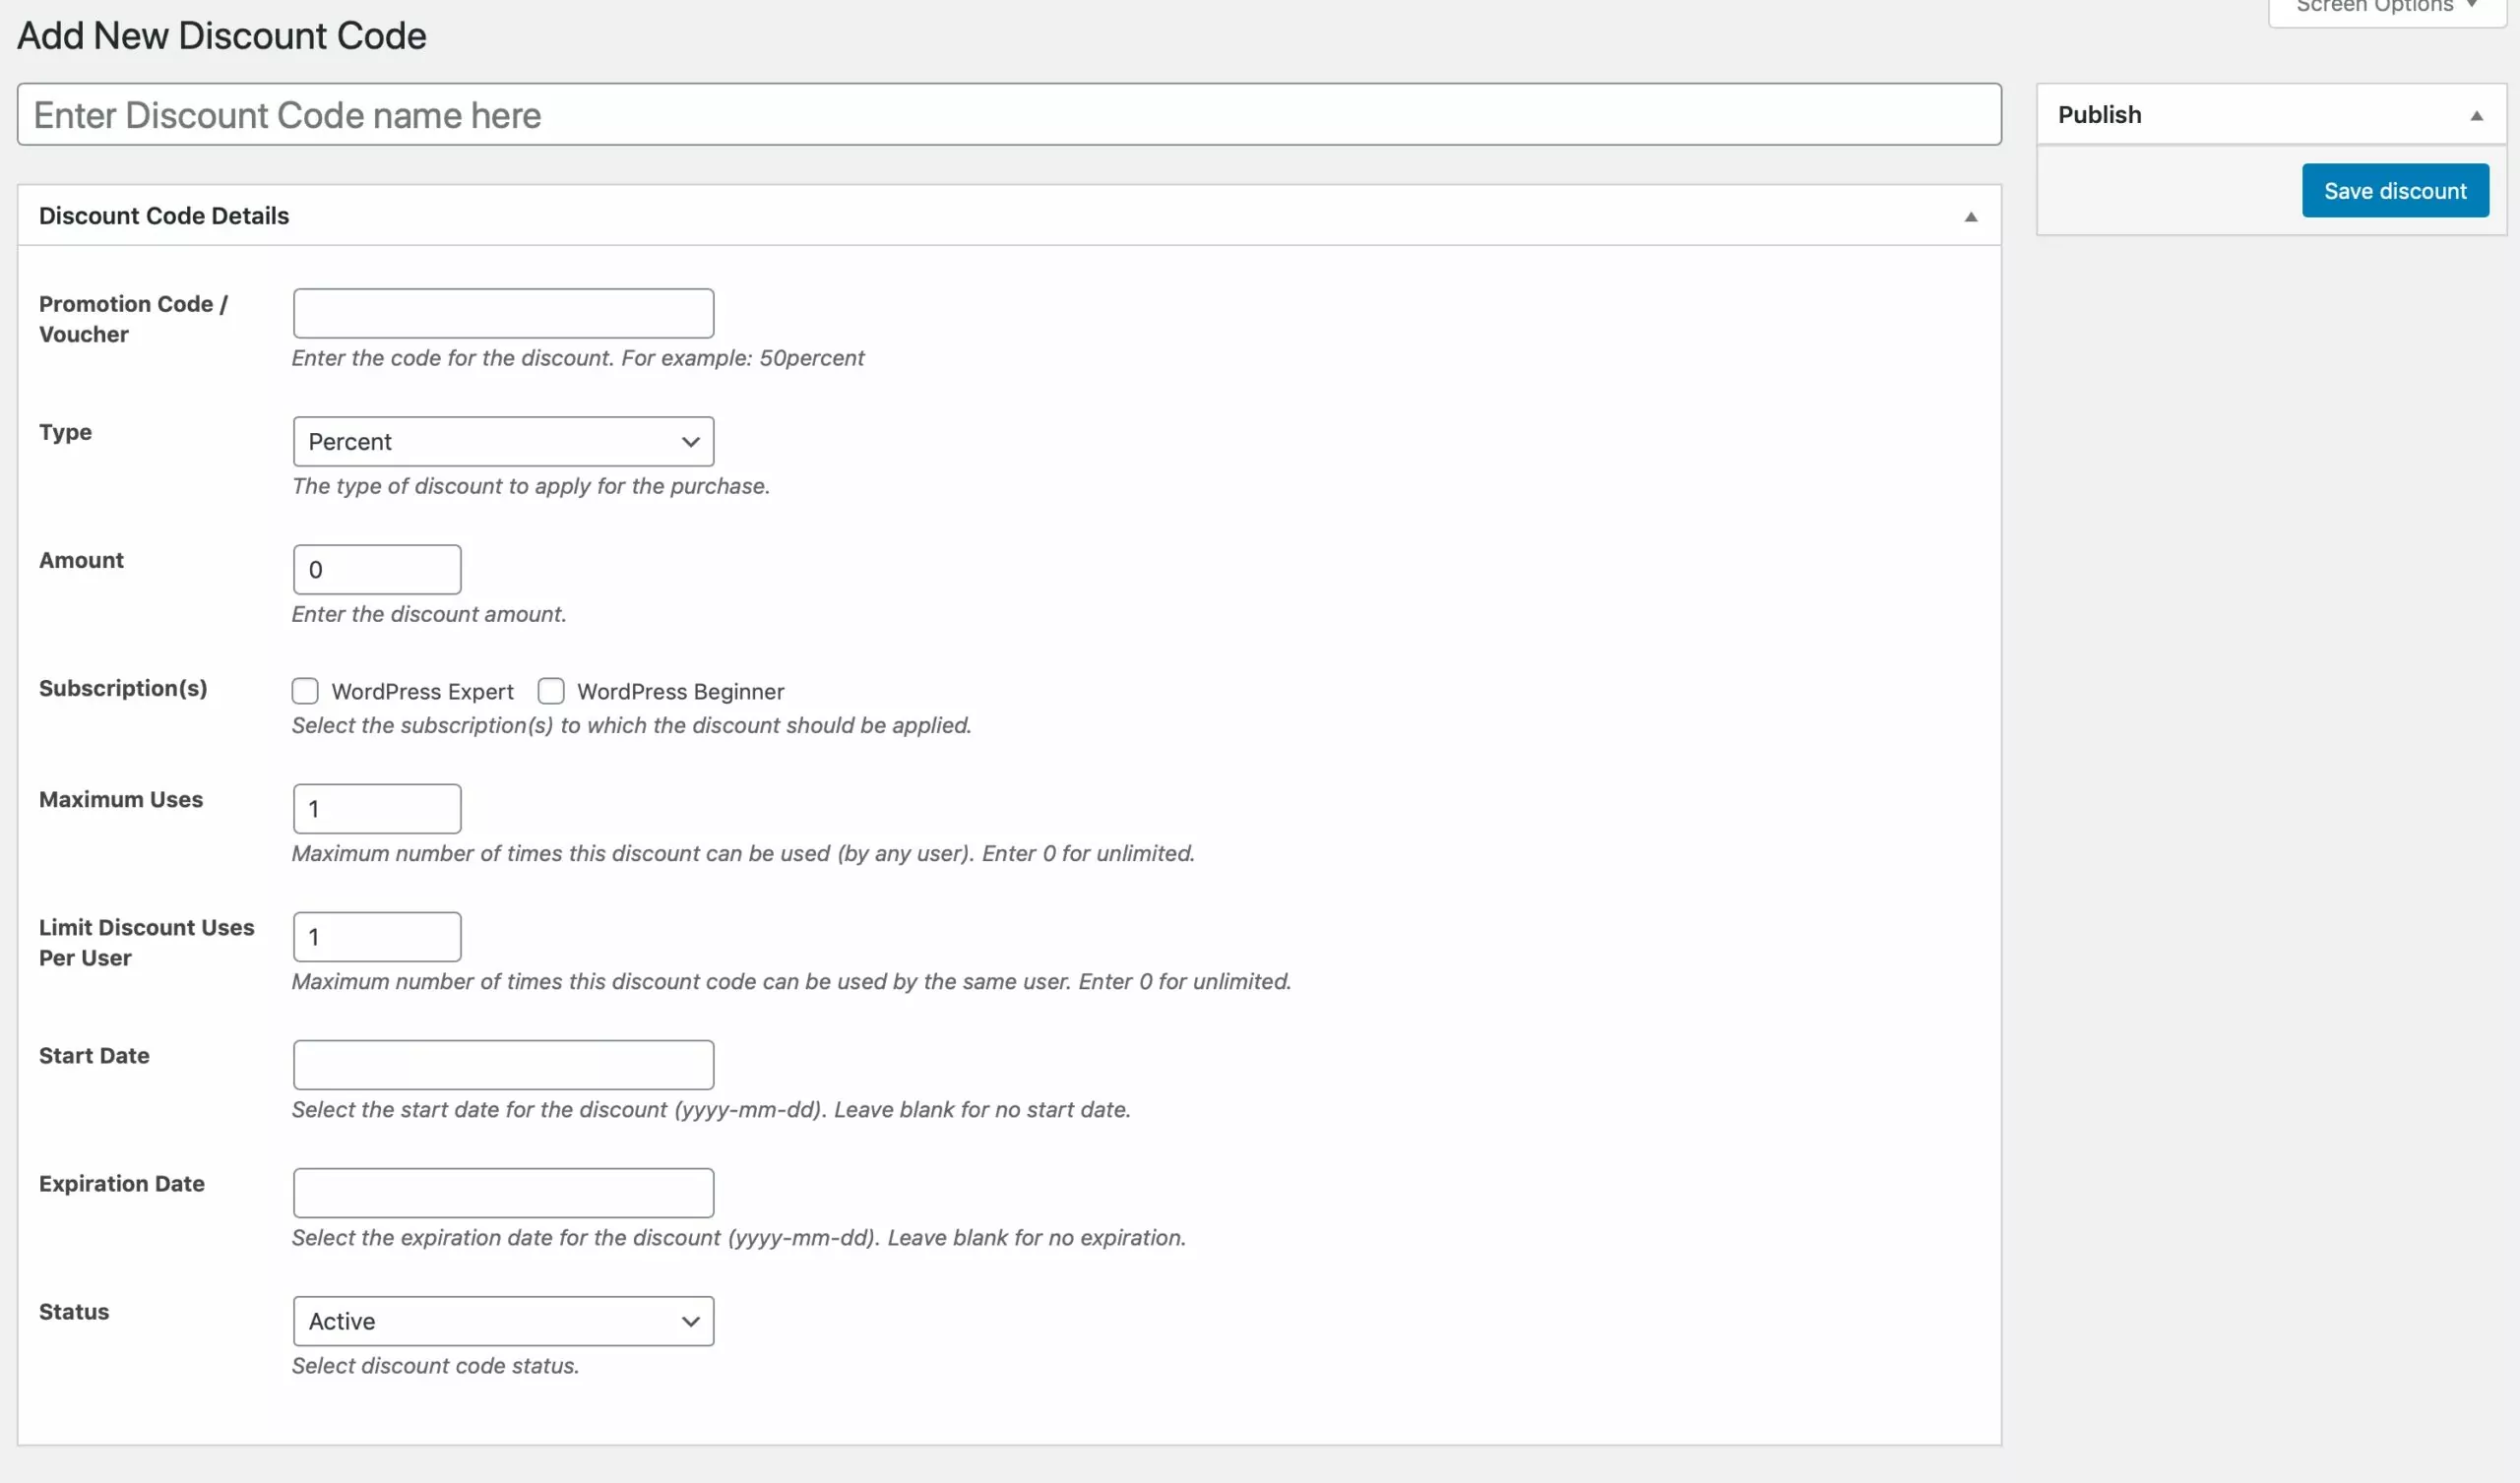
You can provide fixed amount discounts or percentage discounts and set how many times they can be used.
Engage New Members with Content Dripping
The Content Dripping add-on lets you send content to new members in a drip-feed type approach, meaning they’ll be getting scheduled content from your site when they first subscribe.
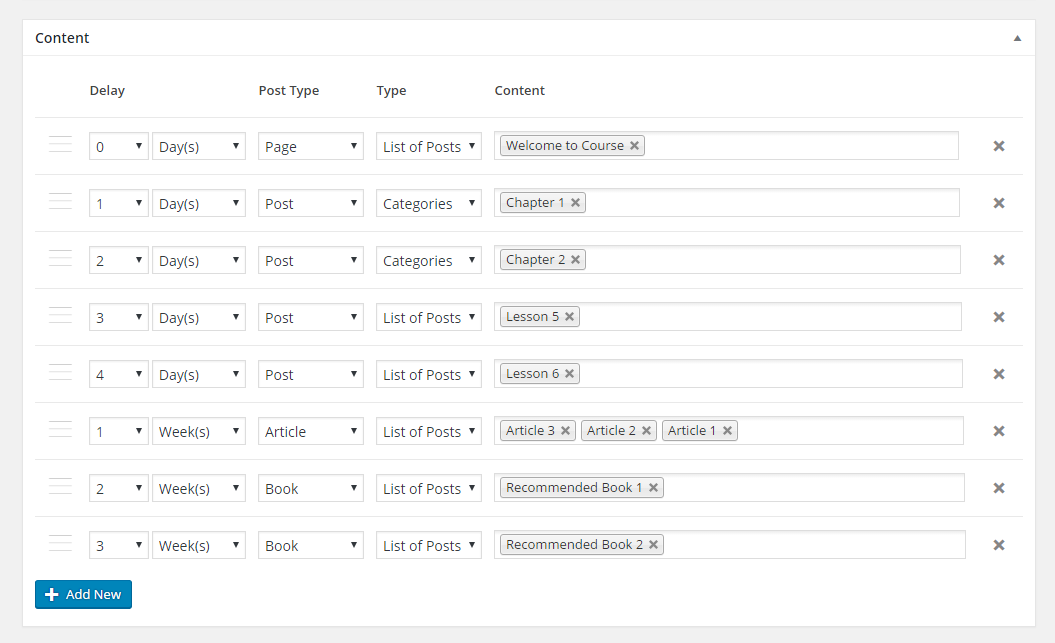
So on the day they subscribe, you might give them access to introductory content, then the next day they might have access to a piece of content that follows on from that. It’s useful for welcoming new subscribers and for running online courses.
This works in a similar way to automation in MailChimp or AWeber, automatically providing content to members when they subscribe and giving them extra value.
Summary
Creating a membership site on WordPress lets you provide more value to your community or users and make more money from your business website.
The Paid Member Subscriptions Pro plugin makes it quick and easy to setup different membership plans and create screens where visitors can register, log in and manage their user profile. It also integrates with WooCommerce for member discounts and offering private products. It can be easily extended with a wide range of premium add-ons.
Paid Member Subscriptions Pro
Accept (recurring) payments, create subscription plans and restrict content on your website. Easily setup a WordPress membership site using Paid Member Subscriptions.
Get Paid Member SubscriptionsFollowing the steps above you can add a membership component to your WordPress site and see the benefits to both your business and your members.
Related Articles
How To Create a Divi Membership Site
If you’re thinking of building a membership site in WordPress, you’ll need a solid theme and a membership plugin that pairs well with it. In this complete guide, we’ll show you how to create a Divi membership site using the popular Divi theme in combination with the Paid Member Subscriptions plugin.
Continue Reading
Membership Blog: Why Start One, Popular Examples and How To
I think you will agree starting a membership blog seems daunting, especially for a first-timer. Talk to just about any beginner who has never created a membership blog (or even a simple website), and they will field questions such as: Why should I start a membership blog? What kind of content, products, or services should […]
Continue Reading
How to Build an Elementor Membership Site with Paid Member Subscriptions
Are you looking to add membership functionality to your Elementor site in WordPress? Perhaps you want to create subscription plans, restrict access to premium content, and accept payments within the popular page builder. The good news is that you can use Paid Member Subscriptions to do all this and more. For example, you can customize restriction […]
Continue Reading