

Table of Contents
- 1 What Elements Does Your Membership Site Need?
- 2 The Plugins You’ll Need to Build an Elementor Membership Site
- 3 How to Build an Elementor Membership Site with Paid Member Subscriptions (5 Steps)
- 4 Start your Elementor Membership Site Today!
Are you looking to add membership functionality to your Elementor site in WordPress? Perhaps you want to create subscription plans, restrict access to premium content, and accept payments within the popular page builder.
The good news is that you can use Paid Member Subscriptions to do all this and more. For example, you can customize restriction messages and templates directly from the Elementor interface. Plus, you can add front-end registration forms and even display a pricing table.
In this post, we’ll take a closer look at the plugins you need to build an Elementor membership site. Then, we’ll show you how to do it. Let’s get started!
What Elements Does Your Membership Site Need?
Before we get started, let’s have a look at some of the most important elements of a WordPress membership website. With this type of site, you’ll be able to do the following:
- Create subscription plans and accept payments
- Restrict content access for non-members
- Add front-end registration and login forms (as well as contact forms)
- Design a pricing table that highlights the benefits of each membership plan
- Customize restriction messages, or add custom templates to boost conversions
All of this can be achieved using the Elementor plugin for WordPress with Paid Member Subscriptions. Let’s take a closer look at these tools.
The Plugins You’ll Need to Build an Elementor Membership Site
For this tutorial, you’ll just need to install and activate two WordPress plugins. Fortunately, both tools offer a free version with premium options.
Elementor
Elementor is one of the most popular drag-and-drop WordPress page builder plugins. You can download the Elementor plugin for WordPress for free:

With Elementor, you can add a variety of global widgets to your membership site’s pages. These include widgets for progress bars, testimonials, Google Maps, image galleries, carousels, and more. There’s even an HTML widget that lets you embed code into your site.
The plugin also lets you add custom CSS styling to customize the look and feel of your Elementor membership site. Additionally, it works seamlessly with other popular WordPress plugins like Yoast SEO, which means you don’t have to worry about your site’s ranking:
It’s also worth mentioning that the Elementor page builder offers tons of typography controls. These make it easy to customize your site and enhance its visual appeal. Elementor also has a built-in revision system, so you can revert to a previous design if you’re unhappy with the new changes.
Paid Member Subscriptions
Paid Member Subscriptions is a robust and easy-to-use membership plugin that integrates beautifully with the Elementor page builder. This integration is available in the free version as well, so you don’t have to use Elementor Pro:
Paid Member Subscriptions Pro
Accept (recurring) payments, create subscription plans and restrict content on your website. Easily setup a WordPress membership site using Paid Member Subscriptions.
Get Paid Member SubscriptionsIt also offers add-ons that help you enhance your Elementor membership site’s functionality. Plus, the premium version comes with additional payment gateways, as well as the ability to issue invoices, add TAX & EU VAT to your plans, and set up content dripping.
How to Build an Elementor Membership Site with Paid Member Subscriptions (5 Steps)
Now that you have both plugins installed and activated in WordPress, let’s take a look at five simple steps to create your membership site.
1. Set Up Your Membership Plans
The first step to building an Elementor membership site is to create subscription plans that users can sign up for. So, from your WordPress sidebar, go to Paid Member Subscriptions and select Subscription Plans. Then, click on Add New.
Here, you can enter the subscription plan name and details:
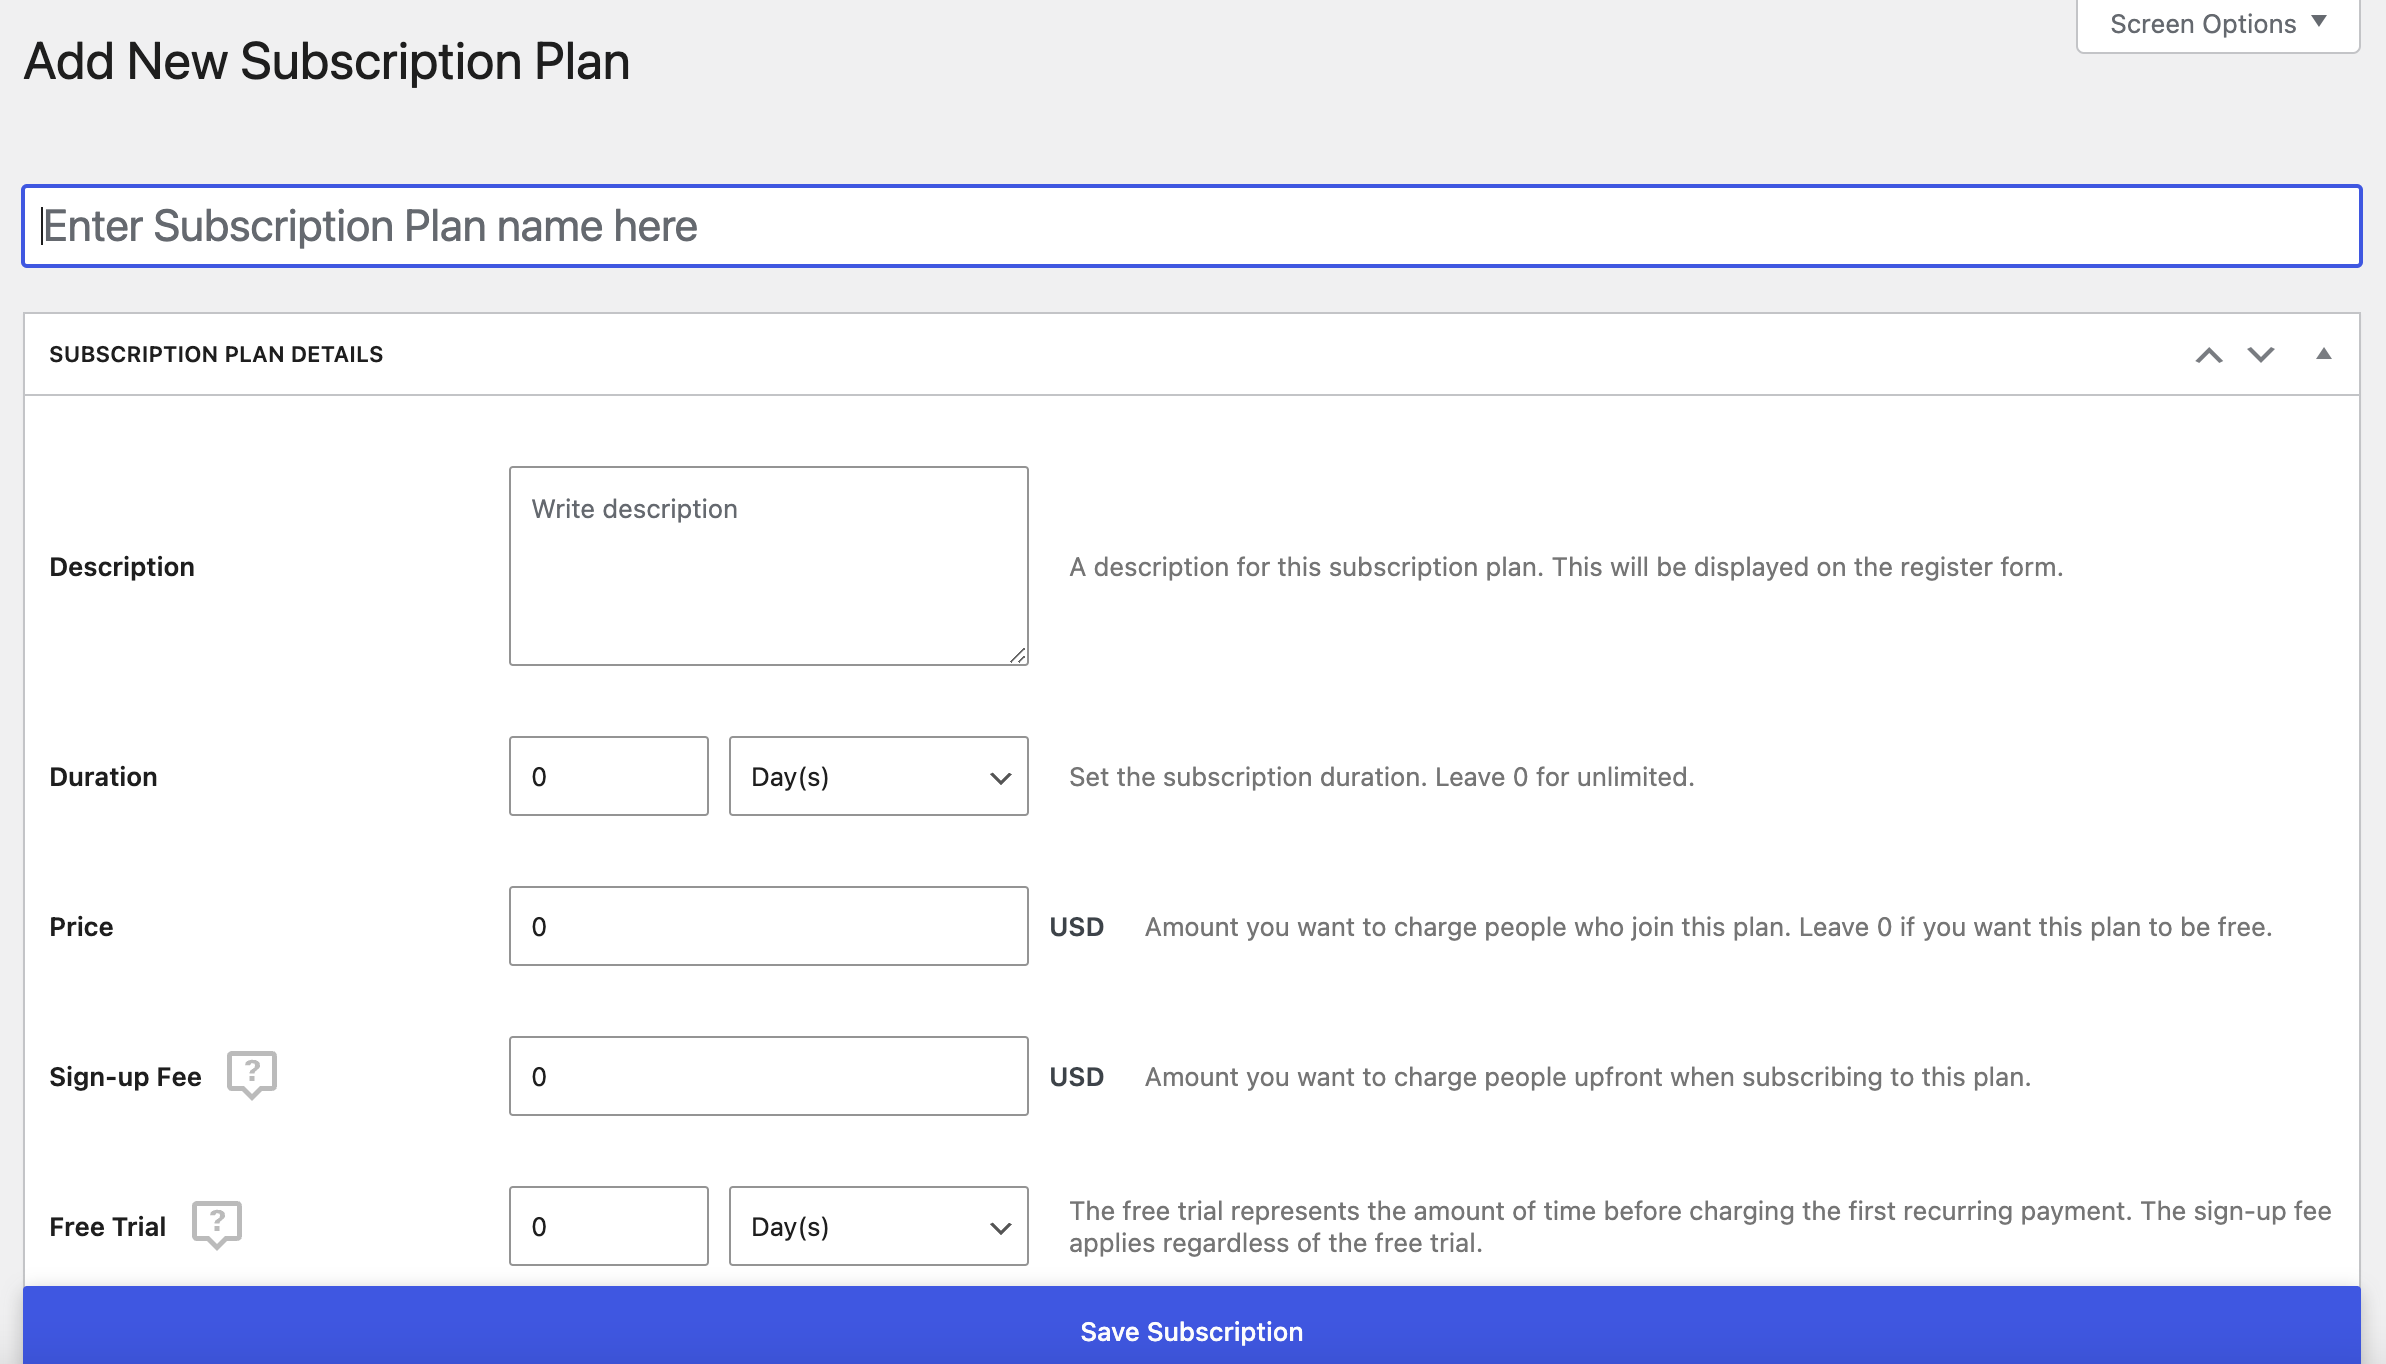
You can also add things like duration, price, and renewal type (whether it’s automatic or not). And, you can easily add a free trial or sign-up fee to your membership plans.
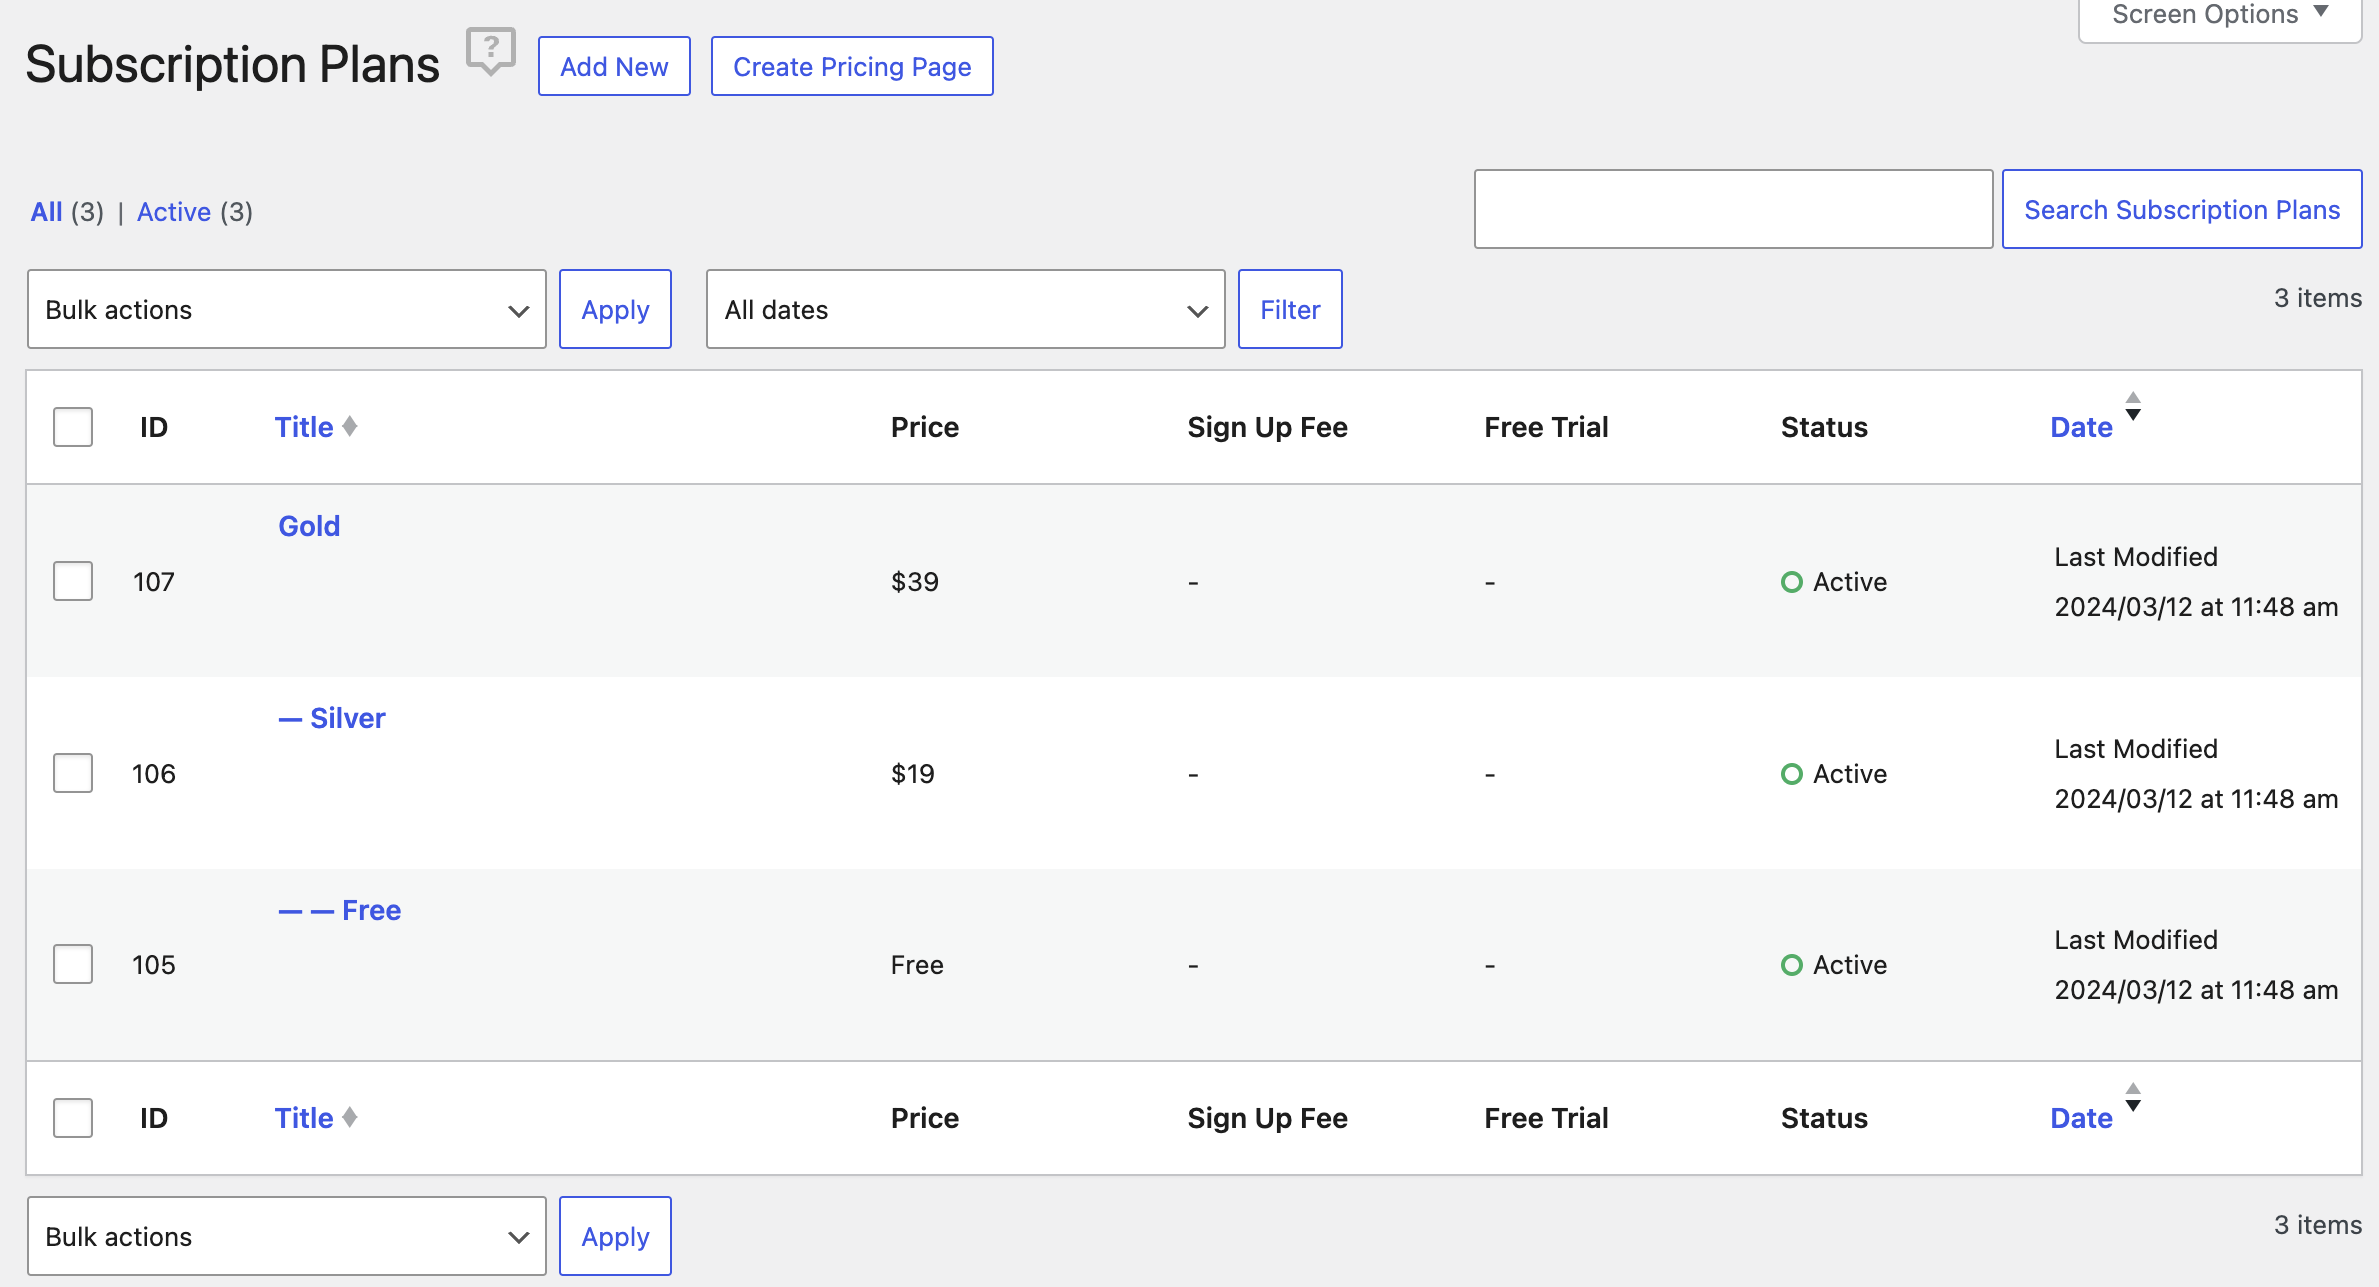
Features like pay-what-you-want pricing or fixed-end-date subscriptions are also available in the premium version. We’ll keep it simple for now and set up three basic plans: Free, Silver, and Gold.
It’s easier to set up the Free plan first. Then, under the Subscription Plans list, click on the Add Upgrade button and proceed with adding the Silver and Gold plans.
Here’s what they look like after filling in all the details:
This way, you don’t have to create a custom post type for subscription plans and have a single post for each plan you offer.
2. Create Key Membership Pages
Now, let’s create the pages that users will need to log in, register, or view their account details on your membership site. We’ll do all of this using Elementor.
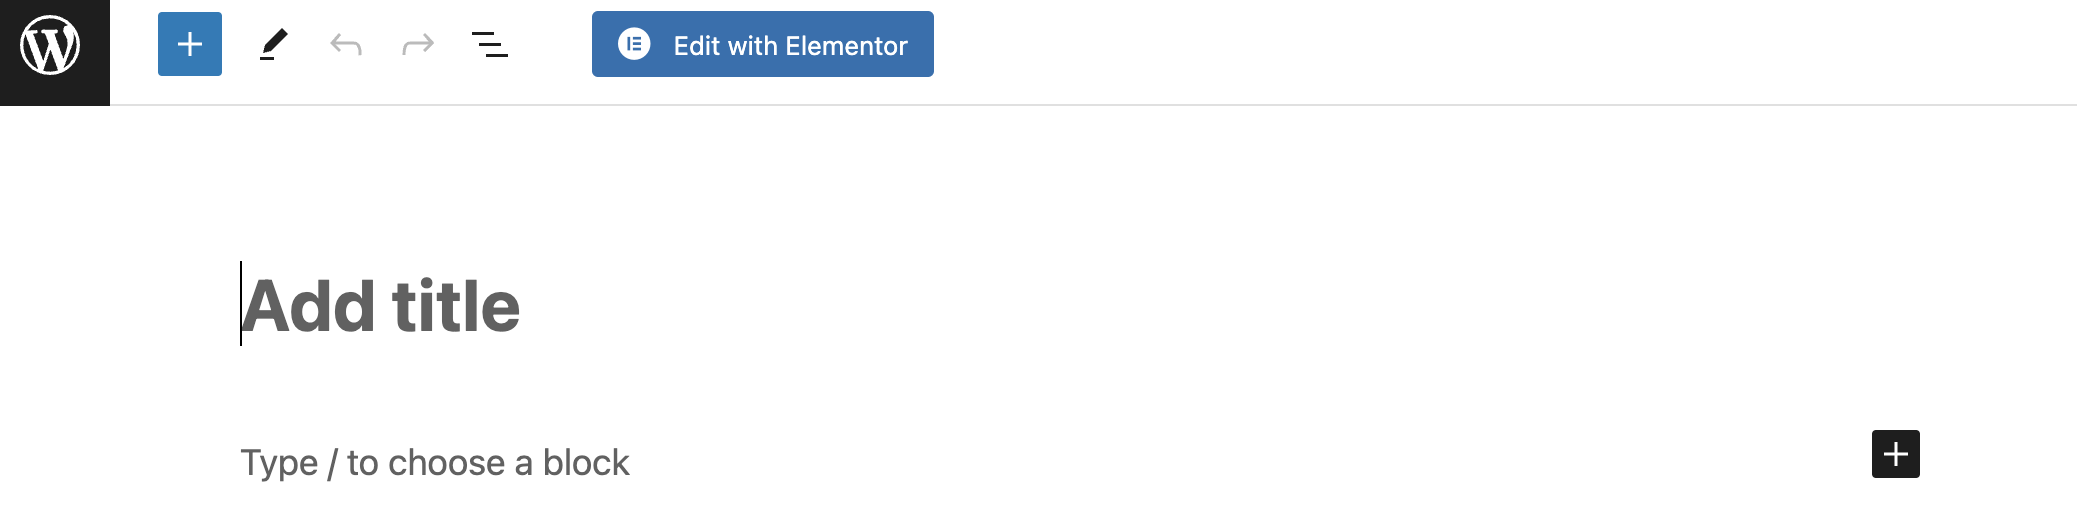
From the WordPress dashboard, click on the Pages menu item and select Add New Page. Then, click on the Edit with Elementor button to open the Elementor editor:
From the Elementor interface, you can insert three main building blocks (Sections, Columns, and Widgets) and add content to each of them. You can also select a pre-designed template that fits your page layout.
For now, we’ll focus on Widgets since this is what we’ll be using to easily include Paid Member Subscriptions register, login, and account forms. Under Elements, you’ll notice many types of widgets.
If you scroll down, you’ll find a section called Paid Member Subscription Shortcodes.
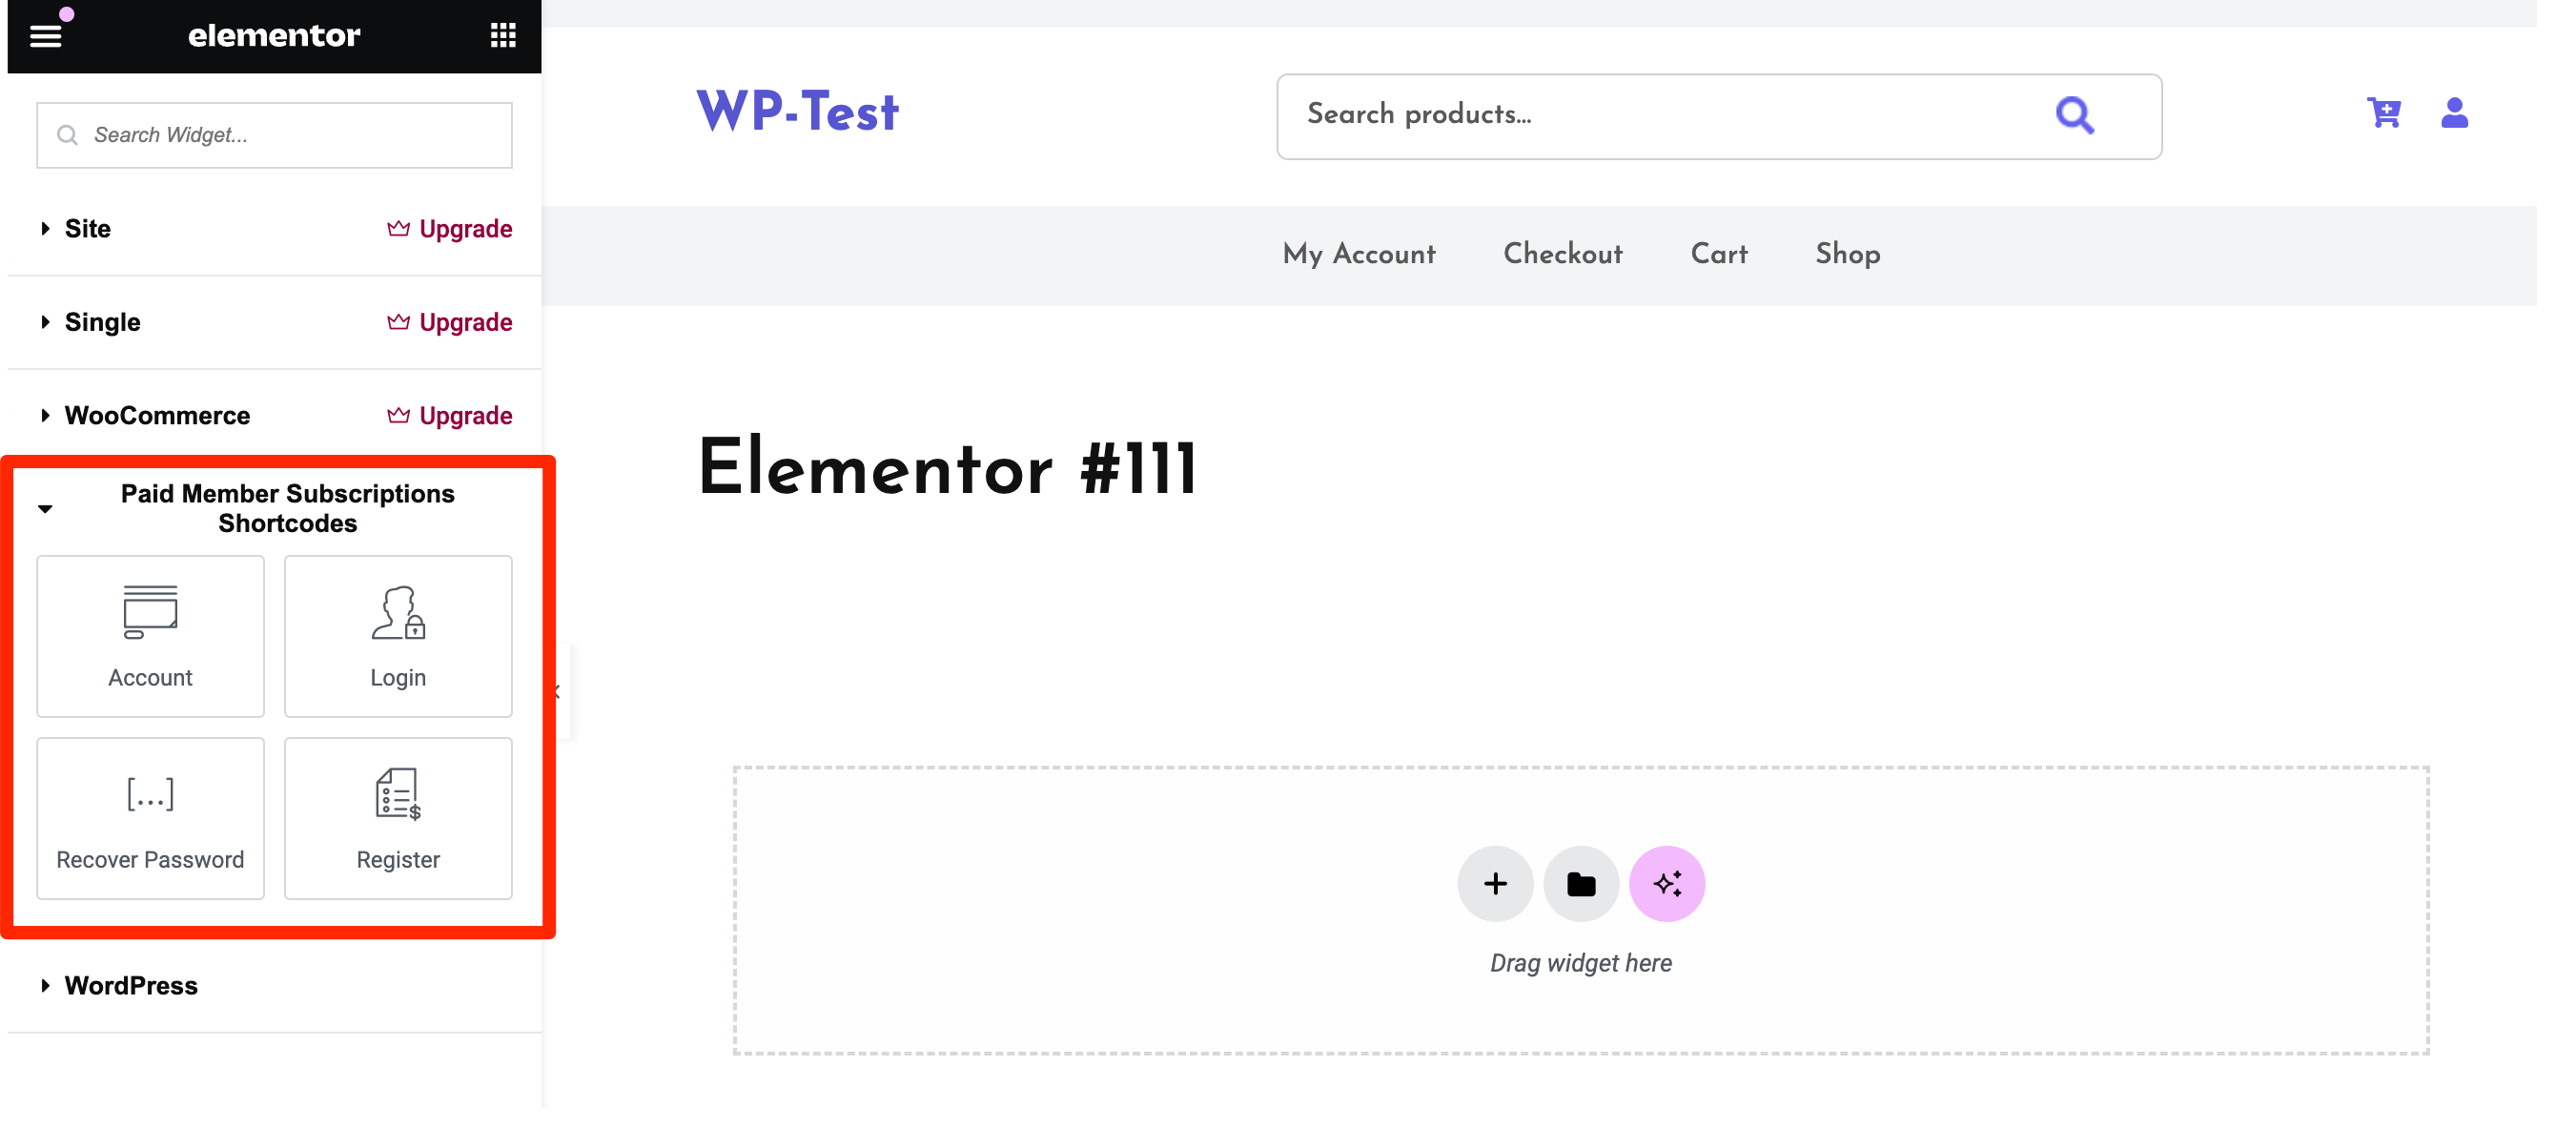
Simply drag a shortcode widget to the page you’re editing to display the desired form. Each shortcode comes with a few customization options that need to be added as parameters (these will be available directly in the interface).
We’ll start by adding the Register shortcode widget to our page:

After you’re done designing your page, click on the Settings icon at the bottom of the editor. In the General Settings, you can change the page title to “Register”:
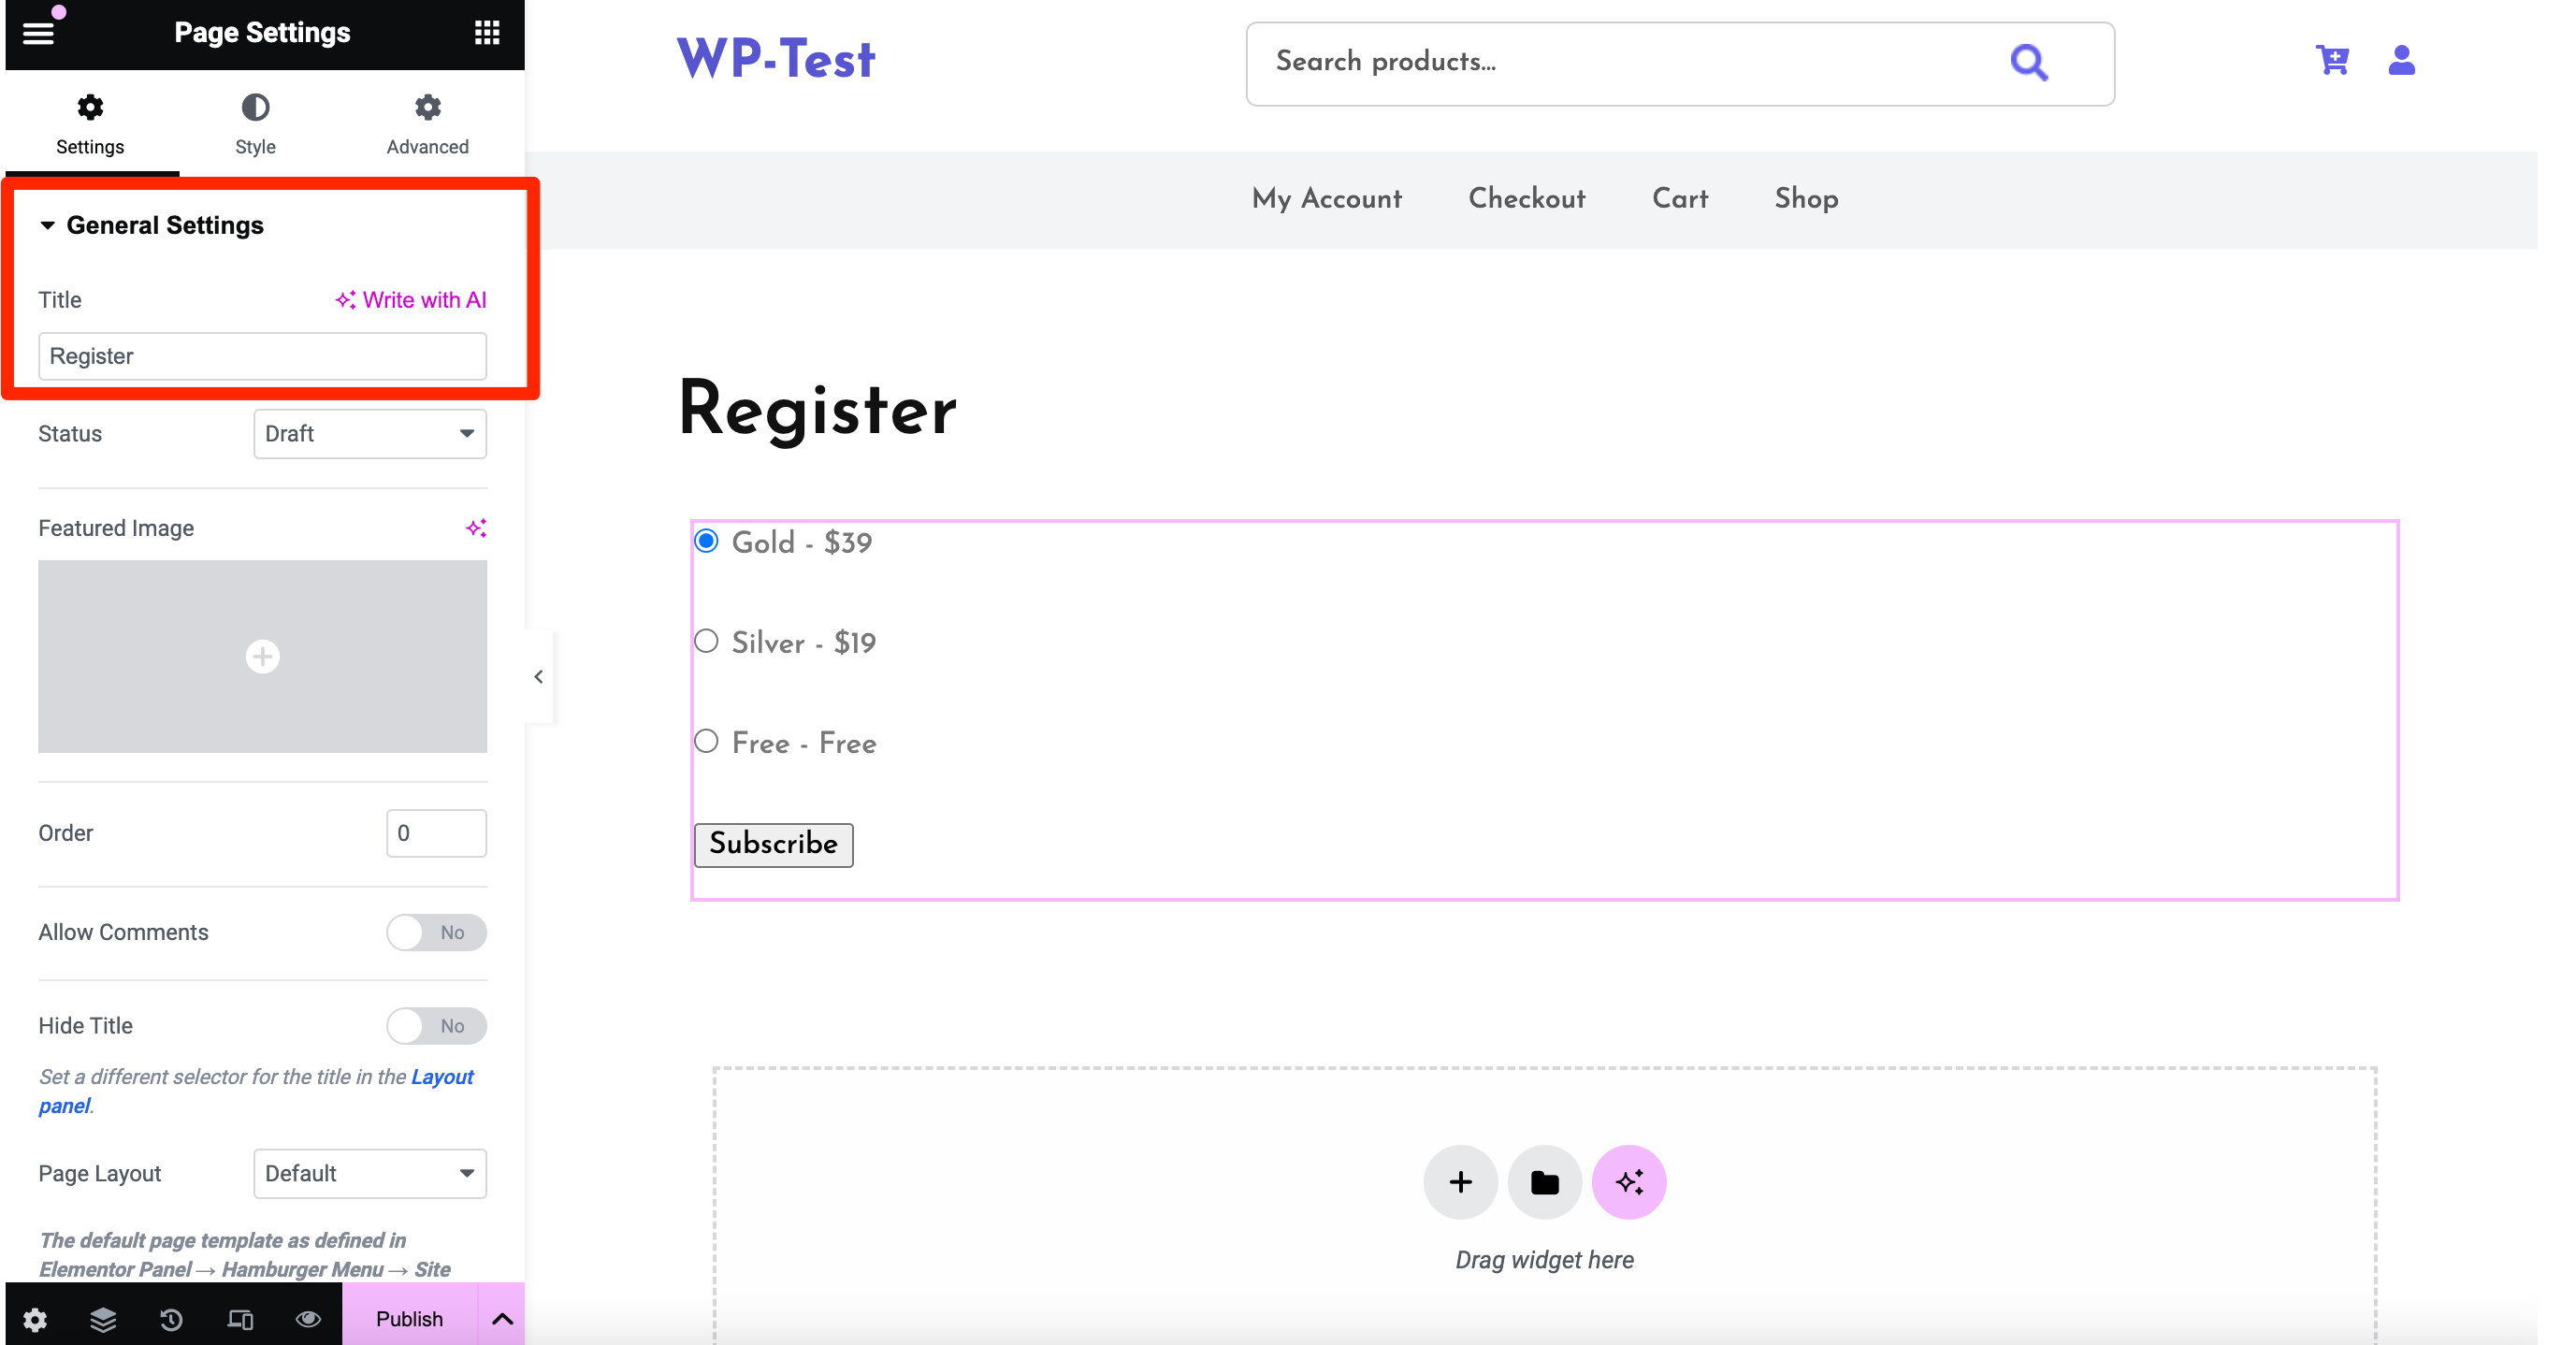
When you’re ready, hit the Publish button. Now, you can repeat the process by dragging the corresponding widget for Login, Account, and Recover Password forms to new pages.
3. Configure a Membership Pricing Table
Do you want to display each subscription plan’s features and make it easy for potential members to compare them? Setting up a membership pricing table is the way to go.
If you use the Block editor to create pages, you can use the default pricing table page that comes with Paid Member Subscriptions. In fact, you can generate this directly from the Subscription Plans page.
However, if you use Elementor to edit pages, you might know that Elementor Pro has a dedicated Price Table widget that you can use. Below, we’ll show you how to build a membership pricing table to make it simple for people to sign up for a certain plan.
How to Create a Membership Pricing Table Using Elementor
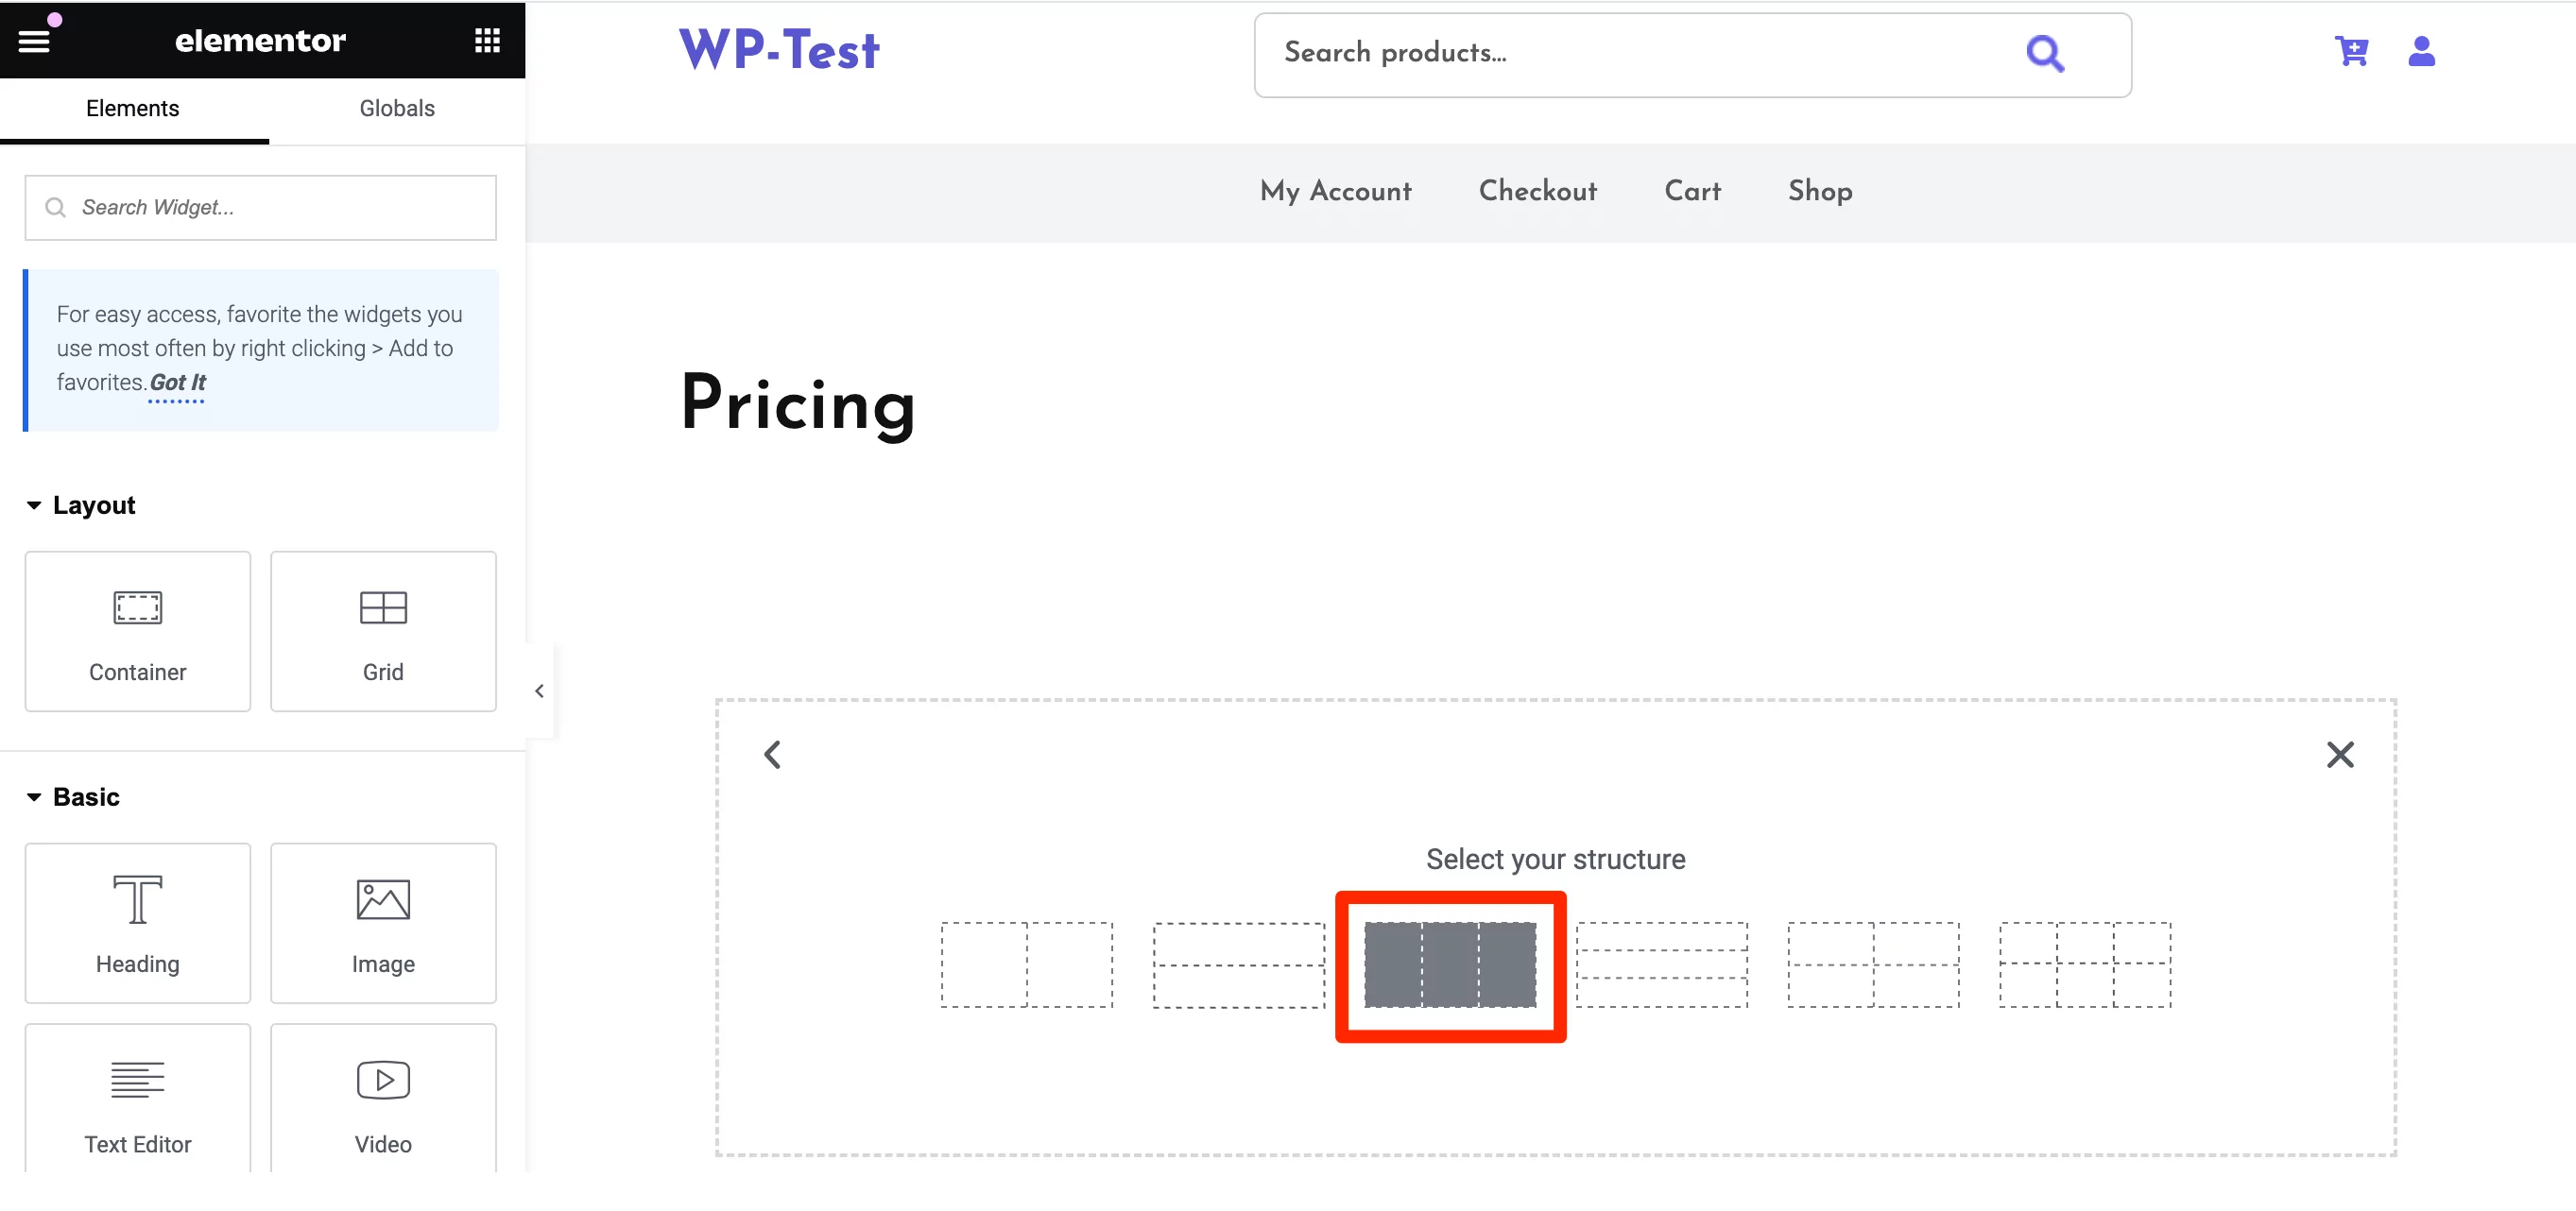
To get started, you’ll need to add a new page to WordPress and click on the Edit with Elementor button. Then, open the page settings to change the page title to “Pricing”.
Since we created three subscription plans, we’ll need three columns to display the plan details. So, click on the Add New Container button (the plus icon). Then, choose the Grid layout and select the three-column structure:
Next, locate the Price Table widget in the Elements section of the sidebar, and drag it into each of the three columns:
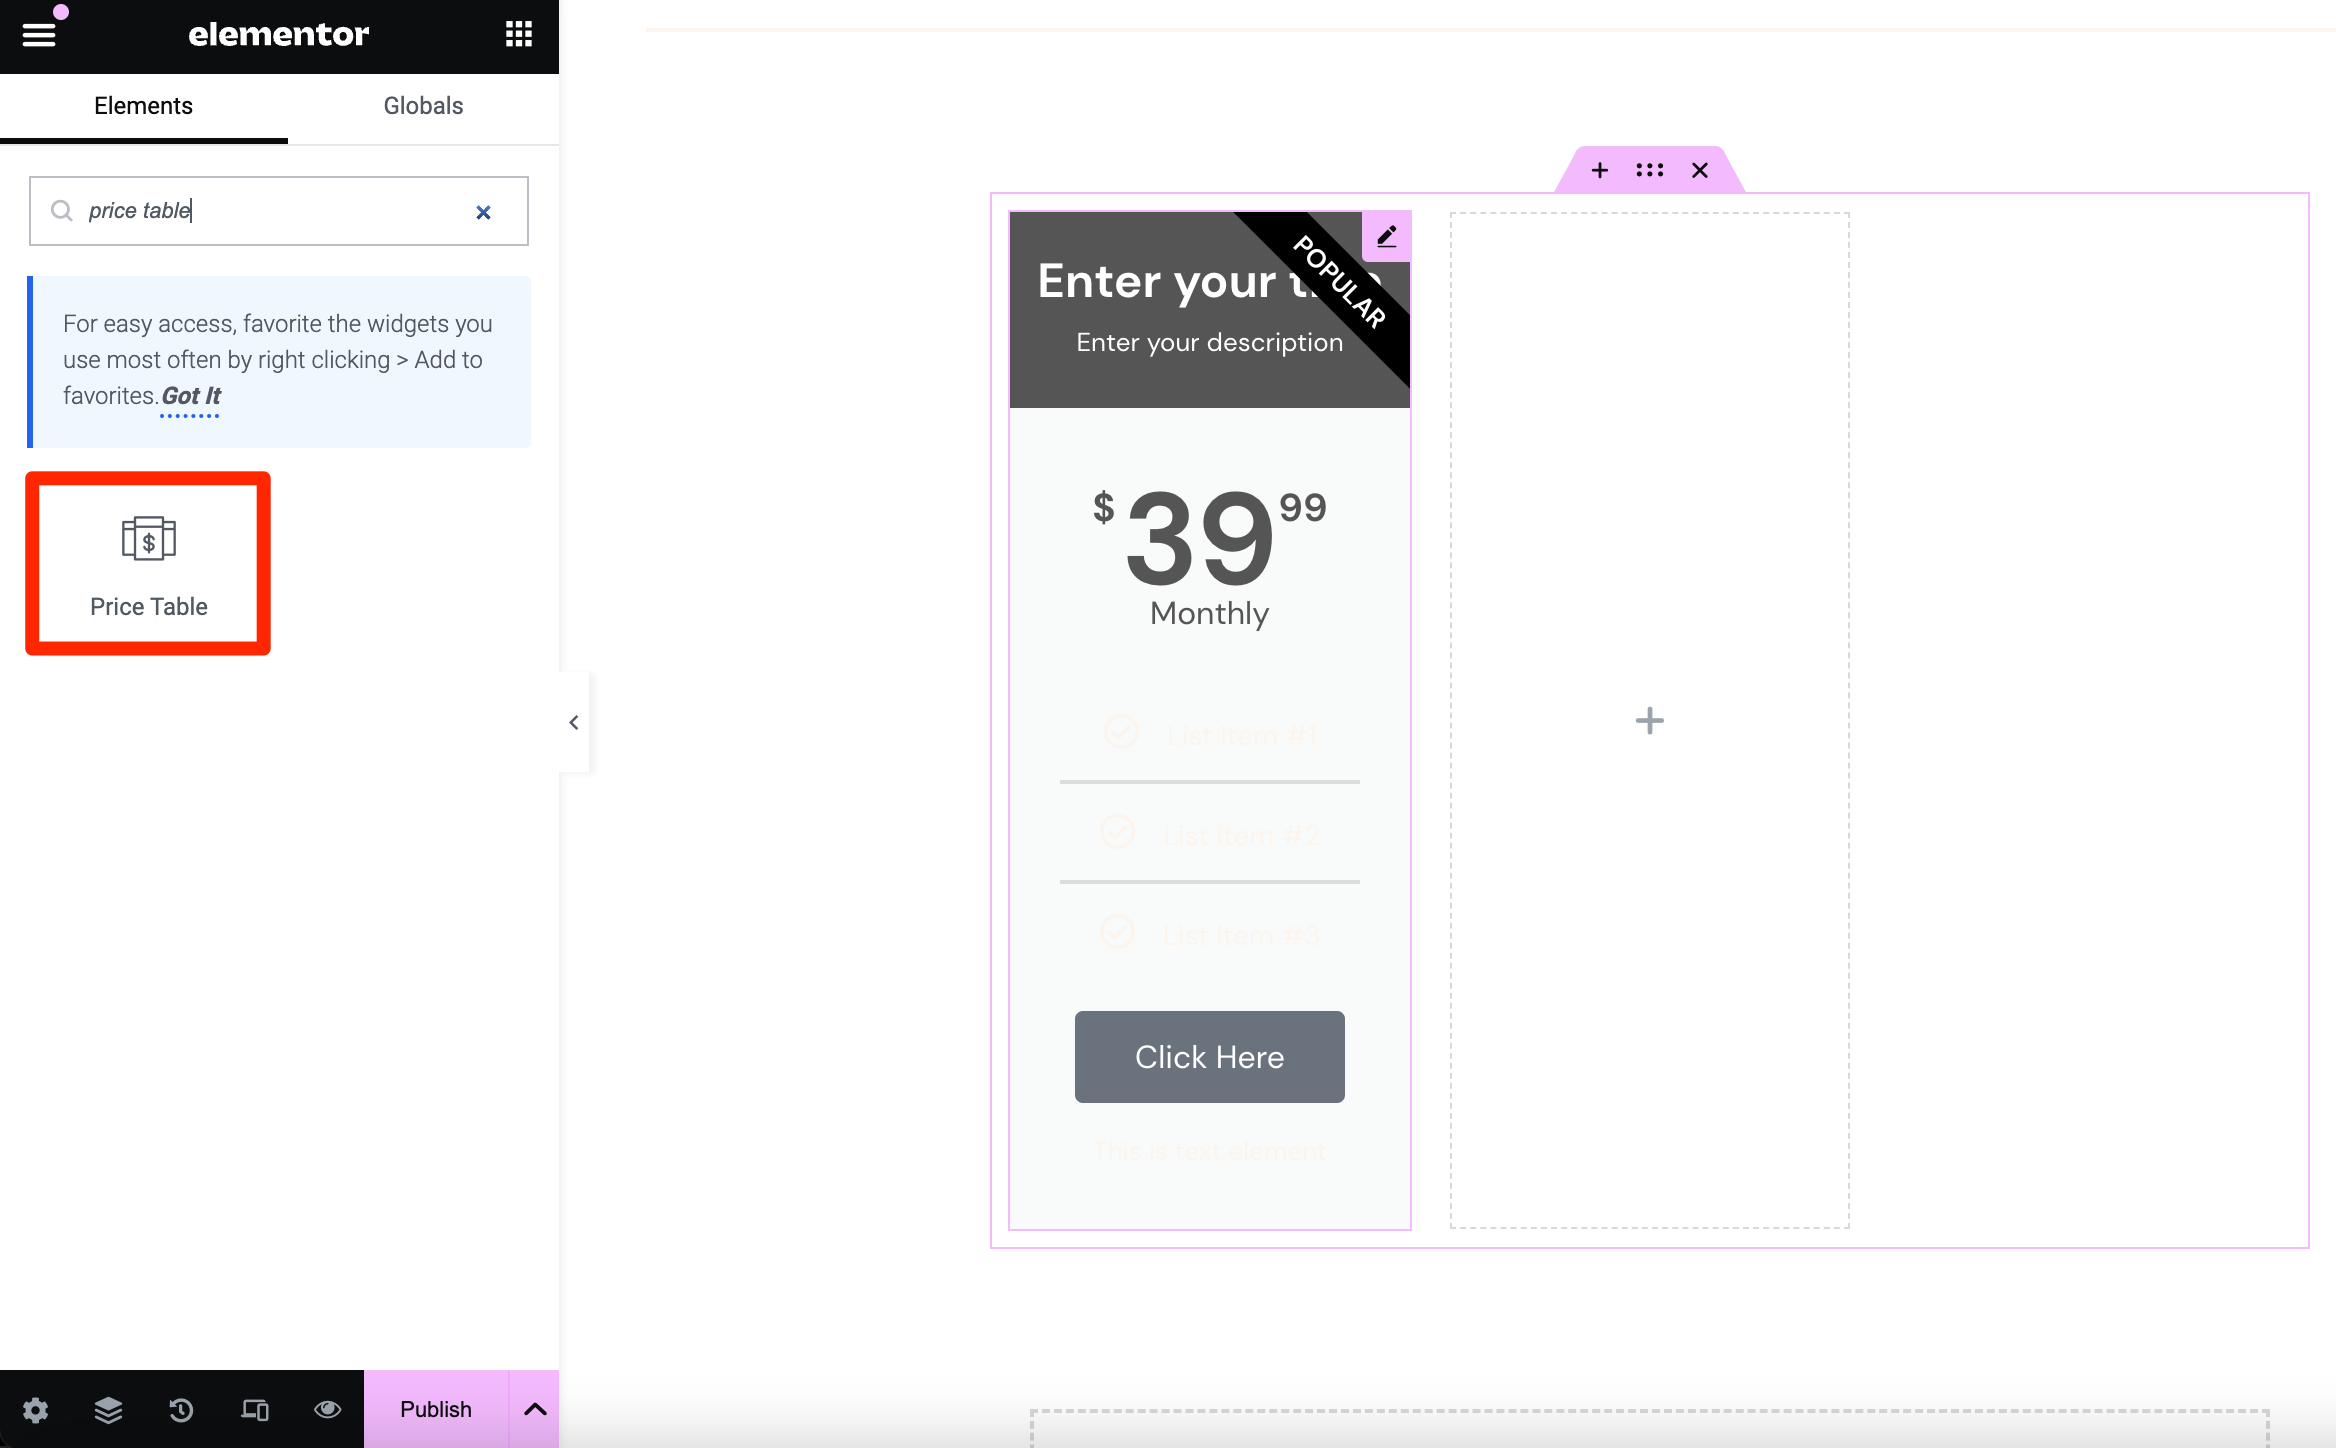
Now, you can edit the name, price, and features of each plan in the Content section of the sidebar. After that, switch to the Style tab to change the colors, fonts, and size of your elements.
The most important element in your pricing table is the Subscribe button. This should contain a link that will make the user pre-select a certain plan using a URL parameter. In our case, the URL of the Register page created previously is https://example.com/register.
If we want to pre-select the Gold plan, the link would become https://example.com/register?subscription_plan=63, since “63” is the ID of the Gold subscription plan. You can find this number in the Subscription Plans list under Paid Member Subscriptions.
If you want the selected plan to be the only one present on the Register form, you can use a second URL parameter. In this case, the link will be https://example.com/register?subscription_plan=63&single_plan=yes.
You can place this under the Subscribe button link for the Gold plan in the Footer section:
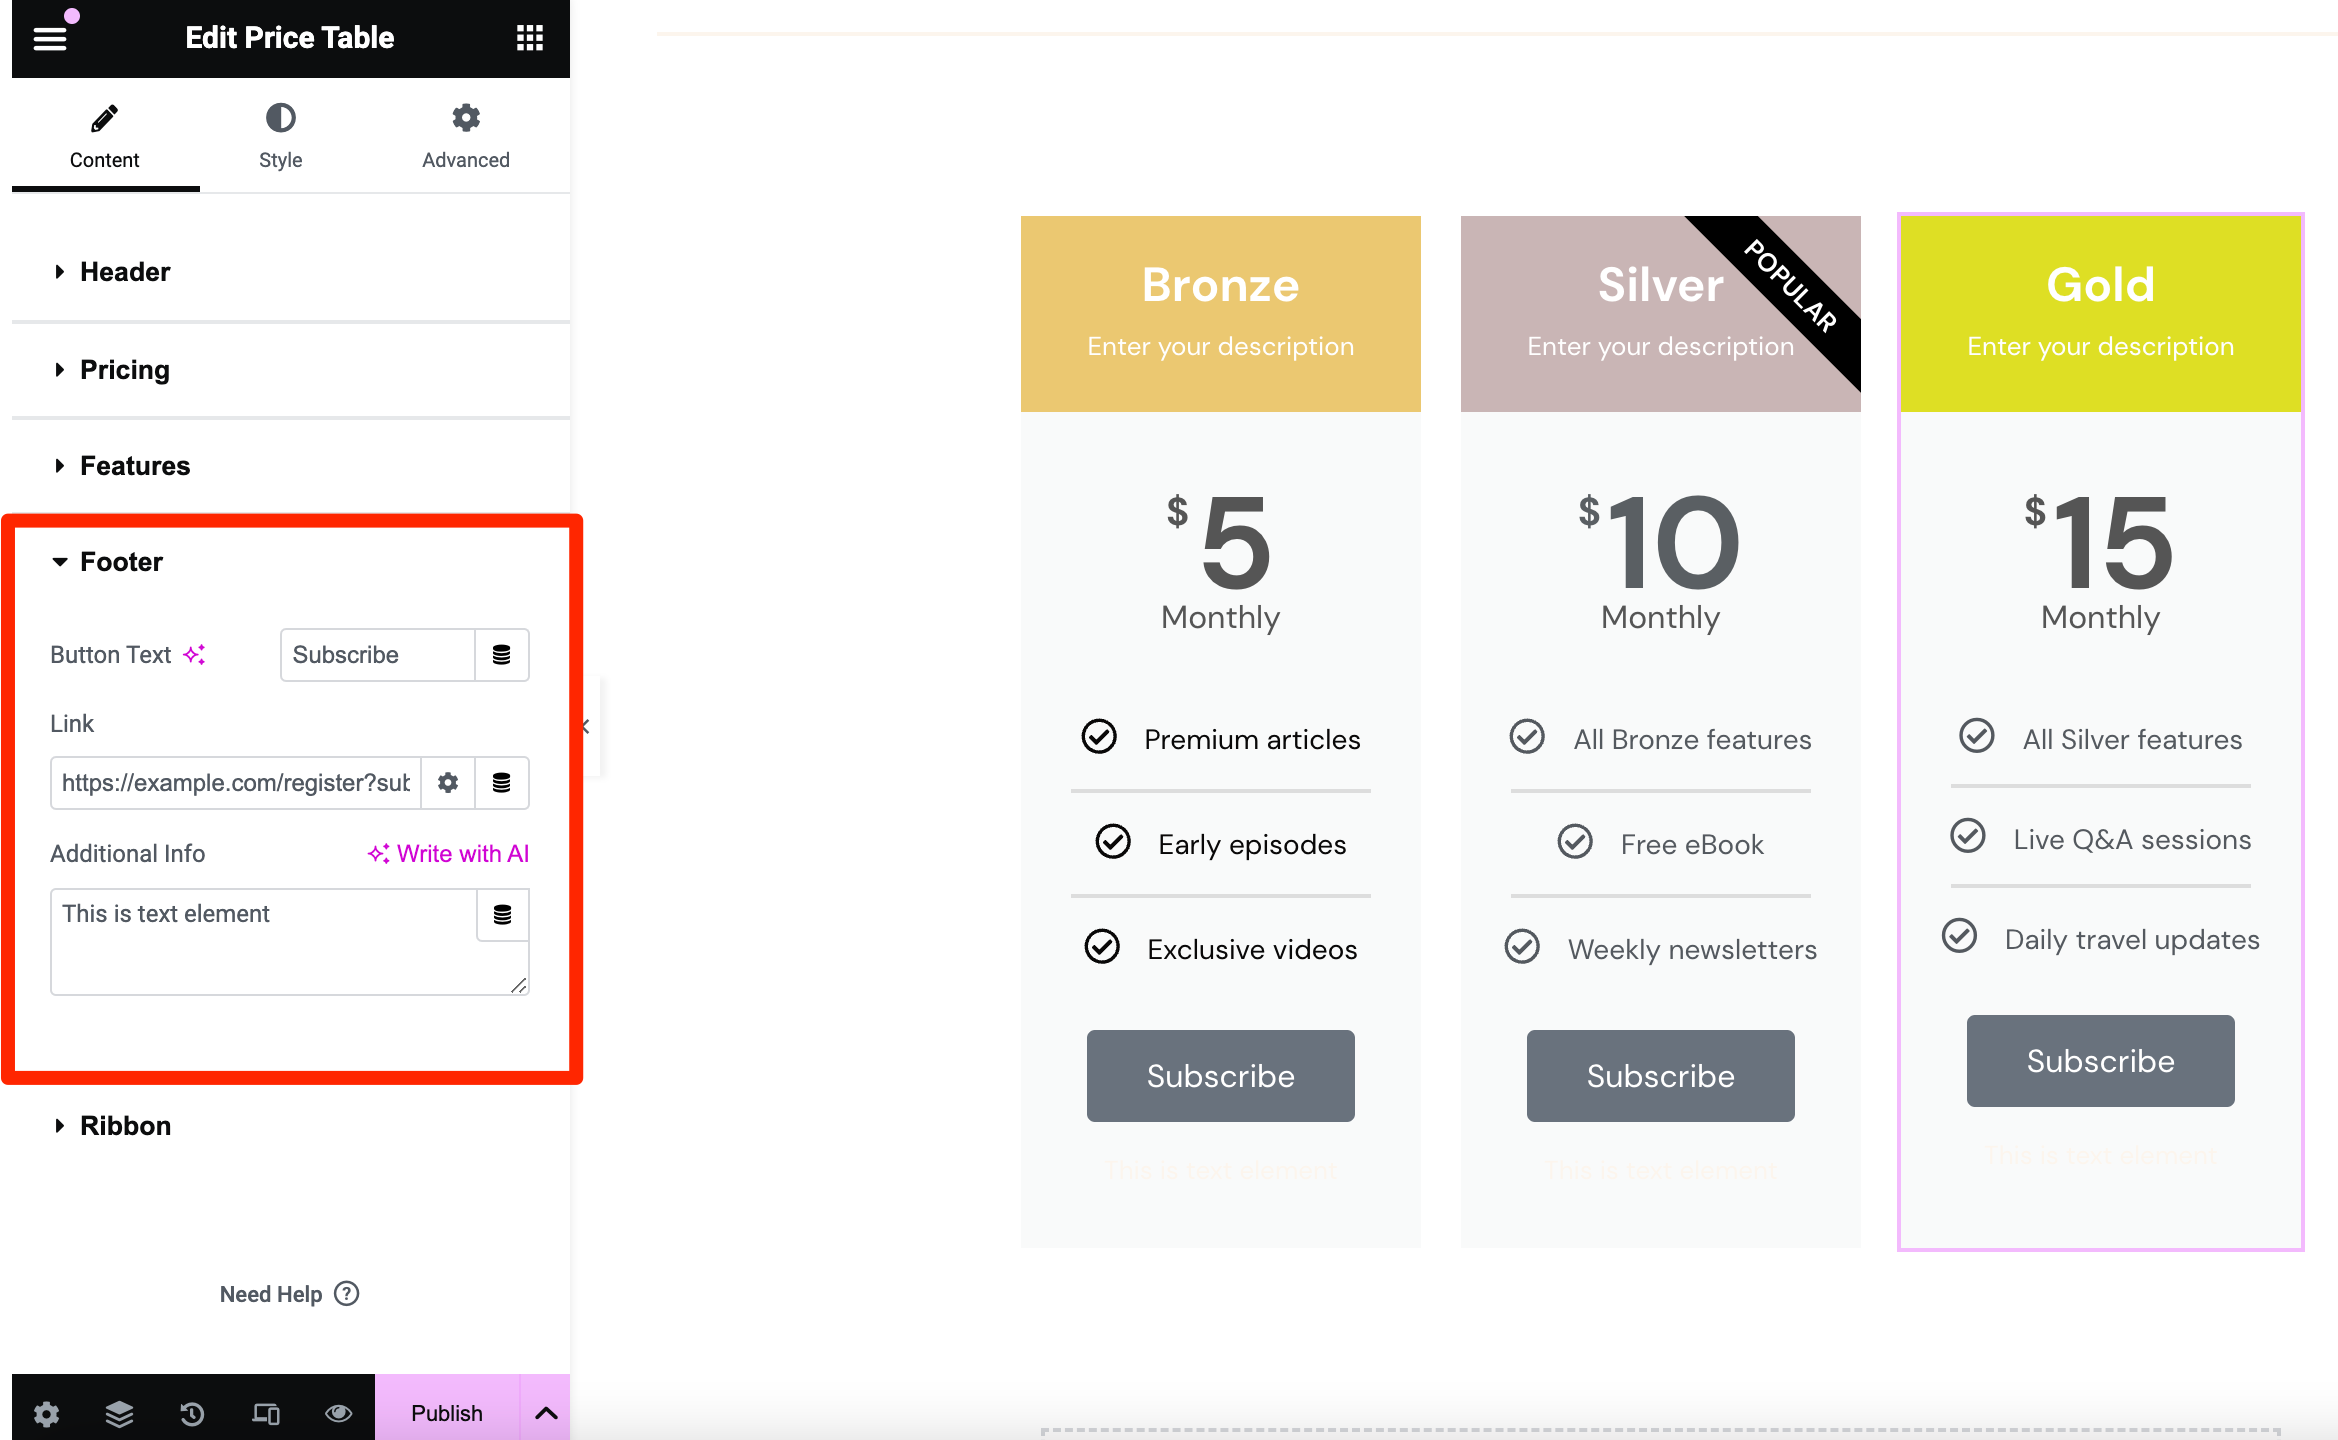
By clicking on this button, users will be taken to the registration page, which will have the gold plan pre-selected (and the only plan listed). All users have to do is enter their account details and pay for the membership.
4. Restrict Access to Your Elementor Content
Access to premium content is one of the main selling points of a membership site. So, let’s see how you can enable content restriction in Elementor with the help of Paid Member Subscriptions.
Using the two plugins together, you can easily restrict access to any Elementor section or widget. All you have to do is select a widget or section on the page and switch to the Advanced tab in the Elementor sidebar.
Then, expand the Content Restriction section:

To make this content exclusively available to logged-in users, set the Restrict to logged in users switch to Yes. This will make the content of the selected section or widget available only to users who are logged in.
To restrict the content by subscription plans, click on the + icon inside the selection field. Then, choose one or more subscription plans that should have access to this content:

You can do the same thing with any type of content, whether it’s a bbPress forum or WooCommerce members-only store.
Both Paid Member Subscriptions and Elementor integrate seamlessly with WooCommerce, enabling you to add e-commerce functionality to your site. For example, you might want to create a product page for members-only merchandise.
5. Enable Elementor Restriction Messages and Templates
At this point, you know how to restrict access to premium content on your Elementor membership site. But, you might also want to display restriction messages (or templates) when non-members try to access it.
To do this, go to the Content Restriction section in the Elementor interface and slide the Enable Restriction Messages toggle to Yes:

Then, in your WordPress dashboard, you can select a message template by going to Paid Member Subscriptions → Settings → Content Restriction. Choose the Template as your restriction type at the top of the page.
Then, scroll down to the Restriction Template section and choose the layout you’d like to use:
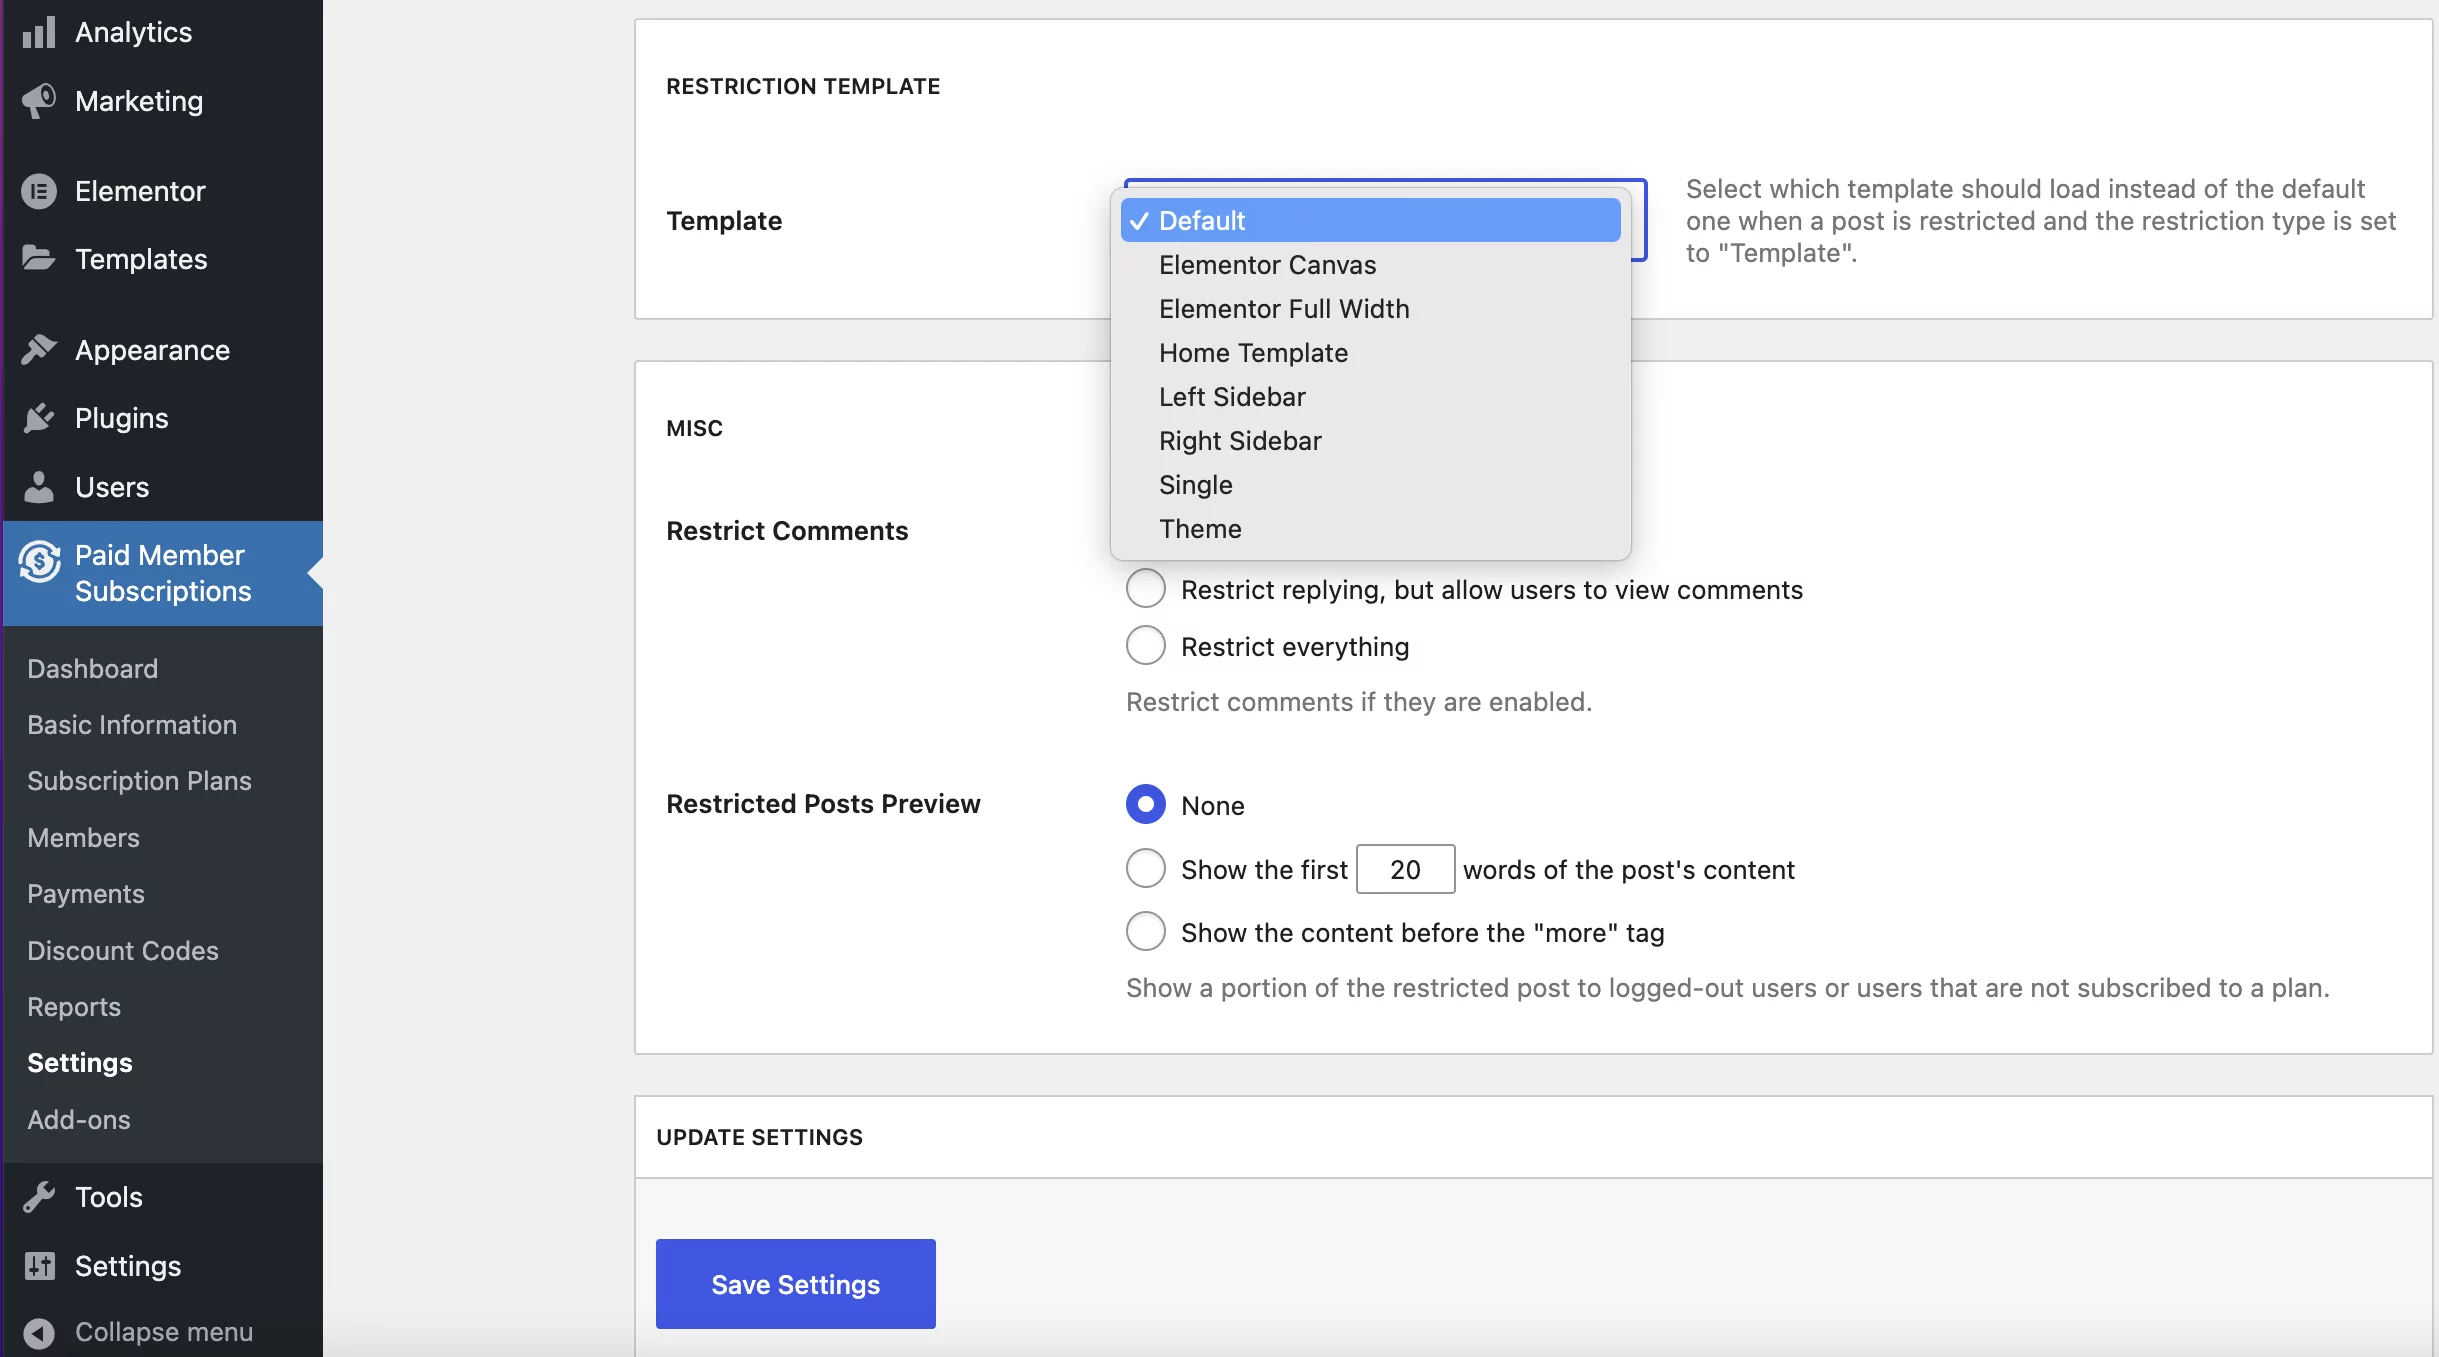
As you can see, you can even select dedicated Elementor templates.
How to Create Custom Restriction Messages and Templates
Although you can use the Paid Member Subscription restriction messages, you can also configure messages (and templates) that are specific to the section or widget. Simply set the Enable Custom Messages switch to Yes.
Here, you’ll have two options to choose from:
- Text: for adding a custom restriction message
- Template: for displaying a certain Elementor template
Let’s have a look at the second option: setting a restriction page template. Below we have created a custom template in the Elementor editor to encourage users to sign up for our membership plans.
So now, our template will appear under the Select Template dropdown after choosing Template as the Content type:

This template shows a content restriction message with a call-to-action button that links to our membership pricing page. Here’s what it looks like when a non-member tries to access the premium content:

And that’s how simple it is to restrict any widget or section, while also adding custom restriction messages or templates. To prompt visitors to sign up, you can create a popup with a registration form, or redirect them to a dedicated landing page.
Start your Elementor Membership Site Today!
A membership website is a great way to earn recurring revenue and build a community of like-minded people. Better yet, it doesn’t require any technical skills if you use the Elementor page-builder plugin and Paid Member Subscriptions.
To recap, here’s how to build an Elementor membership site with the Paid Member Subscriptions plugin:
- Set up your membership plans.
- Create key membership pages.
- Configure a membership pricing table.
- Restrict access to your Elementor content.
- Enable Elementor restriction messages and templates.
Paid Member Subscriptions Pro
Accept (recurring) payments, create subscription plans and restrict content on your website. Easily setup a WordPress membership site using Paid Member Subscriptions.
Get Paid Member SubscriptionsDo you have any questions about how to build an Elementor membership site? Let us know in the comments section below!
Related Articles

How to Set Up WooCommerce Stripe Subscriptions with Recurring Payments (3 Methods)
Are you searching for a way to set up WooCommerce Stripe subscriptions? Setting up recurring subscriptions is a great way to build regular, dependable revenue for your website. And when it comes to processing payments, Stripe is one of the top options thanks to its competitive fees and flexible feature set. However, WooCommerce doesn't include […]
Continue Reading
How to Use a Membership Website Builder
In this article, we’ll cover what you need to build a membership website, the main features, and take a look at some of the best membership website builder plugins.
Continue Reading
How to Build a Successful Video Membership Site
There are all kinds of membership or subscription sites out there: veg boxes, shaving products, entertainment tickets, and so on. But one subscription platform reigns supreme: video. Just look at the success of Netflix, Hulu, Amazon Prime, and the dozens of other niche streaming networks that have sprung up over the past few years. This […]
Continue Reading
Hello,
Great valuable content…Simply wondering if there is any in depth tutorial on how to create the actual membership content itself or a course content.
Thank you,
The support team of this plugin is wonderful.
Thank you for this nice tutorial.
It works with CPT. Great plugin.
Is this plugin accepting IDEAL
For one time payment and recurring payment?
Regards Alan
Hello, this is a great tutorial, but I don’t see the paid membership widgets in Elementor editor. What can be the issue please?
https://prnt.sc/5yZ-l5QC8g_4
Hi Isaac!
First, I would suggest making sure that both the Paid Member Subscriptions (Main & Pro) and Elementor plugins are updated to their latest versions.
If you still can’t find the widget after the update, please reach out to our colleagues from the support team by opening a ticket here: https://www.cozmoslabs.com/support/open-ticket/. I’m sure they’ll be able to help you out. 🙂