

Table of Contents
- 1 What You Need to Create a Website With Membership and User Login
- 2 How to Create a Website with Membership and User Login (5 Steps)
- 2.1 Paid Member Subscriptions Pro
- 2.2 Step 1: Follow the Paid Member Subscriptions Setup Wizard
- 2.3 Step 2: Set Up Your Membership Levels (Subscription Plans)
- 2.4 Step 3: Customize Your Key Pages (Registration, Account, Etc.)
- 2.5 Step 4: Restrict Members-Only Content
- 2.6 Step 5: Explore Other Paid Member Subscriptions Settings
- 3 How to Extend Registration and Profile Editing Functionality (Optional)
- 4 Create Your Membership Website Today
Searching for a way to create a website with membership and user login?
Membership sites are very popular because they let you build your own community. Instead of relying on social media for your audience, you can create your own group of members on your own platform (and maybe even charge for membership if you want to make some money).
Best of all, creating a membership site isn’t that difficult as long as you have the right tools. In fact, you can set everything up with zero technical knowledge required.
In this post, we’re going to tell you what those tools are. Then, we’ll show you step-by-step how to create a website with membership and user login.
Let’s dig in!
What You Need to Create a Website With Membership and User Login
Before we get to the tutorial, let’s talk about the tools that you need to create a user-friendly site with membership and login functionality.
A Website Builder or CMS
First, you’ll need a website builder or content management system (CMS) for the base of your site. In most cases, WordPress is the best option. If you’re not familiar with it, WordPress is the most popular way to make a website by far – it powers over 43.4 percent of all the websites on the internet.
Even better, WordPress is completely free and provides a highly intuitive user experience. You don’t even need to know how to code in order to use it.
You’ll just need to pay for a web hosting plan and domain name to set up your site. And, if you opt for a managed hosting provider, they’ll take care of most of the initial setup for you.
Still, it’s important to note that while WordPress does include support for user registration in the core software, it’s pretty limited and not very user-friendly. So, you’ll want to extend it with one or more plugins.
Membership Functionality With Paid Member Subscriptions
To expand your WordPress site’s membership functionality, you can use the Paid Member Subscriptions plugin. Paid Member Subscriptions is a full WordPress membership solution. It helps you:
- Create unlimited membership levels.
- Set up custom registration and login forms for your members to use.
- Restrict content on your site based on membership levels.
- Charge one-time or recurring payments for membership (you can also offer free membership).
- Manage all of your members and subscription plans from the WordPress dashboard.
Basically, Paid Member Subscriptions is all you need to create a membership site with subscriptions and user management tools, all within WordPress.
Advanced Registration and User Profiles With Profile Builder
If you want even more control over registration/login behavior and user profile management, you can also pair Paid Member Subscriptions with Profile Builder Pro. This plugin offers a full solution for WordPress registration and user profiles.
At a basic level, Profile Builder lets you create and customize three key forms:
- Registration: You can create a custom registration form that you display anywhere on your site. You’ll also be able to control the fields that appear on the form, including collecting custom information from new registrants.
- Login: You can create your own user login form that replaces the default WordPress login system.
- Edit Profile: Once users register, you can let them edit some or all of their profile details from the front end of your site.
The plugin gives you a large degree of control over registration and login behavior. You can use it to set up advanced functionality, such as configuring automatic redirects after login or registration or requiring manual admin approval for specific user roles.
How to Create a Website with Membership and User Login (5 Steps)
Now, let’s get into the step-by-step guide of how to create a website with membership and user login.
For this tutorial, we’ll assume you already have a WordPress site up and running. For the core functionality we’ll cover, you’ll need the Paid Member Subscriptions plugin. We’ll also show you optional instructions for how to extend the registration and edit profile forms using Profile Builder in case you also use that plugin.
To begin, make sure to install and activate the Paid Member Subscriptions plugin. You can use the free version at WordPress.org for a lot of what we cover, but we’ll also note some areas where you might want the paid version.
Paid Member Subscriptions Pro
The best plugin to create a website with membership and user login.
Get Paid Member SubscriptionsStep 1: Follow the Paid Member Subscriptions Setup Wizard
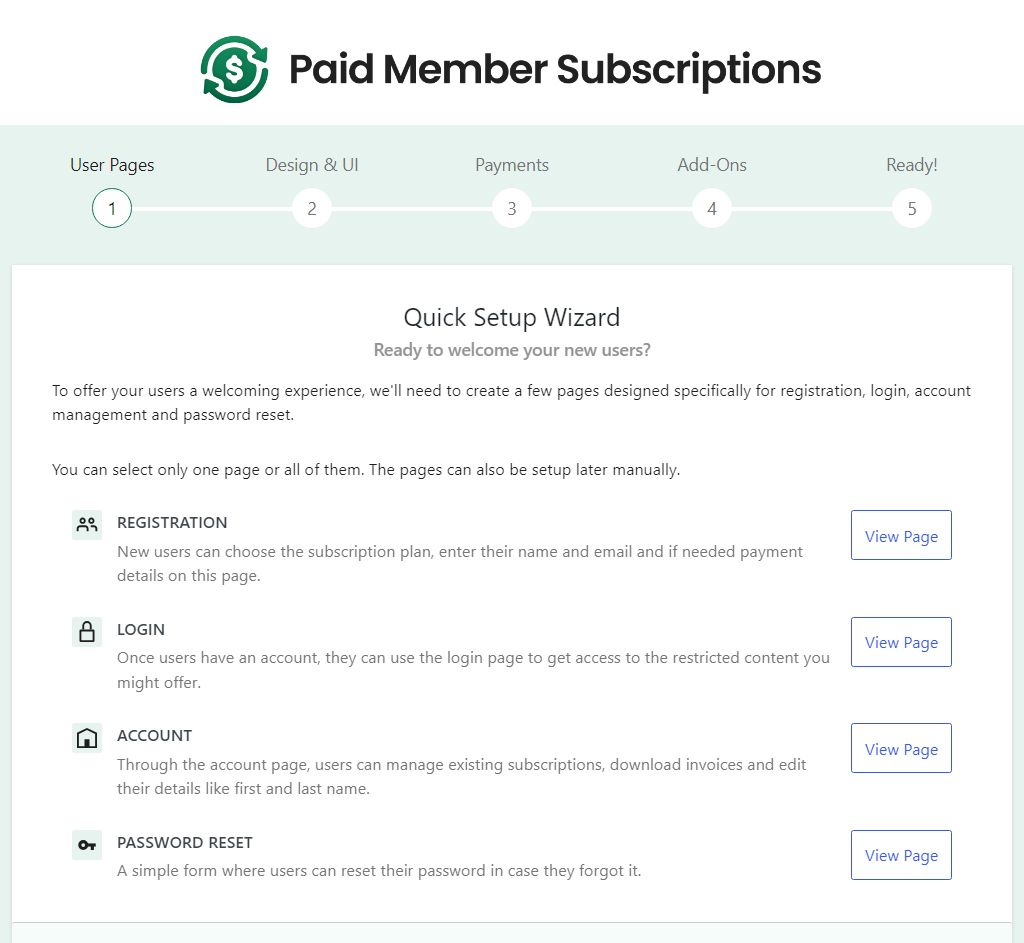
As soon as you activate the Paid Member Subscriptions plugin, it should automatically launch its setup wizard to help you configure some important basics.
If not, you can manually launch the setup wizard by going to the Paid Member Subscriptions area in your WordPress dashboard and clicking the Open Setup Wizard button.
In the first step of the setup wizard, click the button to have the plugin create key membership pages for you, such as registration, login, and account management. As you can see in the screenshot below, the setup wizard shows the option to view the pages because we’ve already set them up:
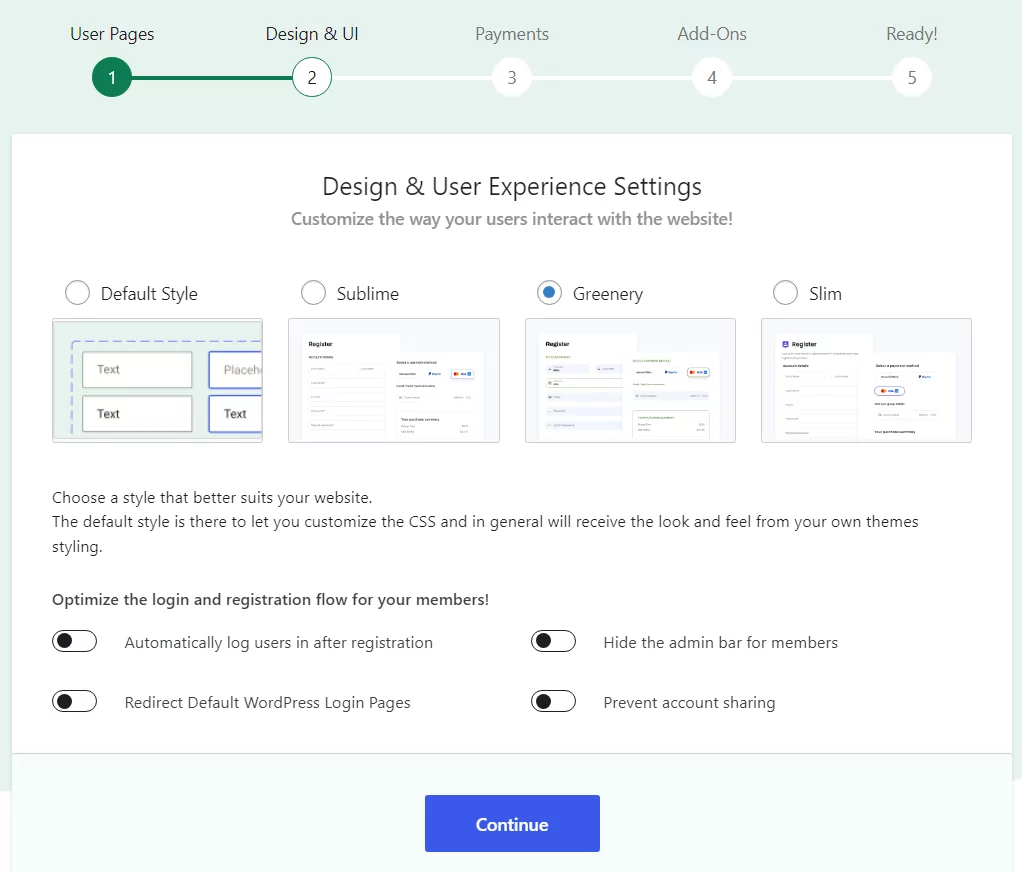
In the next step, you get to configure the default form style. Paid Member Subscriptions includes multiple forms styles to choose from. Go ahead and mouse over any of the options to see a Preview button that zooms on each style so you can get a better look at it.
Select a style and take a minute to look at the Optimize the login and registration flow for your members! options. Here you can configure the plugin to login users after they register, redirect successful logins to other pages, hide the admin bar from members, and more:
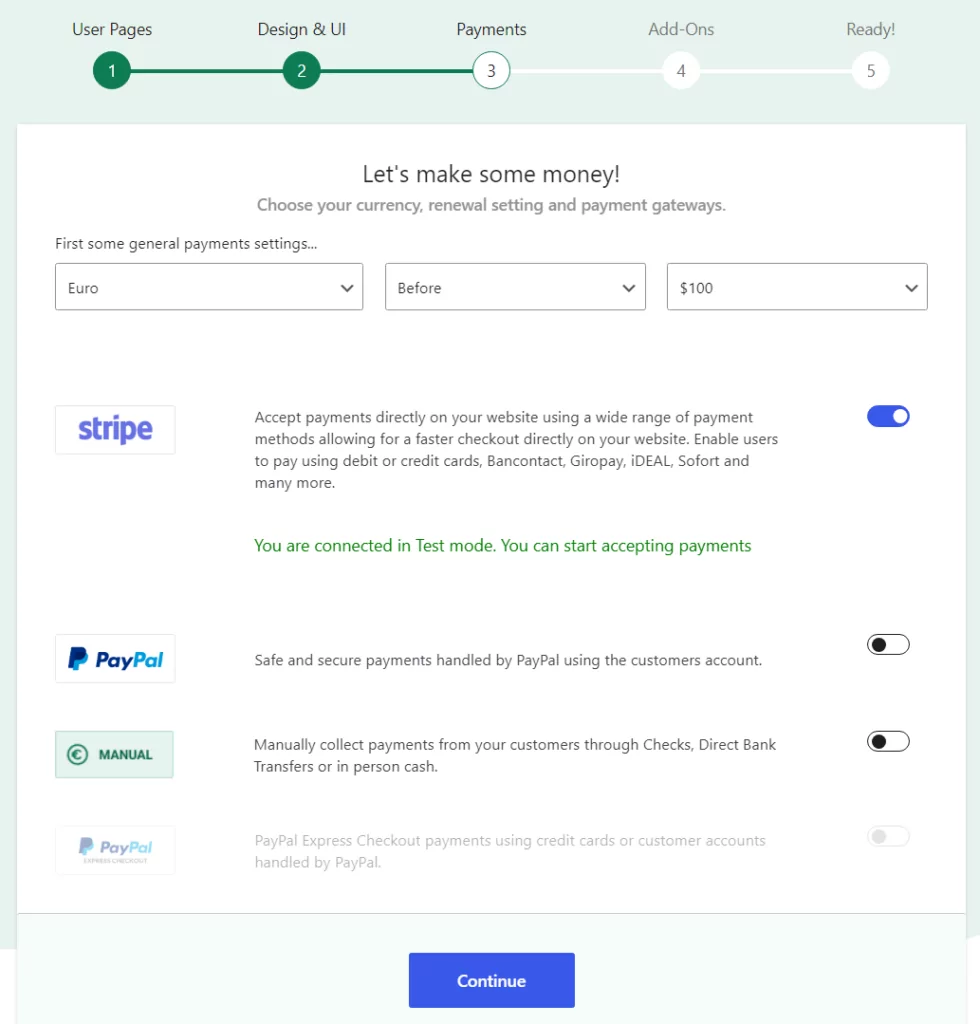
Next up, you can configure the payment methods that you want to accept if you plan to charge some/all of your members for access to your site (more on this in the following sections). If you’re not sure about this, you can always set this up later:
That’s it for the setup wizard. Now let’s move on to talk about how to set up subscription plans for your membership site.
Step 2: Set Up Your Membership Levels (Subscription Plans)
Next, you’ll want to create your membership levels, which the plugin calls Subscription Plans. You’ll use membership levels to control how much access different types of members have to your site.
For example, some members might get access to all your content, while other members might only get limited access.
With Paid Member Subscriptions, you can create both free and paid membership levels. A common approach is to have a limited free tier and then one or more paid tiers. For the paid tiers, you can charge people one-time fees or recurring payments.
Create a Membership Level
To create your first membership level, head to Paid Member Subscriptions → Subscription Plans → Add New:
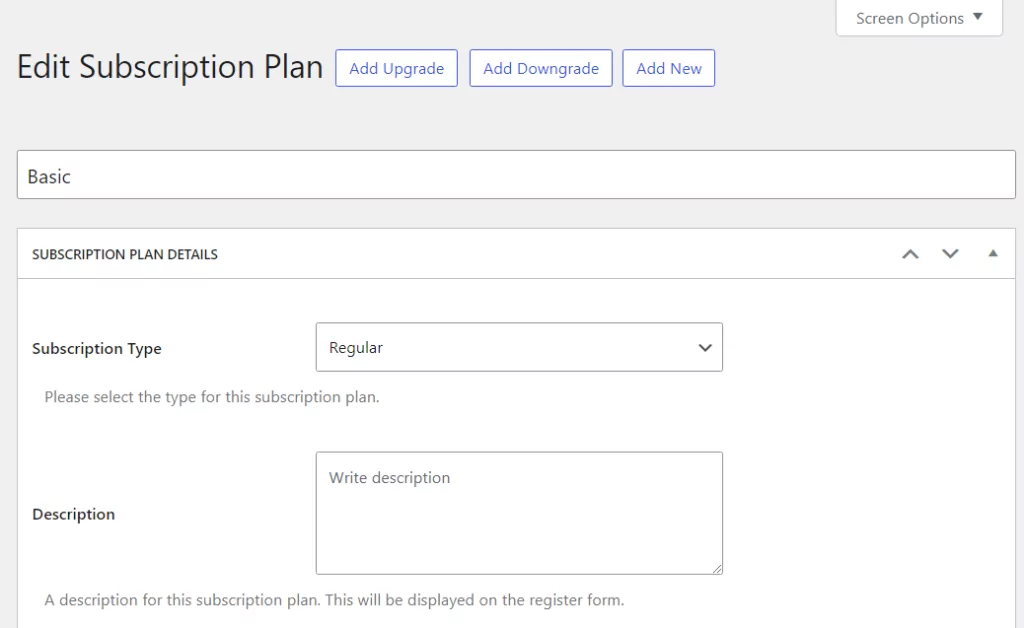
First, you can give it a name. This is the name that will appear when people choose the plan. If you’re not sure what to name it, you can check out our guide to naming your membership levels.
Set Up Pricing and Access
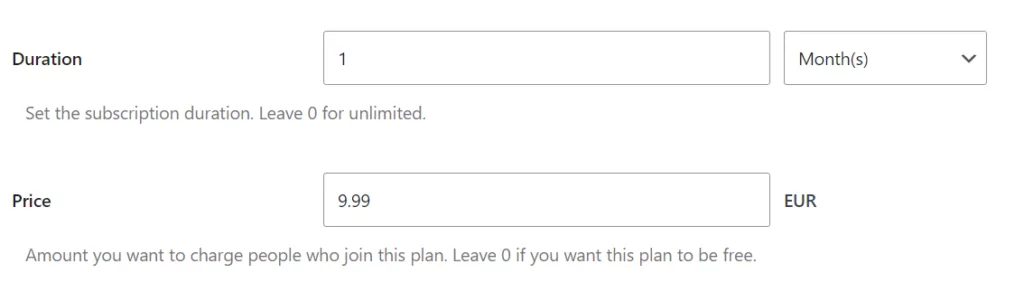
Next, you can enter the duration and price of the plan.
With the free version of Paid Member Subscriptions, you’re able to offer free membership plans or charge a one-time price. Just set the price equal to zero if you want to make the subscription plan free.
To create a regular subscription plan, set the length for its duration and a price. The default with most membership sites is one month, but Paid Member Subscriptions enables you to configure periods in terms of days, weeks, months, and years:
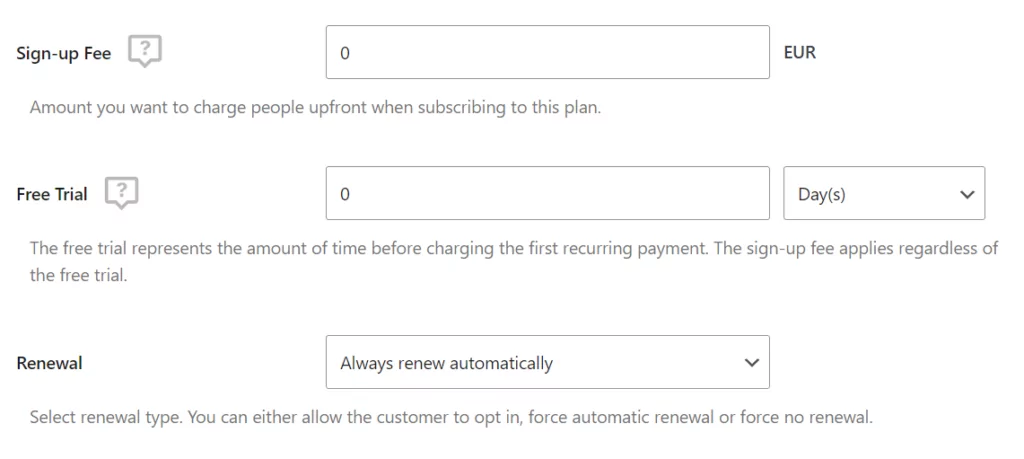
With Paid Member Subscriptions Pro, you can also charge automatic recurring subscriptions, along with things like free trials or one-time sign-up fees. You can configure plans to renew automatically or ask users what they prefer:
When you’re finished, click Save Subscription to save your plan.
Set Up More Plans If Needed
Now, you can set up more membership plans if needed.
If your plans aren’t connected to one another, you can just go to Subscription Plans → Add New again to create a new plan.
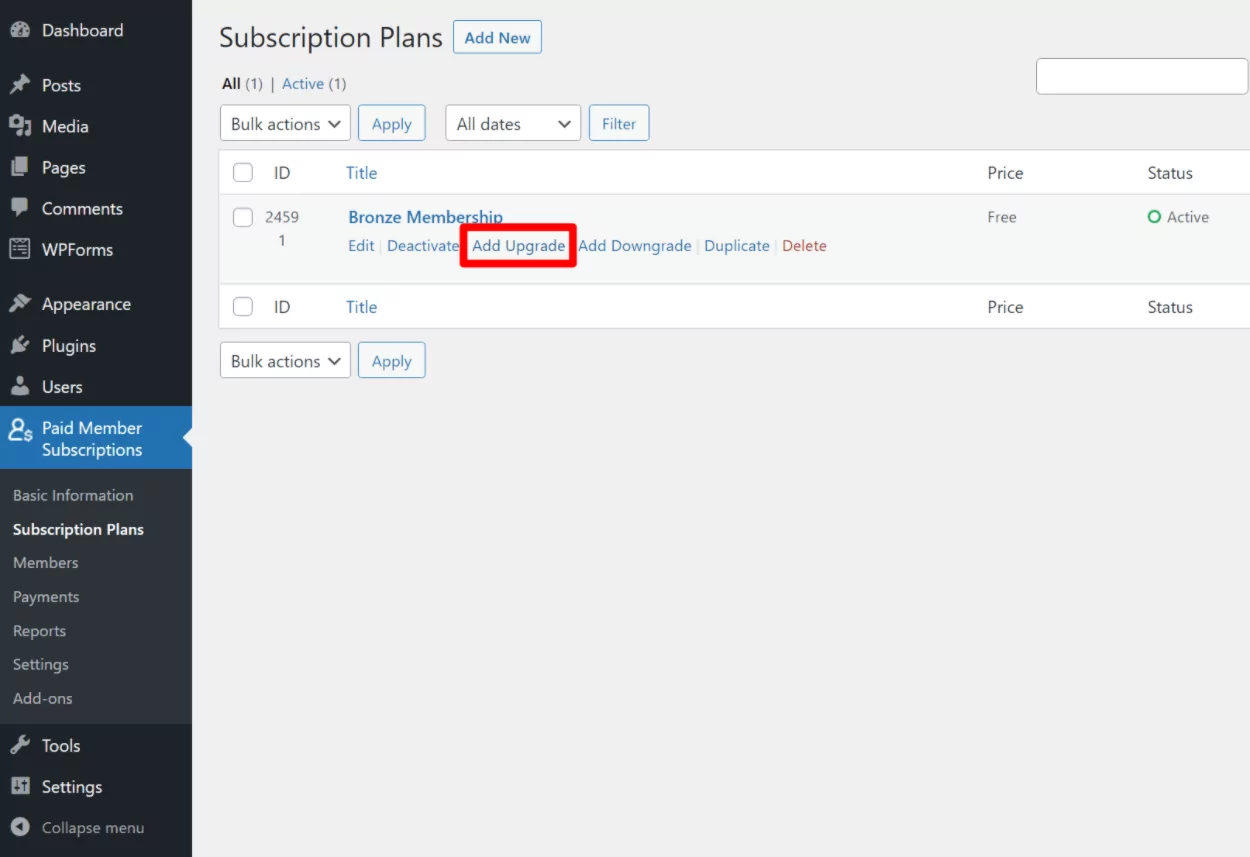
However, you might also have a tiered set of plans where the plans are arranged hierarchically and members can upgrade to a higher-tier plan or downgrade to a lower-tier plan. In this case, you’ll want to add your plans as upgrades or downgrades.
For example, let’s say you want to create an upgrade to the plan that you just created. Head to the Subscription Plans area and hover over the existing plan. Then, click the Add Upgrade option:
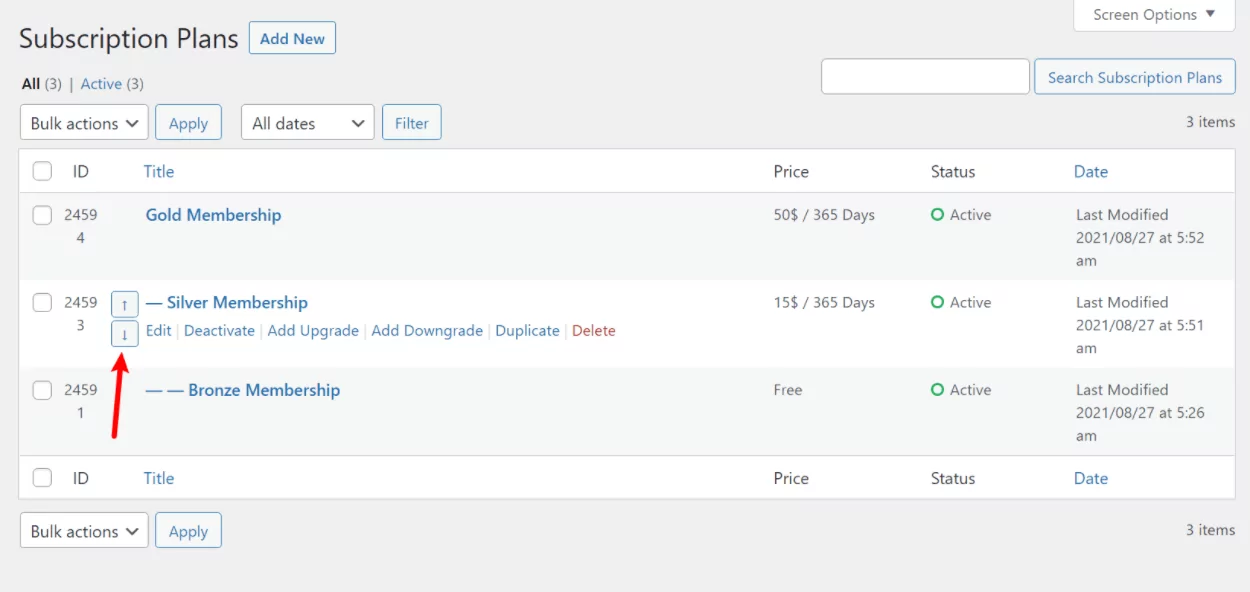
Then, you’ll get the same screen where you can configure the name, pricing, access duration, etc.
When you go back to the Subscription Plans area, you can see the hierarchy of your plans and rearrange them using the arrows if needed:
Once your membership plans are set up, you’re ready to start working on your key membership pages.
Step 3: Customize Your Key Pages (Registration, Account, Etc.)
During the setup wizard, Paid Member Subscriptions automatically created four key pages for your membership site. Those pages are:
- Account
- Login
- Password Reset
- Register
These pages are ready to go right away. However, you might want to add some of your own unique content to them so they are customized to your site. For example, you might want to add some text to the registration page.
To make these changes, go to the Pages area in your WordPress dashboard and find the page you’re looking for. Then, hover over it and click on Edit.
You can add as much content as you want – just don’t remove the block or shortcode set in the page. For example, on the registration page, the registration form will appear wherever the [pms-register] shortcode is located:

Later on, we’ll show you how you can use the Profile Builder plugin to get even more control over your registration page.
Step 4: Restrict Members-Only Content
At this point, you’ve created your membership levels and made it so that people can sign up for free or paid plans via your registration page.
For the final touch, you need to restrict the content that you want to only be available for members.
There are two ways to restrict content – piece by piece or with bulk restriction. Let’s go through both options.
How to Restrict Individual Pieces of Content
To restrict a single piece of content, open the editor for that content. Then, scroll down to the new CONTENT RESTRICTION meta box.
Here, you can restrict the content for all logged-in users (regardless of subscription plan) or for specific subscription plans:
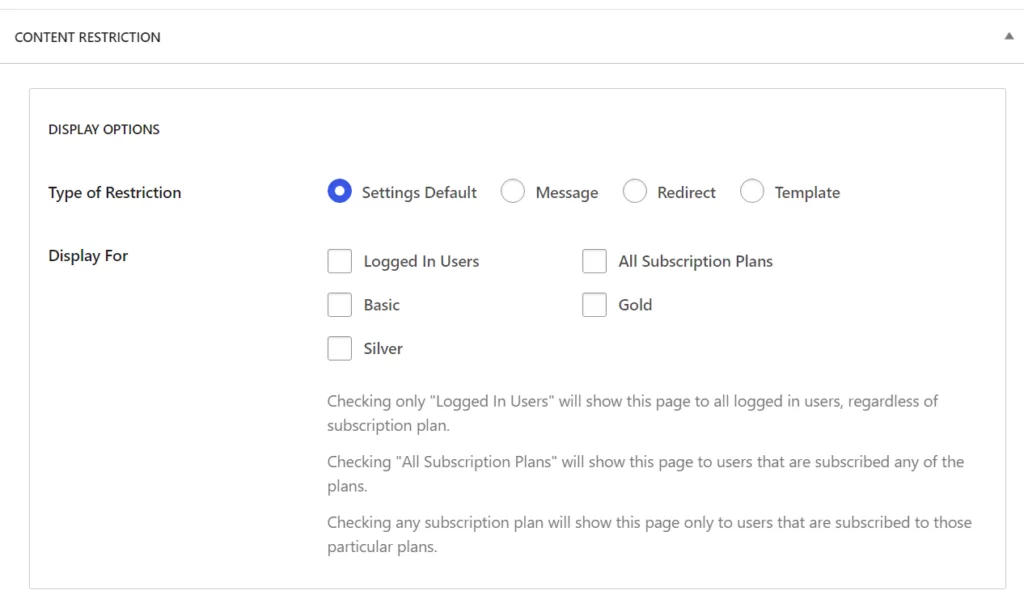
If you want to restrict content so only specific subscription plans can see it, select the corresponding plans under Display For. Note that “higher” tiers typically have access to all the content from the rest of the plans, so keep that in mind when configuring who gets access to what pages and posts.
How to Bulk Restrict Content
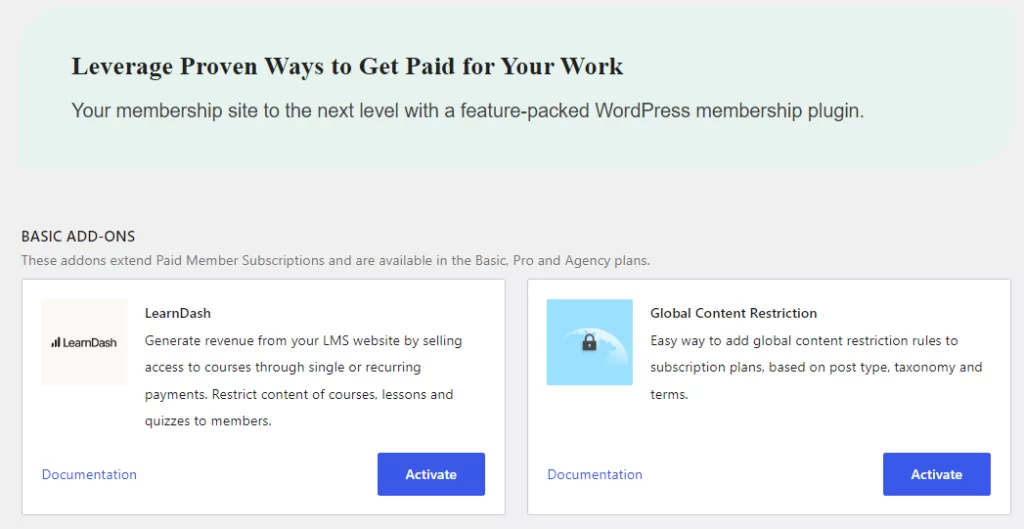
With Paid Member Subscriptions Pro, you also have the option to bulk restrict content. For example, you can restrict all of the posts in a certain category or of a certain post type.
To get started, make sure to purchase at least the Basic license and then install the Global Content Restriction add-on:
With the add-on active, you can bulk restrict content by going to Paid Member Subscriptions → Subscription Plans and editing the plan that you want to bulk restrict content for.
You’ll get a new Global Content Restriction box where you can set up rules. For example, if you bulk restrict the Gold Member Content category (which we set up for this tutorial), you can automatically restrict access to all the posts within this category:
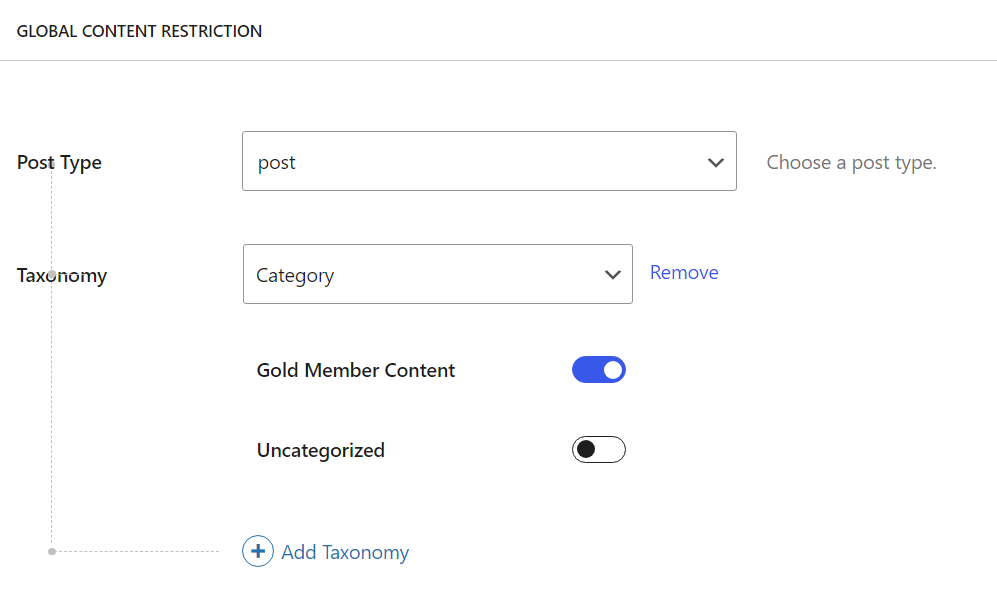
Note that you’ll need to add the corresponding taxonomy to the posts you want to limit to any subscription plan. This is not something the plugin does automatically as what content to restrict is up to the site owner.
How to Drip Content Over Time
Instead of making all the content available to members right away, a lot of membership communities like to “drip” content over time. For instance, you might give members access to one new piece of content every week during their membership. This encourages them to stick around and keep their subscription active.
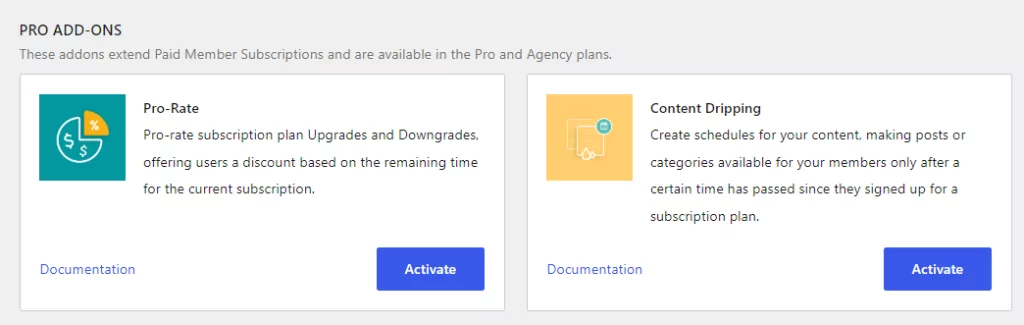
With Paid Member Subscriptions, you can add support for content dripping via the Content Dripping add-on. This add-on is available for the Pro and Agency plans:
With the add-on active, go to Paid Member Subscriptions → Content Drip Sets → Add New to set up content dripping sequences for the different subscription plans.
To get started, set a name for the content drip (this is for internal identification purposes. Then select a subscription and set the status of the drip to Active under CONTENT DRIP SET DETAILS:
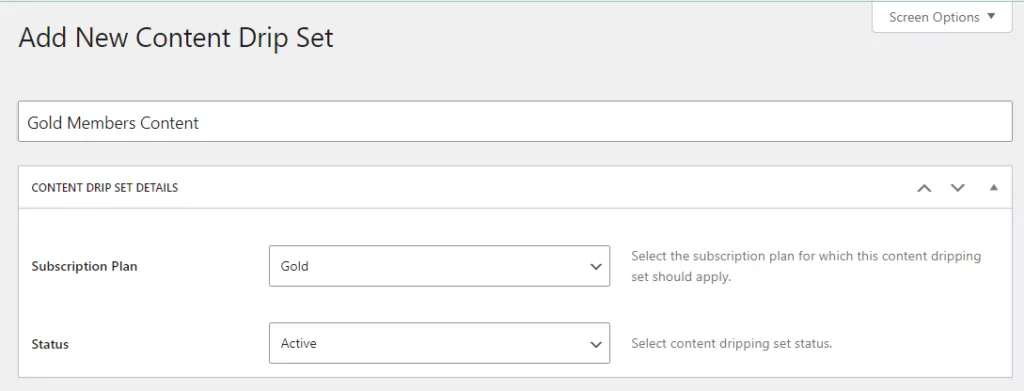
Now move on to the CONTENT options. Here you can configure the drip to serve new content for users on a schedule. In this example, we configured the add-on to give Gold members access to one new post from a specific category every week:
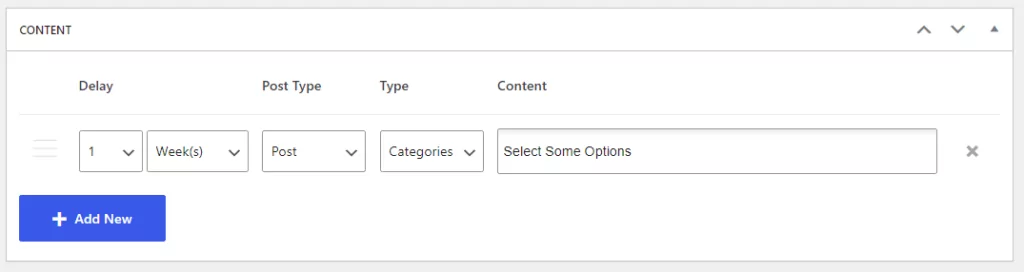
Note that the Content Dripping add-on supports multiple “drips” for each subscription plan. You can, for example, configure the plan to get access to a post from a specific category each week and other bonus content every month, such as access to restricted products.
Step 5: Explore Other Paid Member Subscriptions Settings
At this point in our tutorial on how to create a website with membership and user login, you’re pretty much done. That is, your membership community should be fully working.
However, you might want to explore Paid Member Subscription’s settings to see if there are any other options that you want to tweak for your site.
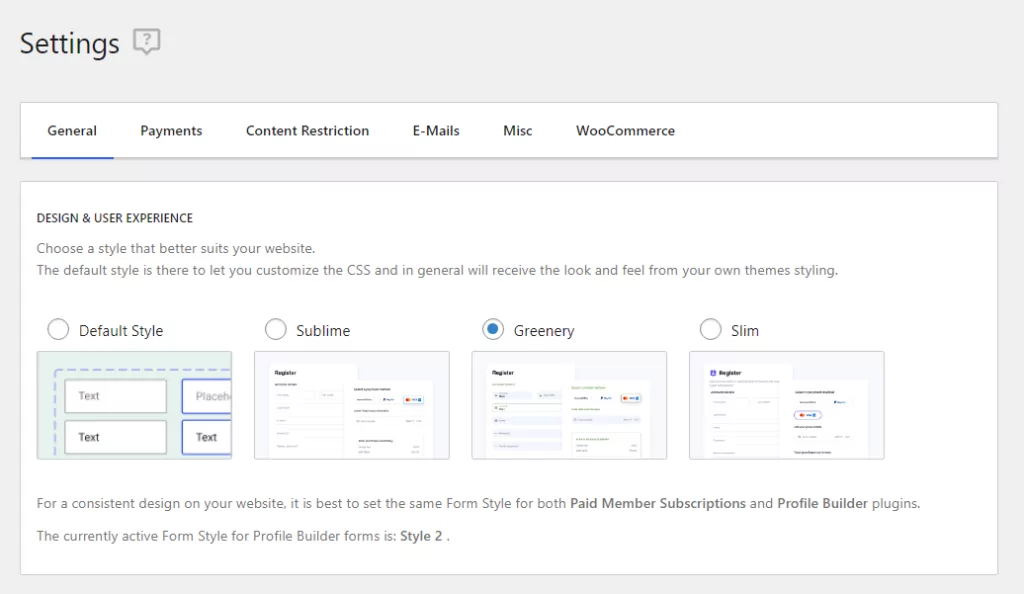
You can access these settings by going to Paid Member Subscriptions → Settings. You’ll see five different tabs inside (or six if you use WooCommerce):
- General: This tab includes a range of general settings for login behavior, core pages, account sharing, and more.
- Payments: Here, you can configure everything to do with payments on your site.
- Content Restriction: Use this tab to configure content restriction behavior, including the default message that displays when a visitor doesn’t have access to content.
- E-Mails: You can configure the emails that your site sends to users.
- Misc: Some miscellaneous settings for things like GDPR compliance and anti-spam protection.
- WooCommerce: This tab will be available if you have WooCommerce installed and active on your site.
You can also browse all of the available add-ons by going to Paid Member Subscriptions → Add-ons. Remember that which add-ons you have access to depends on what Paid Member Subscriptions license you signed up for.
How to Extend Registration and Profile Editing Functionality (Optional)
This next section is optional. If you want more control over your membership site’s registration and user profile features, you can pair Paid Member Subscriptions with the Profile Builder Pro plugin.
Like Paid Member Subscriptions, Profile Builder comes in both a free version and a paid version:
- The free version is fine if you just need the default WordPress user profile fields – e.g. name, email, biography, etc.
- The Pro version lets you add custom fields (and customize how they work). You’ll want to use this version if you’d like to collect more information from people when they register for your membership site.
We’ll use the paid version for this tutorial so that we can show the custom fields. However, the basic plugin interface remains the same whether you’re using the free or Pro versions of the plugin.
Profile Builder Pro
Create beautiful front-end registration and profile forms with custom fields. Setup member directories, custom redirects, cutomize user emails & more using the all in one user management plugin.
Get Profile BuilderCustomize Your Registration Form
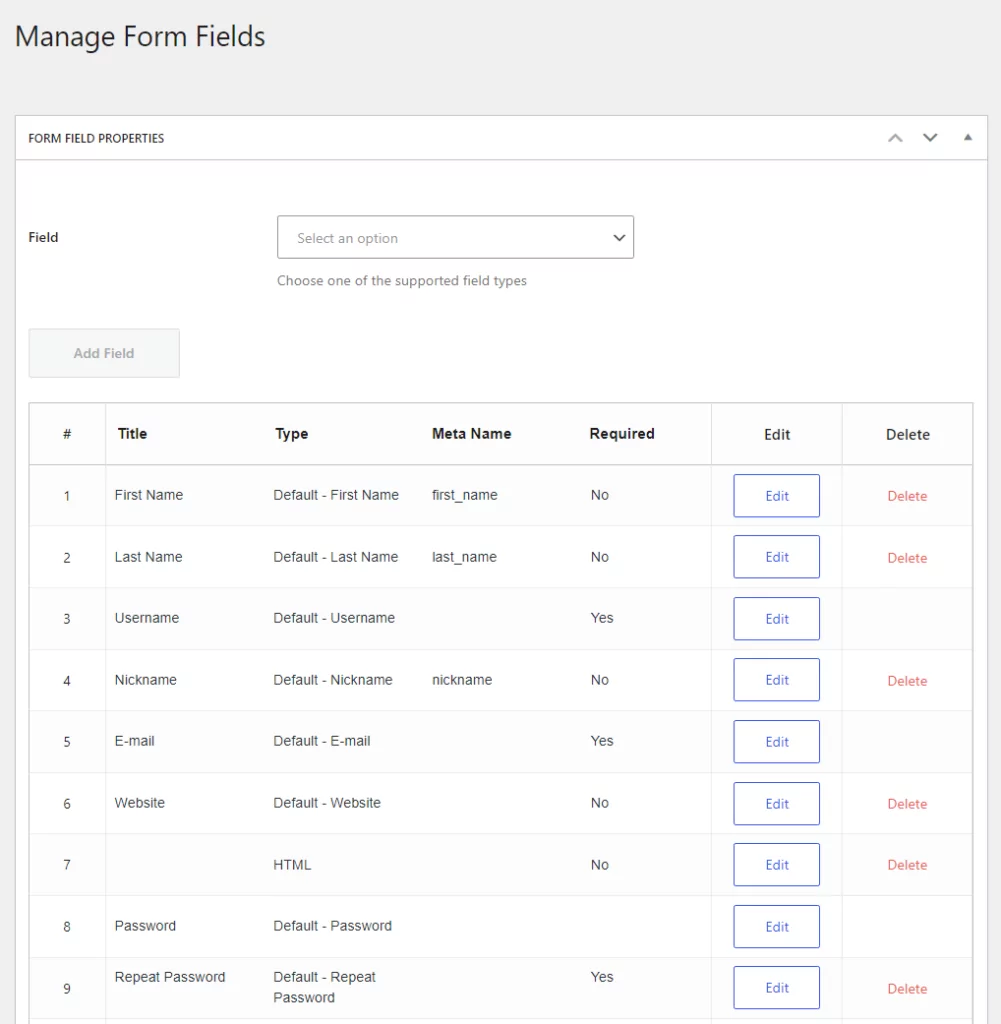
If you haven’t already, you’ll need to install and activate the plugin to get started. Then, go to Profile Builder → Form Fields to see the fields available for use with a custom registration form. Within this page, you can:
- Use the drop-down at the top to add new form fields.
- Drag and drop form fields to change their order by clicking on the number in the left-most column.
- Edit the details for any form field by clicking the Edit button.
- Delete any of the default form fields if needed (with the Delete button).
Feel free to customize the registration form as much as needed. If you have the Pro version, you can add unlimited custom fields to collect as much information as you want:
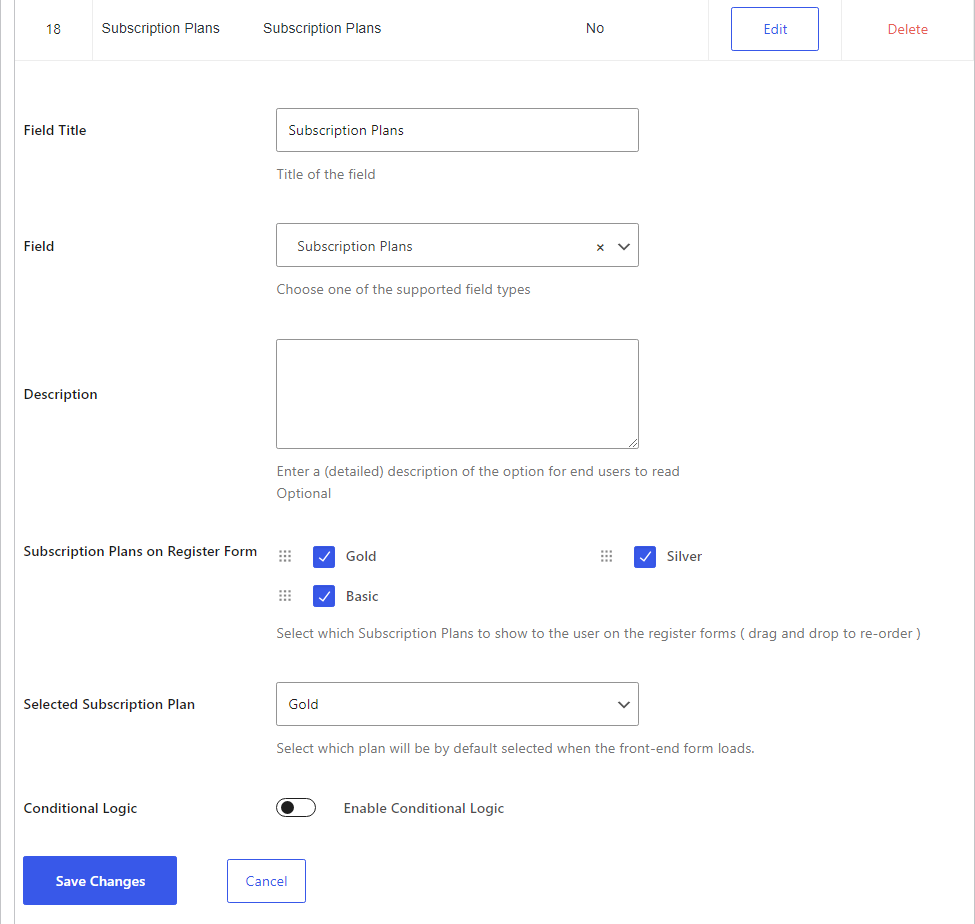
In addition to basic profile fields like email and password, the only field that you must add is the Subscription Plans field. This field enables you to connect your registration form to the subscription plans that you created with Paid Member Subscriptions.
When you customize the field (by clicking on the Edit button next to it), you’ll be able to choose which plans new users can opt for:
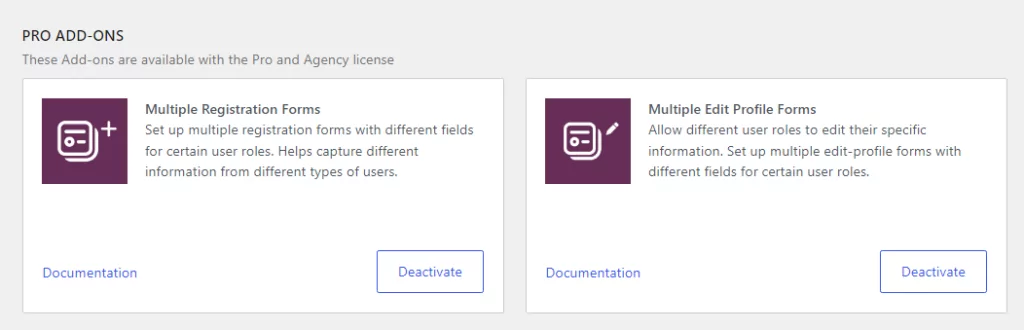
If needed, you can also create multiple unique registration forms, each linked to a different subscription level. For example, you can create one registration form for free members and another for paying users. To do this, make sure to activate the premium Multiple Registration Forms add-on by going to Profile Builder → Add-Ons.
Display Your Registration Form
When you’re finished customizing the fields on your registration form, you can display it on any page using the Register block, which is part of the Profile Builder Pro plugin.
To use this block, open the editor for the page where you want to place the registration form. Select the option to add a block where you want the form to go, and choose the Register option. Here’s what the block should look like:

The plugin also supports shortcodes. However, we recommend using blocks since this enables you to preview how forms look without leaving the editor. Moreover, blocks offer customization options which make it easier to make simple changes to form designs.
Create a Custom Edit Profile Form
In addition to customizing your site’s registration form, Profile Builder can also help you customize the edit profile form that appears in the member’s account area from Paid Member Subscriptions.
For your edit profile form, you can either give members access to the exact same fields from the registration form or you can create a custom set of fields with the premium Multiple Edit Profile Forms add-on. This add-on is available with Pro and Agency licenses:
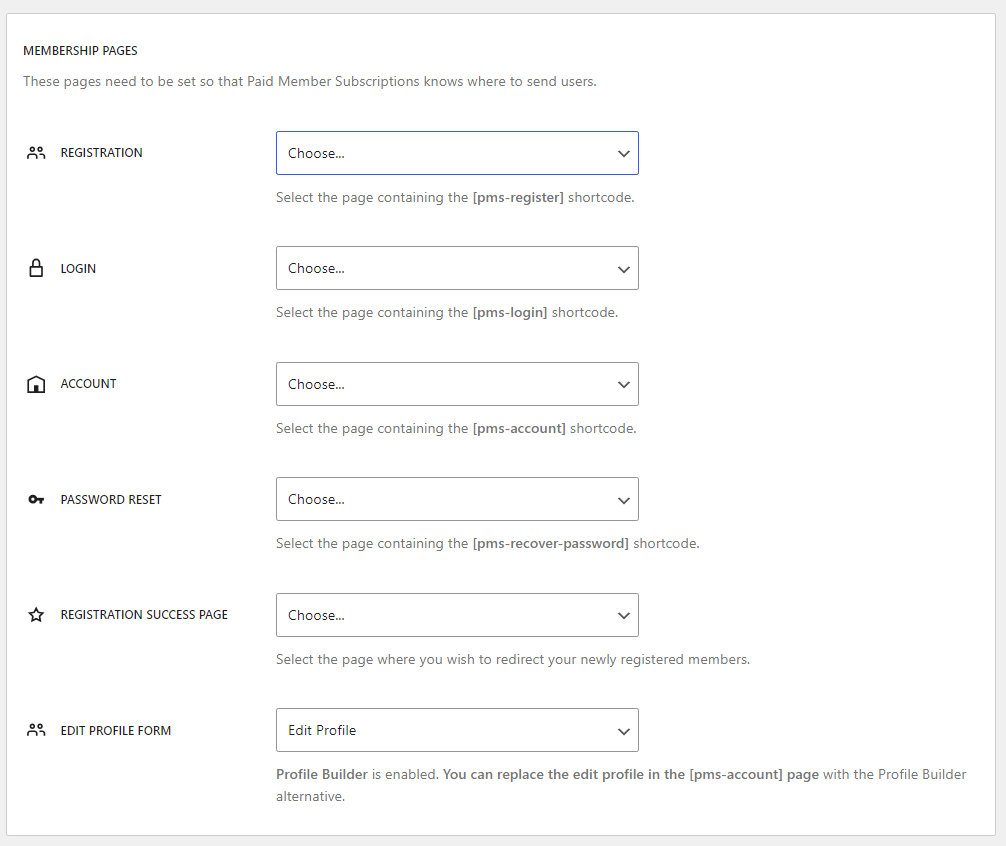
Once you’ve created your custom edit profile form, go to Paid Member Subscriptions → Settings and find the MEMBERSHIP PAGES section. Look for the EDIT PROFILE FORM option and use the corresponding menu to select the form you just set up:
When you’re done, save the changes to the plugin’s settings and that’s it. Now members will see the new edit profile form when they want to make changes to their pages.
Create Your Membership Website Today
With the right tools, creating a website with membership and user login options doesn’t have to be difficult.
Paid Member Subscriptions gives you all the features you need to turn WordPress into a membership site. Then, if you want even more control over your registration and user login behavior, you can pair Paid Member Subscriptions with the Profile Builder plugin.
To get started with your site, you can try the free version of Paid Member Subscriptions at WordPress.org. Once you discover how easy it is to create a website with membership and user login, you can upgrade to Paid Member Subscriptions Pro to access great new features like automatic recurring payments, content dripping, and lots more:
Paid Member Subscriptions Pro
The best plugin to create a website with membership and user login.
Get Paid Member SubscriptionsDo you still have any questions about how to create a website with membership and user login? Let us know in the comments and we’ll try to help!
Related Articles

How To Create a Divi Membership Site
If you’re thinking of building a membership site in WordPress, you’ll need a solid theme and a membership plugin that pairs well with it. In this complete guide, we’ll show you how to create a Divi membership site using the popular Divi theme in combination with the Paid Member Subscriptions plugin.
Continue Reading
Membership Blog: Why Start One, Popular Examples and How To
I think you will agree starting a membership blog seems daunting, especially for a first-timer. Talk to just about any beginner who has never created a membership blog (or even a simple website), and they will field questions such as: Why should I start a membership blog? What kind of content, products, or services should […]
Continue Reading
Membership Page Design Tips & Best Practices
If you're new to subscription businesses, membership page design seems trickier than tackling a fire-breathing dragon. And you are not alone. The idea of creating effective membership page designs is far-fetched for many beginners. Because... Where do you even start? Starting or running a successful membership website is already tough as it is, let alone […]
Continue Reading