

Table of Contents
- 1 Reasons To Consider A Woocommerce Membership Site
- 2 Intro to Paid Member Subscriptions And Basic Setup
- 3 How to Switch Your Store to Members-Only to Create a WooCommerce Membership Site
- 4 How to Make Certain Products Available to Members Only
- 5 Offering Product Discounts Based on Subscriber Level
- 6 Conclusion
One of the best things about WordPress is that you can create any type of website. From personal blogs to online stores and WooCommerce membership sites, WordPress can handle it without a problem. This is possible thanks to numerous WordPress plugins that allow you to add different functionality and features to your site.
What’s even better is that you can combine several plugins to create a completely unique site. For example, you can use a membership plugin with an ecommerce plugin and create an exclusive store for your members.
The two plugins that make this possible? Paid Member Subscriptions and WooCommerce!
In this tutorial, we’ll share reasons why you should consider setting up a WooCommerce membership site. We’ll also show you how to set it up with Paid Member Subscriptions and Woocommerce. Both of them have a powerful free version that will let you achieve all the steps we describe below. Let’s dive in!
Reasons To Consider A Woocommerce Membership Site
Setting up a WooCommerce membership site has multiple benefits. Here’s why you should consider creating one for your site.
1. Make Your Membership More Exclusive
By default, memberships are already pretty exclusive. But once you add a store with products specifically for your members, you can stand out from other membership sites. This allows you to make your membership even more exclusive and make your members feel like they are a part of a select club.
2. Offer Different Products For Different Membership Tiers
When you pair a membership plugin like Paid Member Subscriptions with WooCommerce, you can easily control who gets access to what. You can restrict individual products and make them available to certain subscription plans only. This can be a great way to encourage members to upgrade their plan and get access to other products in your store.
3. Set Up Multiple Income Streams From One Website
As the old saying goes, you should never put all your eggs into one basket. This is especially true when it comes to your income streams. However, managing multiple income streams is no small feat. But if your income streams are all in one place, that task becomes easier.
4. Scale Your Income
A membership site is a wonderful way of creating a predictable, recurring income stream. But if you want to grow that income, you have to recruit more members. While signing up more members is not necessarily bad, it also means that you’ll probably find it difficult to interact with each member individually.
One way to avoid this is keep your community small but find ways to increase your income. A WooCommerce membership site solves that problem by allowing you to sell products to your members on top of an existing membership plan. As a result, you make more money per each member without having to recruit more members.
Intro to Paid Member Subscriptions And Basic Setup
Now that you know why you should consider creating a WooCommerce membership site, let’s dive into the setup. As mentioned earlier, you’ll need the Paid Member Subscriptions plugin on your site for this to work.
Why Paid Member Subscriptions works great for a WooCommerce membership site
Paid Member Subscriptions is a membership plugin for WordPress that allows you to create different membership tiers. It integrates with PayPal and Stripe so you can easily collect payments from your membership site. A few key features include:
- Manage subscription plans and members from your WordPress dashboard
- Restrict content to be visible to members only
- Built-in email templates
- Offer free trials and sign-up fees to give users a taste of your paid membership
- Various add-ons to add even more features such as content dripping, multiple subscriptions per user, group memberships, and more
On top of that, Paid Member Subscriptions integrates with WooCommerce, allowing you to restrict your shop pages and products to members only. You can also offer exclusive discounts to members only.
Paid Member Subscriptions comes with a free and a premium version. The premium version gives you more advanced features such as the ability to create group memberships and fixed period memberships, invoicing, content dripping and more.
That said, you can use the free version of Paid Member Subscriptions to create your WooCommerce membership site and upgrade your license later on when you need more features.
Install Paid Member Subscriptions
To install Paid Member Subscriptions, go to your WordPress dashboard and navigate to Plugins > Add New. Search for Paid Member Subscriptions and click on Install. After the plugin has been installed, click Activate.
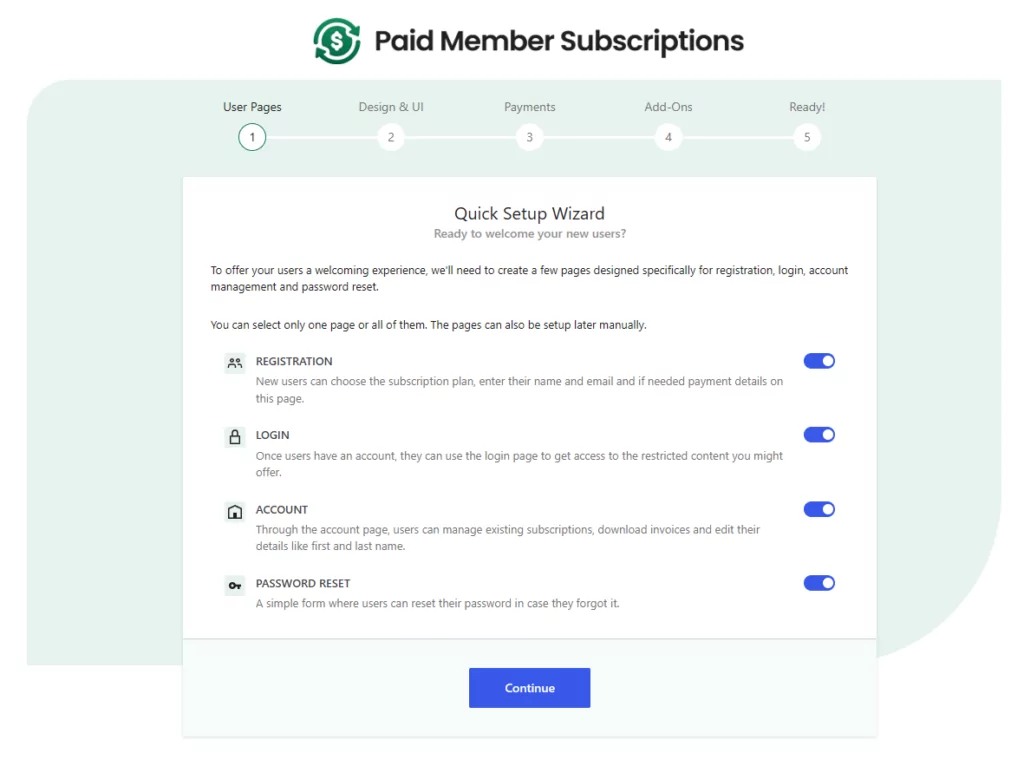
Create pages
You’ll then be taken to the setup wizard and the plugin will walk you through the necessary steps. Click the blue button to create the needed pages and continue with the setup process.
You’ll have the option to select your preferred payment gateway. After that, you’ll have the option to go back to your dashboard or create subscription plans which takes us to the next step.
Keep in mind that if you choose PayPal, you’ll need to set up an IPN URL in your PayPal dashboard. You can do this by logging into your PayPal account and clicking on Profile – Account Settings. There, click on Website Payments > Update in the Instant Payment Notifications section. Click the Turn On IPN option and set your listener’s URL.
Create Subscription Plans
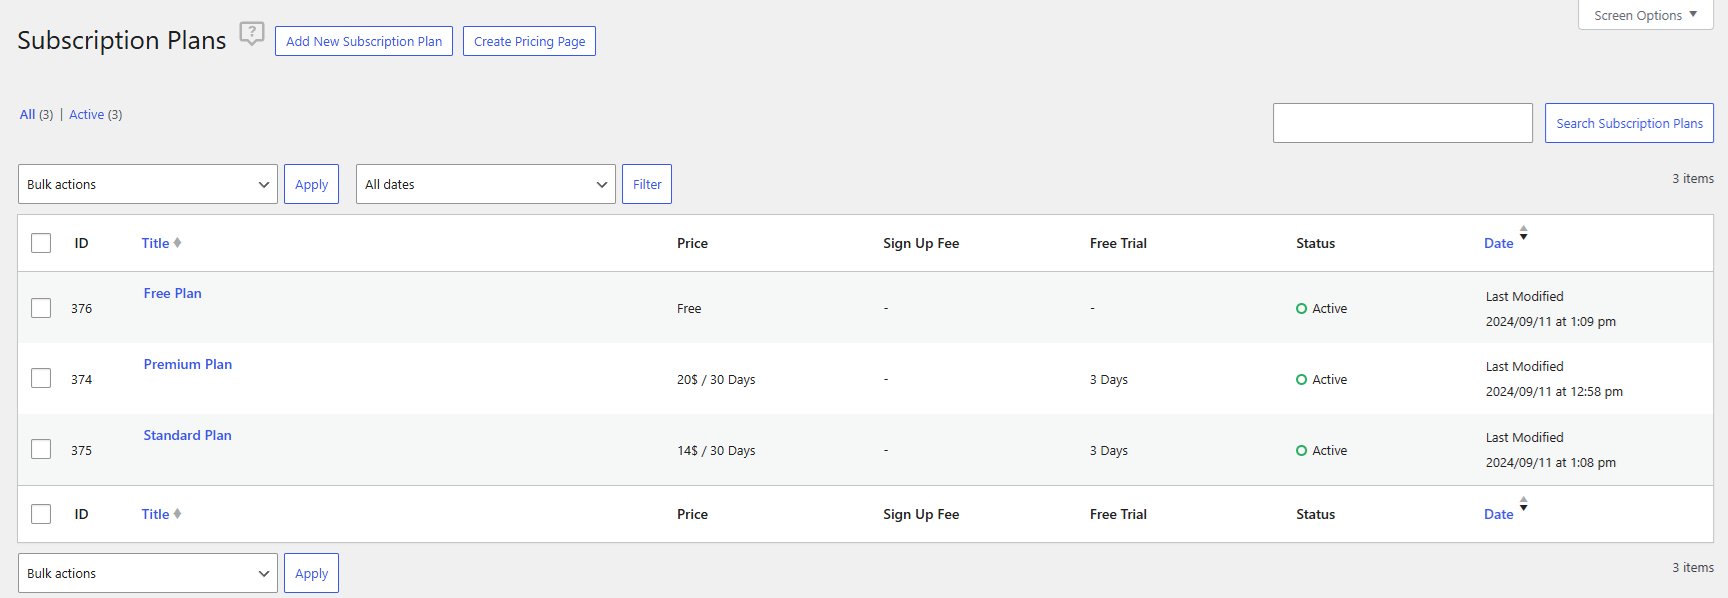
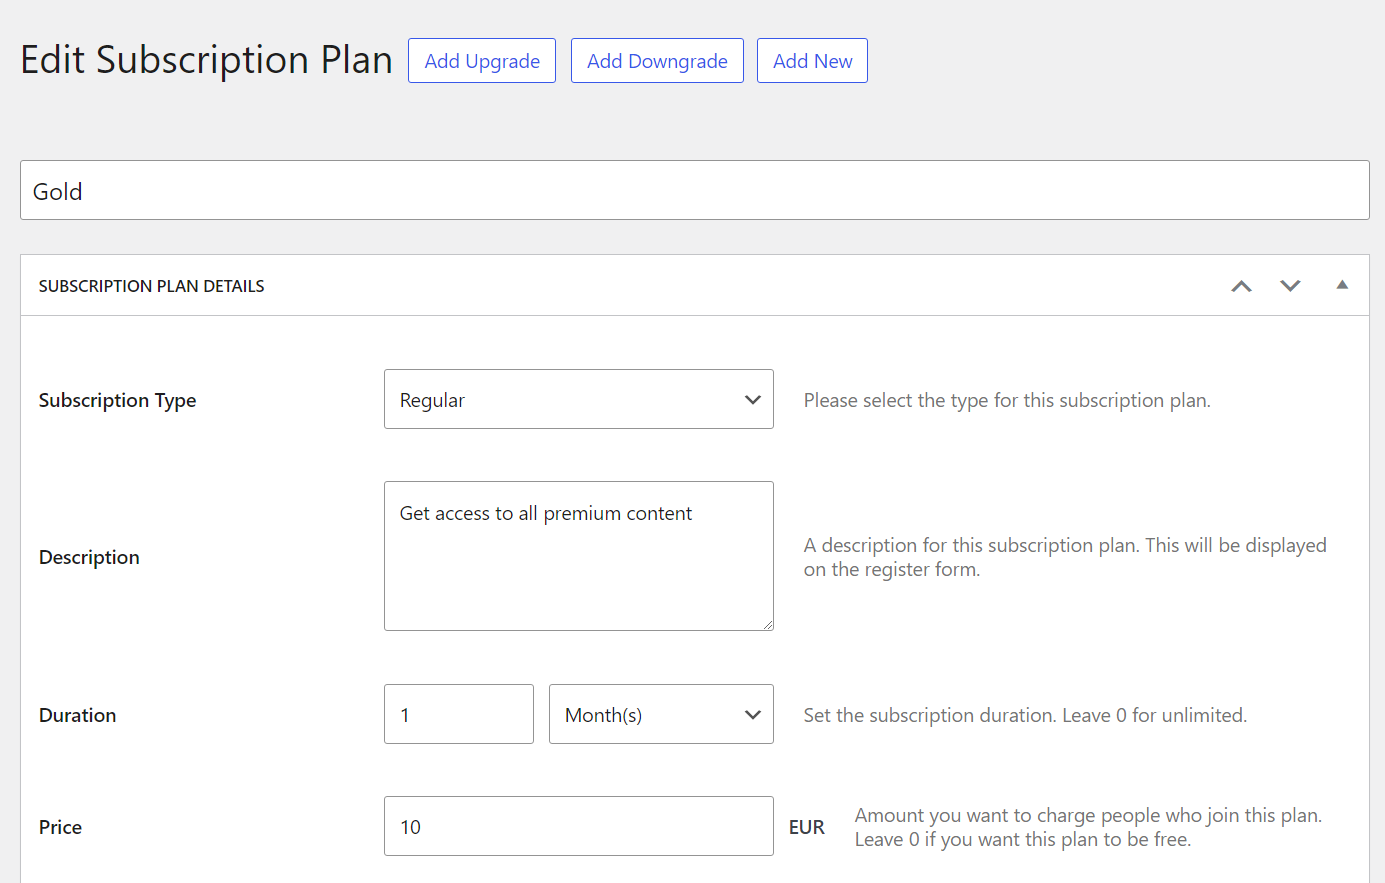
To create your subscription plans, click the Create Subscription Plans button. Press Add New button. You’ll have the option to name your subscription plan, enter a description, set the price, and configure other options.
For the purposes of this tutorial, I’ll create three different membership plans: Free, Gold, and Platinum subscription plans.
Install And Setup WooCommerce
If you don’t have WooCommerce installed, you’ll need to install and set up WooCommerce as well. If you do, feel free to skip to the next section below that walks you through the process of restricting your store.
To install WooCommerce, go to Plugins > Add New. Search for WooCommerce, install, and activate the plugin.
You’ll then be taken to the setup wizard that will help you configure your store. This includes giving your shop a name, setting your payment method, configuring your shipping options, and more.
Once the setup is done, you’ll have the option to go back to your WordPress dashboard or add your first product. Click that button to go to the next step in the process.
Add Your Products
The product editor screen is rather straightforward. You have the option to enter a name and a description for the product, set the price, and set the product as physical or virtual (downloadable).
You can also upload product images so your members can see the product before making a purchase. When you’re done adding a product, click the Publish button. To add more products, click Products > Add New in the left-hand sidebar in your WordPress dashboard.
In this example, I have added an exclusive t-shirt and an eBook that the members can purchase.
How to Switch Your Store to Members-Only to Create a WooCommerce Membership Site
Now that everything is set up, it’s time to restrict your store to your members only. It’s worth mentioning that you can restrict your entire store as well as make only certain products available to your members. This is a great way to encourage your visitors and buyers to become members and get access to exclusive products. We’ll show you both of these options.
First, let’s take a look at how you can switch your WooCommerce store to members only. In your WordPress dashboard, go to Pages. Click on the Edit button under the Shop page.
If you scroll past the editor, you’ll notice that Paid Member Subscriptions added the ability to restrict content. You have several options here.
You can restrict your store to logged in users or users who are subscribed to either one of the three membership plans we’ve created earlier. If you choose Logged In Users, the shop will be visible to all logged in users, regardless of what membership tier they’re subscribed to.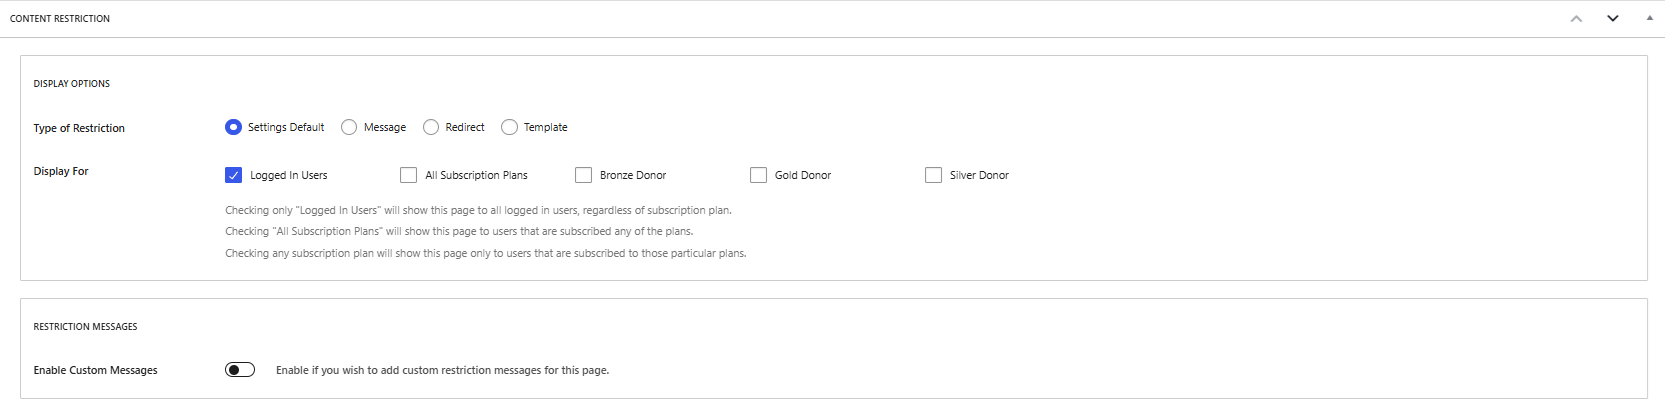 box below allows you to display a custom message to your users. You can create a custom message for logged out users. This will display to anyone who is logged out as well as regular visitors.
You can also add messages for logged in users who haven’t subscribed to any of your membership plans.
In this example, I’ve enabled the shop page for all the members, no matter which subscription tier they belong to. This will make it so that all members can see the product page. Non-members will see a message that the shop page is restricted to members only along with a link to the registration page.
How to Make Certain Products Available to Members Only
Now you know how to restrict your entire shop to members only. But what if you want to sell products and only restrict some of them to your members? Luckily, you can. Here’s how.
In this example shop, we have three products: the club t-shirt, the eBook and a premium promotion package. We’ll set it up so that the t-shirt and eBook are available only to paying members.
To do this, go to Products. Select the product you want to be available to members only and click Edit. If you scroll below the editor, you’ll see the options to make this product available to members only.

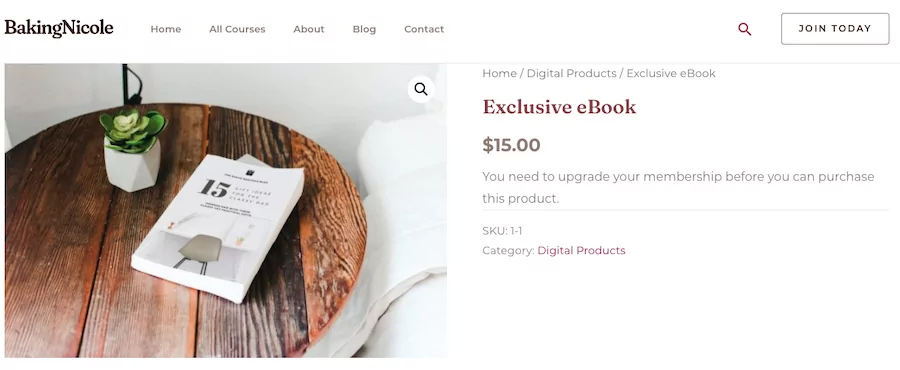
You can restrict the product to be visible to members only and you can also restrict who can purchase the product. In this example, I’ve restricted the purchasing options to subscribers only.
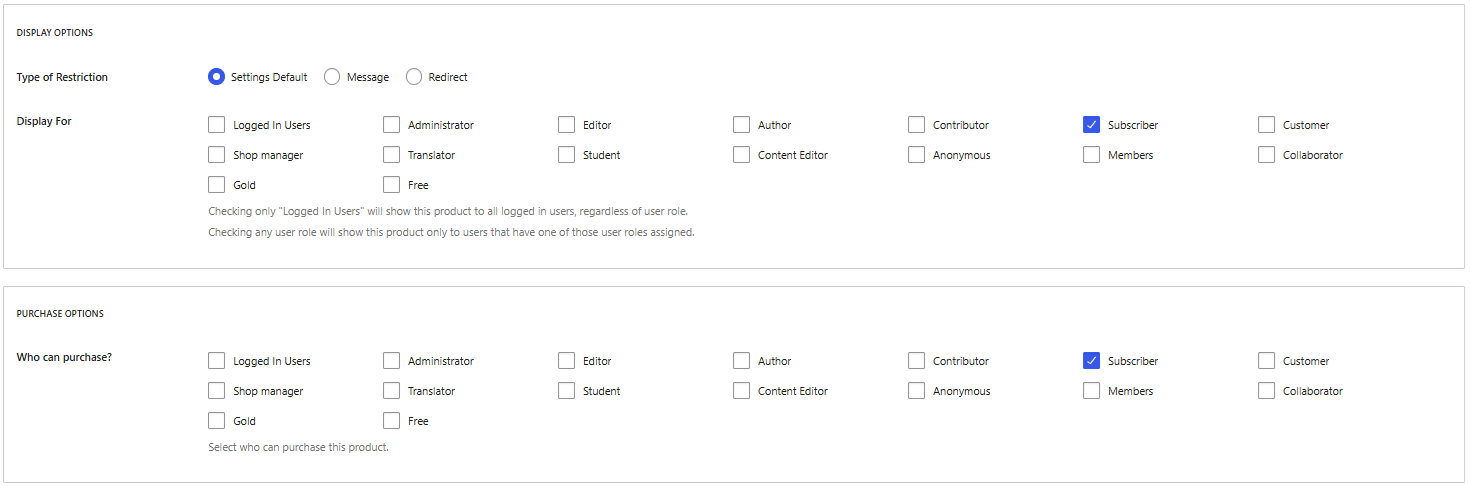
Members who are on the free plan and non-members will see a message that they need to upgrade their membership plan to purchase this product.
When you’re done setting up your restriction options, click Update to update the product settings. Then, repeat the steps above to restrict any other product to members only.
Offering Product Discounts Based on Subscriber Level
So far, we’ve shown you how to restrict your shop to members only as well as how to make certain products available to members only. The last option is to set up discounts based on membership level.
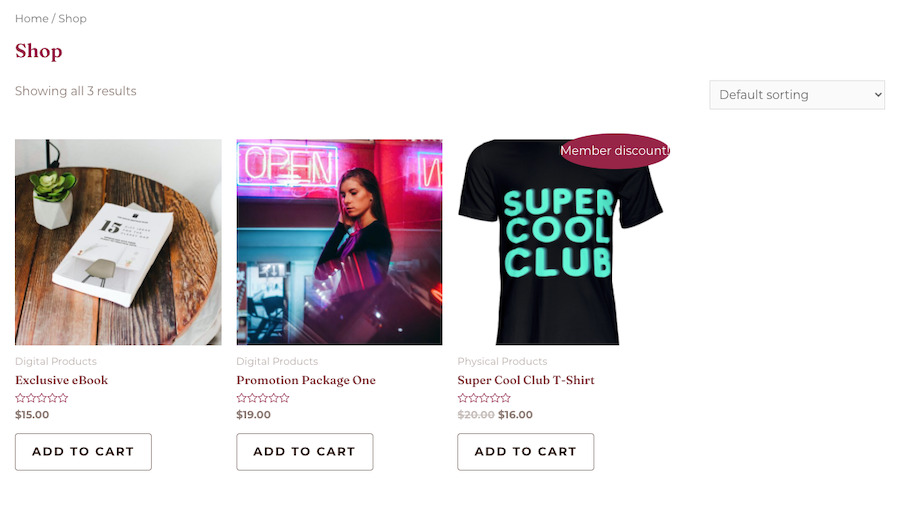
Let’s say we want to offer a discount on the Super Cool Club t-shirt. To make this possible, go to Products and then locate the product you want to create the discount for. Scroll down and you’ll see discount options below the product editor.
Click Add New Discount button. Here, you’ll have the option to set different discounts based on the subscription plan. In this example, I’ve set up three different discounts for different subscription levels.
How you set up the discount is completely up to you. When you’re done, simply click the Update button to apply the changes to your products. Then, repeat the steps for any other product you want to apply the discount too.
As you can see from the screenshot, our members can see which products offer a member discount as well as the discount amount once they click through to the product.
Conclusion
As you can see, setting up a WooCommerce membership site allows you to sell products exclusively to your members and have different membership plans that give access to different products. This is a great way to create multiple income streams from one site and get a boost in your revenue. You can also reward your members by offering them a discount on your store’s products.
With the steps laid out in this article, you now know exactly how to set this up so the only thing left to do is to implement it on your site. Good luck!
Paid Member Subscriptions Pro
Accept (recurring) payments, create subscription plans and restrict content on your website. Easily setup a WordPress membership site using Paid Member Subscriptions.
Get Paid Member SubscriptionsRelated Articles
How To Create a Divi Membership Site
If you’re thinking of building a membership site in WordPress, you’ll need a solid theme and a membership plugin that pairs well with it. In this complete guide, we’ll show you how to create a Divi membership site using the popular Divi theme in combination with the Paid Member Subscriptions plugin.
Continue Reading
How to Set Up WooCommerce Recurring Payments
Can't figure out how to set up WooCommerce recurring payments for your business? You aren't alone. Building a subscription business is daunting, especially if it's your first time. There are many moving parts at any given time. Whether it's laying the foundation, creating content, marketing your membership site, or managing payments, there are plenty of […]
Continue Reading
How to Set Up WooCommerce Stripe Subscriptions with Recurring Payments (3 Methods)
Are you searching for a way to set up WooCommerce Stripe subscriptions? Setting up recurring subscriptions is a great way to build regular, dependable revenue for your website. And when it comes to processing payments, Stripe is one of the top options thanks to its competitive fees and flexible feature set. However, WooCommerce doesn't include […]
Continue Reading