

Table of Contents
- 1 Why You Should Start Accepting Payments on Your WordPress Site
- 2 What to Look for in a WordPress Payments Plugin?
- 3 WordPress Payments Plugin Requirements
- 4 How to Accept WordPress Payments with Paid Member Subscriptions
- 5 Accepting Stripe Payments in WordPress Using Paid Member Subscriptions
- 6 Accepting PayPal Payments Using Paid Member Subscriptions
- 7 Start Accepting Payments on your WordPress Site Today
Running a membership site is a great way to make money online. It allows you to create a recurring source of income. This means you can predict what your income is going to be like every month which gives you a sense of financial security and stability in your online business.
But before you can make that recurring income a reality, you need a way to accept payments for your membership program. That’s where a WordPress payments plugin, like Paid Member Subscriptions, comes in handy.
In this guide, we’ll share the benefits of accepting payments on your WordPress website, what to look for in a WordPress payments plugin, and how to set it up.
Why You Should Start Accepting Payments on Your WordPress Site
Before diving into the specifics, let’s take a look at the top reasons why you should start accepting payments on your WordPress website.
Make Money From the Community You Helped to Build
Let’s face it: building a community and creating content that fosters engagement and relationship building takes time. And you deserve to be paid for all that hard work. By accepting payments on your WordPress site, you can easily monetize the content and the community you’ve created.
Create a Recurring Revenue Stream
As mentioned earlier, a membership program allows you to have a predictable, recurring income coming every month. Simply by knowing the price of your monthly membership and the number of active members, you can reliably know how much you’ll make each month and if that’s enough to meet your income goals.
Make it Easy for Members to Pay for Their Membership
They can submit payment easily from the comfort of their home using their preferred payment method. They don’t have to go anywhere to make a payment nor do they have to keep track of a separate website for payments.
Facilitate Accounting
When you’re busy running a membership, you have a lot of tasks on your plate. Whether it’s creating new content or engaging with your members, there’s always something that needs to get done.
As such, it’s all too easy to let less exciting tasks like accounting to fall through the cracks. But when you take payments on your site, you can easily keep track of member payments, see if any payments are overdue, and remind members to update their payment information.
Why Use a Plugin to Accept Payments on Your Site
Now you know why you should accept payments on your WordPress website. Let’s talk about why a plugin is the best choice and the most effective solution.
For starters, a plugin doesn’t require you to spend time finding a developer to build out a payment solution for you.
Secondly, it’s also cost-effective since a plugin is much cheaper than a custom-coded option.
What to Look for in a WordPress Payments Plugin?
There are several specific features you need in a WordPress payments plugin. They include a payment gateway integration, the ability to restrict content and content dripping features, and the ability to send invoices and charge taxes as needed. Let’s go over these features below.
Payment Gateway Integration
The most important feature your WordPress payments plugin should have is the integration with payment gateways such as Stripe and PayPal. Without this, you won’t be able to accept payments online.
The Ability to Restrict Content
Visitors who pay for the membership should get exclusive content that’s not available to regular visitors. That’s why your payment plugin should have the feature that allows you to protect that exclusive content and put it behind the paywall.
Content-dripping features
One of the trickiest aspects of running a membership is keeping your members engaged with your website and the community as a whole. That’s why it’s a good idea to drip the content out instead of letting them see everything as soon as they join.
By dripping the content out, you’ll encourage members to come back and continue interacting with the site and pay for the membership. This will decrease your churn rate which means you’ll lose less members.
Invoices And Taxes
Lastly, your payment plugin should have the feature that allows you to generate invoices to facilitate payments. It should also accommodate for sales taxes as some states and countries require you to charge tax. It’s recommended you contact your commerce department and local laws to ensure you’re compliant and within regulations.
WordPress Payments Plugin Requirements
So far, we’ve covered why you should take payments on your membership site and what features to look for in a WordPress Payments Plugin. Aside from that, there are also certain plugin requirements to consider before you start setting everything up. This will speed up the plugin setup time and ensure your website is ready to accept payments online.
Install An SSL Certificate
The first thing you’ll need is an SSL certificate. An SSL certificate will encrypt the information that’s exchanged between your website and your members’ computer and browser to ensure it doesn’t get into the wrong hands.
Every major payment gateway will require you to have an SSL certificate if you want to take payments on your site. The good news is that SSL certificates are not that expensive and some hosting providers even sell SSL certificates. Get in touch with your hosting company and inquire about the possibility of buying an SSL certificate through them.
Create A Stripe Account

Once you have an SSL certificate, you’ll need to create a Stripe account. Stripe is a popular payment gateway that has the lowest transaction processing fees. It allows you to easily accept credit and debit card payments on your site. The funds get deposited directly into your bank account on a regular schedule.
To get started with Stripe, visit their website and click Start now. On the next page, you’ll need to enter your email, password, and full name. You’ll also need to select your country from the dropdown menu. Then, check the box if you want to receive Stripe’s newsletter and click Create Account.
You’ll need to verify your email address and provide business details to activate your account. Once that’s done, don’t forget to enter your bank information so Stripe knows where to send your money.
Set Up PayPal Account And Enable PayPal IPN
PayPal is another popular payment gateway and a great alternative for customers who don’t want to enter their credit card information directly on your website.
If you don’t already have a PayPal account, you’ll need to sign up for one and enable PayPal IPN.
Start by going to PayPal and click Sign Up. On the next page, choose Business account and then follow the steps to create your PayPal business account. Once your account has been created, be sure to provide PayPal with all the requested information about your business and verify your bank account or your card so you can withdraw money from PayPal.

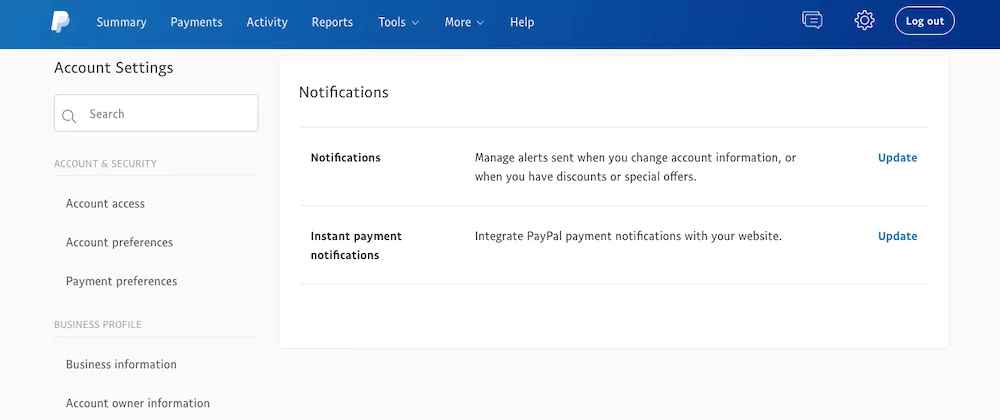
After you’ve verified your PayPal account, you’ll need to enable the IPN which stands for Instant Payment Notifications.
Essentially, this allows your WordPress payments plugin to instantly send information to PayPal about transactions happening on your site so you can then ship products, enable them to download digital files, or get access to their member’s area.
To enable IPN, log into your PayPal account. Click Profile and go to Account Settings > Notifications. Click Update in the Instant Payment Notifications section. Then, turn on IPN and set your listener’s URL. The URL needs to be in the following format:
https://www.yourdomain.com/?pay_gate_listener=paypal_ipn
You’ll also need to check Receive IPN messages (Enabled). Click Save changes.
Now that you have an SSL certificate and you’ve set up your Stripe and PayPal accounts, it’s time to set up your website to accept payments.
How to Accept WordPress Payments with Paid Member Subscriptions
There are several plugins that allow you to accept payments on your WordPress website. But if you plan on running a membership program, sell access to premium content, or setup recurring subscriptions, Paid Member Subscriptions is a great choice.
For starters, Paid Member Subscriptions allows you to easily and quickly turn your WordPress website into a membership platform. Secondly, it makes it easy to accept payments online, both one time and recurring.
Paid Member Subscriptions Features
Here’s a brief look at the main features offered by Paid Member Subscriptions:
- Integrates with both Paypal and Stripe
- You can accept one time and recurring payments
- You can allow members to sign up for a free trial or add a sign-up fee
- Members can easily edit their account information
- You can restrict content, or drip it regularly
- Easily keep track of all member payments, payment statuses or purchased subscription plans.
Pros And Cons Of PayPal
Before we go through the steps to setup Paid Member Subscriptions with PayPal, there are a few things to keep in mind. The benefits of using PayPal include:
- Popular payment method
- Members don’t have to enter their credit card information
A couple of disadvantages of using PayPal include:
- Your members will need to create a PayPal account if they don’t want to pay with their credit or debit card
- Transaction processing fees can be high
Pros And Cons Of Stripe
Similarly to PayPal, there are a few pros and cons of using Stripe. Benefits include:
- The easiest way to accept credit and debit card payments
- Lowest transaction processing fees
The downside of Stripe is that it’s not available in all countries. So if you live outside of these 43 countries, you won’t be able to use Stripe unless you sign up for their Stripe Atlas program.
Why Enable Multiple Payment Gateways
You might be wondering why you should offer multiple payment gateways and go through the hassle of setting them up. The biggest reason is that not all of your customers will settle for the same payment method.
Some may prefer to keep their credit card information private and opt for PayPal. Others may loathe PayPal and prefer paying with a card.
By offering multiple payment gateways, you’re giving your customers multiple options to pay which can increase your conversion rate.
Accepting Stripe Payments in WordPress Using Paid Member Subscriptions
Now that everything is set up, let’s take a look at how you can start accepting Stripe payments in WordPress using Paid Member Subscriptions.
1. Installing The Plugin
The first step is to install the Paid Member Subscriptions plugin on your site. For this, you’ll need the premium version of the plugin. From you account, simply download the plugin files to your computer.
Log in to your WordPress dashboard and navigate to Plugins > Add New > Upload. Click the Choose files button and locate the downloaded plugin files to your computer. Press Install and then Activate.
2. Set Up The Plugin
You’ll be taken to the plugin setup wizard so you’ll need to click the button to create the necessary pages. You can also toggle the options on to redirect the default WordPress pages and automatically log in users after registration.
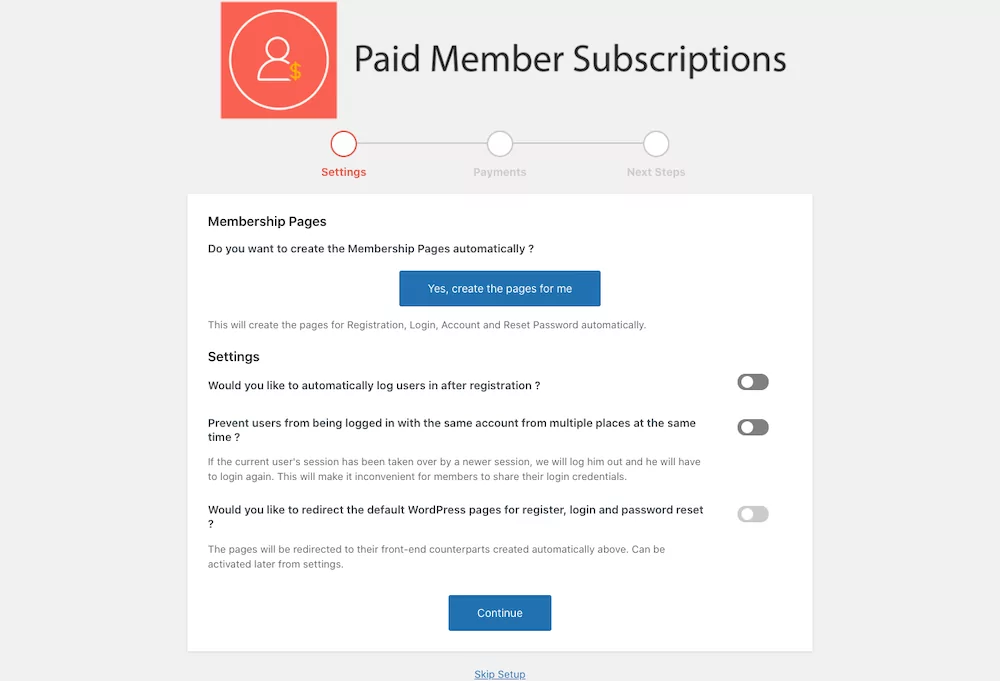
Once you’ve created the pages, click Continue. You’ll have the option to configure your payment gateways there but feel free to skip this step for now by clicking the Continue button as we’ll configure them in just a moment.
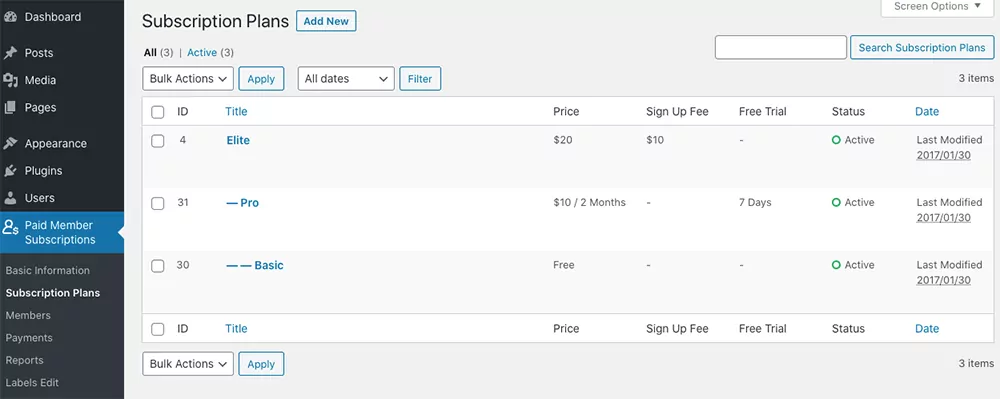
3. Create Subscription Plans
The last step in the plugin wizard will give you the option to create your subscription options so go ahead and click that button. On the Subscription Plans page, click Add New.
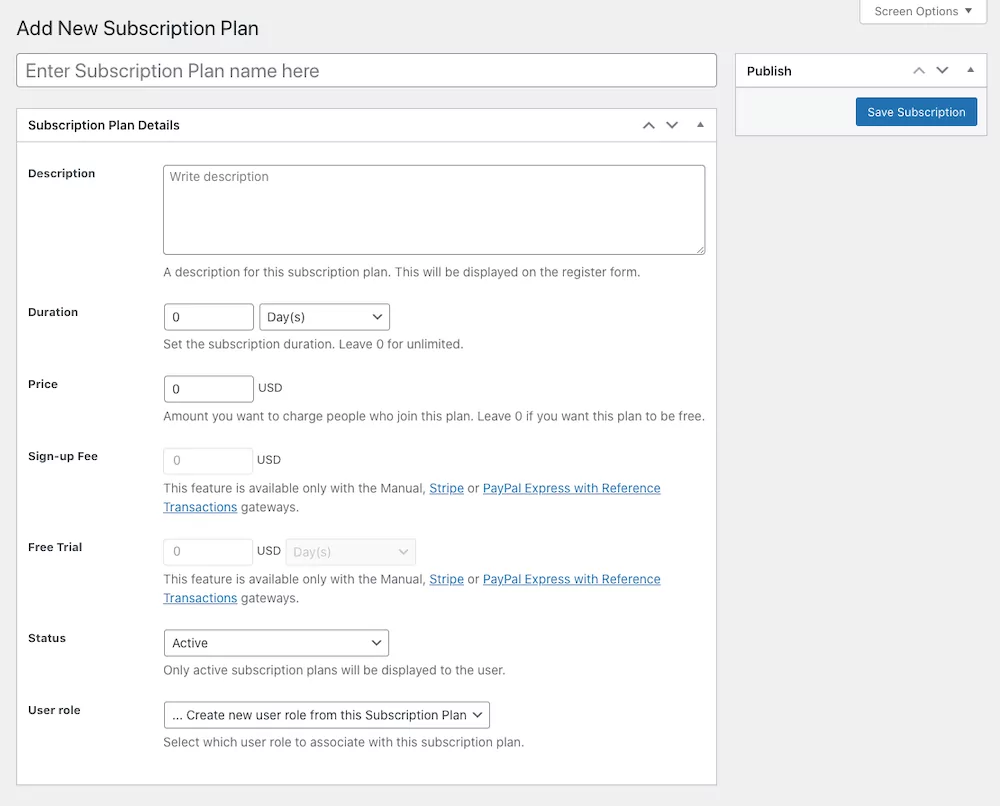
You can then enter the description, duration, price, enable free trial, and more. Once you’re done setting up the plan, click on Save Subscription. Then, repeat this process for all other membership tiers you plan on offering.
4. Activate Stripe Add-On
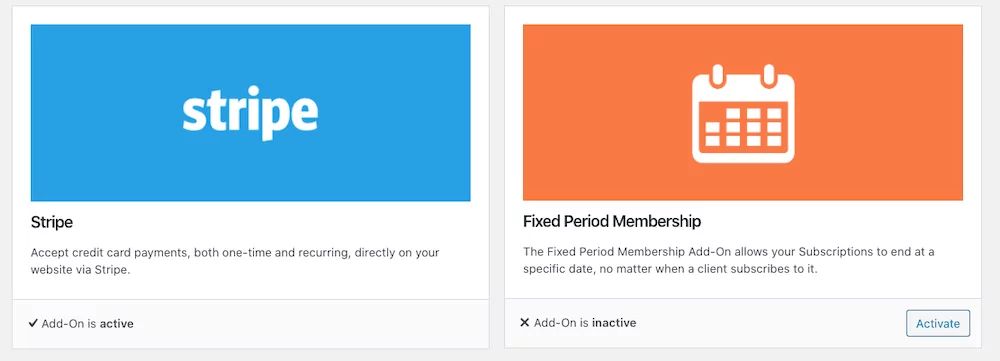
To set up Stripe, go to Paid Member Subscriptions > Add-Ons. Scroll down to Stripe and activate it.
5. Setup Stripe
Paid Member Subscriptions is also a Stripe Certified Partner, making it really easy and secure to accept payments using Stripe.

To setup Stripe go to Paid Member Subscriptions > Settings and click on the Payments tab. Scroll down until you find the Stripe section. As you can see, you’ll need your test and live publishable and secret keys.
Login to Stripe and retrieve the publishable and secret keys by clicking on the Developers tab. Be sure to copy both test and live keys. Then paste them into corresponding boxes in your WordPress dashboard. Save your changes.
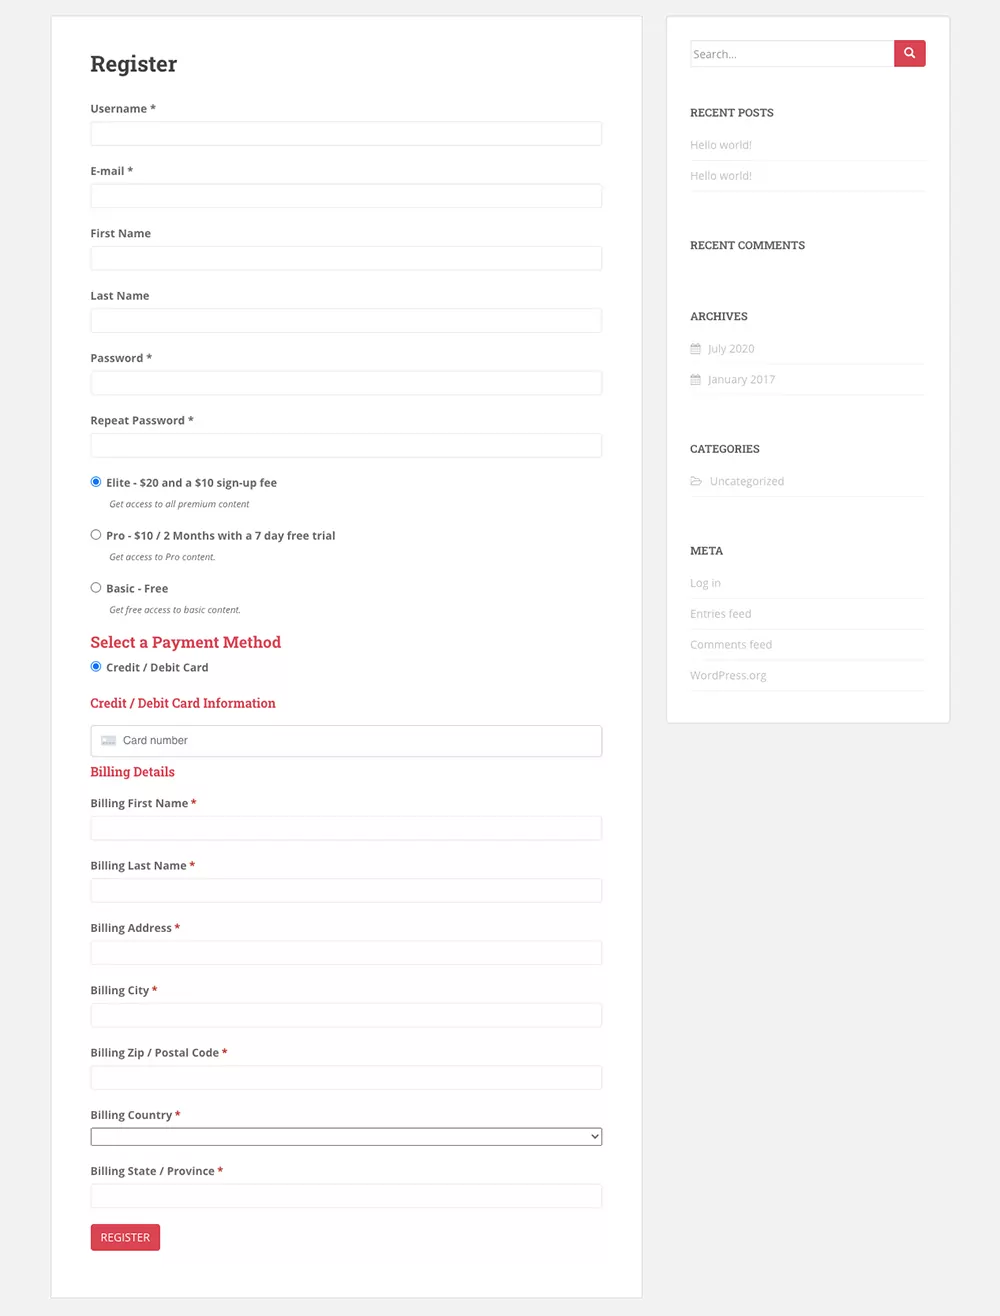
Once this is done, you can navigate to the front-end of your website and see the end result. The payment form will allow users to register for the different plans you set up. Once they do so they will become active members of your website. To increase conversions you can also consider presenting each plan offerings using a membership pricing table.
Accepting PayPal Payments Using Paid Member Subscriptions
The process for setting up PayPal with Paid Member Subscriptions is similar to how we’ve configured Stripe. Let’s go through the steps below.
1. Installing The Plugin
First things first, you’ll need to install the Paid Member Subscriptions plugin on your site. It’s worth mentioning that you can accept standard PayPal payments with the free version of the plugin that’s available on the official plugin repository.
However, this option won’t allow you to accept recurring payments. If you have a membership program that is limited in duration and want members to pay the full amount upfront, this option will work. But if you want to offer monthly recurring payments, you’ll need the Paid Member Subscriptions PRO.
In any case, download the plugin files and save them to your computer. Then, log in to your WordPress dashboard, go to Plugins > Add New > Upload. Locate the files on your computer and then press Install and Activate.
2. Create Subscription Plans
Like we did with Stripe, go through the plugin’s set up process to create the necessary pages and then skip the Payment step. On the third step, click the blue button to create your subscription plans.
This will take you to the Subscription Plans page. Click the Add New button and then enter all the options for the subscription plan. When you’re done, click Save Subscription. Repeat this process for other subscription plans.
3. Setup PayPal
The last step is to set up your PayPal account. First, go to Paid Member Subscriptions > Add-Ons. Activate Recurring Payments for PayPal Standard and PayPal Express add-ons.

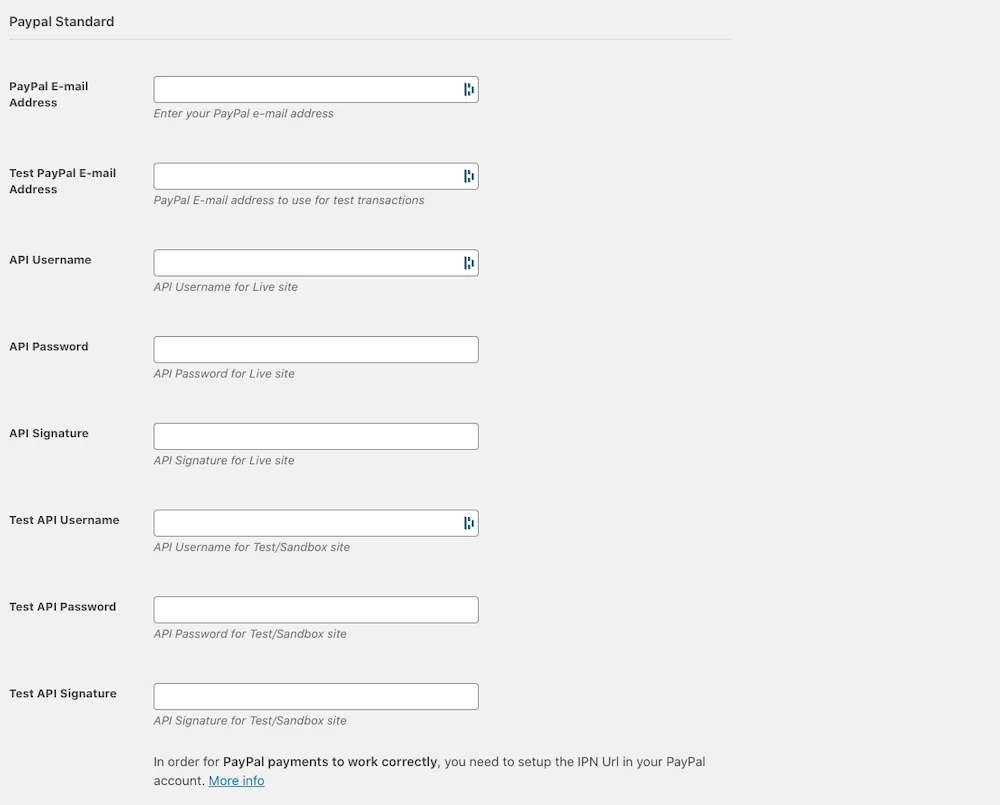
Then, go to Paid Member Subscriptions > Settings. Click the Payments tab and scroll down to PayPal. Enter your PayPal email address.
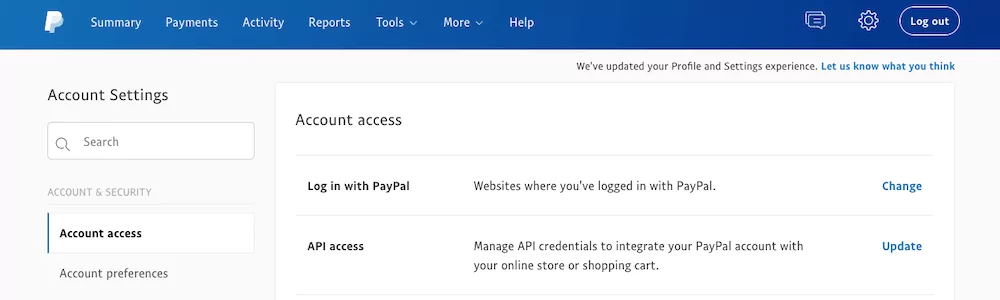
Then, log in to your PayPal account and go to Account Settings > API Access > Update. You’ll then see the Request API credentials page. Click on Set up PayPal API credentials and permissions.
On the PayPal API Access page, click on NVP/SOAP API integration > View API Signature. You’ll then be able to see your API keys. While you’re on this page, click to enable the Express Checkout feature. Select Accept PayPal payments before API permissions or credentials are set up and then press Submit.
Lastly, copy your API keys and paste them into your WordPress dashboard. Be sure to also go through the other settings and set up your currency, format, and preferred payment gateways. When you’re done, click Save settings.
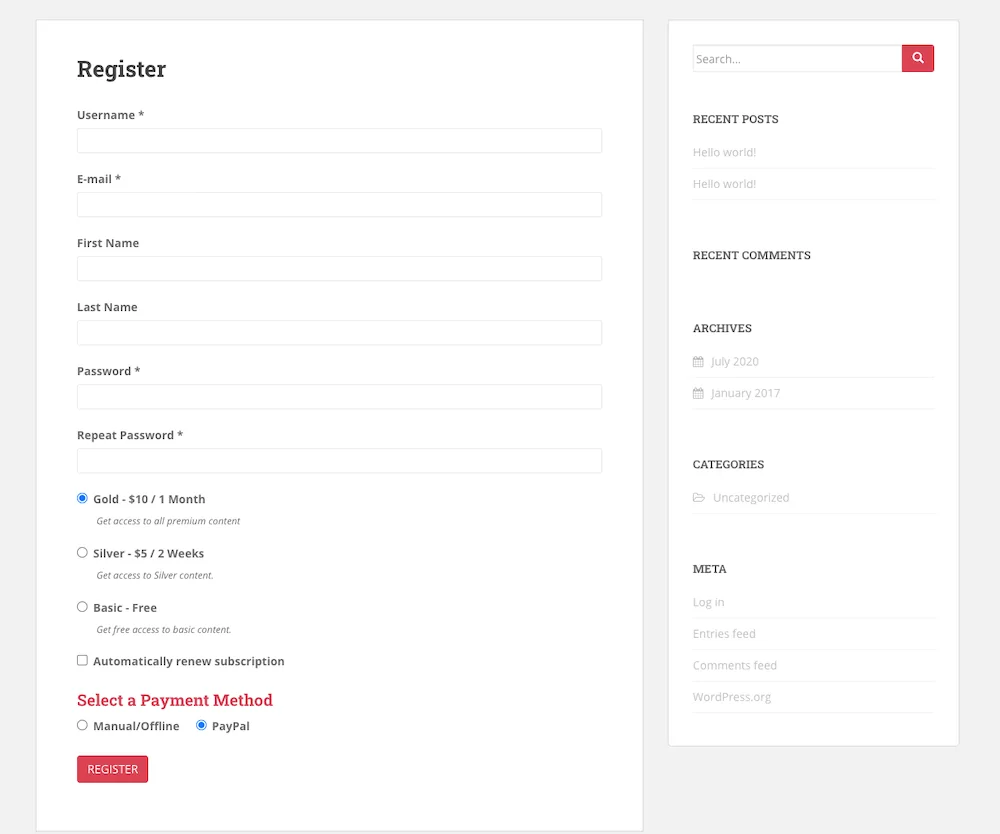
This is how our PayPal front-end registration and payment form will look like. Of course, you can combine both payment options, as it can lead to increased conversion rates.
Start Accepting Payments on your WordPress Site Today
Accepting payments for your WordPress site might seem daunting and complicated, but it’s not. In reality, once you know what steps to follow and when you’re using the right tools things can be really straight forward. By now, you should know all the benefits of:
- Accepting payments on your site
- Why you should use Paid Member Subscriptions to accept payments and run your membership program
- Advantages of both Stripe and PayPal as well as why you should offer multiple payment options on your site.
The only thing left to do now is to follow the steps in the tutorial to set it up on your own website. Then work on growing that revenue. Good luck!
Paid Member Subscriptions Pro
Accept recurring payments, create subscription plans and restrict content on your website. Quickly setup a WordPress membership site with Paid Member Subscriptions.
Get Paid Member SubscriptionsRelated Articles

How to Set Up WooCommerce Stripe Subscriptions with Recurring Payments (3 Methods)
Are you searching for a way to set up WooCommerce Stripe subscriptions? Setting up recurring subscriptions is a great way to build regular, dependable revenue for your website. And when it comes to processing payments, Stripe is one of the top options thanks to its competitive fees and flexible feature set. However, WooCommerce doesn't include […]
Continue Reading
How to Use a Membership Website Builder
In this article, we’ll cover what you need to build a membership website, the main features, and take a look at some of the best membership website builder plugins.
Continue Reading
How to Build a Successful Video Membership Site
There are all kinds of membership or subscription sites out there: veg boxes, shaving products, entertainment tickets, and so on. But one subscription platform reigns supreme: video. Just look at the success of Netflix, Hulu, Amazon Prime, and the dozens of other niche streaming networks that have sprung up over the past few years. This […]
Continue Reading