

Table of Contents
- 1 The Benefits of Using Custom Fields at WooCommerce Checkout
- 2 Installing Profile Builder and the WooCommerce Sync Add-on
- 3 Adding Custom Fields to the WooCommerce Checkout Page
- 4 Adding Conditional Logic and Repeater Fields to the WooCommerce Checkout
- 5 Adding Customer Billing & Shipping Fields in Profile Builder Forms
- 6 Start Creating Your WooCommerce Checkout Custom Fields Today
Looking to add custom fields to WooCommerce checkout?
Along with your product pages, it’s enormously important to get the WooCommerce checkout page right. It can be vital in securing sales! The standard WooCommerce checkout field editor provides a range of standard fields to cover the basics. But what if you need more customization?
That’s where WooCommerce checkout custom fields come in! These are custom fields that let you collect additional data at checkout.
This guide will introduce you to WooCommerce custom checkout fields and show you how the Profile Builder Pro plugin — along with its WooCommerce Sync add-on — can help you create and manage those fields.
The Benefits of Using Custom Fields at WooCommerce Checkout
The standard WooCommerce checkout fields cannot fit every situation. There’s often a range of extra information that you need to collect. The checkout page is often the place to collect it! The customer is already expecting to fill out a form, so this is the perfect time to ensure you get any necessary additional information. This also avoids having to get it from them at a less convenient moment.
For example, need a VAT number at checkout? Add it with a custom checkout field. Want to add custom shipping options? Use a custom field. Want to add a section for custom order notes or order details? Use a custom text field. Need to include GDPR consent or special instructions? You guessed it, all you need to do is add a WooCommerce custom checkout field.
You’ll want to use a plugin to add your WooCommerce custom checkout fields. It is possible to create a DIY solution, but this involves some complex coding using PHP and CSS and is highly likely to be less reliable unless you’re a very confident coder. Your WooCommerce checkout is where you or your client makes their money, so it’s not worth taking any risks here.
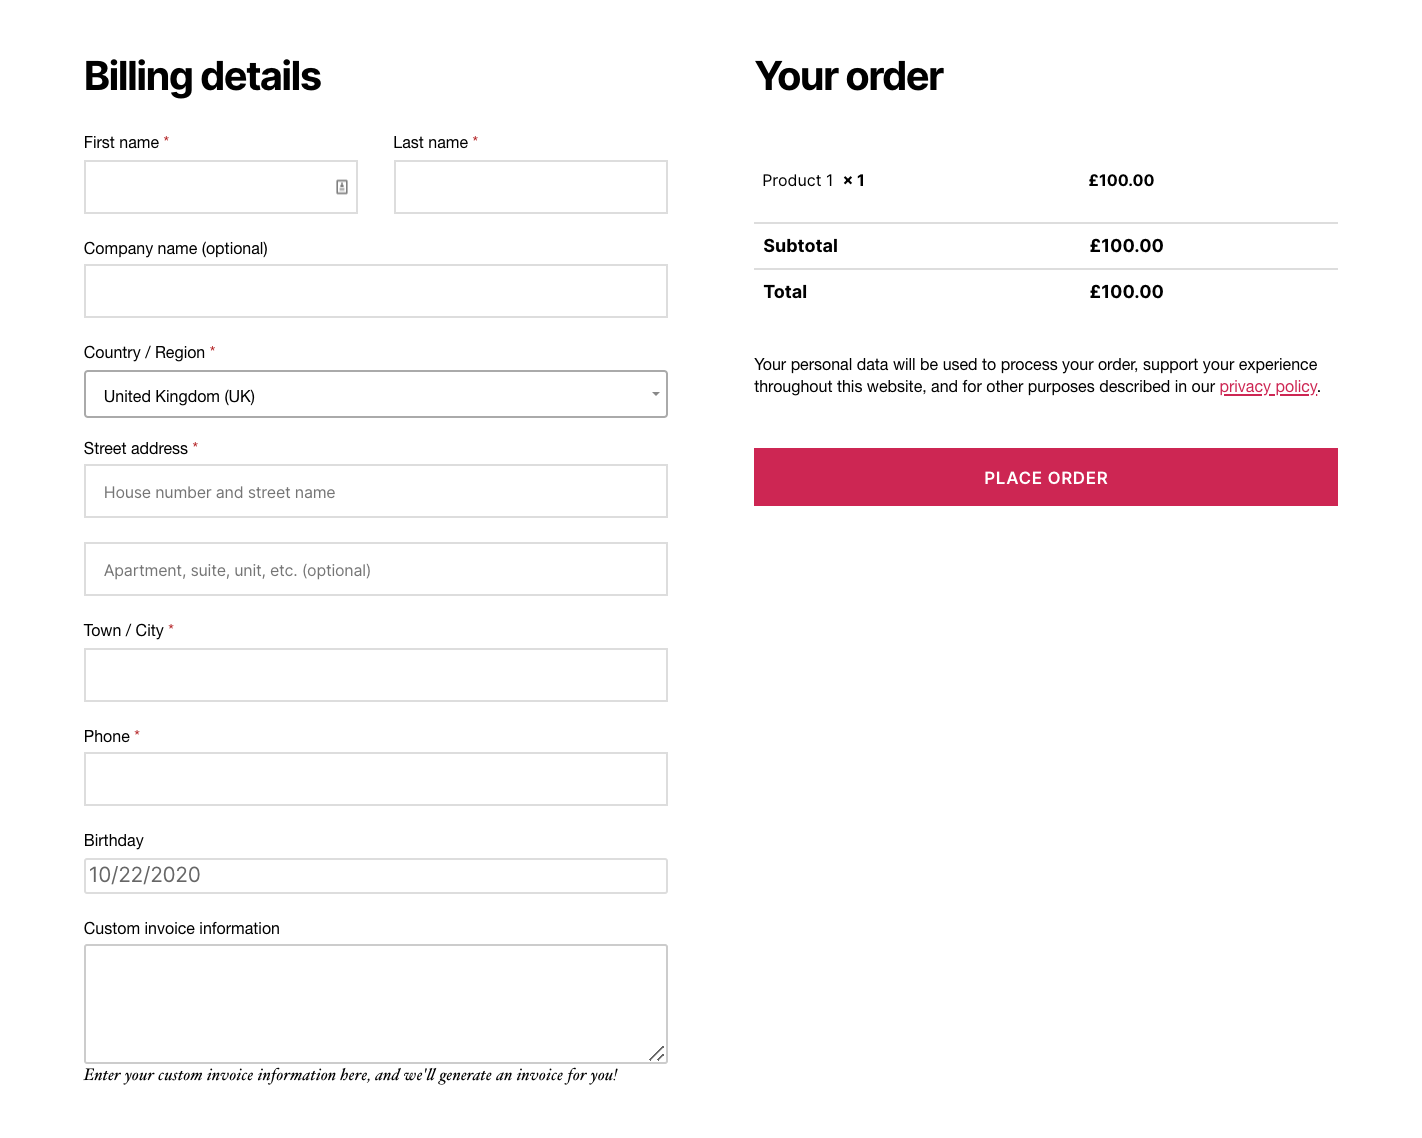
That’s where Profile Builder Pro and WooCommerce Sync come in. You can use them to add any type of custom fields to WooCommerce checkout, including conditional or repeater fields (we’ll get into all of this later on, don’t worry). Here’s an example of a checkout page with some custom fields:
Now that you know what Woocommerce checkout custom fields are, let’s get to the tutorial!
Installing Profile Builder and the WooCommerce Sync Add-on
To get started with adding custom fields to the WooCommerce checkout, you’ll first need to install Profile Builder Pro. This is the all-in-one user registration and management plugin for WordPress sites, giving you the power to:
- Create front-end login, registration, and profile forms by using shortcodes;
- Add a wide variety of custom fields to your registration and profile forms;
- Enable user email registration confirmations, as well as admin approval;
- Allow users to login with their email and username, or social accounts;
- Enforce password length and strength;
- Add custom fields to WooCommerce checkout plus manage & display customer fields directly from Profile Builder forms;
…and much more! What’s even better? It requires absolutely no coding skills. Profile Builder Pro comes with multiple advanced add-ons and user modules, dramatically extending the base feature set. To add custom fields to the WooCommerce Checkout form, we’ll use the WooCommerce Sync add-on.
Profile Builder installs and activates just like any other WordPress plugin. After purchasing a Pro license from our site, you’ll get an email containing links to your purchased downloads along with the additional info you’ll need to access your account.
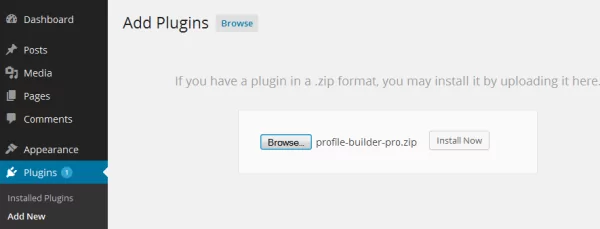
Installation step-by-step
Simply go to Plugins from your WordPress admin interface, choose Add New → Upload → Browse… and upload your .zip file. Then just hit Install Now. After the installation completes, just press Activate Plugin and Profile Builder will be ready for use!
After you’ve got Profile Builder Pro set up, we can start on WooCommerce Sync. This add-on has a range of powerful features integrating Profile Builder with WooCommerce, but for the time being, we’re concerned with how it makes it easy to add custom fields created with Profile Builder straight onto the WooCommerce checkout page.
To install the add-on, simply go to WordPress Admin → Profile Builder → Add-Ons → Basic Add-Ons, and under the Basic Addons section, search for WooCommerce Sync. 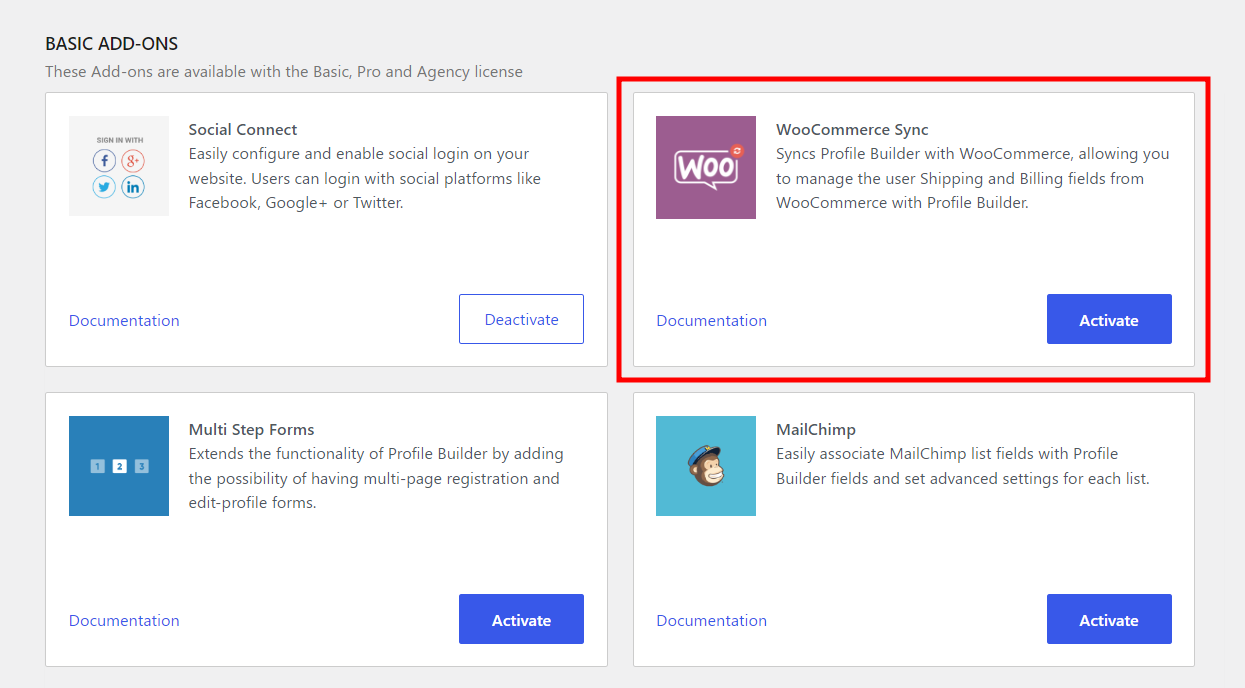
Click on Activate and you’re done!
If you’re not using WooCommerce, you can use Profile Builder Pro to create a custom registration form instead!
Create beautiful front-end registration and profile forms with custom fields. Setup member directories, custom redirects, cutomize user emails & more using the all in one user management plugin.![]()
Profile Builder Pro
Adding Custom Fields to the WooCommerce Checkout Page
Let’s look at how we can use WooCommerce Sync to customize the WooCommerce checkout page by adding custom fields.
Profile Builder is, at its heart, a plugin that simplifies and automates the processes behind creating advanced User Profiles for use across your WordPress site. It makes the process of user registration, login, and profile editing swift and easy for you and your users.
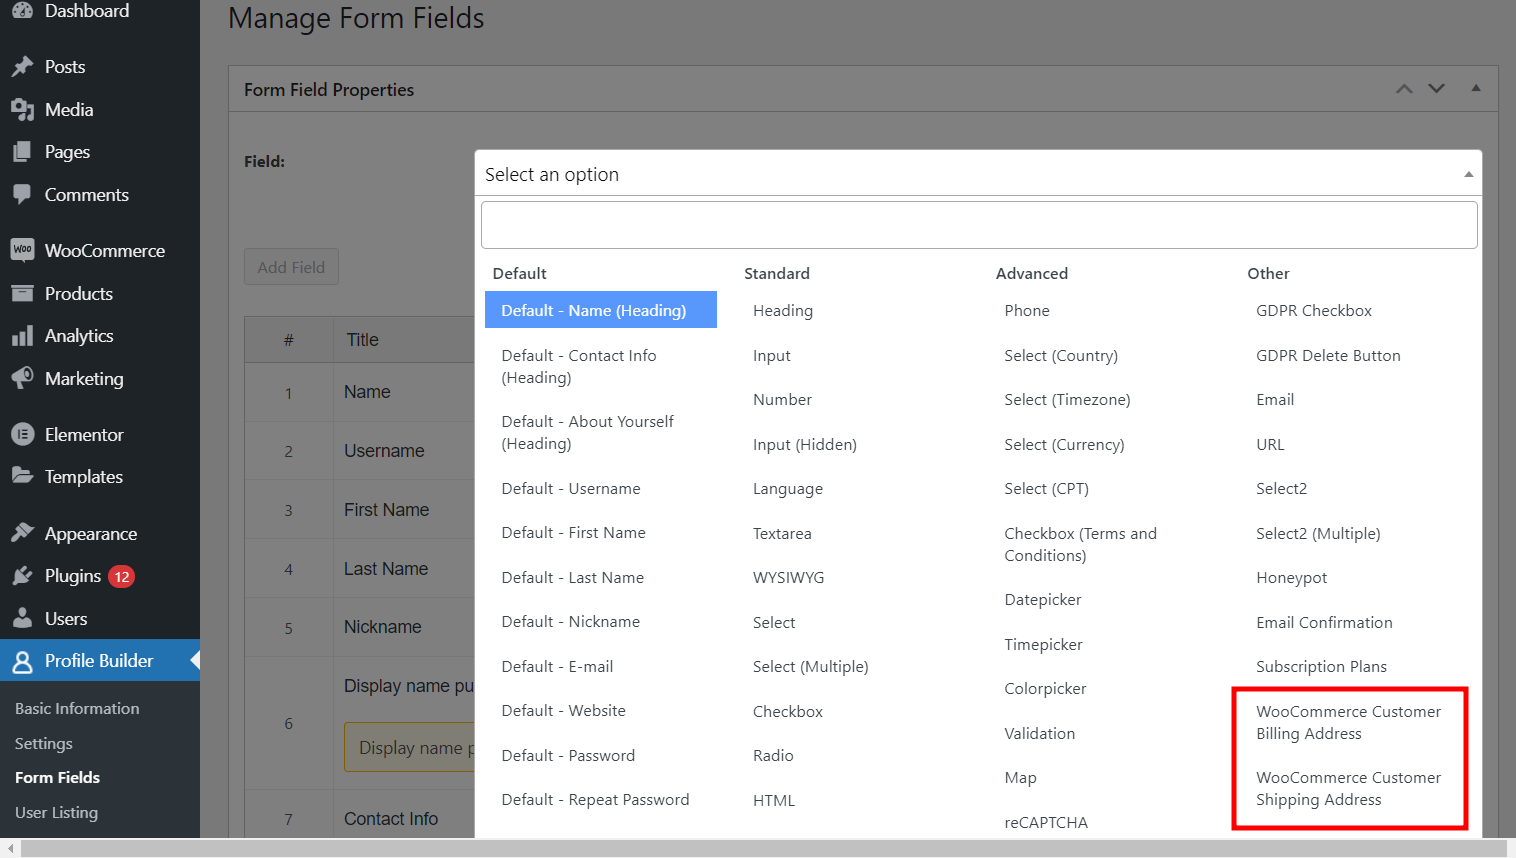
We can use Profile Builder’s Default and Extra Fields Types to add all kinds of extra information to the “Create an Account” WooCommerce section. All field types are supported except certain default fields that are already taken into account by WooCommerce (email and username in particular).
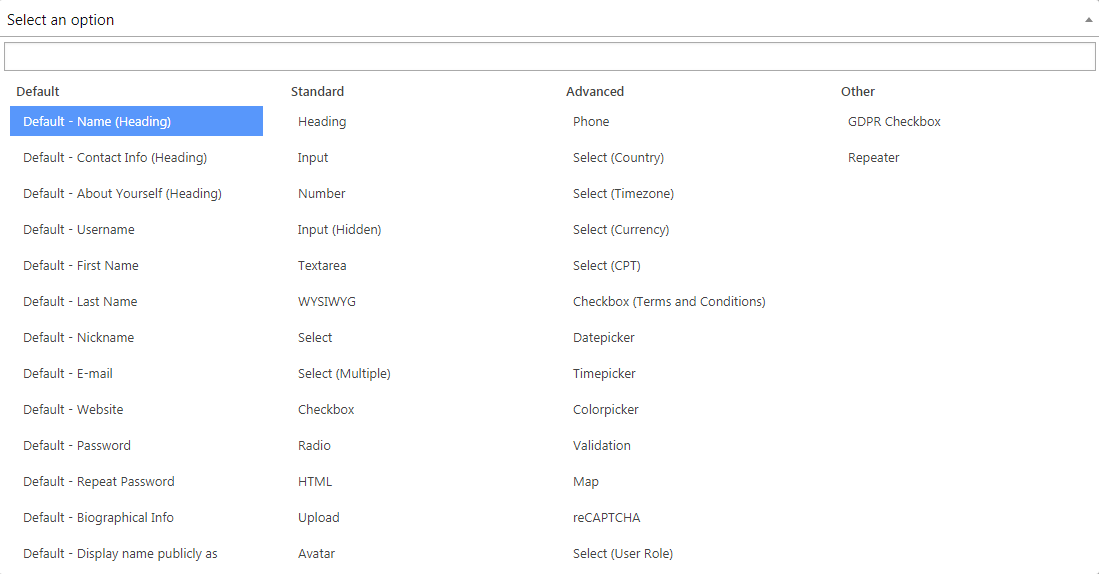
As you can see below, the “add field” option opens up loads of new possibilities:
The WooCommerce Sync Add-on therefore takes this functionality and links it up with WooCommerce, allowing you to automatically add customer billing fields and shipping address fields into Profile Builder’s Registration and Edit Profile forms. Once you install the add-on, you’ll see new options under Form Field Properties:
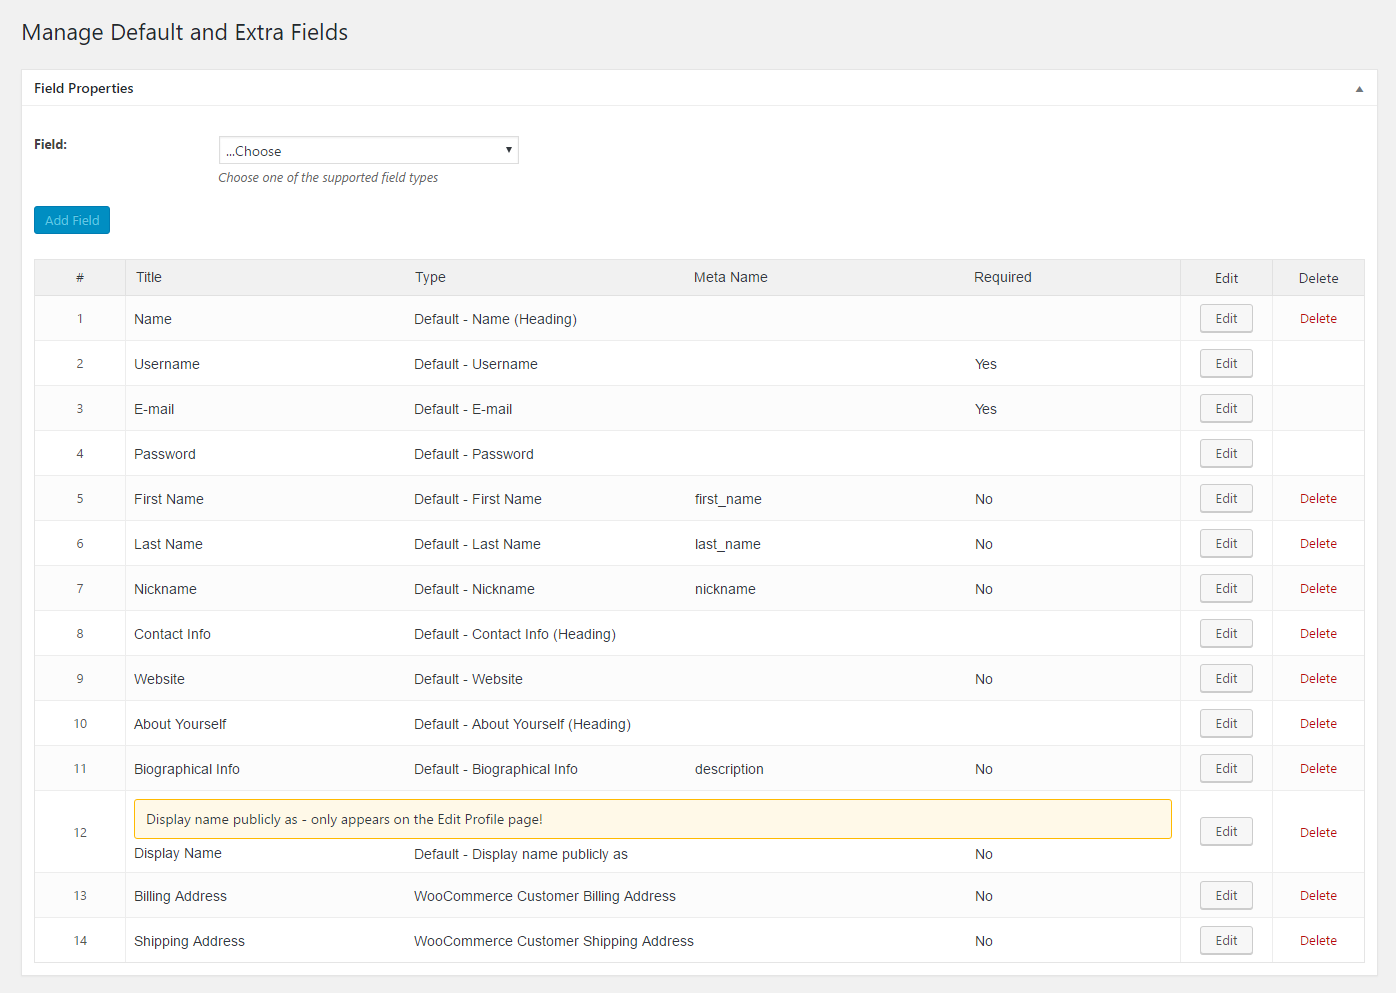
You can choose how the additional fields appear on the front-end, edit their headings, remove and re-add them on the Form Fields interface:
Here’s the complete range of extra field types supported by Profile Builder that can be hugely useful on the WooCommerce Checkout:
- Heading – Used by the Admin for breaking the front-end forms into sections
- Input – Used by the User for custom information inputs
- Number – Used by the User to add numbers
- Input (Hidden) – Used by the Admin for saving information that’s not visible by the logged-in user
- Textarea – Used by the User for consistent information
- WYSIWYG – Used by the User for adding and editing information with HTML
- Phone – Used by the User for adding a phone number
- Select – Used by the User to choose data from a predefined list
- Select (Multiple) – Used by the User to choose multiple selections from a predefined list
- Select (Country) – Used by the User to choose a Country
- Select (Timezone) – Used by the User to choose a Timezone
- Select (User Role) – Used by the User to choose a User Role
- Select (Currency) – Used by the User to choose a Currency
- Select (CPT) – Used by the User to select a Custom Post Type (Page, Post, or Custom Post Type)
- Checkbox – Used by the User to check an option from a list
- Checkbox (Terms and Conditions) – Used by the User to accept the Terms and Conditions
- Checkbox (GDPR) – Used by the User to consent to the collecting of personal data
- Radio – Used by the User to select an option from a radio button group
- Upload – Used by the User to upload files
- Avatar Upload – Used by the User to upload an Avatar
- Datepicker – Used by the User to choose a Date
- Timepicker – Used by the User to choose the Time
- Colorpicker – Used by the User to choose a Color
- reCAPTCHA – Used by the Admin to protect against spam
- Validation – Used by the Admin to implement Custom Validation Inputs
- Map – Used by the User to pin his location
- HTML – Used by the Admin to add HTML content
- Email – Used by the User to add an Email address
- URL – Used by the User to add a website URL
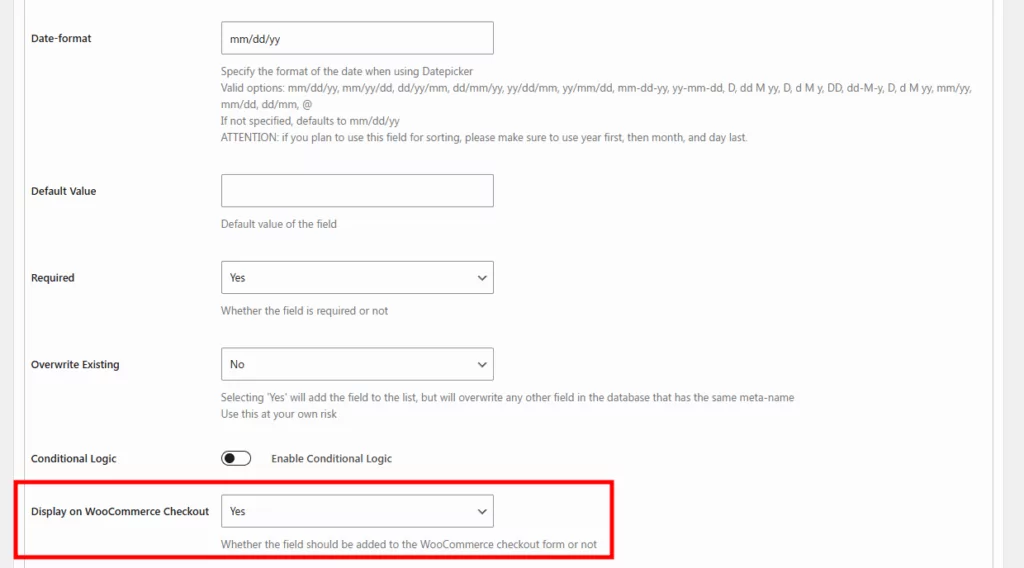
To add a custom field in the WooCommerce checkout page, you have to go to Form Fields → Add New or Edit (depending on if you are creating a new field or editing an already existing one). Then, set the Display on WooCommerce Checkout section to ‘Yes’.
You can see this near the bottom of the screenshot below. We’ll use the date of birth/birthday field value as the example here, which would appear as a datepicker in the final form.
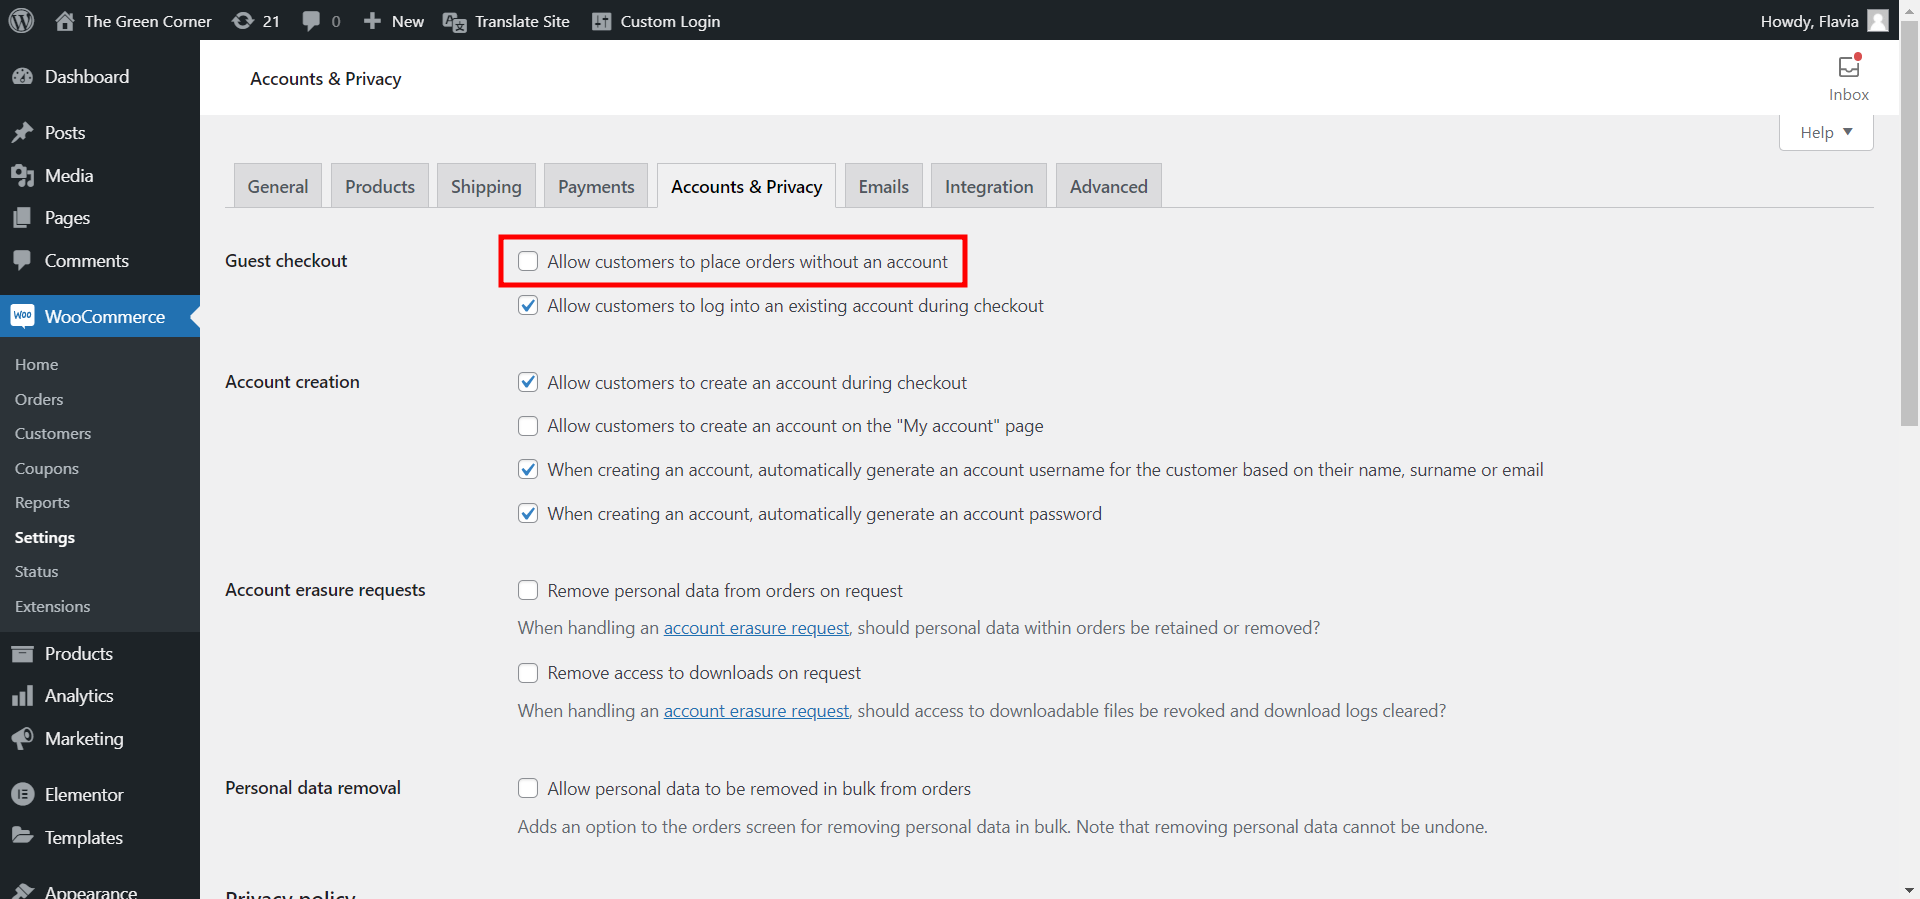
In order to let users register on the WooCommerce Checkout page, you will need to check the Allow customers to create an account during checkout checkbox found in WooCommerce → Settings → Accounts & Privacy tab.
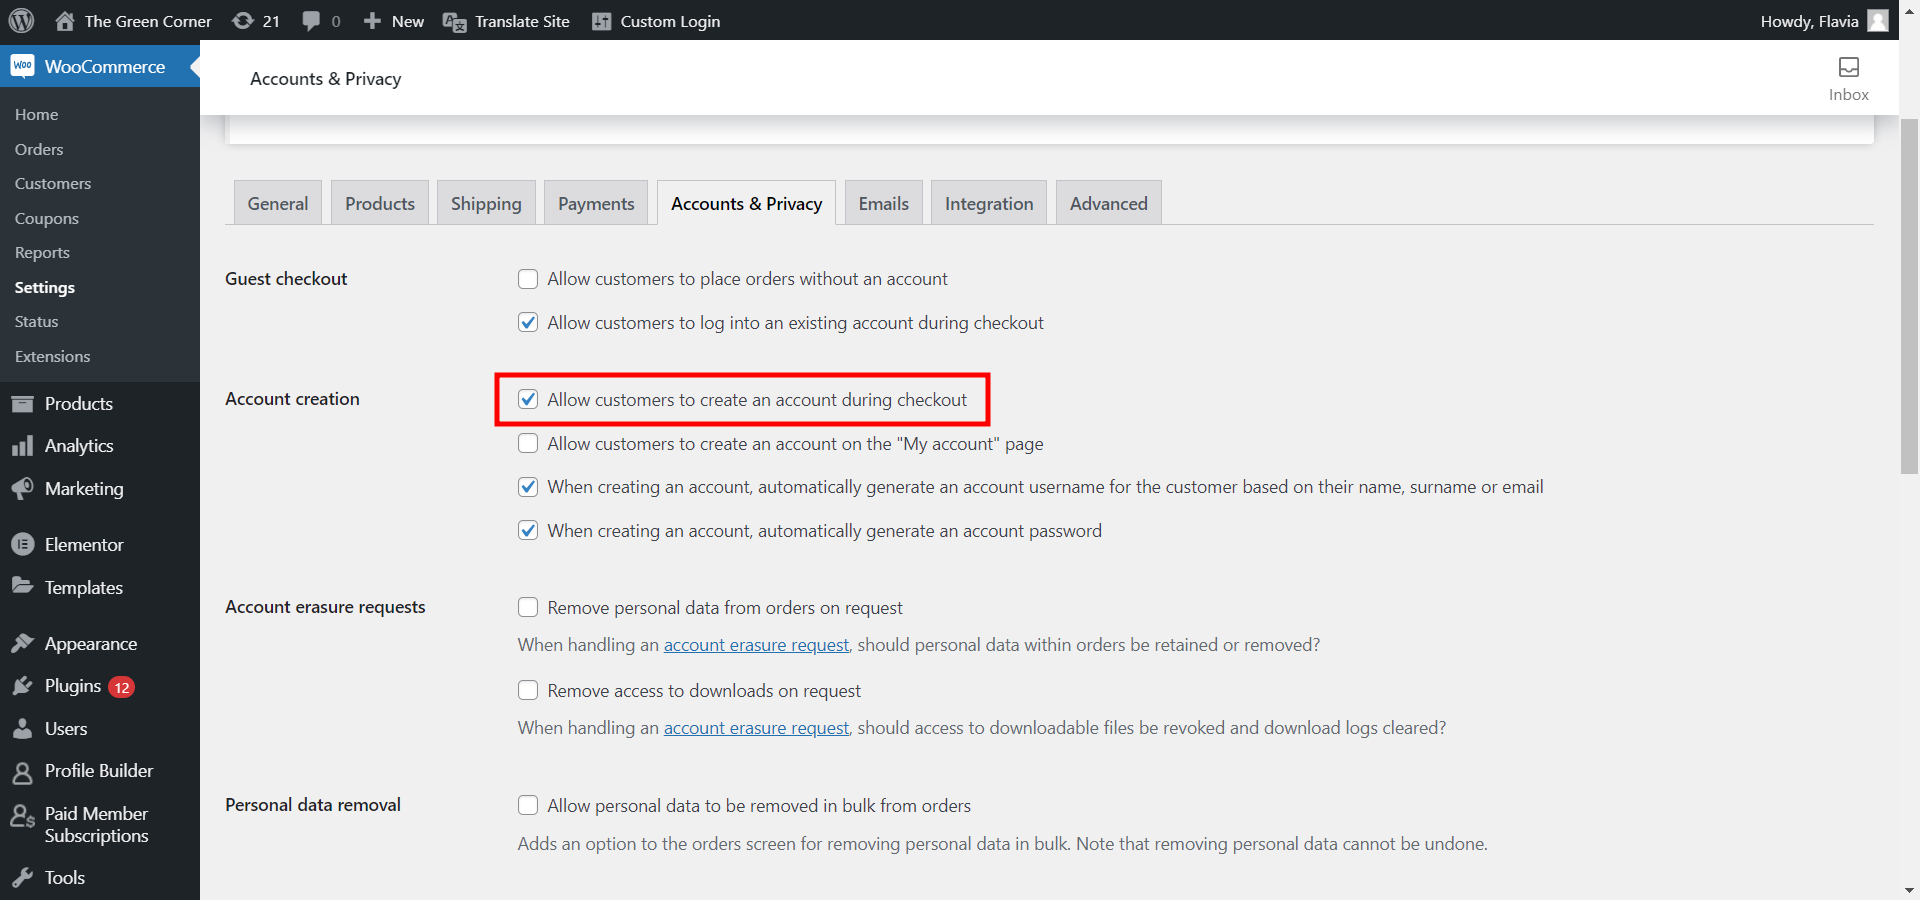
Inside the same tab, we also have a section called Guest checkout. If the “Allow customers to place orders without an account” is checked, it will allow customers to checkout without creating an account. By leaving it unchecked, you can ensure that anyone purchasing your product is forced to create an account on checkout if they haven’t already logged in.
If your store already has existing customers, you don’t need to worry. You’ll still be able to collect extra info at the checkout when they place a new order and their user profiles will be updated automatically. Here’s what this looks like for customers checking out:
Adding Conditional Logic and Repeater Fields to the WooCommerce Checkout
Many field entries in Profile Builder Pro give you the option of using conditional logic. The fields that appear on the WooCommerce checkout with WooCommerce Sync are no exception.
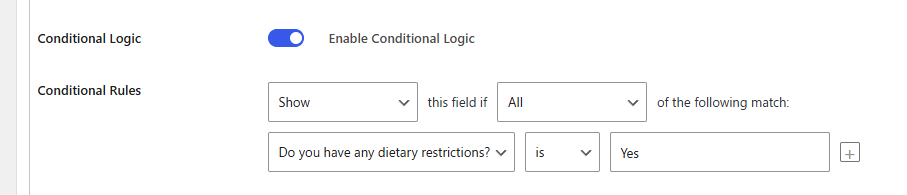
Conditional logic allows you to show or hide form fields depending on what the user has already entered. For example, if you have a ‘subscribe to our newsletter’ entry on your checkout page, you can tell conditional logic to add an email box and opt-in consent as required fields of the form that only appear if the user selects the option.
Or if your customer enters a country in the EU, you could then display postcode instead of zip code, VAT, or other conditions depending on how they complete the form.
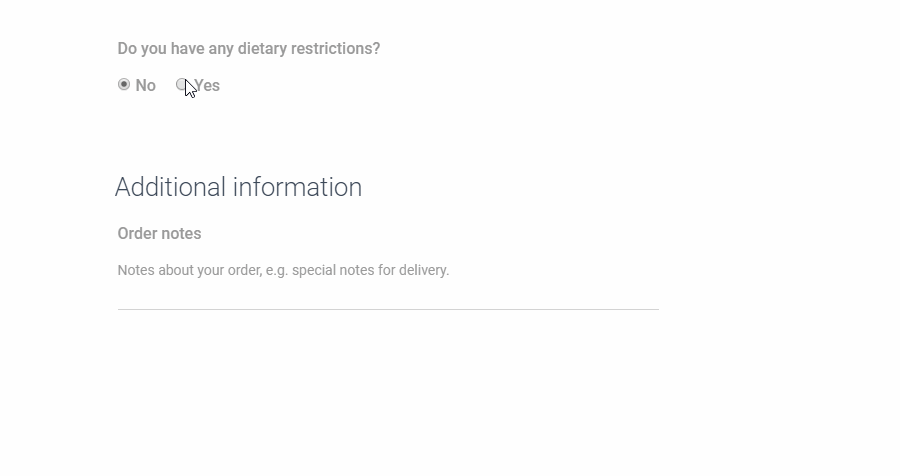
You can see our conditional logic at work below. If a user doesn’t have any dietary restrictions, then they can move straight onto the next field. If they mark that they do, then a new field appears allowing their dietary preference to be entered.
You can select the conditional logic checkbox for individual elements of pages, giving you full control over how your forms look and feel.
WooCommerce Sync also allows you to add repeater fields or groups of fields, directly to the WooCommerce checkout page. Repeater fields can be used when you need your users to insert things like: multiple phone numbers, upload multiple pdf, images, or other types of files.
Adding Customer Billing & Shipping Fields in Profile Builder Forms
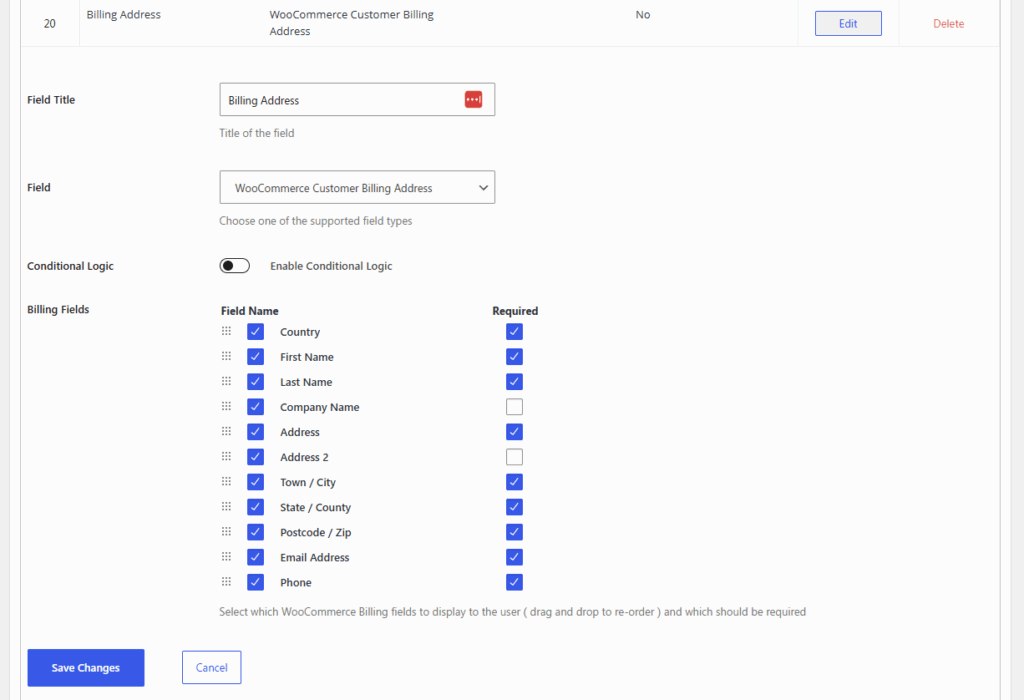
You’re able to rename and reorder each individual Billing and Shipping field from the Form Fields UI after picking it from the dropdown. You can also choose which individual fields to display in the front-end, as well as which should be marked as required.
Also, you can simply drag & drop to reorder the individual fields within both Billing Address and Shipping Address display fields. When first added, the default names, their order, and ‘required’ values are taken automatically from WooCommerce.
The benefit of all this is that when a new user registers or logs in to their profile, you can give them access to add or modify the WooCommerce customer fields along with their other profile info.
Start Creating Your WooCommerce Checkout Custom Fields Today
As you can see, while the idea of customizing the WooCommerce checkout page may seem intimidating, it isn’t! With the help of Profile Builder Pro and its WooCommerce Sync add-on, you can add any type of WooCommerce checkout custom fields, with no coding whatsoever. You can even make some of the fields conditional, or repeating.
You’ll also be able to manage the WooCommerce customer billing and shipping fields directly from the front-end profile forms created with Profile Builder.
A little patience and this guide are all you need to fully customize your custom checkout fields however you like. Get started today!
Profile Builder Pro
Create beautiful front-end registration and profile forms with custom fields. Setup member directories, custom redirects, cutomize user emails & more using the all in one user management plugin.
Get Profile BuilderRelated Articles

How to Customize the WooCommerce Login Page (No Code Needed)
Searching for a solution to customize the WooCommerce login page and otherwise control login behavior on your WooCommerce store? If you allow (or force) registration on your store, you'll want to create a user-friendly login experience so that your shoppers can easily log in to their accounts and access other key features. In this post, […]
Continue Reading
How to Customize the WooCommerce Register Page (Add Custom Fields)
Looking to create a custom WooCommerce register page for your store? Whether you want to create a dedicated registration page or add custom fields to the checkout register form (or both), we're going to show you an easy, code-free way to customize all parts of the WooCommerce registration process. By following this tutorial, you'll learn […]
Continue Reading
8 Best WordPress User Registration Plugins
Not sure what WordPress user registration plugin to use for your project? Going through all the WordPress user registration plugins can be disorienting. You may have spent hours and hours searching for plugins and tutorials to help you with your project, and you’re still as confused as you were when you started. Imagine finding the […]
Continue Reading