
Table of Contents
- 1 How to Create An Elementor Pricing Table for Your Membership Website
- 1.1 1. Set Up Your Subscription Plans (If You Haven’t Done So Already)
- 1.2 Paid Member Subscriptions Pro
- 1.3 2. Add the Price Table Widget in Elementor
- 1.4 3. Set Up the Design and Content of Your Pricing Table
- 1.5 4. Link Your Pricing Table to Your Membership Plans
- 1.6 5. Test Your Elementor Pricing Table
- 2 How to Create a Pricing Table for Elementor With Add-Ons
- 3 Create Your Elementor Pricing Table Today
Are you searching for a way to create a unique pricing table for your membership website? Well, your best bet is to use a page builder like Elementor.
With Elementor, you’ll be able to fully control the design and content of your pricing table. Plus, you can integrate it with your membership plans to create a seamless purchase/signup flow.
In this guide, you’ll learn how to create an Elementor pricing table and integrate it with your membership plans. Let’s get started!
How to Create An Elementor Pricing Table for Your Membership Website
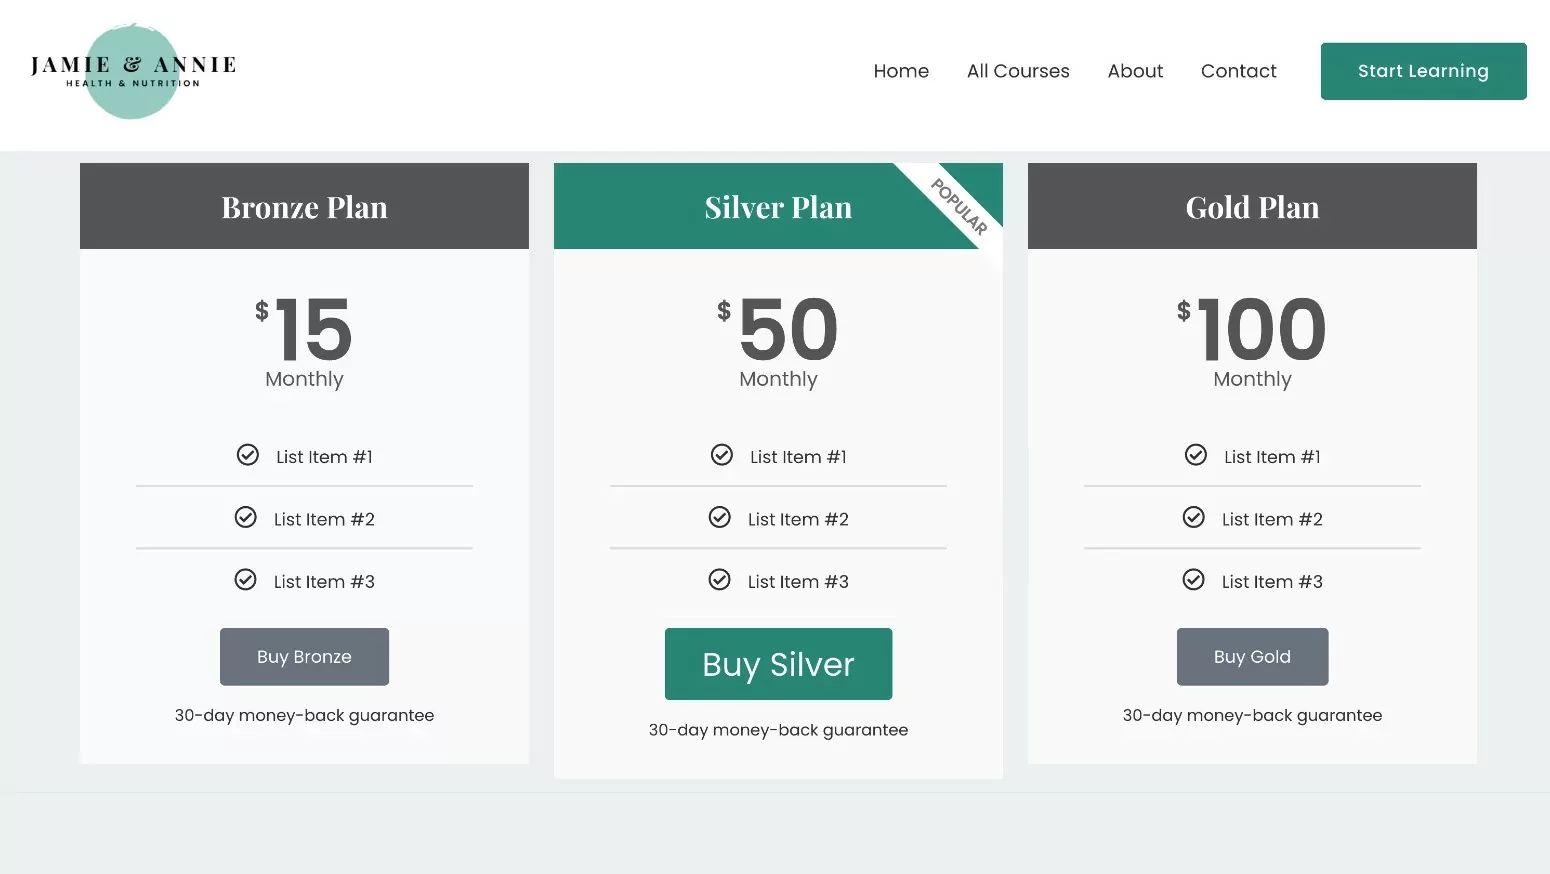
Let’s jump straight into a step-by-step tutorial on using Elementor to create a pricing table for a membership website. If you follow the steps correctly, you should have a pricing table that looks something like this:
To create an Elementor pricing table for your membership website, you’ll need to make sure you’ve installed a few plugins:
- Elementor: the core free version at WordPress.org.
- Elementor Pro: if you don’t have access to Elementor Pro, we’ll share an alternative free method in the next section. However, the pricing table widget is only available with Elementor Pro. Plus, Paid Member Subscriptions (see below) offers a dedicated integration with the dynamic content feature to easily link your subscription plans.
- Paid Member Subscriptions: the tutorial in this post can be done with both the free version at WordPress.org and the premium version.
Once you have all three plugins installed, you can proceed with the next sections.
1. Set Up Your Subscription Plans (If You Haven’t Done So Already)
Before you set up your Elementor pricing table, you’ll first want to make sure that you’ve set up Paid Member Subscriptions and configured your subscription plans. These are the same plans that you want to display in your pricing table.
When you set up the pricing table, you’ll be able to create a column for each plan that you offer, including free and paid plans. If you’ve already created your plans, feel free to skip ahead to the next section.
If you don’t have any subscription plans yet, you’ll need to install the Paid Member Subscriptions plugin (you can use the free version or the premium version):
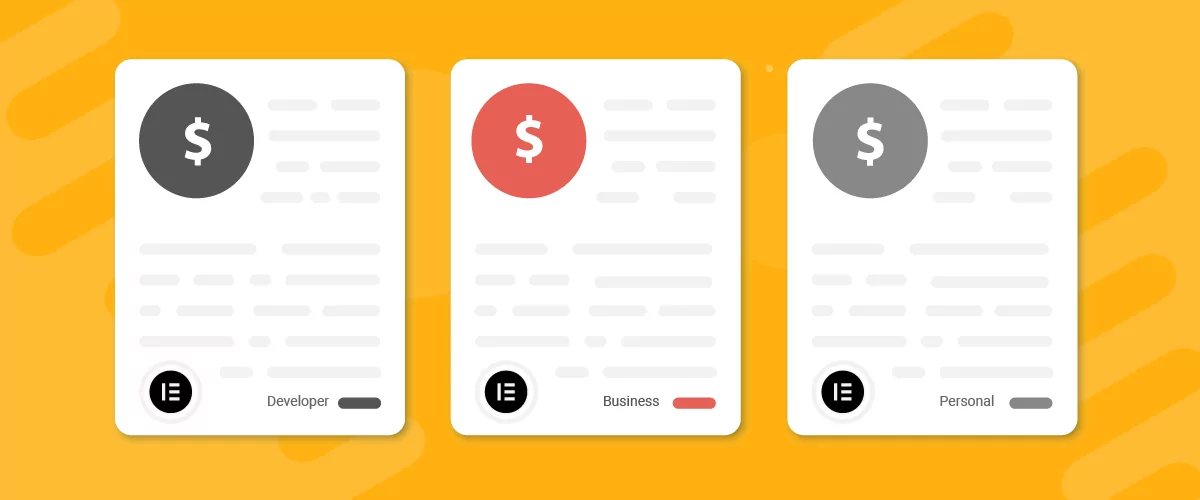
Paid Member Subscriptions Pro
Paid Member Subscriptions lets you create an Elementor pricing table to display your subscription plans
Get Paid Member SubscriptionsThen, complete the short setup wizard.
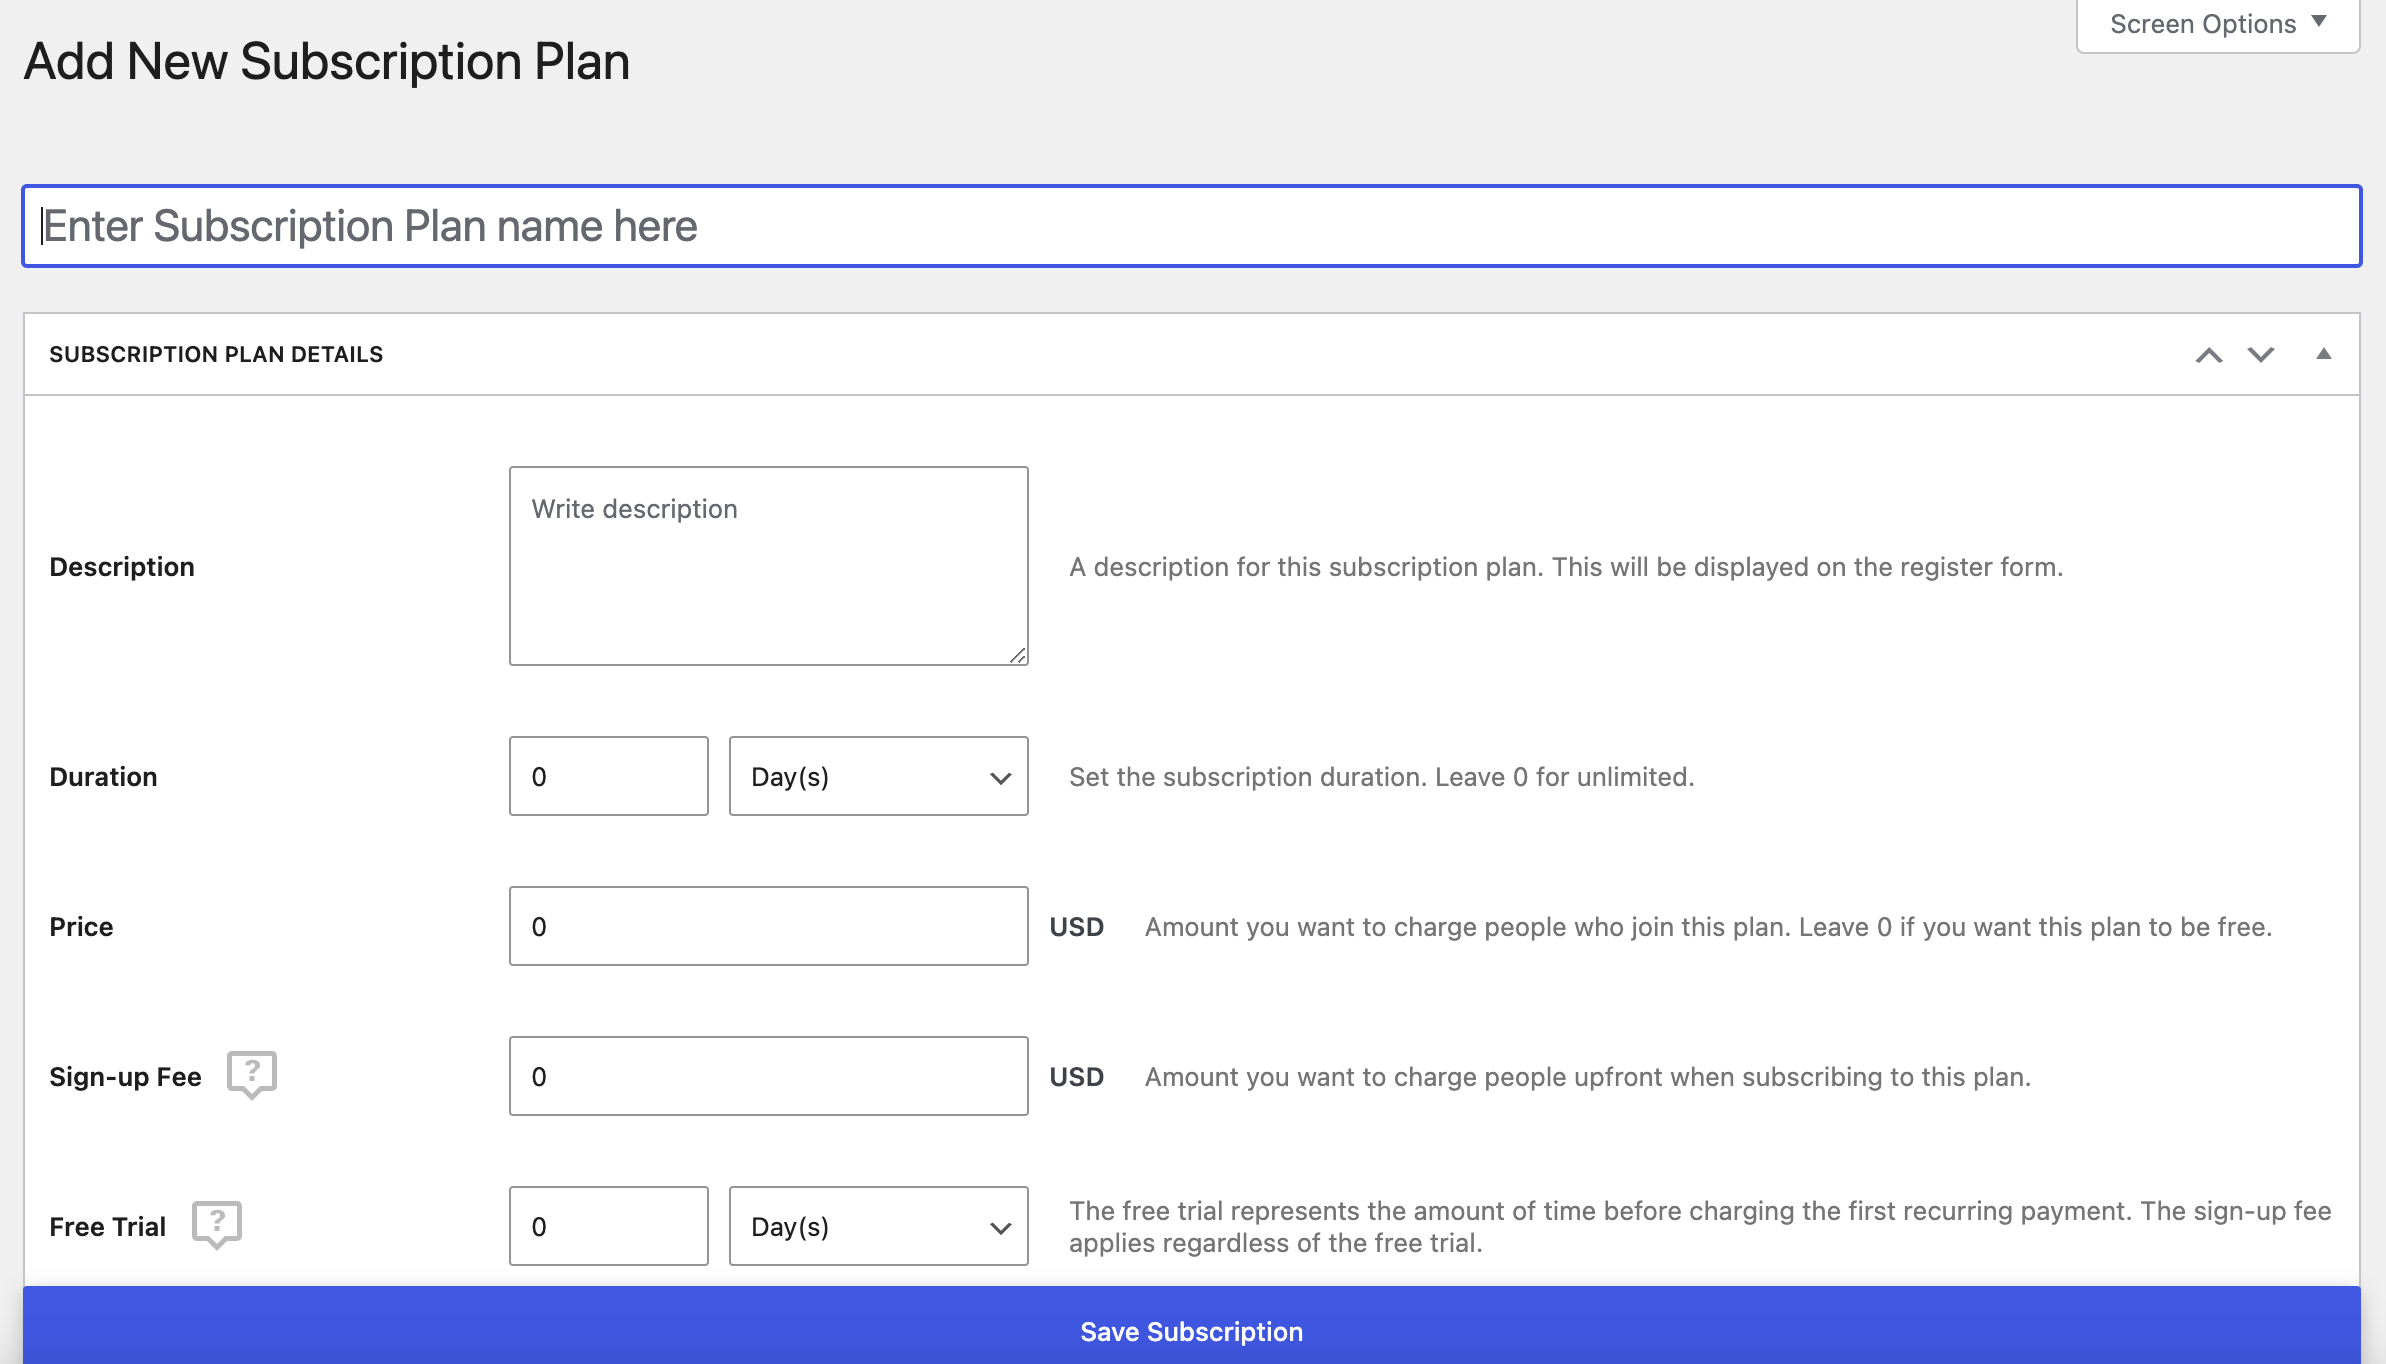
You can create your first subscription plan by going to Paid Member Subscriptions → Subscription Plans → Add New. Here, you can give your membership plan a name and fill out the pricing details:
Repeat as needed to create as many plans as you want to show in your pricing table. You can also link plans together in a hierarchical relationship so that users can easily upgrade/downgrade in a defined path.
We’re keeping this brief because we’re focused on creating pricing tables in this post. But if you want more detailed instructions for setting up your membership site, you can check out our full guide on how to create an Elementor membership site.
2. Add the Price Table Widget in Elementor
Next, open the Elementor editor for the post or page where you want to add your pricing table.
Then, add the Price Table Elementor widget to your page. This widget is available via Elementor Pro, so it will appear in the Pro widget section:

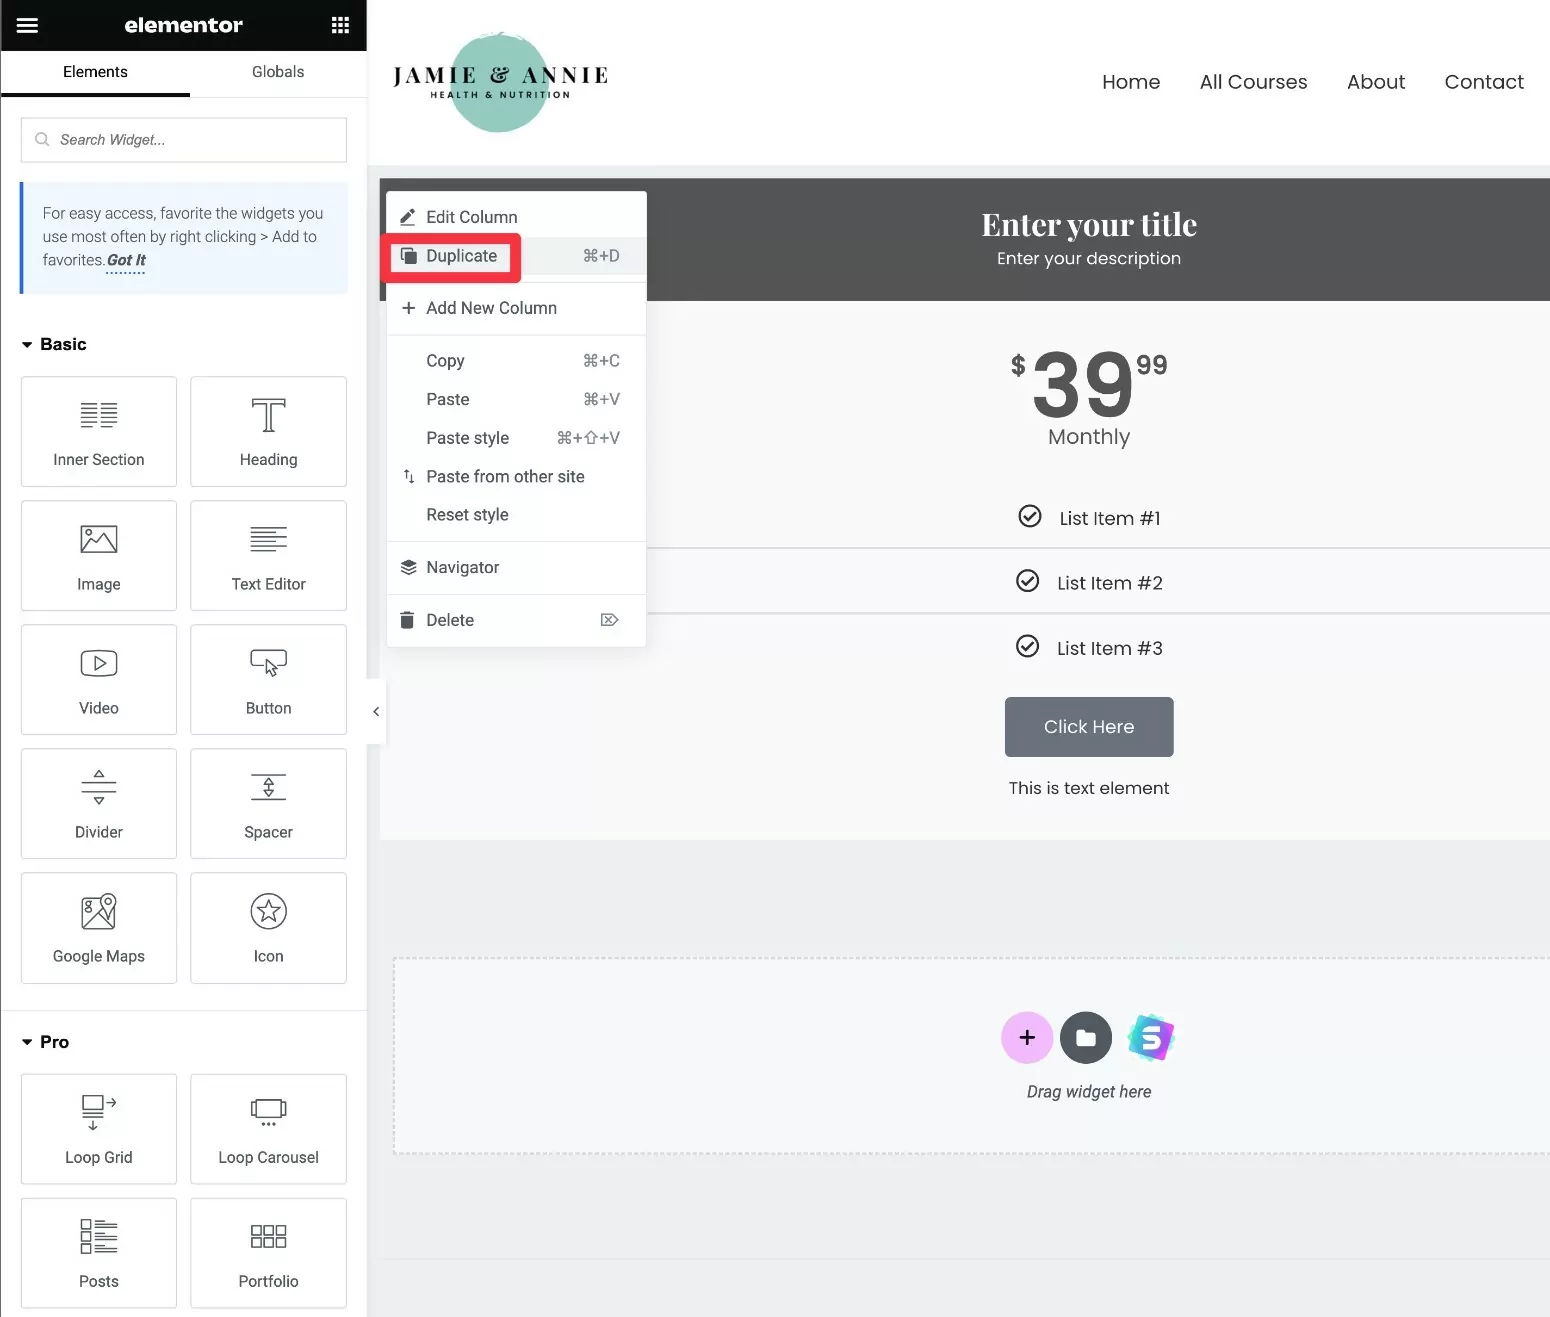
When you add the Price Table widget, it will only show one pricing table column at first. To create additional columns, right-click on the existing column:
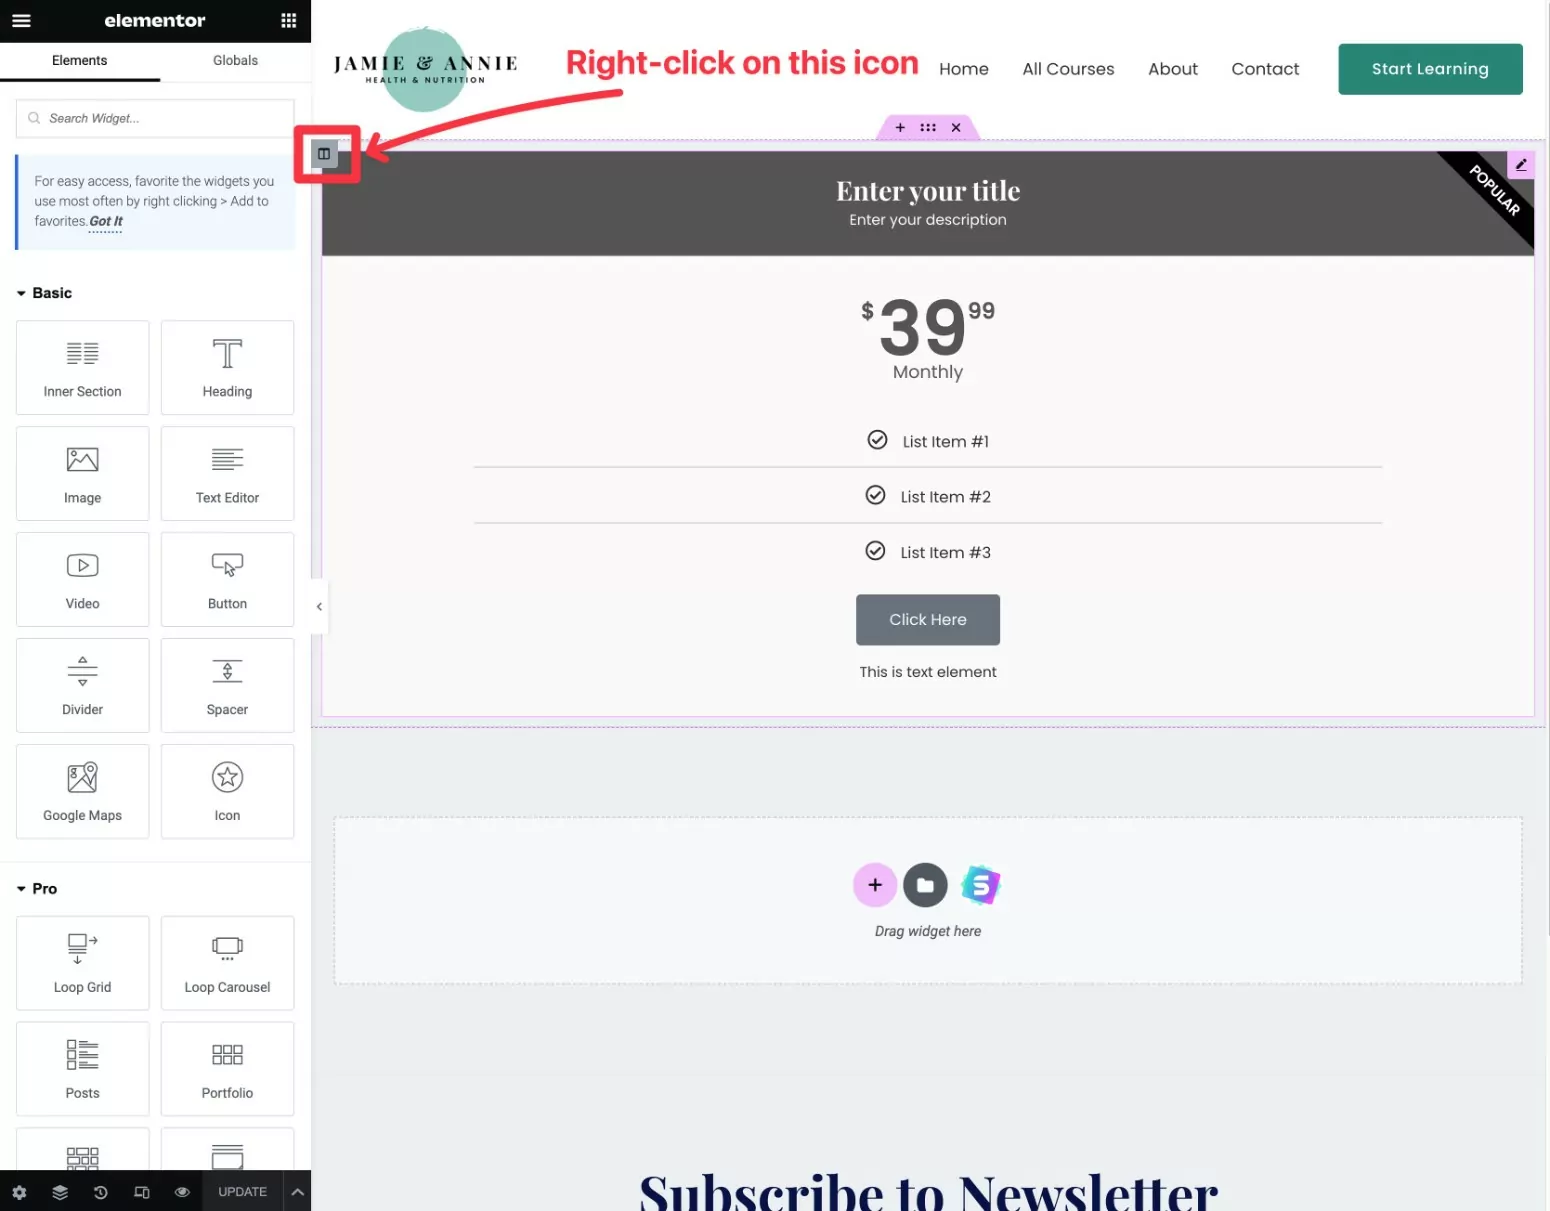
Make sure you right-click on the icon marked in the screenshot above. If you right-click on the widget instead, it will create a new pricing table below the existing one instead of beside it. That’s not a problem, but you’ll need to manually move that widget beside the other one if you do that.
Then, select Duplicate from the drop-down:
You should see another column appear beside the original one:
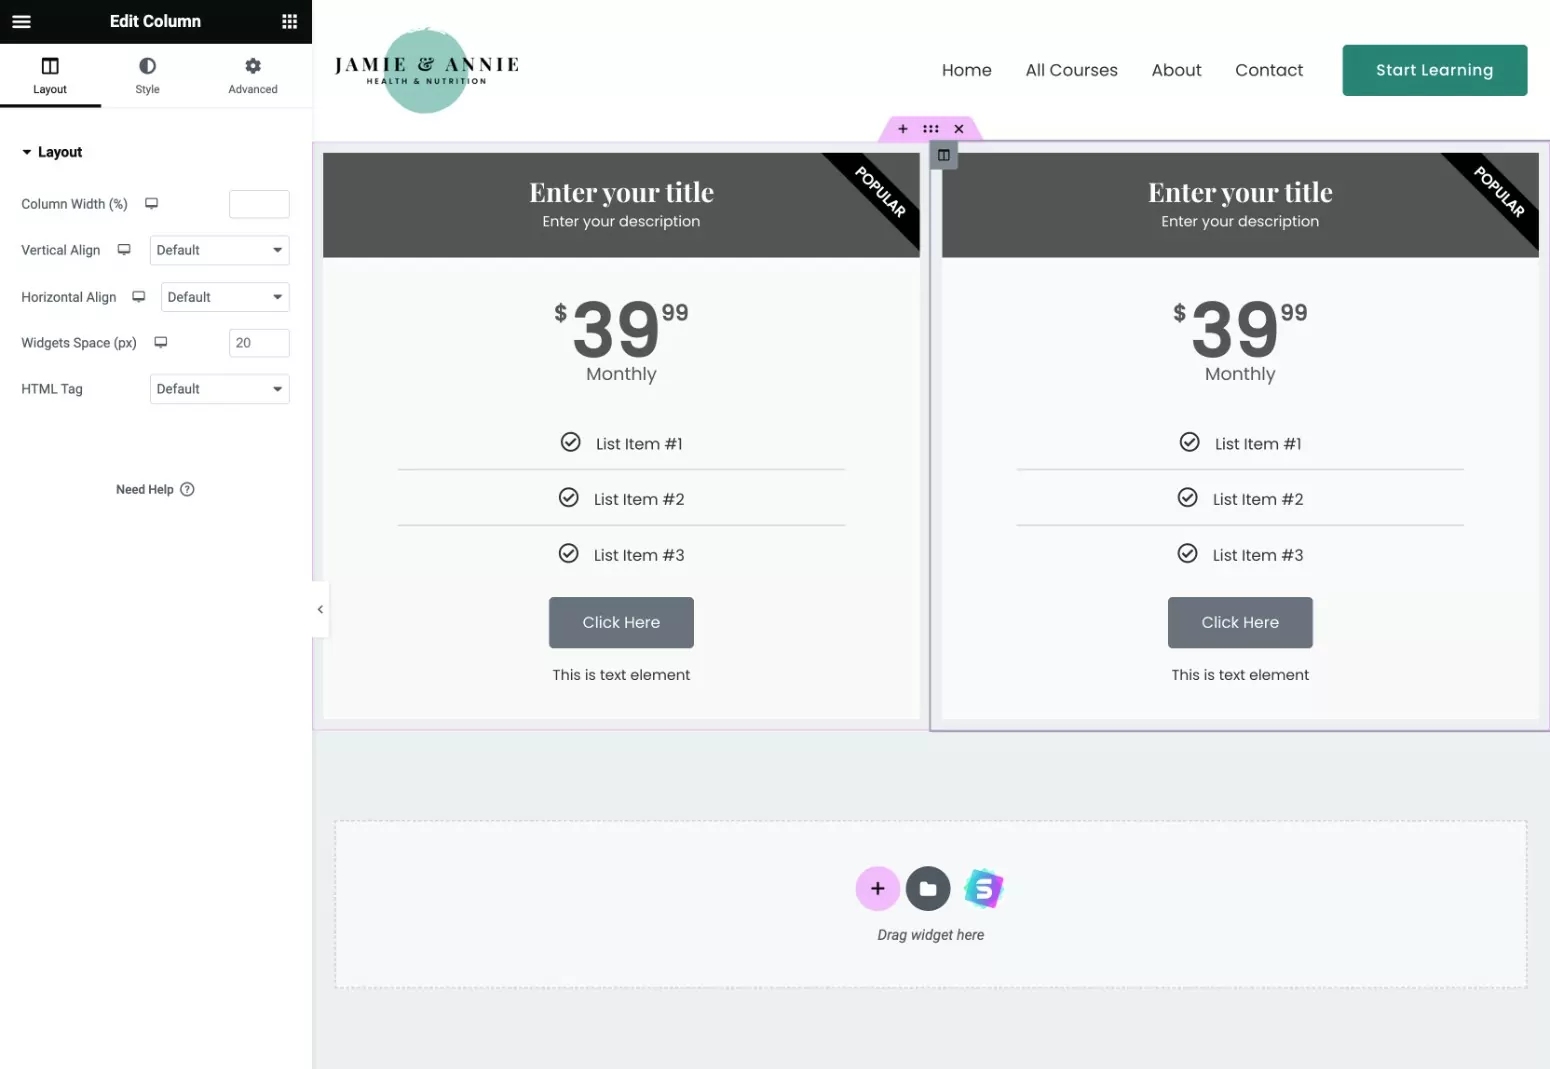
To set up additional pricing table columns, just repeat the same step as many times as needed.
You might prefer to set up the style of your pricing table before you duplicate the columns. Alternatively, you can use the copy/paste styles feature to copy styling between different pricing table columns.
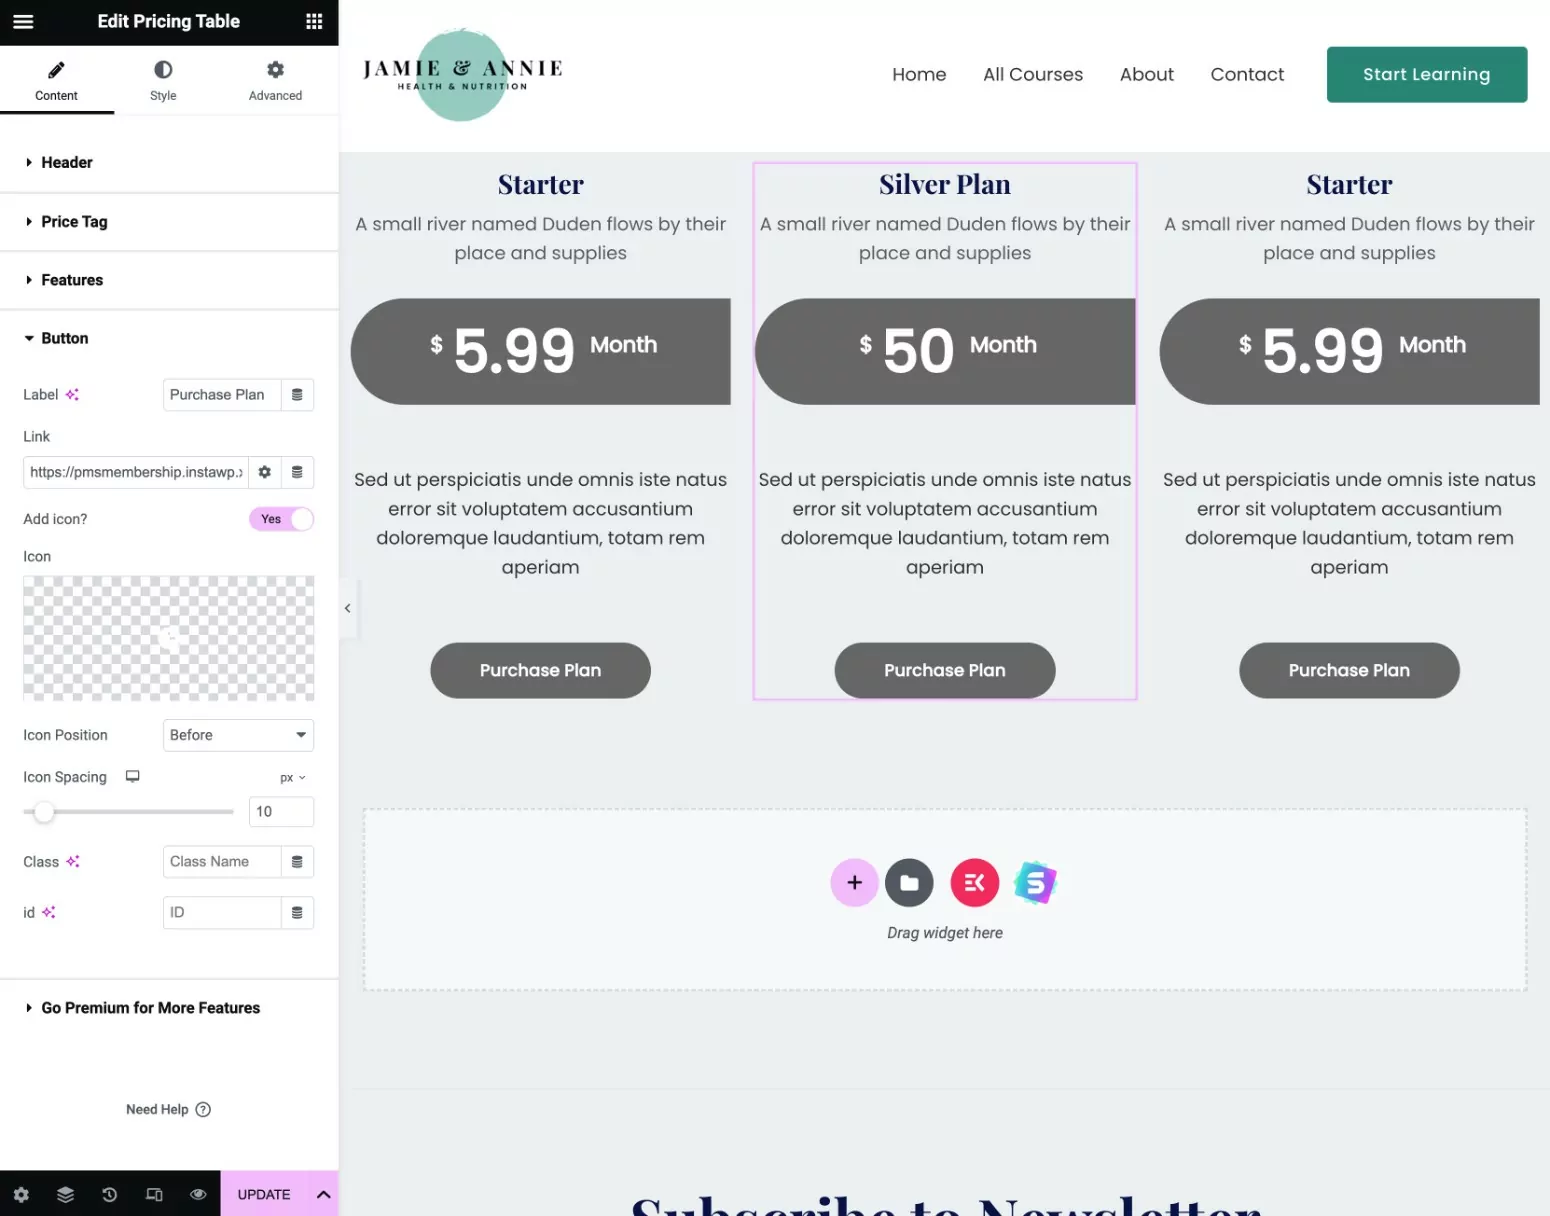
3. Set Up the Design and Content of Your Pricing Table
Once you’ve added the widget, you can use Elementor’s settings sidebar to control the content and design of your pricing table.
You can add content using the different sections in the Content tab. For example, this is where you can control the title, feature lists, pricing, CTA button text, and more:
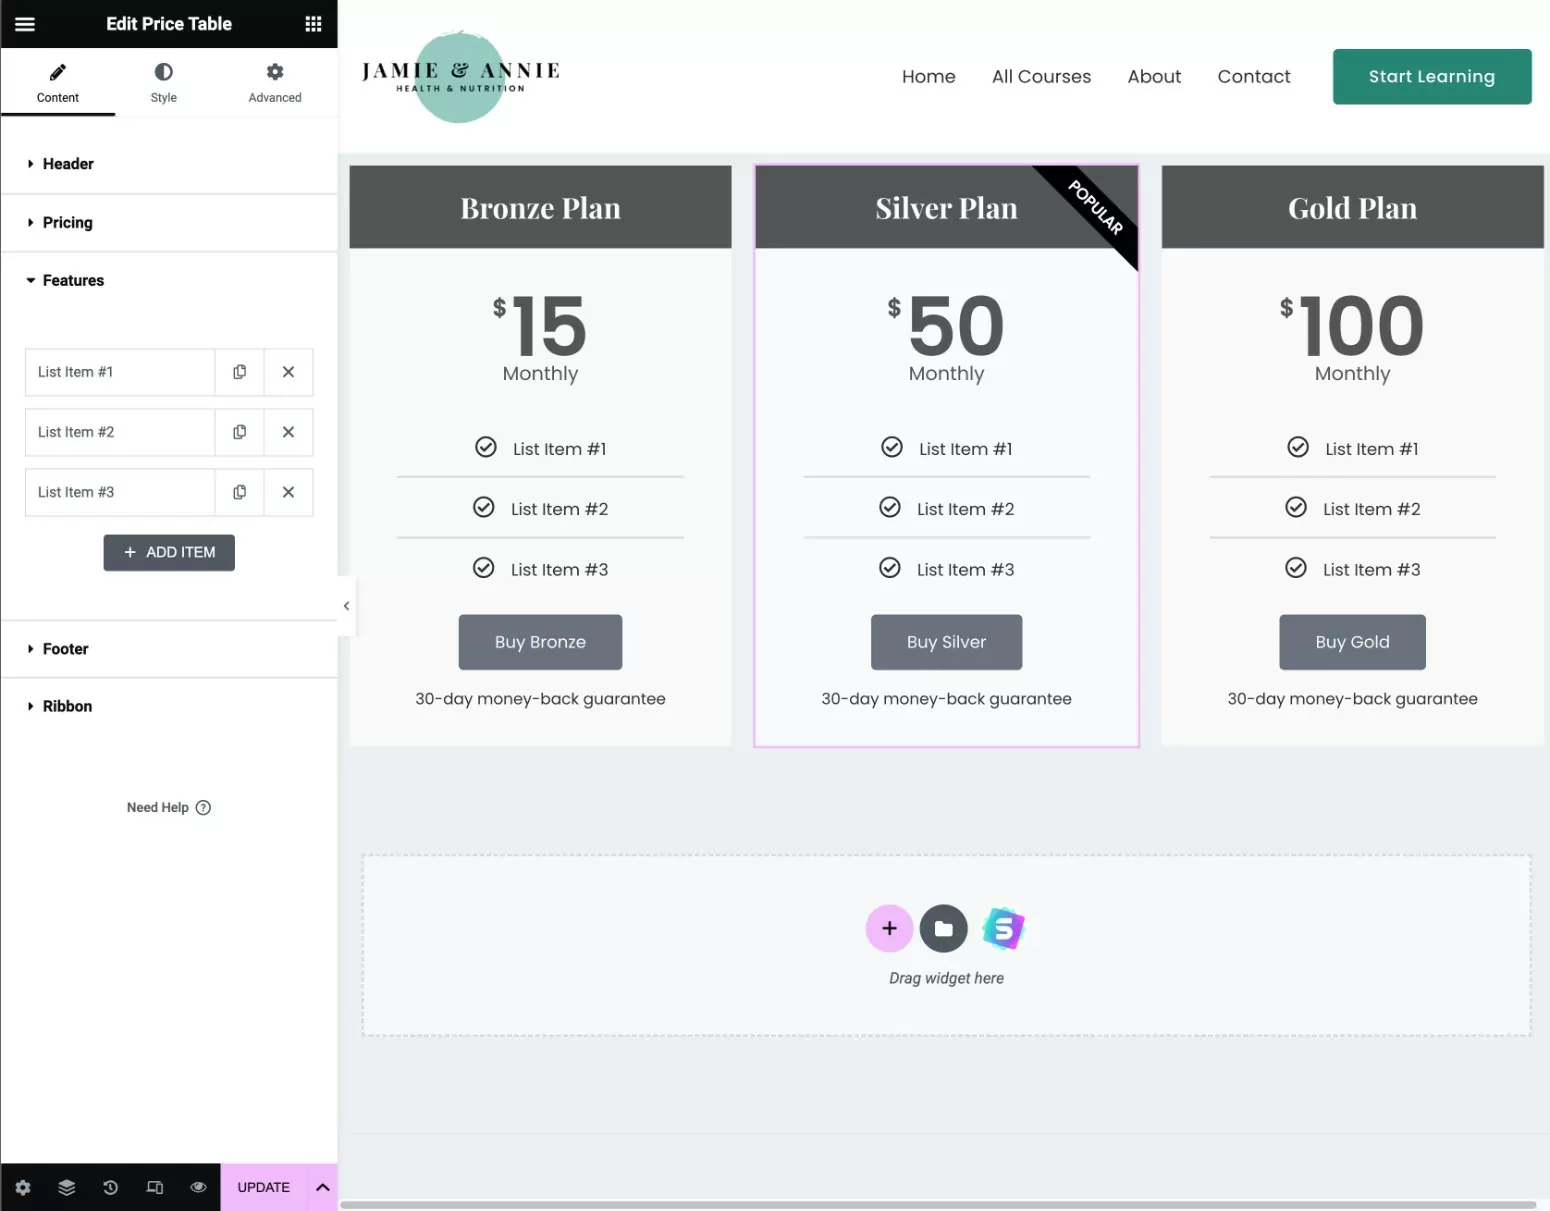
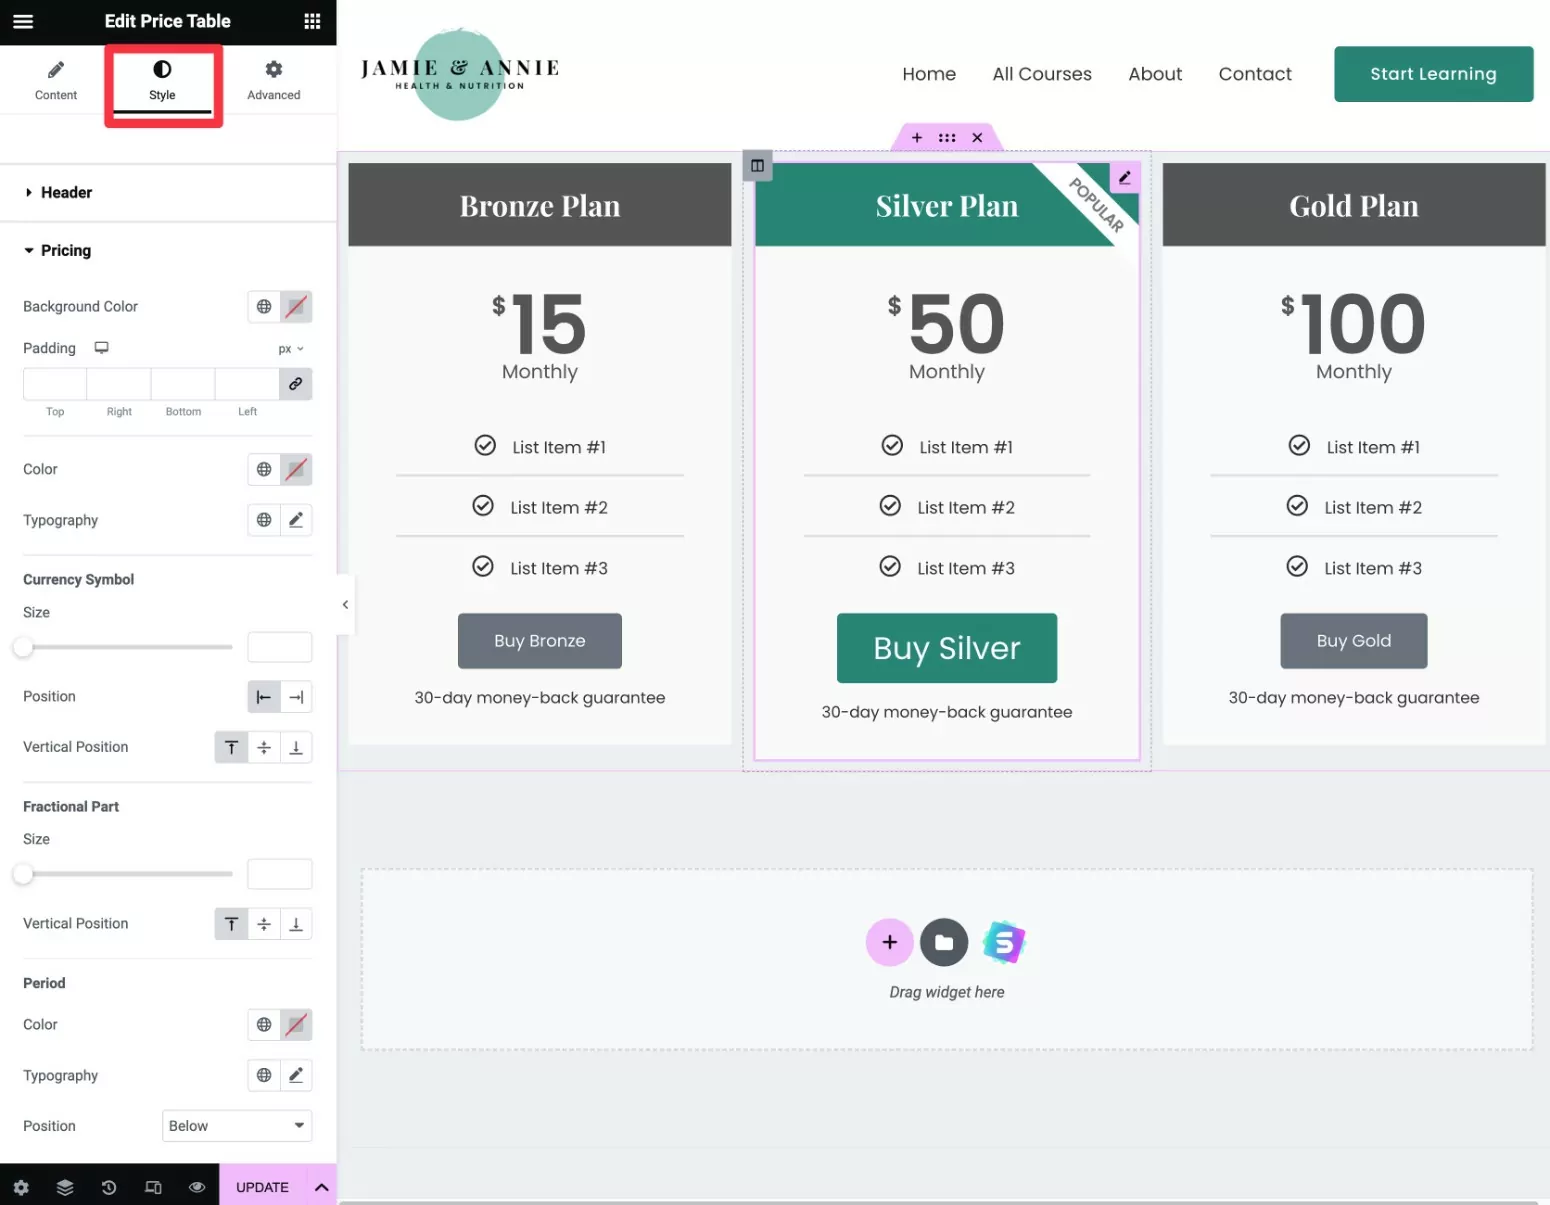
Once you’ve set up the content, you can move to the Style tab to configure the design of each pricing table.
We recommend using an accent color to draw attention to your most popular plan. You can also use the built-in ribbon feature to do this:
Additionally, you can explore the Advanced tab to access additional settings if desired, but you normally don’t need to change anything there.
4. Link Your Pricing Table to Your Membership Plans
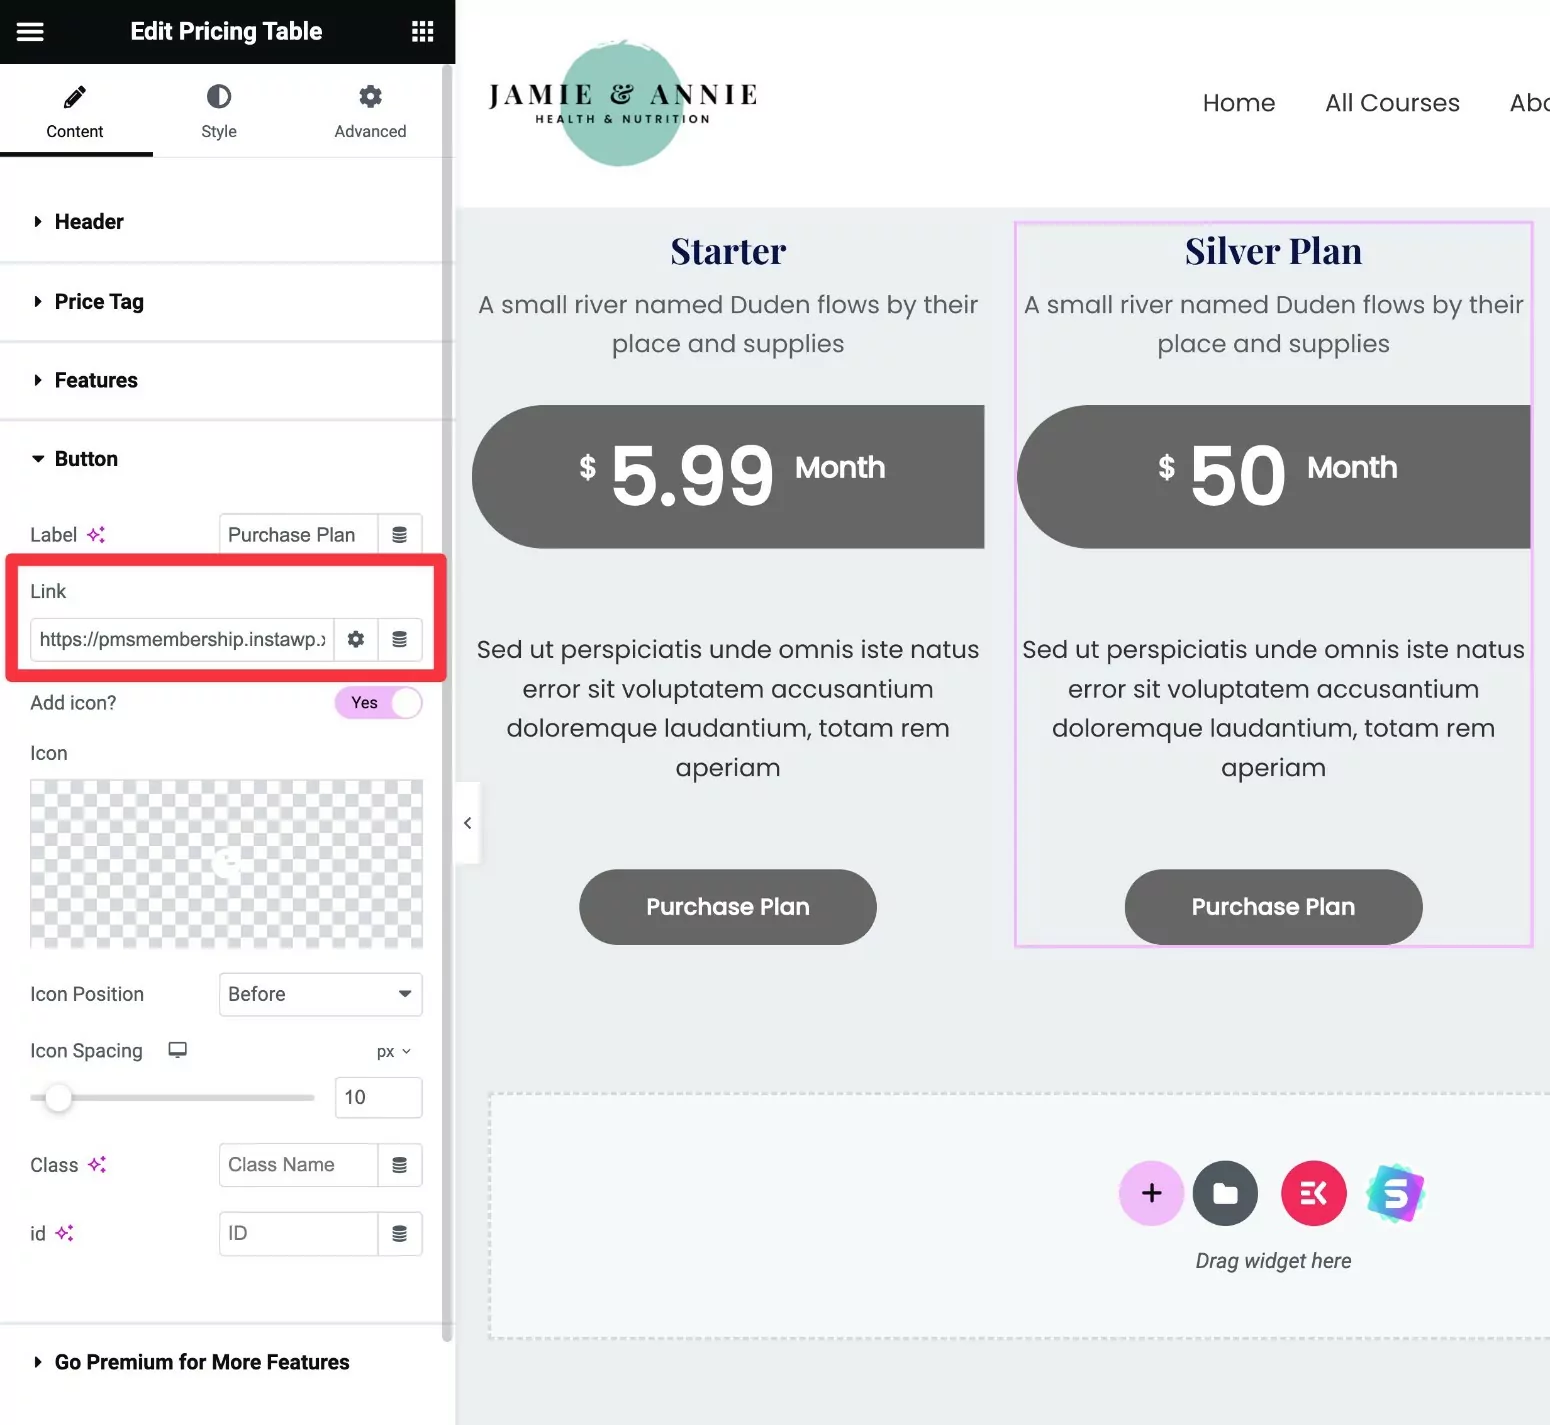
Once you’re happy with the content and design of your pricing table, the next step is to link your pricing table CTA buttons to your subscription plans in Paid Member Subscriptions.
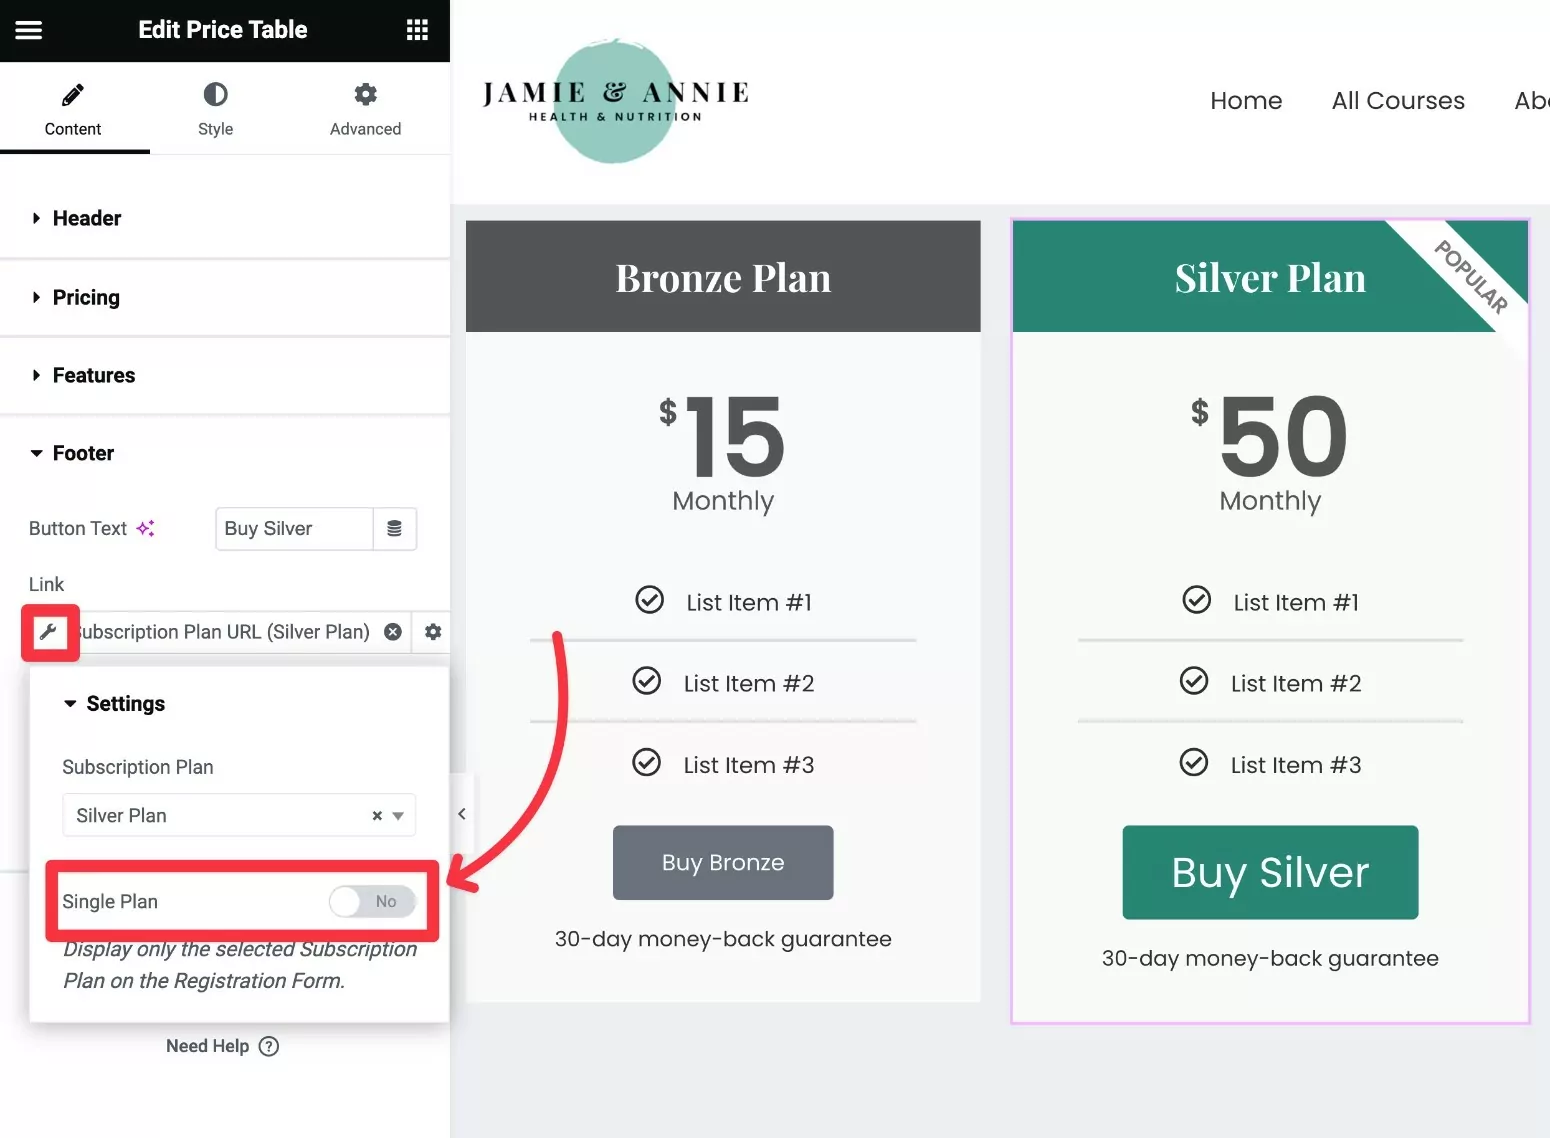
To do this, open the settings for one of your Price Table widgets and go to the Footer settings in the Content tab. Here, find the Link section and click on the Dynamic Tags icon next to it:
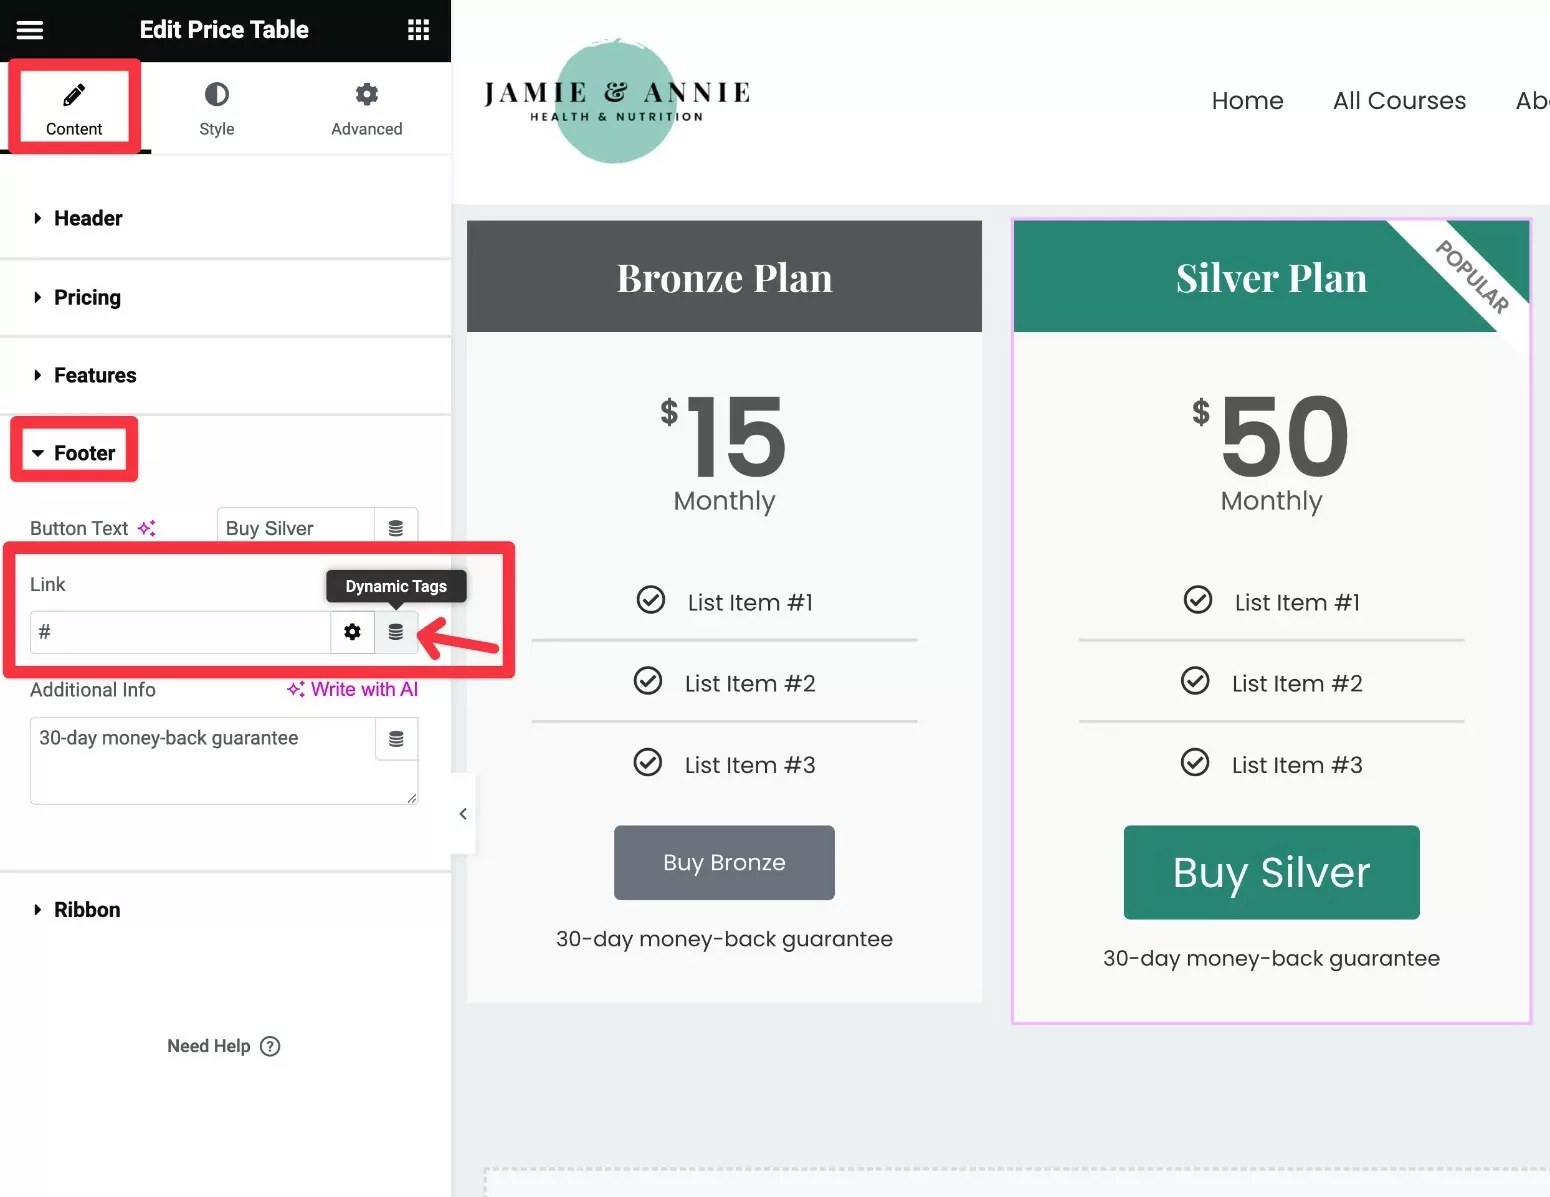
You should see a drop-down menu appear. Select the Subscription Plan URL option under the Subscription Plans heading:
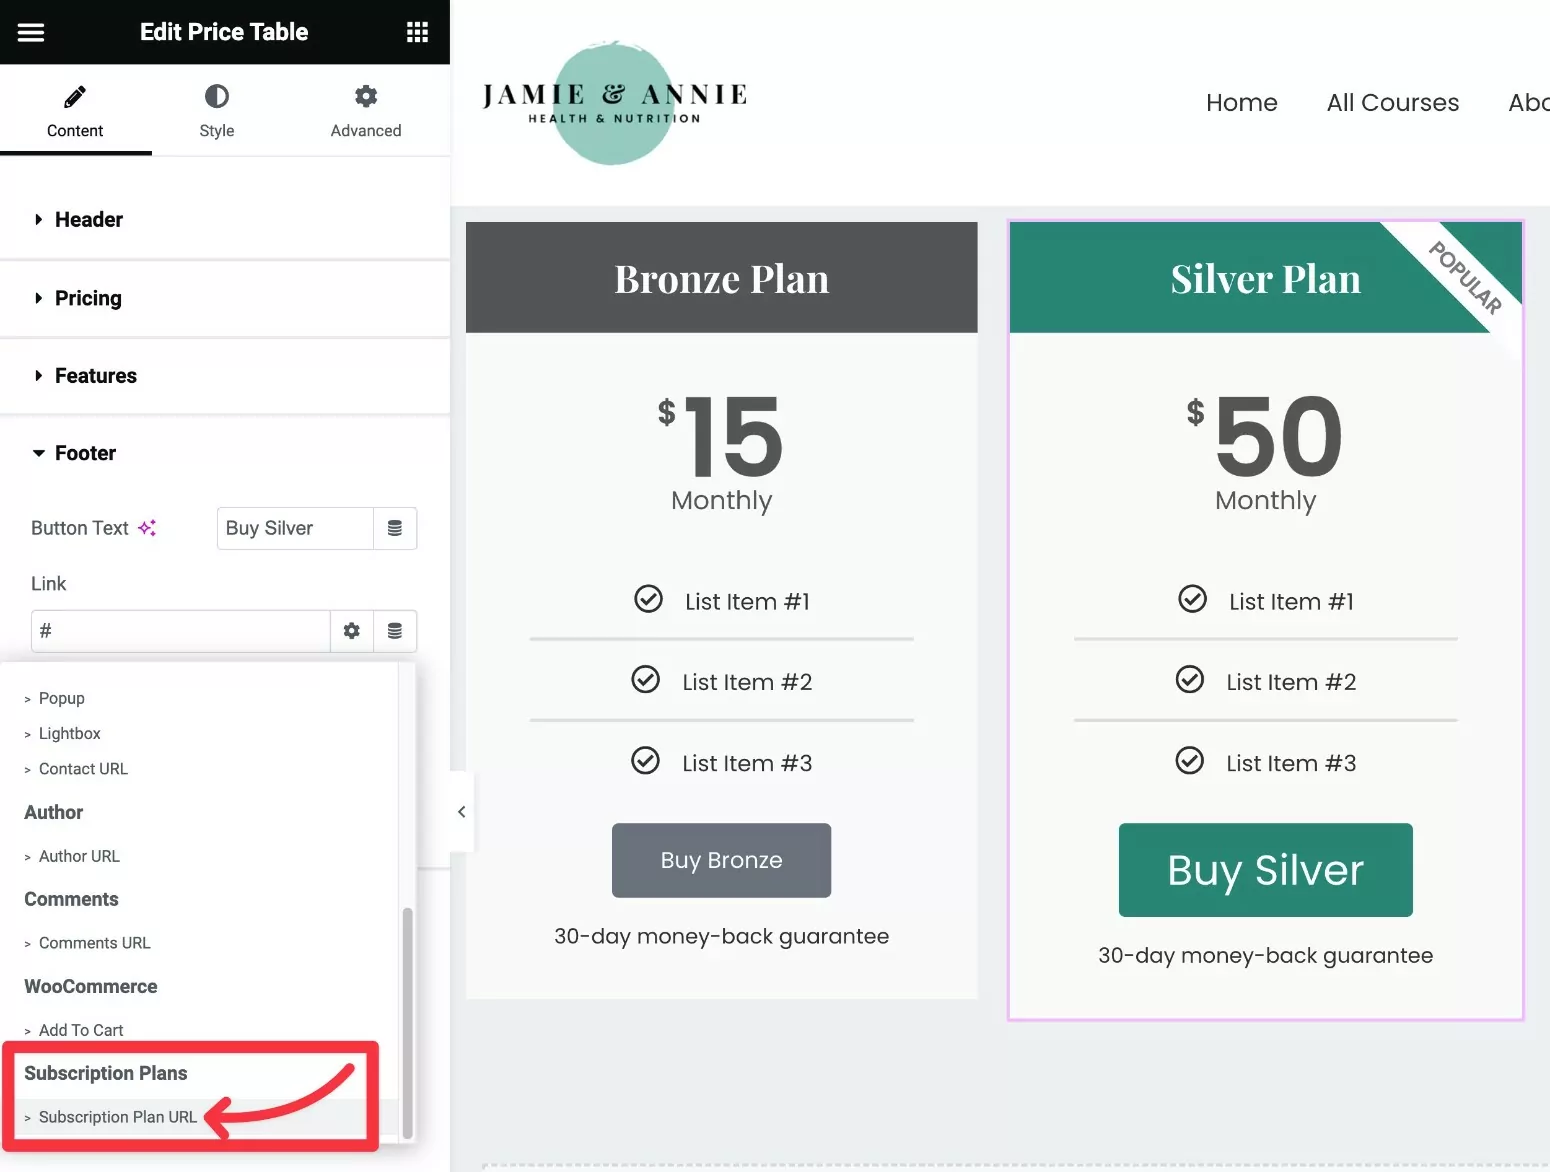
Then, click on the wrench icon that appears beside the Subscription Plan URL text. This will expand the settings panel where you can select the appropriate subscription plan from the drop-down box:

And that’s all there is to it. Now, simply repeat the same steps for all of the other columns in your pricing table, making sure to link each column to the right plan.
5. Test Your Elementor Pricing Table
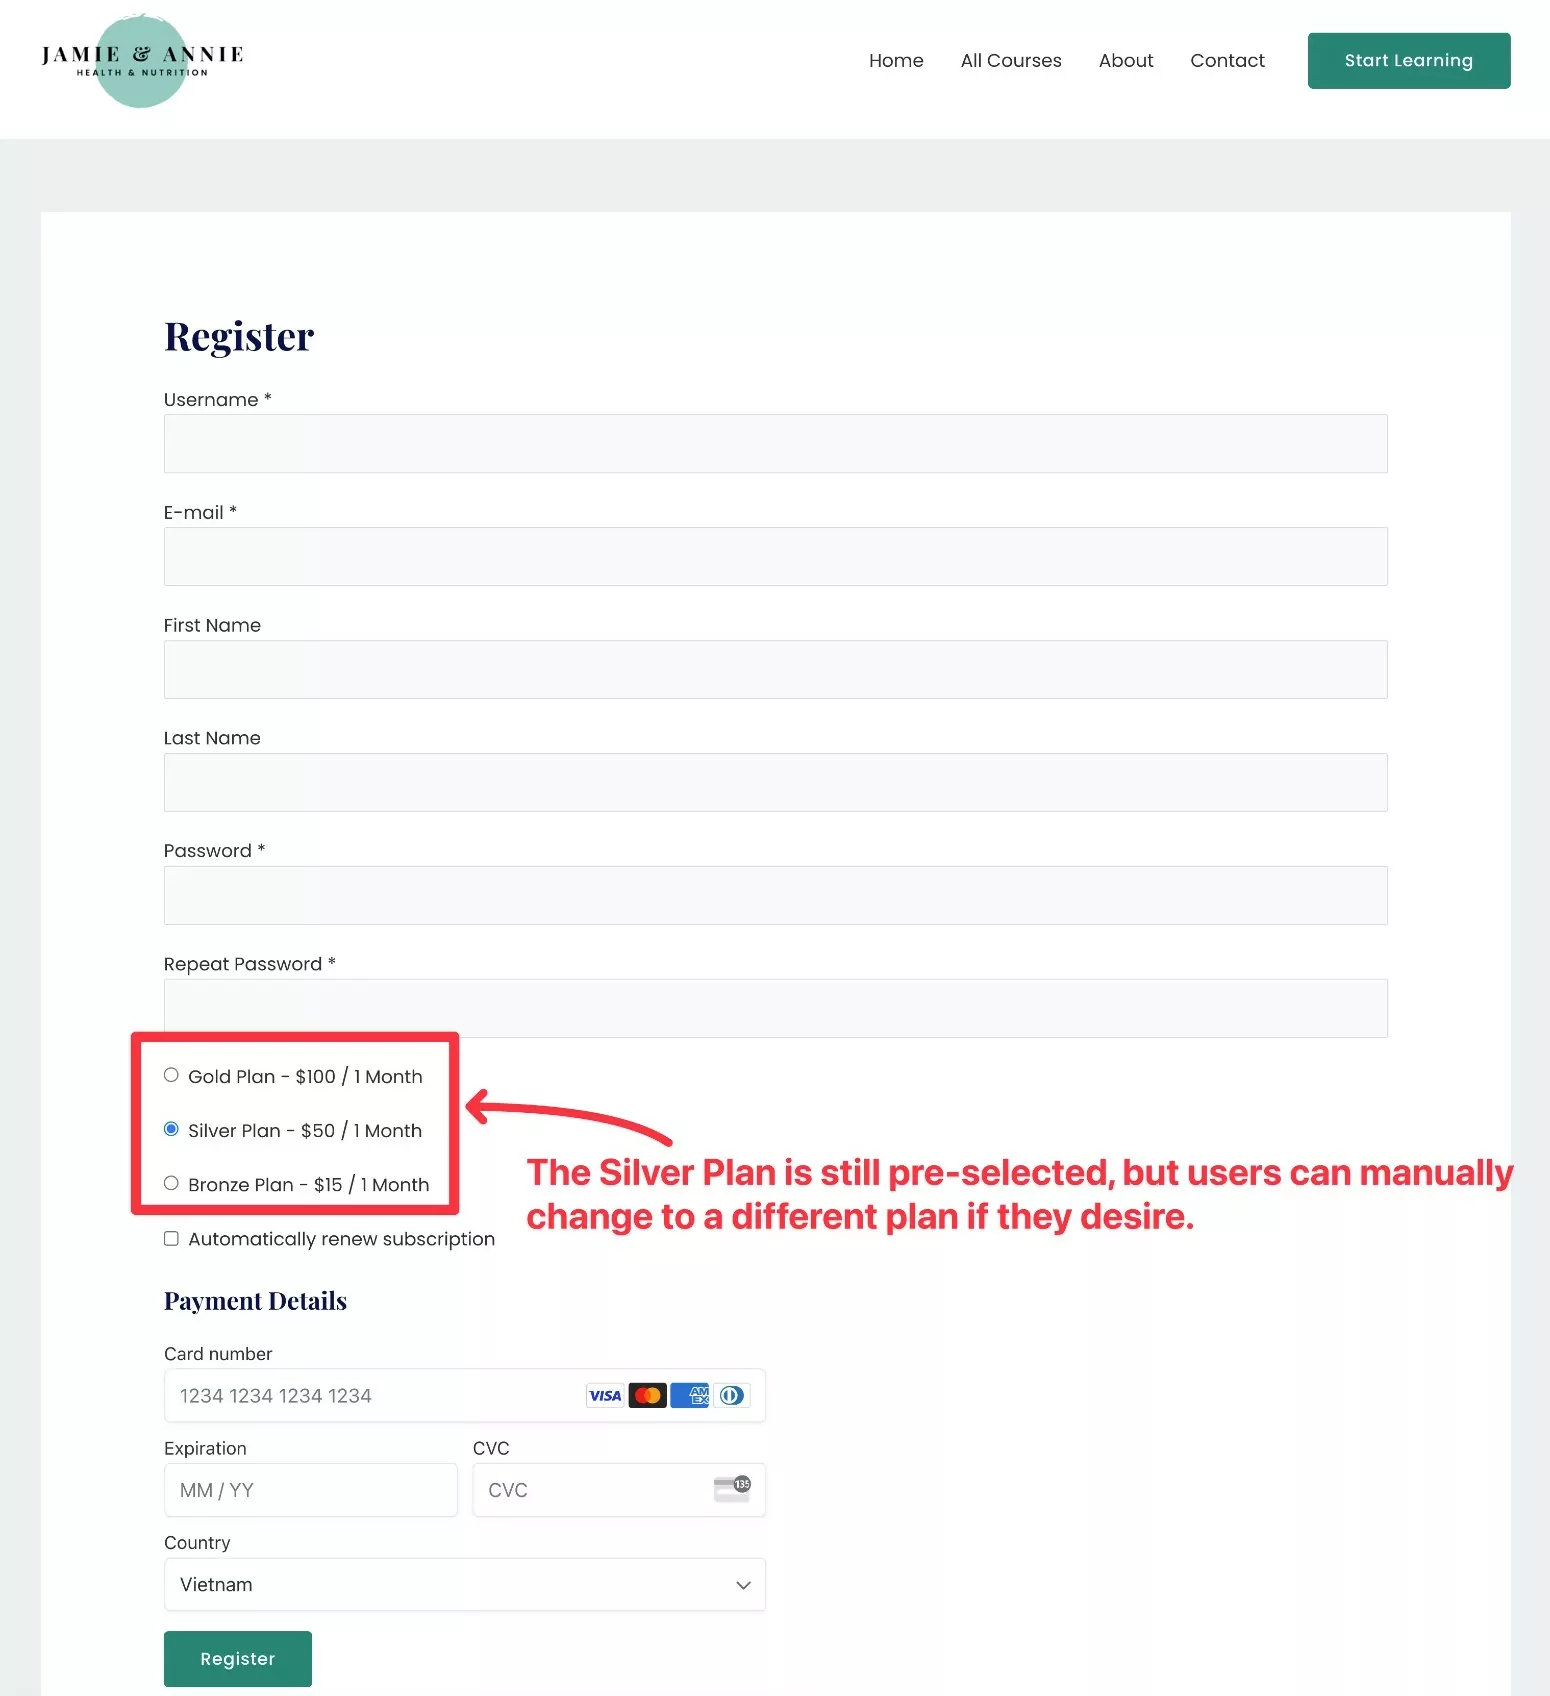
To finish up, we recommend testing your Elementor pricing table to make sure that it’s behaving as you expect:
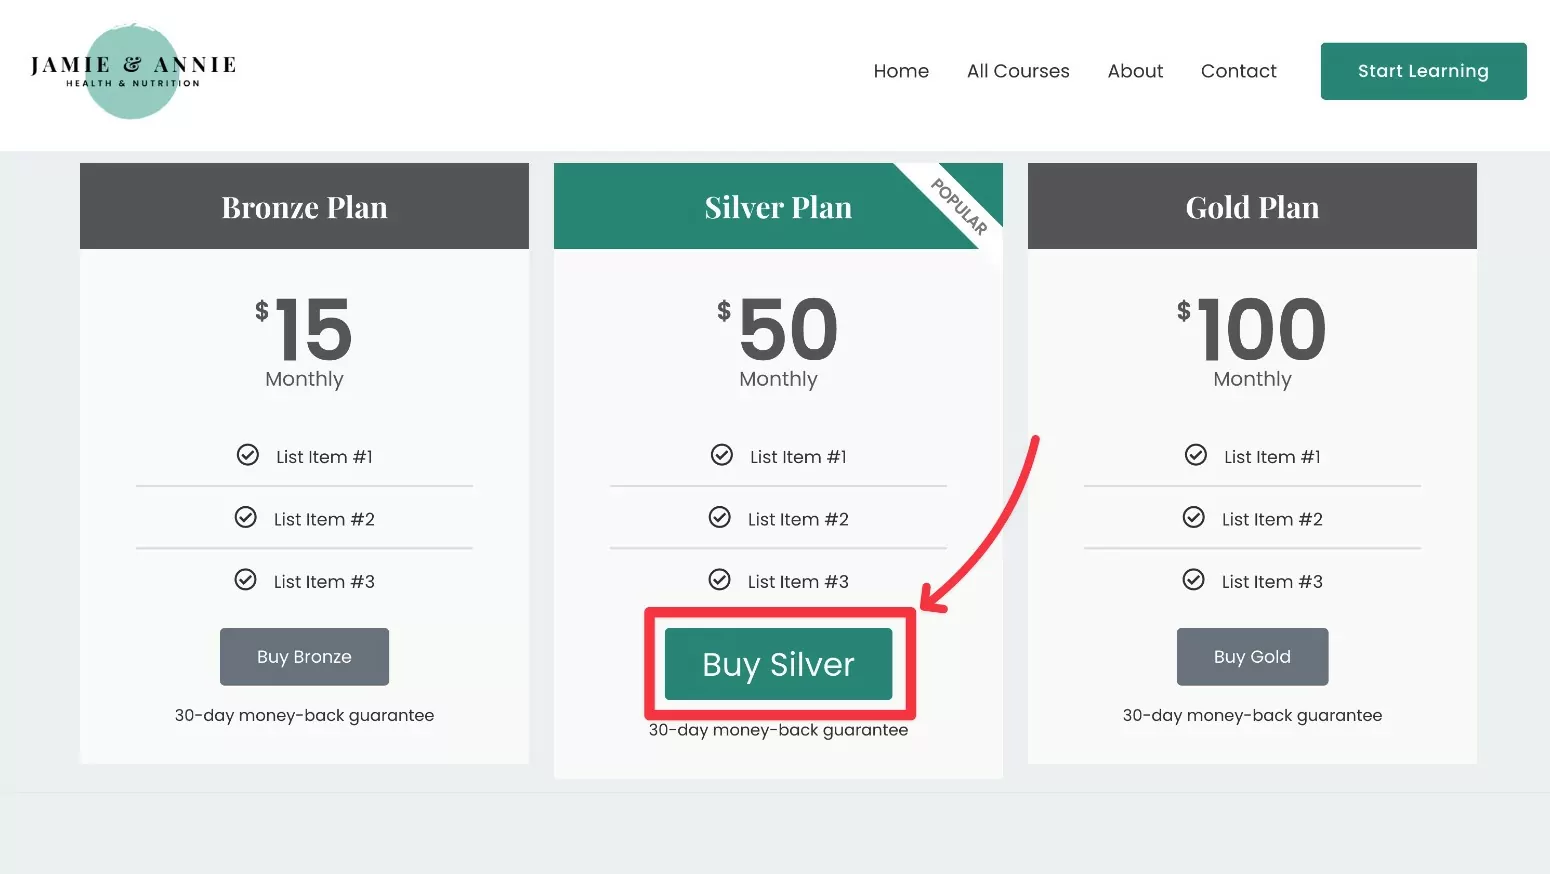
For example, if a user clicks on the Buy Silver button under the Silver Plan, they should be directed straight to the registration/checkout page with the Silver Plan pre-selected:
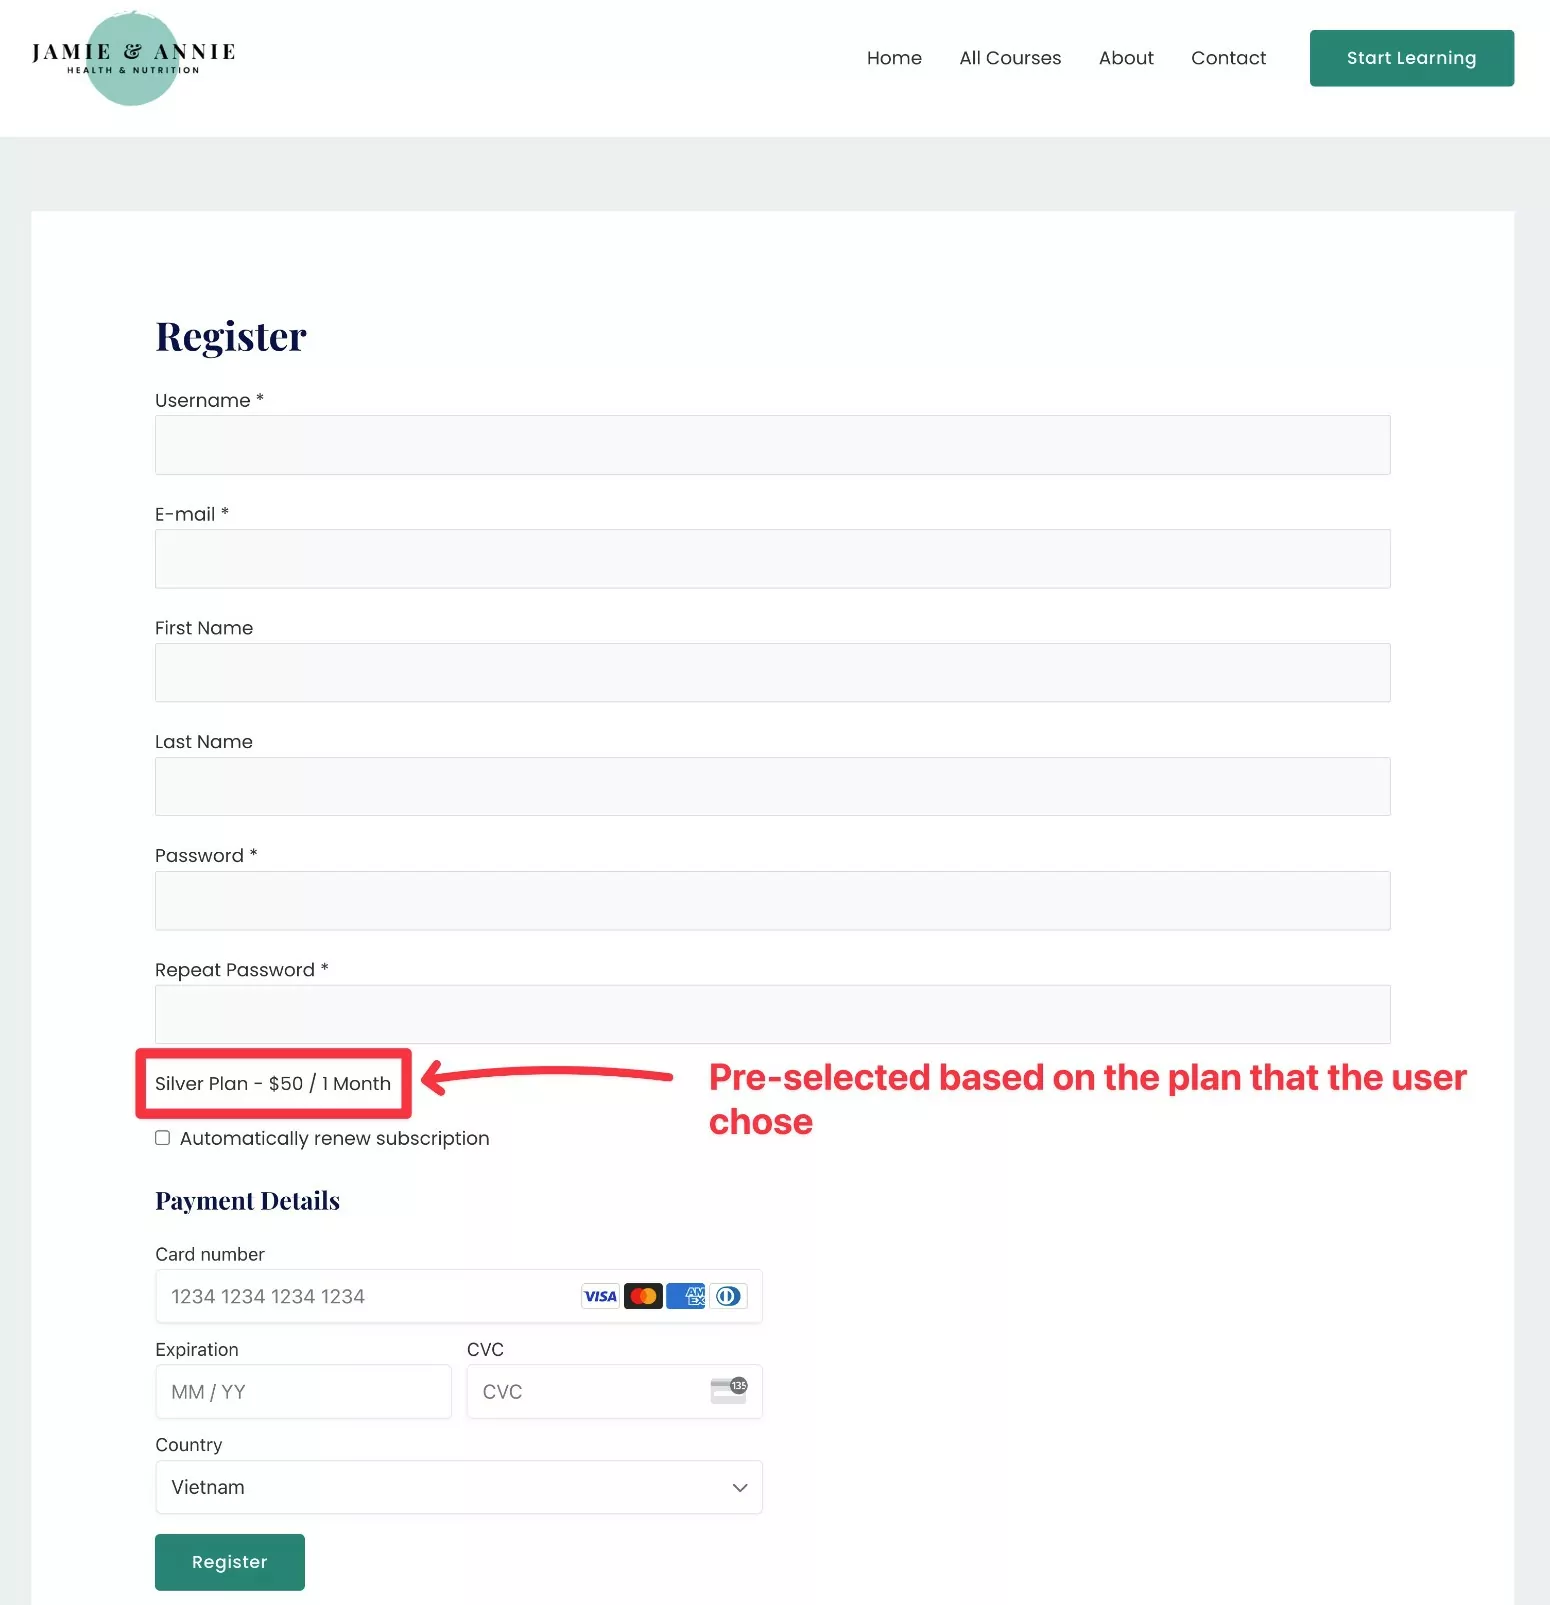
If you want to give users the option to change their plans on the registration page, you can disable the Single Plan toggle in the Elementor settings when you link to the subscription plan:
When you disable this toggle, Paid Member Subscriptions will still pre-select the chosen plan on the registration page. However, users can manually change the plan if they desire.
How to Create a Pricing Table for Elementor With Add-Ons
If you don’t have access to Elementor Pro, you can also use a third-party Elementor pricing table template or add-on.
There are many quality Elementor add-on plugins that will help you add a pricing table. The only downside is that you’ll need to manually link to your membership plans – you won’t be able to dynamically link them.
Don’t worry, though – it’s still not too complicated to set this up. We won’t go as in-depth here, but we’ll provide a quick guide on how to achieve this.
1. Install a Free Pricing Table Elementor Plugin
While the free version of Elementor doesn’t have its own pricing table widget, you can find lots of free add-ons that do.
Here are some options to start you off:
- ElementsKit Elementor Addons
- Essential Addons for Elementor
- Premium Addons for Elementor
- Royal Elementor Addons
You can find more by searching “Elementor pricing table” at WordPress.org.
We’ll use ElementsKit for this example, but the basic idea will be the same for any plugin. So, if you prefer the design options/style of a different add-on, feel free to use that one instead.
2. Create Your Pricing Table
Next, use the pricing table Elementor widget in your chosen plugin to create the content and design of your pricing table.
Here’s what it might look like with the ElementsKit Pricing Table widget:
Again, you can use the Content and Style tab to change the text, colors, font, size, and more.
3. Manually Link Pricing Table to Subscription Plans
If you don’t have Elementor Pro, you can’t access the Dynamic Tags feature to automatically link to your subscription plans. However, you can still manually link your pricing table CTAs to the relevant subscription plan.
To do this, you’ll need to find the ID of your subscription plan. Therefore, navigate to Paid Member Subscriptions → Subscription Plans. You can find the ID number in the ID column next to the plan title.
You can also click to edit the subscription plan and look at the URL in the address bar. Find the number after post=[number] in the URL. This is your subscription plan ID.
For example, if the URL of the edit screen is like this:
https://yoursite.com/wp-admin/post.php?post=24481&action=edit
Then the membership plan ID is 24481.
Add the plan ID to this URL structure (making sure to also replace the example domain name with your real domain name).
https://yoursite.com/register/?subscription_plan=[ID_NUMBER]
For example, if the membership plan ID is 24481, the correct URL would be as follows:
https://yoursite.com/register/?subscription_plan=24481
Once you have the direct link to your subscription plan, manually insert that link into the button of the pricing table widget you’re using:
Repeat the process for other subscription plans.
Create Your Elementor Pricing Table Today
That wraps up our guide on how to use Elementor Pro and Paid Member Subscriptions to create a pricing table for your membership website. If you’re happy to manually insert the links, you can also use a third-party Elementor add-on (that provides a pricing table widget) with the free version of Elementor.
The great thing about Paid Membership Subscriptions is that it integrates with Elementor in more ways than just pricing tables. You can also use your membership plans to restrict access to certain Elementor sections, columns, and widgets, customize your registration and login pages, and more.
We have a whole guide on how to create an Elementor membership website with Paid Member Subscriptions and another one on how to easily create a stunning pricing table with it too. If you’re ready to get started, install Paid Member Subscriptions today.
Paid Member Subscriptions Pro
Paid Member Subscriptions lets you create an Elementor pricing table to display your subscription plans
Get Paid Member SubscriptionsDo you have any questions about how to create an Elementor pricing table for your subscription plans? Let us know in the comments below!
Related Articles

How to Set Up WooCommerce Stripe Subscriptions with Recurring Payments (3 Methods)
Are you searching for a way to set up WooCommerce Stripe subscriptions? Setting up recurring subscriptions is a great way to build regular, dependable revenue for your website. And when it comes to processing payments, Stripe is one of the top options thanks to its competitive fees and flexible feature set. However, WooCommerce doesn't include […]
Continue Reading
5 Best WooCommerce Subscription Plugins
Subscriptions are a very common payment model, but WooCommerce doesn’t natively support recurring payments out of the box. This is where the power of using a WooCommerce subscription plugin comes into play. With this tool, you can start selling memberships, subscriptions, and product bundles. This way, you can increase your income through renewal fees and […]
Continue Reading
Subscription Business Ideas: 10 Ways to Make Money in 2026
Are you after brilliant subscription business ideas to spark your imagination, get your creative juices flowing, and make money in 2026? If that's a yes, you came to the right place. The subscription-based business model has gained tremendous popularity in recent years. According to a report by Statista, e-commerce sales via the subscription model in […]
Continue Reading