

Table of Contents
Looking for a way to enhance your customer experience? Set up a customer portal in WordPress.
A customer portal lets customers quickly access information and helpful resources. These might be related to the product they purchased from you or information on how to get in touch with customer support. A customer portal essentially promotes communication between you and your customers.
In this article, we’ll take a closer look at what a client portal is, and how you can create a WordPress client portal for your business.
What is a Portal Website?
In a nutshell, a portal website is a site that brings information from multiple sources into a single place. These might include blogs, forums, emails, and search engines. It’s essentially a gateway to information on the web.
Types of Portal Websites
Let’s dive deeper into some of the different types of portal websites and what they do:
- Project management portal. A project management portal can be used to showcase or display all resources being used in a specific project. This way, you can give portal access to all team members and instructors, allowing them to access all resources from a central place.
- Client or customer portal. A client portal lets users access resources such as help desk, FAQs sections, and contact information to get in touch with the business or download additional resources such as guides or manuals. It can also be used to let customers access the knowledge base, support channels, or forums.
- Sales portal. A sales portal lets users access and view all ongoing sales data from a single place. In addition to this, you can also use it to share sales battlecards with team members and make downloadables easy to access.
- Hobby portal. A hobby portal is useful for gathering a community of like-minded individuals. For instance, you can create a “Photographers portal” where all individuals can showcase their skills and share information or ideas with each other.
- Membership portal. Since a membership involves community building, creating a membership portal to let members access the community forums and discussions is a great way to keep them engaged with the program.
- Student portal. Universities and educational sites can use a student portal to let enrolled students access downloadable lessons, assignments, and guides, as well as their admission details. It can also be used to let students submit assignments and take quizzes online.
- Patient portal. Hospitals and medical institutes often have patient portals that users can use to access their medical reports and records, and view medication details securely.
Why Create a Client Portal?
Creating a client portal using a specialized software is a great way to compile all necessary information and present it in a professional way to customers and clients. This makes it easy for businesses to share resources and deliver an enhanced customer experience.
Other than enhancing the client experience, creating a customer portal is a great way to improve brand perception. People will know your brand offers professional service by allowing them to log in to a separate portal.
In addition to this, a client portal also makes it easier for you to share information from a centralized platform. This way, you don’t have to worry about unauthorized users accessing premium resources and content.
Before we jump into creating your own client portal, it’s important to take a step back to better understand what a typical portal website contains.
For starters, a customer portal offers membership or subscription as the main offering to customers. This way, users can subscribe to the portal service to access membership content, online courses, product information, or service information.
A portal website also contains links to other websites that might be helpful to users. Ideally, you also want to add other resources such as forums, calendars, and search functionality to your client portal website.
How to Create Your Own Client Portal
Here, we’ll show you how to create your own client portal in WordPress using robust plugins. The same process will work perfectly for a student portal, patient portal, or any other type of portal website.
For this, we’ll need a working WordPress site with the free Client Portal plugin. We’ll also need to use a member registration and login plugin such as Profile Builder to ensure only authorized users can access the client portal.
Step #1: Get the Client Portal Plugin and Configure the Settings
Before we get started, make sure you have the Client Portal plugin installed on your WordPress site. Now navigate to Users → Client Portal Settings using the WordPress admin panel.
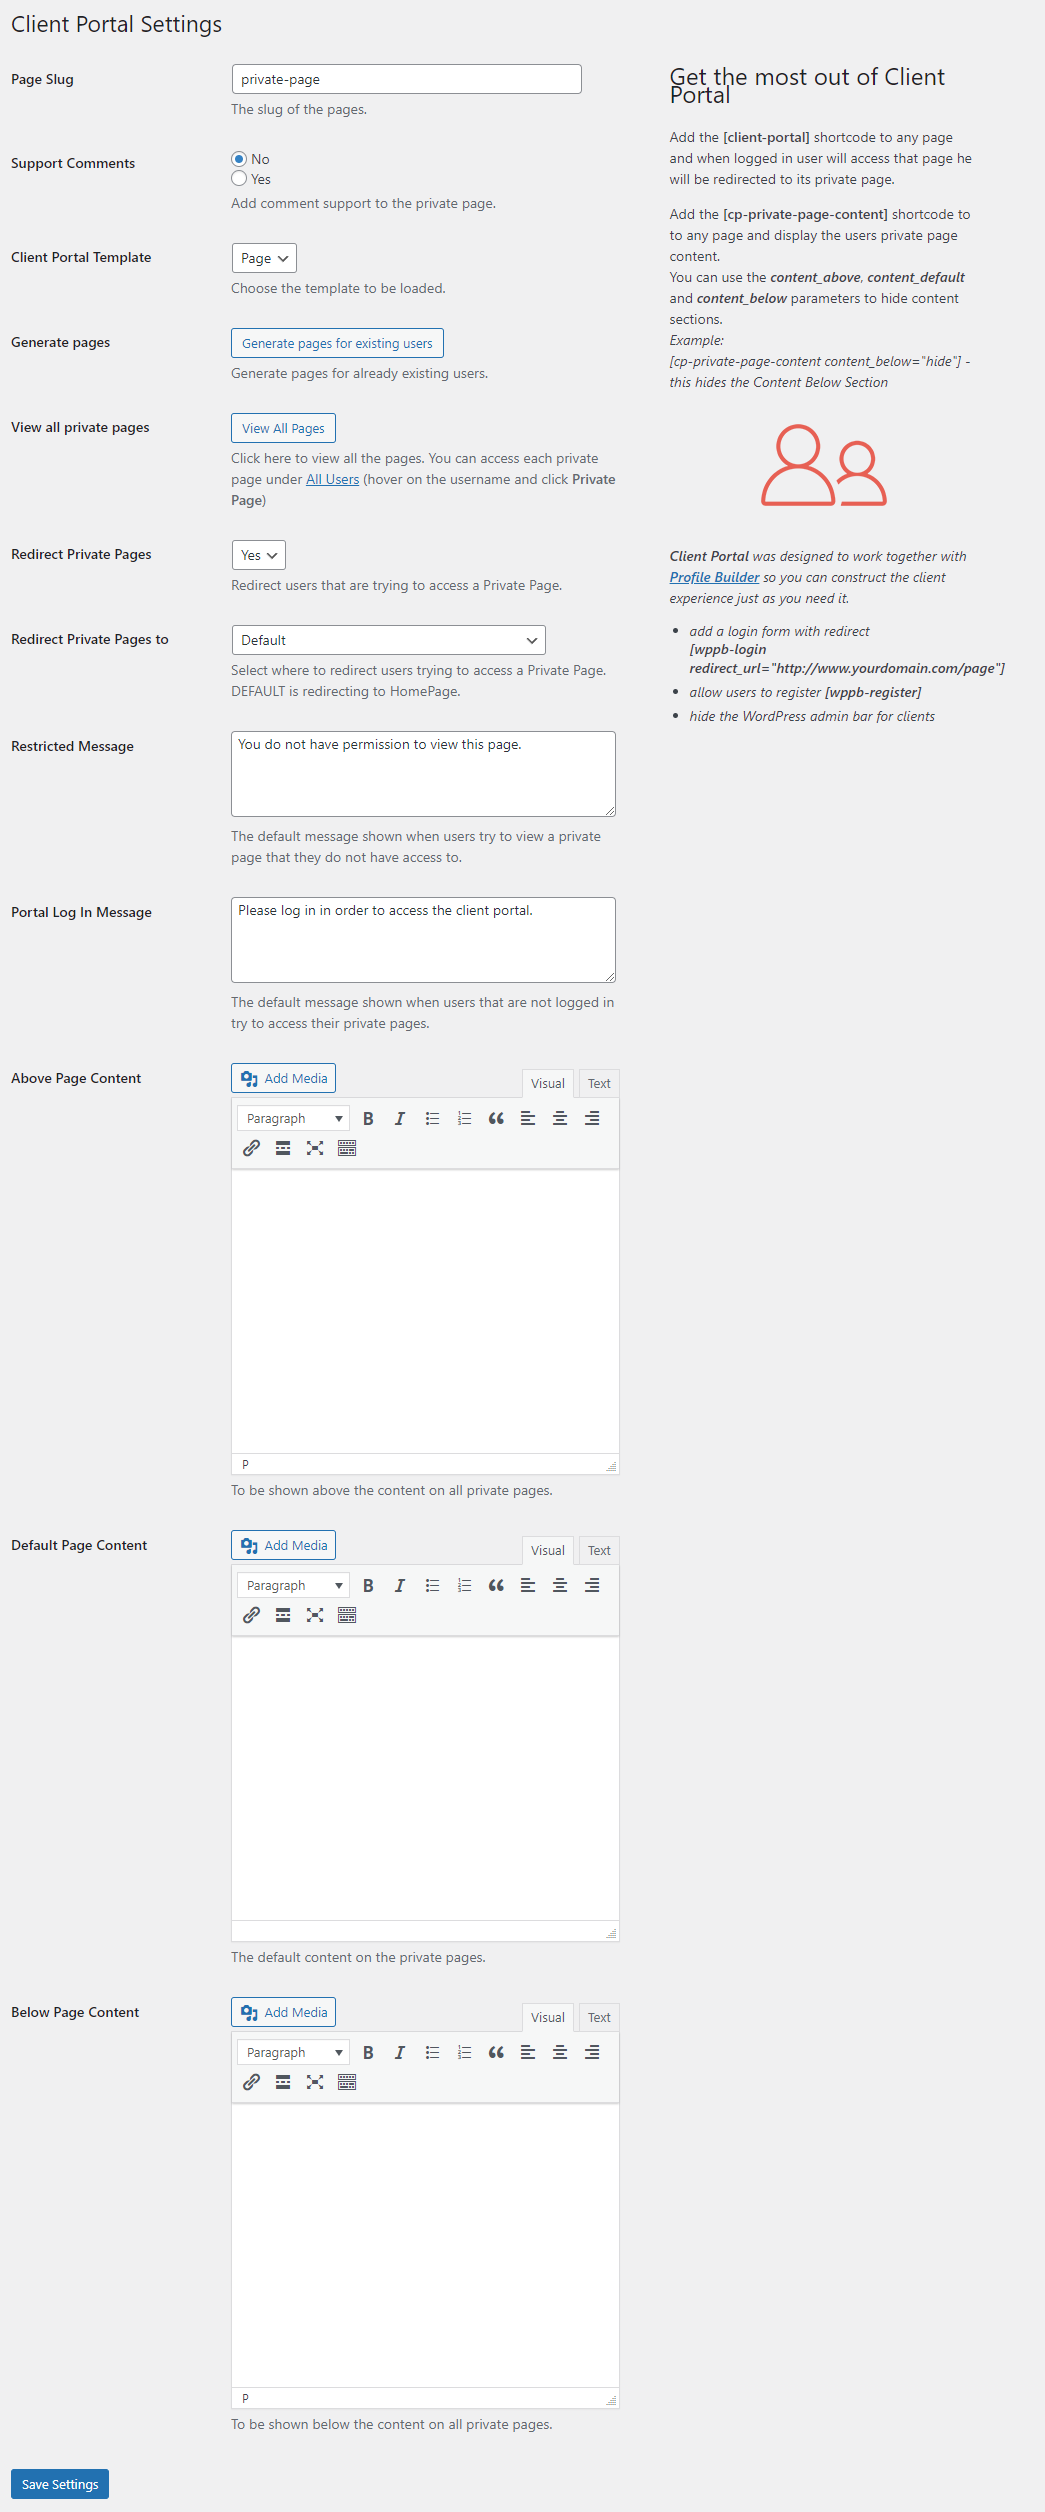
Here, you can configure various settings for your client portal by editing messages that will be displayed to unauthorized users and specifying page content. Using the Restricted Message text box, you can show a message to unauthorized users when they try to access the client portal.
The Portal Log In Message text box lets you display a message to logged-out clients only. Using the Above Page Content, Default Page Content, and the Below Page Content text boxes, you can display anything you’d like in your client portal. For example, you can display links to other websites, forums, contact information, and other useful resources anywhere on your client portal from here.
Once you’re ready, click on the Save Settings button to create your brand new client portal page.
Step #2: Onboard Clients
Now with the client portal in place, it’s time to start onboarding clients to your portal. Let’s go over some of the best practices to follow for onboarding clients successfully:
- Keep it brief. Keeping your onboarding process as short as possible encourages more people to access the client portal. The easier you make it for users to register and log in, the more likely they will be to do so.
- Offer a behind-the-scenes look. Another great way to encourage more people to subscribe is by offering them free resources when they first sign-up with you. For example, you can offer a sneak peek into the client portal to let them know what they can expect to find.
- Offer easy navigation. Another important aspect of any successful client onboarding strategy is making the whole onboarding process simple and easy to navigate. You can ensure all important resources such as the contact form, submit ticket buttons, FAQs, and knowledge base sections are easily accessible when clients first log in to the client portal.
- Offer product walkthrough and roadmaps. Offering a walkthrough of how your product works and what it helps achieve is a great way to encourage more people to try it out.
Step #3: Set Up a Client Registration and Login Forms
Creating an easy sign up and log-in process can help you maximize registrations and engagement with the client portal. For this, you will need the Profile Builder Pro plugin.
The plugin offers an easy way to set up client registration forms and login pages for your client portal website. After activating the plugin on your WordPress site, navigate to Profile Builder → Form Fields to start creating a custom registration form.
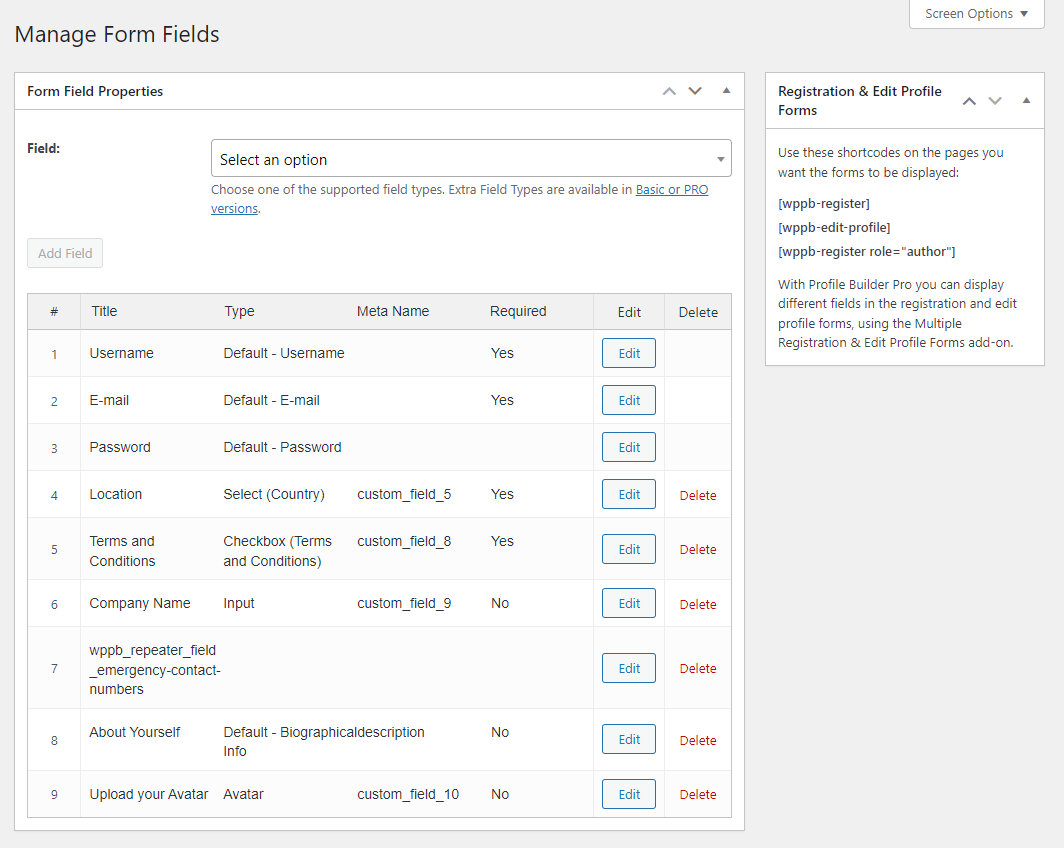
This allows you to add custom fields so it’s easier to gather as much information from customers as required. Once you’re done, navigate to Pages → Add New and paste the [Only an administrator can create pages with the register shortcode.] shortcode.
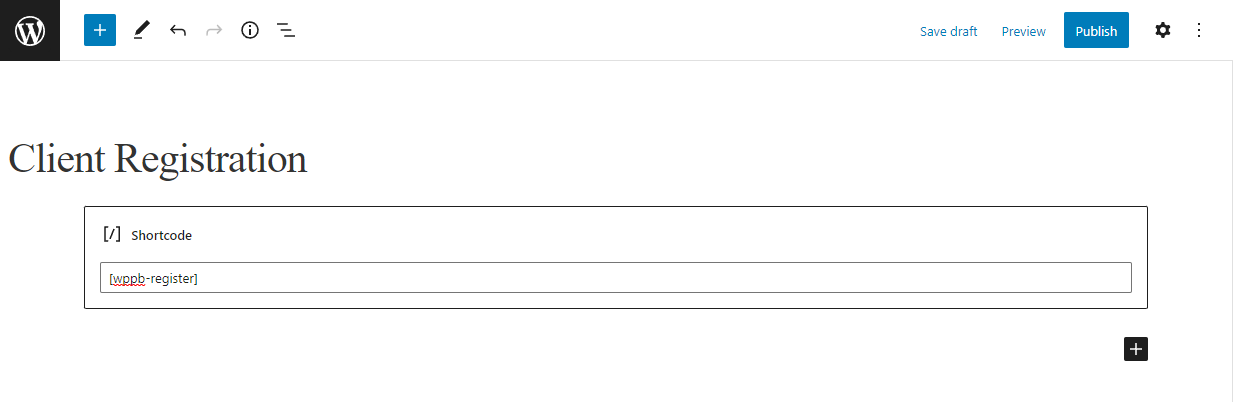
Make sure to click on the Publish button to continue. This will display a custom registration page for clients to register themselves on your site.
Similarly, to create a new login page as well, use the same method and paste the [wppb-login redirect_url="https://www.yourdomain.com/page"] shortcode on a page. You’ll have to replace the last part of that shortcode with the URL for the client portal you’ve just created at step 1#.
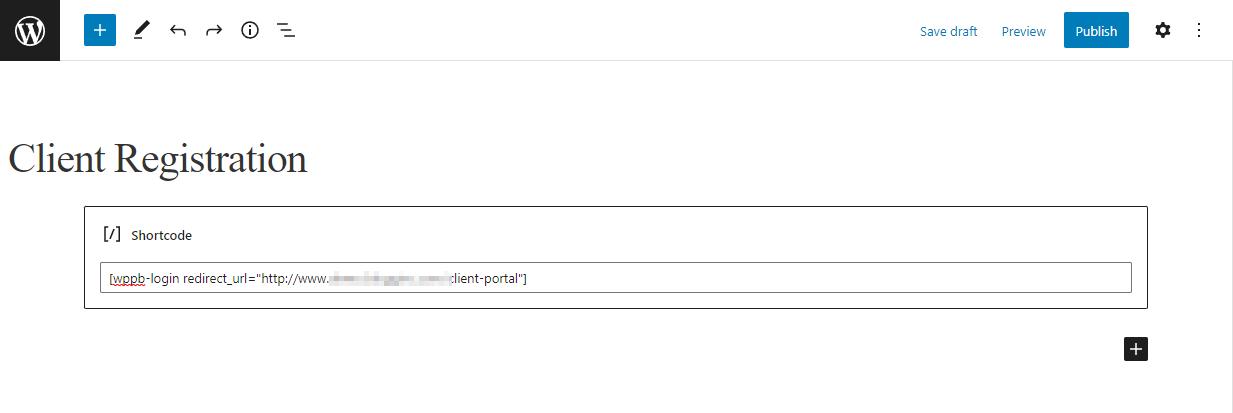
This will create a login page that redirects the user to the client portal page you created earlier, right after login. Once you’re done, click on the Publish button to continue.
Bonus: Restrict User Access to the Client Portal
While letting all users register and access the client portal is a great way to encourage more clicks on your site, it also lets unauthorized users access your premium portal content. This is why you should restrict client portal access by user role. You can even charge users a premium to access the client portal.
A great way to create and offer a client portal for your membership and subscription website is by using the Paid Member Subscriptions plugin.
Here’s how you can set this up:
Once you have the Paid Member Subscriptions plugin installed, navigate to Paid Member Subscriptions → Subscription Plans and click on the Add New button.
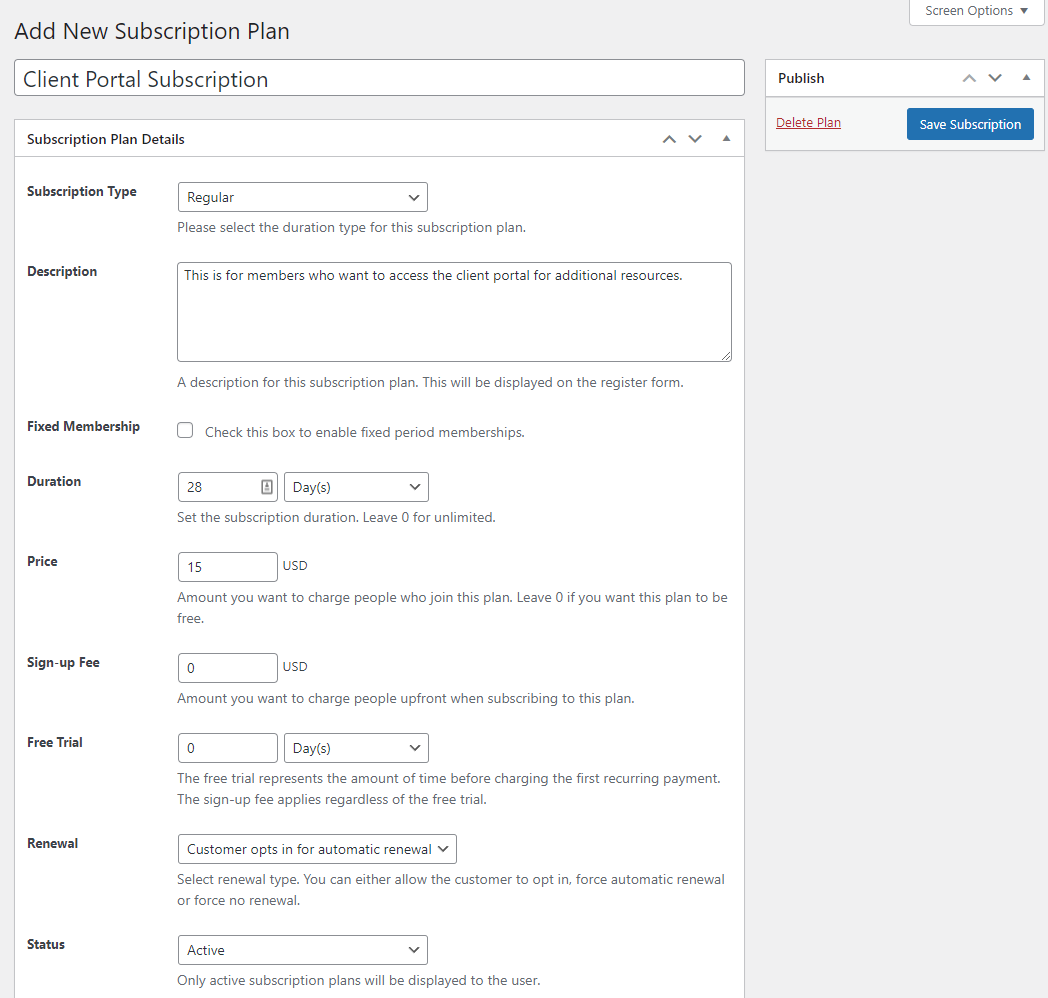
Create a subscription plan so members can subscribe to the client portal by paying a small fee. Click on the Save Subscription button once you’re ready.
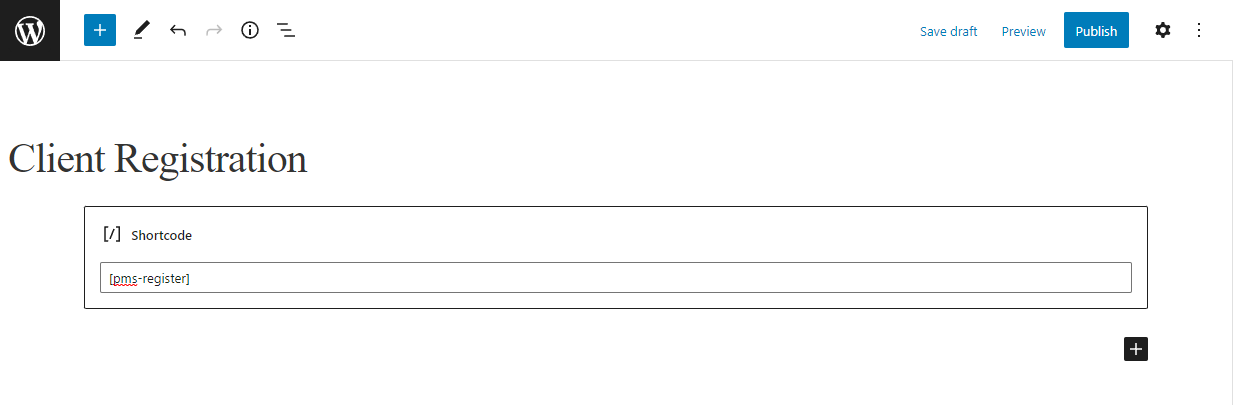
You also want to create a new registration page so users who aren’t subscribed and want to access your client portal can do so. Navigate to Pages → Add New to create a new page. Paste [pms-register] in the shortcode block and click the Publish button.
In this case, you’ll have to make sure to replace the registration page you’ve created using Profile Builder with this one above.
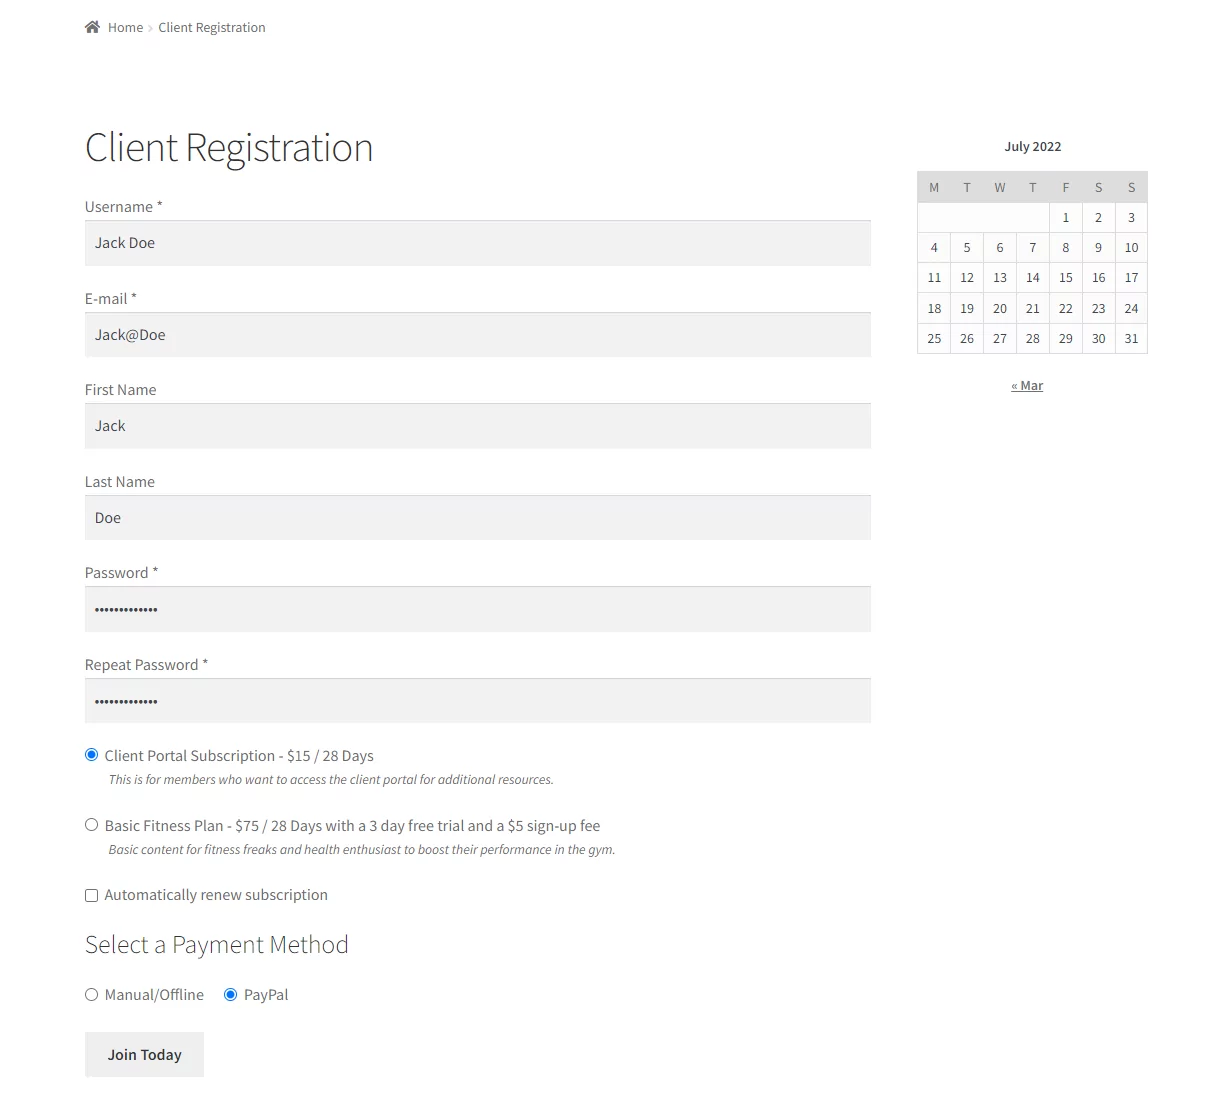
This lets regular members subscribe to the client portal subscription, if you don’t want to offer it for free.
Now navigate to the client portal page and restrict content using the Content Restriction meta box at the end of the page.
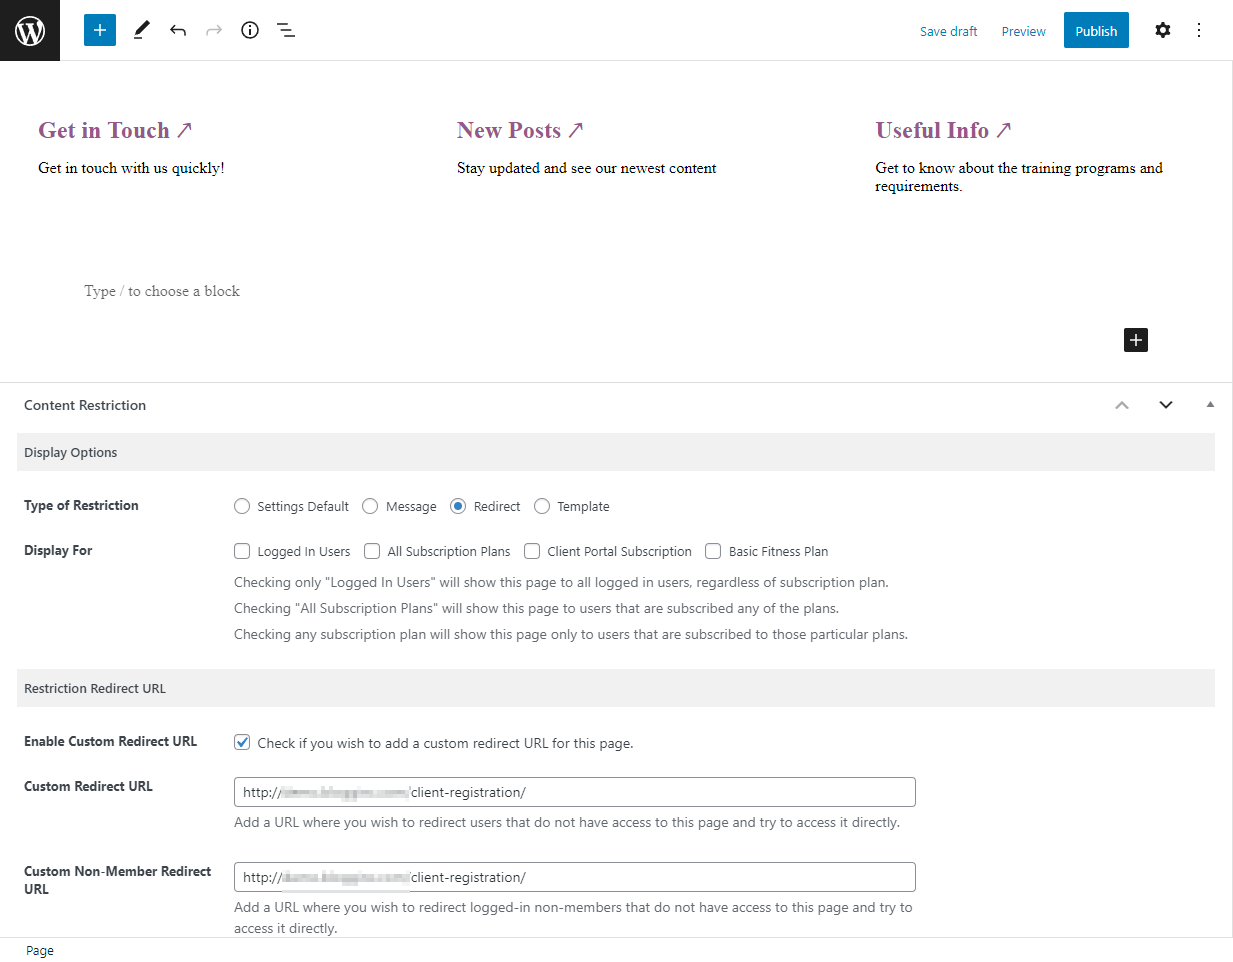
You can set the Type of Restriction to redirect and paste the client registration page’s URL. This will redirect all unauthorized users to the subscription page.
Now, all users who want to access the client portal will have to subscribe to you first by paying a small fee.
Additionally, you can also create a new login page for users who have already subscribed to log in to your site so they can access the client portal content. To do this, simply paste the [pms-login] shortcode onto a page instead of the one from Profile Builder.
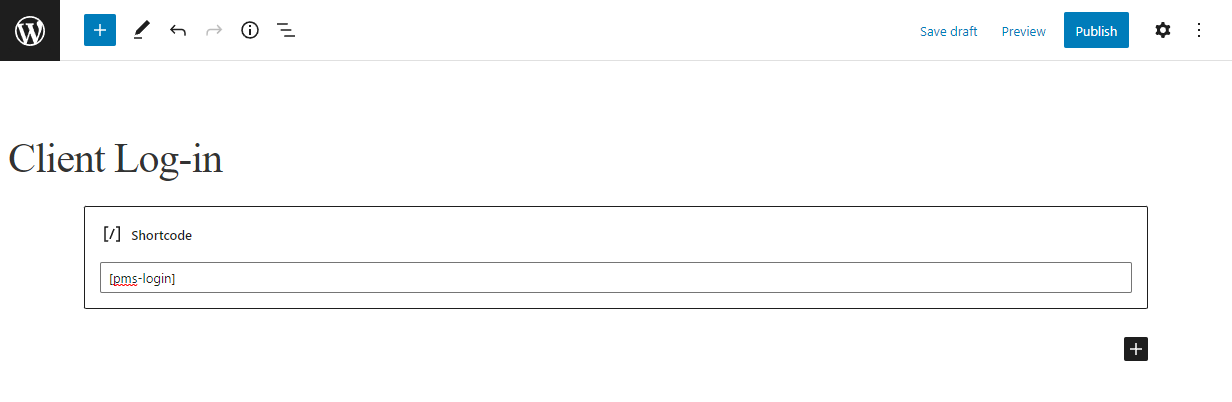
Make sure to click on the Publish button to continue.
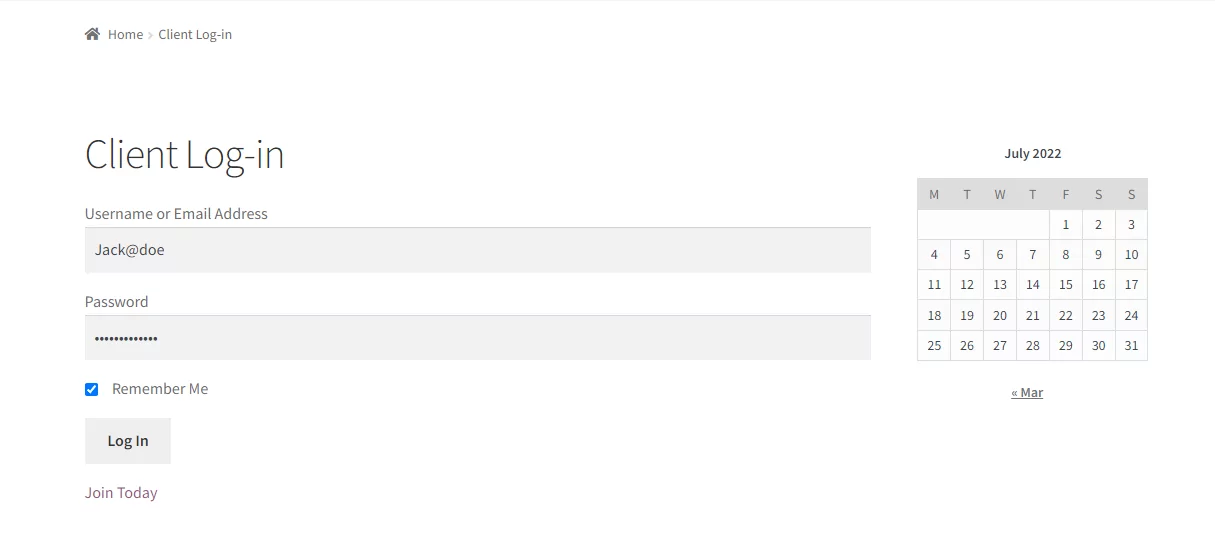
Now all registered members can log in to their accounts to easily access the client portal.
Conclusion
Creating a client portal yourself can be a challenge, especially if you don’t know where to start. Once you have a solid idea of what kind of portal you want to create for your business, you can start setting up a portal on your website using the free Client Portal plugin.
With a client portal, you also need to offer an easy way for users to register and log in to the client portal. This is where the robust Profile Builder plugin comes in. It lets you easily set up custom login and registration forms on your client portal and works seamlessly with the Client Portal plugin.
Finally, you might need to restrict client portal access for all site visitors, only letting specific user roles access the additional content in exchange for a small fee. This is easily possible with the Paid Member Subscriptions plugin.
Ready to create your own WordPress customer portal? Get Profile Builder Pro today!
Do you still have questions about building a WordPress customer portal? Ask them in the comments section below!
Related Articles

WordPress Profile Builder: a Front-end User Registration, Login and Edit-Profile Plugin
Easily Login, Register and Edit your Profile Directly from the Front-end Profile Builder lets you add front-end forms that give your users a more flexible way to register, log in, and modify their profile information. If you allow public registration on your site, you don't want to force your users to use the backend WordPress […]
Continue Reading
Best WooCommerce Subscriptions Alternative: Paid Member Subscriptions, a More Affordable and Complete Solution
Are you looking to sell subscription products on your WooCommerce site? One of the most popular ways to sell subscription products in WooCommerce is with the WooCommerce Subscriptions plugin. It lets you create WooCommerce products with recurring payments as a way to offer subscriptions to your customers. While this is an official extension from WooCommerce, […]
Continue Reading
How to Create a Website with Membership and User Login
Searching for a way to create a website with membership and user login? Membership sites are very popular because they let you build your own community. Instead of relying on social media for your audience, you can create your own group of members on your own platform (and maybe even charge for membership if you […]
Continue Reading