

Table of Contents
- 1 Useful Ways to Customize the WooCommerce Registration Setup
- 2 What You’ll Need to Customize WooCommerce Registration
- 3 How to Customize WooCommerce User Registration Using Profile Builder (4 Steps)
- 3.1 1. Set Up Basic WooCommerce Registration Behavior
- 3.2 2. Customize Your WooCommerce Registration Form
- 3.3 3. Replace the “My Account” Registration Form With Your Custom Form
- 3.4 4. Add Custom User Registration Fields for WooCommerce Checkout
- 3.5 Optional: Create Separate Registration Forms for Different Users
- 3.6 Optional: Customize the WooCommerce Edit Profile Form
- 4 Create Your Own Custom WooCommerce User Registration Setup
Are you looking for a way to customize WooCommerce user registration on your site? Perhaps you need to collect more information or want to display different fields to different users. By default, WooCommerce doesn’t give you much control over the registration process.
Fortunately, you can use a dedicated WooCommerce user registration plugin. This way, you can replace the default WooCommerce registration forms with custom ones. For example, you might present different items, add more fields, and more.
In this post, we’ll look at some of the ways to customize the WooCommerce registration process. Then, we’ll show you how to customize the existing registration forms. Let’s dive in!
Useful Ways to Customize the WooCommerce Registration Setup
Before we show you how to customize the WooCommerce registration process, let’s go over a few examples of modifications that you can make.
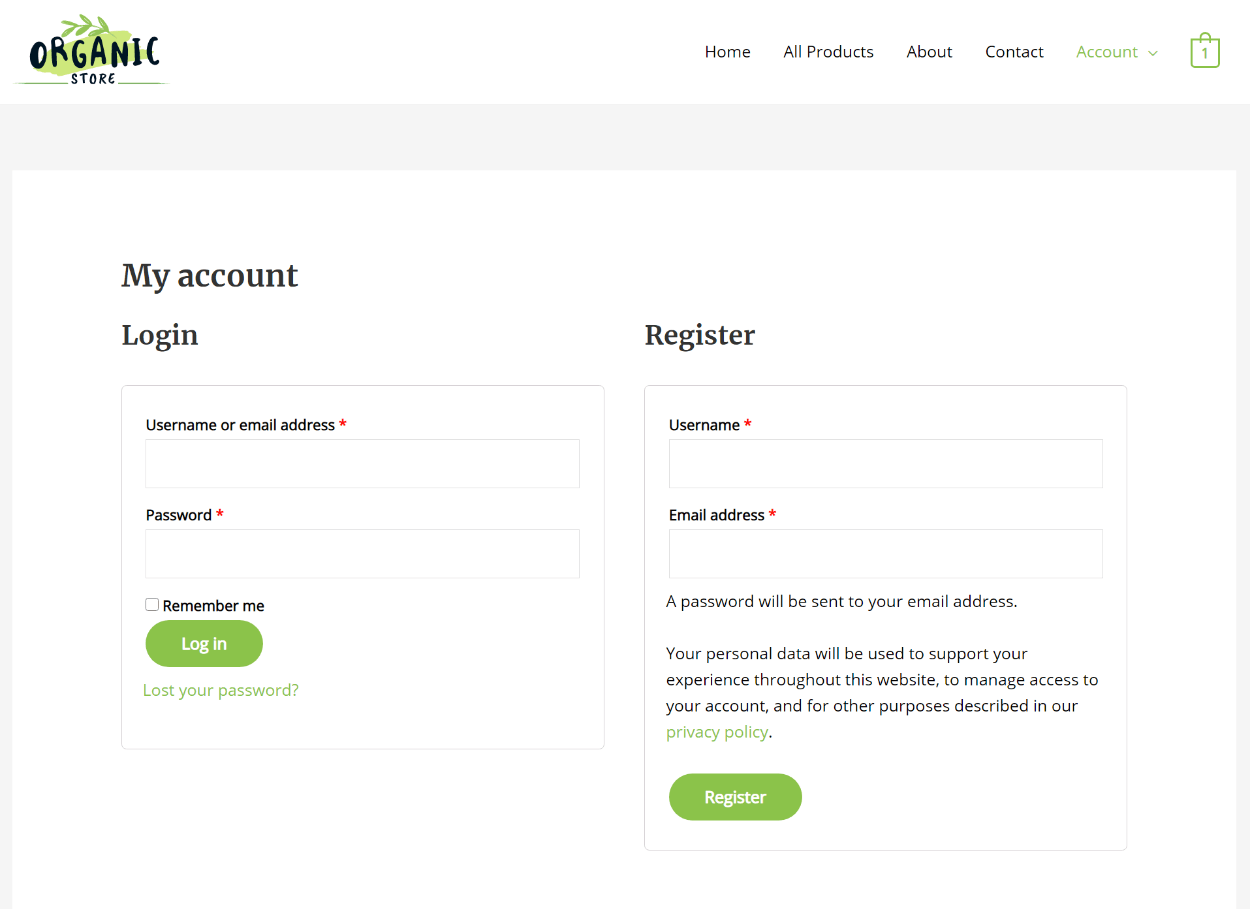
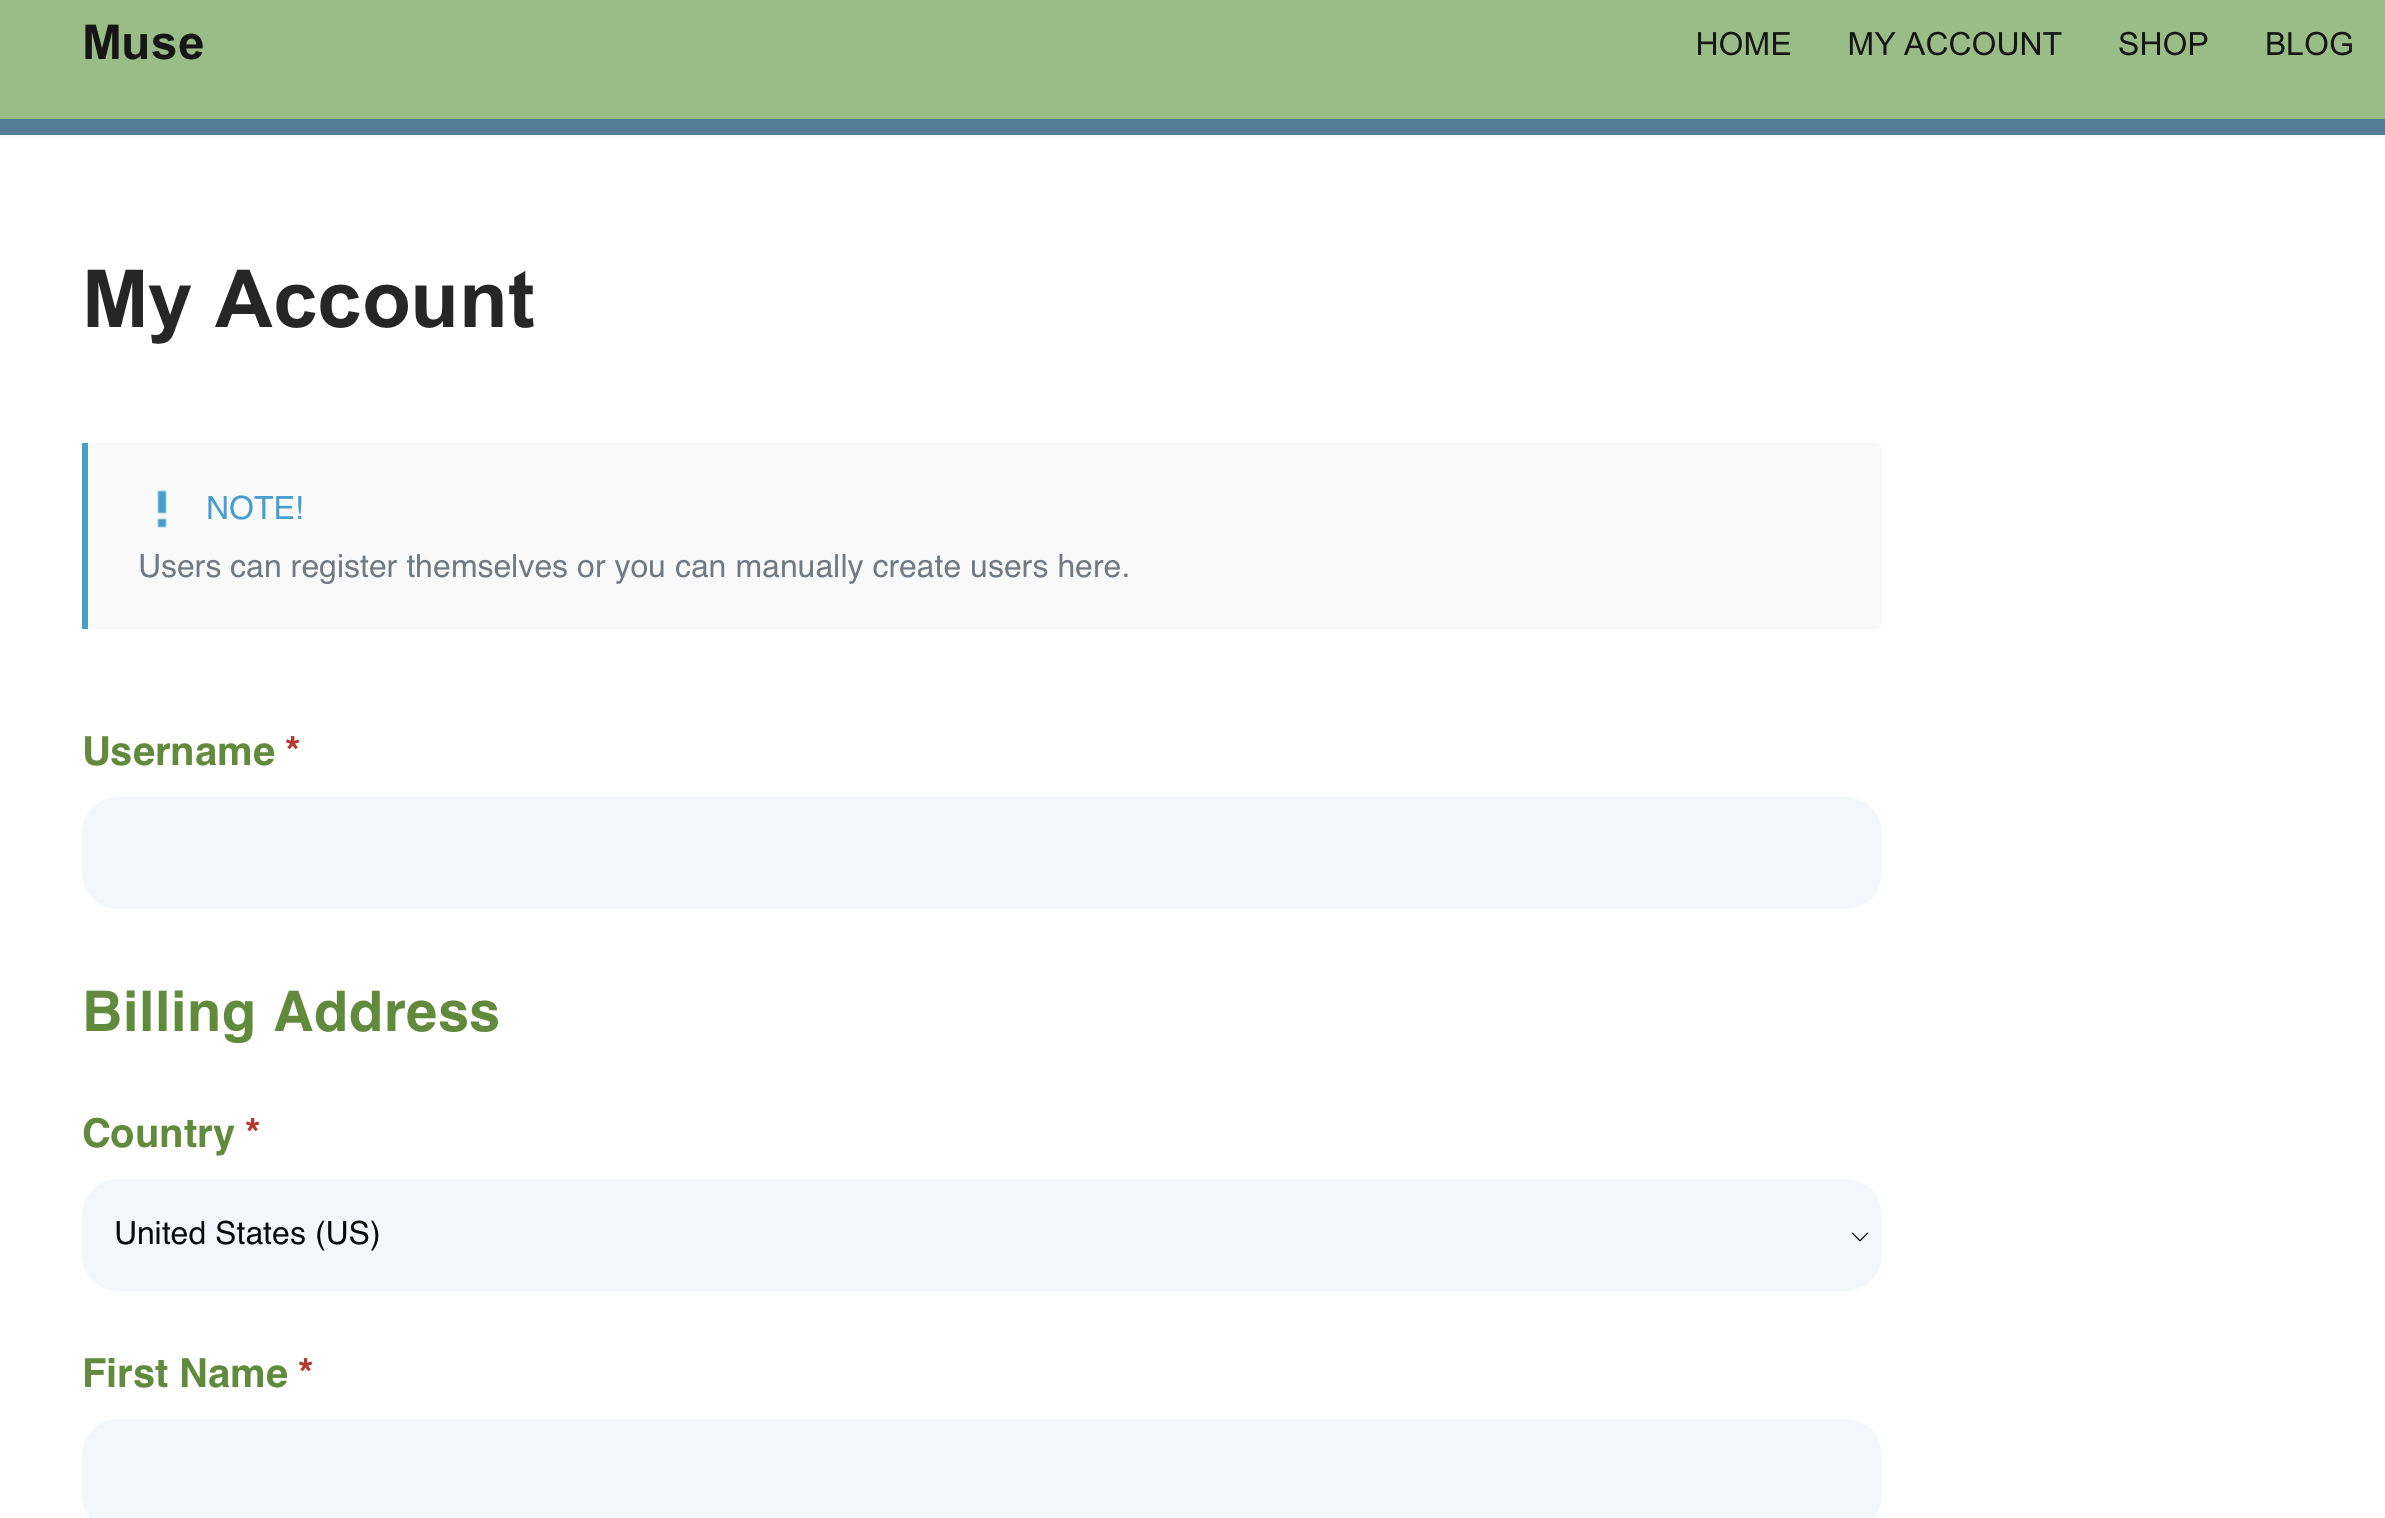
For instance, you might want to change the default WooCommerce registration form on the “My Account” page:
By following the tutorial in the next section, you’ll be able to replace it with a completely custom form:
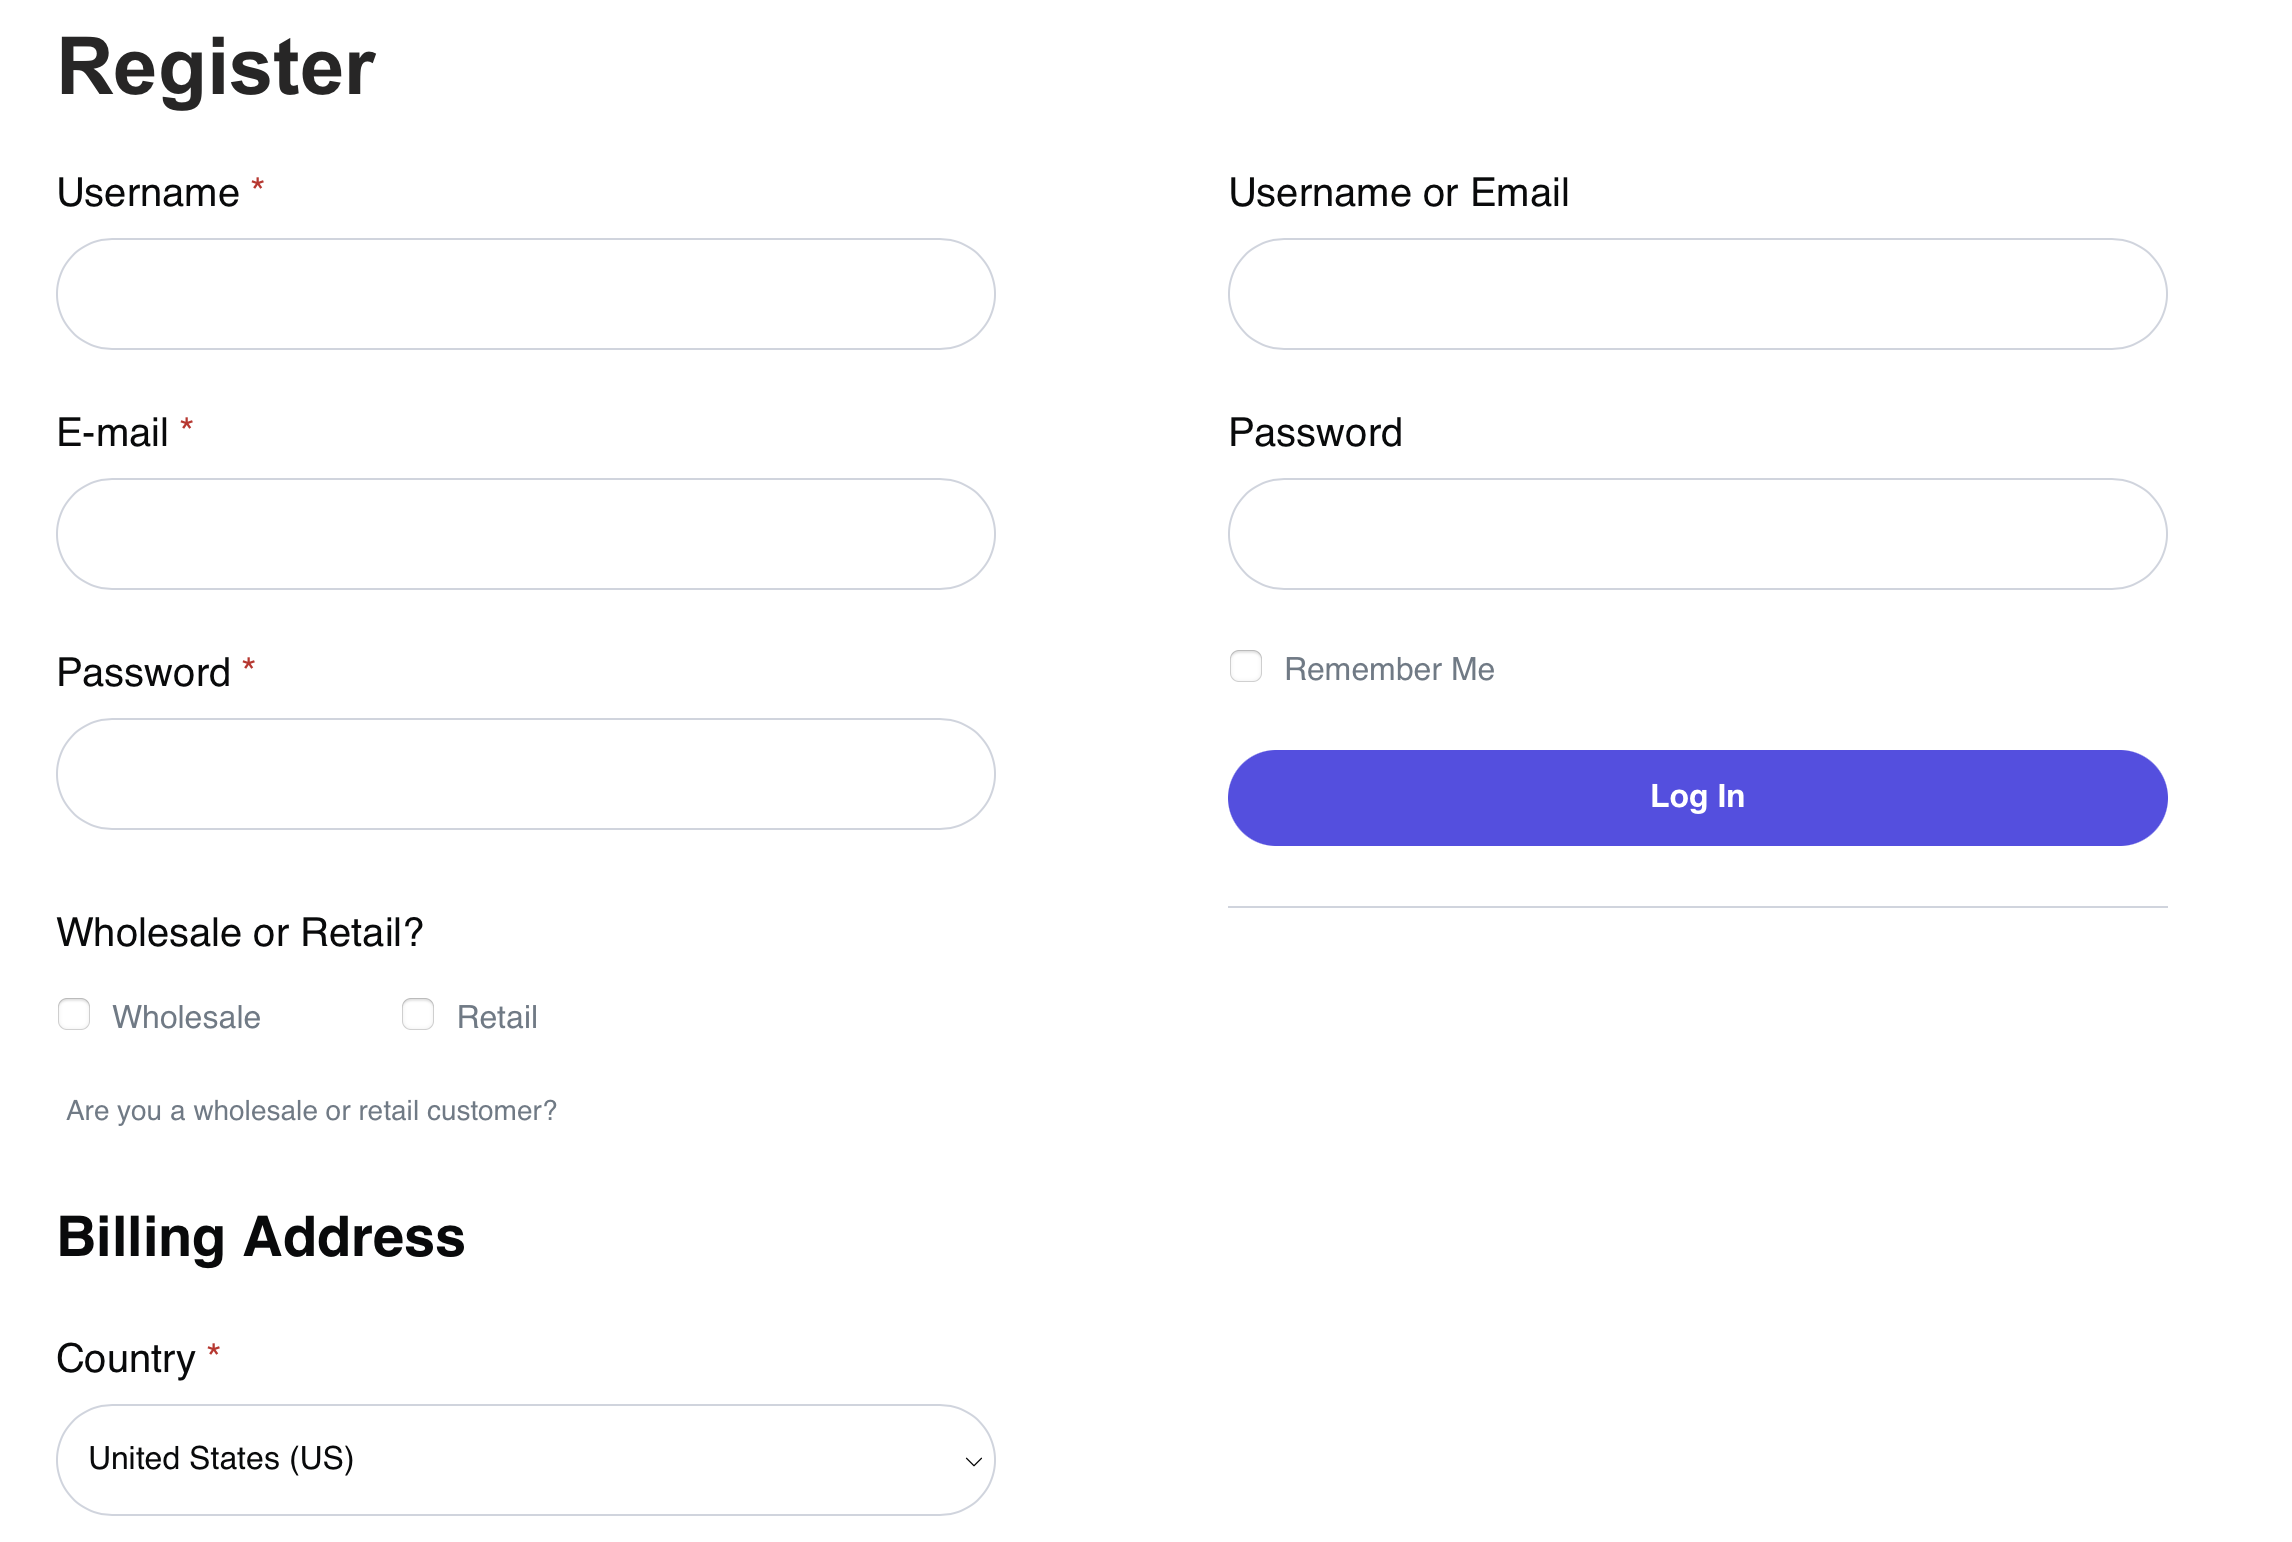
You can include as many fields as needed. You can even add unlimited custom fields to collect additional information like billing details.
Similarly, you might modify the default WooCommerce checkout page to include new fields. Plus, you can use advanced tactics like conditional logic and repeater fields to keep your checkout registration forms short while collecting all the information that you need.
Additionally, you’re able to use different sets of fields on the “My Account” page and checkout page registration forms. And, if you want to go beyond the default WooCommerce registration system, you can add your custom registration forms anywhere on your site.
What You’ll Need to Customize WooCommerce Registration
To customize the WooCommerce registration process, you’ll need the help of a dedicated WooCommerce user registration plugin. Specifically, you’ll want to install the Profile Builder plugin:
Profile Builder is a full-service WooCommerce registration and user profile plugin that has a dedicated integration with WooCommerce.
While the basic Profile Builder plugin is available for free at WordPress.org, you’ll need the premium version to access the WooCommerce Sync add-on. WooCommerce Sync lets you connect your custom registration forms with existing WooCommerce fields like shipping and billing fields.
It also lets you replace parts of the default WooCommerce registration system with your custom system. To access this integration, you’ll need to purchase the Basic plan.
Meanwhile, if you want access to other advanced features such as repeater fields, you’ll need the Pro license.
How to Customize WooCommerce User Registration Using Profile Builder (4 Steps)
Now, let’s get into the step-by-step tutorial. In this section, we’ll show you how to use the Profile Builder plugin to customize your WooCommerce registration process.
Before we begin, we’ll assume that:
- You already have a working WooCommerce store.
- You’ve installed and activated the Profile Builder plugin and the WooCommerce Sync add-on. Again, you can get access to the WooCommerce Sync add-on by purchasing the Basic license.
Now, let’s get to it!
1. Set Up Basic WooCommerce Registration Behavior
We’re going to show you how to successfully customize the WooCommerce registration process. But first, you’ll want to make sure you’ve properly configured WooCommerce to achieve the registration behavior that you want.
For example, do you want users to be able to register for an account from the checkout page? And if so, do you want to force them to register for an account or do you want to give them the option to check out as a guest?
To make these choices, go to WooCommerce → Settings → Accounts & Privacy. In this area, look at the Guest checkout and Account creation settings, which are both located at the top:
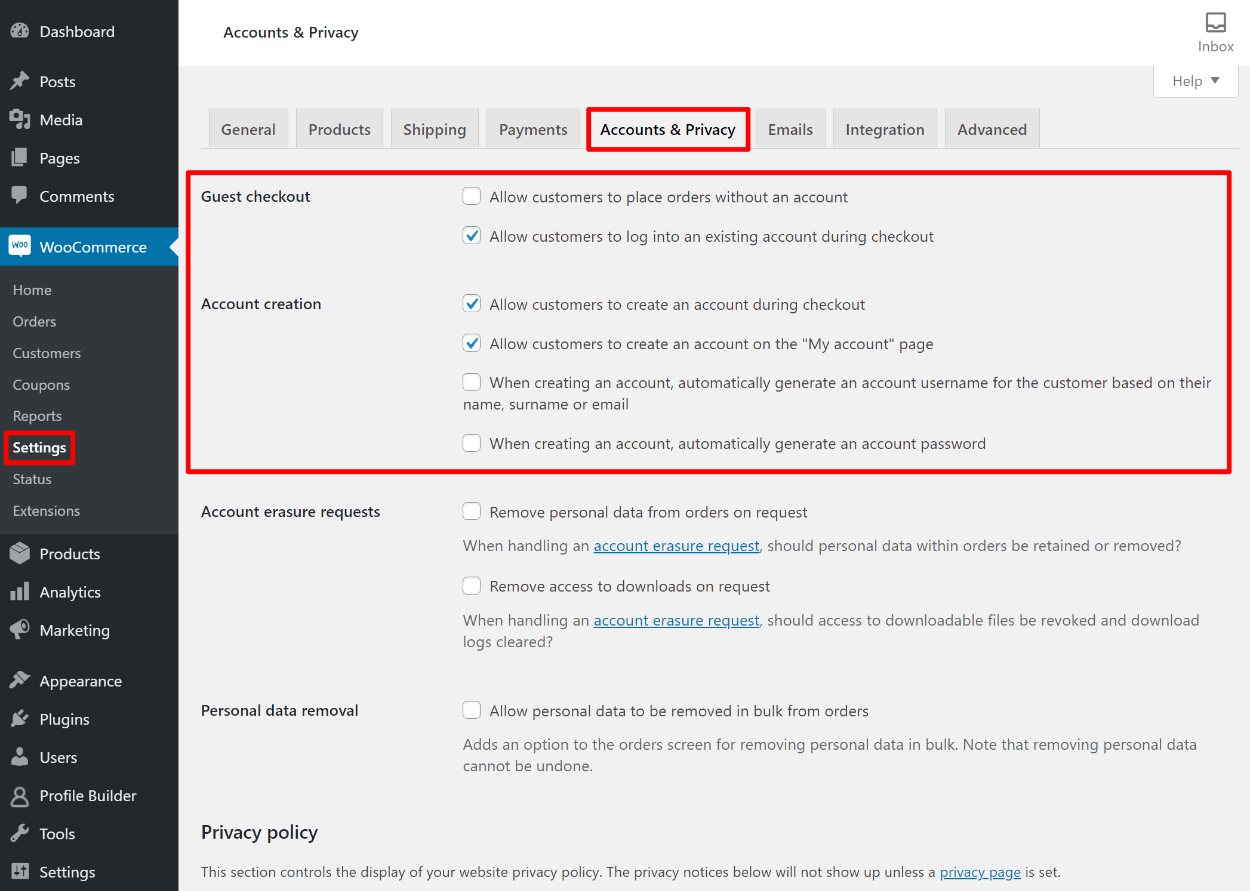
In the Guest checkout settings, you can choose whether or not shoppers should be able to place an order without an account. If you uncheck the box, shoppers will be forced to register before they can check out.
Second, you can use the Account creation settings to control where/when shoppers can register. For this tutorial, we recommend allowing users to register during checkout and on the “My Account” page.
You could even disable both options and force users to register via a custom form that you place somewhere else. We’ll show you how to create this type of form in the next section.
2. Customize Your WooCommerce Registration Form
Now, you’re ready to create the custom registration form that you’ll use to replace the default WooCommerce user registration form.
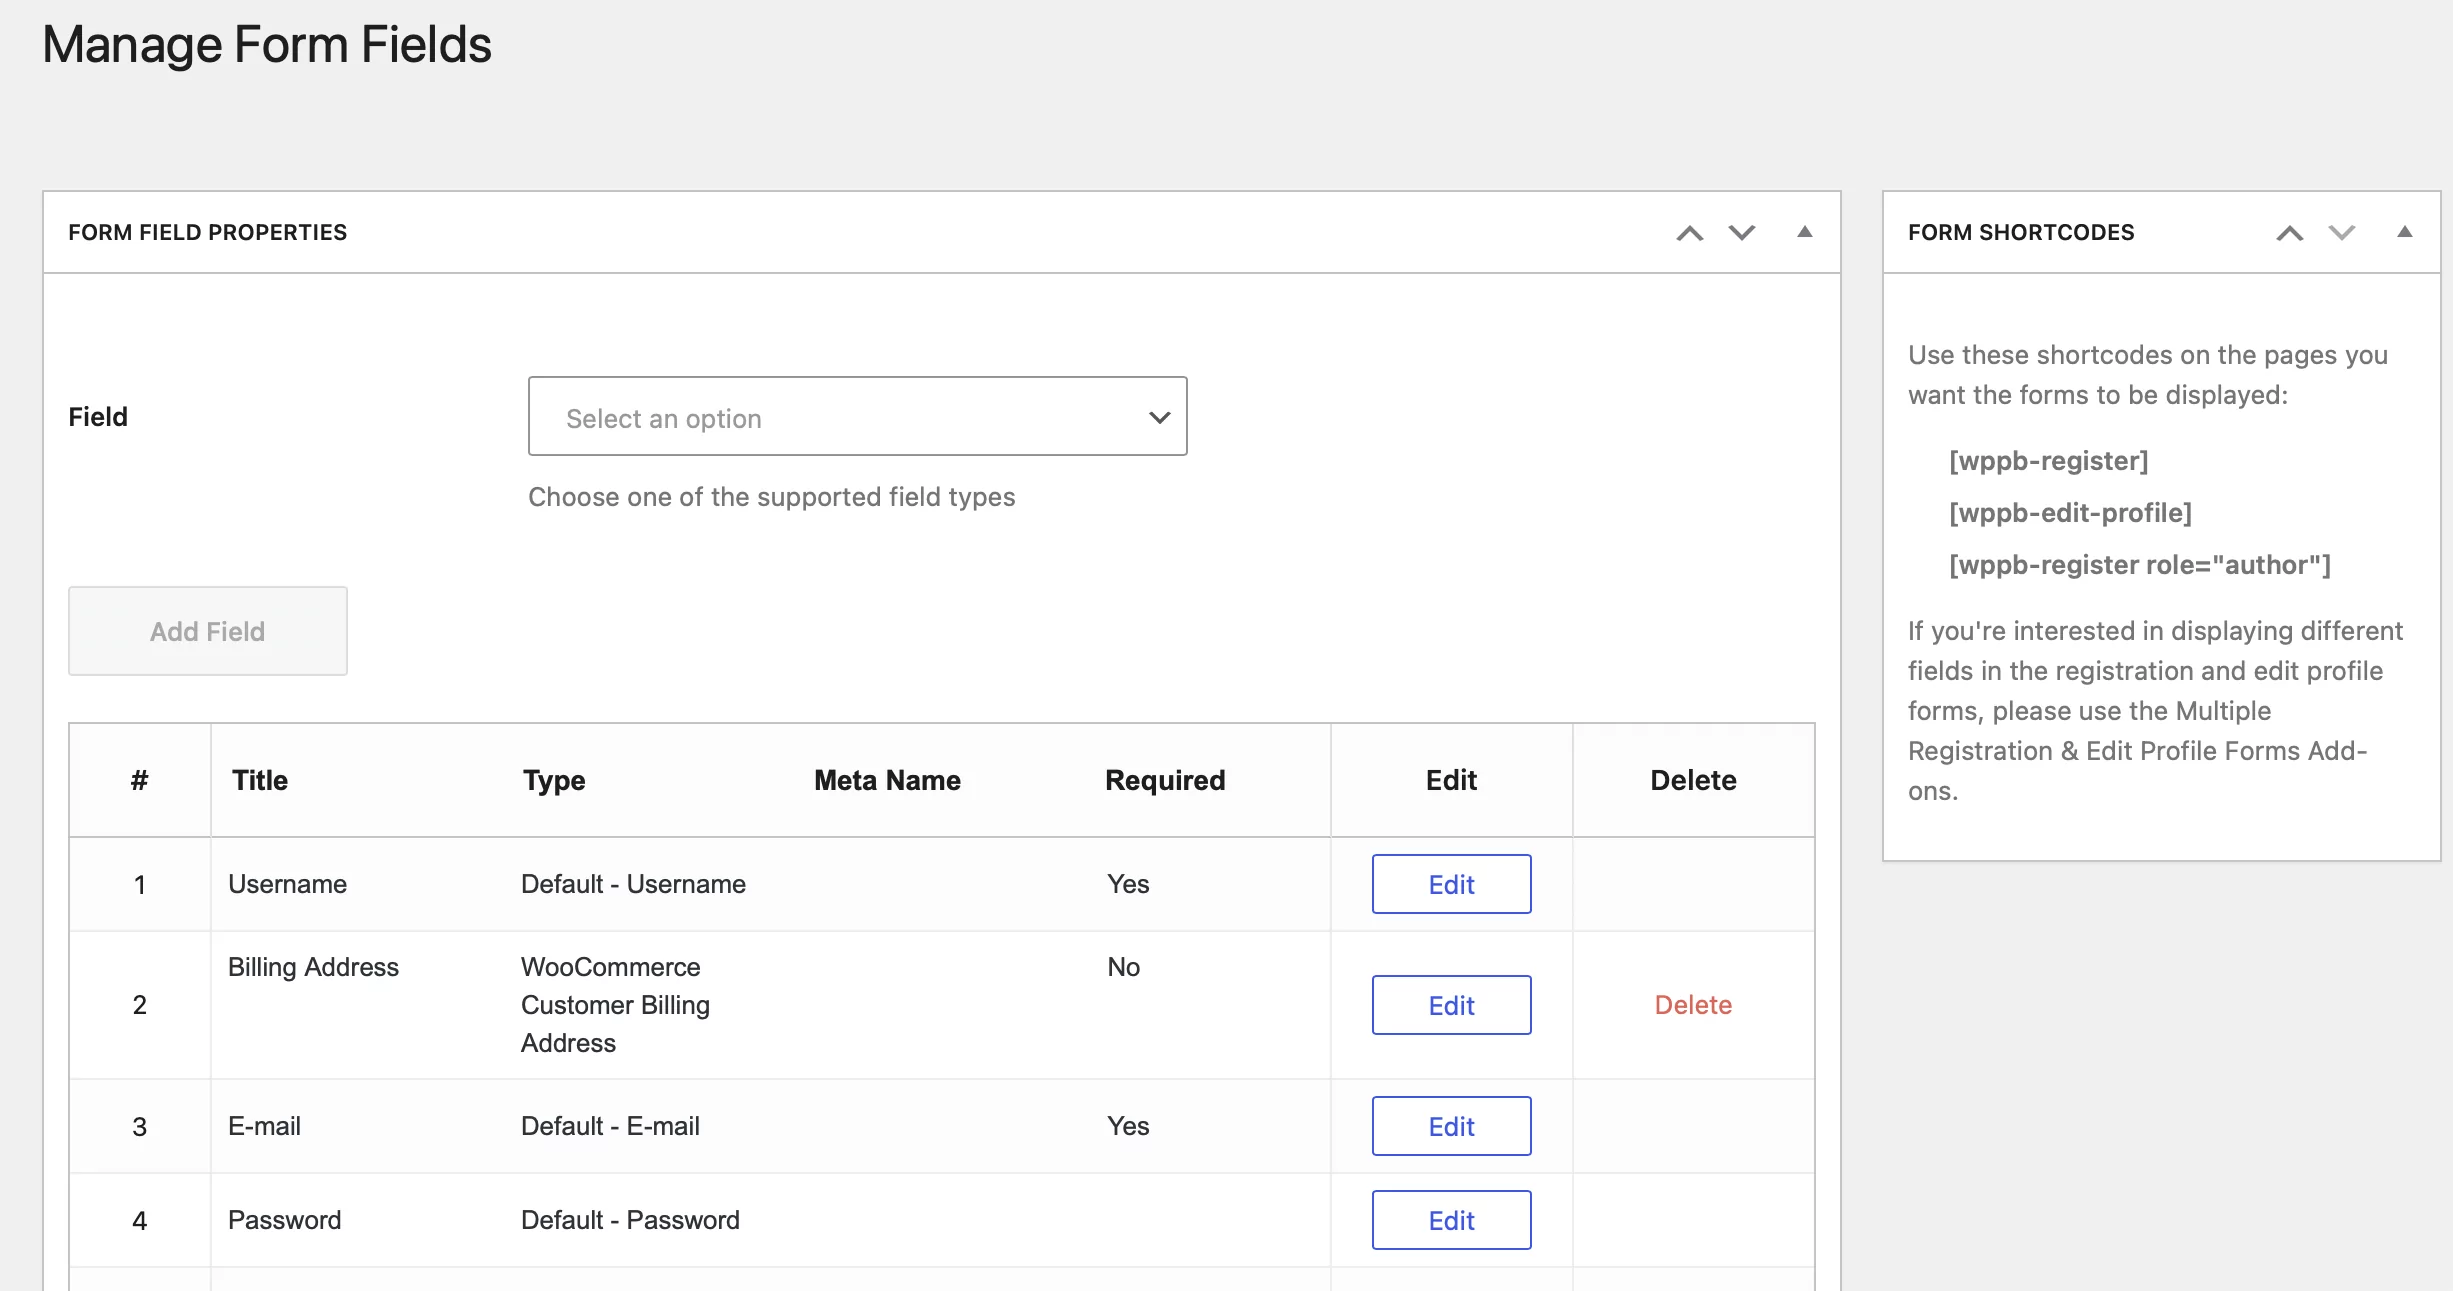
To do this, go to Profile Builder → Form Fields:
Here, you’ll be able to choose exactly which fields to include on the WooCommerce registration form. You can use:
- Default WordPress fields – for example, “Email”, “Name”, “Password”, etc.
- Default WooCommerce fields – you can add dedicated fields for “Billing Address” and “Shipping Address” that sync with WooCommerce.
- Custom fields – you can add your own custom fields to collect whatever information you want. You can choose from a variety of field types including text, drop-down, file upload, checkbox, and more.
By default, Profile Builder will have already added the bare minimum that you need for a WooCommerce registration form. This includes essential fields like “Email”, “Billing Address”, and “Shipping Address”.
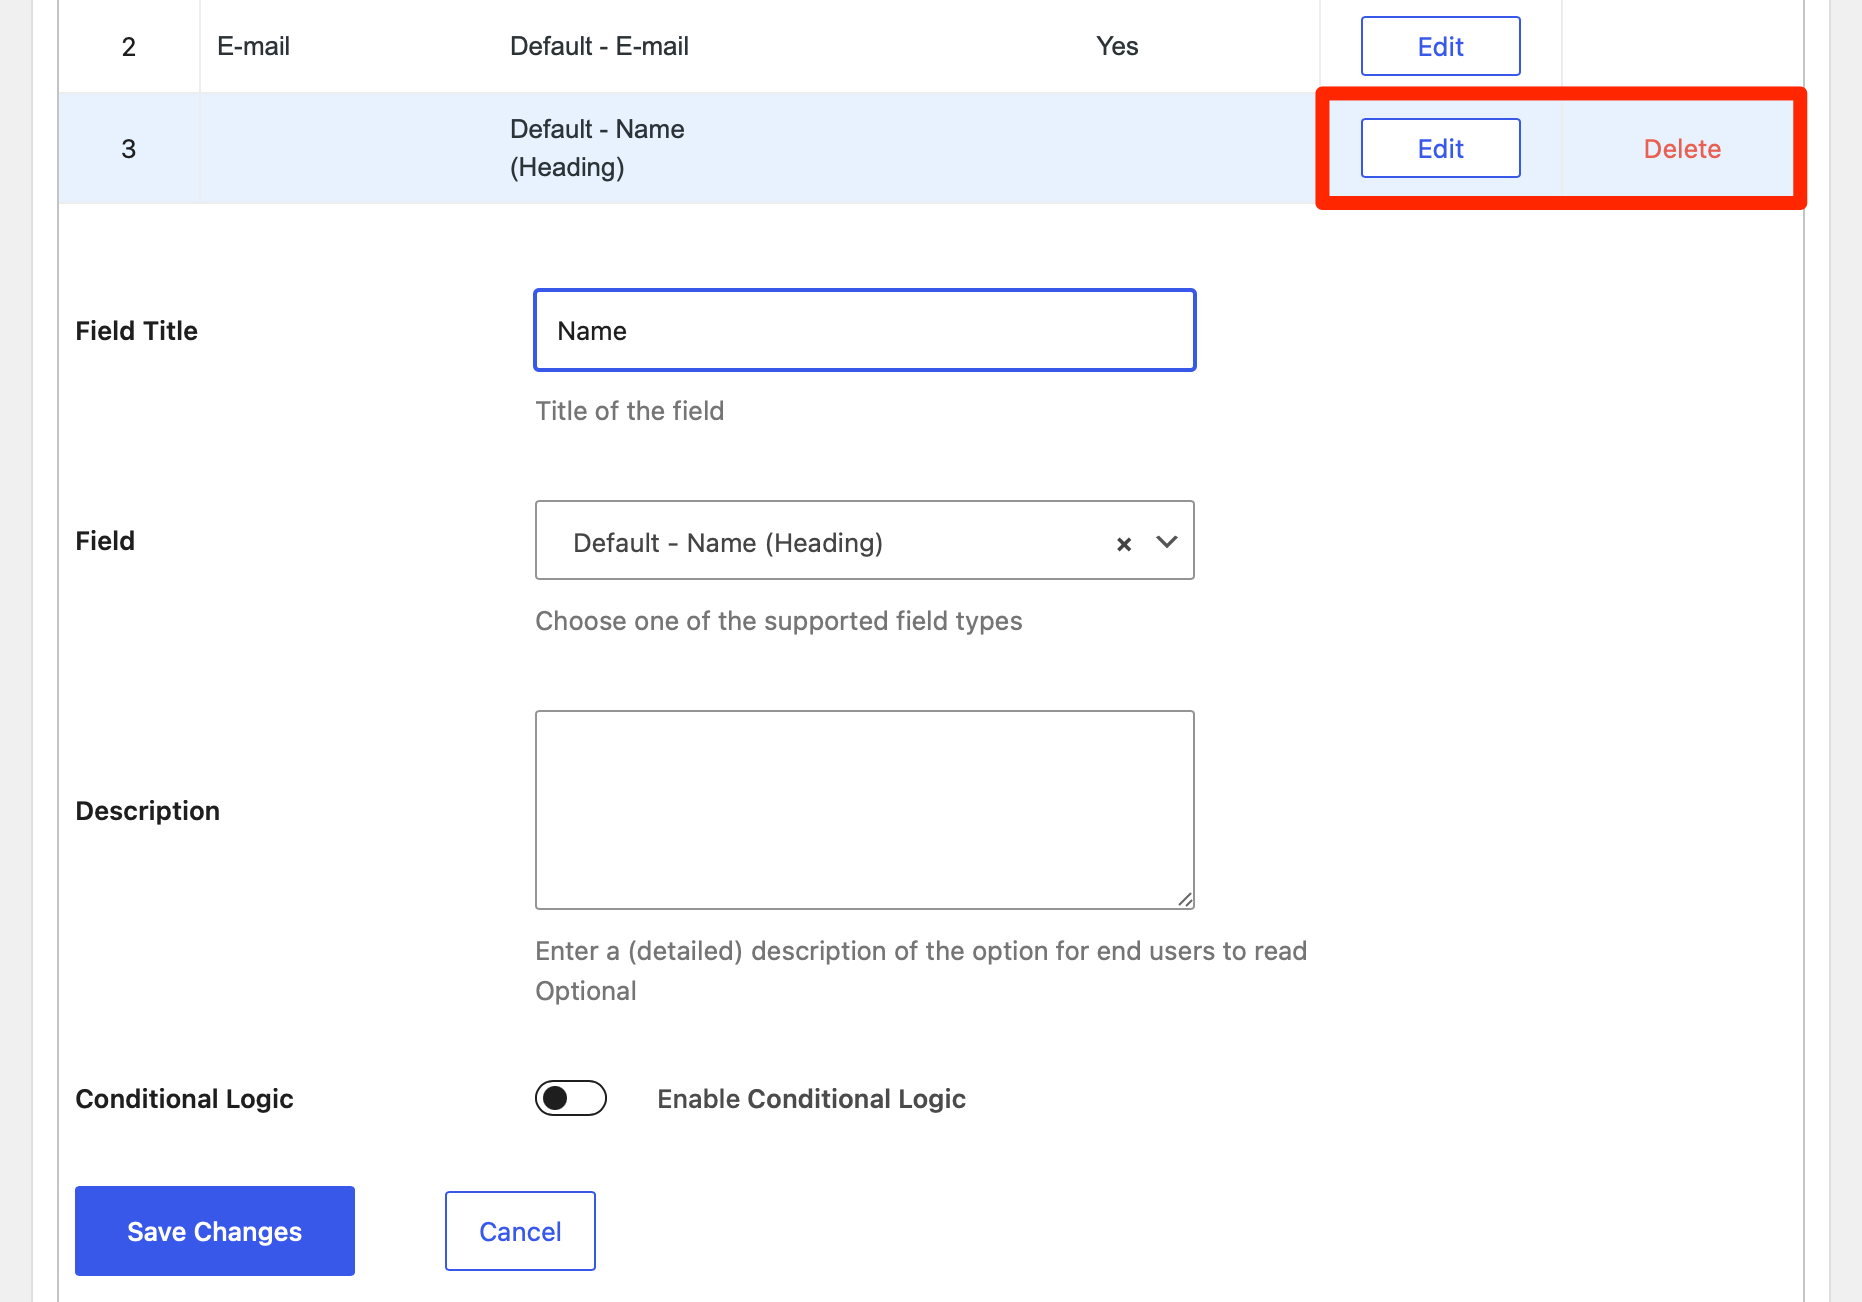
You can simply drag and drop the fields to rearrange the display order. You can also click on the Edit option next to each field to change the settings. If you don’t need it, select Delete to remove it:
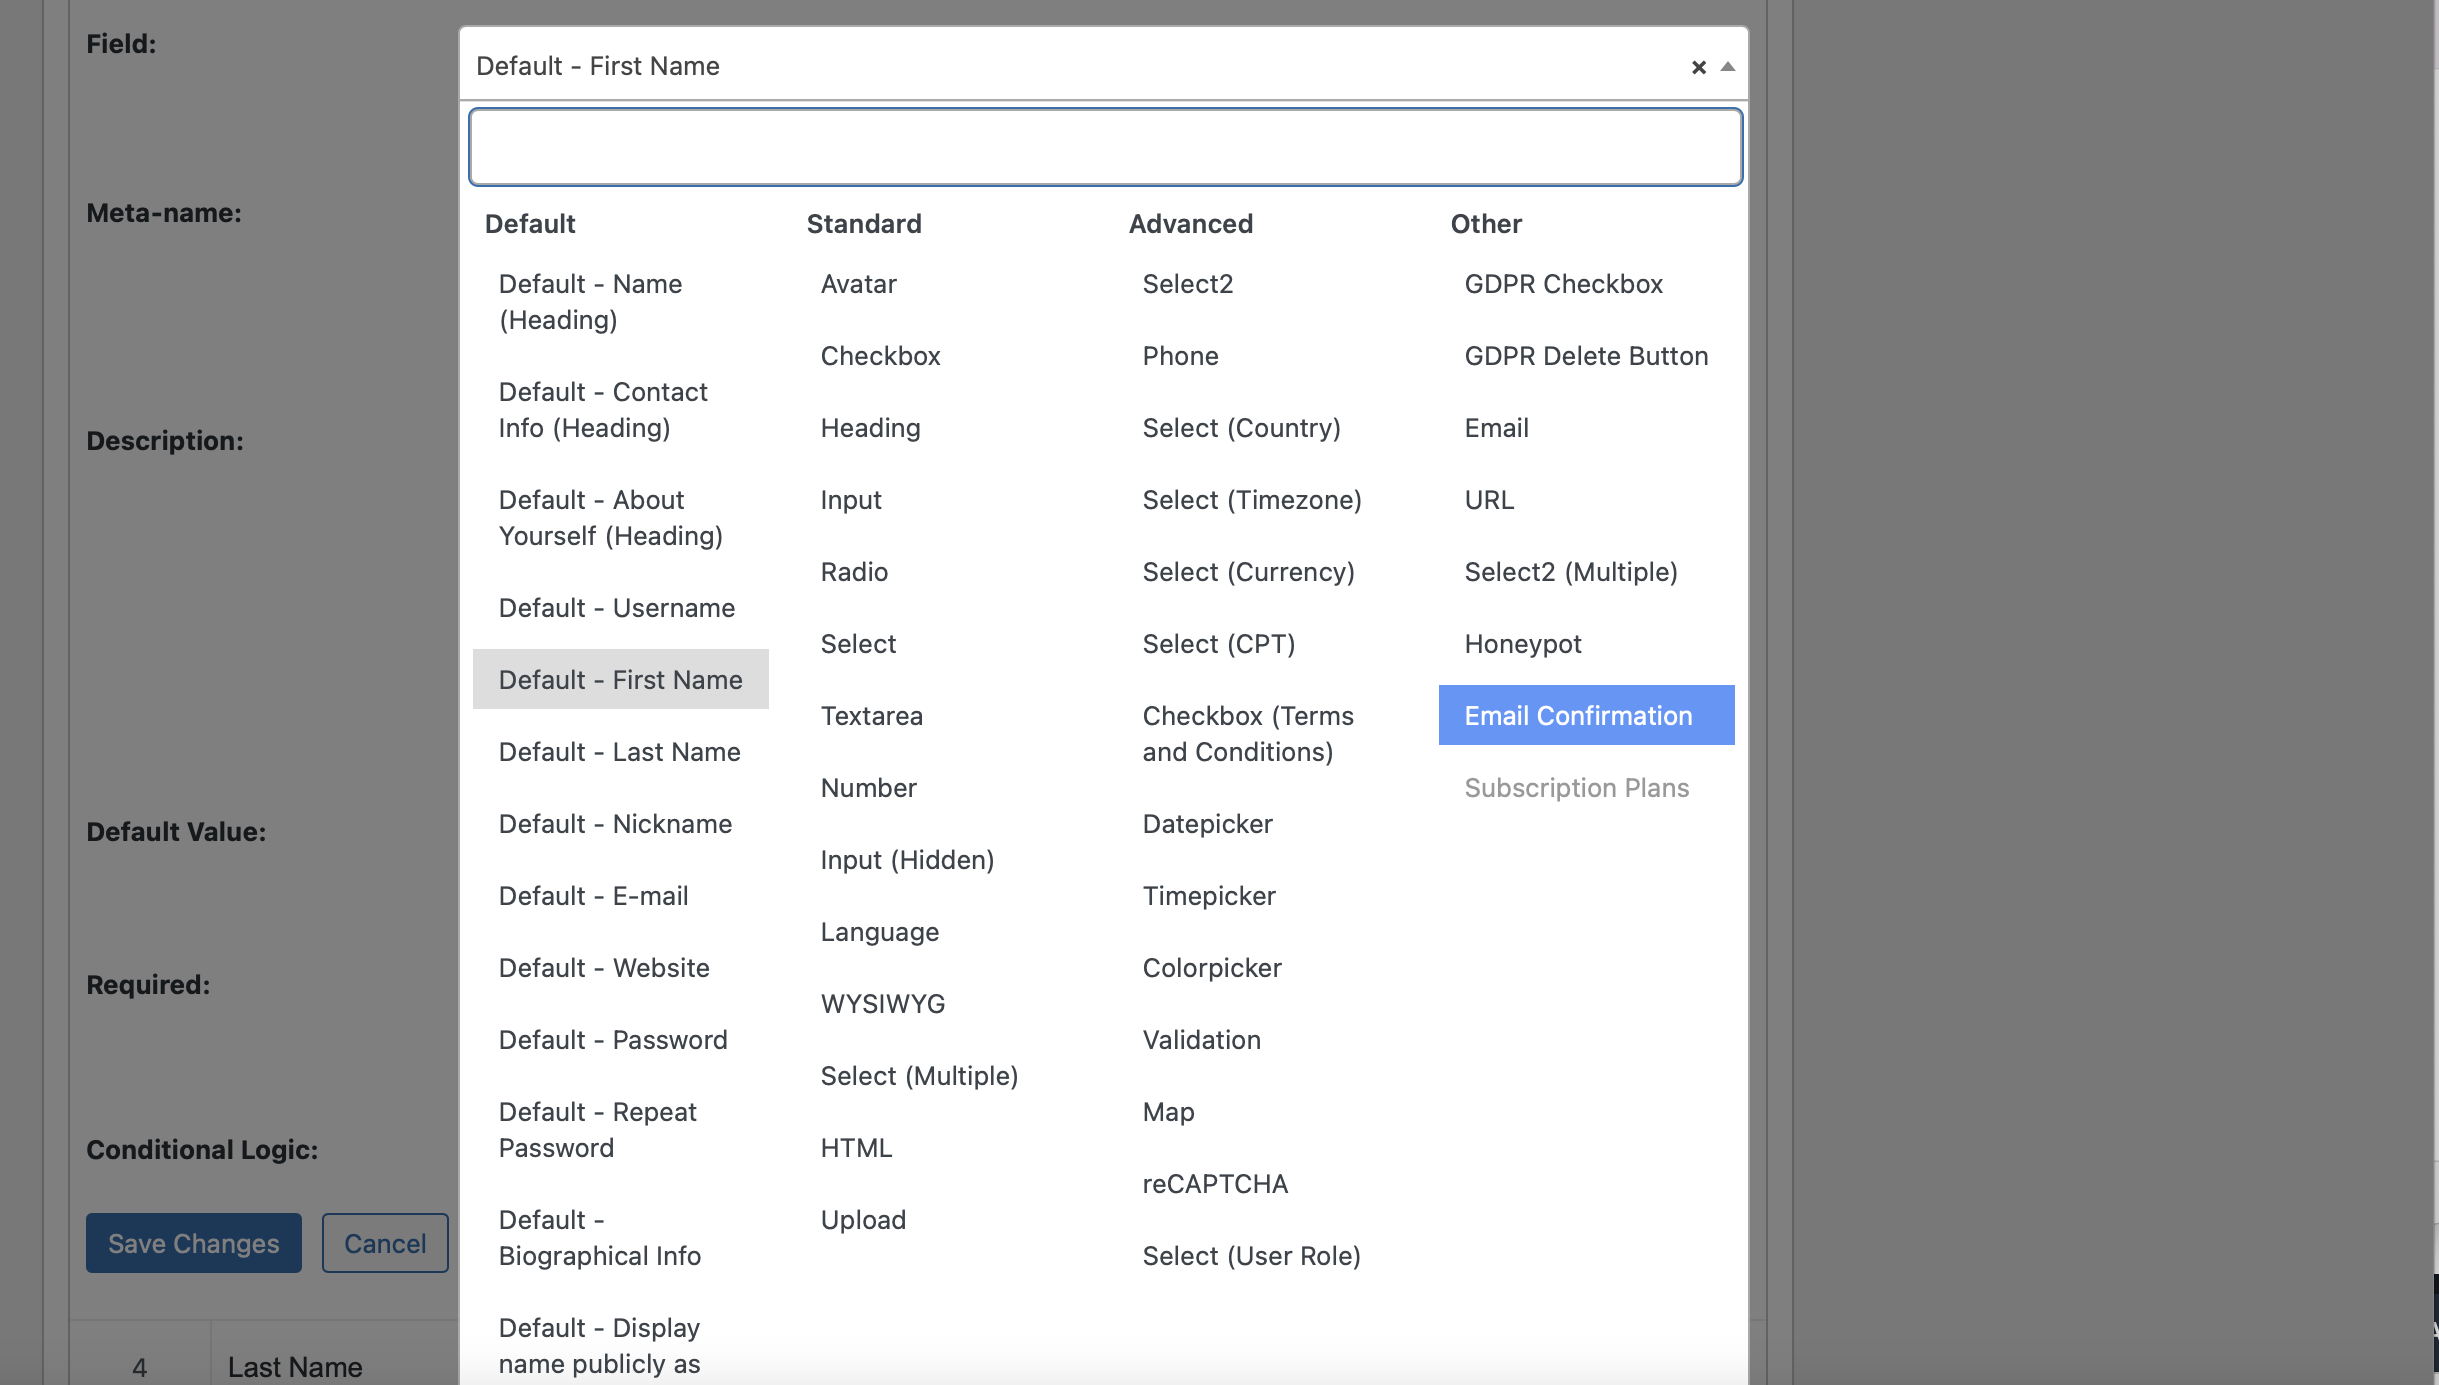
To add custom fields, use the Field drop-down at the top to choose the type of field that you want to add:
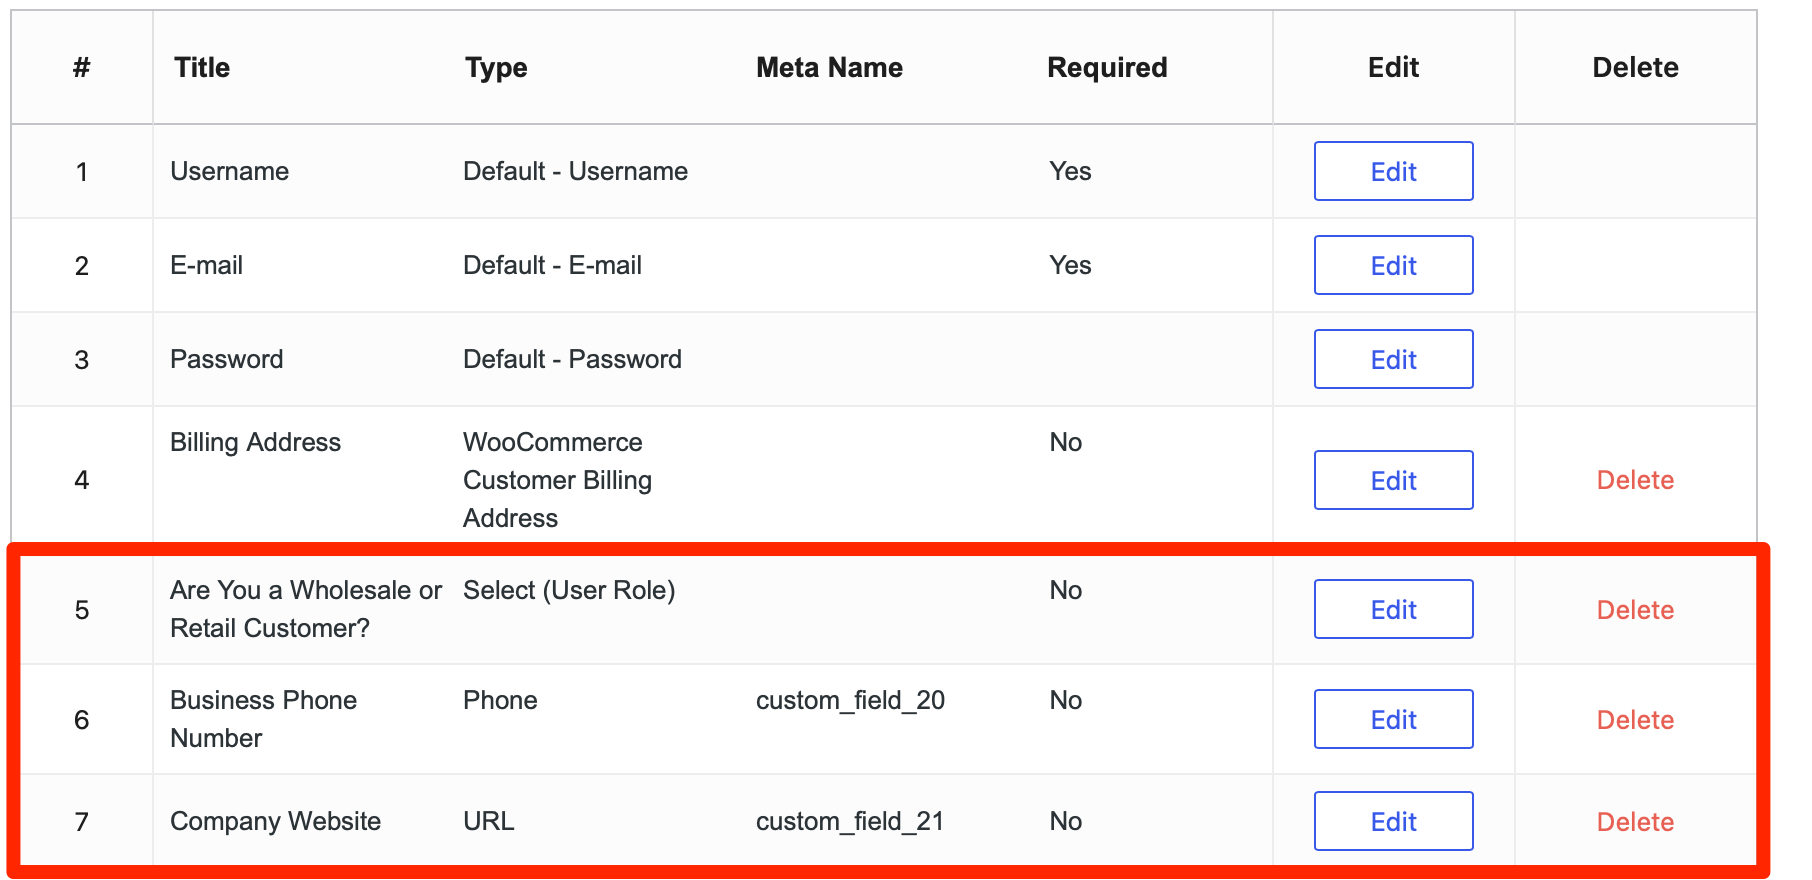
With the Select (User Role) field, you can even register shoppers as different WooCommerce user roles depending on how they answer. For example, we’ve added some additional fields that let shoppers choose whether they’re wholesale or retail customers:
Check out our post on WooCommerce user roles to learn why this is useful.
You can add whatever field types you want, and as many fields as you need. For each field, you’ll also be able to choose whether it’s required.
Advanced: Use Conditional Logic
Conditional logic is one of the advanced features available with Profile Builder. This feature enables you to show/hide certain WooCommerce registration fields based on how a user has answered previous fields:
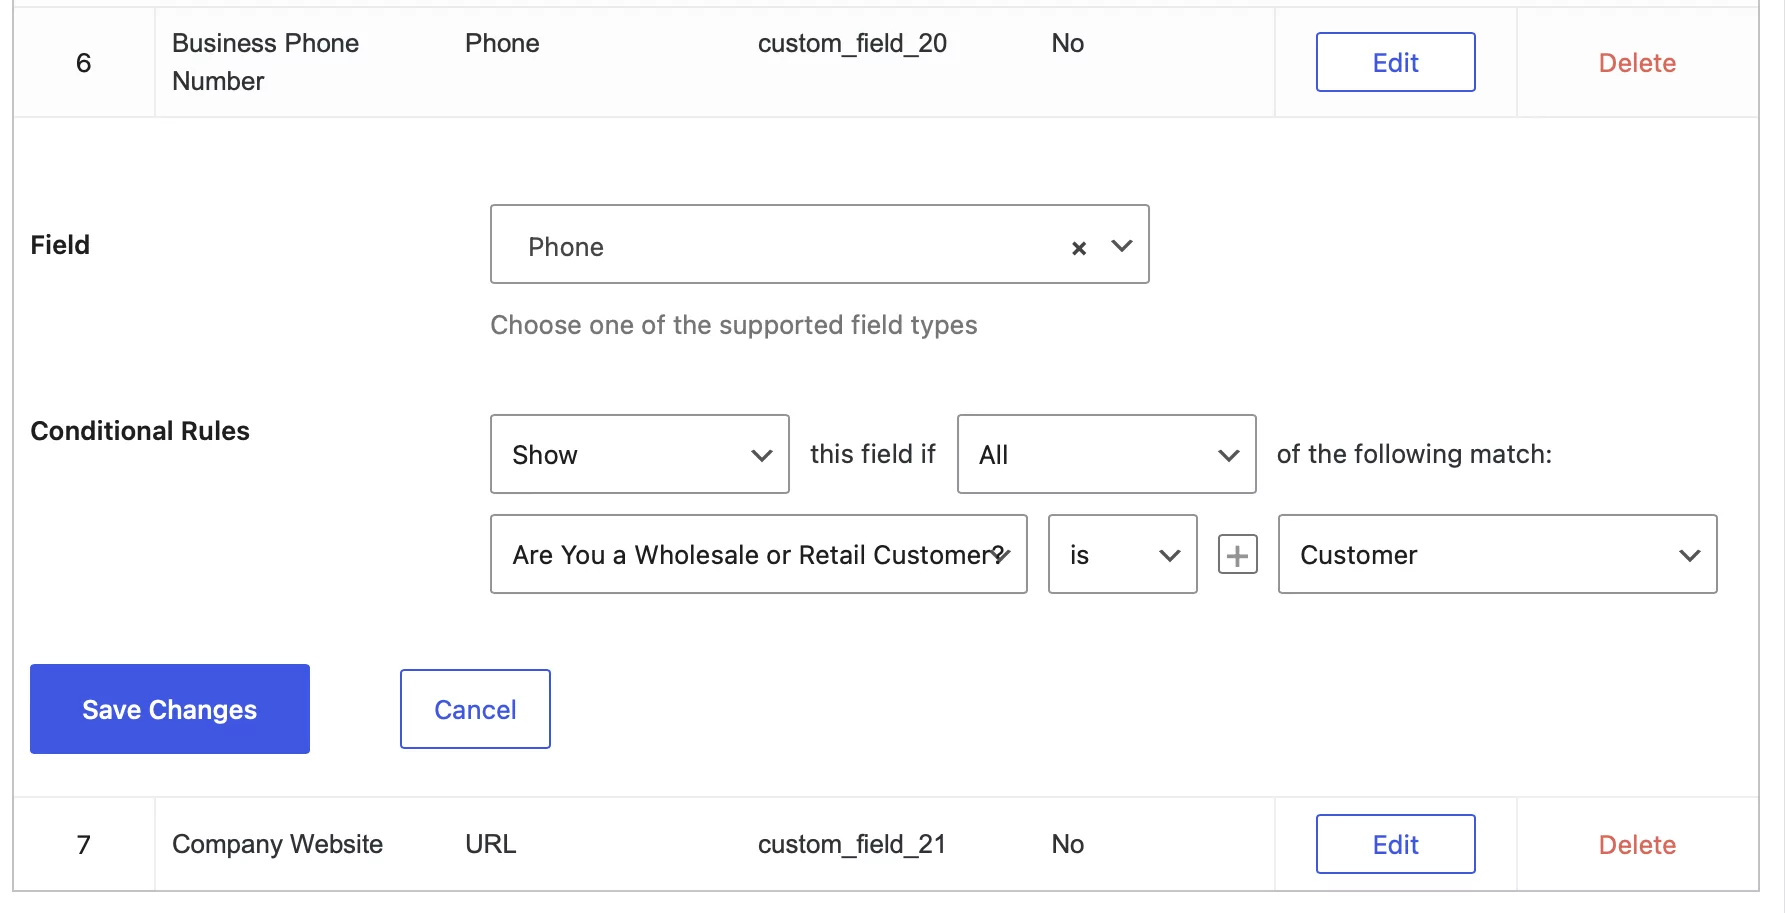
In the example above, we’ve set it up so that a user needs to enter some additional information if they mark themselves as a wholesale customer. In this configuration, the user will only need to enter their business phone number if they indicate that they’re a wholesale customer on the registration form.
Advanced: Add Repeater Fields
Profile Builder also lets you use repeater fields in your WooCommerce registration forms. This gives users the option to enter the same information multiple times.
For example, if you’re selling to wholesale customers, you might want to give customers the option to add multiple contact numbers for the account. Therefore, you could create a repeater field that lets users add as many names and phone numbers as needed.
You can even display repeater fields on the WooCommerce checkout, which opens up a lot of possibilities. To learn how this works, check out our guide on repeater fields in Profile Builder. Note that you’ll need to purchase the Pro plan to access repeater fields.
3. Replace the “My Account” Registration Form With Your Custom Form
Once you’ve created your custom WooCommerce registration form, the next step is to use it to replace the default WooCommerce forms. In this section, we’ll show you how to do that.
To replace the default WooCommerce form with your custom form, go to Profile Builder → WooCommerce Sync. Then, use the Register form dropdown to select Default Register:
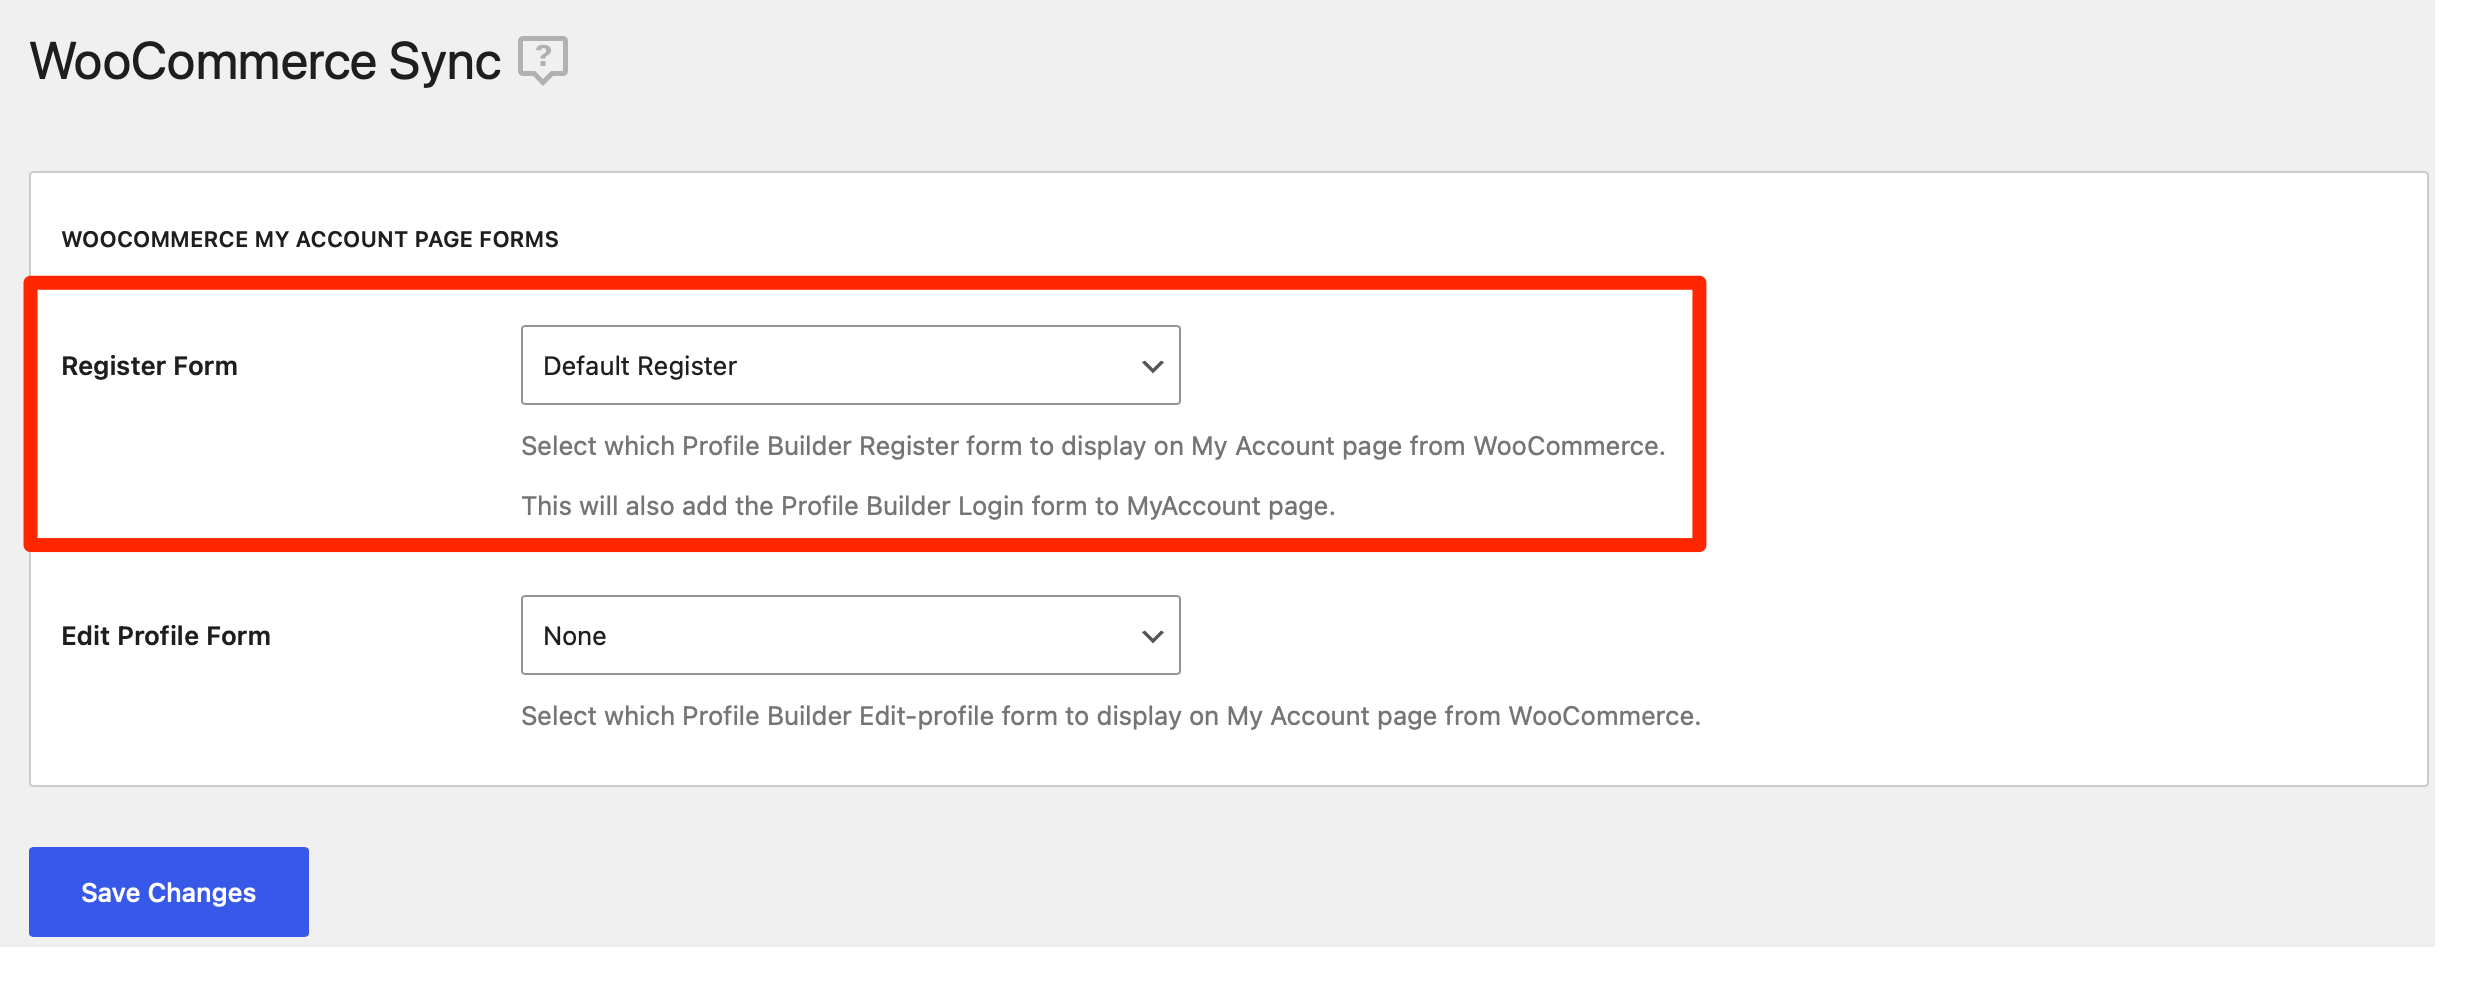
Now, users will see your custom registration form when they go to the “My Account” page:
However, this is only the case if users aren’t already logged into their accounts.
4. Add Custom User Registration Fields for WooCommerce Checkout
At this point, you’ve replaced the WooCommerce registration form on the “My Account” page with your custom form. However, if users register during checkout, they’ll still see the default WooCommerce registration form.
Profile Builder lets you choose which individual fields you want to display at checkout. This is useful if you don’t want to use the same registration form on your checkout page.
You could use all of the registration fields to create the exact same registration form. But, you could also leave out nonessential fields to shorten your form and reduce friction during the checkout process.
To make these choices, go back to Profile Builder → Form Fields. Then, edit one of the form fields that you want to include on the WooCommerce checkout page.
Here, set the Display on WooCommerce Checkout dropdown to Yes:
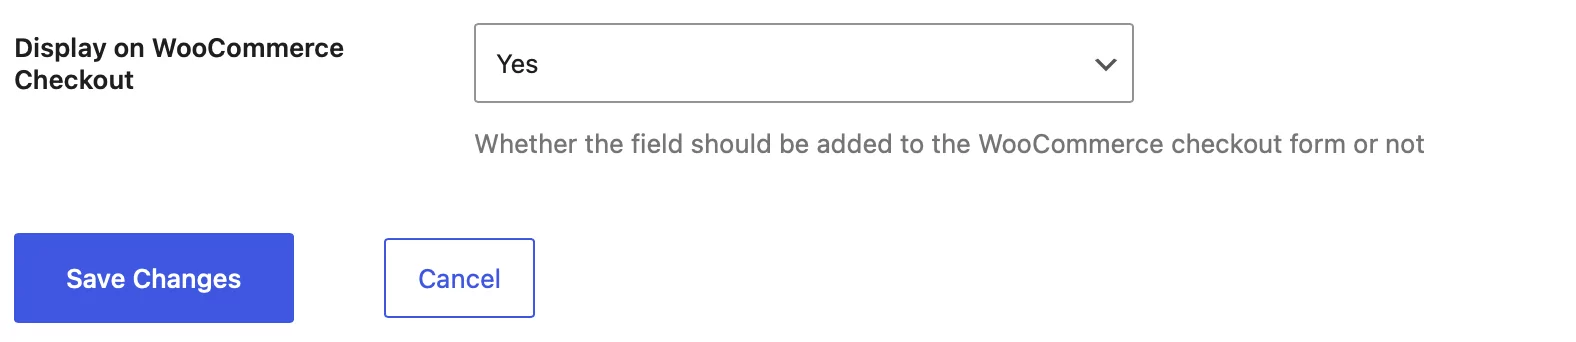
Then, just repeat the process for as many fields as you want to include on the WooCommerce checkout registration form.
You’ll still be able to use the advanced features in Profile Builder, including conditional logic and repeater fields.
And that’s it! You’ve created your own custom WooCommerce registration forms for both the “My Account” page and the checkout.
Optional: Create Separate Registration Forms for Different Users
So far, we’ve focused on the idea that you want to use the same form for all your WooCommerce shoppers. That said, you also have the option to customize the fields to set up custom user registration fields for the WooCommerce checkout.
For example, it might make sense to use completely separate registration forms for different types of shoppers (like wholesale and retail customers). This way, you can keep your public-facing store entirely focused on retail customers, without any mention of wholesale.
To accomplish this, you’ll need to follow the steps above to customize the native WooCommerce registration form for retail customers. Then, you can create another separate form to place on a different page for wholesale customers.
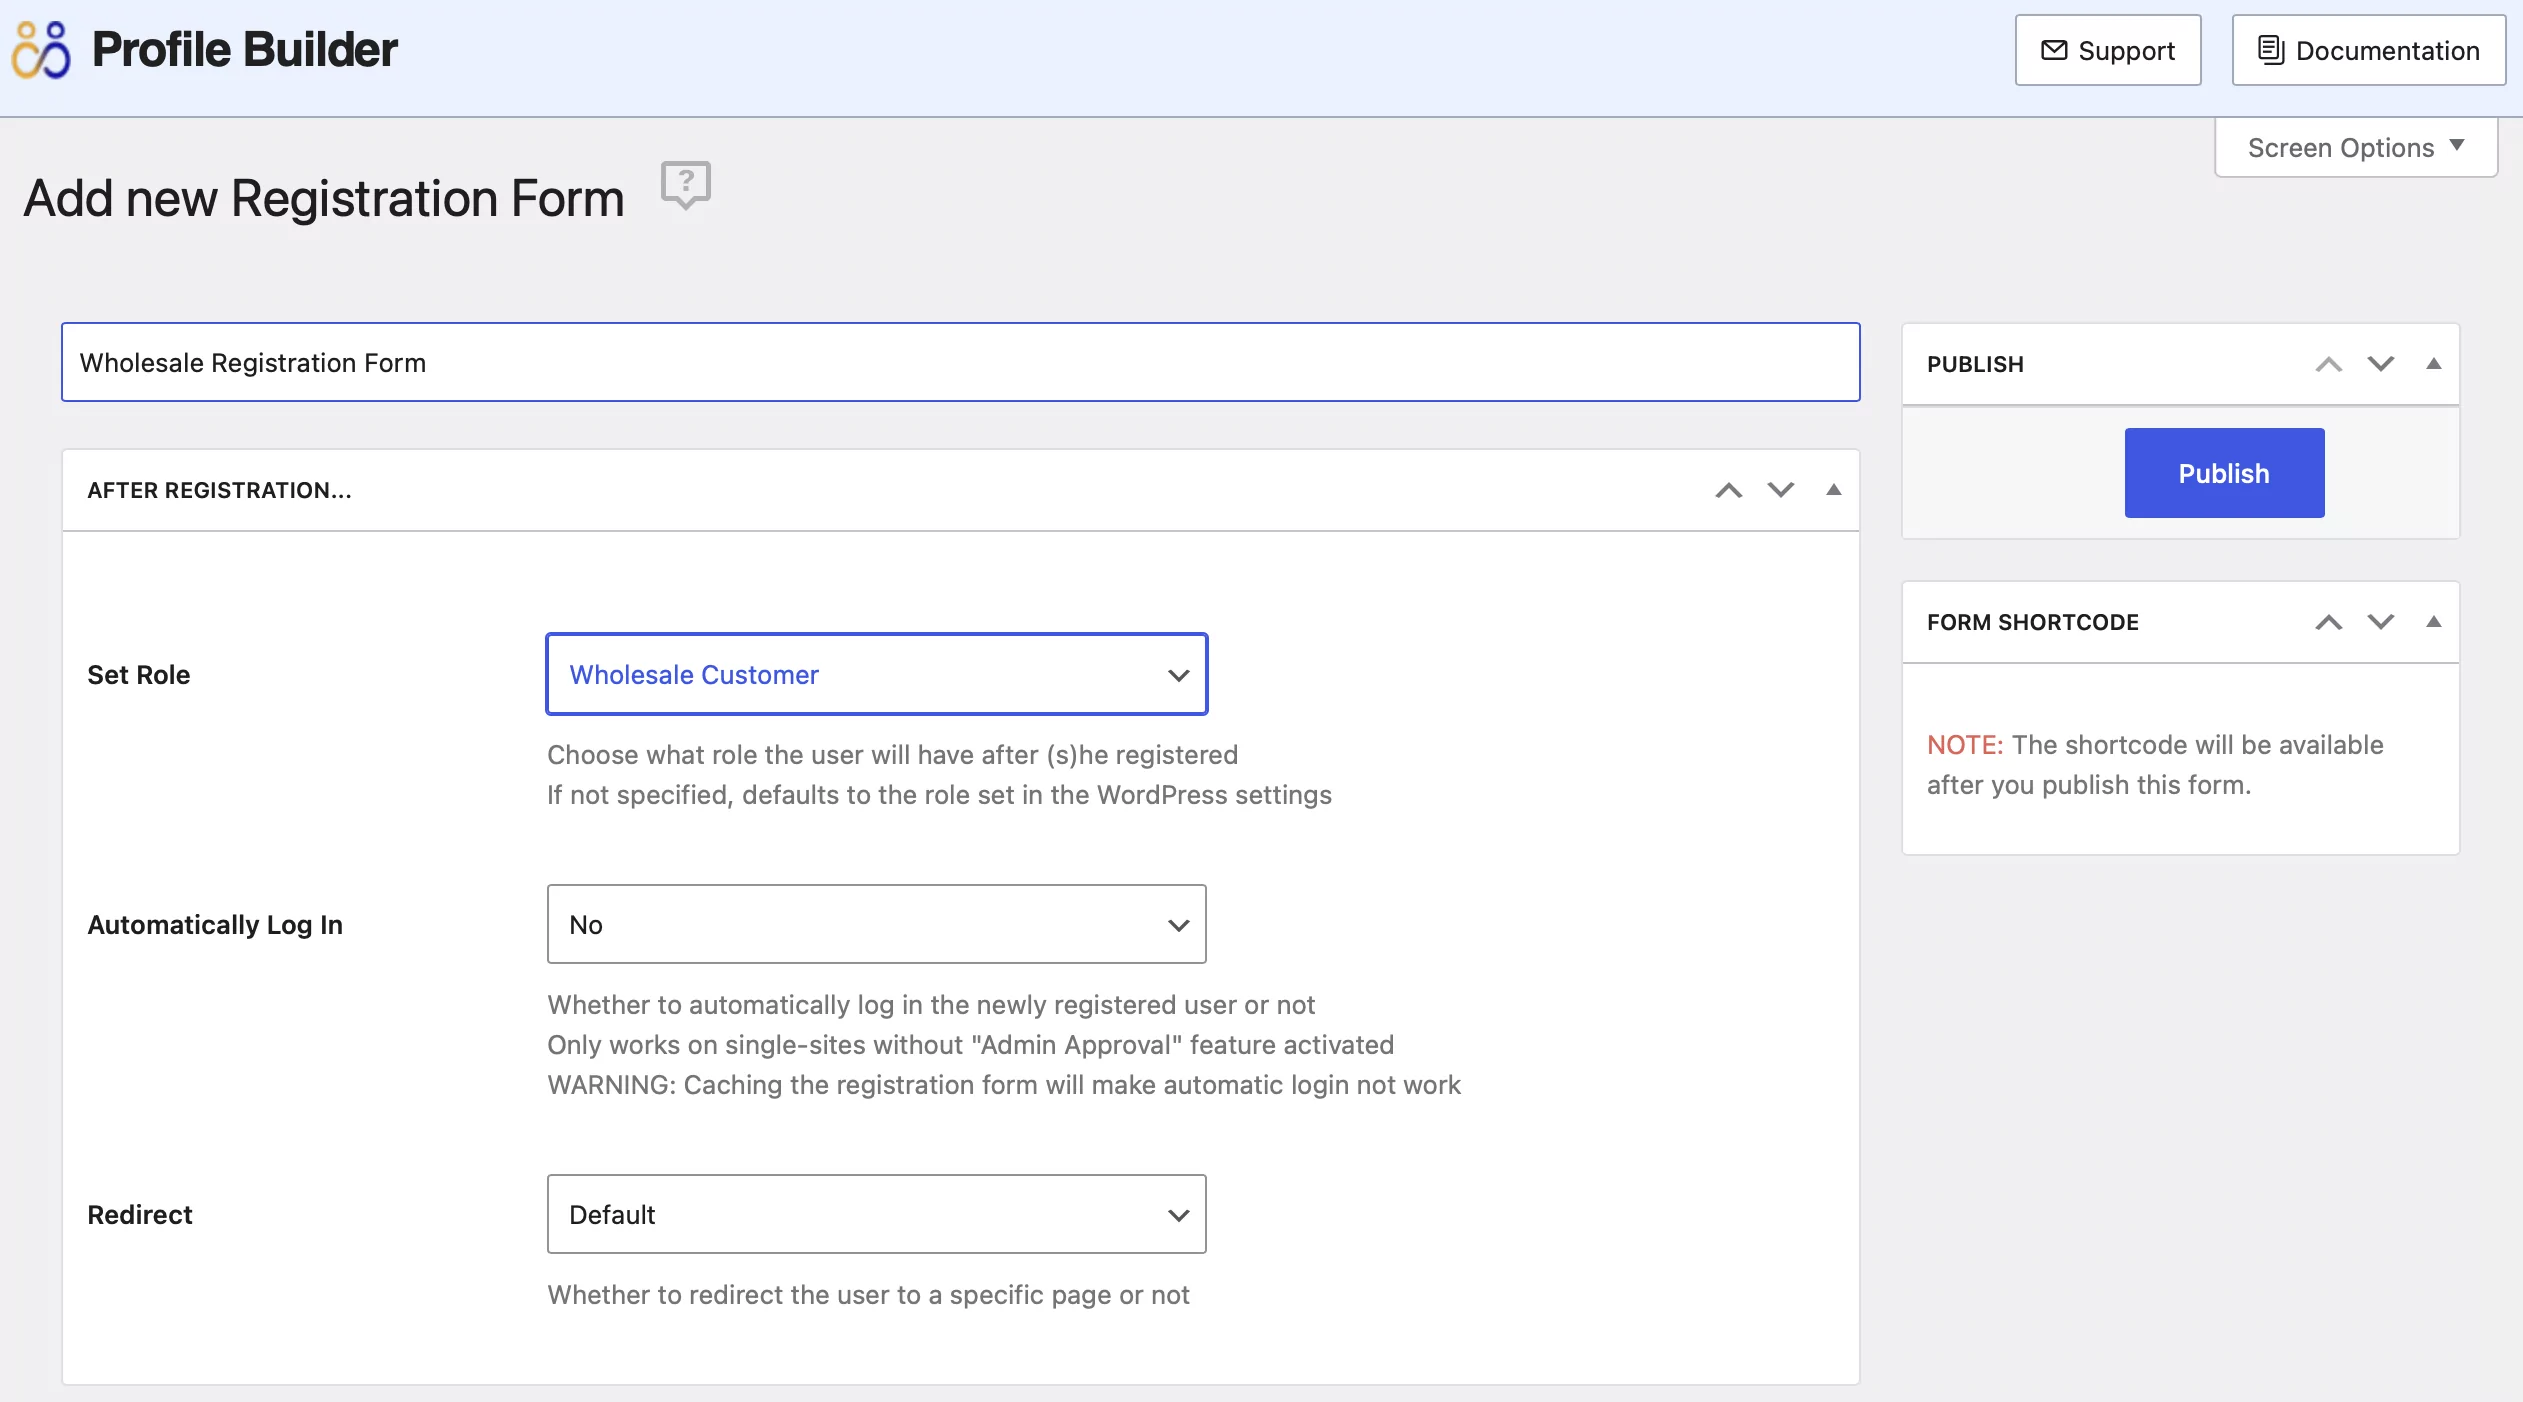
To create this different form, go to Profile Builder → Registration Forms → Add New. Here, you can set up a registration form that’s completely dedicated to wholesale shoppers.
If you’ve set up a dedicated WooCommerce role for wholesale shoppers, you can automatically assign people who use this form to the wholesale user role:
Then, you can add the form anywhere on your site using its shortcode which will display at the right-hand side of the screen when you publish the form.
Another neat thing you can do is require manual admin approval for people who use certain registration forms. To enable this, go to Profile Builder → Settings:
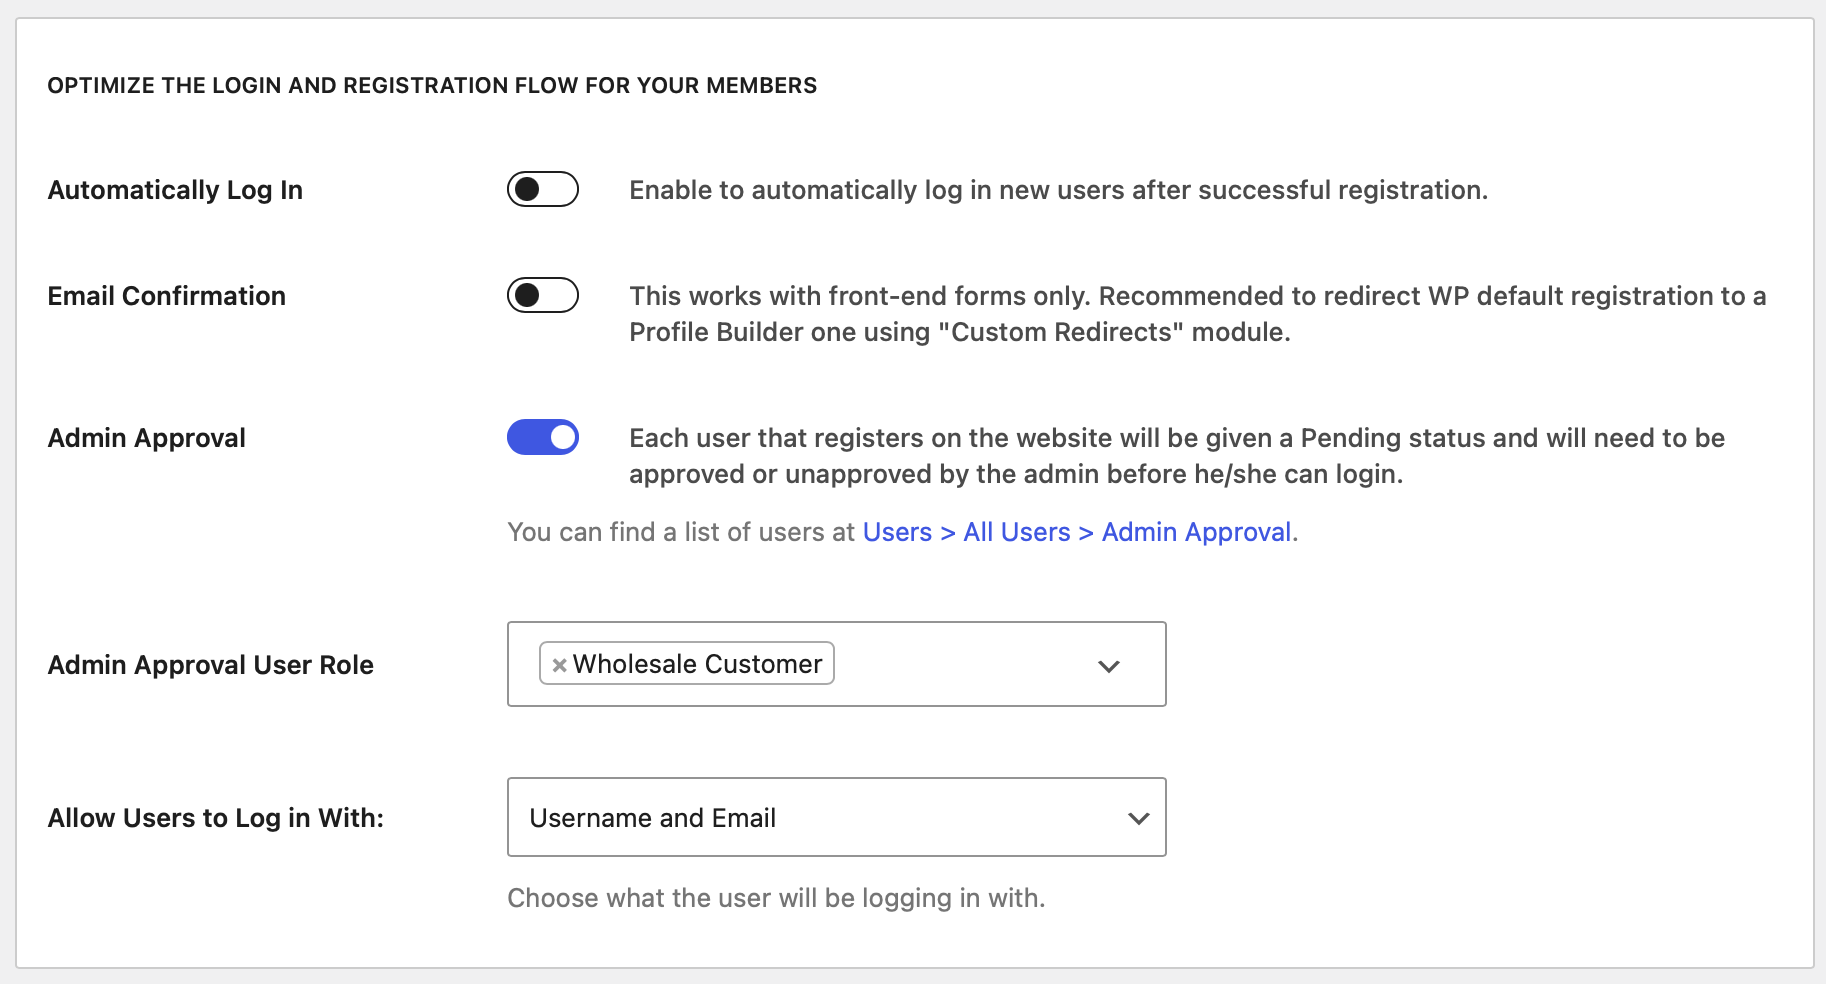
Here, use the Admin Approval toggle to activate this feature. After that, use the Admin Approval User Role dropdown to select the specific roles that require manual approval (e.g. the wholesale role).
Optional: Customize the WooCommerce Edit Profile Form
Since you’re creating a custom WooCommerce user registration form that collects additional information, you might also want to give shoppers the option to edit details after they’ve registered. Luckily, Profile Builder lets you create custom edit profile forms.
You can use these forms to replace the “Edit Profile” area in the default WooCommerce “My Account” page. To give you an idea, custom edit profile forms can let users edit:
- All of the fields on your registration form
- Just some of the fields on your registration form
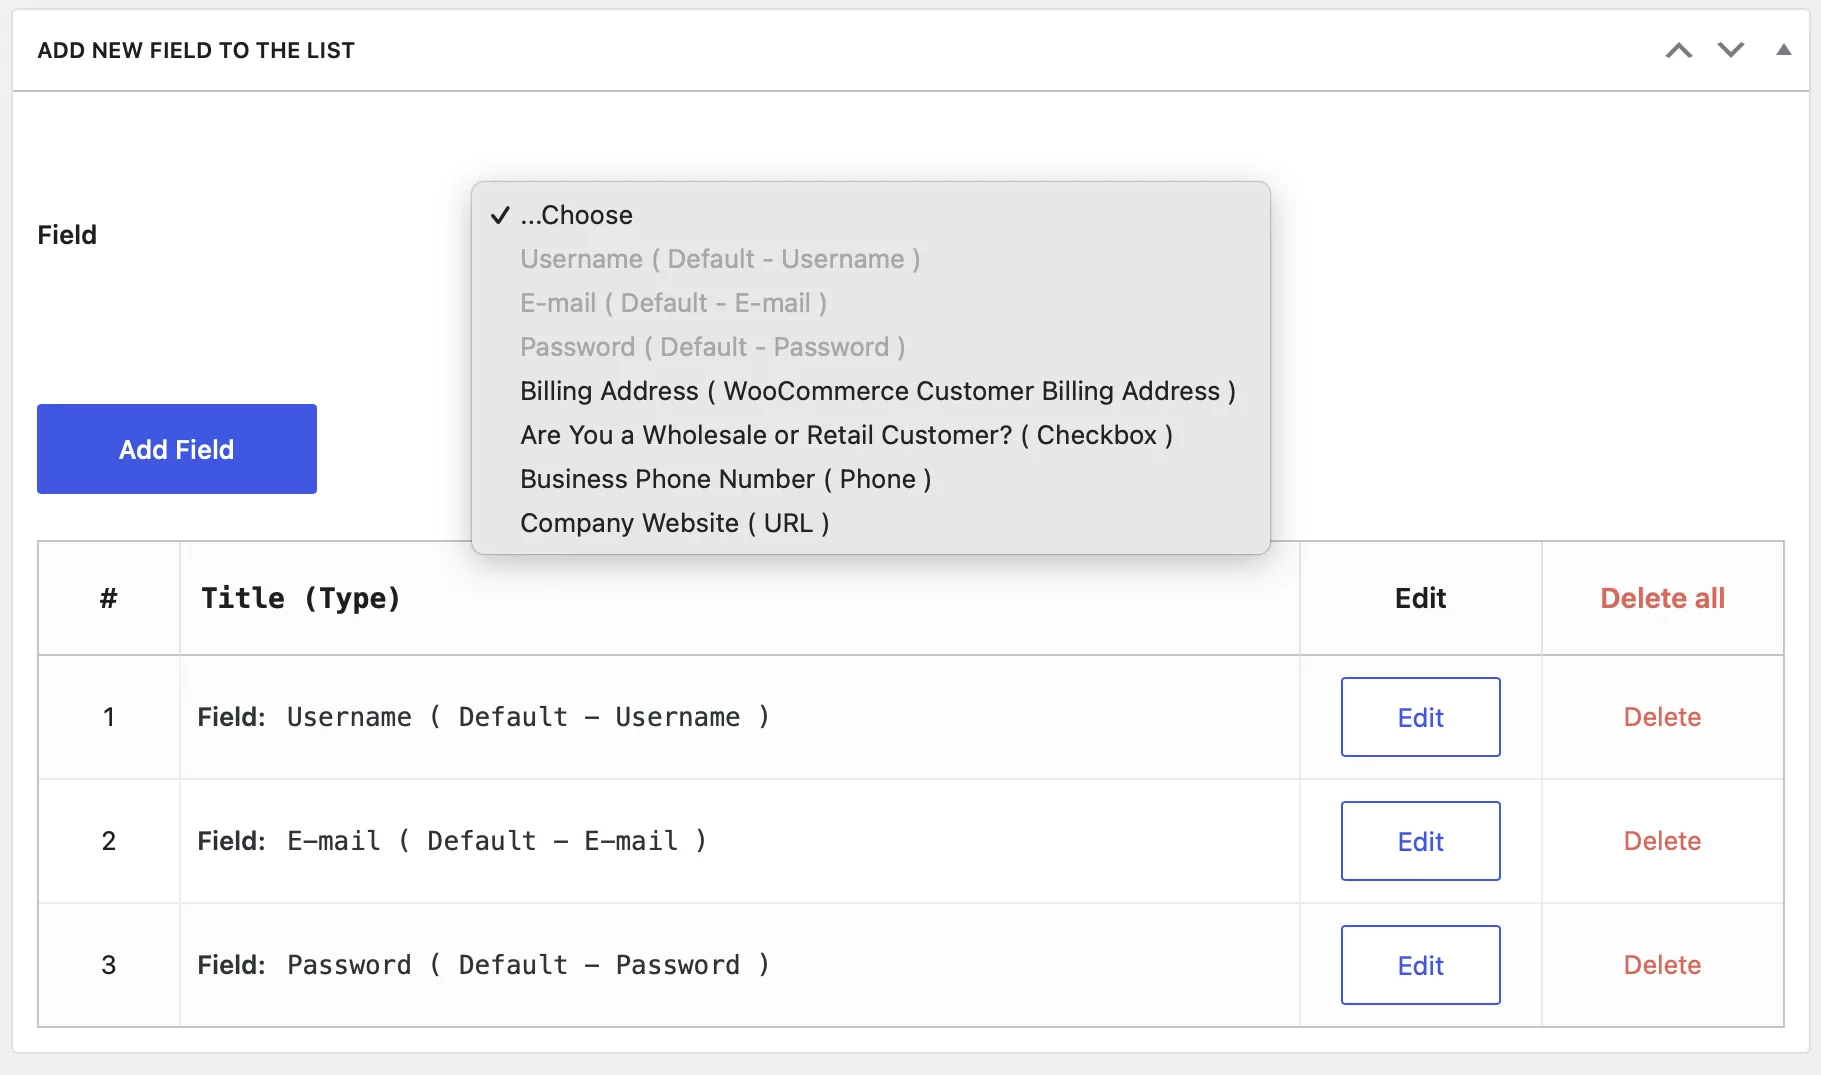
To create a new WooCommerce edit profile form, go to Profile Builder → Edit-profile Forms → Add New (or edit the default form that Profile Builder adds). Then, you can choose which fields you want to make editable.
If you click on the Add Field button, you’ll be able to add any one of the fields from your registration form:
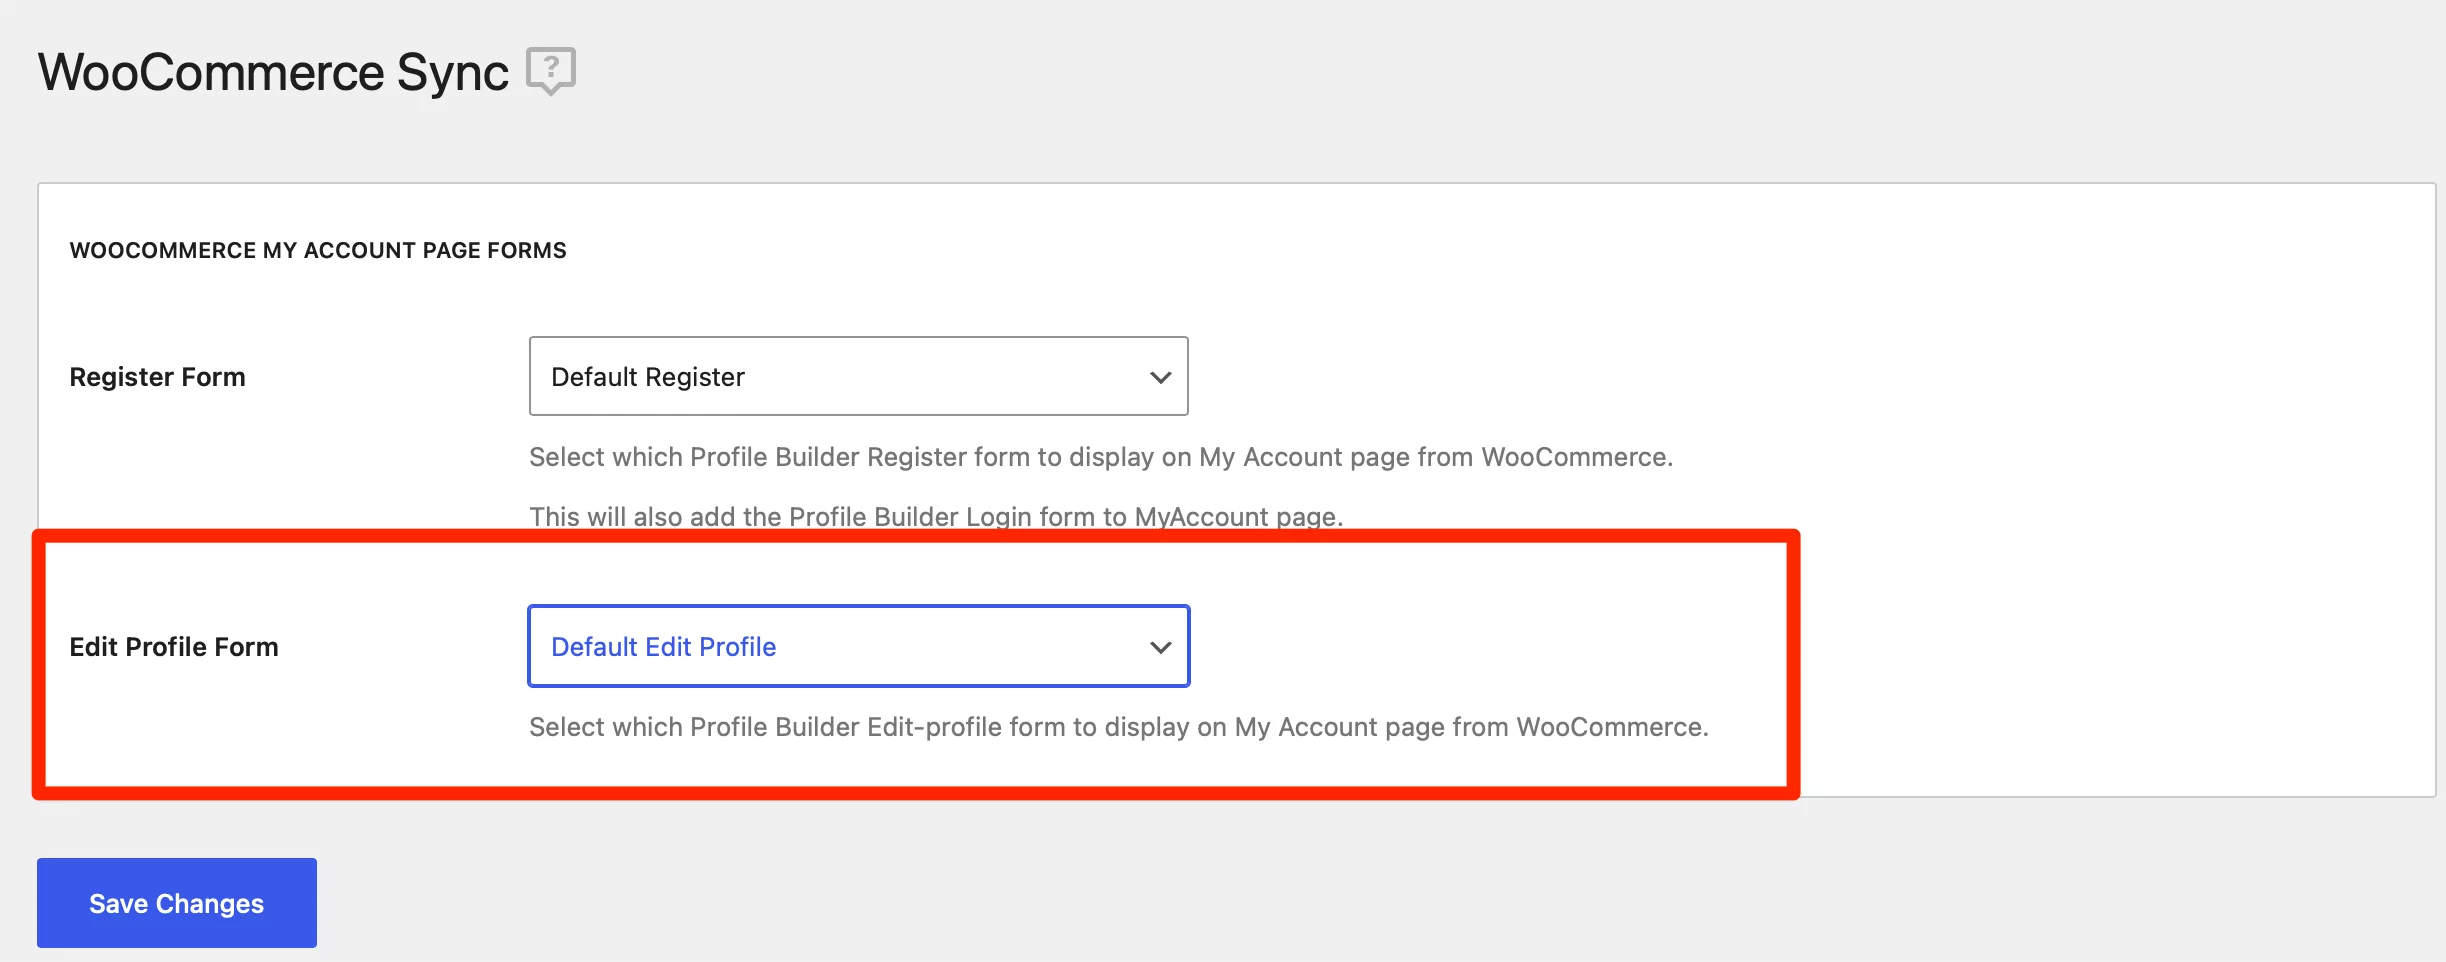
Once you’ve added all of the fields that you want your shoppers to be able to edit, you need to tell WooCommerce to replace its default form in the “My Account” area with your custom form.
To do this, go to Profile Builder → WooCommerce Sync. Then, use the Edit Profile form dropdown to select Default Edit Profile (or the name of your form if you created a custom edit profile form):
Now, users will be able to edit those fields from the Account details tab in the regular WooCommerce “My Account” area.
Create Your Own Custom WooCommerce User Registration Setup
The default WooCommerce registration system takes a one-size-fits-all approach, which may or may not work for your store. For example, you might want to request more information from customers.
Thankfully, it’s possible to customize how users register for WooCommerce using Profile Builder and the WooCommerce Sync add-on. To recap, here are the key steps to follow:
- Set up basic WooCommerce registration behavior.
- Customize your WooCommerce registration form.
- Replace the “My Account” registration form with your custom form.
- Add custom user registration fields for WooCommerce checkout.
You can also create separate registration forms for different users. Plus, you have the option to customize the WooCommerce edit profile form.
Do you have any questions about how to customize WooCommerce user registration? Let us know in the comments below!
Related Articles

WordPress Profile Builder: a Front-end User Registration, Login and Edit-Profile Plugin
Easily Login, Register and Edit your Profile Directly from the Front-end Profile Builder lets you add front-end forms that give your users a more flexible way to register, log in, and modify their profile information. If you allow public registration on your site, you don't want to force your users to use the backend WordPress […]
Continue Reading
How To Customize WooCommerce Registration Form (2026 Ultimate Guide)
Customizing the WooCommerce registration form in WordPress is something you should consider doing if you want to get more from your WooCommerce store and from the customer registration process. However, the WooCommerce plugin only allows you to collect basic information about your new users. If you customize it using Profile Builder Pro, you can collect […]
Continue Reading
How to Edit WooCommerce My Account Page (Add Fields + More)
Looking for a simple way to customize the WooCommerce account page to add extra user fields and let customers manage their data from the front-end? How about adding custom user fields to the WooCommerce checkout page? In this post, you'll learn how to easily customize the WooCommerce account page using the Profile Builder plugin and its WooCommerce Sync add-on.
Continue Reading