

Table of Contents
One of the biggest advantages of using WooCommerce for building and operating an online store is the flexibility it offers. Its huge collection of plugins ensures that store owners can add every functionality they need (even some that are rather unconventional). What’s more, you can do all this without knowing how to code or even being technically savvy.
Disabling your ecommerce site’s cart and checkout pages may not be desirable for most stores. That said, there are plenty of reasons to do it. For instance, you may only sell one product (making a cart unnecessary). Or, you might want to deactivate the checkout option when your seasonal store is on break.
In this post, we’ll show you how to disable the WooCommerce cart or the WooCommerce checkout page. Then, we’ll explain how you can do both at the same time. Let’s get to it!
Why Disable the WooCommerce Cart and Checkout Pages
Before we dive into our guide, let’s start by talking about why you may want to disable these seemingly crucial pages. The reasons for disabling the cart tend to be very different from the reasons for disabling the checkout page. So, let’s discuss them separately.
Why Disable the WooCommerce Cart Page
While disabling the cart is understandable in some cases, disabling the checkout page might sound outrageous to some. However, it can be a viable strategy in certain specific scenarios.
Take seasonal stores as an example. These stores might not want to sell or operate once their preferred season is over. So, they might want to disable the checkout after the season is done (until the next year when the store reopens). This is a much better solution than disabling the site altogether or blocking access to it, something that may also kill their SEO rankings in the search engines.
There are also cases where a large store may be asked to temporarily stop its operations by regulators for an investigation or other reasons. In those cases, the store owners would have no option but to comply with the regulatory agencies, and disabling the checkout functionality would be the best way to do it.
There are also store owners who create websites just to display their product catalog, such as wholesalers. In this scenario, they want their customers to talk to them directly to place orders, so it makes sense to disable the checkout.
Similarly, store owners wanting to disable the checkout functionality for maintenance reasons is also pretty common.
Finally, some store owners may also want to run a private WooCommerce store. For that, they need to disable the checkout functionality for their general visitors while using a tool to help them create and run a private store.
But there’s a better way to build a private WooCommerce store (more on that towards the end of this post).
Why Disable the WooCommerce Checkout Page
While disabling the cart is understandable in some cases, disabling the checkout page completely can be a controversial topic. However, it can be a viable strategy in some specific scenarios.
Take seasonal stores as an example. These stores might not want to sell or operate once their preferred season is over. So, they might want to disable the checkout after the season is done (until the next year when the store reopens). This is a much better solution than disabling the site altogether or blocking access to it.
There are also cases where a large store may be asked to temporarily stop its operations by regulators for an investigation or other reasons. In those cases, the store owners would have no option but to comply with the regulatory agencies, and disabling the checkout functionality would be the best way to do it.
There are also store owners who create websites just to display their product catalog, such as wholesalers. In this scenario, they want their customers to talk to them directly to place orders, so it makes sense to disable the checkout.
Similarly, store owners wanting to disable the checkout functionality for maintenance reasons is also pretty common.
Finally, some store owners may also want to run a private WooCommerce store. For that, they need to disable the checkout functionality for their general visitors while using a tool to help them create and run a private store.
But there’s a better way to build a private WooCommerce store (more on that towards the end of this post).
How to Disable the Cart Page in WooCommerce (2 Ways)
As explained above, disabling the cart page and disabling the checkout functionality are two different tasks. So they will need different solutions, too.
In this section, we’ll discuss how to disable the cart page on your store. There are a few ways you can do this without directly messing with your website’s code. Let’s go over them now.
1. Use a Plugin to Disable the Cart Functionality
The beauty of WooCommerce is that there’s a plugin available for pretty much everything you need. That includes disabling the cart functionality.
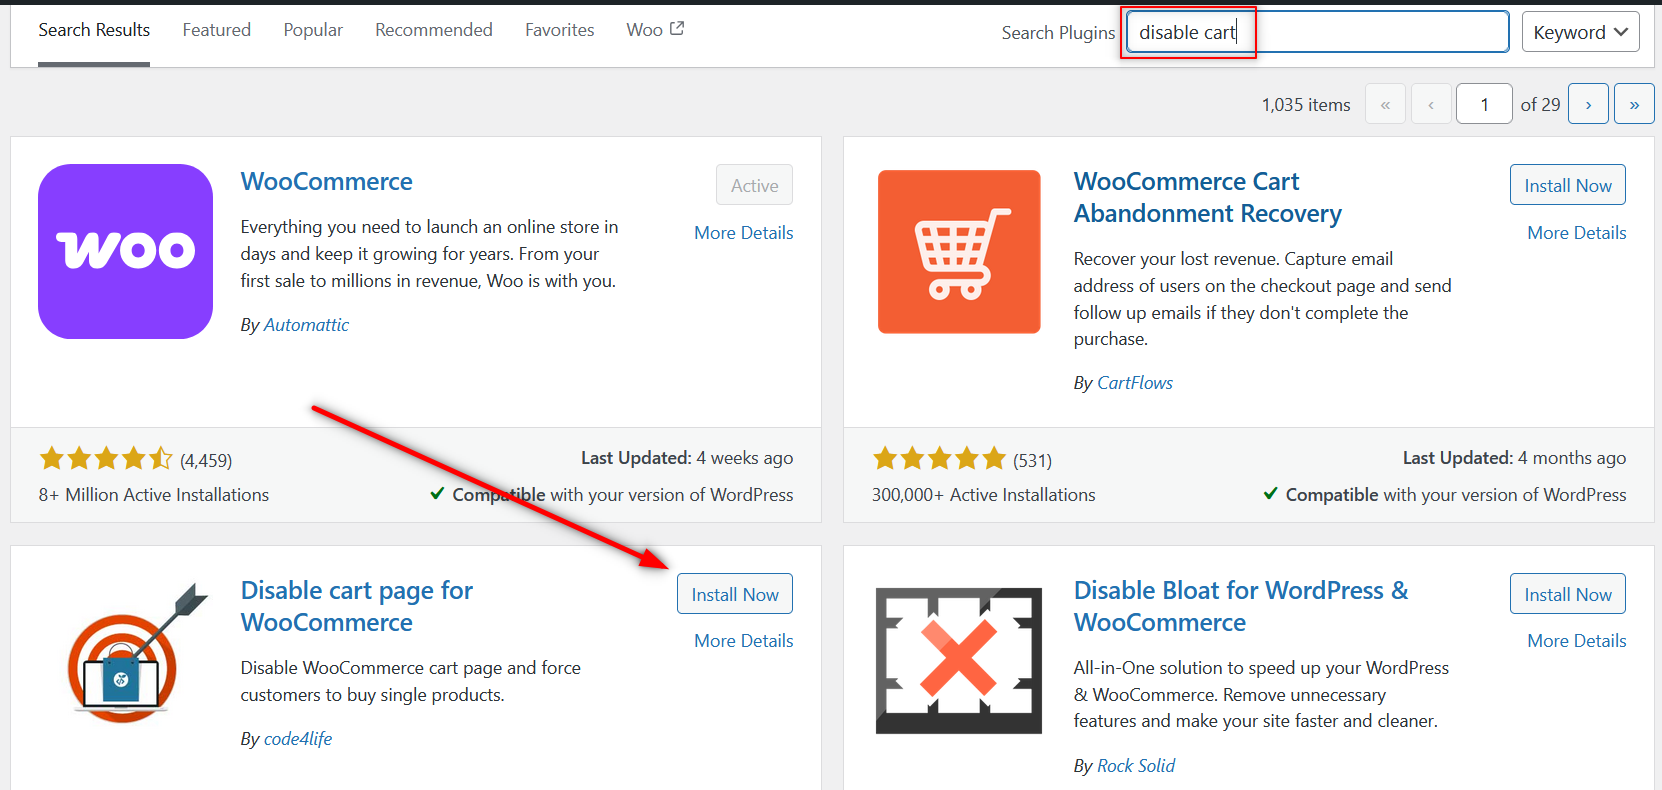
To install the necessary plugin, go to Plugins → Add New Plugin and look for the Disable Cart Page for WooCommerce tool using the search feature. Once you find the plugin, go ahead and install it:
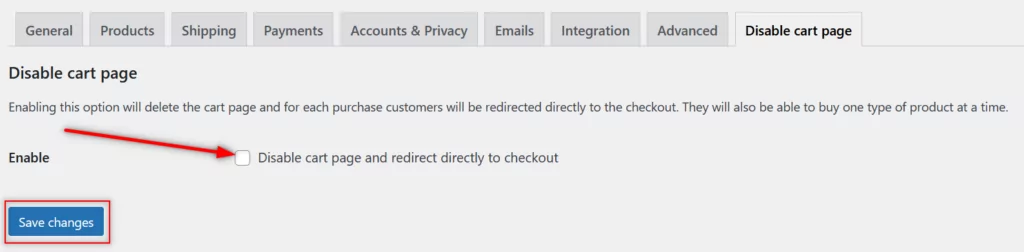
Once the plugin is active, you’ll find its settings under WooCommerce → Settings → Disable cart page. All you need to do is check the Disable cart page and redirect directly to checkout option and click on the Save changes button:
As soon as you do this, the cart option and page will disappear from the store. When customers add an item for purchase, they’ll be sent to the checkout page directly.
2. Redirect Users to the Checkout Page from the Cart
If you prefer not to install an additional plugin to disable the cart page, you can use the WooCommerce settings for the task. For this section, we’ll create a workaround where if a customer clicks on the cart icon, they’ll go straight to the checkout page.
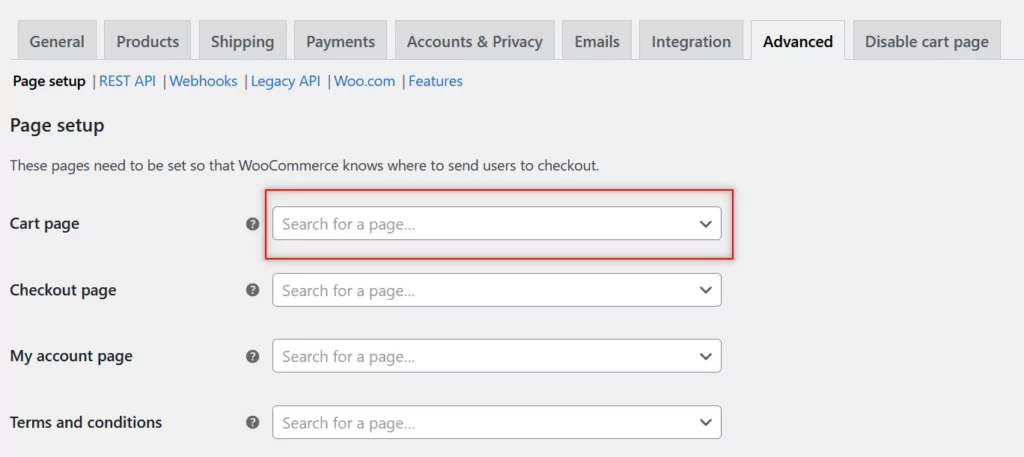
To do this, go to WooCommerce → Settings → Advanced. Here, you can choose which page will be your cart page. Go ahead and set the checkout page as the cart:
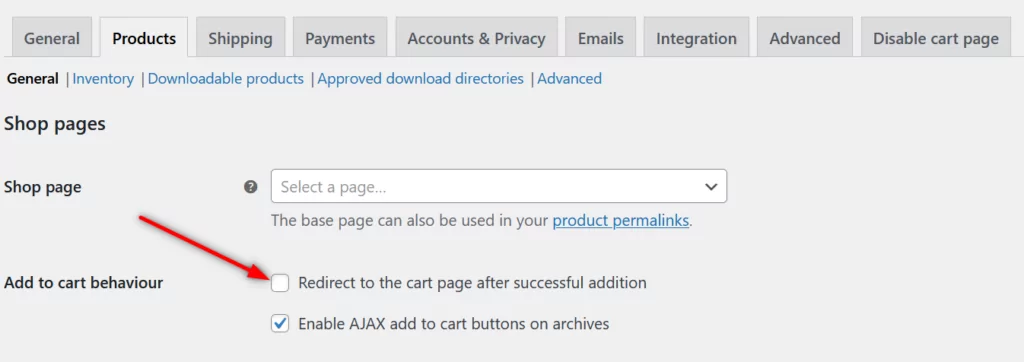
Now go to the Products → General tab and look for the Add to cart behaviour settings. Enable the option that reads Redirect to the cart page after successful addition:
With this setup, WooCommerce automatically redirects users to the cart page when they add a product. However, this triggers a second redirect, which in turn sends them to the checkout.
If you’re an end-user, you won’t notice the redirects. You’ll simply go from the product page to the checkout. All that without using extra plugins.
How to Disable the WooCommerce Checkout Page
Now, let’s go over how you can disable your store’s checkout page entirely.
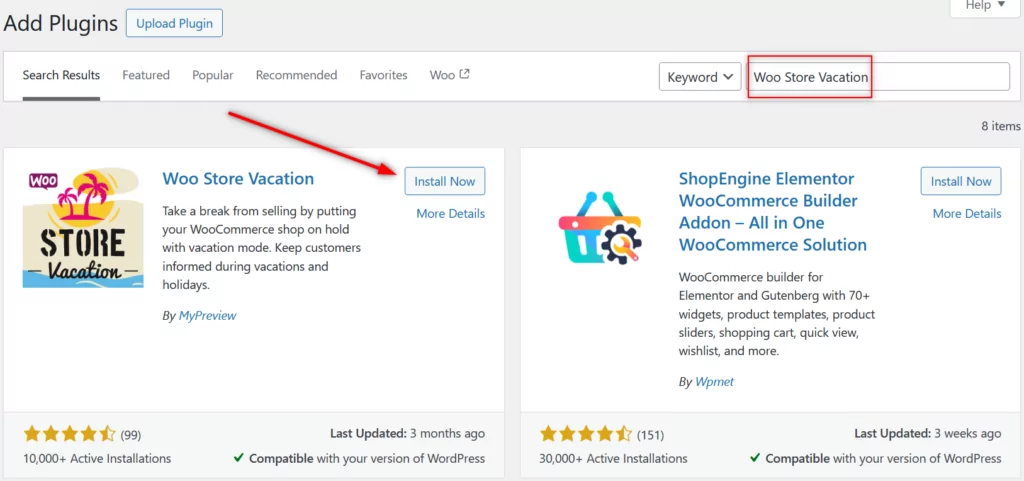
To do this, we recommend using the Woo Store Vacation plugin. This tool is designed to prevent users from making purchases, but it doesn’t interfere with any other WooCommerce feature.
To install the plugin, go to Plugins → Add New Plugin and use the search feature to look for Woo Store Vacation. Then, install and activate the plugin:
Once activated, you can disable the checkout on your store by specifying a ‘start date’ and an ‘end date’ in the plugin’s settings. The plugin automatically re-enables the checkout functionality after the end date.
To set this up, go to WooCommerce → Store Vacation:
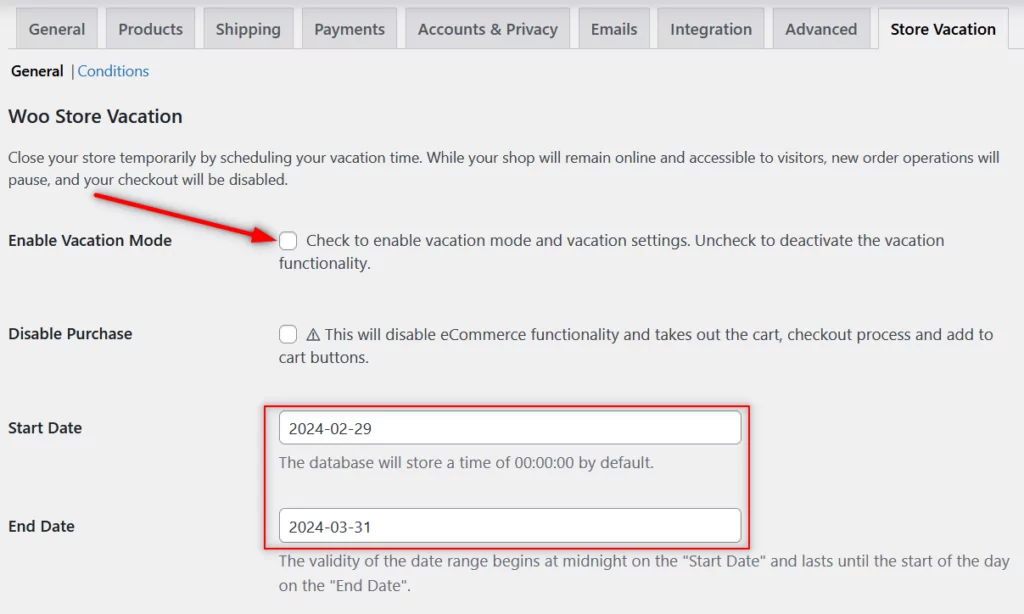
Make sure you check the box for enabling vacation mode (which you can see in the screenshot above). Afterward, specify the start and end dates for the vacation mode. But that’s not all. You can also notify your users about the checkout being temporarily disabled by displaying a custom message. To use this feature, look for the option that says Vacation Notice in the settings screen:
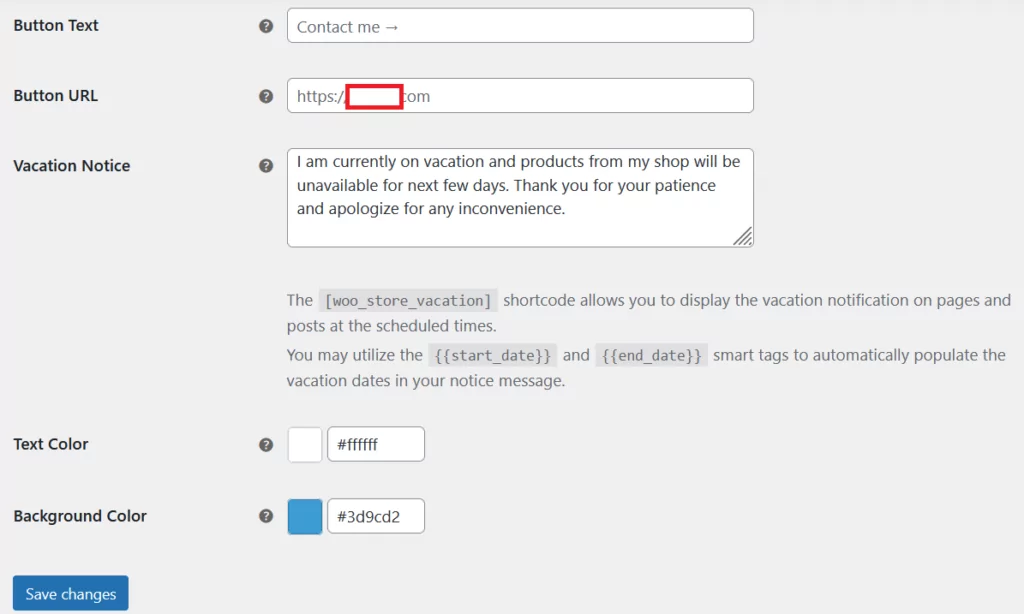
You can customize this message as you wish, mentioning the start and end dates of the vacation period (if appropriate). Your users will be shown this note on the product and shop pages.
Finally, you’ll need to scroll down and click on the Save changes button. Once you do that, the checkout on your store will be disabled for the specified period.
If you want to re-enable the checkout functionality before the end date, you can do that too. All you have to do is return to this page and uncheck the vacation mode setting.
How to Disable Both the WooCommerce Cart and Checkout Pages
Disabling both the cart and the checkout functionality is not much different than disabling the checkout functionality. In fact, you can use the same plugin recommended above for disabling the cart as well.
Simply return to the Store Vacation tab in your WooCommerce settings. Then, check the option that basically says that it will disable the cart, checkout process, and also the ‘add to cart’ buttons.
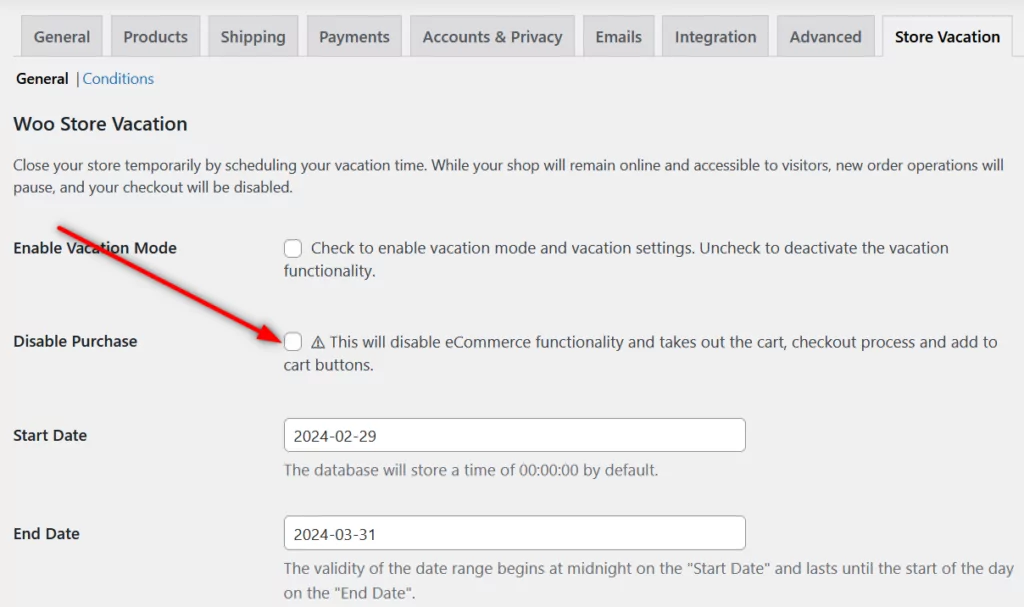
Next, scroll to the bottom of the page and click on the Save changes button. That’s it! At this point, there will be no more cart and checkout options on your store until you decide to bring them back.
However, keep in mind that this isn’t the recommended way if you want to disable the cart and checkout on your store permanently. In that case, you would be better off transitioning your online store into a WooCommerce private store instead.
You can easily do that using Paid Member Subscriptions, which is a WooCommerce membership site plugin and a payment management tool.
Take Your WooCommerce Store to the Next Level
You can customize your WooCommerce store in many ways beyond disabling the cart and checkout pages. With the right plugins, you can create a private store, set up custom login pages for customers, enable passwordless login, offer subscriptions, and much more.
If you’re interested in these features, check out Profile Builder Pro and Paid Member Subscriptions. You can use Profile Builder Pro to create custom login and registration pages for your site, as well as enable users to modify their profiles.
Meanwhile, Paid Member Subscriptions focuses on subscriptions, content protection, and handling recurring payments. You can use the plugin to protect pages, posts, and products on your site. This way, they’re only accessible to subscribers. Moreover, you can offer as many subscription tiers as you want, with different protected content for each of them.
Paid Member Subscriptions Pro
Paid Member Subscriptions is a must-have plugin for every store owner selling membership products or accepting recurring payments.
Get Paid Member SubscriptionsDo you have any questions about how to use Profile Builder Pro or Paid Member Subscriptions? Ask away in the comments section below!
Related Articles

How to Sell Courses with WooCommerce
Are you looking to sell courses with WooCommerce? If that's a resounding yes, prepare to learn everything you need to start today, even if it's your first time, and you're on a tight budget. The eLearning market has grown tremendously in the last few years, offering individuals and businesses additional revenue opportunities. While this is […]
Continue Reading
27+ WooCommerce Must Have Plugins for 2026: Improve Your Store
What are the WooCommerce must have plugins that every store needs? If you found your way to this post, that's probably the issue you're dealing with right now. While the core WooCommerce plugin offers most of the basic functionality that you need for a store, pretty much all WooCommerce stores rely on dozens or even […]
Continue Reading
5 Best WooCommerce Membership Plugins 2026 (Hands-On Comparison)
Searching for the best WooCommerce membership plugins to create a members-only store or otherwise control members-only behavior on your store? With the right WooCommerce membership plugin, you can: Restrict who can view and/or purchase products at your store. For example, you could let anyone view products but only allow members to actually purchase them. Offer […]
Continue Reading