

Table of Contents
- 1 What is a Subscription Site?
- 2 Types of Subscription Sites
- 3 How to Create a Membership Website with a WooCommerce Membership Plugin
- 4 How to Grow Your Subscription Website’s Revenue
- 5 Start Your WooCommerce Subscription Empire Today
Adding a WooCommerce membership plugin to your site has the potential to transform your business. The eCommerce subscription model can help create customer loyalty, increase recurring revenue, and act as the main driver of your business growth.
In fact, it’s been used by one of the most successful companies in the world, Amazon. A lot of Amazon’s success can be attributed to Prime, its subscription-based customer loyalty program. 62% of Amazon’s customers are also Amazon Prime subscribers, and Prime now boasts over 100 million members.
It’s a reasonably simple subscription program. Members in the USA get free 2-day Prime shipping on select items, access to Amazon Prime Video, and Amazon Music, all for a yearly fee. International benefits are similar.
Using a WooCommerce membership plugin, you too can easily add a subscription element to your existing or new WooCommerce website.
In this step-by-step guide, you’ll learn everything you need to know about creating a successful subscription site from scratch – from choosing the right WordPress theme and installing WooCommerce, to setting up the Paid Member Subscriptions WooCommerce membership plugin and creating subscription products.
What is a Subscription Site?
A subscription site can take many forms, and can sell both digital and physical products.
In the eCommerce space, you’ll generally be selling a bundle or subscription product that gets delivered to your customers regularly, such as a weekly veg box.
With digital products, a subscription site can take many forms: digital newsletters, magazines, online courses, different WordPress custom post types, forums, and much more.
A subscription website can not only be a lucrative model, but it can be easier to run, especially with the right tools running your business. For example, tasks like billing, delivery, registration, account management, and more can be managed with a WooCommerce membership plugin like Paid Member Subscriptions.
Paid Member Subscriptions Pro
Accept (recurring) payments, create subscription plans and restrict content on your website. Easily setup a WordPress membership site using Paid Member Subscriptions.
Get Paid Member SubscriptionsTypes of Subscription Sites
There are all kinds of subscription websites you can create. With the power of WooCommerce and Paid Member Subscriptions, you can easily create an automated eCommerce subscription business.
Here are a few of the most popular WooCommerce subscription methods:
Replenishment Subscription Model
The replenishment model provides goods that need to be replenished regularly. This offers products that people would buy at the store anyway, but allows them to save money and make their lives easier by subscribing.

One of the most successful examples of this model is Dollar Shave Club, which started by shipping razors, and has expanded into other related products.
Curation Subscription Model
A curation service delivers goods regularly, based upon the unique needs of the subscriber. For example, Stitch Fix sends subscribers a monthly selection of clothing based upon their preferences.
This model seeks to provide your subscribers with variety, while still offering a personalized shopping experience.
Access-Based Subscription Model
With this model, subscribers pay a monthly or yearly fee to access the membership product selection. One of the best examples of this is Costco. People pay an annual membership fee to shop at their stores and shop bulk products offered at a discount.
You can create this type of store easily with WooCommerce and Paid Member Subscriptions, which lets you set up a members-only store or offer subscribers a discount on your products.
How to Create a Membership Website with a WooCommerce Membership Plugin
Creating a WooCommerce membership website doesn’t have to be complicated. Using the right tools, you can simplify the process and build your membership site in record time.
Setting Up Your Website
To create a successful WooCommerce subscription site, you need the right foundation, which includes:
- A great domain name
- Fast hosting that’s built to scale
- An eye-catching WordPress membership theme
- A solid WooCommerce membership plugin
If you don’t yet have a domain name or web hosting, then SiteGround is a solid choice. You’ll get high-performing hosting, that is fast and secure.
Once your hosting and domain name is set up, you’ll need to install WordPress on your server. Once again, if you’re using SiteGround (or another beginner-friendly host), you can do this in a couple of clicks.
Next, you’ll need a quality theme. It’s possible to spend hours searching for the right theme – or you could take a look at our list, where we’ve compiled over 20 of the best WordPress membership themes!
Install WooCommerce
If you already have a functioning WooCommerce store, then you can move onto the next step. Users who don’t yet have a store up and running – read on!
Open up your WordPress dashboard and navigate to Plugins > Add New, search for “WooCommerce,” and install the WooCommerce membership plugin shown in the image below.
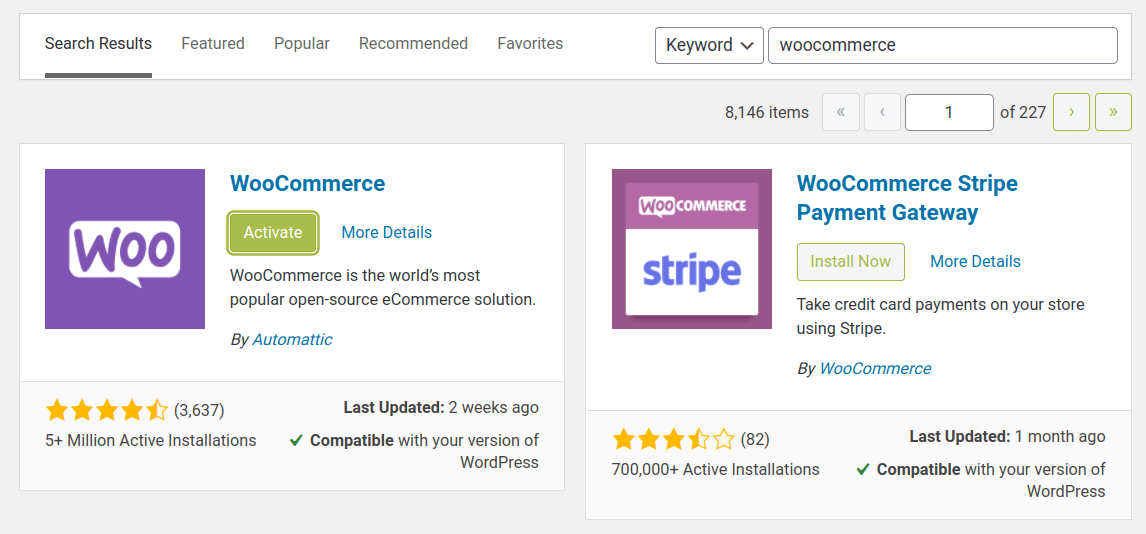
Once you activate the plugin, WooCommerce will automatically create the necessary shop pages required for your store to function.
Install and Set Up Paid Member Subscriptions
Once you have the right domain and hosting, WordPress installed, a WordPress membership theme activated, plus WooCommerce installed, it’s time to install the Paid Member Subscriptions plugin.
This WooCommerce membership plugin will help you add subscription and membership features to your site.
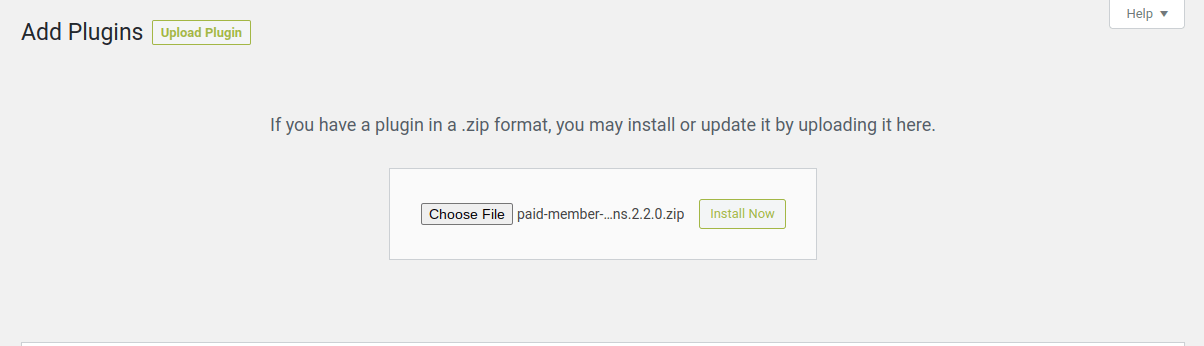
To install the plugin, navigate to Plugins > Add New and upload the ZIP file you downloaded after purchase:
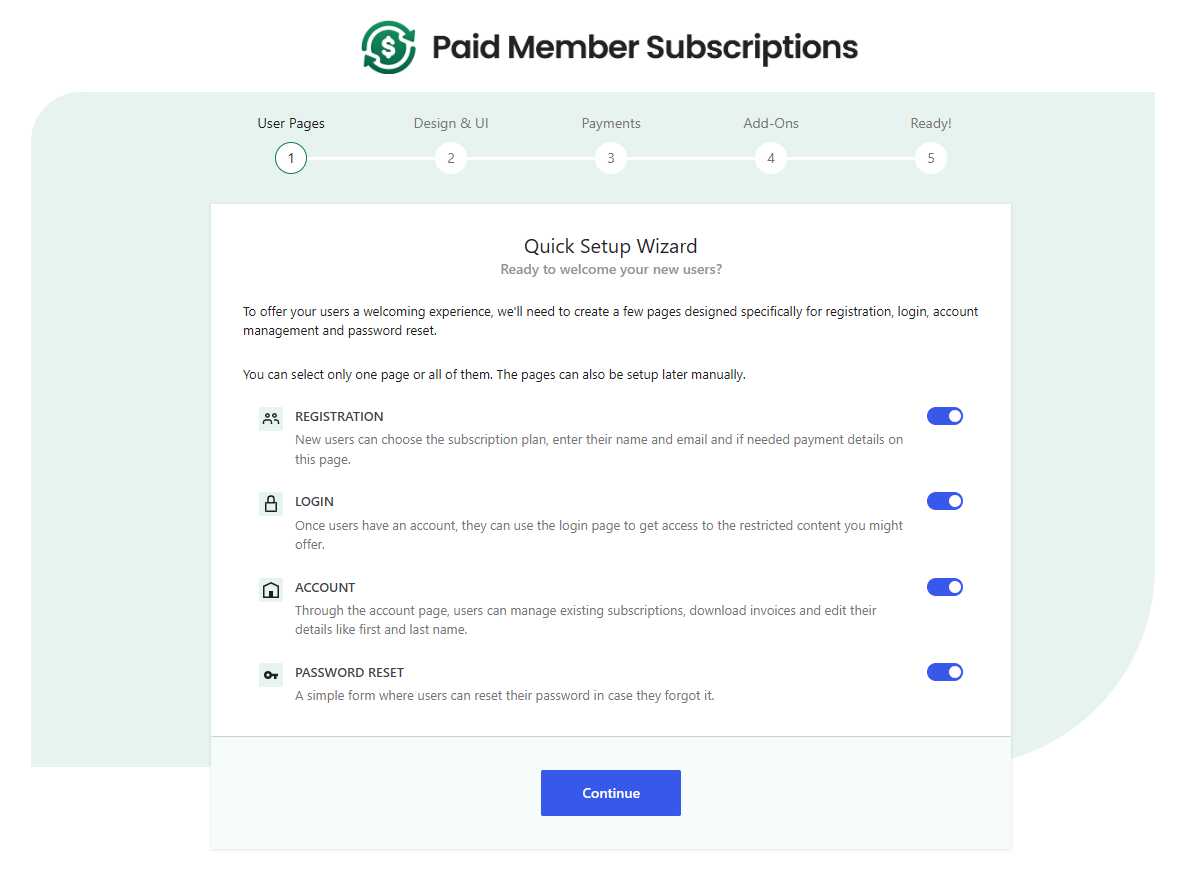
Once you install and activate the plugin, a membership wizard will walk you through configuring your basic settings, setting up payment gateways, and more.
Create pages
Restrict Your WooCommerce Store
With Paid Member Subscriptions, you have a few different options for restricting products per membership level.
1. Restrict Individual Products
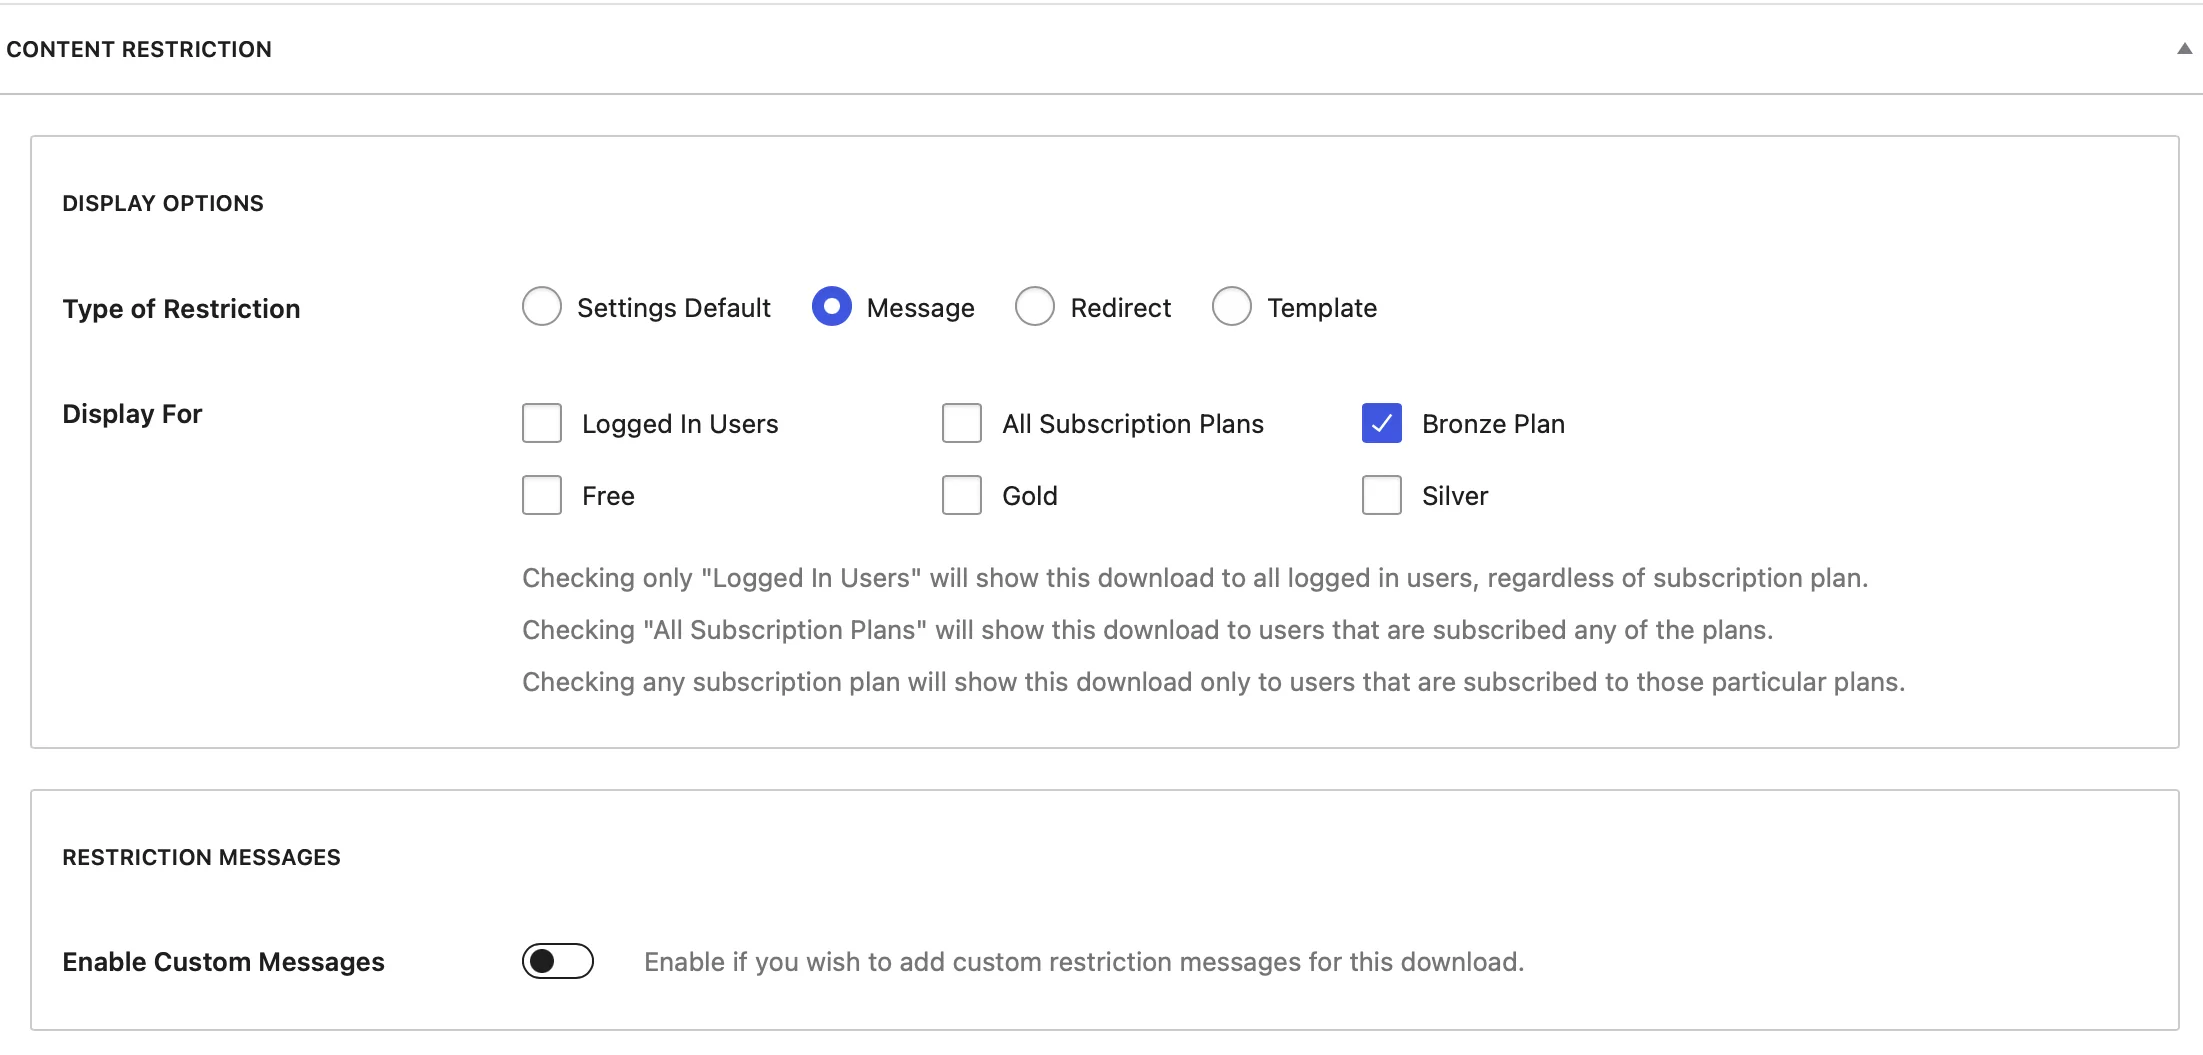
By restricting product viewing, you can create products that are only available to your members. With this enabled, only members with the right subscription plan will be able to view the products.
When you edit a product, there’s a meta box called Content Restriction. In the Display Options setting, you can choose which subscription levels will be able to view the product.
2. Restrict Your Entire Shop Page
Another option is to restrict your entire WooCommerce shop fully. This will hide your WooCommerce shop from people who aren’t members, but you can still set up a redirect or a custom message where non-subscribers can become paying members.
To create a members-only shop page, navigate to your Pages and Select the Shop page. Underneath your content area, you’ll find a meta box called Content Restriction. Here you can choose the subscription levels you’d like to give access to your WooCommerce store.
If you want to hide, or password protect, your entire WordPress site then that’s possible with Paid Member Subscriptions’ sister-plugin, Profile Builder.
Create Different Membership Options
You’ll probably want to offer more than a single membership plan, depending on the type of subscription site you’re creating. At the very least, you’ll want to create a single subscription level and a free level that gives users basic access. Either way, the process is the same.
To create different membership plans, navigate to Paid Member Subscriptions > Subscription Plans > Add New.
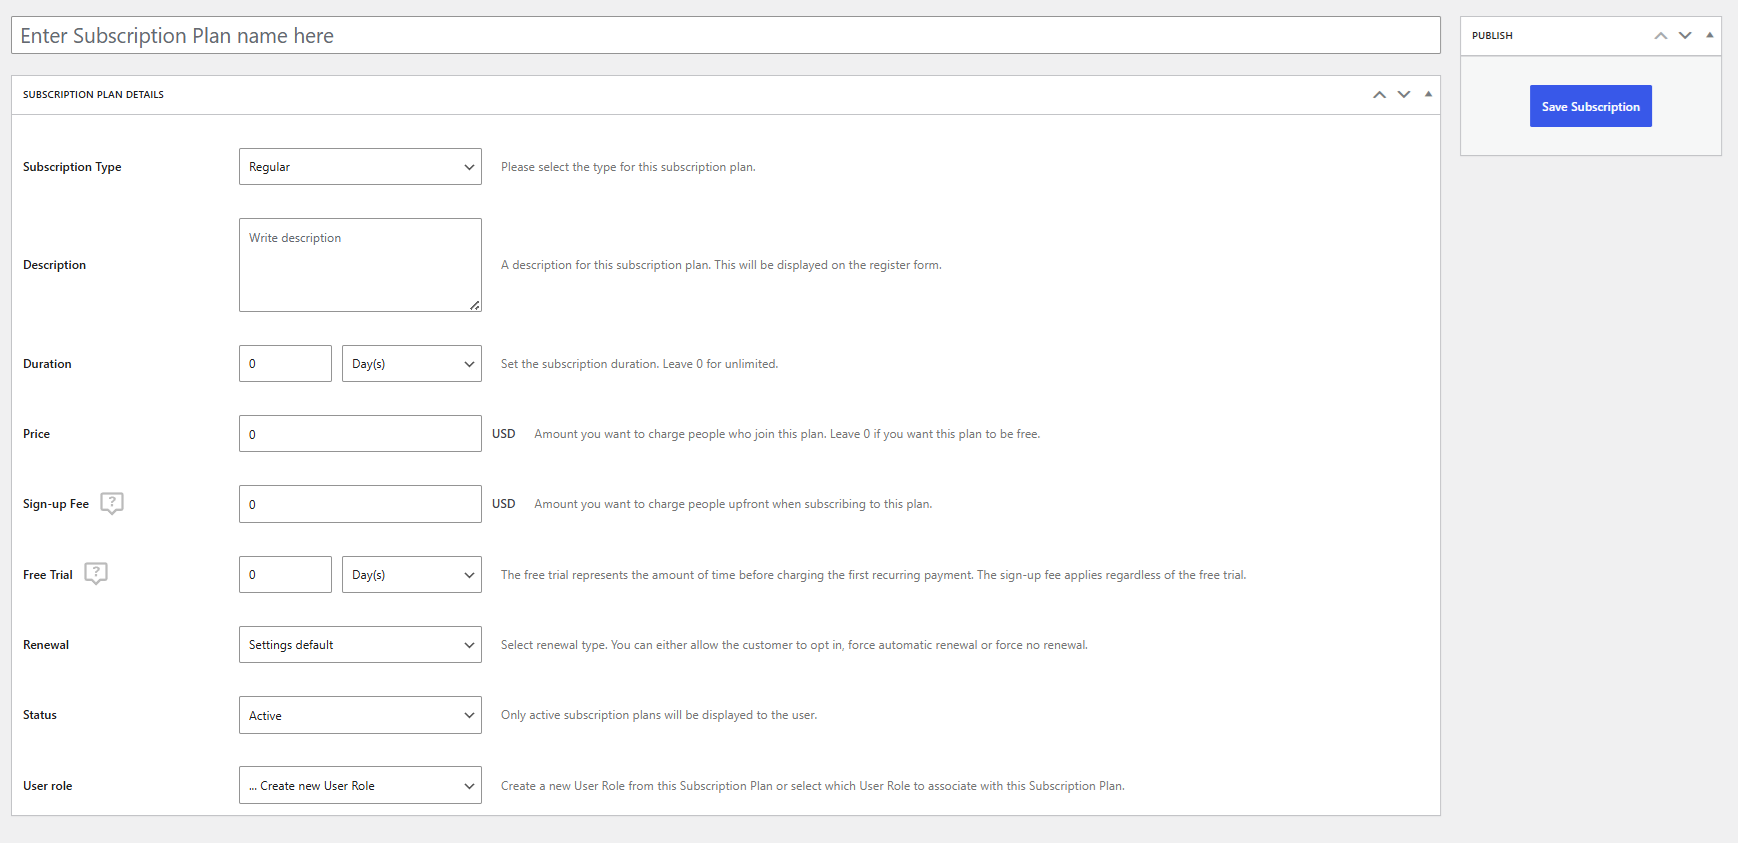
There are a lot of different options you can customize for each plan:
- The description of your plan that’ll display on the front end.
- The length of the subscription.
- The price of the subscription.
- The sign-up fee (if you’re adding one)
- The free trial length (if you’re offering one)
- The status of the plan (whether or not you want it to display on the front-end)
Once you’ve finished, click Save Subscription, and it’ll be live on your WooCommerce site. You can create as many subscription levels as you’d like.
Here’s what your visitors will see when choosing the right subscription plan for them. You can also customize this page as much as you’d like and add additional fields to collect even more user information.
Create Member Discounts
Paid Member Subscriptions lets you offer special product discounts to your members. You can set product discounts either based on the subscription plan your users are on, or per individual WooCommerce product.
Once you set up membership-based WooCommerce product discounts, your online store’s prices will automatically update when the members are logged in without affecting the store’s appearance for non-members. Members will see prices based upon their plan, instead of the standard pricing, and receive the discounts at the checkout accordingly.
Set Up Discounts Per Subscription Level
On the individual Subscription Plan page, scroll down under the main content section and you’ll see a box titles Product Discounts.
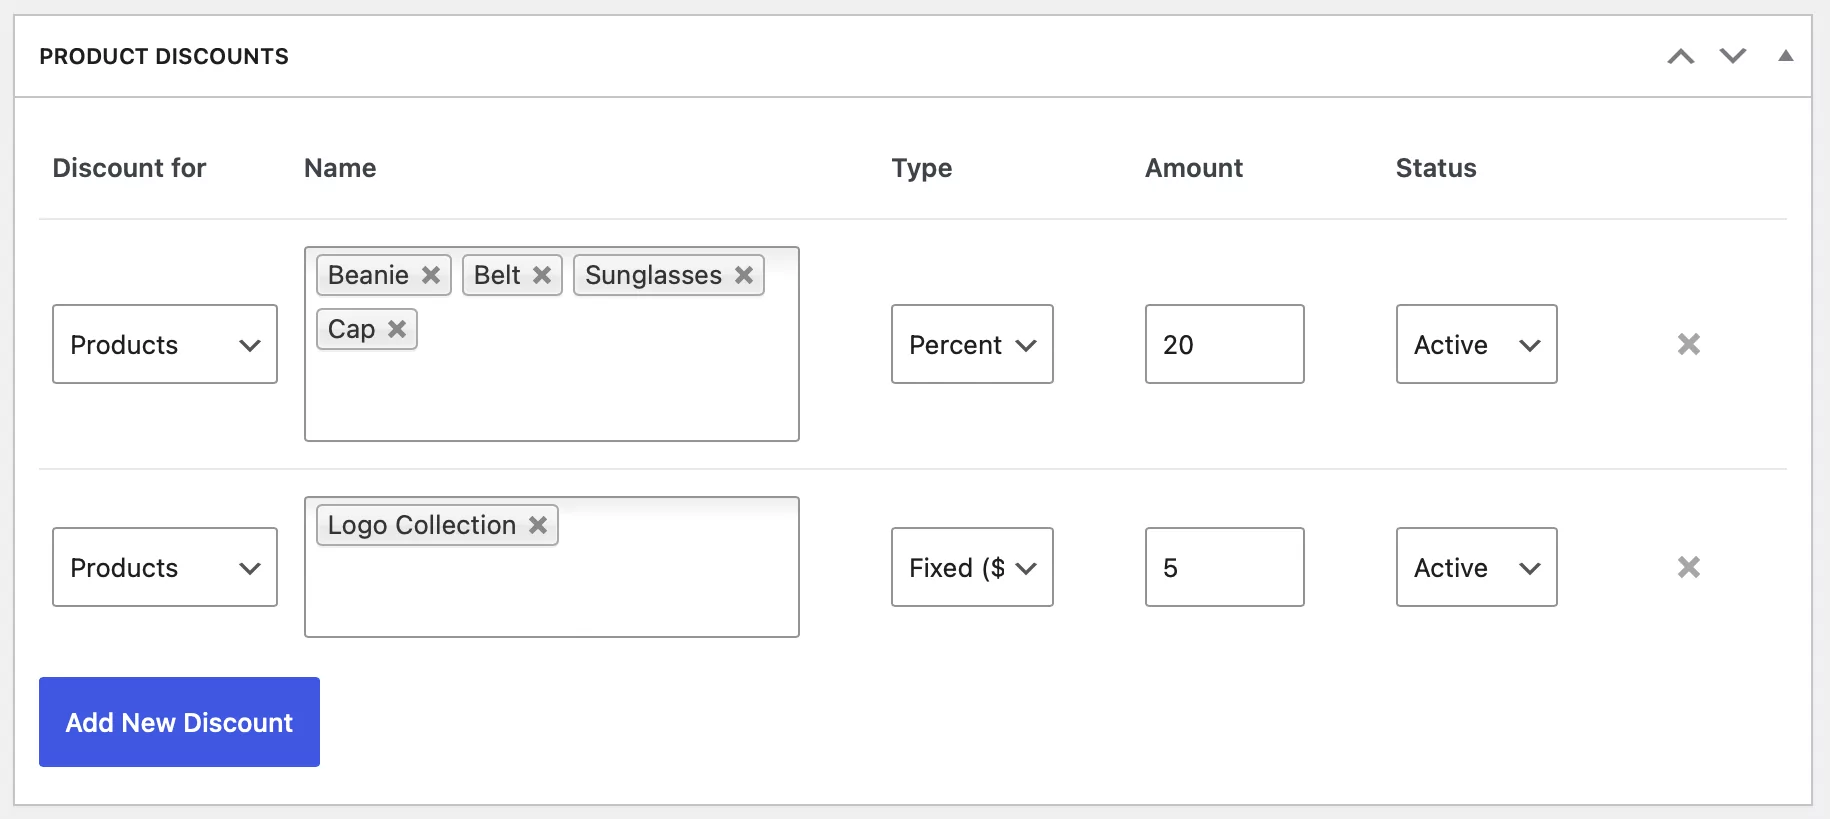
Click ‘Add New Discount’ and enter your discount options.
Set Up Membership Discounts Per Product
To create a discount per individual product, navigate to the WooCommerce product you’d like to add a discount for and go to the Membership Discounts meta box.

Here you can select the subscription plan the discount will apply to, how much the discount will be, choose how the discount will be applied, and more.
Configure Your Payment Options
With Paid Member Subscriptions, you’ll have a variety of different payment options, including:
One-time membership fee
A one-time membership fee is an excellent choice for subscription store owners who offer lifetime membership to their stores.
You’ll set up your membership fee when you’re creating each subscription plan.
Recurring payments
To set up recurring payments, you can use the Recurring Payments for PayPal Standard add-on. You can also use Stripe if your store is setup that way.
Navigate to Paid Member Subscriptions > Settings > Payments > Renewal.
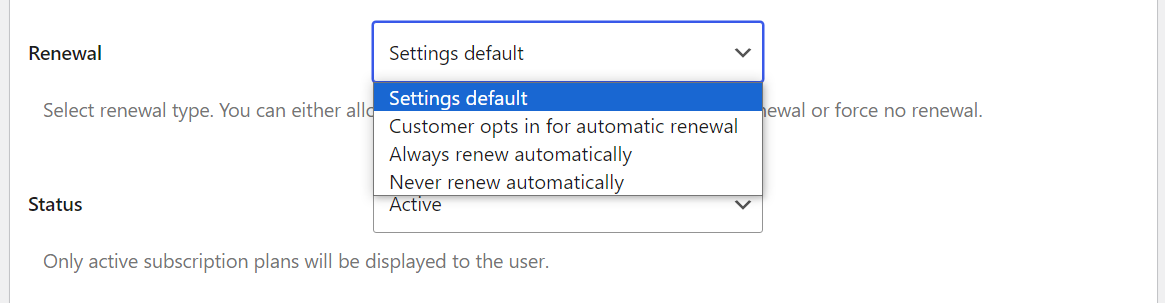
There are a few different renewal options you’ll be able to choose between:
- Let the customer opt-in for an automatic renewal
- Always renew the plan automatically
- Never renew the plan automatically
Free trial
With a free trial, you can let users test out the subscription before they decide to buy a “pro upgrade”. If they like your premium-level features, there’s a good chance they’ll decide to upgrade to a paid plan once the trial period is up.
To set up a free trial, navigate to Paid Member Subscriptions > Subscription Plans > Edit your Subscription plan > Setup Free Trial.
Here you can set the length of the free trial. Once it expires, users will have the option of upgrading to one of the paid plans.
Sign-up Fee
Sign-up fees will allow you to charge an upfront fee on top of your current subscription fee.
To set up a sign-up fee, navigate to Paid Member Subscriptions > Subscription Plans > Edit your Subscription plan > Setup Sign-up Fee.
Keep in mind the sign-up fee will apply even during a free trial, so be aware of the plans you’re applying it to.
Advanced Settings
Beyond the features highlighted above, some additional advanced features might be useful for your subscription website:
Email your Members
By adding email integration to your website, you can send automated emails when users trigger certain events, such as when a user:
- Registers for an account
- Creates or upgrades their subscription
- Has an account which is about to expire
- Cancels their account
For additional email automation features, you can use the Email Reminders Add-on to send out automated emails before events take place, like a subscription that’s about the expire.
Stop Account Sharing
Account sharing can actually be a significant loss of revenue for your subscription website. It costs Netflix over $135 million every month. Once you turn on this setting, it’ll stop users from logging into the same account from multiple locations.
Tax and EU VAT
If you’re running a WooCommerce store, you’ll want to charge tax based on your users’ location. WooCommerce allows you to set up tax rates on your products, but not on your subscriptions.
If you want to charge and collect tax based upon your subscriptions, you’ll want to use the Tax & EU VAT add-on. Once you’ve set up this add-on, you can collect tax and process payments at the checkout through the Paid Member Subscriptions plugin.
This works great in combination with the Invoices add-on, allowing customers to download invoices for their subscription payments, invoices which will also contain the collected tax.
How to Grow Your Subscription Website’s Revenue
Launching your WooCommerce subscription site is a big step, but it’s just as important to stay focused on your online store’s growth. Here are some tips for increasing revenue.
Choose the Right Niche
One of the first things you’ll need to do is define your customer persona – i.e. who your customers are. By developing a deep understanding of your customers, it’ll be much easier to market and sell membership plans to them. You’ll need to weigh up the pros and cons of appealing to different segments of the market.
Beyond standard demographic data, you’ll want to know how they prefer to buy products, and the needs/problems your subscription is helping with.
For example:
- Are they subscribed to any other subscription services?
- What problems do they have that your product solves?
- What price points are they the most receptive to?
- Have they tried solutions like yours in the past?
Define Your USP (Unique Selling Proposition)
Along the same lines as above, you’ll need to define what makes you different.
Ask yourself: what makes your membership site unique compared to the other subscription eCommerce stores in your market?
For example:
- Do you offer same-day delivery?
- Is your product truly innovative?
- Do you offer a product bundle cheaper than the competition?
- Are your products sourced from sustainable materials?
You’ll also want to incorporate how the subscription model benefits your customers. Does it make their lives easier? Save them money?
Here’s a quick breakdown of how the various subscription models have built-in customer benefits:
- Curation subscription. Provide your customers with a wide variety of new products and expose them to new things of all different stripes.
- Replenishment subscription. Allow customers to save money and replenish goods they would need to buy anyways.
- Unique product subscription. Gain access to products that are difficult to find or solve a unique problem.
Use Email Marketing
One of the most effective marketing channels is email. The average ROI for email campaigns is $38. There are loads of effective platforms out there for you to choose from, such as Mailchimp.
Since subscription eCommerce relies on frequent communication with your subscribers, email is the perfect tool.
Here are a few different ways you can use email:
- Create a welcome sequence. A Mailchimp welcome sequence is your chance to set the tone of your customer relationship. You can even offer an up-sell to a higher-priced pro or unlimited membership plan.
- Re-activate old customers. Send a re-activation email to reengage subscribers whose subscription has passed its expiration date and see if their situation has changed.
- Get user feedback. Create a survey, or ask questions to get feedback on your products, price points, and more.
- Value-add emails. Send out emails with tips and tricks on how to better use your products or other emails that don’t sell, but instead build rapport with your customers.
Test and Refine Your Packages
It’s easy to get stuck in the planning phase forever. However, the most important thing you can do is launch your subscription products into the world. You’ll learn more selling your products and getting feedback from real customers than you can endlessly planning the perfect subscription product.
The more data you have to work with, the better you’ll be able to determine what’s working and where you need to adjust.
Here are some metrics you’ll want to keep an eye on:
- The monthly recurring revenue you’re generating
- How much it costs to acquire a new customer
- The customer lifetime value (how much your customer is worth over the long-term)
- The churn rate (how long your subscription customers remain a paying customer before leaving).
You can also test multiple subscription products, different product bundles, and price points. Over time, you’ll be able to refine your subscription products, price points, and more.
Start Your WooCommerce Subscription Empire Today
Learning how to create a subscription website can be a great way to build the six-figure online business you’ve been dreaming about. By using the combination of WooCommerce and Paid Member Subscriptions plugins, you can streamline the process and realize your goals much faster.
With your WooCommerce store up and running, the fastest way to add subscription functionality is by installing Paid Member Subscriptions. This membership plugin gives you instant access to features like recurring subscriptions, members-only store functionality, subscriber-only product discounts, and more. You’ll be adding a membership component to your WooCommerce store in no time.
Paid Member Subscriptions Pro
Accept (recurring) payments, create subscription plans and restrict content on your website. Easily setup a WordPress membership site using Paid Member Subscriptions.
Get Paid Member SubscriptionsRelated Articles

How to Set Up WooCommerce Stripe Subscriptions with Recurring Payments (3 Methods)
Are you searching for a way to set up WooCommerce Stripe subscriptions? Setting up recurring subscriptions is a great way to build regular, dependable revenue for your website. And when it comes to processing payments, Stripe is one of the top options thanks to its competitive fees and flexible feature set. However, WooCommerce doesn't include […]
Continue Reading
How to Set Up WooCommerce Recurring Payments
Can't figure out how to set up WooCommerce recurring payments for your business? You aren't alone. Building a subscription business is daunting, especially if it's your first time. There are many moving parts at any given time. Whether it's laying the foundation, creating content, marketing your membership site, or managing payments, there are plenty of […]
Continue Reading
Best WooCommerce Subscriptions Alternative: Paid Member Subscriptions, a More Affordable and Complete Solution
Are you looking to sell subscription products on your WooCommerce site? One of the most popular ways to sell subscription products in WooCommerce is with the WooCommerce Subscriptions plugin. It lets you create WooCommerce products with recurring payments as a way to offer subscriptions to your customers. While this is an official extension from WooCommerce, […]
Continue Reading