

Table of Contents
- 1 Why Private Community Websites Work
- 2 Why Most Private Communities Fail
- 3 Key Elements of a Successful Private Community
- 4 How To Create a Private Community Website With WordPress
- 4.1 Profile Builder Pro
- 4.2 Step #1: Install and Activate Profile Builder
- 4.3 Step #2: Create and Customize Your Sign-Up Page
- 4.4 Step #3: Restrict Content and Create Members-Only Areas
- 4.5 Step #4: Enhance Interaction On Your Private Community Website
- 4.6 Bonus: Monetizing Your Private Community Website
- 4.7 Paid Member Subscriptions Pro
- 5 Your Private Community Starts Here
Public social platforms used to feel like the easiest way to build a community. But over time, many businesses have realized their limitations.
- Algorithms decide who sees your content.
- Discussions get buried.
- Notifications compete with endless distractions.
And most importantly, you don’t truly own the space or the relationship with your audience.
That’s why more and more businesses are investing in a private community website instead.
A private community gives you full control over the experience, which means you decide who joins, what they see, how discussions are structured, and what value members receive. These communities are increasingly used for online courses, paid memberships, coaching programs, client portals, alumni groups, and niche professional networks.
However, simply setting up a members-only space isn’t enough. The real challenge isn’t in launching a community but building one that people actually use.
In this guide, we’ll cover both sides of building a successful private community. We’ll explore:
- Why private communities work so well
- Why most of them fail
- The essential features every private forum WordPress site needs
- How to build a fully functional private community using WordPress
Let’s start by looking at why private communities are so effective when done right.
Why Private Community Websites Work
A well-built private community website creates something that public platforms rarely can: focus.
When access is controlled, the perceived value immediately increases. That exclusivity often leads to higher engagement and stronger participation.
Another key advantage is a higher signal-to-noise ratio. Unlike public forums or social media groups, private communities are built around a clear purpose. Members join intentionally because they genuinely care about the topic. The result is more meaningful discussions and fewer distractions.
Private communities also make it easier to build trust. When members recognize each other, complete profiles, and interact consistently, relationships develop naturally. Moderation is easier, culture is easier to maintain, and conversations stay aligned with your goals.
For businesses, the benefits go even further. A private space provides direct access to members or customers without relying on third-party platforms. Instead of short social media comments, you create room for thoughtful discussions, feedback, and long-term engagement.
Here are a few examples of where private communities work especially well:
- Coaching groups. Clients can ask questions, share progress, and support each other between sessions.
- Customer communities. Users can exchange tips, troubleshoot issues, and provide product feedback.
- Professional social networks. Members connect around shared industries or expertise.
- Learning communities. Students discuss lessons and collaborate on projects.
- Internal company hubs. Teams communicate, share resources, and centralize knowledge.
When structured properly, a private community becomes an ecosystem built around shared value and consistent interaction.
Why Most Private Communities Fail
While launching a private community sounds like a powerful way to serve your audience, the reality is that many of them lose momentum (read: fail) quickly.
One of the most common reasons a private community website fails is the lack of a clear purpose. If members don’t immediately understand what the space is for, why it exists, or how it benefits them, they won’t engage.
Weak onboarding is another major issue. New members join, look around, and don’t know what to do next because there’s no welcome flow, introduction thread, or clear first action.
Empty spaces can also kill momentum. If discussion areas have no activity, new members assume the community is inactive. Without seeded conversations or guided prompts, it’s difficult to spark engagement organically.
Other common problems include no clear structure for discussions, a lack of moderation or community leadership, too many barriers during signup, and no engagement strategy after launch.
With clear positioning, thoughtful onboarding, structured discussions, and the right tools in place, you can build a private community that stays active long after launch.
Key Elements of a Successful Private Community
Building a successful private community website requires intentional structure, clear participation paths, and the right features to support interaction.
Below, we’ll break down the core elements that turn a basic members-only space into an active, valuable community.
Access Control
Access control is the foundation of any successful private community website. Without it, your space isn’t truly private.
At its core, access control allows you to decide who can register, what they can see, and how they participate. This can include members-only content, gated discussions, and role-based permissions that give different users different levels of visibility.
For example, you might allow paying members to access premium discussion areas, while free members only see general topics. Or you might create private groups for coaching clients, course participants, or internal teams.
Clear access rules also help maintain culture and focus. When members know the space is curated and intentional, they’re more likely to engage thoughtfully and consistently.
Member Profiles
When members can personalize their profiles, add relevant details, and control what others see, the space feels more human. Identity and context are two factors that significantly increase participation.
Custom user fields allow you to collect meaningful information such as industry, interests, experience level, or goals. This makes it easier for members to connect with the right people and contribute to relevant discussions.
Profile editing options also give users control over their information, which builds trust. When members feel visible and recognized within a private community website, they’re far more likely to engage, respond to others, and return regularly.
Gated Content
When valuable resources are available only to members, access becomes part of the benefit. This could include premium tutorials, recorded training, downloadable materials, exclusive discussions, or early product updates.
Gating content also allows you to structure information intentionally i.e. you can organize resources by membership level, role, or progress stage. For example, beginner members might see foundational materials, while advanced members unlock deeper discussions or specialized resources.
Clear Onboarding
Clear onboarding removes confusion and immediately shows people what to do next. Instead of logging in and seeing an empty dashboard, members should encounter a guided experience like a welcome message, a short explanation of how the community works, and a clear first action.
That first action might be introducing themselves, completing their profile, or replying to a pinned discussion. Welcome emails, automated prompts, and clearly structured navigation all help reduce friction.
How To Create a Private Community Website With WordPress
WordPress gives you full control over your platform, content, and member experience.
With the right tools, you can create a structured, secure, and scalable private community website without relying on third-party platforms. One of the most flexible ways to do this is with the Profile Builder plugin.
Profile Builder Pro
Advanced registration forms and member directories to build private community sites in WordPress.
Get Profile BuilderProfile Builder extends WordPress’ default user system and allows you to create custom registration forms, front-end profile editing, member directories, and content restriction rules. In other words, it provides the foundation for a fully functional members-only space.
Here’s what you need to do:
Step #1: Install and Activate Profile Builder
The first step is to install and activate the Profile Builder plugin.
You can follow this tutorial using just the free version of the plugin, which lets you build a simple gated online community. You can get it from the WordPress.org plugin repository or search for it in the back-end by heading over to Plugins → Add New.

The premium version of the plugin unlocks advanced features like extra fields, front-end member directories, and premium add-ons. So if you’re interested in that, feel free to install the Pro versionas well.
Step #2: Create and Customize Your Sign-Up Page
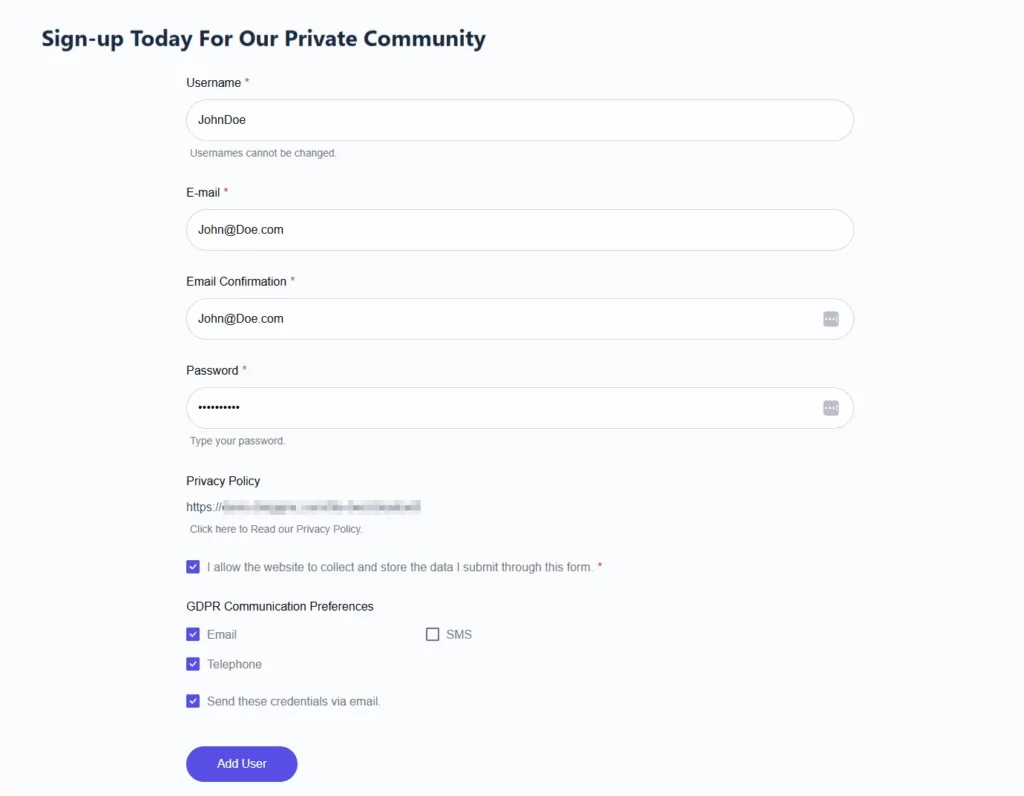
First things first, if we want to create private pages for members, we’ll for sure need some members. For this, we need a sign-up page.
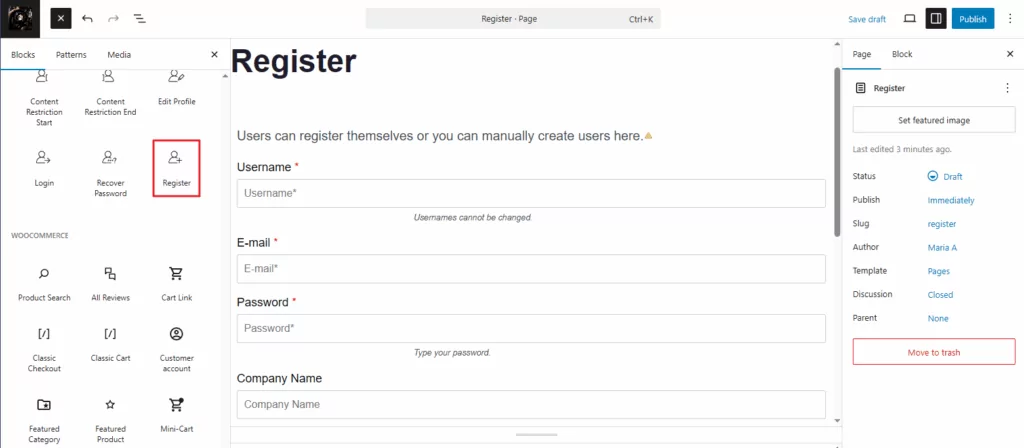
Luckily, Profile Builder automatically creates all user-related pages for you upon activation, including a registration page. You can find it in your pages tab and tweak it if you want to add extra content to it or change its title.
You can also create a new registration page from scratch by adding the Profile Builder Registration block to any page.
Next, you’ll want to customize your members’ experience by adding relevant custom form fields to your registration form.
For this, go to Profile Builder → Form Fields and pick the fields available in the dropdown menu. If you’re using the free version of the plugin, your options are a bit more limited, but you can still create a perfectly functional custom registration experience.
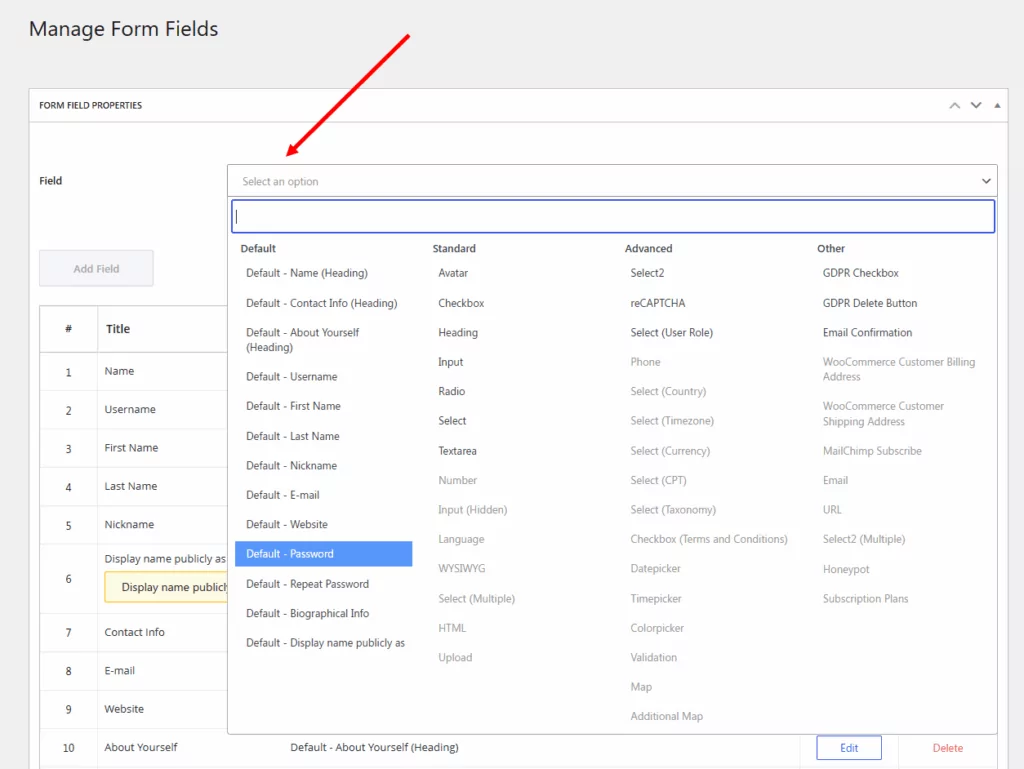
Pick the ones you need and then, using drag and drop, you can rearrange their order in your form. Once you save your changes, these new fields will be automatically displayed in your sign-up form.
Step #3: Restrict Content and Create Members-Only Areas
With your registration form ready, it’s time to protect your content.
Go to Profile Builder → Settings → Content Restriction to enable the functionality. Here, you can also edit your default settings for how content is restricted for non-members on your private community site.
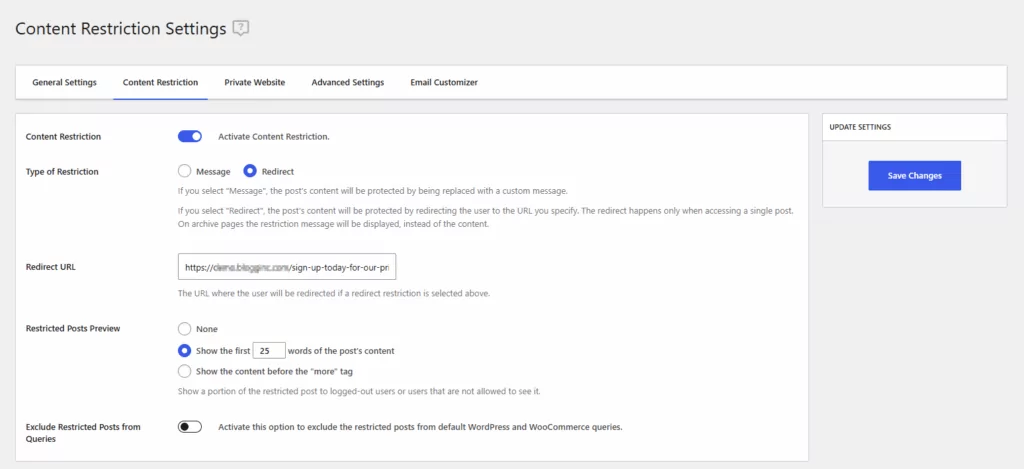
You can choose to display a message to logged-out users or redirect them to the member registration page. If you’re going with the second option, paste the URL of your page that has the Profile Builder registration form and click on the Save Changes button to continue.
Next, you can specify with individual page is restricted to your members only. Go to a page you wish to make private and use the WordPress page editor to specify the content restriction rules for it. In the editable page, scroll down to the Profile Builder Content Restriction metabox.
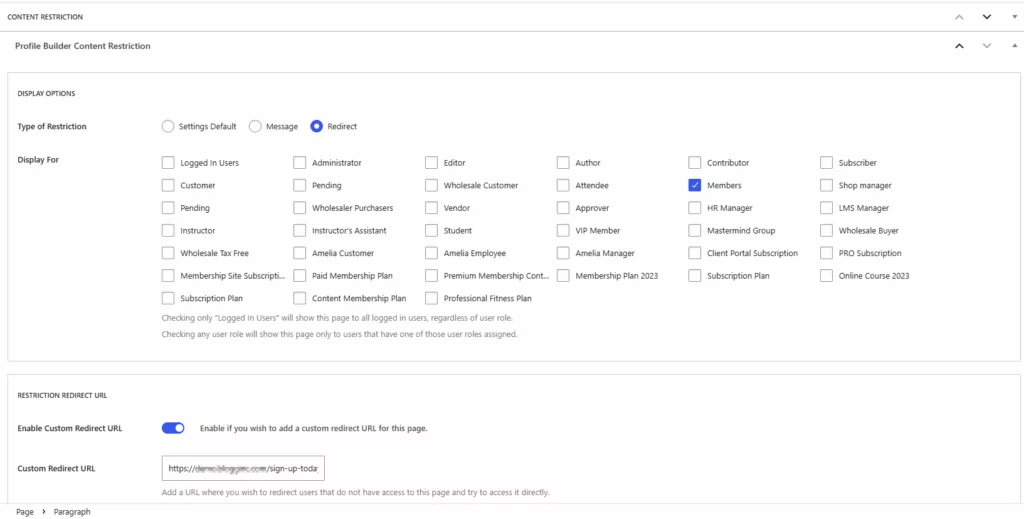
If you choose the Settings Default option in the Type of Restriction section, everything you’ve already set up in the step above will be applied to this page. But if you want to customize this specific page’s restrictions, you can choose to show a custom message to the logged-out users, or even choose another custom redirect URL, just for this page.
Next, you can also choose which user roles you want the content to display for. Or, you can also choose to apply the restriction to all logged-out users by checking the Logged In Users option.
Update the page, and now, every user who doesn’t have the right user role or is not logged in (depending on your settings) will be greeted by your redirect or your custom message when trying to access your private page.
In my case, if a user is not a member, they will promptly be redirected to my registration page:
Step #4: Enhance Interaction On Your Private Community Website
So, you’ve already learned how to make your community private, which was the purpose of this article. Additionally, everything I’ve shown you so far you can do for free.
However, if you need help setting up more community-related features on your site, you can use the BuddyPress add-on for Profile Builder to take things further. This add-on comes with a pro version of the plugin and gives you extra powers when it comes to community engagement.
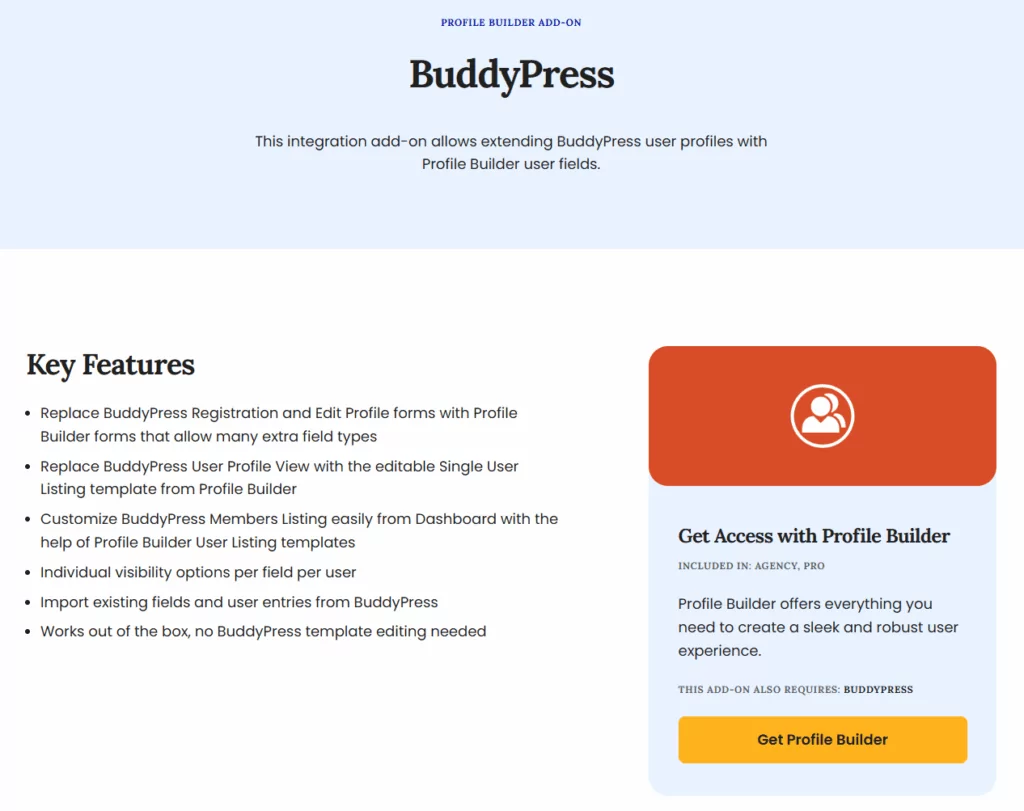
Activity feeds and group discussions encourage connections. User notifications, private messaging, and social features keep members active. So, to learn how to make your private community engaging and interactive, I highly recommend you read this complete guide:
👉 How to build an engaging community with Profile Builder and BuddyPress
Combine these tools with onboarding prompts and guided discussions to spark participation, turning your members-only WordPress site into a vibrant community where members feel connected and motivated to contribute regularly.
Bonus: Monetizing Your Private Community Website
Once your private community is active and providing value, it can also become a source of revenue. Many communities monetize through tiered memberships. For example, basic members might get access to general discussion areas, while premium members unlock specialized content, exclusive groups, or direct access to experts.
This approach ensures that paying members feel the value of their subscription, while non-paying members still engage with the community.
Another approach is offering premium resources. This could include recorded workshops, downloadable templates, exclusive training, or early access to content. Gating these resources encourages sign-ups and keeps members active.
On a WordPress site, the easiest way to implement monetization is with the Paid Member Subscriptions plugin.
Paid Member Subscriptions Pro
The easiest way to set up a paid private community website in WordPress.
Get Paid Member SubscriptionsIt supports subscription-based communities, tiered access, premium groups, and paid memberships. With this setup, you can offer flexible membership levels, manage recurring payments, and provide members-only content seamlessly.
If you’re looking to monetize your community, here’s a guide on how to do so with Paid Member Subscriptions:
👉 How to build an online community with paid membership tiers
Monetization works best when it’s part of your overall engagement strategy. By combining thoughtful onboarding, active discussion, gated resources, and subscription tiers, you can create a sustainable private community that both serves your members and supports your business goals.
Your Private Community Starts Here
Creating a private community website that people actually use is about combining value, structure, and engagement. Tools like Profile Builder, its BuddyPress add-on, and Paid Member Subscriptions give you the features you need to manage members, restrict content, and build meaningful connections.
But technology alone isn’t enough.
Clear onboarding, thoughtful access control, strong member profiles, and gated content are what turn a members-only space into a thriving community. Start small, focus on delivering real value, and iterate based on member feedback.
Profile Builder Pro
Advanced registration forms and member directories to build private community sites in WordPress.
Get Profile BuilderTake the first step and start building your private WordPress community with Profile Builder!
Related Articles
WordPress Profile Builder: a Front-end User Registration, Login and Edit-Profile Plugin
Easily Login, Register and Edit your Profile Directly from the Front-end Profile Builder lets you add front-end forms that give your users a more flexible way to register, log in, and modify their profile information. If you allow public registration on your site, you don't want to force your users to use the backend WordPress […]
Continue Reading
How to Build an Online Community Website – Best Method in 2026
Are you trying to create an online community website but not sure where to start? Building an online community platform is a great way to bring together a group of members around a specific topic. And by creating your own platform, you can fully own the relationship with your members so that you're never at […]
Continue Reading
How To Create a Divi Membership Site
If you’re thinking of building a membership site in WordPress, you’ll need a solid theme and a membership plugin that pairs well with it. In this complete guide, we’ll show you how to create a Divi membership site using the popular Divi theme in combination with the Paid Member Subscriptions plugin.
Continue Reading