

Table of Contents
- 1 What You’ll Need to Set Up Your WordPress Stripe Payment Plugin
- 2 How to Set Up the WordPress Stripe Payment Plugin
- 3 Set Up WordPress Stripe Payments Plugin Today
If your business manages subscriptions on a WordPress-powered website, a WordPress Stripe payment plugin might be exactly what you need.
There are plenty of payment gateways out there for WordPress users, but they are not all equal. They all target different needs and different ways of making payments in WordPress. What’s great when using Stripe, compared to other available options, is that it will help you handle transactions directly on your site, with no redirects, making payments an absolute breeze for your website’s users.
In this post, we’ll show you how to unlock this functionality for your own membership website and add a Stripe payment gateway to your site, using an easy-to-use WordPress plugin. So let’s dive in!
What You’ll Need to Set Up Your WordPress Stripe Payment Plugin
So, before you get to setting up the Stripe payment gateway, there are a few more steps you’ll need to go through. Namely, a couple of plugins.
Paid Member Subscriptions
Paid Member Subscriptions is a powerful WordPress membership plugin that allows you to easily set up a membership site and manage subscription plans. It seamlessly integrates with any WordPress website, giving it membership functionalities.
The plugin offers a free version at WordPress.org, and two paid versions for extended functionality. The Pro plan provides access to 8 Pro Add-ons, which include the Stripe payment gateway Add-on that you’ll be needing to enable Stripe payment on your membership site.
The Stripe Pro Add-on
The Stripe Add-on from Paid Member Subscriptions is available in the Pro version of the plugin and it makes for better user experience and improved conversion rates. Your users will be able to easily make credit and debit card payments, both one-time and recurring, directly on your site without being redirected anywhere else. Stripe meets the highest standards of security in the payments industry, and is certified as a PCI Service Provider Level 1. With the plugin, you can also add a Sign-up Fee and allow a Free Trial period to your subscription plans.
While there are many payment gateways on the market, the Stripe payment gateway is an excellent choice because it meets Strong Customer Authentication requirements and supports new authentication methods like 3D Secure 2, which provides frictionless authentication. With its ease of use and availability in 46 countries around the world, the extension is a beneficial addition to any membership website.
How to Set Up the WordPress Stripe Payment Plugin
After your purchase is complete, you can now start setting up your WordPress Stripe Payment Plugin. So, let us walk you through the process of doing this with the help of the Paid Member Subscriptions plugin.
Step 1: Install the Paid Member Subscriptions Plugin
The first step of the process is to set up Paid Member Subscriptions, which can be done in three simple steps: Download, Install, and Activate.
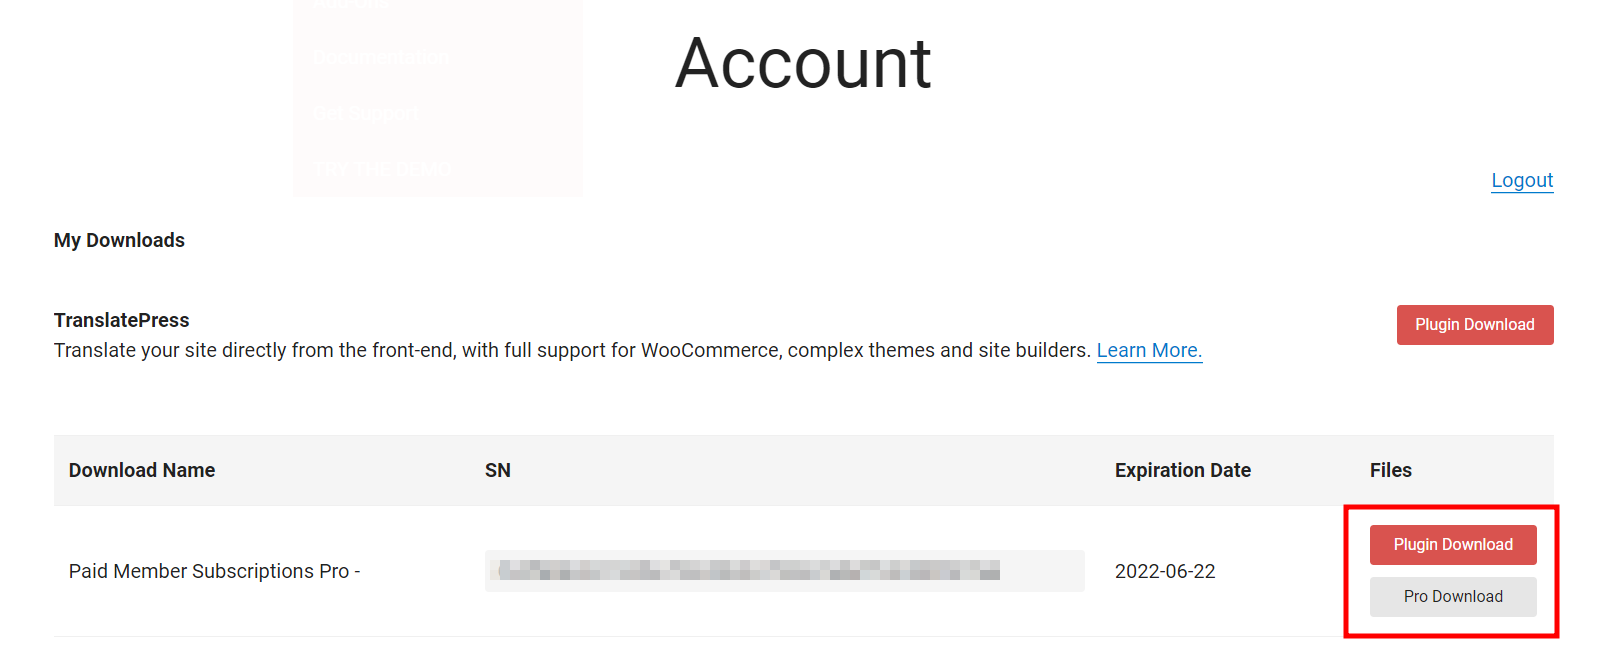
Start off by going to your own Account page and download both the main plugin and the Pro extension as .zip files.
Now, within your WordPress admin interface, go to Plugins → Add New and click on the upper right button labeled Upload Plugin.
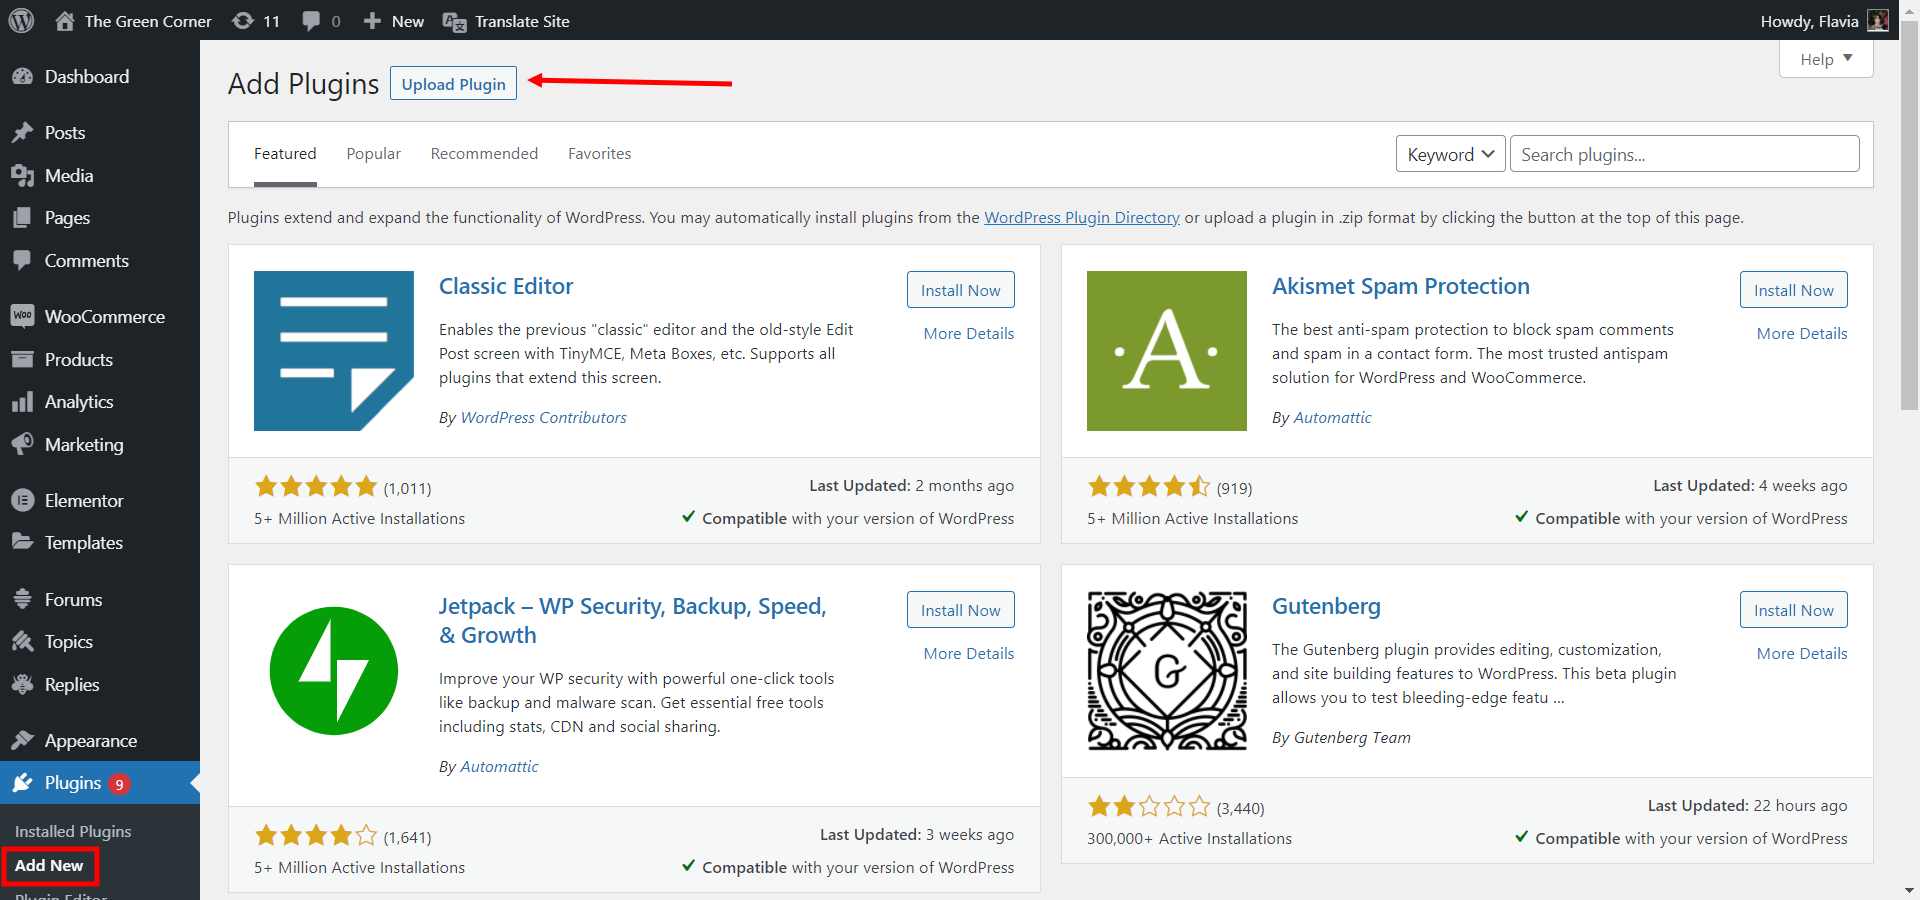
Next, use the Choose File button to select your previously downloaded main plugin .zip file and then click on Install Now. After installation, don’t forget to Activate the plugin. Repeat the process one more time, this time making sure to upload the Pro plugin.
Now you should be able to begin setting up the Paid Membership Subscriptions plugin, including creating pages with shortcodes, setting up your payment details, creating subscription plans, and restricting your premium content. For a more detailed guide on how to do all of this, you can follow the steps in this tutorial.
Step 2: Install the Stripe Add-on
After your membership site is all set up, you are ready to integrate the Stripe add-on, which is available only with the PRO version of the WordPress membership plugin.
Requirements
Before configuring the Stripe plugin, however, ensure that you meet the following requirements, as they are necessary in order to have the plugin function smoothly:
- Your Paid Member Subscription must be version 1.5.0 or higher since that will be necessary so the Stripe add-on works properly;
- You have an SSL certificate installed on your domain. This is necessary if you are using Stripe to process credit card payments. Here’s more info on that.
Install the Add-on
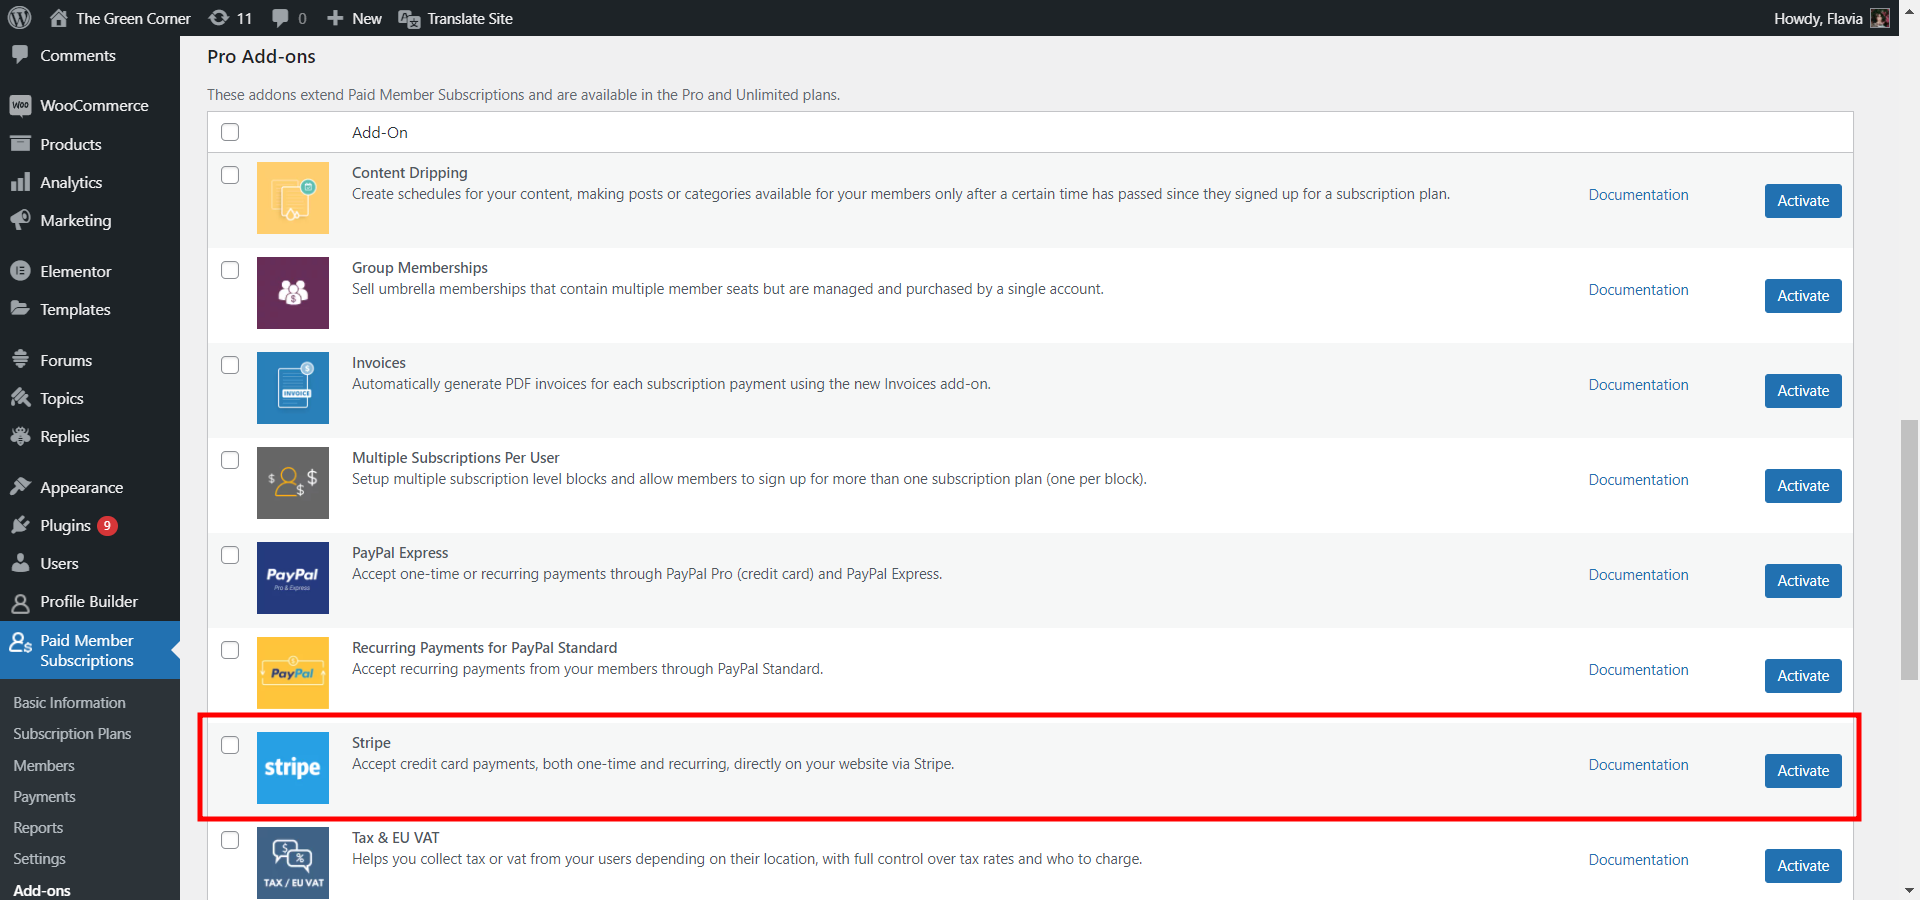
To access the Stripe Payment Gateway plugin, navigate to Paid Member Subscriptions → Add-ons from your WordPress dashboard. Scroll down on this page and find the Stripe Add-on in the provided list. Once you’ve identified it, click the Activate button.
Get Your Stripe API Credentials
In order for your website users to be able to make payments through Stripe using credit or debit cards, you’ll need to enter your Stripe API credentials. Here are the steps to obtain your credentials and add them to your WordPress site.
First, log into your Stripe Account and make sure it has been activated. Next, go to the Developers tab and select API keys from the left sidebar.
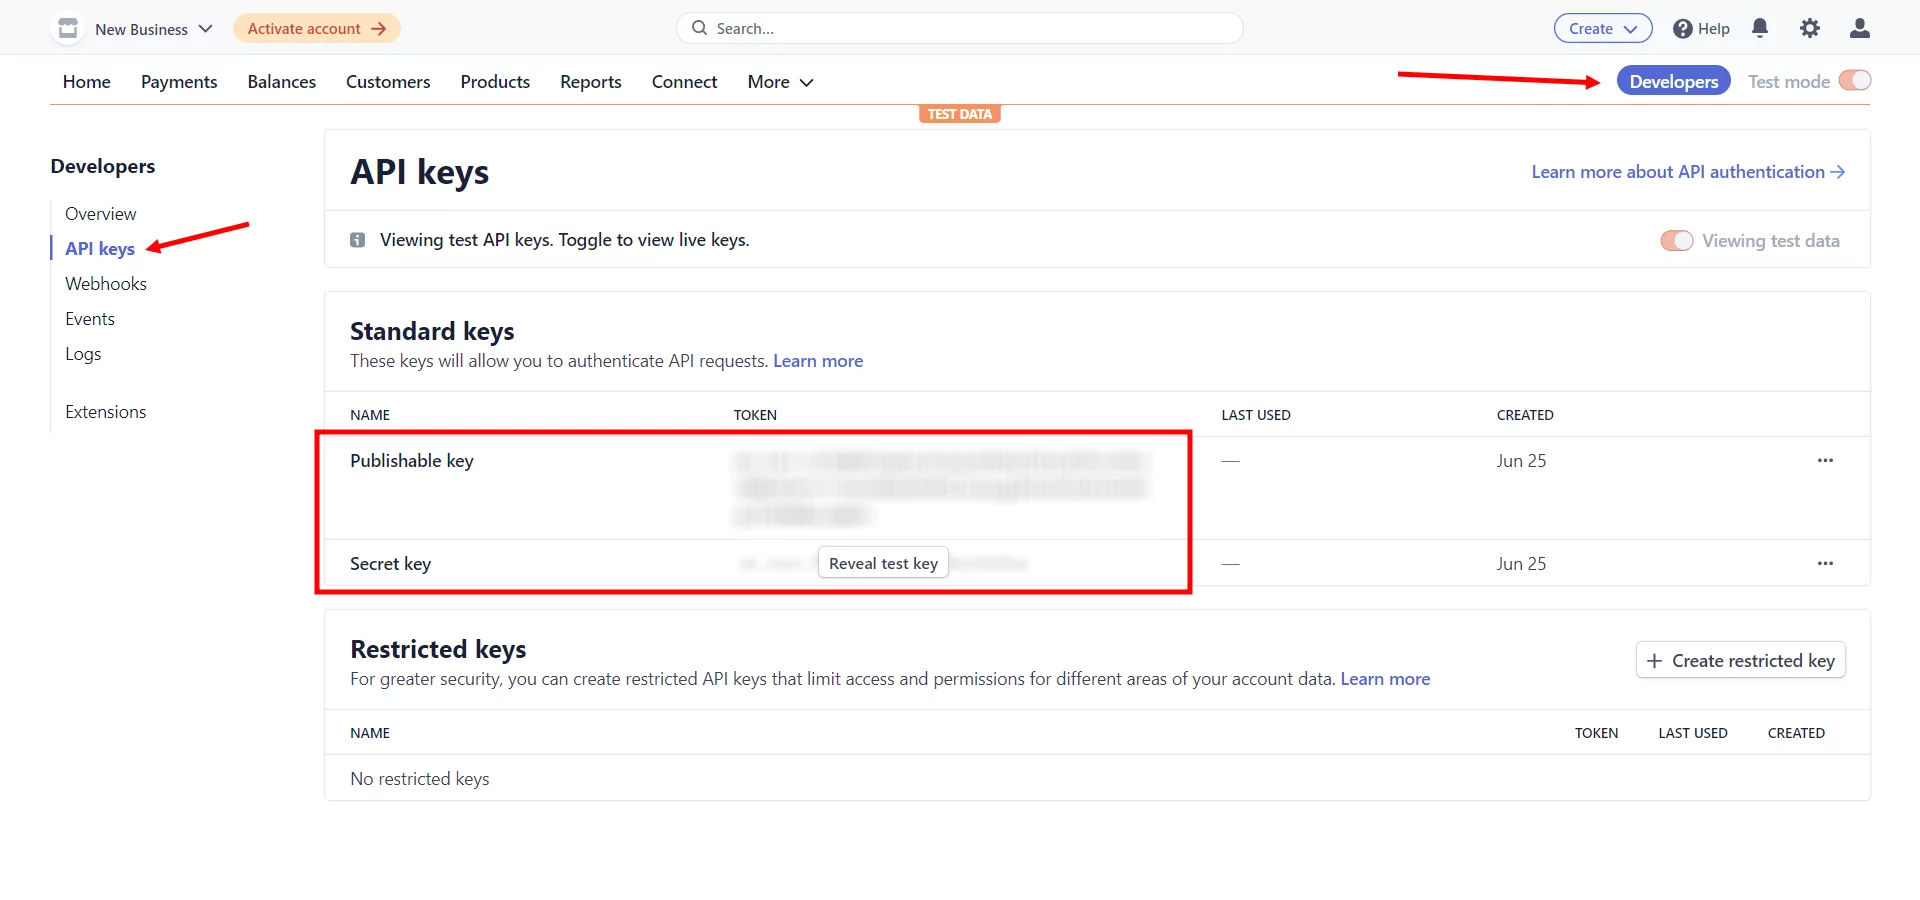
In the example above only the test data is available, since the account is not active. When activated, you will be able to also retrieve the live data by switching one of the radio switchers from the upper right side of the screen.
Now, simply copy these credentials (Publishable key and Secret key) and let’s get them onto your WordPress site.
Step 3: Configure Stripe Payments with Paid Member Subscriptions
In your WordPress dashboard, navigate to Paid Member Subscriptions → Settings and then select the Payments tab. Now, from the Active Payment Gateways section, select one of the Stripe options (you can still keep other types of payment gateways active if you wish so).
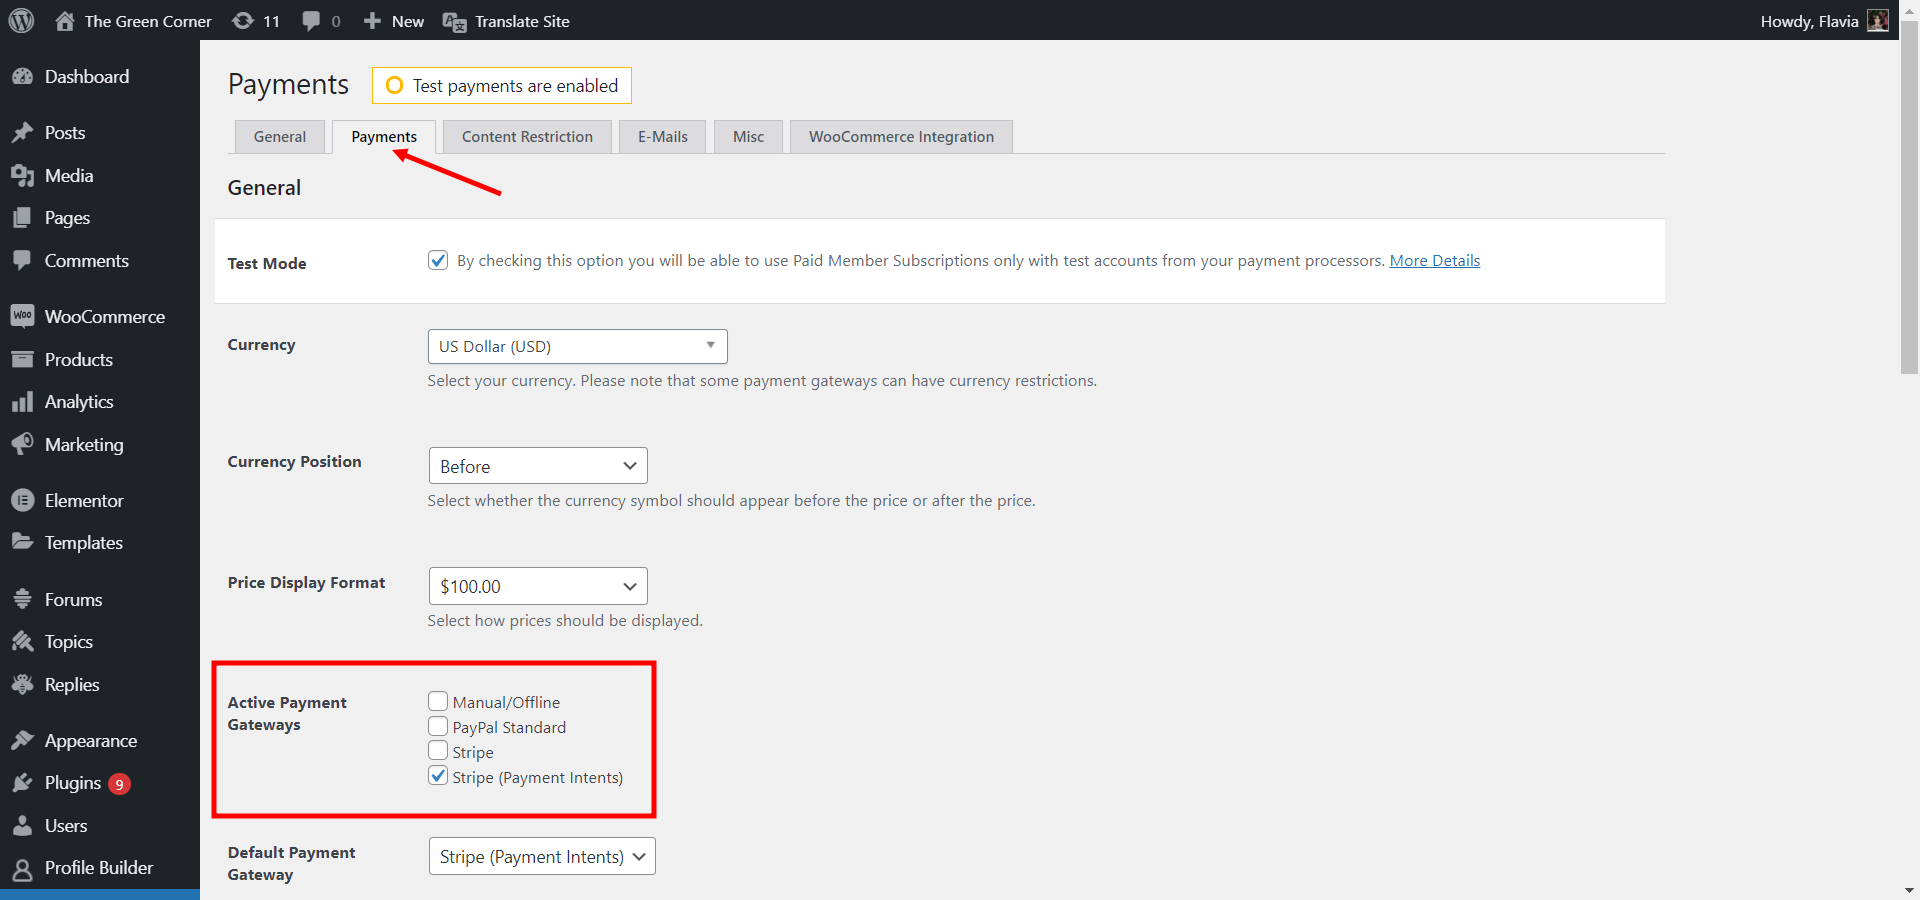
The main difference between the two available Stripe options is that Stripe (Payment Intents) is SCA compliant since it supports payments made with additional authentication (3D Secure, 3D Secure 2). We strongly recommend that you go with this option in order to support EU-issued credit cards.
On this same page, you can also configure some more options:
- Test Mode will restrict the Paid Member Subscriptions to only test accounts for payment processors.
- The Currency drop-down will allow you to select your currency (i.e. US dollar), and Currency Position will allow you to designate the currency symbol to either appear before or after the numerical price. Refer to currency restrictions.
- You can also choose your preferred Price Display Format here.
- Default Payment Gateway will allow you to select which type of payment gateway should be selected by default in the registration form.
- You can also select the Renewal type, which will allow for recurring payments (more on this in the next section).
- The Retry Payments option makes Paid Member Subscriptions try to charge a user with a failed payment again, after 3 days, for a maximum of 3 retries.
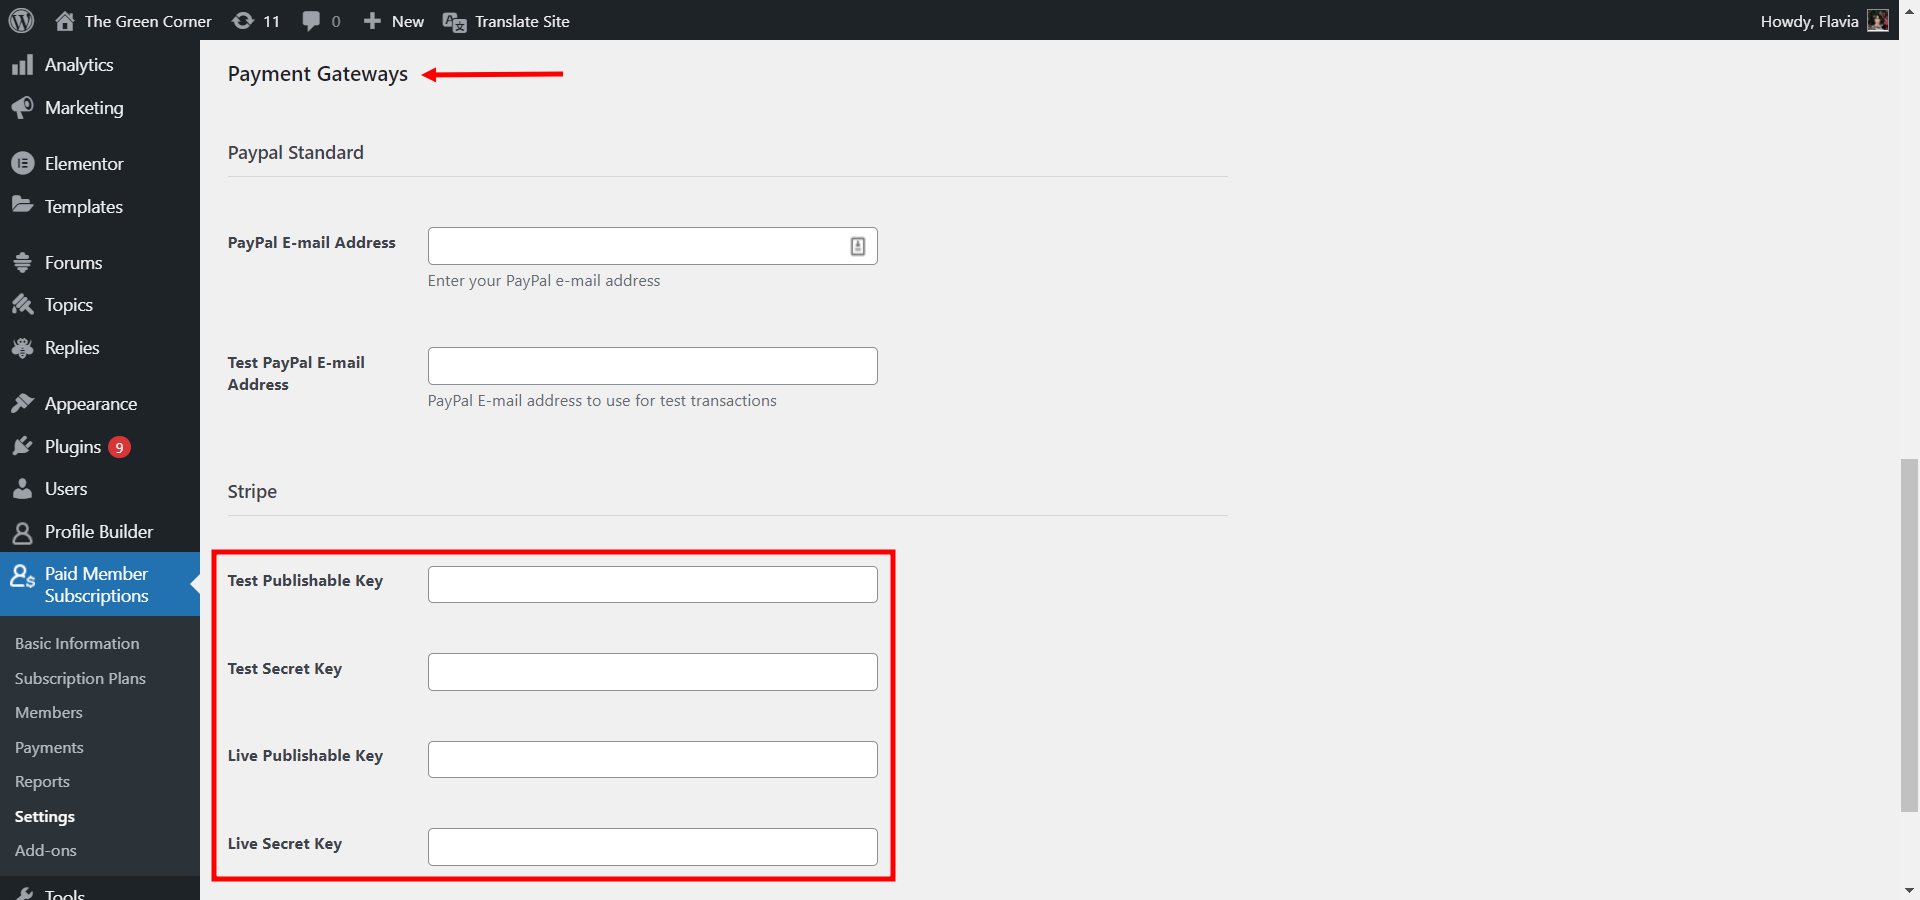
Next, scroll down to the Payment Gateways section to add your credentials under the Stripe sub-section. Simply paste the credentials you have copied from your Stripe account in these fields:
Once the Stripe payment gateway has been activated, the Paid Member Subscriptions registration form will include this payment method as well.
Step 4: Further Customize Your WordPress Stripe Payment Plugin
After you’ve gone through the main setup for the Stripe payment gateway, you can go the extra mile and customize it even more.
Stripe Recurring Payments for WordPress
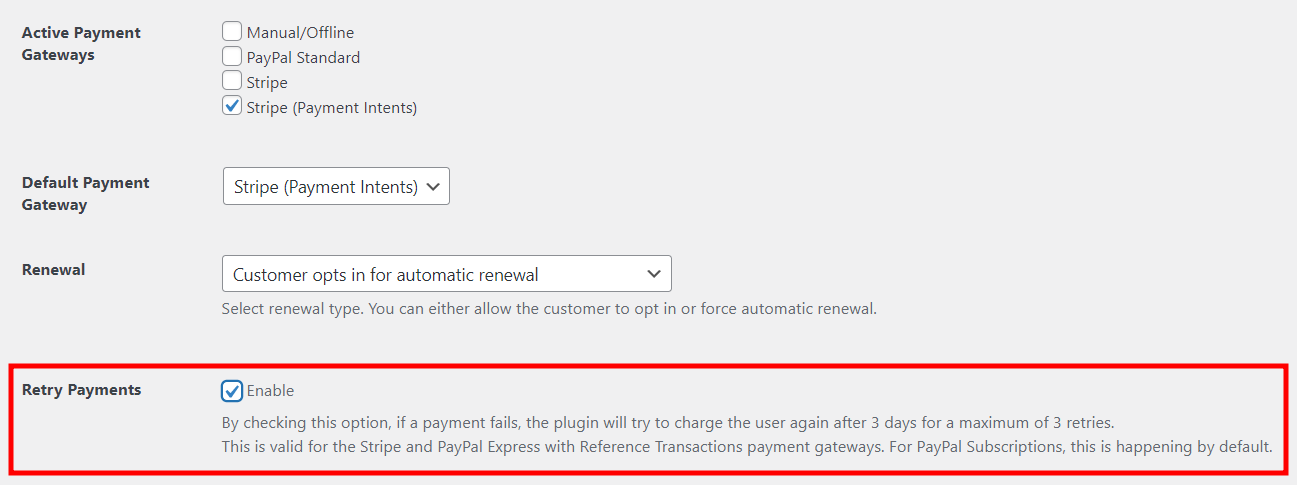
Manage recurring payments on your domain with the Stripe Payment Gateway. You can set up Renewals by navigating to Paid Member Subscriptions → Settings → Payments tab. Here, you’ll find the previously mentioned Renewal section, where you can choose between 3 Stripe recurring payment options:
- The “Customer opts in for automatic renewal” gives the user the flexibility in deciding between a one-time payment vs. recurring payments. To make the payment a recurring payment with this option, the new user will need to complete an additional step in the registration form and check the “Automatically renew subscription” checkbox;
- The “Always renew automatically” option will render all payments to be recurring payments;
- The “Never renew automatically” option will make sure all payments are one-time payments.

To test a payment with Stripe, you can do it using Paid Member Subscriptions in Test Mode. You can use any of these test cards:

Automatic Payment Retry
The plugin also offers an option to handle failed payments made through the Stripe payment gateway. Select the Enable checkbox under Retry Payments, which is disabled by default, to activate this option. When the automatic payment retry option is enabled, the plugin automatically attempts to retake the payment 3 days after a failed attempt. A total of 3 automatic retry attempts may occur before the subscription is considered expired.
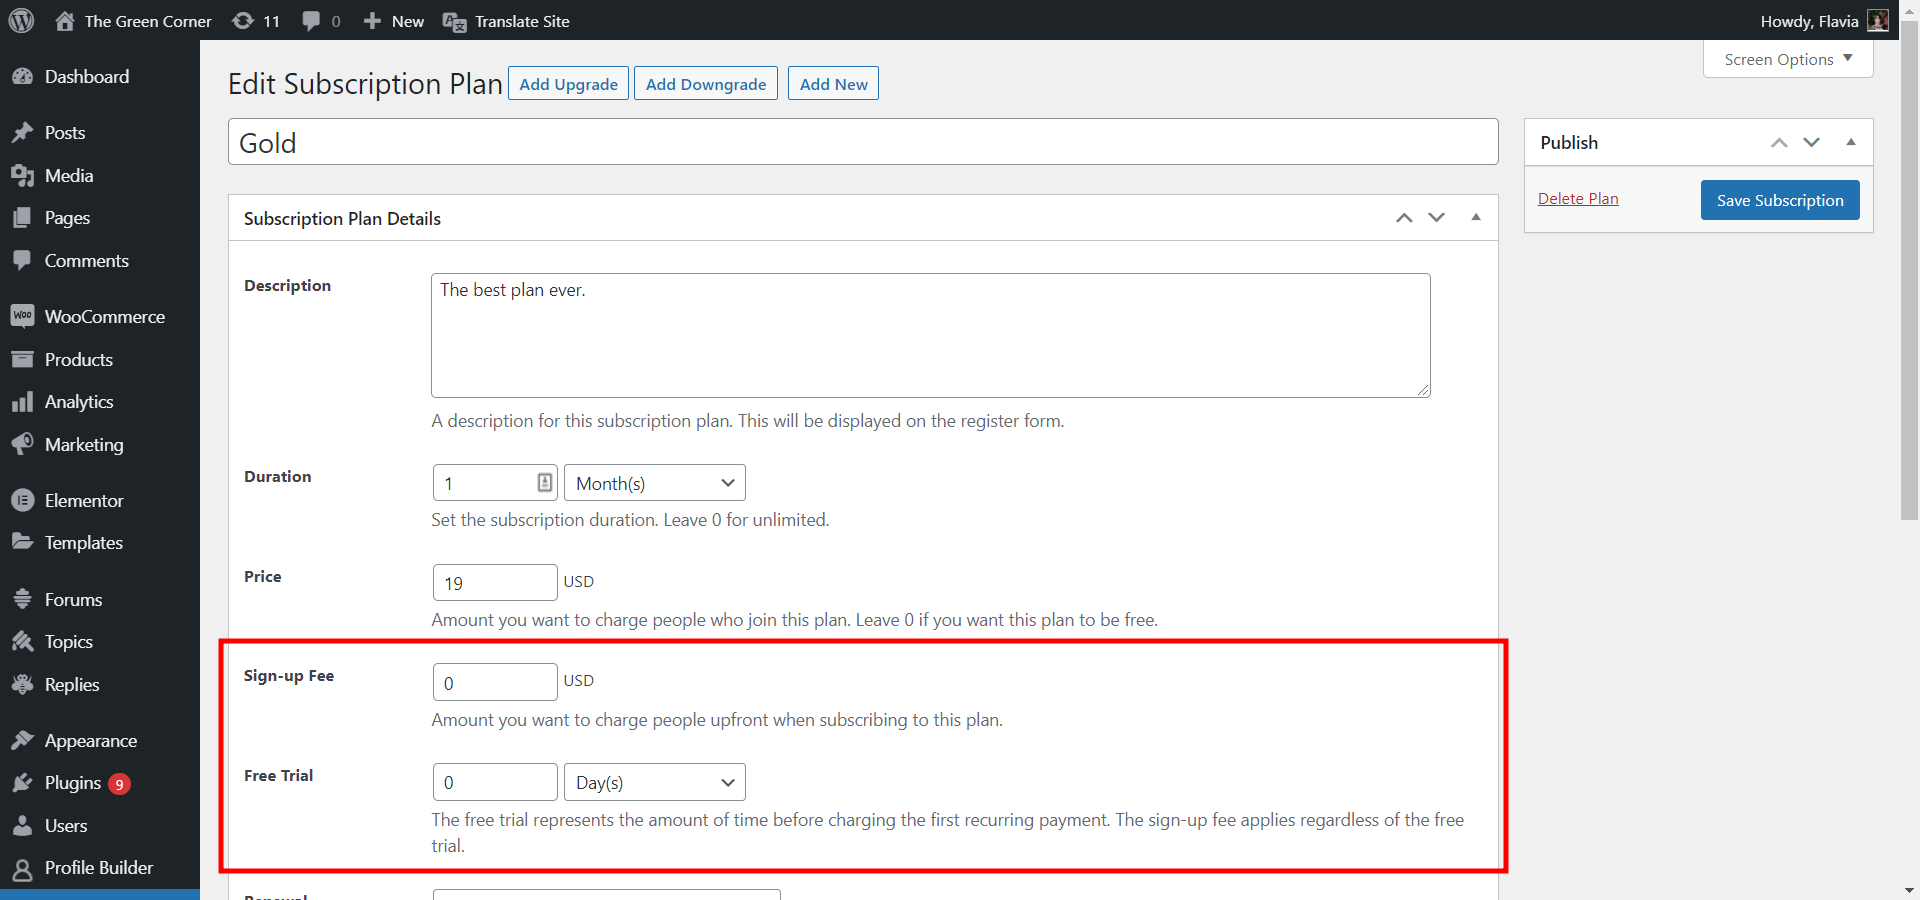
Sign-Up Fee and Free Trial Periods
The options to set up a sign-up fee and a free trial period for recurring payments are also available with Paid Membership Subscription Pro plan.
- The Sign-Up Fee will allow you to determine a flat fee amount to charge users when they subscribe to a certain subscription plan.
- The Free Trial option allows you to determine the amount of time the free trial will be active until the first payment gets charged for recurring payments.
These options can be configured by going to Paid Member Subscriptions → Subscription Plans and choosing an available plan to edit. On the subscription plan edit page, you’ll be able to see these two options and their configurations:
Security
Stripe has been certified as a PCI Service Provider Level 1, which is the highest standard of certification in the payments industry.
As mentioned earlier, you will need to have an SSL/TLS certificate if you wish to make payments through Stripe, since this will establish a secure encrypted connection. The price of such a certificate can vary a lot depending on your needs and your chosen provider, but there are free TLS certificate providers out there as well, such as Let’s Encrypt.
Make sure that the TLS of your SSL Certificate is at least TLS v.1.2, per the Stripe SSL Requirements (all interactions between your server and Stripe must use TLS v1.2).
Once you have installed the SSL Certificate on your domain, you will need to configure your settings to ensure your website runs over HTTPS. To uphold the highest security standards, Stripe forces HTTPS for all services using TLS. Here’s more information on this subject, provided by Stripe.
Set Up WordPress Stripe Payments Plugin Today
Secure, easy to use, and popular. No matter what your individual business needs are, you can rest assured that this WordPress Stripe payments plugin will manage the payment process for you with ease and security so that you can focus on your product and meet all your business goals.
Your website visitors will thank you as well since this functionality makes for the easiest way of online credit or debit card payment.
Paid Member Subscriptions Pro
Accept (recurring) payments, create subscription plans and restrict content on your website. Easily setup a WordPress membership site using Paid Member Subscriptions.
Get Paid Member SubscriptionsDo you still have questions about setting up your Stripe payment gateway in WordPress? Ask away in the comments section below.
Related Articles

Best WooCommerce Subscriptions Alternative: Paid Member Subscriptions, a More Affordable and Complete Solution
Are you looking to sell subscription products on your WooCommerce site? One of the most popular ways to sell subscription products in WooCommerce is with the WooCommerce Subscriptions plugin. It lets you create WooCommerce products with recurring payments as a way to offer subscriptions to your customers. While this is an official extension from WooCommerce, […]
Continue Reading
How to Set Up WooCommerce Stripe Subscriptions with Recurring Payments (3 Methods)
Are you searching for a way to set up WooCommerce Stripe subscriptions? Setting up recurring subscriptions is a great way to build regular, dependable revenue for your website. And when it comes to processing payments, Stripe is one of the top options thanks to its competitive fees and flexible feature set. However, WooCommerce doesn't include […]
Continue Reading
How to Set Up WooCommerce Recurring Payments
Can't figure out how to set up WooCommerce recurring payments for your business? You aren't alone. Building a subscription business is daunting, especially if it's your first time. There are many moving parts at any given time. Whether it's laying the foundation, creating content, marketing your membership site, or managing payments, there are plenty of […]
Continue Reading