

Table of Contents
- 1 How to Create a Custom WordPress Frontend Login Page
- 2 Adding Extra Features to Your WordPress Frontend Login Form
- 3 Conclusion
The default WordPress login screen is functional, but it doesn’t reflect your brand. Plus, it might not include everything you want, and it directs users to the back end of your site, which isn’t always convenient.
Fortunately, you can add a custom WordPress frontend login page to your website. This way, you can control access to restricted content on your site (which is useful if you have a membership site). And, you can direct users to the frontend login screen (even when they access the default WordPress login).
In this post, we’ll guide you through the step-by-step process to add WordPress frontend login to your website. Let’s get started!
How to Create a Custom WordPress Frontend Login Page
The good news is that if you want to add a custom WordPress login page, you don’t need a dedicated login plugin. Instead, you can use Profile Builder Pro which is an all-in-one user management plugin:
Create beautiful front-end registration and profile forms with custom fields. Setup member directories, custom redirects, cutomize user emails & more using the all in one user management plugin.![]()
Profile Builder Pro
Among its features is the ability to add a custom WordPress frontend login to your site. Here are the steps you’ll need to follow:
- Install and configure the Profile Builder Pro plugin
- Create a page to use as your login page
- Add the login form to your login page
You can then add extra features to your login screen to make it more user-friendly and secure like the following:
- Redirect from the default WordPress login screen to your custom login page
- Add reCAPTCHA and other security features such as secure passwords
- Allow users to register or reset the password from the login screen
- Redirect users to a screen of your choice after they log in
- Add extra features to your login screen with add-ons
Now, let’s take a look at all of these steps one by one.
Step 1: Install and Configure the Profile Builder Pro Plugin
To create a custom WordPress frontend login page, you’ll need to install and activate the Profile Builder plugin and the Pro extension. So, navigate to Plugins → Add New Plugin.
Then, use the search feature to locate the free version of the tool. Once you find it, hit Install Now followed by Activate:

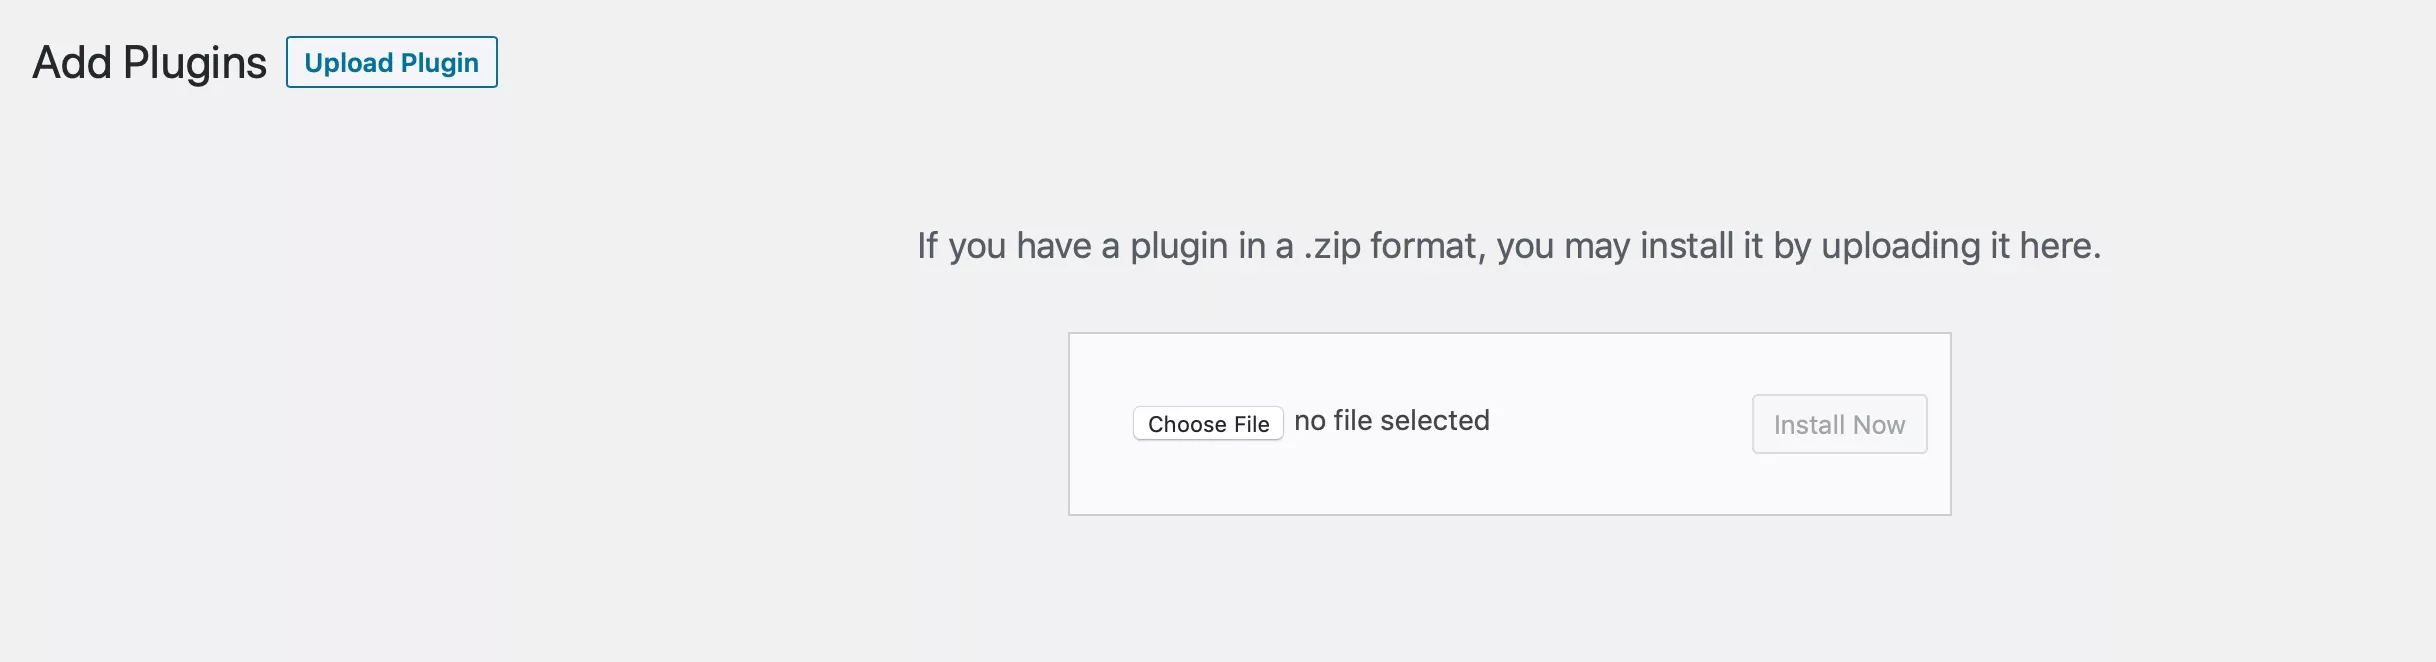
After that, you’ll need to purchase the Pro version and then download the .zip file from your account page. Return to Plugins → Add New Plugin and click on the Upload Plugin button:
Next, install and activate the premium plugin. You’ll then see a new Profile Builder menu in your WordPress admin area.
Step 2: Create a Page for Your Custom Frontend Login Form
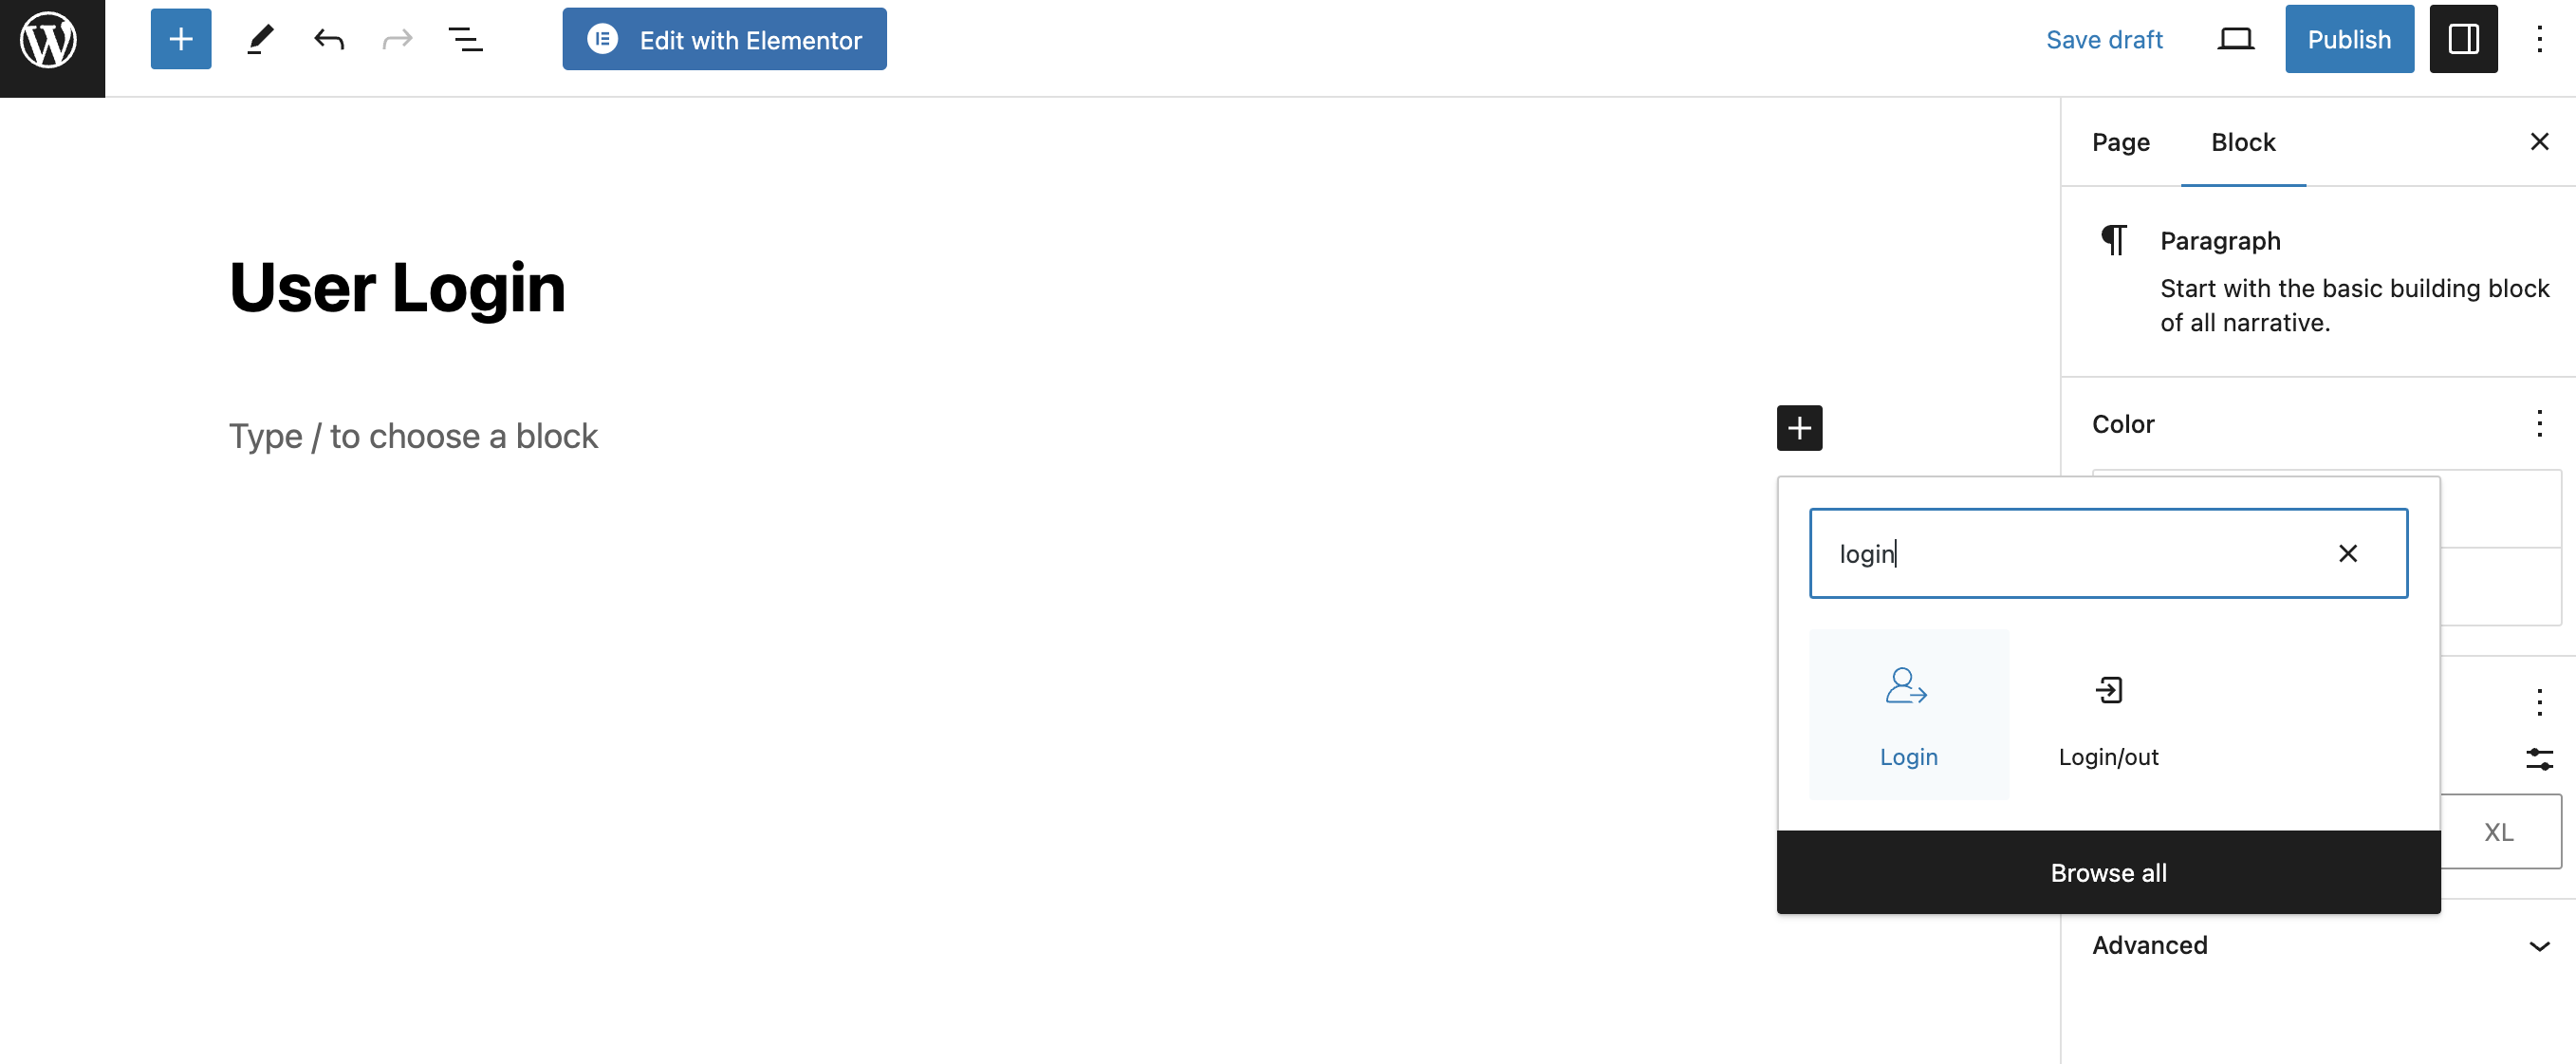
Now that you have the plugin set up, it’s time to create a page that will support your custom login form (so that users don’t get directed to the backend login page). To do this, create a page as you usually would, navigating to Pages → Add New Page.
Give the page a title (such as “Login” or “User Login”) and add any another content you’d like. Then, click on the + icon to add a new block and select the Profile Builder Login block:
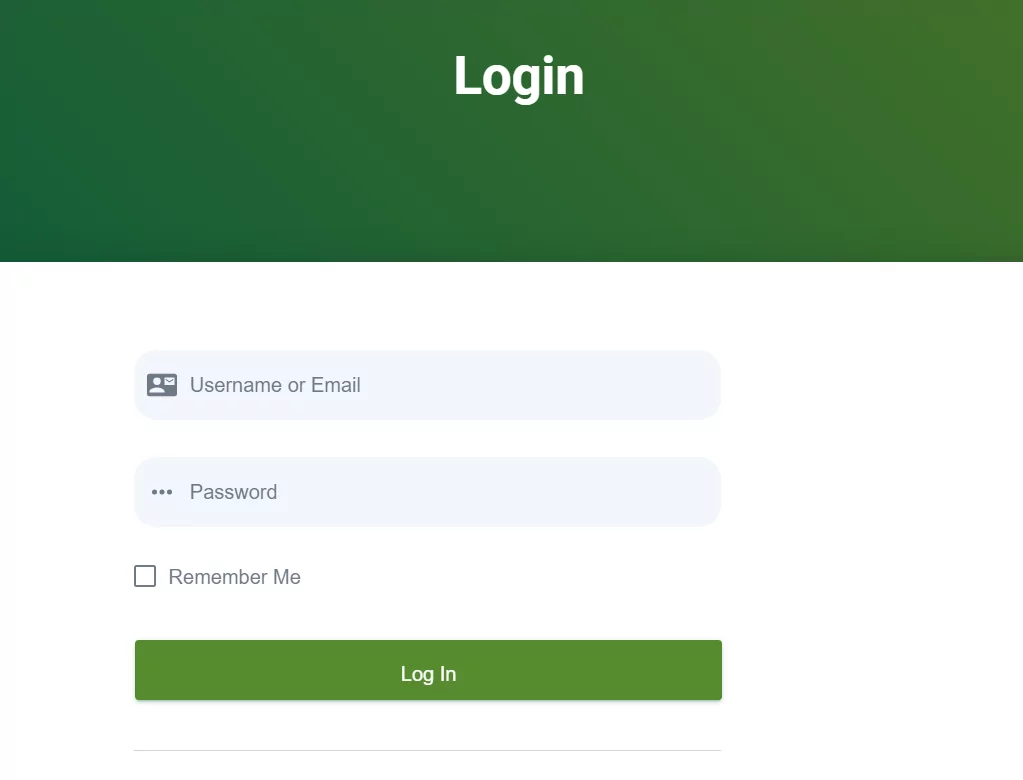
Now you have a basic form, displayed on a screen that looks like the rest of your site (instead of being the default WordPress login page). If the user isn’t logged in, the login form will be shown. If they’re already logged in, they’ll see a logout option.
Add Redirection to the WordPress Frontend Login Page
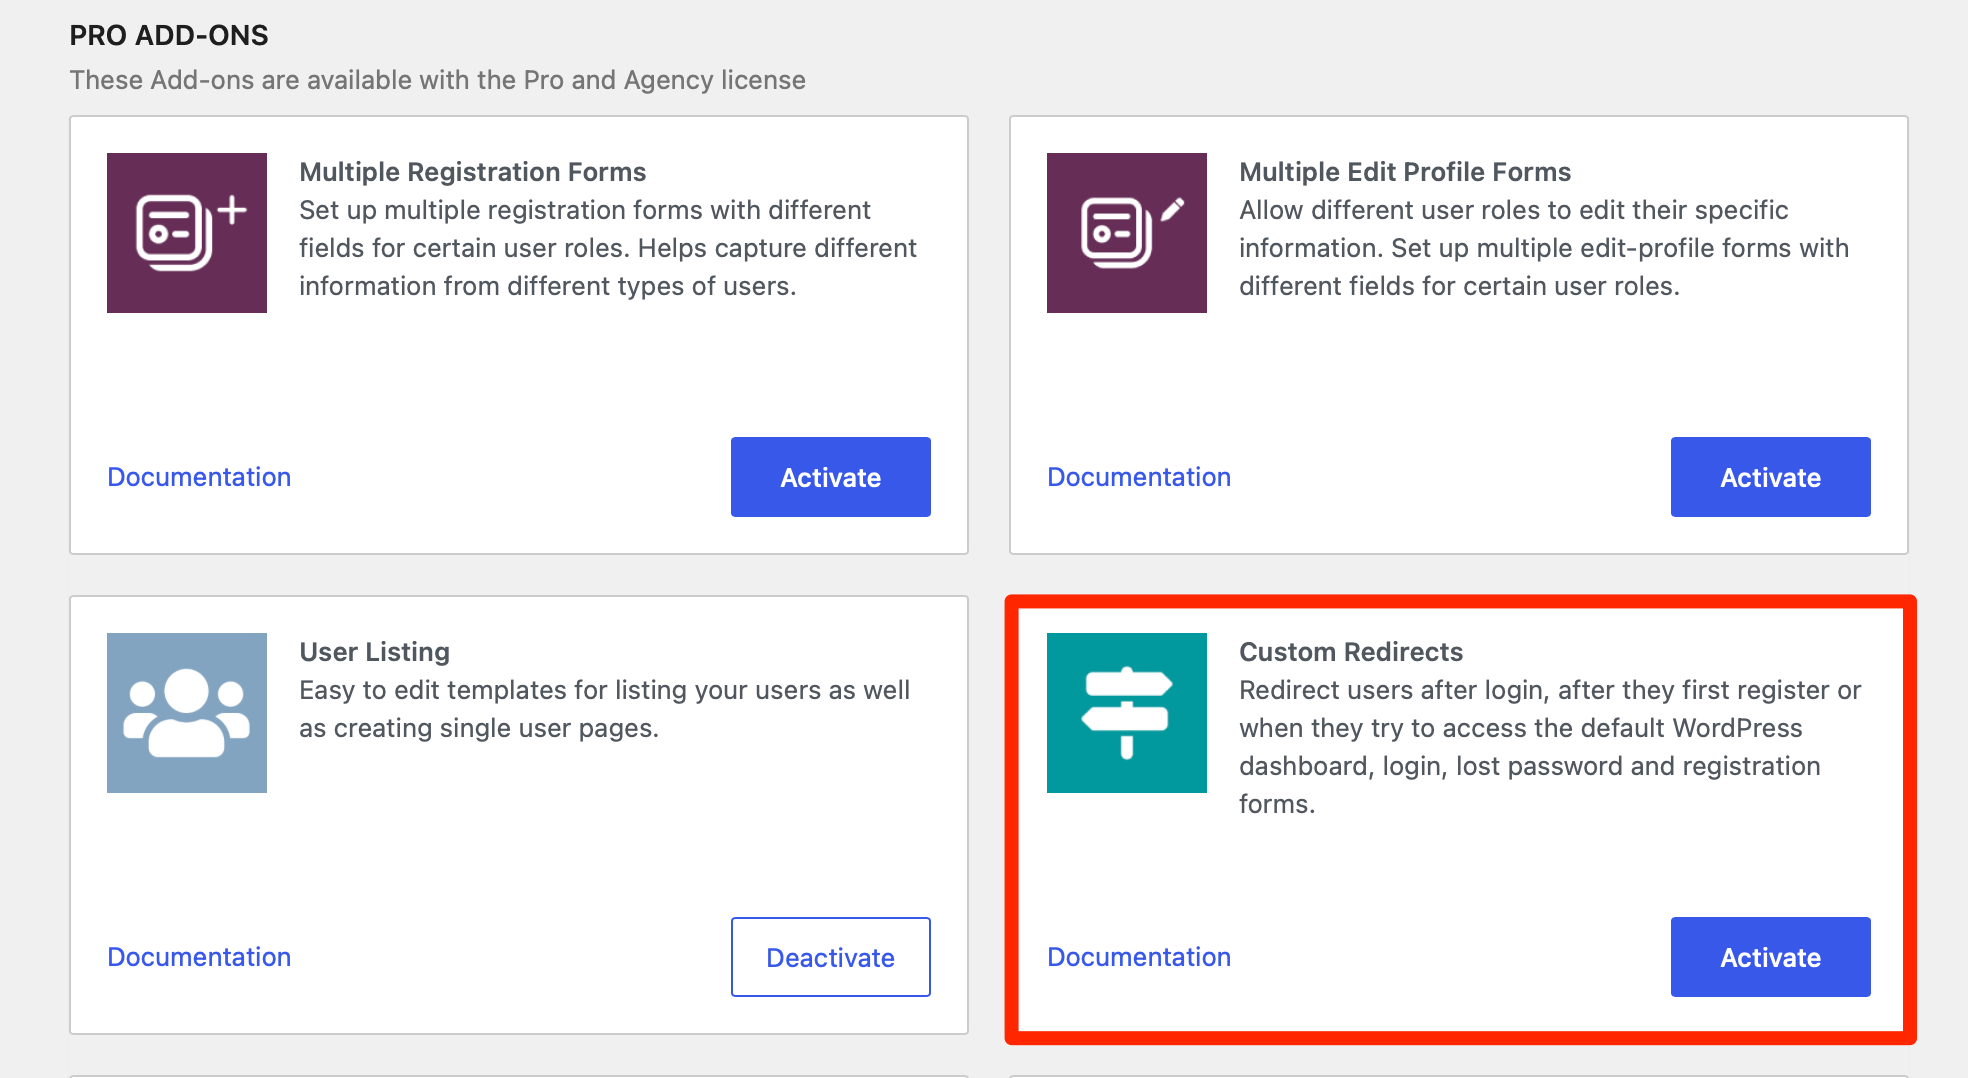
Once you have your login page set up, you need to redirect WordPress users to that screen instead of to the default wp-login.php WordPress login screen. To do this, you have to set up redirection, so you’ll need the Custom Redirects add-on.
You can activate this extension by going to Profile Builder → Add-Ons. Then, scroll down to Custom Redirects and click on the Activate button:
Now, go to Profile Builder → Custom Redirects and scroll down to the Default WordPress Forms and Pages section. In the Redirect Type dropdown, select Login:
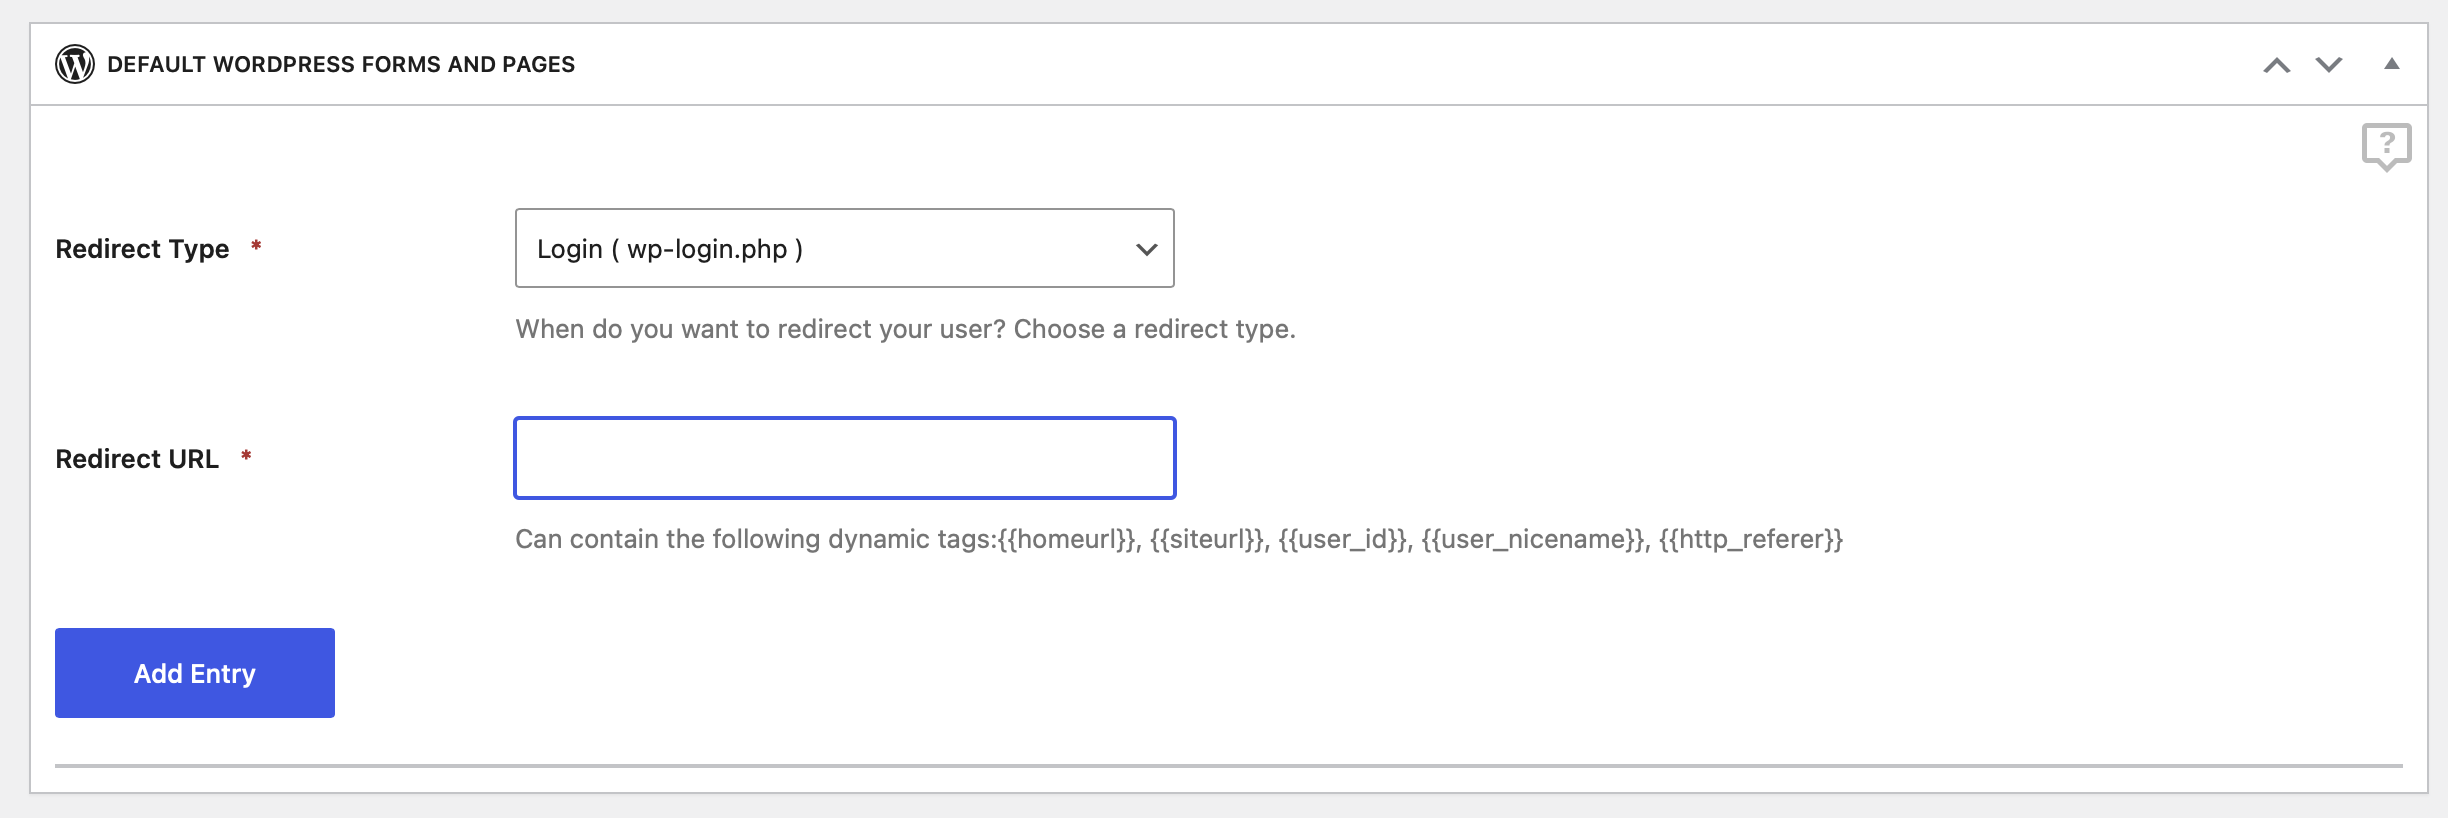
In the Redirect URL field, enter the URL of the frontend login page you just created. Click the Add Entry button. Now, when someone tries to access the default WordPress login screen, they’ll be taken to your login screen instead.
Profile Builder lets you set up redirects for all default WordPress forms (registration, login, and lost password). This makes it easy for you to offer an improved user experience and keep your users from accessing the back end of your site.
Add reCAPTCHA to Your Login Form
If you want to avoid bots trying to log into your site, it’s a good idea to add a reCAPTCHA field to your frontend login form. This way, you’ll be less likely to suffer from malicious attacks via the login screen and eliminate spam registrations.
To do this, you’ll need to add an extra field to your login form for the reCAPTCHA. Go to Profile Builder → Form Fields. Then, click on the Field dropdown and select reCAPTCHA:
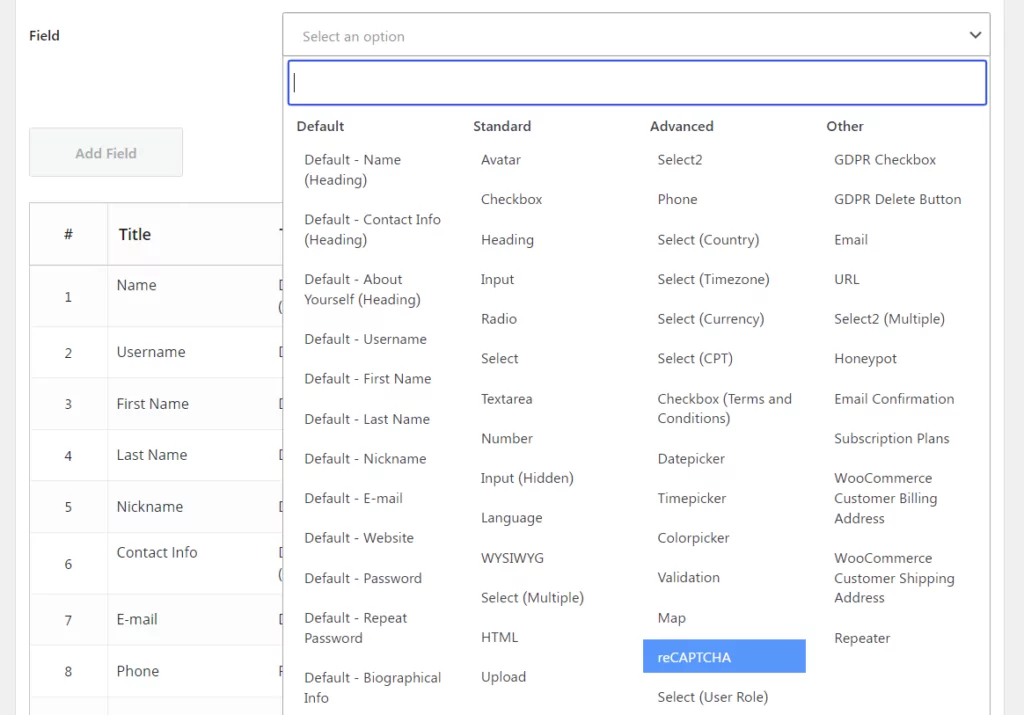
Find the reCAPTCHA Type dropdown and select reCAPTCHA v2 for a visible reCAPTCHA. Or, choose Invisible reCAPTCHA which happens in the background (without the user having to select images or type anything in).
Next, you need to add a site key and secret key in the relevant fields. Follow these Google instructions to get your keys and paste them into the relevant fields.
Now, go to the Display on PB forms section and check the PB Login option. You also might want to check the other options for the registration form and password recovery form:
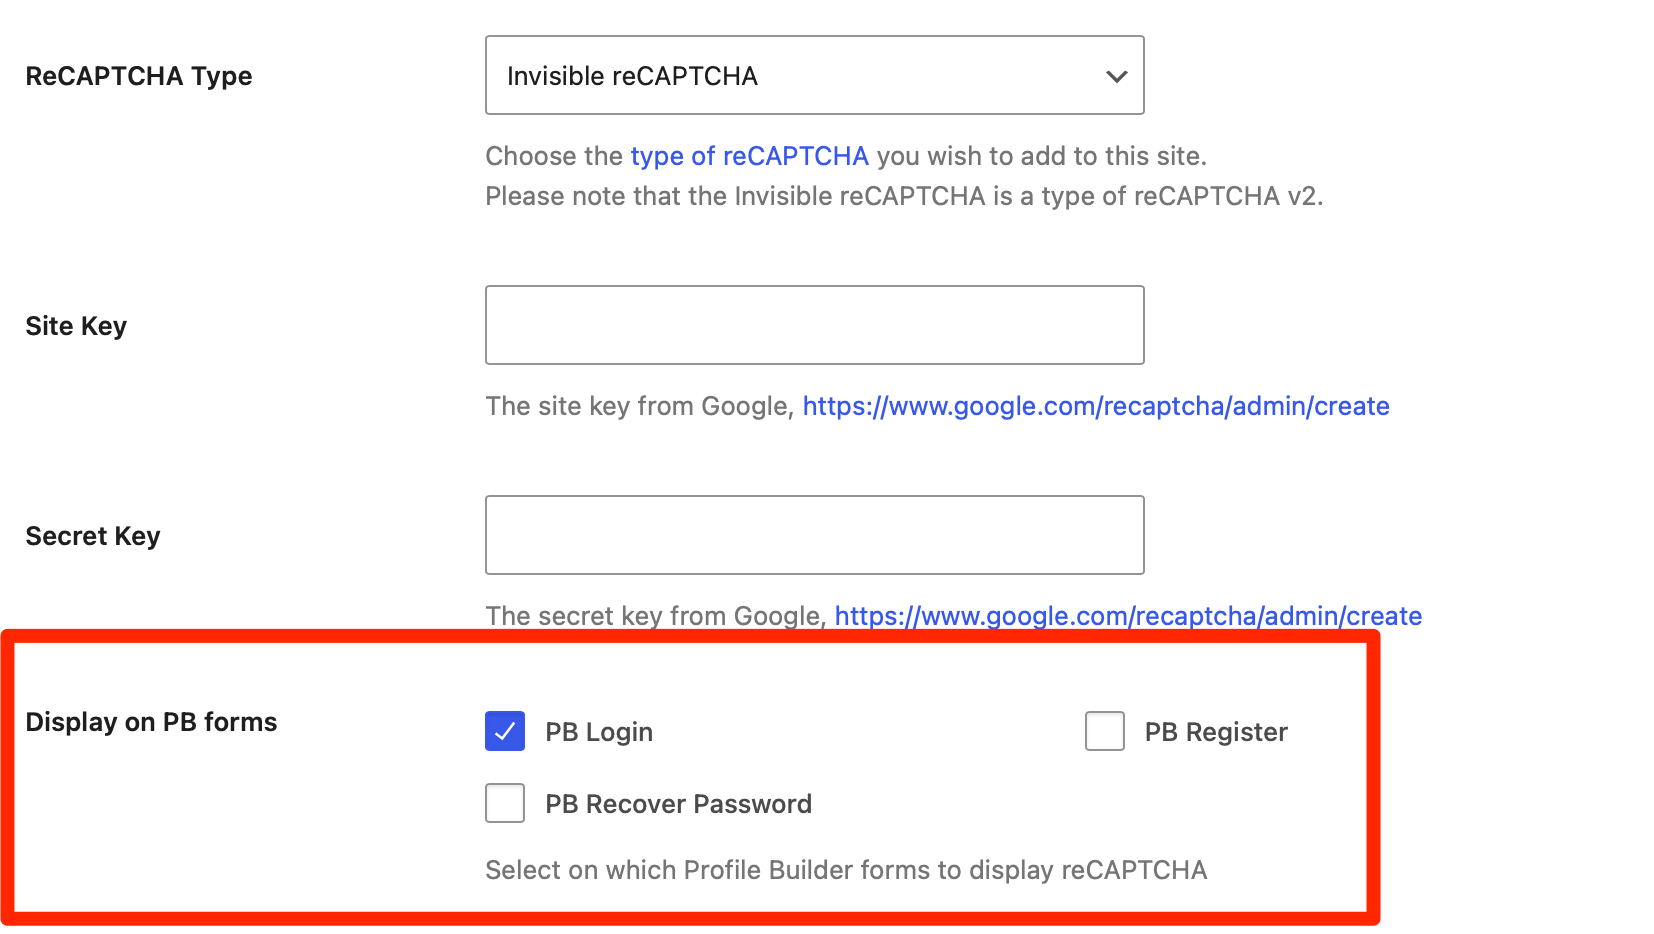
Click the Add Field button to add it to your form fields.
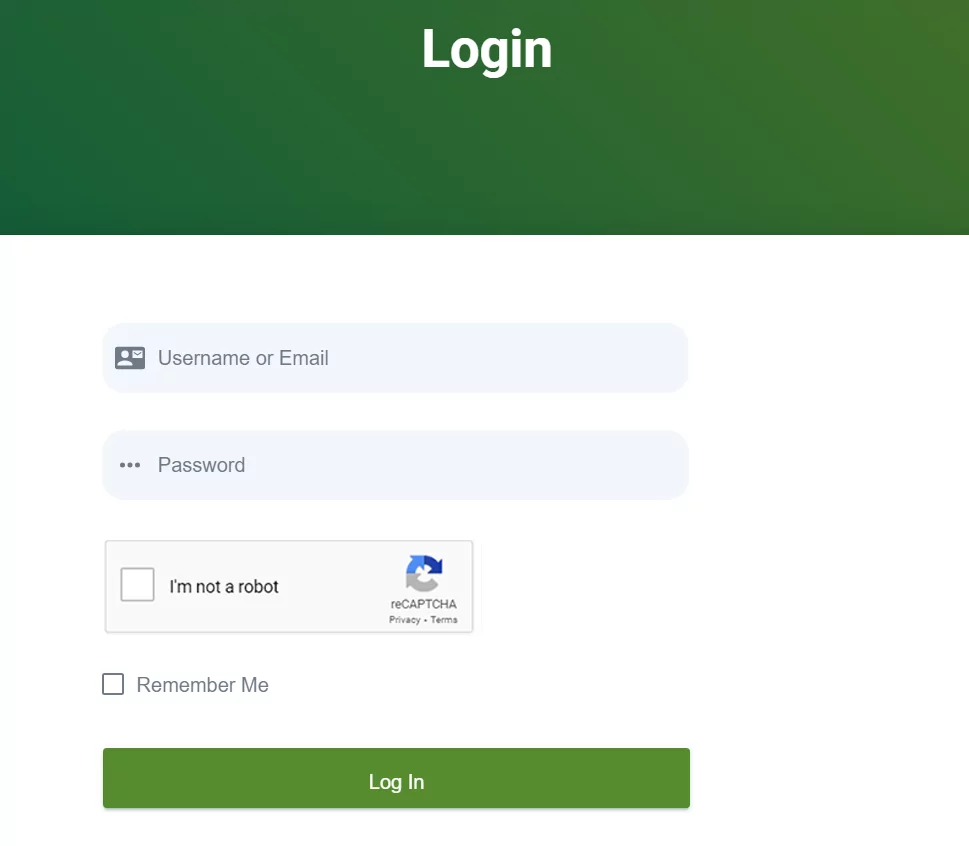
If you’ve selected Invisible reCAPTCHA, you won’t see anything on your login screen as it’ll work invisibly. But, if you selected reCAPTCHA version 2, you’ll see a new reCAPTCHA field.
Add Lost Password and Register Links to Your WordPress Frontend Login Form
The frontend login form won’t be complete without an option to register or reset a password. If users have forgotten their password, it’s helpful to give them a password reset option.
And for new users, adding a link to the frontend registration page can encourage new sign-ups and get you more user registrations. You can add lost password and registration links to your custom login form to make this easy for them.
When you create or edit your login form, navigate to the Block settings. Here, locate the Form Settings and use the dropdown menus to add links to your registration page and recover password page:

Now, these links will be displayed below your login form. These links are the URLs of the pages that contain the frontend registration form and the password reset form.
Ensure Security on Your WordPress Frontend Login Screen
It’s important to ensure that your frontend login is secure and only the people you want can use it to access your site. Some steps you can take include:
- Add a reCAPTCHA field (which we’ve already done)
- Limit user registrations in the Settings → Discussion screen in the WordPress dashboard
- Enable restricted content using the Profile Builder Pro plugin, via Profile Builder → Settings → Content Restriction
- Force users to implement strong passwords with the Profile Builder WordPress plugin
- Install a security plugin to monitor your site and keep it safe from breaches
- Limit login attempts with a security plugin or dedicated login limiter plugin
If you want to enforce strong passwords in your custom login and registration forms, go to Profile Builder → Settings. Then, scroll down to Security and type in your preferred number of characters in the Minimum Password Length field.
Then, use the Minimum Password Strength dropdown to select the password strength that people must use to register on your site:

Now, when people register, they’ll have to use strong passwords to gain access to your site.
Redirect Users after Login
After your WordPress users log in, by default, they’ll stay on the login page. But what if you want to send them to your home page, latest blog post, sales page, or your most popular content?
With the Profile Builder plugin, you can redirect users to your chosen page after they log in. To do this, go to Profile Builder → Custom Redirects.
Scroll down to the Global Redirects section and select After Login in the Redirect Type field:

Next, enter the URL of the post or page you want to direct people to in the Redirect URL field. Then, click the Add Entry button to save the change.
User Moderation
It’s helpful to be able to moderate users and manage the content they can access, as well as the actions they can perform. To do this, go to Profile Builder → Settings and scroll down to Other Features.
Then, enable the Role Editor feature to achieve the following:
- Customize and restrict content available to different types of users
- Create a frontend member directory, with a list of all user profiles
- Set up custom redirects, customize user emails, and more
This adds extra functionality on top of the default WordPress user management features, giving you more control over user moderation.
Step 3: Add the Registration Form to the Login Page
We’ve already seen how you can add a link to the registration page below your login form. But, what if you want to add a registration form to your login page?
Adding a registration form means that if people don’t already have an account and want to log in, they can register in order to do so. This can help you get more registrations. However, you’ll only want to add this if your site is open to new registrations.
You can also add a registration form to the login page if your site is taking registrations from new members. To do this, add the Register block to your page:
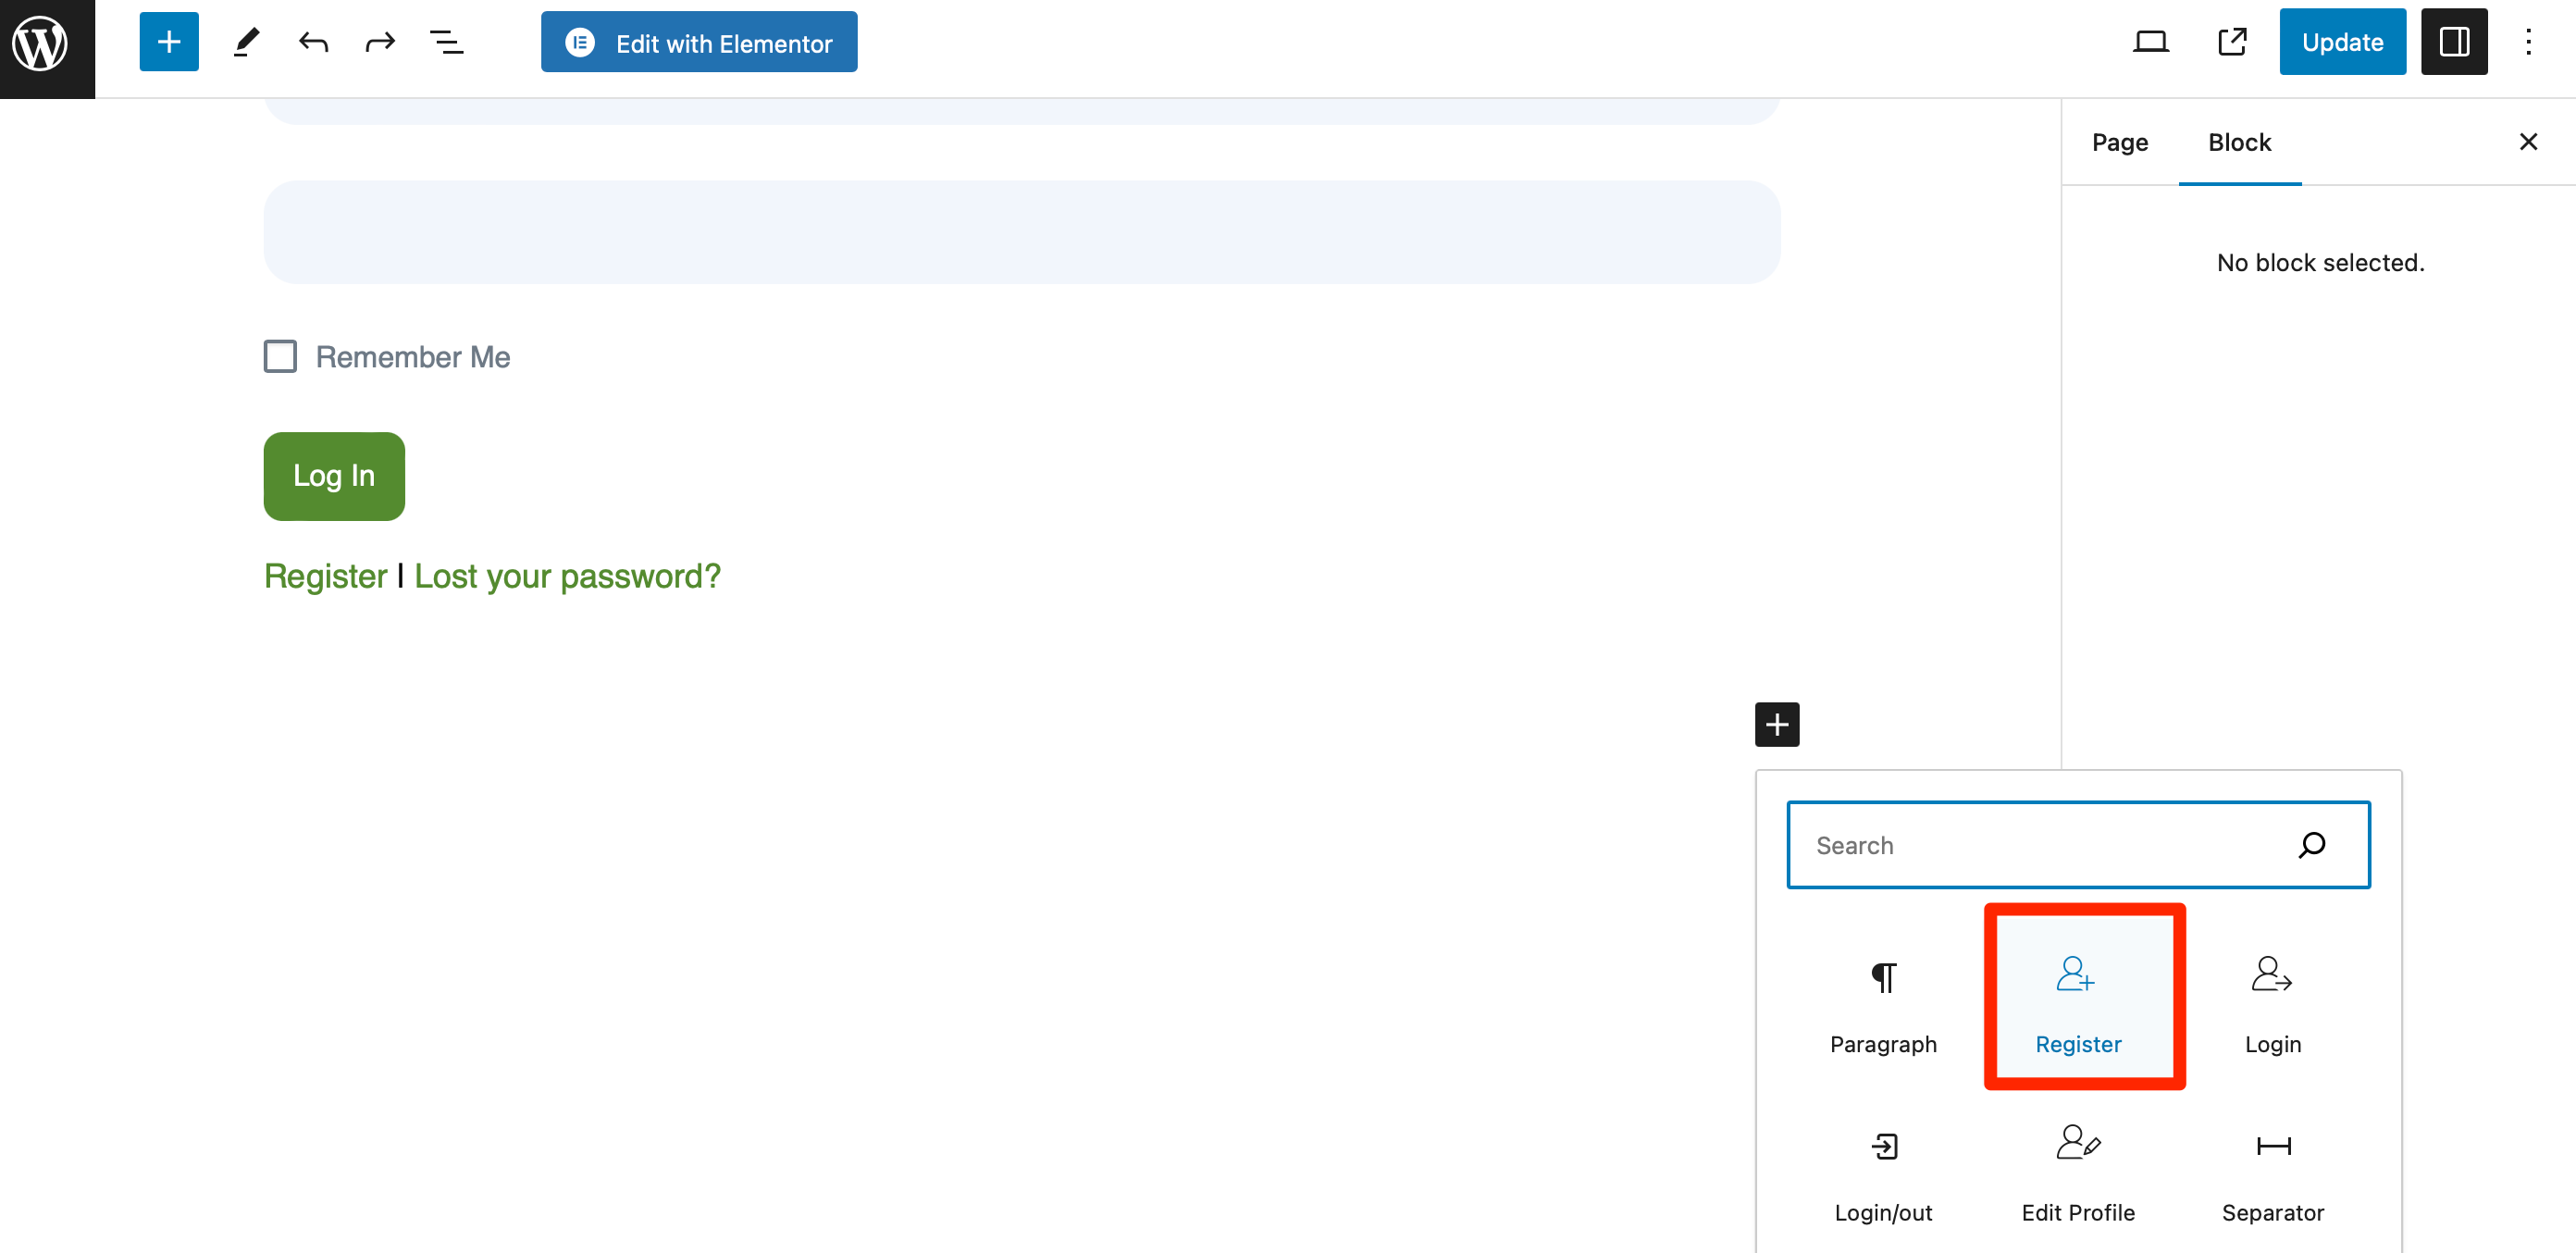
This adds the default registration form to your login page. Keep in mind that this registration form is quite long. So, if you want to customize it, you can create a custom registration form using Profile Builder’s ability to create multiple registration forms.
Adding Extra Features to Your WordPress Frontend Login Form
Profile Builder Pro has add-ons you can use to add more customization to your frontend login, to help you improve the user experience and brand your login screen. These include custom page templates for login and passwordless login.
The Custom Login Page Templates add-on lets you choose from a range of pre-designed login page templates that help you make your login page stand out. You can customize the templates with your own logo or background image or use a ‘picture of the day’ for variety.
With the Passwordless Login add-on, your users can log in without a password. Instead, they provide their username, and are then sent an email with a link that contains a unique token allowing them to log in. This way, they don’t need to check ‘remember me’ or remember their password – and your site is still secure.
Or, you can simply use the plugin’s built-in Advanced Settings if you want to perform the following actions:
- Automatically generate passwords for your users
- Allow or deny certain email domains from registering
- Redirect users to a specific page if they have empty required fields
- Ban certain words from being used in the First Name, Last Name, or Username fields
You can also add a custom login widget to the sidebar or footer of your site, meaning people can log in from anywhere on the site. Or try using the Customizer (via the admin bar) to add CSS to your custom login page and edit the colors or layout.
Combine Profile Builder Pro with Paid Member Subscriptions
You can even create a paid membership site by combining Profile Builder Pro with the Paid Member Subscriptions plugin. It enables you to easily monetize your site with the ability to create membership tiers:
This way, you’re able to publish content for specific member groups. And, with both plugins, you can give members of your site a custom login that enhances your brand and makes it easier for them to access the user area.
Conclusion
Adding a custom frontend user login form to your WordPress site allows you to brand your sign-in page and provide a better user experience for your visitors. It also lets you customize the login form and add extra features like a reCAPTCHA for security.
Using the Profile Builder Pro plugin, you’re able to customize the login form, manage users, and redirect them to a page of your choice after they log in. You can take things further by combining Profile Builder Pro with Paid Member Subscriptions to provide a professional login to your membership site.
Do you have any questions about how to add a custom WordPress frontend login form to your website? Let us know in the comments section below!
Related Articles

How to Customize the WooCommerce Login Page (No Code Needed)
Searching for a solution to customize the WooCommerce login page and otherwise control login behavior on your WooCommerce store? If you allow (or force) registration on your store, you'll want to create a user-friendly login experience so that your shoppers can easily log in to their accounts and access other key features. In this post, […]
Continue Reading
8 Best WordPress User Registration Plugins
Not sure what WordPress user registration plugin to use for your project? Going through all the WordPress user registration plugins can be disorienting. You may have spent hours and hours searching for plugins and tutorials to help you with your project, and you’re still as confused as you were when you started. Imagine finding the […]
Continue Reading
How to Customize WordPress Email Login Behavior (+ Registration)
Searching for a WordPress email login feature so that you can customize your site's login process, such as requiring users to use their email address instead of a username? By default, WordPress lets users log in with either their username and password or their email and password via the default login page. But if you […]
Continue Reading