

Table of Contents
A WordPress subscribe plugin, as the name suggests, allows you to set up different types of subscription levels on your site. For example, you can create three subscription levels – Bronze, Silver, and Gold.
As an online business owner there are plenty of ways you can benefit from a subscription based website. You can create premium content and use subscriptions to make it available to paying users only. If you’re an online instructor or coach, you can sell online courses or build a list of loyal registered members.
Put simply, a WordPress subscribe plugin can help you build a subscription based WordPress website and start generating recurring income.
With this in mind, in this article, we’ll show you how to set up a subscription site using an easy to use plugin, Paid Member Subscriptions.
Features to Look for in a WordPress Subscribe Plugin
First things first, it’s important to take a step back and understand what features to look for in a WordPress subscribe plugin. This makes it easy to get the .
For starters, you’ll need a WordPress subscribe plugin that lets you create forms to gather information from prospective customers and members more easily. It should also let you set up unlimited membership levels for better control over your subscriptions.
This makes it easy to move users through your funnel towards sales!
Key Features
Here’s a quick breakdown of the key features to look for in a WordPress subscribe plugin:
- Ease of use. Is the plugin user-friendly? Does it make it easy to set up your subscription-based site?
- Compatibility and integration. Is the WordPress subscribe plugin compatible with the other essential plugin you’re using on your website? Does it offer integration with the plugins and tools you use, like WooCommerce?
- Front-end forms. Does the WordPress subscribe plugin let you create and customize front-end forms or do you have to use a separate plugin for registration, login, and account management?
- Membership levels. Can you create unlimited membership levels (or subscription levels) using the WordPress subscribe plugin? Can you add upgrades and downgrades to move users through the funnel?
- Payment options. What payment options and payment gateways does the plugin support? PayPal and Stripe are must-haves.
- Email notifications. It’s important to keep members and email subscribers in the know about upcoming events. Does the WordPress subscribe plugin offer built-in email capabilities? Can you integrate with a third-party email marketing service like Mailchimp, MailPoet, Sendinblue, GetResponse, or AWeber to build an email list or send out notification emails?
The WordPress subscribe plugin should let you create a professional-looking subscription site that’s free of popups and opt-ins.
How to Add a Subscribe Plugin to a WordPress Site using Paid Member Subscriptions
Here, we’ll show you how to use a WordPress subscribe plugin, Paid Member Subscriptions, to create a subscription-based website. For this tutorial, we’ll assume you already have Paid Member Subscriptions installed and activated on your website.
Step #1: Configure Payment Options
Log in to the WordPress admin panel and head over to Paid Member Subscriptions > Settings > Payments.
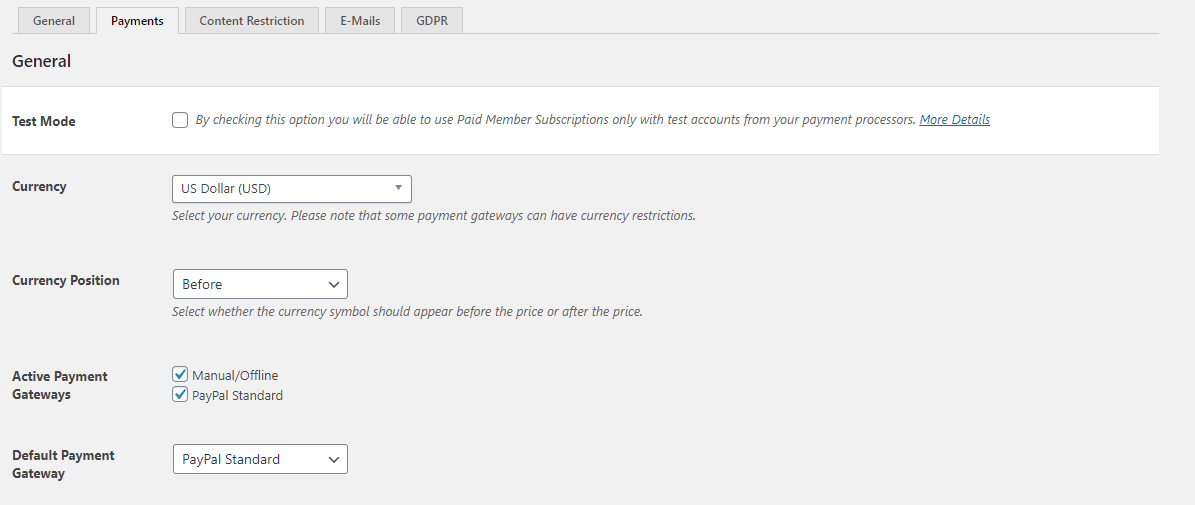
Enter the payment options you’d like to make available to subscribers. Keep in mind that the more options you give subscribers, the more likely they will be to sign up.
Paid Member Subscriptions lets you set:
- Currency. Choose the currency (like USD) that you want to accept subscription payments in. Some payment gateways may have currency restrictions.
- Currency position. Use this option to decide if the currency symbol should appear before or after the price of the subscription plan.
- Active payment gateways. Tick the checkboxes next to the payment gateways you’d like to make available to members. You can use Paid Member Subscription add-ons to integrate additional payment gateways – like PayPal Express and Stripe – to your subscription-based website.
- Default payment gateway. Set the default payment gateway for your WordPress membership site.
We recommend using either Stripe, PayPal Express, or Recurring Payments for PayPal Standard add-ons to accept one-time or recurring payments for subscriptions. The plugin also integrates with WooCommerce, allowing you to set-up a members only store.
Step #2: Create Subscription Plans
Once you’ve set up the payment options, the next step is to create subscription plans. It’s a good idea to jot down the subscription plans you want to offer on paper before creating them on your site. This will help you better visualize your offering.
When you’re ready, head over to Paid Member Subscriptions > Subscriptions > Add New to get started.
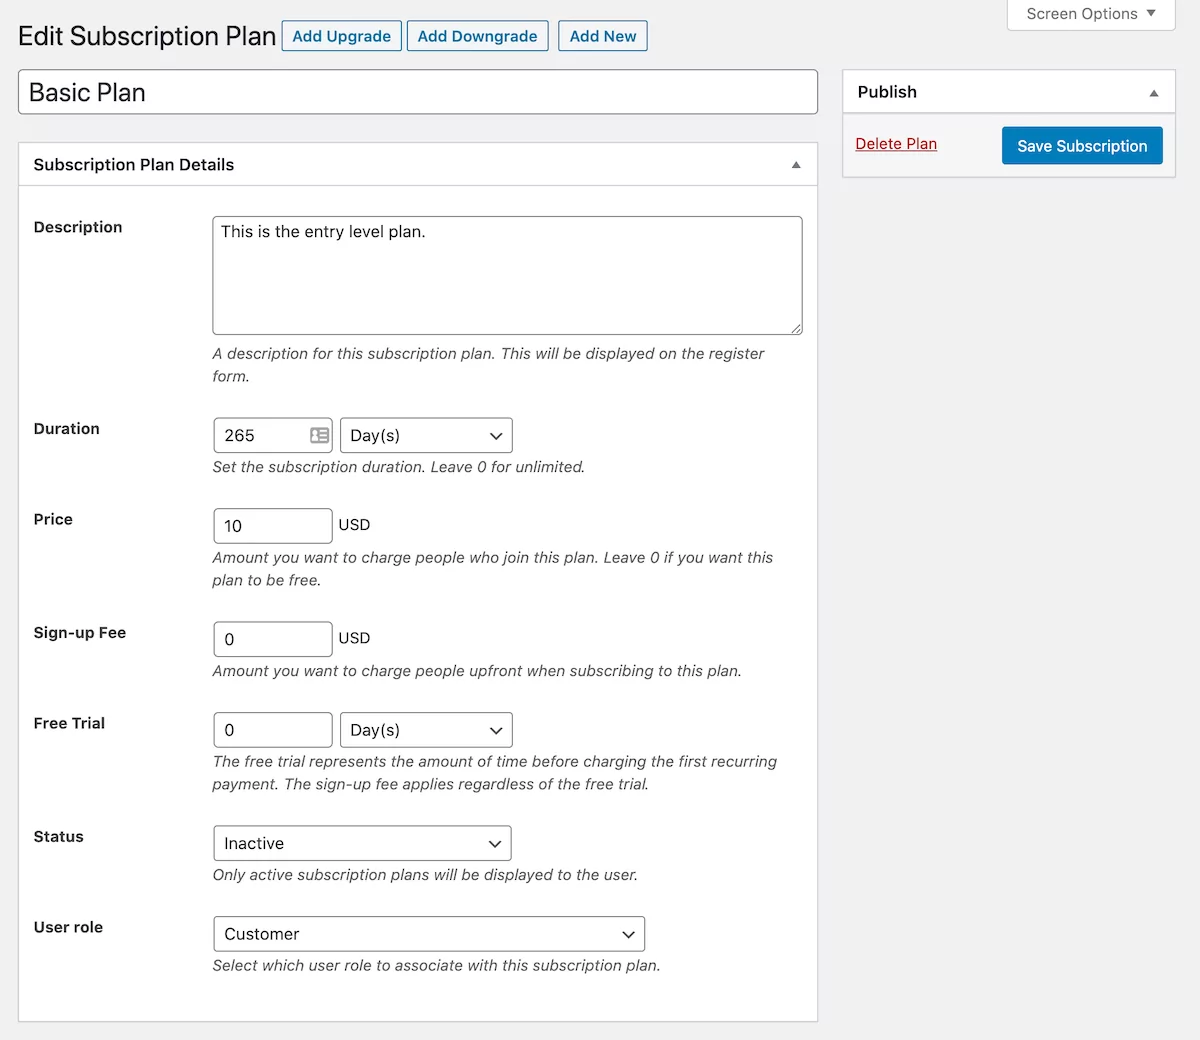
Paid Member Subscriptions lets you enter the following details for each subscription plan you create:
- Description. This will appear on your site’s front-end so make sure it accurately describes the subscription plan.
- Duration. Set the subscription duration or enter 0 for an unlimited subscription.
- Price. Enter the amount you want to charge for the subscription. This will be based on the duration of the subscription plan.
- Sign-up fee. Paid Member Subscriptions lets you enter a sign-up fee. Subscribers will be charged this amount at the time of registration.
- Free trial. It’s a good idea to offer a limited-time free trial to give prospective subscribers an idea of what they can expect to get. Enter the duration of the free trial here.
- Status. Use the dropdown to set the subscription status. Only active subscriptions appear on the front-end.
- User role. Use this option to specify the user role that will be assigned to people when they purchase this subscription plan. This will make it easy to restrict access to content later on.
Click the Save Subscription button to continue.
Bonus Options
If you’d like, you can add upgrades and downgrades for your subscription plan. This is great for moving users through the sales funnel. For example, you can create a Basic Plan at a low subscription cost and encourage subscribers to upgrade to the Pro Plan later on.
In addition to this, the Paid Member Subscriptions WordPress subscribe plugin makes it easy to create multiple-tiered subscriptions plans, as well. This is great for setting up different subscription level groups.
Step #3: Set Up a Subscription Signup Form
Now that you have payment options set up and a few subscription levels added, you need to create a front-end subscription form (signup form). This will allow people to learn about your subscription plans, enter their details, and subscribe.
One of the neat features of Paid Member Subscriptions is that it makes it super easy to create a subscription form. You can also use it to set up a membership pricing table.
To get started, create a new page in WordPress by heading over to Pages > Add New. Give your page a title and add a shortcode block to the text editor. Next, enter the [pms-register] shortcode to it. Click the Publish and you’re done.
The WordPress subscribe plugin will automatically detect the subscription plans you created and generate a complete front-end subscription form for you. It will look something like this on the front-end:
Preview
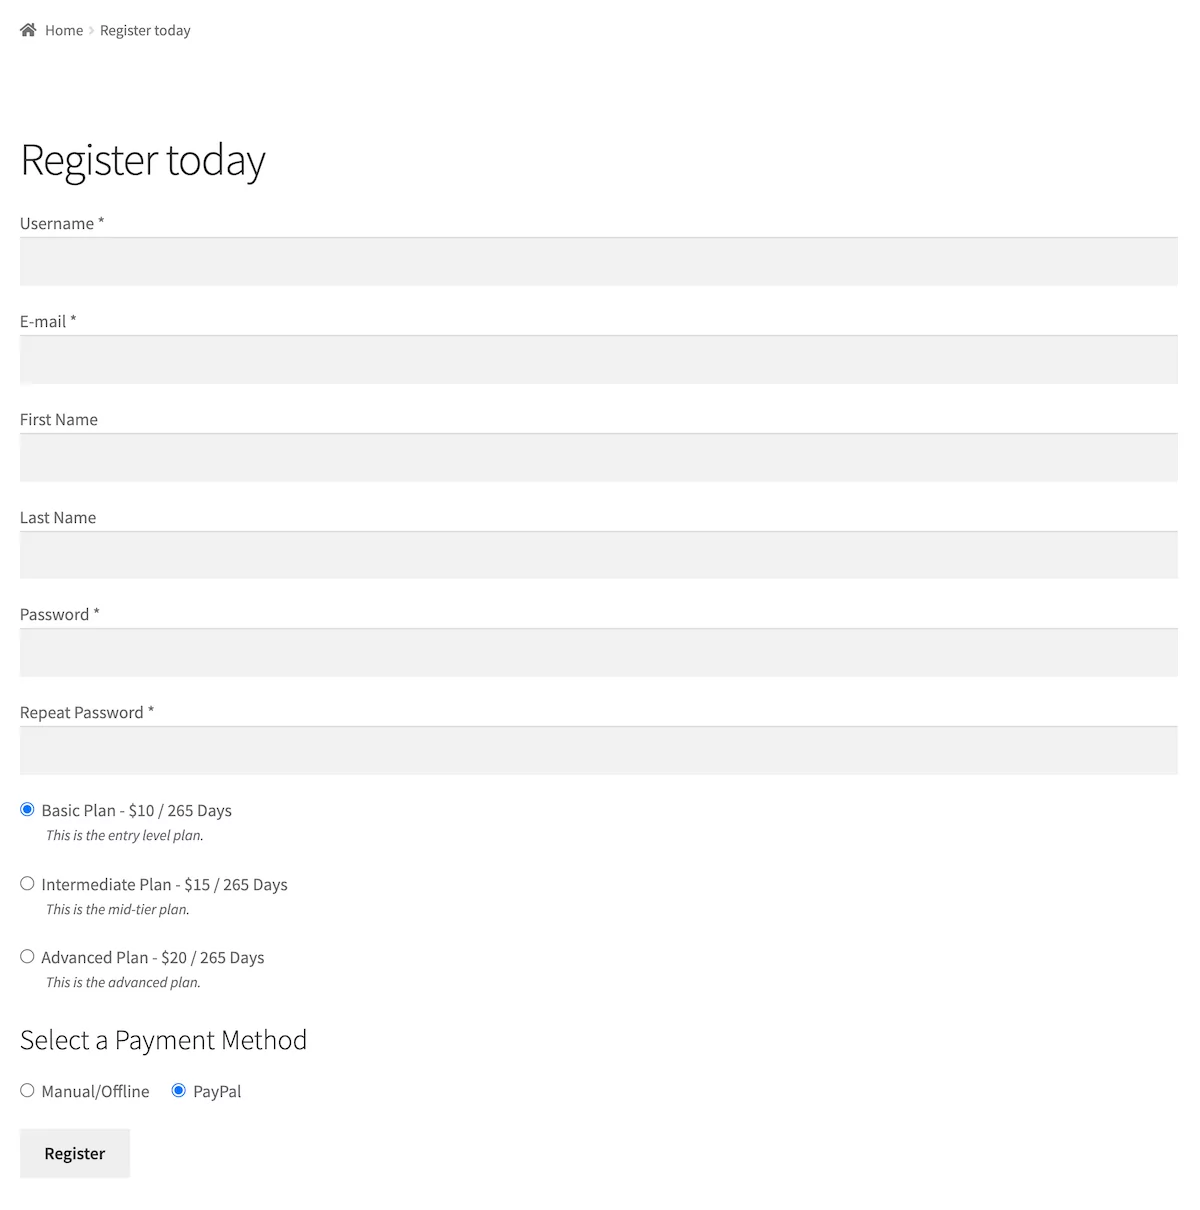
Prospective subscribers can then enter their name, email address, and password, and select a subscription plan and payment method to complete their registration and proceed to checkout. This helps you deliver a good user experience (without popups or opt-ins).
In the same way, you can create a login page and an account page using the shortcodes [pms-login] and [pms-account], respectively. The login form lets subscribers log in to your subscription-based website and access exclusive content. You can add the login form to a widget on your homepage, as well. And the account page makes it easy for them to view subscription details and also manage their subscriptions.
Step #4: Restrict Access to Content
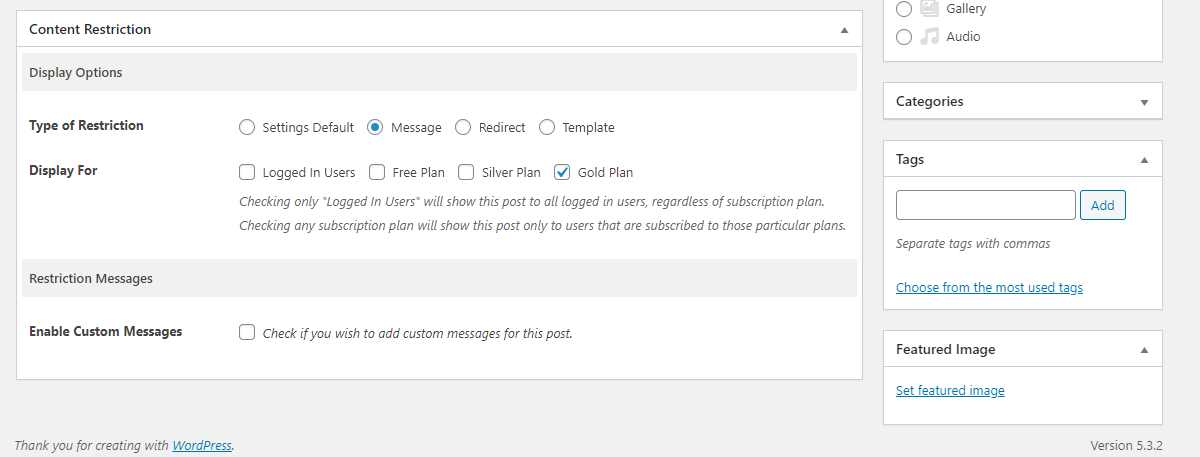
The final step in setting up a WordPress subscribe plugin is to configure content restriction. In other words, you want to specify which pages, posts, and custom post types are accessible to people on different subscription plans.
With the Paid Member Subscription plugin you can do this by heading over to the page, post, or custom post type you want to restrict access to and use the Content Restriction meta box to specify who has access.
Alternatively, you can also use the [pms-restrict subscription_plans=”6,7″] Your restricted content [/pms-restrict] shortcode to restrict access to chunks of content on your pages, posts, and custom post types instead of the entire page.
For even more control, you can use a combination of both options on your subscription-based site.
Bonus: Customizing Your WordPress Subscription Website
One of the key benefits of using an extendable and flexible WordPress subscribe plugin is that you can use add-ons to customize your subscription site. You can do this without using HTML or CSS code.
Here’s how you can use Paid Member Subscriptions add-ons to add even more features to your website:
- Pay What You Want. You can use this add-on to let subscribers choose how much they’d like to pay for their subscription. It does this by letting you set up a variable pricing option. This is especially useful when you’re just starting out selling subscriptions or want to encourage registrations.
- Stripe and PayPal Express integration. Paid Member Subscriptions’ Stripe and PayPal integrations let you accept one-time and recurring payments for subscriptions.
- Email Reminders. Set up automated email reminders to keep email subscribers in the know about the latest happenings and upcoming events. This is also great for sending out subscription renewal emails to subscribers. This way, you don’t have to sign up for a separate email marketing service.
- Multiple Subscriptions Per User. If you’re offering multiple subscription levels, you can use this add-on to let people subscribe to multiple subscription plans. This is especially useful for online course sites and membership sites.
- Global Content Restriction and Content Dripping. These add-ons make it easy to restrict access to exclusive content and keep things organized in the back-end. You can also use the content dripping feature to make content available based on a predetermined schedule.
Create a Subscription-Based Site Today
The Paid Member Subscriptions WordPress subscribe plugin makes it easy for just about anyone to create a subscription-based website. You can use it to set up a membership site, sell online courses, subscription boxes, or SaaS products.
All you have to do is configure the payment options you’d like to make available to subscribers, create subscription plans, set up a subscription form, and restrict access to exclusive content. Once that’s done, you can start selling subscriptions, build an email list (using the built-in email service), and generate recurring income!
Ready to create your WordPress subscription site? Check out Paid Member Subscriptions full list of features.
Paid Member Subscriptions Pro
Accept (recurring) payments, create subscription plans and restrict content on your website. Easily setup a WordPress membership site using Paid Member Subscriptions.
Get Paid Member SubscriptionsRelated Articles

How to Sell Group Memberships in WordPress using Paid Member Subscriptions
Selling group memberships on your WordPress site is a great way to increase revenue by making subscriptions purchase more convenient to certain customers. You don’t even need to completely reinvent the wheel if you already have a membership site of your own. In this post, we’re going to walk you through the process of using […]
Continue Reading
Best WooCommerce Subscriptions Alternative: Paid Member Subscriptions, a More Affordable and Complete Solution
Are you looking to sell subscription products on your WooCommerce site? One of the most popular ways to sell subscription products in WooCommerce is with the WooCommerce Subscriptions plugin. It lets you create WooCommerce products with recurring payments as a way to offer subscriptions to your customers. While this is an official extension from WooCommerce, […]
Continue Reading
How to Set Up WooCommerce Stripe Subscriptions with Recurring Payments (3 Methods)
Are you searching for a way to set up WooCommerce Stripe subscriptions? Setting up recurring subscriptions is a great way to build regular, dependable revenue for your website. And when it comes to processing payments, Stripe is one of the top options thanks to its competitive fees and flexible feature set. However, WooCommerce doesn't include […]
Continue Reading