

Table of Contents
- 1 What is WordPress Registration Spam?
- 2 How to Stop User Registration Spam in WordPress – 6 Actionable Tips
- 2.1 Tip #1: Disable default WordPress registration and replace it with a more secure option
- 2.2 Profile Builder Pro
- 2.3 Tip #2: Add reCAPTCHA to your registration form
- 2.4 Tip #3: Add an email confirmation field to your registration form
- 2.5 Tip #4: Enable email address verification for new users
- 2.6 Tip #5: Admin approval for new registrants
- 2.7 Tip #6: Limit who can register
- 3 Say Goodbye to Spam—Your Site Deserves Better
You log into your WordPress site and see tons of new user registrations. The only problem is they’re all junk.
Random usernames, shady email domains, and no real engagement. It’s spam.
WordPress registration spam is a common issue. Bots scan the internet for unprotected signup pages and flood them with fake accounts. Even low-traffic sites can be hit.
If left unchecked, this spam can:
- Clutter your database and slow down your admin dashboard
- Strain your server with unnecessary load
- Open the door to comment spam, phishing links, or even brute-force attacks
The good news is that it’s preventable.
In this guide, we’ll break down how user registration spam happens, what signs to watch for, and, most importantly, how to stop bots from registering on WordPress. You’ll also learn how to use Profile Builder to implement key protections like CAPTCHA, email verification, admin approval, and more.
For a quick walkthrough, you can watch our video on how to implement the most important security measures to stop fake sign-ups, but I recommend you scan the whole article below for some bonus tips that might just make the difference for your site.
What is WordPress Registration Spam?
WordPress registration spam refers to fake or malicious user accounts created through your site’s registration form. Usually, this is done by bots, but sometimes humans are responsible. These spam accounts don’t engage with your site like real users would. Instead, they exist to clutter your database, exploit vulnerabilities, or attempt future attacks.
Here’s how it typically happens: bots scan the web for WordPress sites with open registration pages. If your signup form isn’t protected by measures like reCAPTCHA or email verification, it becomes an easy target. In seconds, your site can be flooded with junk accounts.
So, why is this a problem?
Besides the obvious annoyance for the admin, registration spam can:
- Slow down your admin dashboard due to excessive user records
- Waste storage and server resources
- Open the door to further threats like phishing links or brute-force login attempts
Common signs you’re facing WordPress registration spam include:
- Generic usernames like user1123, testaccount, or jhfueywe
- Suspicious email domains, e.g. @mail.ru, @cheapmail.top, or random strings
- Sudden spikes in registrations without any corresponding traffic increase
Stopping these fake signups early protects your site’s performance and long-term security.
How to Stop User Registration Spam in WordPress – 6 Actionable Tips
The best way to deal with spam user registrations is to stop them before they happen. By tightening your registration process and using the right tools, you can block bots, verify real users, and keep your site secure.
Let’s walk through the most effective strategies.
Tip #1: Disable default WordPress registration and replace it with a more secure option
By default, WordPress allows anyone to register an account if the Anyone can register setting is enabled. Unfortunately, this open-door policy is one of the biggest culprits behind spam signups. Bots actively seek out these default forms, making your site an easy target.
The first step in fighting registration spam is to disable WordPress’s default registration system and replace it with a more secure, customizable alternative like the one offered by Profile Builder. This gives you full control over who can sign up and adds an extra layer of protection against unwanted users.
Here’s what you need to do to disable default WordPress registration:
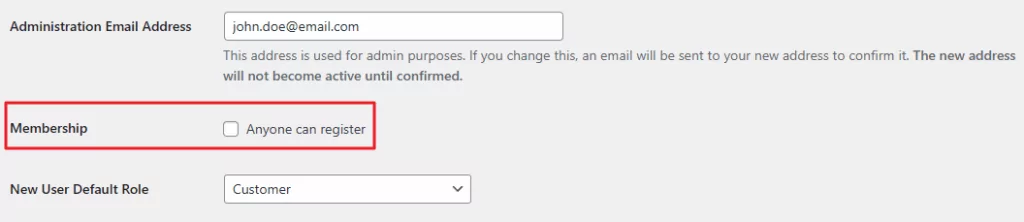
- Go to Settings → General from the WordPress admin panel.
- Scroll down till you reach the Membership option.
- Untick the Anyone can register checkbox.
- Click the Save Changes button.
Once that’s done, you can install a plugin that gives you more flexibility when it comes to setting up and managing the registration process on your site.
Profile Builder is a robust solution for building professional-looking login, registration, and profile-edit forms, but the most important thing is it provides a more secure sign-up process out of the box, with minimal setup.
To install the free plugin, go to Plugins → Add Plugin from the WordPress admin panel, and search for Profile Builder. Install and activate the plugin on your site.

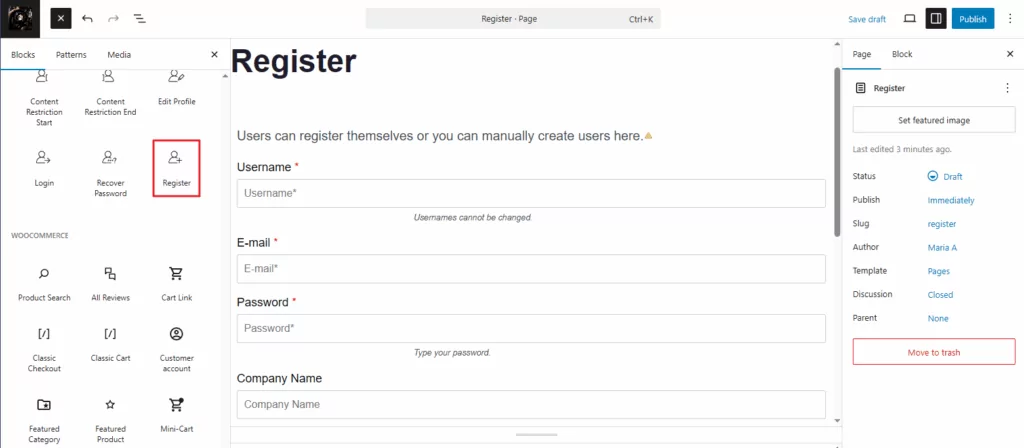
The plugin will automatically create a Register page for you from the start, bu you can also:
- Add a registration form anywhere on your site using the Only an administrator can create pages with the register shortcode. shortcode.
- If you’re using the Block Editor, search for the Register block under Profile Builder and add that to your page.
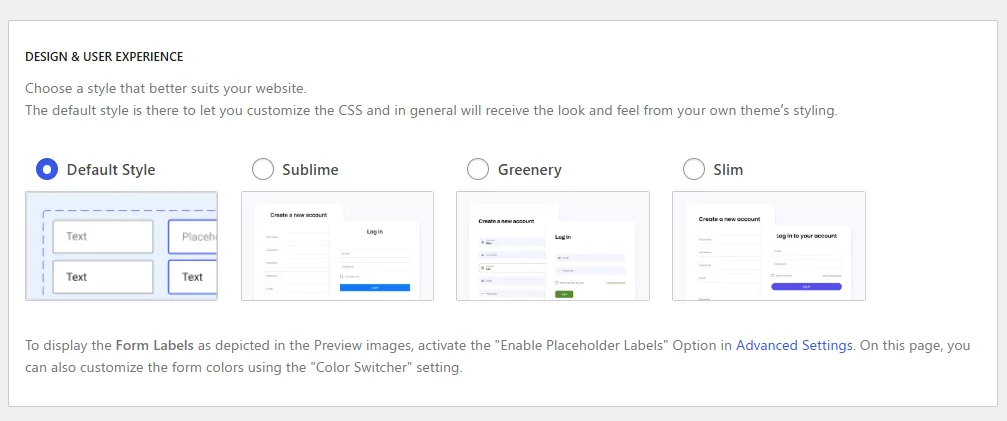
The premium version of the plugin also offers pre-designed templates for your forms, so you can choose whatever matches your site’s style.
Here’s what your newly built registration form will look like on the front-end:

Tip #2: Add reCAPTCHA to your registration form
One of the simplest and most effective ways to stop bots from registering on your WordPress site is by adding a CAPTCHA or reCAPTCHA to your registration form. These tools can distinguish between bots and real users.
Profile Builder makes it easy to integrate Google reCAPTCHA, helping you block automated spam signups while keeping the process smooth for real users.
To enable it, you’ll need to go to Profile Builder → Form Fields from the WordPress admin panel, and use the Field dropdown to select reCAPTCHA from the list of available field types.

Next, choose the type of reCAPTCHA you want to use. I recommend reCAPTCHA V3, as it runs only in the background and is invisible to the user on the front end. This makes the registration process smoother, without bothering the visitor with annoying checkmarks or challenges.
You’ll then have to enter the Site Key and Secret Key. If you need help with this step, you can follow the instructions in this article here.
Now choose which forms to display the reCAPTCHA on, and make sure the Required option is set to Yes. Click the Add Field button and you’re done!

❗ Note: As I mentioned before, the reCAPTCHA V3 is going to be invisible on the front-end, so your form should look exactly as it did before adding this extra field.
Tip #3: Add an email confirmation field to your registration form
Adding a second email field so people can re-enter their email address helps reduce typos in email addresses, which in turns reduces fake sign-ups. These type of fake registrations might not come from bots, but they are still going to end up as unusable accounts.
Enabling this field works pretty much in the same way:
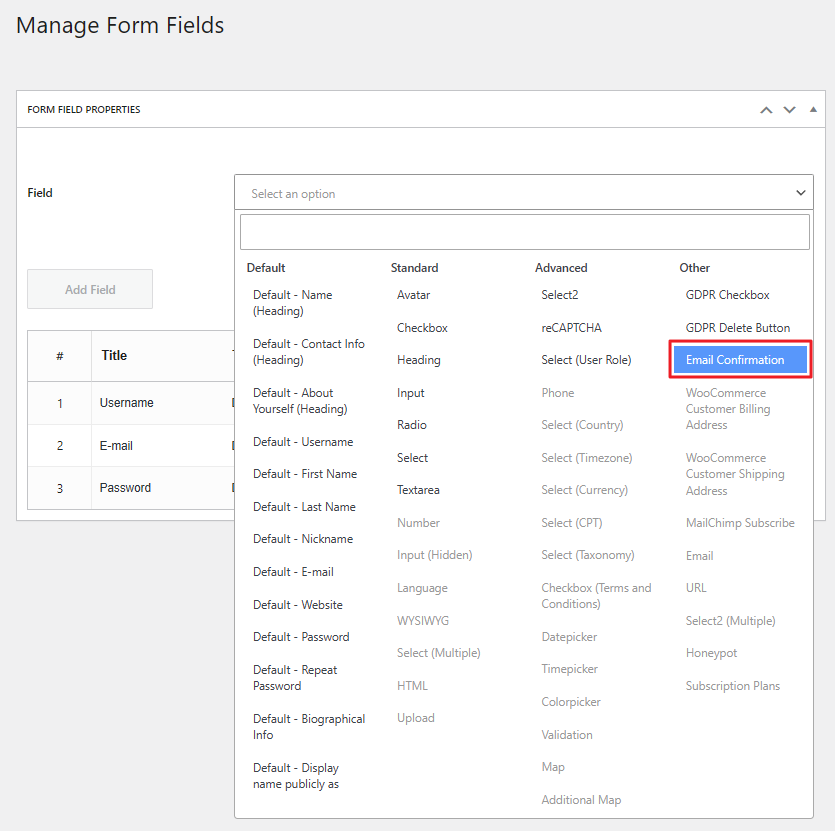
- Go to Profile Builder → Form Fields from the WordPress admin panel.
- Use the Field dropdown to select Email Confirmation from the list of available field types.
- Enter the form field details.
- Make sure the Required option is set to Yes.
- Click the Add Field button.
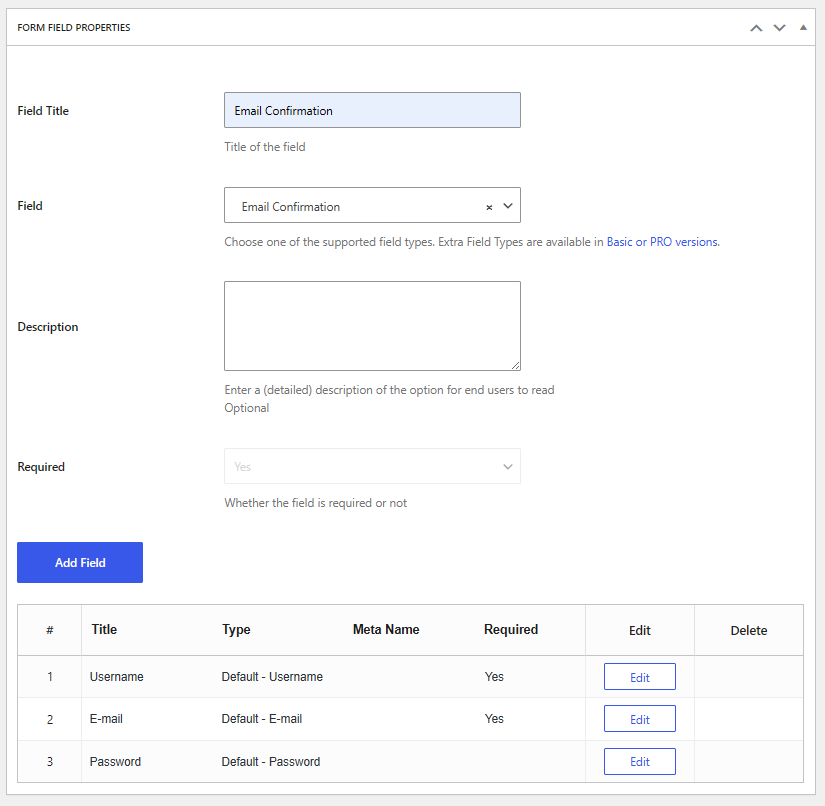
Here’s what the Email Confirmation field will look like on the front-end:

Tip #4: Enable email address verification for new users
Email verification adds an extra layer of protection by requiring users to confirm their email address through a special link before completing registration. This helps filter out fake accounts created with invalid or disposable emails, which is pretty common in spam attacks.
With Profile Builder, you can enable email verification to ensure that only users with working inboxes can complete the signup process, keeping your user list clean and your site more secure.
To do so, go to back to Profile Builder → Settings → General from the WordPress admin panel, and find the Email Confirmation setting in the Optimize the Login and Registration Flow for Your Members section.
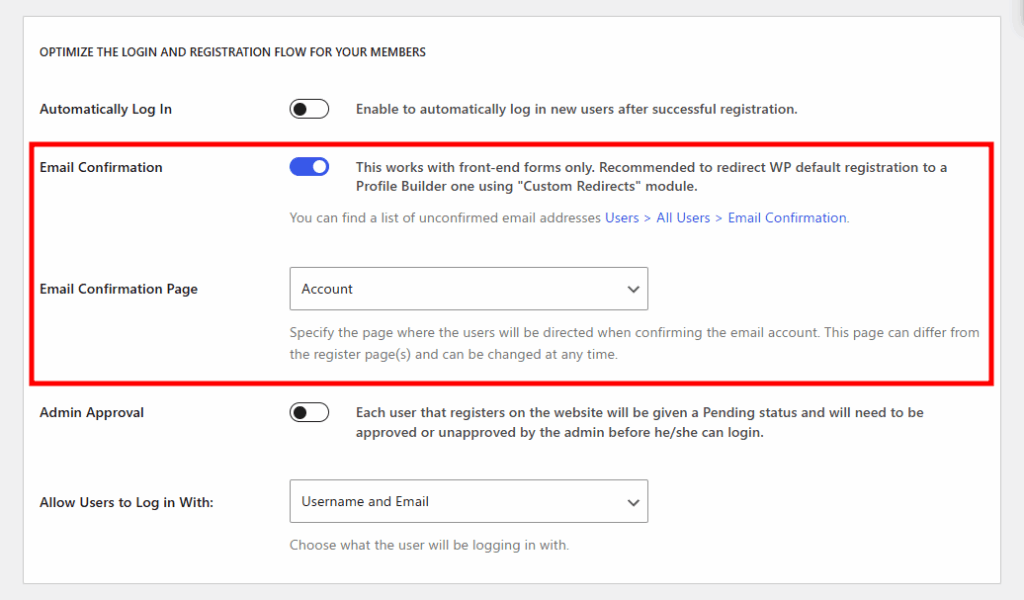
Enable the funtionality, and then select a page where you want your users to be redirected once they click the verification link. I recommend you to create a special page with a thank you message for your registrants so they immediately understand that their account has been created. But you can also simply redirect them to their account page.
Now, each time a user fills out your sign-up form, they will receive a link via email. Once they click that link, their account will become active. Otherwise, the registration will not be completed.
Tip #5: Admin approval for new registrants
For even tighter control, you can require admin approval before new users are granted access. This means no one can log in until you’ve reviewed and approved their registration. This method is ideal for community sites or private memberships.
While the previous steps are available in Profile Builder’s free version, admin approval is a Pro feature. If spam is a recurring problem, upgrading can give you hands-on control over every new account.
So, here’s what you have to do in order to enable admin approval of your registrants:
- Get the Pro version of the Profile Builder plugin and install it on your WordPress site.
- Go to Profile Builder → Settings → General from the WordPress admin panel.
- Scroll down to the Admin Approval option (in the Optimize the Login and Registration Flow for Your Members section) and toggle it on.
- Choose which user roles you’d like to enable admin approval for.
- Click the Save Changes button.
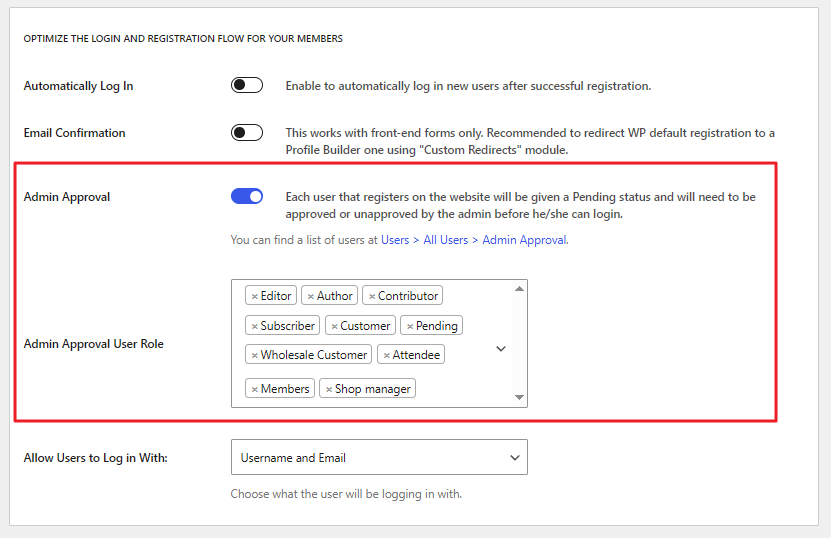
Now, each time you get a new sign-up from one of the user roles you picked, you’ll get a notification wo approve or deny their registration, so you stay in full control.
Tip #6: Limit who can register
If you want to go beyond standard protections, you can restrict access to your registration form entirely. With Profile Builder, you can allow or deny email domains from registering.
This is an advanced option (not necessary for most sites) but useful if you’re running a private community or have experienced targeted spam attacks. It’s a powerful way to tighten security even further and keep your site under full control.
Once again, this is a premium-only feature, so you do need an active Profile Builder license to enable the functionality.
With the plugin installed, you’ll have to:
- Go to Profile Builder → Settings → Advanced Settings → Forms from the WordPress admin panel.
- Toggle on the Email Domains Registering option.
- Set Registering Type to either Allow or Deny and enter the Restricted Domains.
- Click the Save Changes button.

This way, you can filter out any unwanted domains from your site.
Say Goodbye to Spam—Your Site Deserves Better
User registration spam might start as a minor nuisance, but left unchecked, it can become a serious security and performance issue. Thankfully, with the right strategies in place, you can stop fake signups before they ever reach your site.
To recap, here are the 6 tips you can implement on your site to manage spam user registrations:
- Disable the default WordPress registration.
- Add reCAPTCHA to your registration.
- Add an email confirmation field.
- Require email verification.
- Set up admin approval.
- Limit who can register by restricting domains.
Each step builds on the last to give you full control over your site’s registration process. However, you can also pick and choose only the tips that are useful to you.
If you’re serious about protecting your WordPress site from spam users, Profile Builder offers all the tools you need for simple safeguards as well as advanced protection.
Let me know if you have any questions in the comments section below!
Related Articles

WordPress Profile Builder: a Front-end User Registration, Login and Edit-Profile Plugin
Easily Login, Register and Edit your Profile Directly from the Front-end Profile Builder lets you add front-end forms that give your users a more flexible way to register, log in, and modify their profile information. If you allow public registration on your site, you don't want to force your users to use the backend WordPress […]
Continue ReadingWordPress User Avatar Tutorial: Let Users Upload Custom Profile Pictures
Searching for a way to let users on your site upload a custom WordPress user avatar or profile picture? By default, WordPress relies on the Gravatar service for user profile pictures, which means that your site will show the avatar associated with each user's email in Gravatar. However, this isn't ideal because not all users […]
Continue Reading
5 Best WordPress User Management Plugins
By default, WordPress lets you add different types of users to your website. However, you might be looking for a more flexible way to manage the people who interact with your content. If this is the case, you can use a WordPress user management plugin to manage authors and contributors. With an efficient user management […]
Continue Reading