

Table of Contents
- 1 Why do I need a user-listing directory plugin with member directory templates?
- 2 Instructions for how to create a member directory using member directory templates
- 3 Conclusion
Member directory templates make it easy for you to display a massive amount of information on your WordPress site in a well-ordered, beautiful way.
The function of a user listing directory is to manage your online database (e.g. staff, the businesses in your network, topic specialists, or anything in between). Member directories (user listings) provide your visitors with easy-to-navigate search and filter functions. Directories create networking and trade opportunities and allow people to connect and participate in your community. Plus, there are many SEO and marketing advantages too!
In this tutorial, we’ll use one of the 5 pre-created Profile Builder member directory templates to create a sophisticated, beautiful, and most importantly, useful member directory. With our user-friendly templates, you don’t need any coding knowledge. We’ll provide step-by-step instructions for creating a flawless user, staff, or business directory.
Why do I need a user-listing directory plugin with member directory templates?
It is possible to create a manual information listing or information tables for your site, but it’s hard to present lists in a useful way. If your lists are long and complex, you need to add a sorting or filtering function, or your users won’t be able to get what they need. And it’s a nightmare to keep manual lists updated!
A properly integrated user listing plugin provides member directories that are much easier to maintain than tables and lists but can also serve you in other ways. You can create several different member directories, on different parts of your website, with just a few clicks. More importantly, the Profile Builder plugin is actually a combination of 4 significant WordPress functions:
- The ability to get the information you need from your users through user forms,
- and use the info to manage users and their roles and capabilities,
- all done without impairing the security of your site,
- while still being able to display useful information beautifully through member directories.
Instructions for how to create a member directory using member directory templates
In this section, we’ll do a step-by-step example of using one of Profile Builder’s member directory templates to create a list of users.
Step 1: Install, Set Up, and register Profile Builder Pro
You’ll need an up-to-date WordPress installation and a suitable theme. For this tutorial, we’ll use the Hello Elementor theme. We’ll ask plant sellers to provide their field of specialization, then use that information to display a filtered list of specialist plant sellers.
You’ll also need the Profile Builder PRO plugin. Start by choosing the Profile Builder plan best suited to your needs. After registration and payment, you’ll receive an email confirming your purchase.
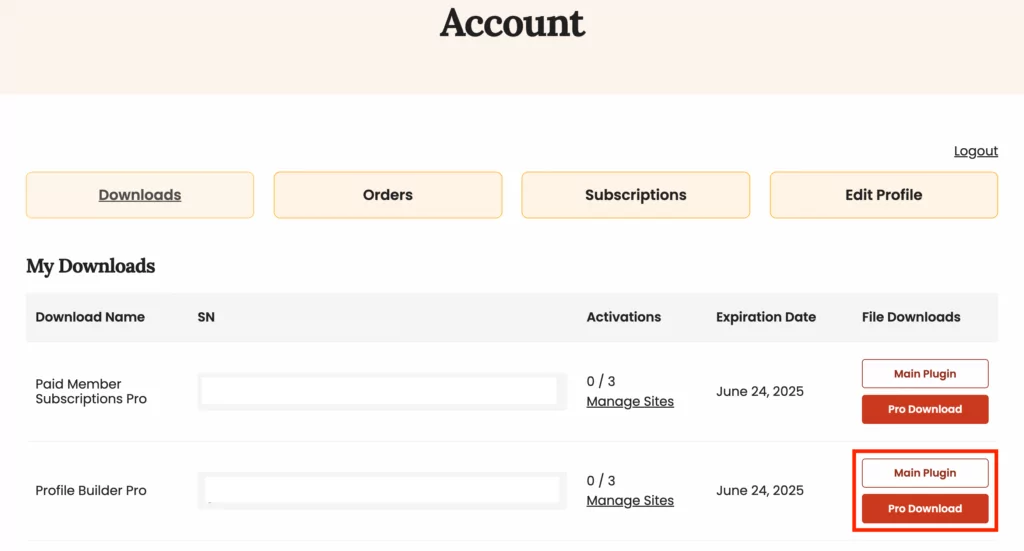
Log in to your Cozmoslabs account. Go to the Downloads tab. Download the Profile Builder Main and Pro zipped files to your computer. Next, go to the Plugins page on your WordPress dashboard. Upload both archives to your website one at a time. Click Install and Activate each time.
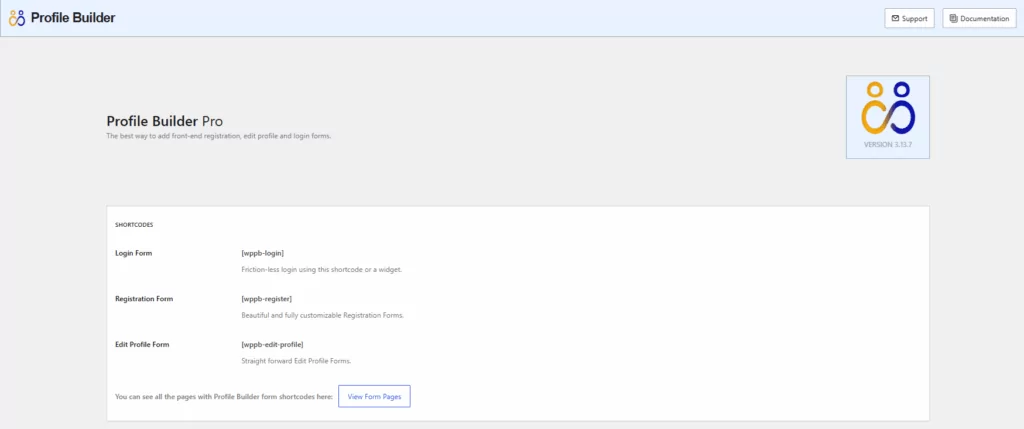
Once it’s set up on your WordPress panel, you’ll need to register the PRO version to get access to full functionality. Go to Profile Builder → Register Version to create a connection between your website and Profile Builder PRO by registering your site. Use the key or SR (Serial number) that appears under the Licences tab on your Cozmoslabs account page. If you need any help with registering, check out this step-by-step documentation.
Step 2: Customize your registration page
Like other advanced plugins (e.g. WooCommerce), the Profile Builder plugin can automatically create new pages. Click on the Create Form Pages button. It will create your Edit Profile, Login, and Register pages, and take you to the Pages tab on your WordPress dashboard. Your new Edit Profile, Login, and Register pages will be perfectly integrated with your website’s look and feel. To check, click the View button that appears on hover.
Alternatively, the quickest way to identify your Profile Builder pages is to navigate to the main Profile Builder page and click on the large blue button “View Form Pages”. You can also navigate to Pages → All Pages.
If you can’t find the premade registration page or want to add a new registration page, you can create a new one. Simply copy the registration page shortcode from the Form Fields page and paste it onto a blank page.
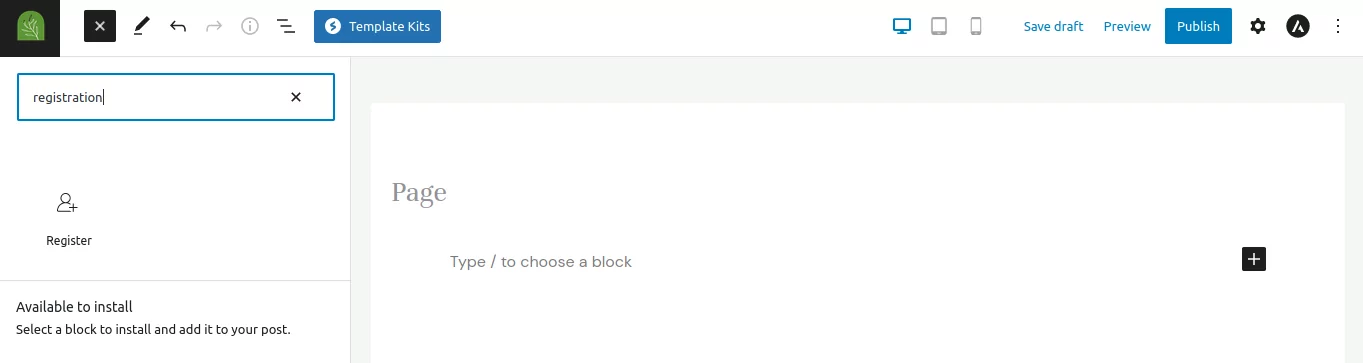
Another shortcut is to pick the Profile Builder’s Register block (or any other user form) from the Gutenberg blocks menu.
Note: Remember that you can customize both the registration page and the registration form itself. Your registration page should contain all pertinent information to make sure that users understand what they are signing up to do. The registration form on the registration page should contain the fields that are useful for your business model and your user listing.
In the next step, you’ll customize the pre-created registration form by adding fields you specifically want, removing redundant fields, and adding special values fields and rules to prevent unauthorized actions.
Customize forms
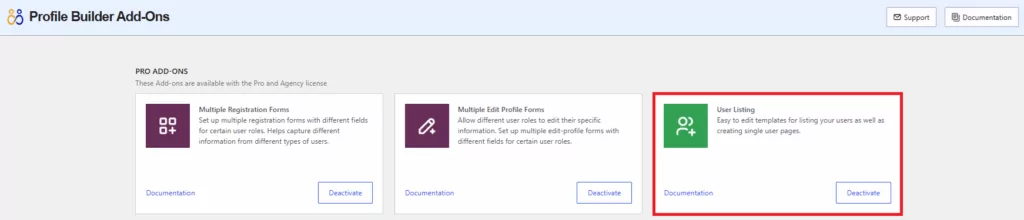
Navigate to the dashboard tab Profile Builder → Form Fields. A prompt to activate User Listing Add-ons appears. If you miss the prompt, you can navigate to the Add-ons page to activate the add-ons. We recommend that you activate the User Listing, Multiple Registration Forms, and Multiple Edit Profile Forms add-ons before you start customizing your first form.
Let’s start customizing the default, pre-created form!
New forms will, by default, include all of the fields you customize during this step. You can create new or different forms by navigating to the Profile Builder Registration forms page and clicking Add New.
Note: The default form does not appear on this page. To edit this original default form, go to the Profile Builder Form fields page.
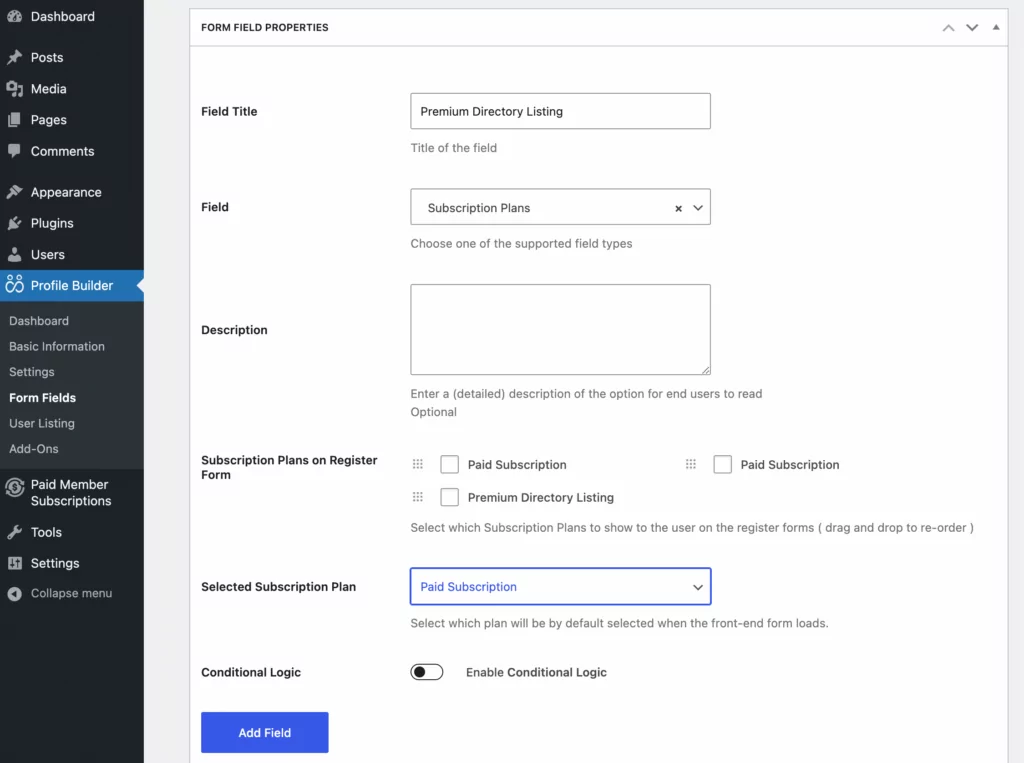
Your registration form must contain the fields that you need as a business manager. In this example, we want to change the form to ask registrants to provide their specialist field in the plant trade, location, and contact information to create a business directory for members.
Profile Builder includes some basic default fields for each registration form. You’ll see those if you scroll down the page. Click the Delete button next to the fields you want to remove. To start adding new fields, click the arrow in the Select an Option menu field and scroll through the pop-up menu for the list of fields you can choose from.
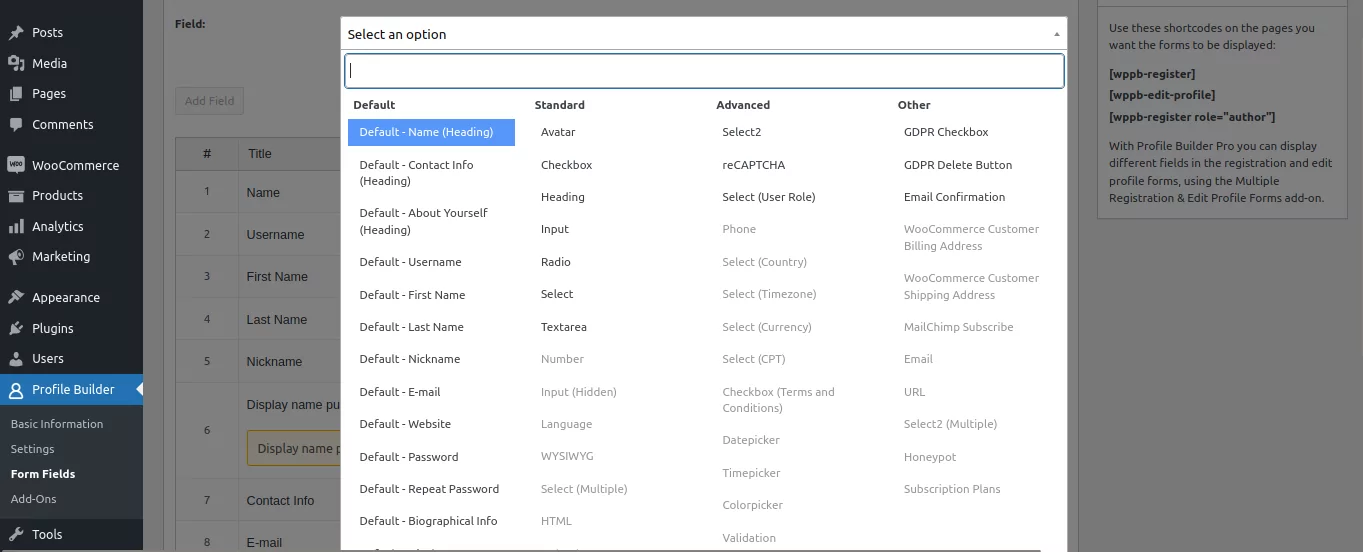
Pick your desired fields and customize them as you wish before clicking the Add Field button. In this example, we’ve added the Field title ‘Specialist Field’, chosen the Multiple Selection field type, and added a few Options (Cacti, Shrubs, Trees, etc.).
In the next step, you’ll learn how to display the information from all these fields in a member directory or User Listing to make the info useful to visitors to your website.
Step 3. Create a WordPress User Listing
As mentioned in Step 2, you’ll need to enable the User Listing add-on before you go any further. We recommend that you activate the User Listing, Multiple Registration Forms, and Multiple Edit Profile Forms add-ons.
On the WordPress dashboard, look for User Listing under the Profile Builder tab. Click on it. On the user listing page, you’ll see a ready-made, published, master default user listing called Userlisting with the shortcode [wppb-list-users name="userlisting"]
If you’re new to User Listings, we recommend that you don’t edit this listing as it can serve as a handy reference for default settings while you learn. Also, be cautious about using this master list to display all of the info on your website without adding filters.
Click the Add New button at the top and give your user listing (member directory) a title.
NOTE: If you can’t find the Add New button, make sure that you’ve activated the necessary add-ons (User Listing, Multiple Registration Forms, and Multiple Edit Profile Forms add-on)

Customize Userlisting settings
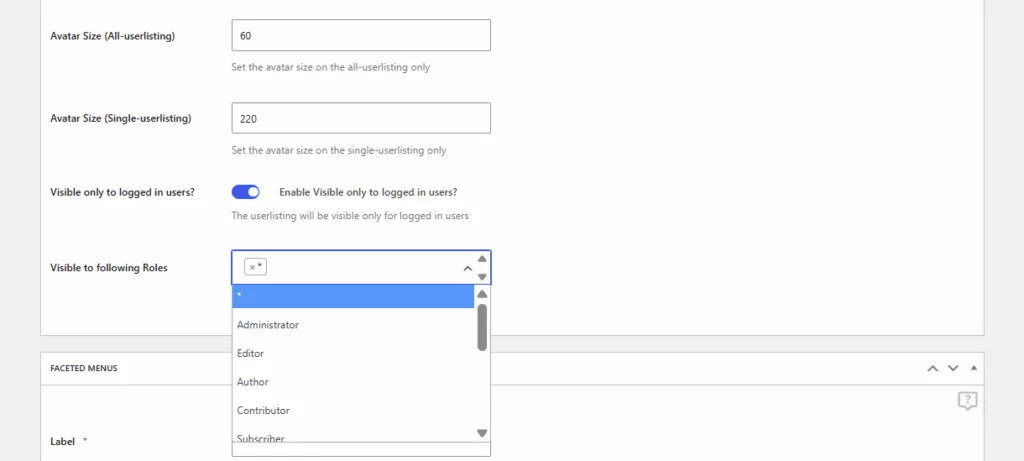
In this example, we’ve used the Used Listing Title ‘Plant specialists’ and we’ve restricted the roles to be displayed to ‘Contributors’ and ‘Subscribers’. After giving your user listing a title, scroll down a little to the other basic settings. You can choose which user roles to include, and how they’ll be displayed in the user listing.
For example, you can hide the user listing from non-logged-in users so that only people who are logged in can see the directory. If you should select Visible only to logged-in users, a further menu option appears where you can further select whether it should be visible to all logged-in users, or to customers, subscribers, etc. Tick the ” * ” box to make it visible to all logged-in users, but be cautious about exposing sensitive information to all users.
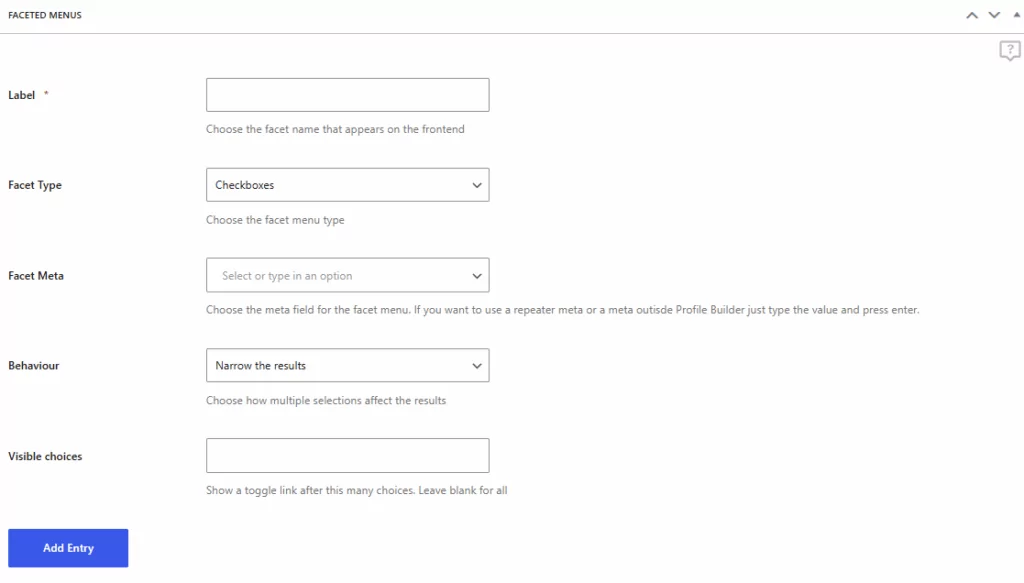
Customize Faceted Menus
The next section on the page is Faceted Menus. Adding facets means choosing what filters will be available on your user listing page. Most users are pretty familiar with using filters on shopping sites. So, you can add the same type of filters they’re used to, to help them get the information they need from your site. For example, you could let them filter search results by location, specialist field, age, etc.
We’re going to add a filter to sort members by their plant specialty, so we’ve typed “Specialty” as the Label we want to display on the page. For this Faceted Menu example, we’ve chosen Select Multiple as the Facet Type—since you want people to be able to select multiple options simultaneously. In the Facet Meta field, we’ve used the drop-down menu to select the “Specialist In” field as a source for the filter (Facet Meta).
Click Add Entry. Repeat the same steps for adding as many filters as you need. As soon as you click Add Entry your new filter will appear in the filter (facet) summary just below the Add Entry button.
This is how a filter will look on the front end:
Customize Search Settings
Next, choose how Profile Builder should locate the information to make the search bar work. This section lies just below the Faceted Menus section on this same page. Pick search functions by ticking or de-selecting which information you want to be scanned when a visitor searches for a keyword in the search bar.

Create your directory using member directory templates
The final section is where you pick a member directory template and customize the format and the way you want the listing to look on the front end of your website. As you’ll know, standardizing the design and formatting of different elements across your website can take hours. That’s why Profile Builder offers you 5 pre-designed themes for your user listing page.
There’s a default theme, plus 4 other custom themes. Each represents the best way to display tables, grids, boxes, or lists, respectively. When you hover your mouse over each, you’ll see a button to Preview the theme, and one to Activate it.
Each template includes a member directory (User Listing) display that appears as an ordered list on your website, plus an individual page for each entry on your member list. That’s where you’ll display the in-depth info for each member.

The membership directory templates are a great starting point, but you can customize each theme even further. For now, simply pick the one you think will look best, and will best suit the type of information you’re looking to display. You can easily switch to a different theme, and the HTML and CSS will update automatically to the new styling.
The Default template displays only a minimalist sorting function, so, for this example, we’ve used the Tablesi template to illustrate its prominent filter buttons and directory search field.
To customize the information you want to be displayed in your member directory scroll down to see the “All-userlisting Template” sub-heading. It looks like this:

NOTE: The All-Userlisting Template is for customizing the member directory (User Listing) as displayed on your website. The Single-Userlisting Template is for customizing the individual member’s details when people click on the “More” button in the member directory. We’ll get to that soon!).
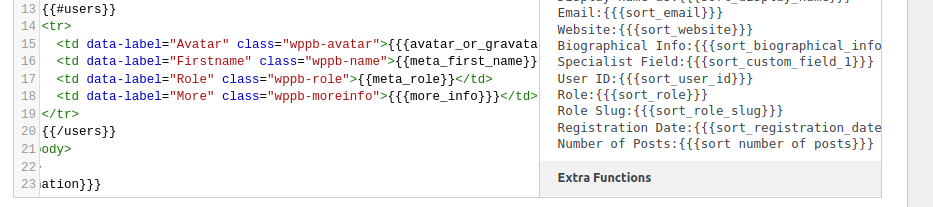
If you’re ok with the default display fields, you can just leave everything as is. If you want to add or remove information to the user directory, you’ll find all of the Profile Builder tags that are available for each listing type on the right side of the display column on the right. In this example, we removed the “number of posts” from the member directory template by deleting the appropriate lines as can be seen in this image:
Finally, let’s customize how we want the individual entries to look when visitors click on the “More” or “View” button in the member directory. Scroll down to the Single-Userlisting template.
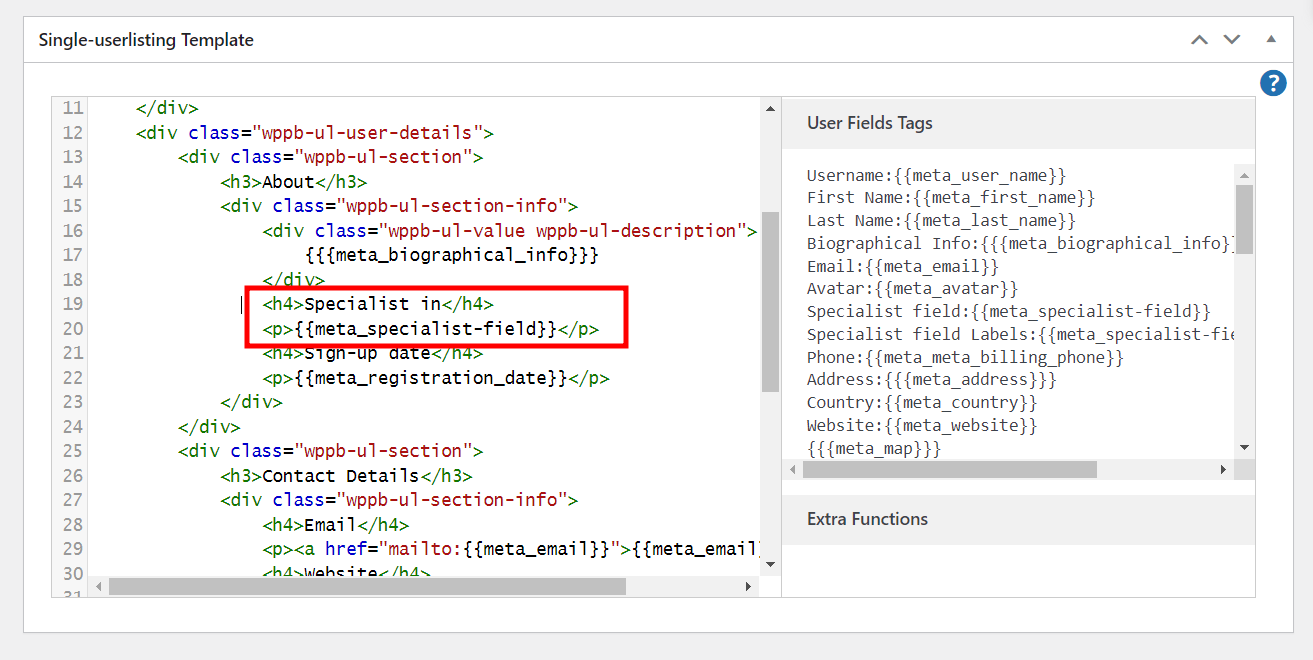
In this example, we’ll add another label in the single-user template (the individual’s profile listing), the “Specialist In” label. Just highlight and copy the ‘Specialist’ tag and tag from the right, and paste it on the left.
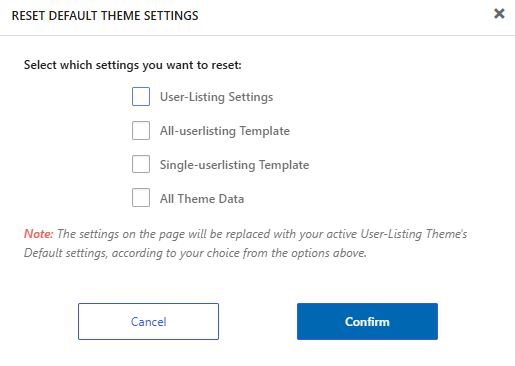
Fix mistakes with the reset function
Mistakes can happen, especially when you’re doing a lot of customization. Fortunately, you can restore default settings for a fresh start. You can reset either the general Userlisting Settings, the All-userlisting Template, or the Single-userlisting Template, or, you can start from scratch by resetting everything. Just scroll back up to the member directory templates section. Hover over the active theme. Click the Reset Data button, and select which setting or settings you want to reset.
Step 4: Publishing member directory templates
When you’re happy with your customizations, hit the Publish button at the top. This will generate a shortcode for your user listing, that you can paste or insert via Gutenberg blocks on any page on your site.
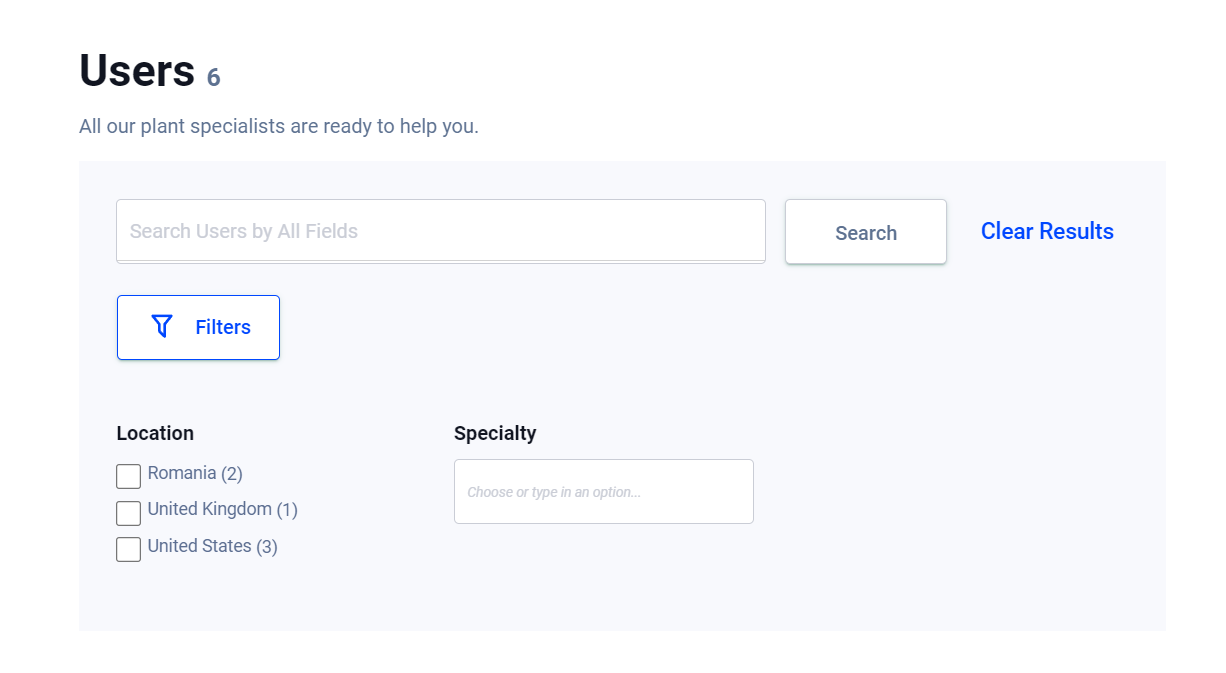
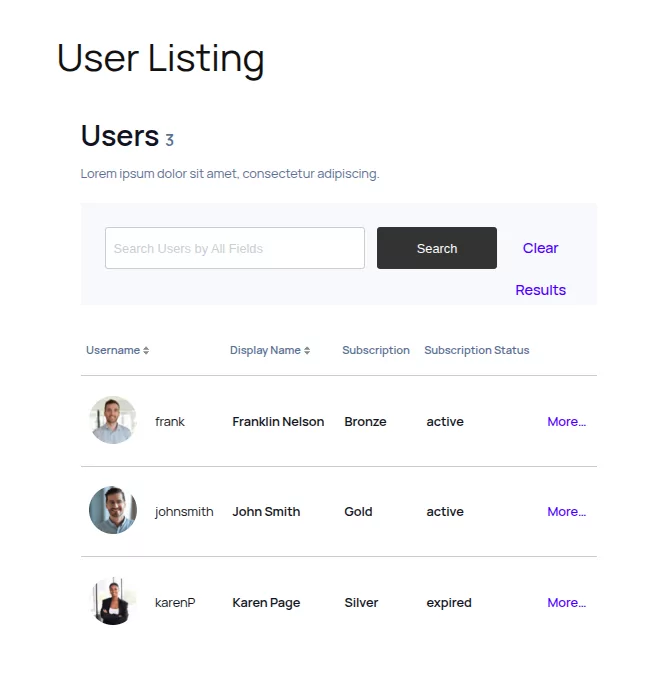
And: Ta-Daa! This is what your new membership directory looks like on the website’s front end. Note the Tablesi member directory templates prominent filter buttons. If you don’t like the look, simply choose a different template.
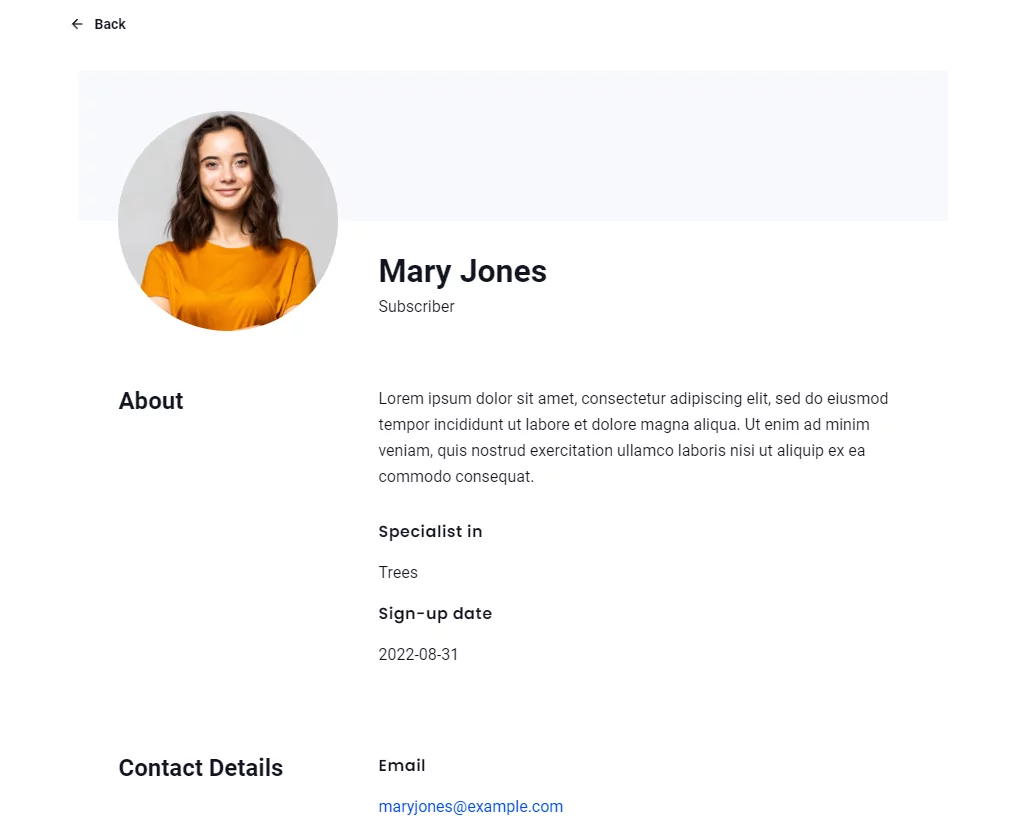
The next image shows what an individual user information page looks like when you use one of the membership directory templates. Visitors to your site can access this page by clicking the “view” or “more” button on the directory list.
Conclusion
The Profile Builder Pro plugin makes it very easy to list your users in a way that adds real value to your site. The prebuilt templates for both user registration forms and user listing displays will save you time (and money!). Profile Builder Pro gives you 5 easy-to-use member directory templates that are guaranteed to add new monetization opportunities for your business.
Take your website to a new level with just a few clicks: Download Profile Builder Pro right here!
Profile Builder Pro
Create beautiful front-end registration and profile forms with custom fields. Setup member directories, custom redirects, cutomize user emails & more using the all in one user management plugin.
Get Profile BuilderHave you used Profile Builder to create one or more member directories or business directories for your website? Help others to maximize their website’s potential. Share your experience in the comments section below!
Related Articles

8 Best WordPress User Registration Plugins
Not sure what WordPress user registration plugin to use for your project? Going through all the WordPress user registration plugins can be disorienting. You may have spent hours and hours searching for plugins and tutorials to help you with your project, and you’re still as confused as you were when you started. Imagine finding the […]
Continue Reading
How to Password Protect Content, Posts, and Categories in WordPress
There are many use cases for password-protected content in WordPress. For example, you might be a content creator who wants to monetize premium content in the form of subscriptions or memberships. As with everything related to WordPress, password-protecting posts doesn’t have to be difficult. If you’re wondering how to password-protect WordPress content, posts, and even […]
Continue Reading
How to Create a Custom Reset Password Page in WordPress
If you’re building a user-focused website, creating a WordPress custom reset password page is a no-brainer. Users forgetting the password to their accounts is inevitable, so it only makes sense to offer them a way to recover their password. In this post, you will learn everything there is to know about creating a WordPress reset […]
Continue Reading