Table of Contents
Are you looking for a way to list all of your registered paid members or selected service providers in your industry on your WordPress site? Create a directory website!
A directory website is useful for many purposes including listing registered users or showcasing well-known experts in your industry so your audience can reach out to them for solutions quickly. However, with default WordPress functionality, creating a full-fledged directory website can be challenging.
In this article, we’re going to show you step-by-step how to build a directory website using the Profile Builder Pro plugin.
What is a directory website?
Before we begin building a directory website, it’s important to understand what it is and how it works.
A directory website is essentially an online catalog that lists different businesses within your industry or individuals who have subscribed to your brand’s membership plan.
For example, if you run a membership site, you can set up a “member’s directory” page that lists all users who have subscribed to the membership plan. This makes it easy for members to find one another and start conversations on topics of common interest.
Similarly, you can set up a professional directory website by listing all restaurant businesses within your area or creating a list of all the real estate agents within a certain area.
Here are some of the most popular examples of directory websites:
- Yellow Pages. Yellow Pages is a directory website dedicated to listing businesses from different industries including food and health, automotive repairs, and grocery stores. This helps users quickly find the right businesses within their locality.
- eLocal. eLocal is another directory website aimed to help thousands of users connect with local businesses in their area. It lets users search for the services that are required with their unique ZIP code so people only view local businesses or solutions that are close to them.
- Yelp. Yelp is a free-to-use directory website that’s designed to connect customers with businesses. It’s designed for businesses that are looking to connect with more customers and grow their customer base.
Directory website use cases
The great thing about directory websites is that they have a lot of useful real-life use cases. Let’s take a closer look at some of these:
- Product catalog site. An online grocery store or brand can list all of its available products on a directory website. This lets customers go over all product options and compare them before they buy from the store. It’s also a great way to improve product visibility and helps showcase your brand’s entire product catalog professionally.
- Business listing. Similar to websites like Yellow Pages or eLocal, directory websites are also used to list businesses offering a wide range of solutions. For instance, you can set up a directory site that lists businesses from the automotive industry or the medical and healthcare industry.
- Member or subscriber directory. If you run an online membership business, building a directory website can be a great way to offer exclusivity to your subscribers. For example, you can list users who have purchased the membership plan on a separate “Members Directory” page.
- Restaurant directory. People can go through your restaurant directory and find the best restaurant in their area. You can create separate directories for specific types of restaurants, for example, a Vegan Restaurants Directory.
- Real estate directory. A real estate directory is useful for listing real estate agents or available homes or apartments for sale or purchase. People who are looking to purchase a home or want to look for rentable places in their area can sort through the available options using a real estate directory website.
- Job boards. Job boards are another great use case for directory websites. It’s essentially a place where job seekers or experts can connect with clients based on their skills and expertise. Clients or brands can list jobs so individuals can reach out and connect with the right people in an efficient way.
- Directory of professionals. Directory websites can also be used to create a directory of professionals from a certain industry or field. For instance, you can create a directory or list of therapists and charge a small fee to be listed on your site.
How to create a directory website in WordPress
Profile Builder Pro is a WordPress user registration and management plugin that lets you set up custom forms and replace the default WordPress pages with more optimized ones.
It gives you full control over customizing the look and feel of your WordPress site’s front-end account pages. You can quickly set up important WordPress pages using shortcodes and choose a form style using pre-designed templates.
The best part about Profile Builder Pro is that it comes with a wide range of add-ons that lets you extend the core plugin’s functionality. While the core plugin is designed to let you transform your WordPress account pages, you can use the User Listing add-on to create a directory page on your site.
With the User Listing add-on, you have access to customizable templates that let you quickly list users or members anywhere on your site. This makes it easy for anyone to start creating professional-looking directories using the pre-built WordPress directory themes.
You also have the option to create multiple user listings or directories on your WordPress site. For instance, if you create a directory of professionals, you can list experts from each industry in a separate directory. So, Therapists will be listed in a different directory than Web Developers. This way, it’s easier to manage multiple groups of users on your WordPress directory website.
Additionally, Profile Builder Pro with the User Listing add-on lets you restrict user listings to logged-in users only. This encourages people to register and creates room for your brand to offer premium user listings.
Step #1: Get the Profile Builder Pro plugin
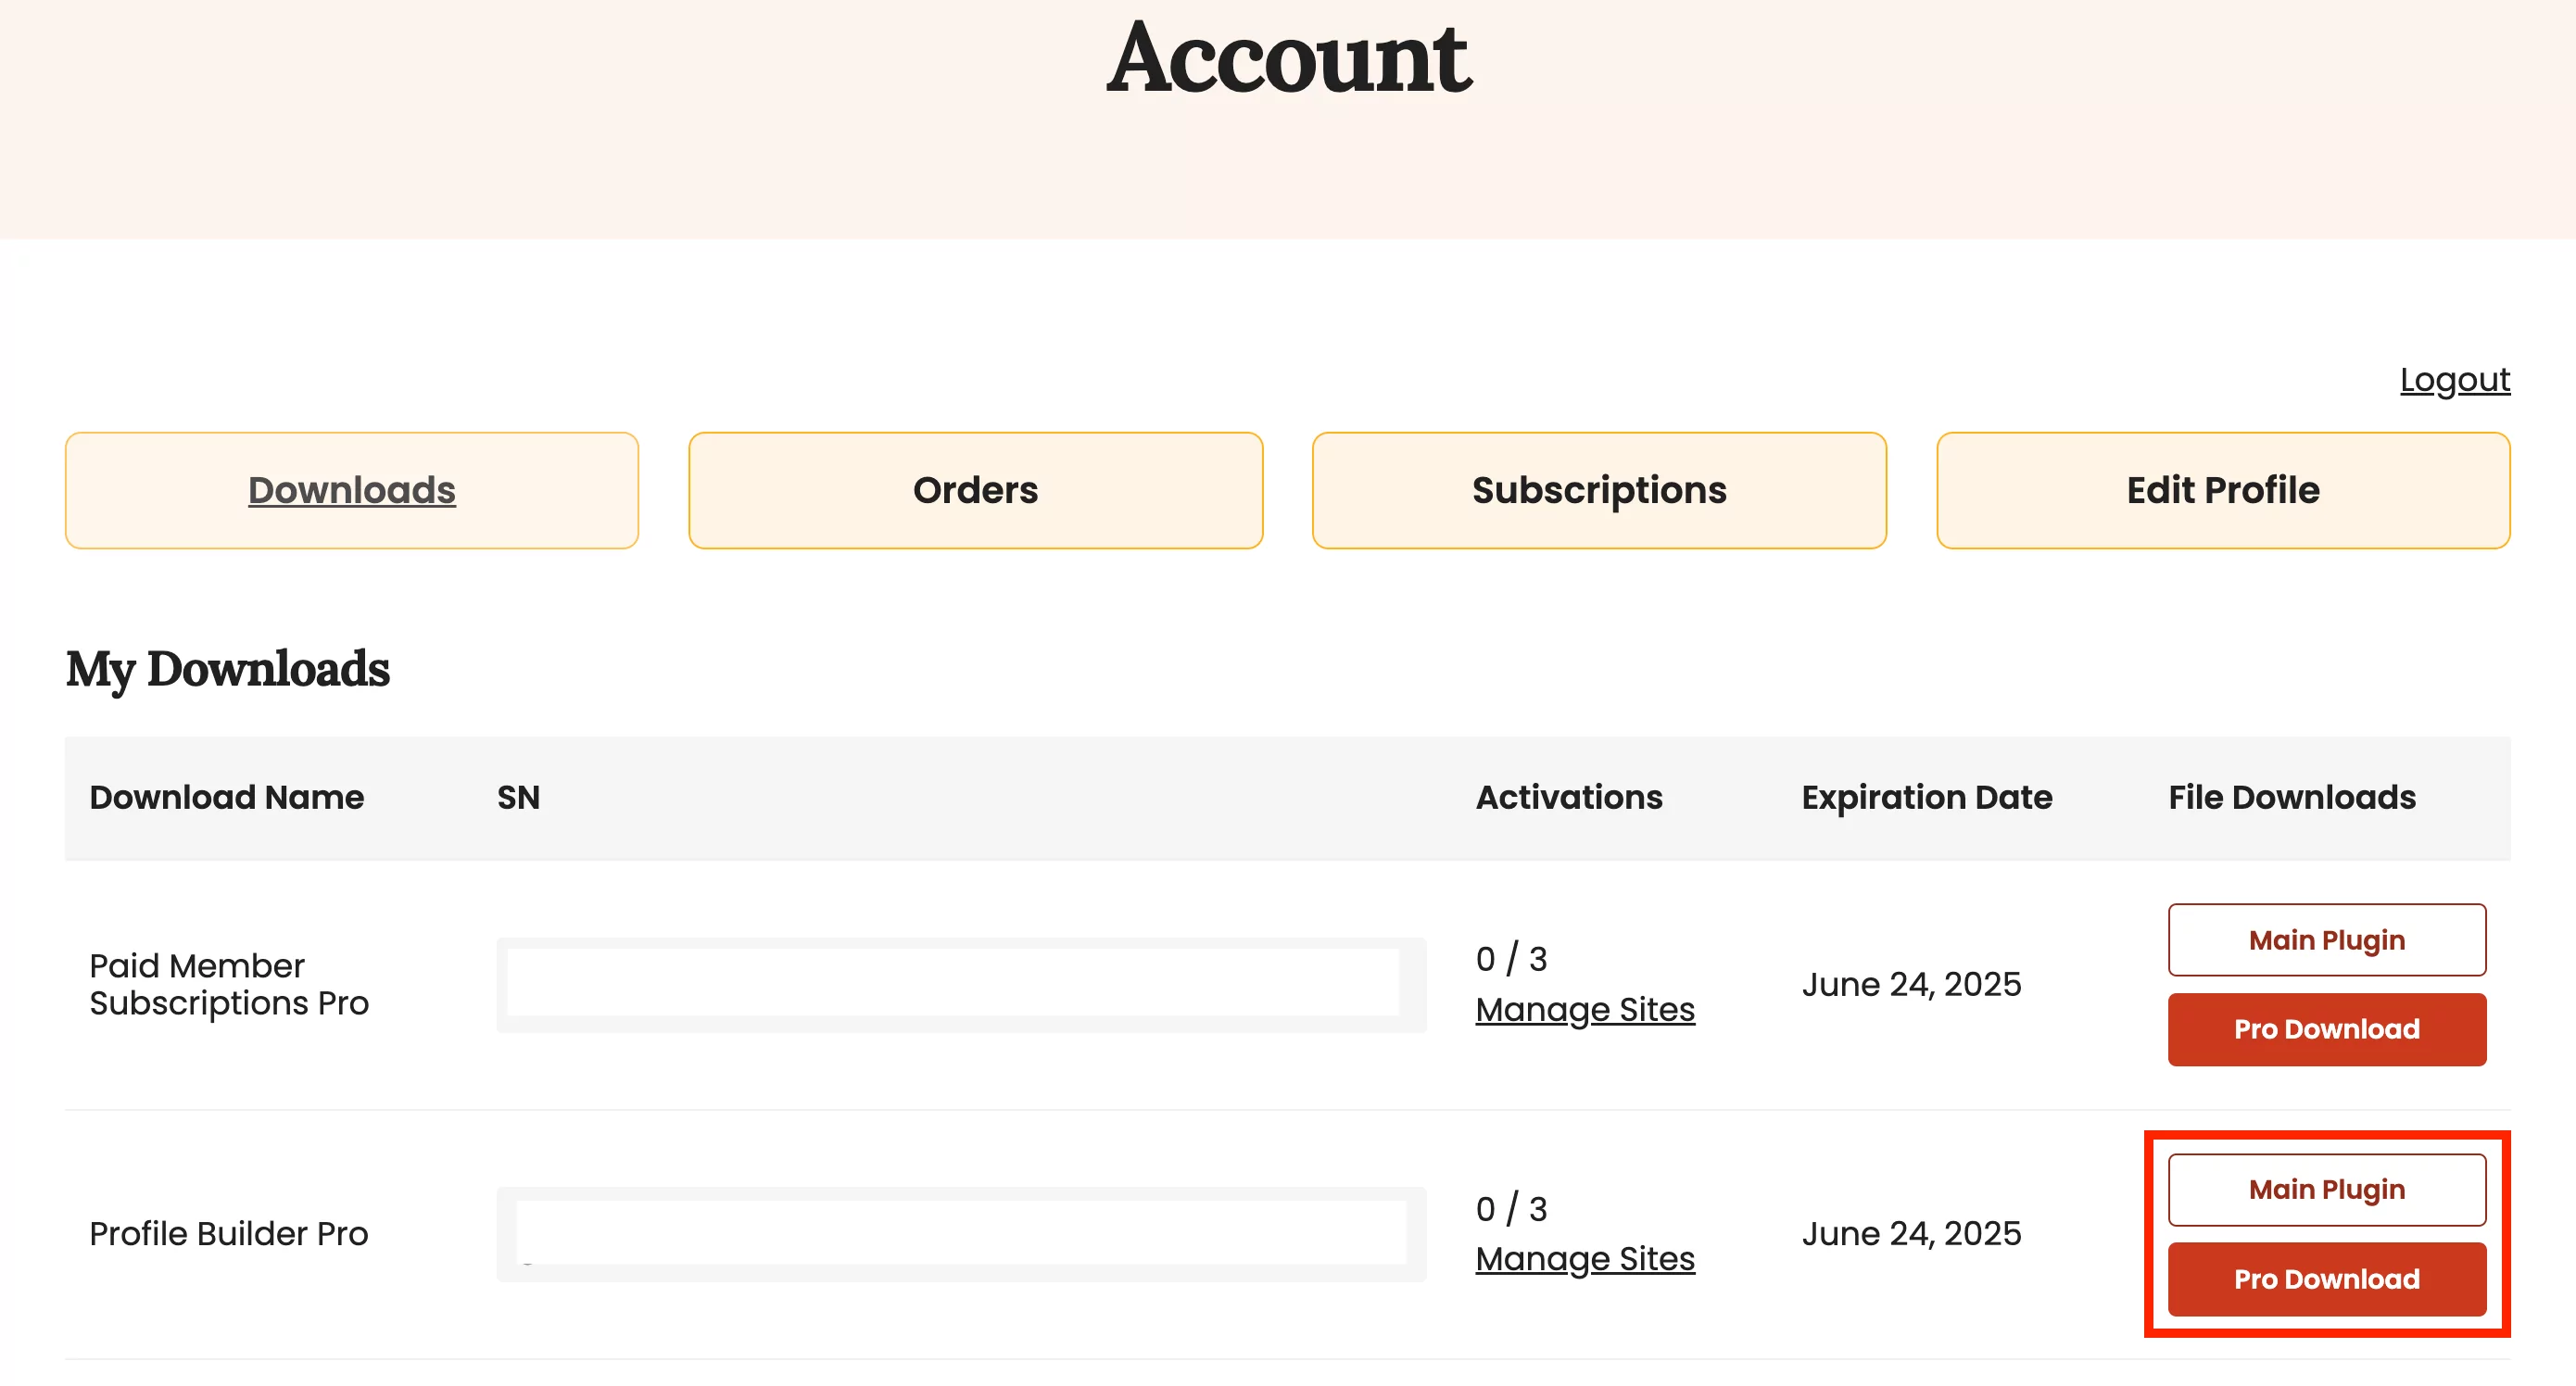
Get the Profile Builder Pro plugin and install it on your WordPress site. To do this, choose your preferred plan and, after purchase, download it from your account on cozmoslabs.com.
Then, navigate to Plugins → Add New from the WordPress admin panel and upload the plugin’s ZIP files to your site. Keep in mind that you’ll need both the main plugin and the pro extension installed on your site.
Once the plugin is installed on your WordPress site, navigate to Profile Builder → Register Version and enter the license key given to you at the time of purchase. You can also find it in your account.
Click on the Activate License button to continue.
Step #2: Create a new user listing
With the Profile Builder Pro plugin installed and activated on your site, it’s time to start setting up a new user listing. Start off by enabling the User Lisiting add-on by going to Profile Builder → Add-ons and activating it.
Next, navigate to Profile Builder → User Listing and click on the Add New button.
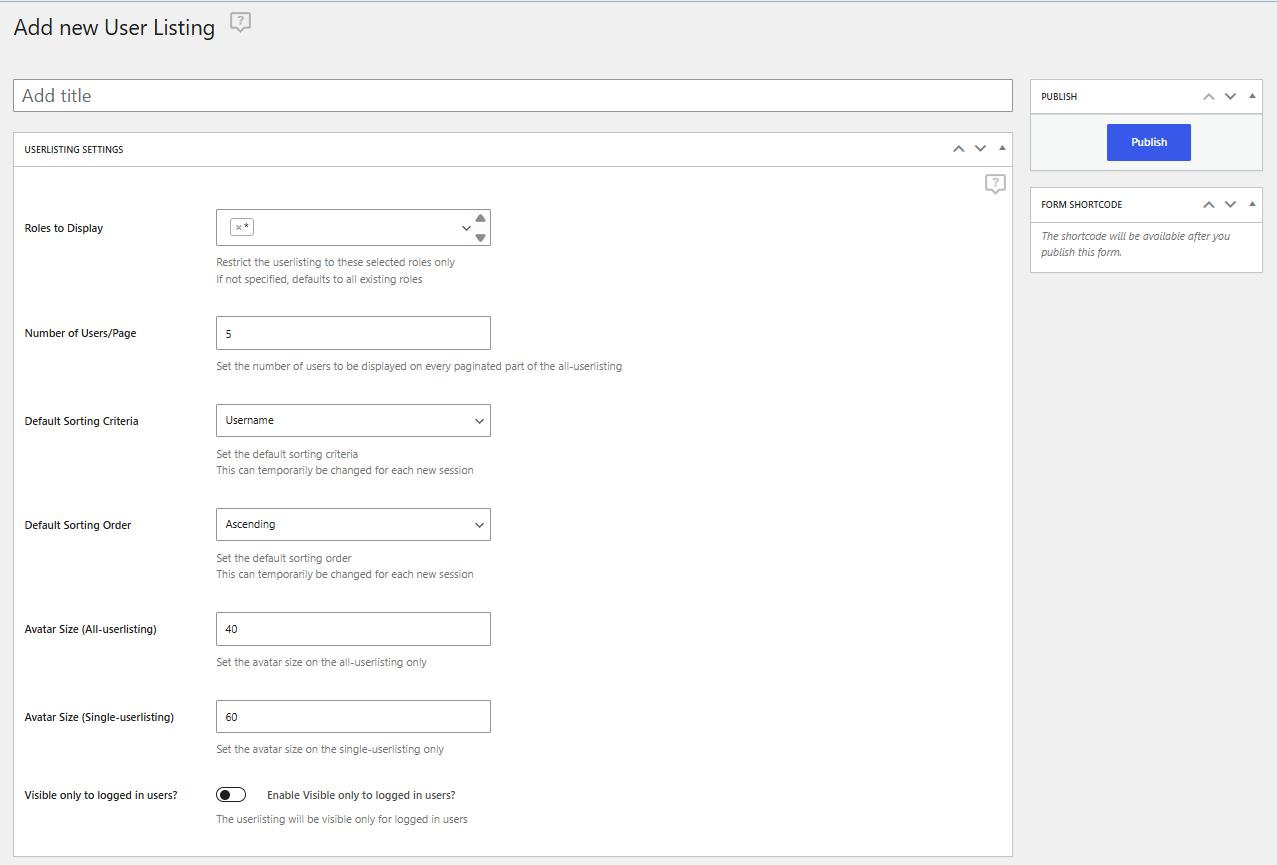
After giving your user listing a suitable title, select the user roles you want to display using the Roles to Display section.
You can also specify how many users will be listed on each page using the Number of Users/Page field and choose the default sorting criteria using the dropdown menus below. If you only want to showcase the user listing to logged-in users on your site, make sure to select the Visible only to logged in users? checkbox. In addition to this, you can even select specific user roles that can view the user listing on the front-end of your site.
Using the Search Settings metabox, you can select which search fields will appear on the front-end of your directory page. In addition this, you can use the Themes metabox to select one of the 5 pre-designed WordPress directory themes for your user listing.
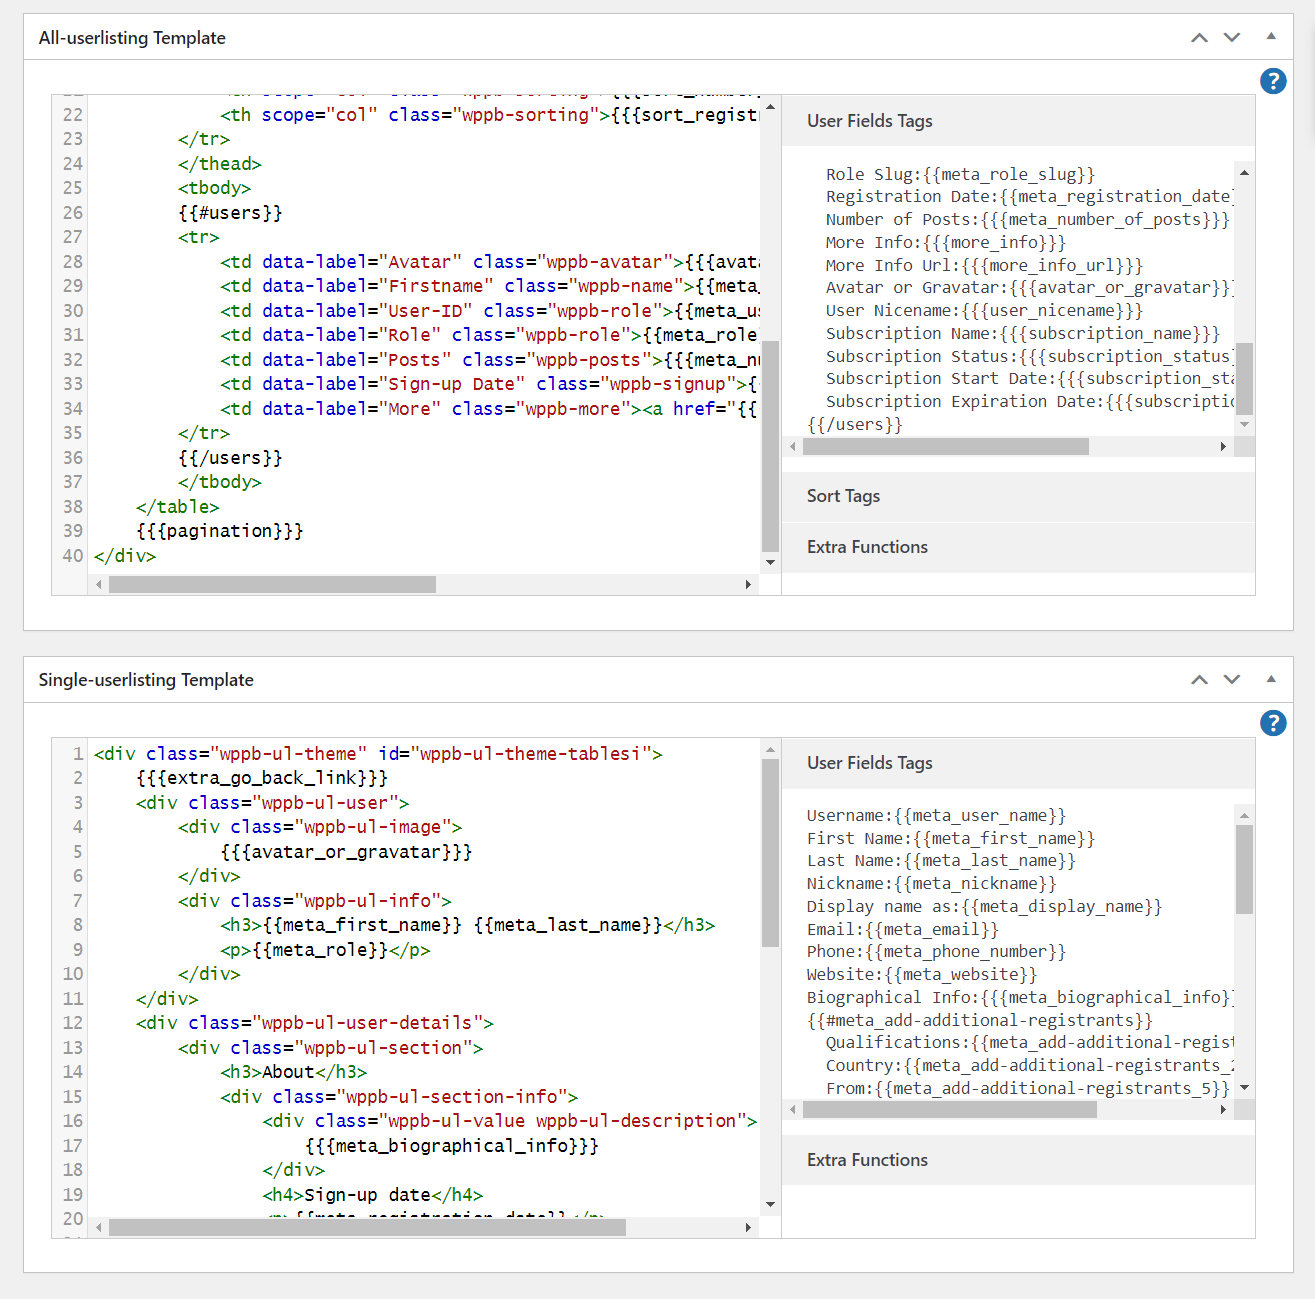
If your directory needs more customization, you can customize it even further from the All-userlisting Template and Single-userlisting Template sections using the tags on the left side of the screen.
You can learn more about customizing your user listing in this article about using the member directory templates.
Once you’re ready, make sure to click on the Publish button to continue.
Step #3: Setup your directory page
Now that the user listing is created, it’s time to set it up on any of your WordPress pages. To create a new directory page, navigate to Pages → Add New.
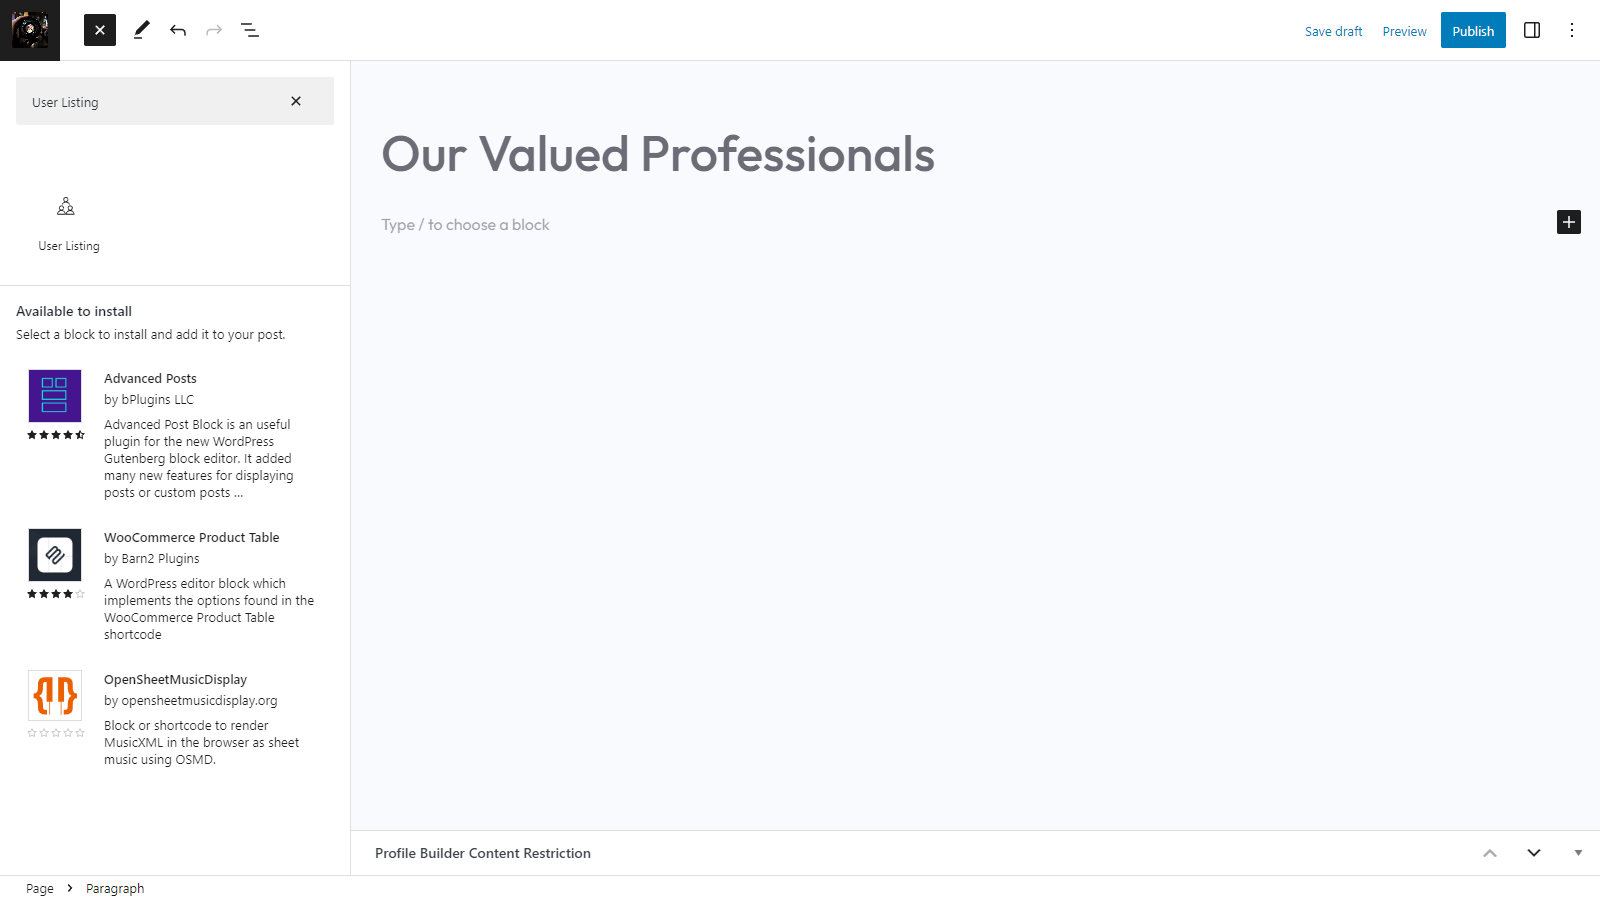
Click on the “+” icon to add a new Gutenberg block and select the User Listing block from the Profile Builder Pro plugin. This lets you show a user listing anywhere on your WordPress pages and customize it however you want.
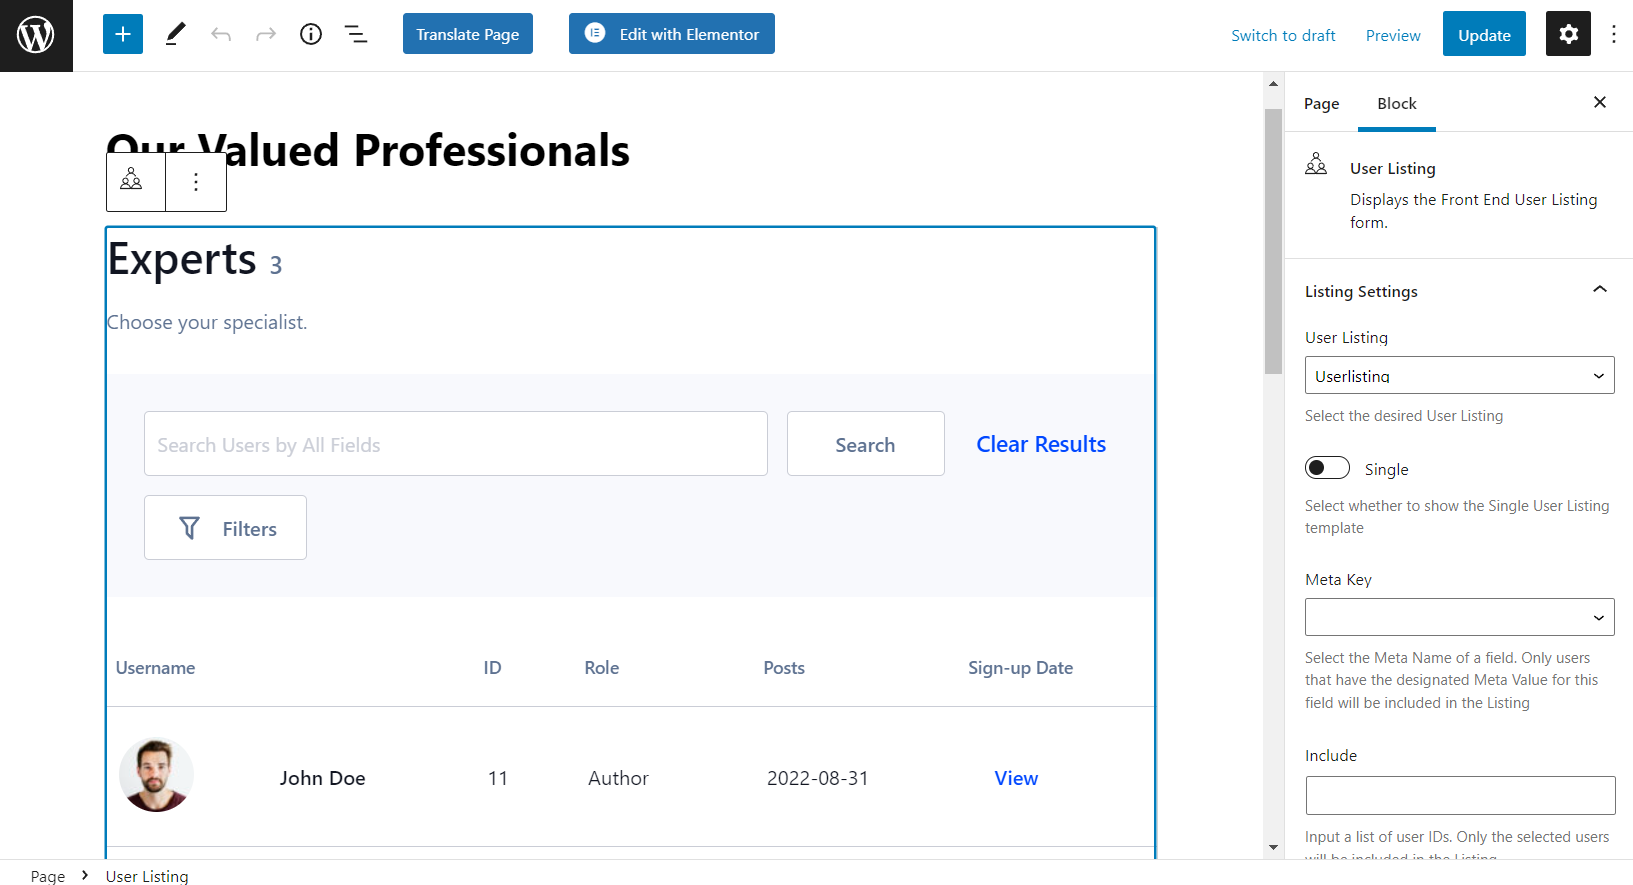
Using the block settings page, select the user listing you created earlier. You can also use the Include and Exclude fields below to add or remove specific user roles from the directory page. Once you’re ready, click on the Publish button to continue.
Step #4: Preview
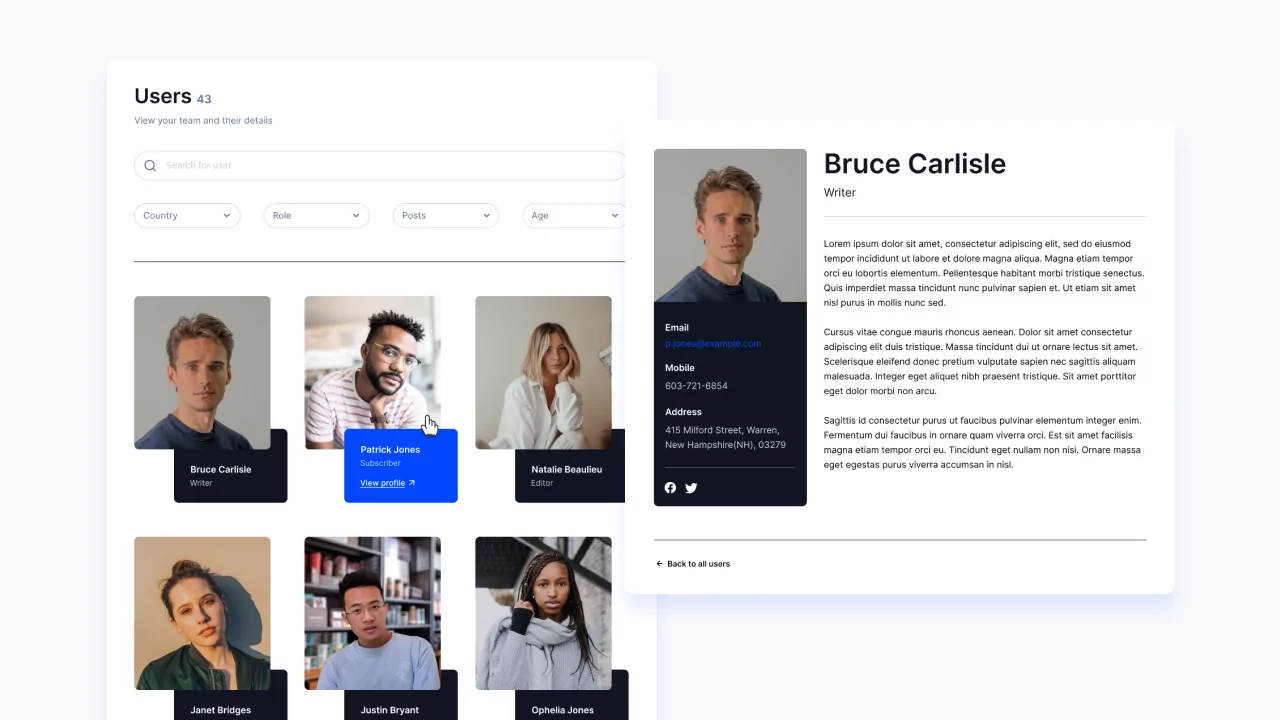
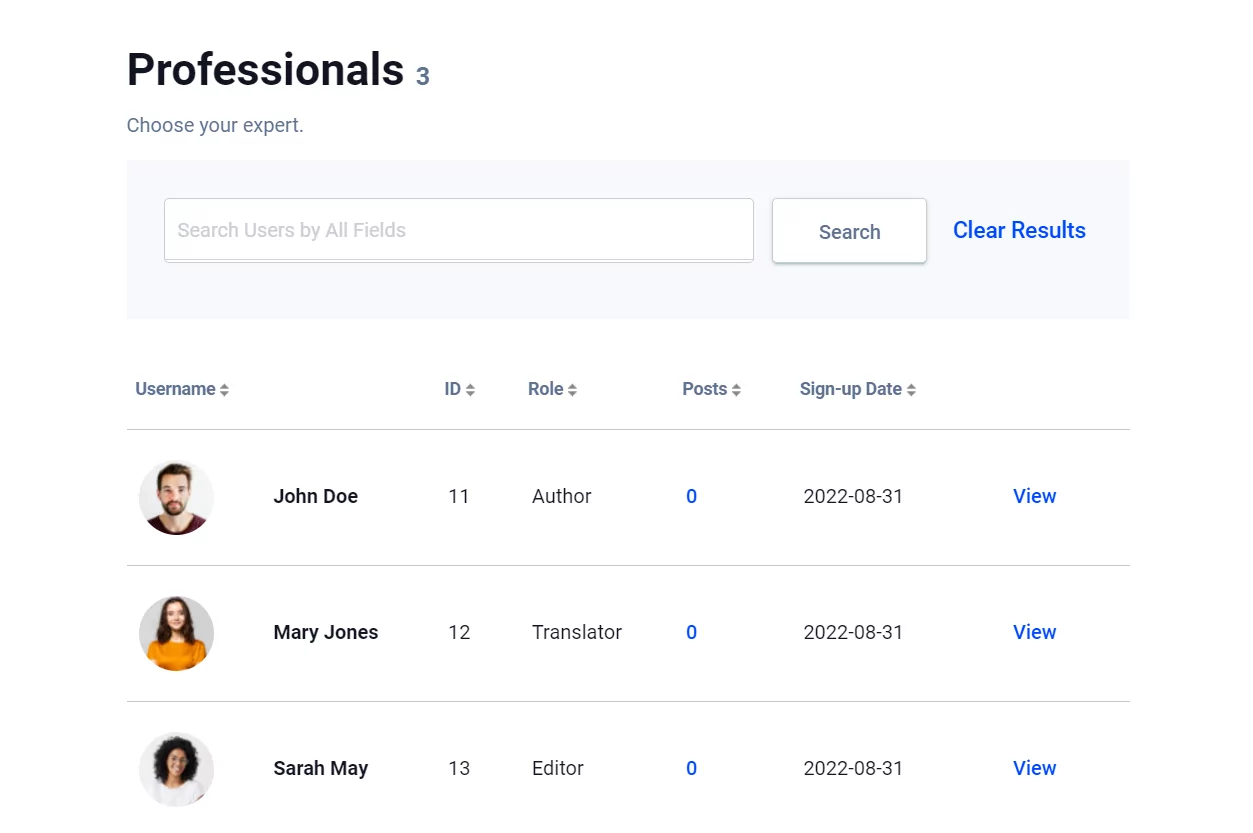
Now people can view the user listing on the front-end of your site that not only looks amazing but makes it easier for site visitors to quickly find relevant users using smart search options.
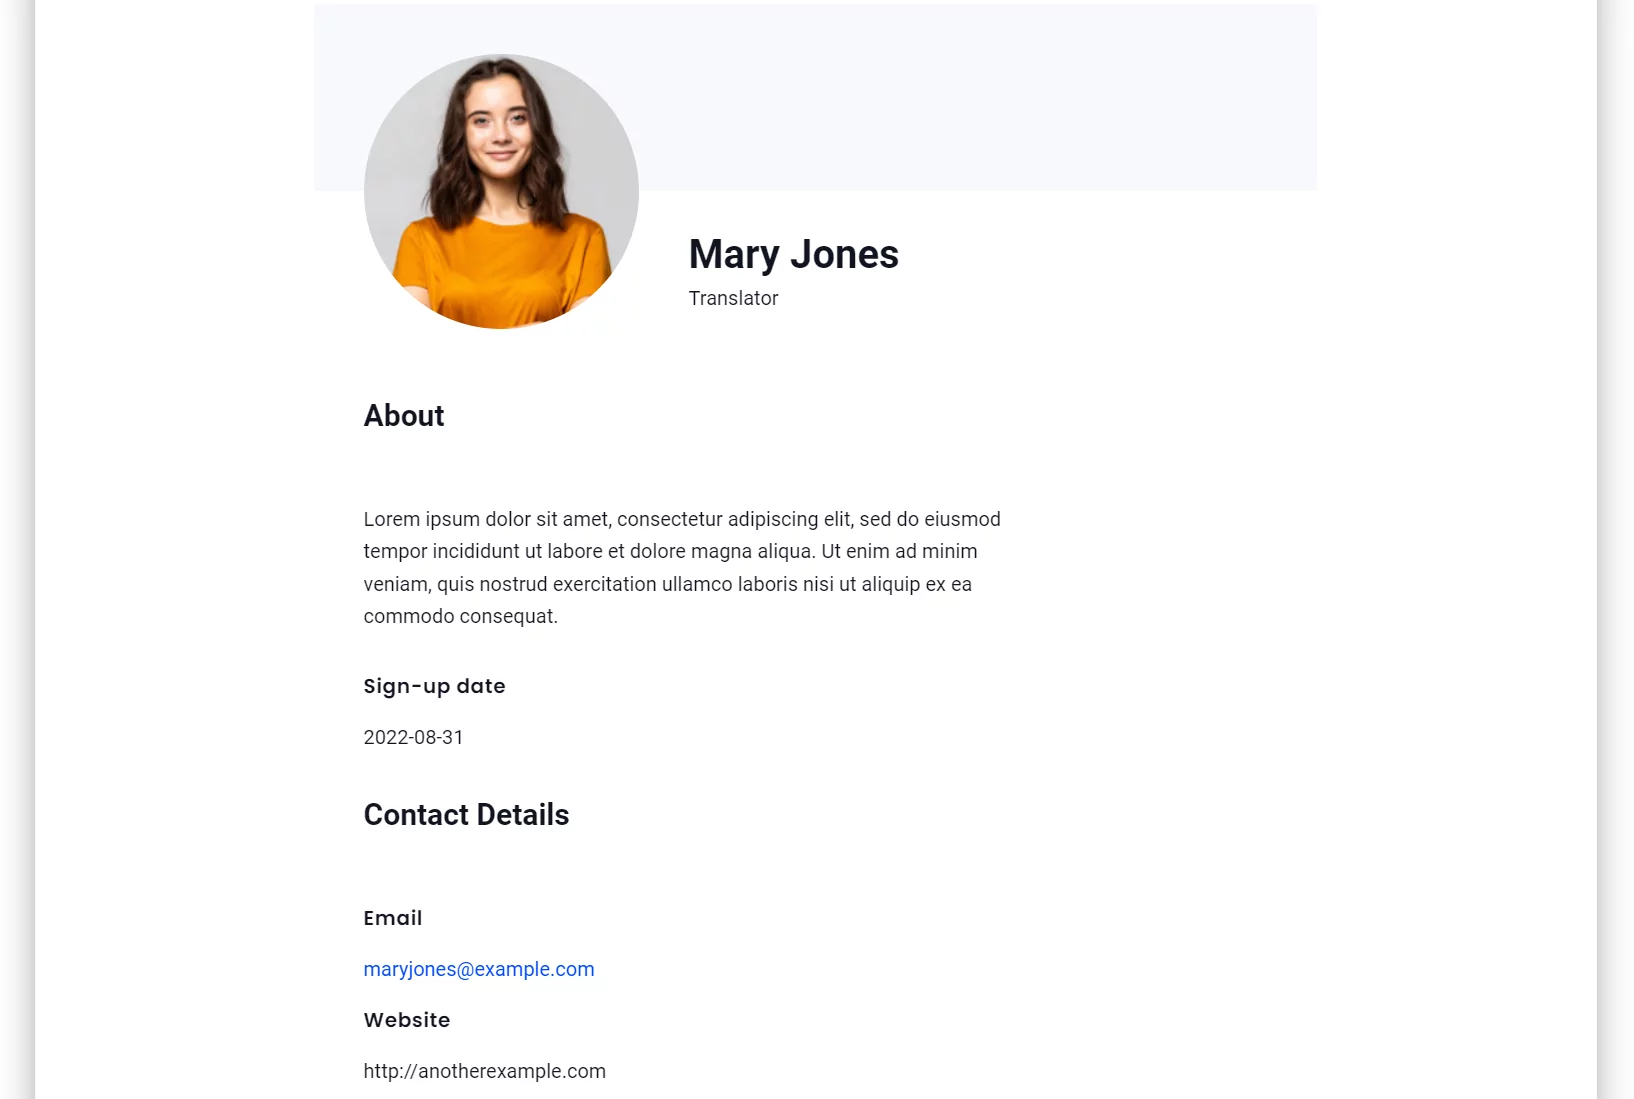
Users can also view more detailed information by clicking on the View link next to a listing.
Conclusion
WordPress by default doesn’t have built-in functionality to create user directories.
A better way to do this is by using a dedicated plugin for WordPress like Profile Builder Pro. While the core plugin is designed to let you customize the default WordPress user registration and login pages, it comes with a wide range of add-ons that help you add more functionality to your WordPress site. With the User Listing add-on, you can create user listings or directory pages anywhere on your WordPress site. In addition to this, you can also set up multiple directories on the same WordPress site so it’s easier to manage different user groups.
Ready to start building a directory website for WordPress? Get Profile Builder Pro today!
Do you have any questions on how to create a directory website with WordPress? Ask them in the comments section below!
Related Articles

How To Create a Divi Membership Site
If you’re thinking of building a membership site in WordPress, you’ll need a solid theme and a membership plugin that pairs well with it. In this complete guide, we’ll show you how to create a Divi membership site using the popular Divi theme in combination with the Paid Member Subscriptions plugin.
Continue Reading
How to Hide Products by User Roles in WooCommerce?
Do you want to easily hide products by user roles in WooCommerce? Some WooCommerce store owners have a unique requirement where they want to hide certain products from all but a few specific groups of users. There may be many reasons for this, including selling exclusive products only to the more loyal customers, with a […]
Continue ReadingWordPress User Registration
Have you hit a road block when it comes to WordPress user registration? You probably would like to have new users register before being able to take certain actions (for example, posting reviews or commenting) but do not want them to have access to the WordPress Dashboard? Truth is, WordPress User Registration doesn't have to […]
Continue Reading


