

Table of Contents
Have you ever had a customer fill their cart only to vanish just before checking out? Most of the time, it’s because the price seemed excessive all at once. This is where offering clients the possibility of going for an installment payment plan can make all the difference.
You can make it easier for people to say “yes” by dividing the total into smaller payments, and you can do it directly within WordPress or WooCommerce without the need for extra tools.
You can provide flexible payment plans with just a few clicks using Paid Member Subscriptions’ new Installment Payments feature. Ideal for WooCommerce stores, online courses, and membership websites.
Let’s get started!
Why Offer Installment Payments?
Adding an installment payment plan to your site isn’t just a nice-to-have. It’s one of the smartest moves you can make if you want to grow sales. Here’s why:
- Reduced Cart Abandonment, Increased Sales – People are more likely to commit when the initial payment is lower.
- Bigger Orders – When customers can spread out payments, they are more likely to select premium plans or bundles.
- Happier Customers – Being adaptable sets you apart and encourages repeat business.
For WooCommerce stores, partial payment in WooCommerce means you don’t lose the sale. Besides this, it’s a method for membership sites to increase recurring income without turning off potential members.
How It Actually Works
The Paid Member Subscriptions Installment Payments feature lets you set up subscription plans where the total price is split into a set number of equal payments. The initial payment is made at the time of checkout, and subsequent charges are made automatically based on your selected schedule.
The best part? The same plugin can be used for WooCommerce installment payments for subscriptions too.
Paid Member Subscriptions Pro
Accept (recurring) payments, create subscription plans and restrict content on your website. Easily setup a WordPress membership site using Paid Member Subscriptions.
Get Paid Member SubscriptionsStep-by-Step: Setting Up Installment Payments
Step 1: Install Paid Member Subscriptions
First things first, you have to install Paid Member Subscriptions if you haven’t already; the free version will be enough to begin accepting installment payments. Of course, if you want more features like multiple currencies, advanced content restriction, or pro add-ons, you can upgrade at any time.
To do so, all you have to do is:
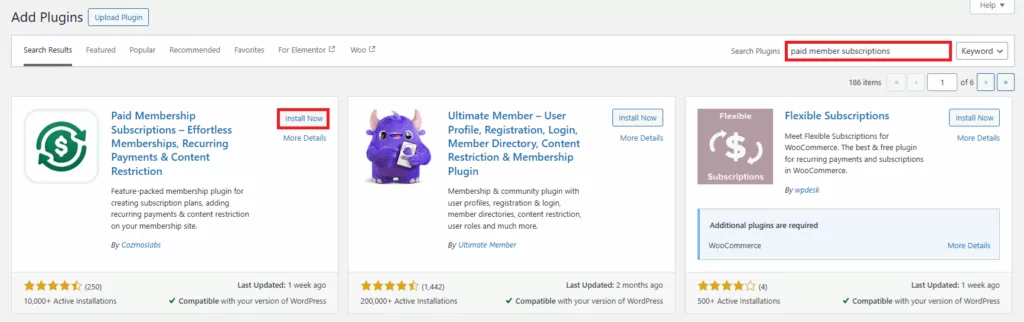
- Log in to your WordPress admin dashboard, and navigate to Plugins → Add New Plugin.
- Enter “Paid Member Subscriptions” in the keyword search box, and once you find the plugin, hit the Install Now button.
- After that, make sure to hit Activate.
Step 2: Set Up Your Payment Gateways
Before actually diving in, let’s set up your payment gateways just to make sure everything will work smoothly. To do so, all you have to do is:
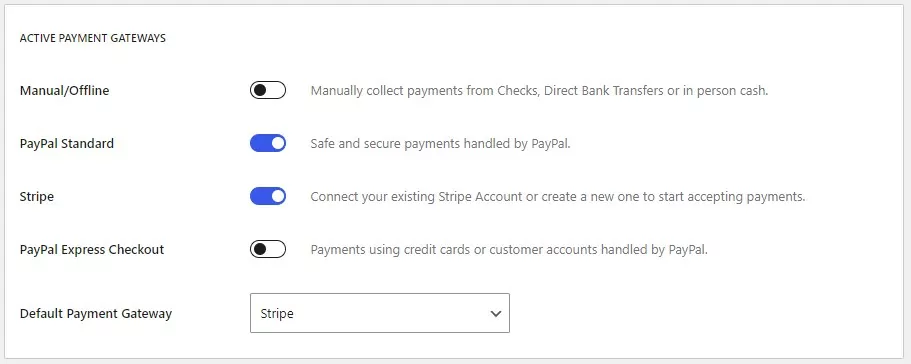
- Go to Paid Member Subscriptions → Settings → Payments.
- Choose your Default Payment Gateway (Stripe, PayPal, or manual payments).
- Follow the steps and add your credentials (API keys, client IDs, etc.) depending on the gateway you select.
- If you want to give your customers more options, you can enable multiple payment gateways at once.
And that’s it! Your website can start processing payments now.
Step 3: Create a Subscription Plan
Next, you will need at least one subscription plan for your customers to buy before you can set up installment payments.
- Navigate to Paid Member Subscriptions → Subscription Plans in your WordPress dashboard.
- After selecting Add New, give it a proper name.
- Decide on the Price and Duration: this will be the total cost and duration of the subscription before any installments are applied.
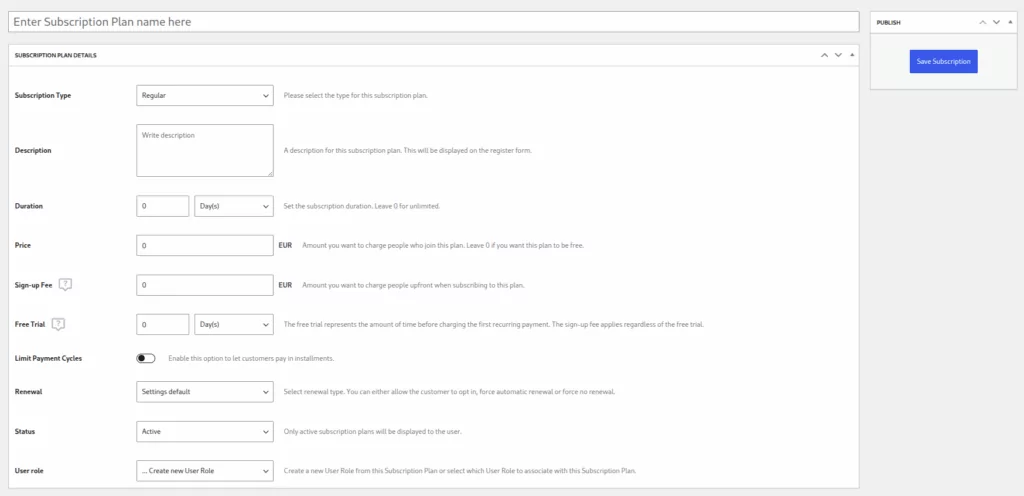
But don’t hit Save just yet. The next step is to enable installment payments for your subscription plan in the same area.
Step 4: Enable Installment Payments
After all the details of your subscription plan are set up, all you have to do is scroll to the Limit Payment Cycles section. Enable it, and then set up the maximum number of payments before the subscription ends.
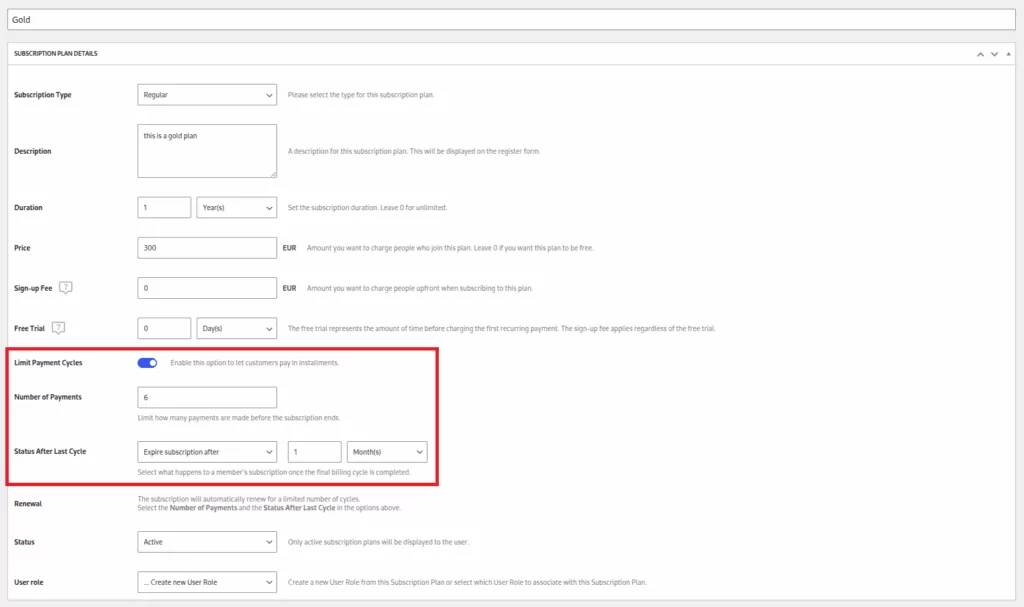
After this, you can also select what happens to a member’s subscription once the final billing cycle is completed in the Status After Last Cycle dropdown. You could, for example, leave the subscription active forever, you could close it immediately, or put an expiration date on it.
Once everything looks good, make sure to hit the Save Subscription button.
Step 5: Test The Checkout
In the end, your payment plans should look something like this on the front end:
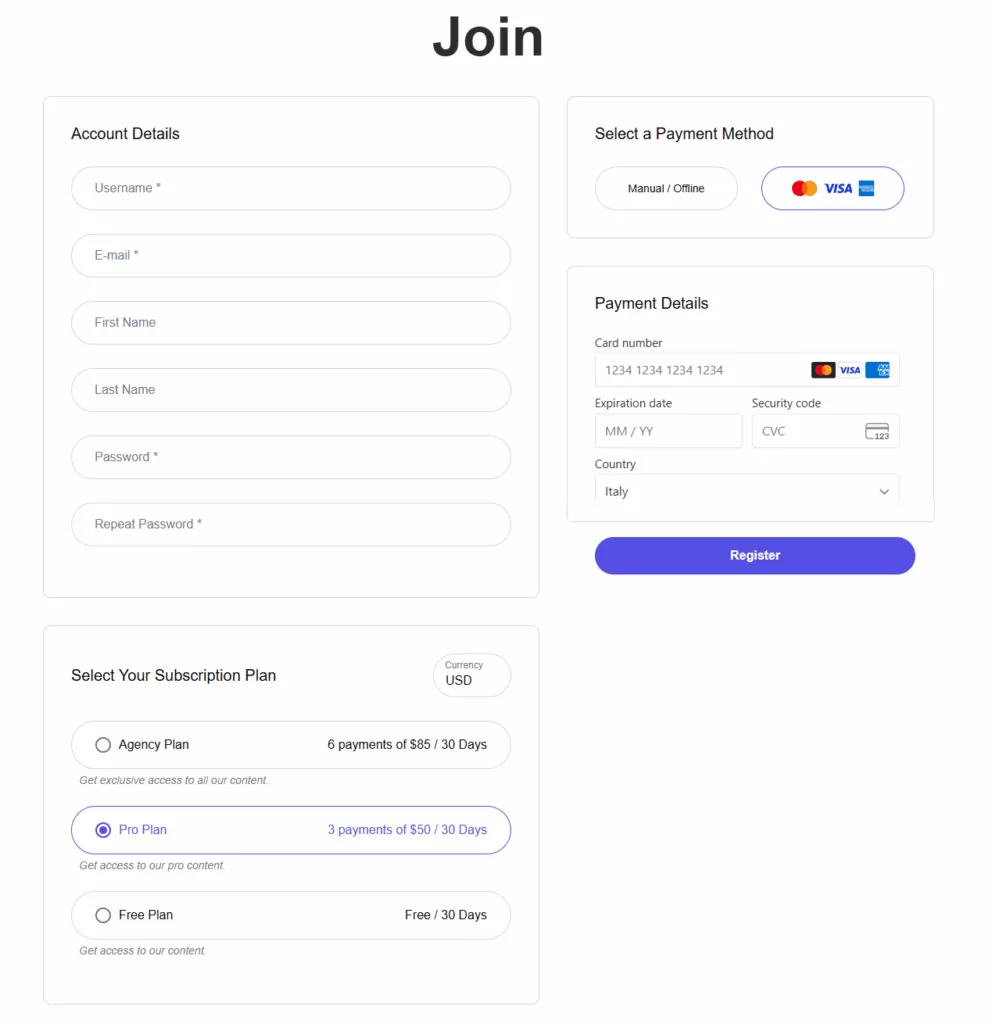
Before going live, run a few test payments and make sure:
- The payments are appropriately split.
- Emails and receipts are operational.
- Your gateway (Stripe, PayPal, etc.) is processing future payments automatically.
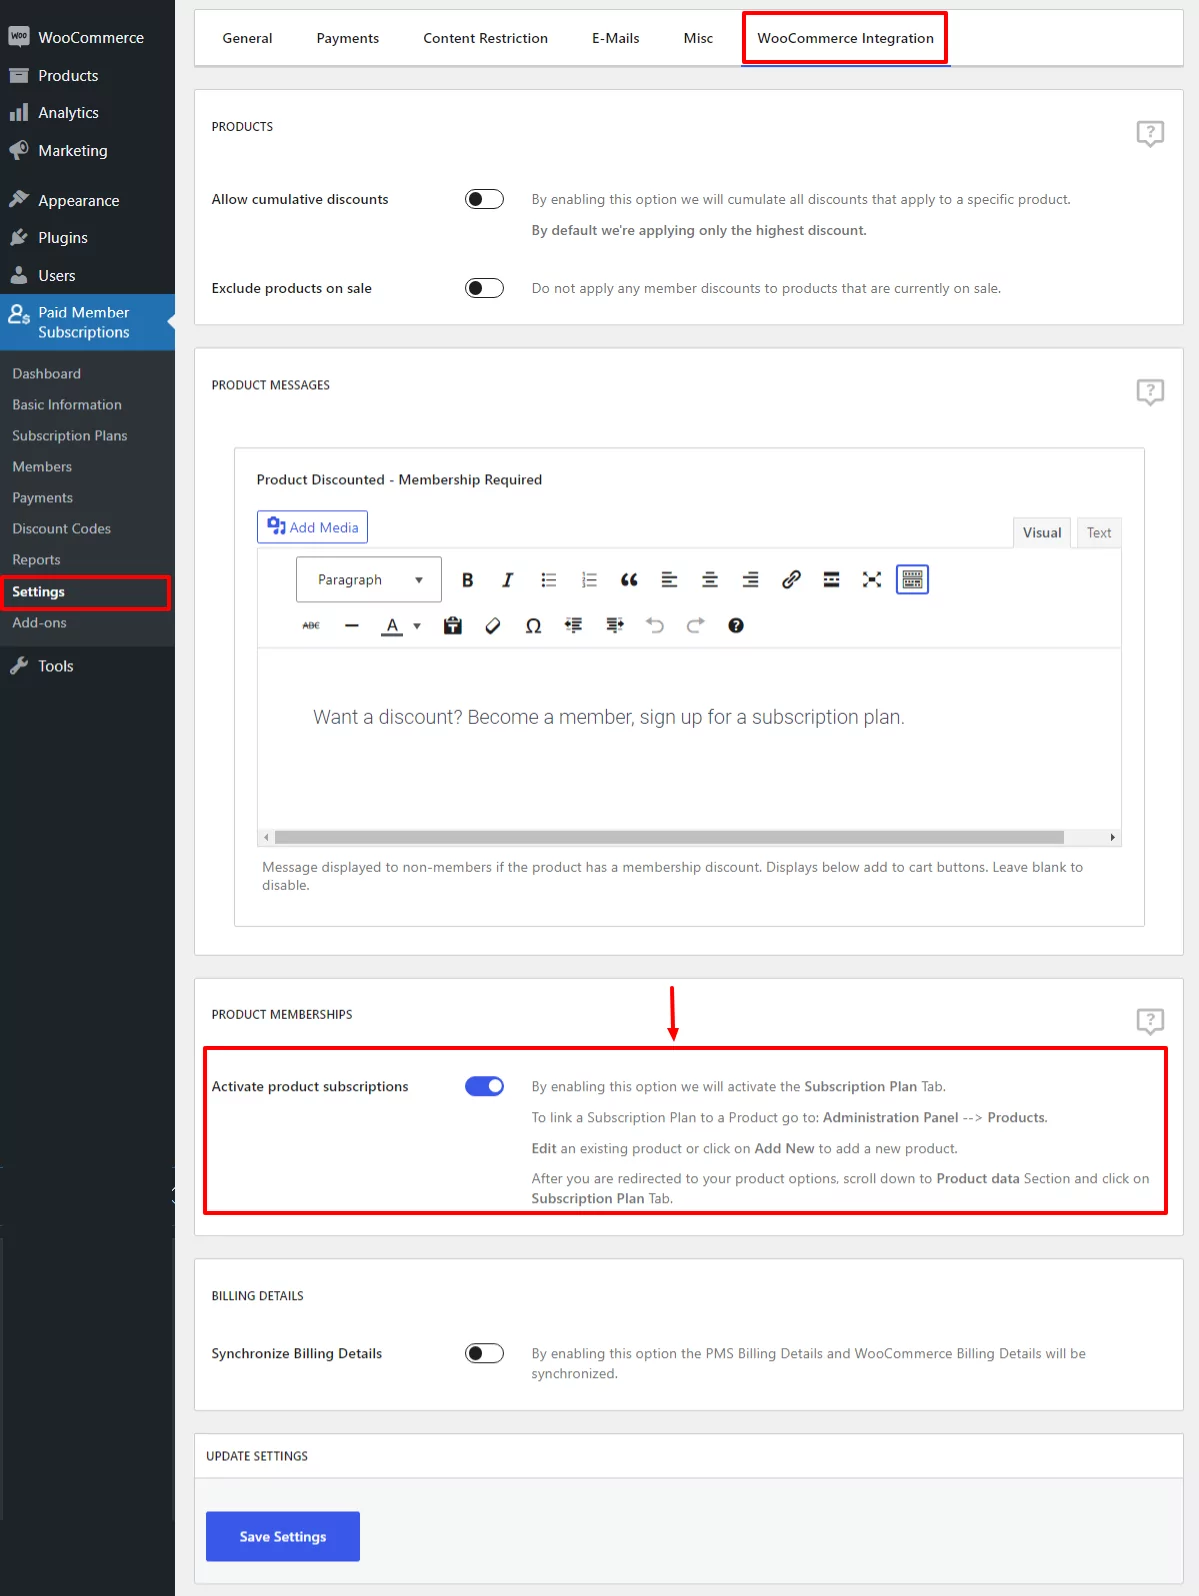
Step 6 (Optional): Integrate Subscriptions With WooCommerce
Installment payments are also easy to use with WooCommerce if you have an online store. This means that you can use the same setup to allow customers to pay in installments for memberships, physical products, and the list goes on.
First, you want to enable the WooCommerce integration. Go to Paid Member Subscriptions → Settings → WooCommerce. Here, make sure the Activate product subscriptions button is enabled to link your subscription plans to WooCommerce products.
Next, since we already have an active subscription plan, it’s time to link it to a WooCommerce product.
For that, all you have to do is:
- Navigate to Products → All products.
- Click on Add New and input all the necessary info of your product.
- Scroll down, click on Subscription Plan, and choose the plan you want to link.
- Hit Publish.
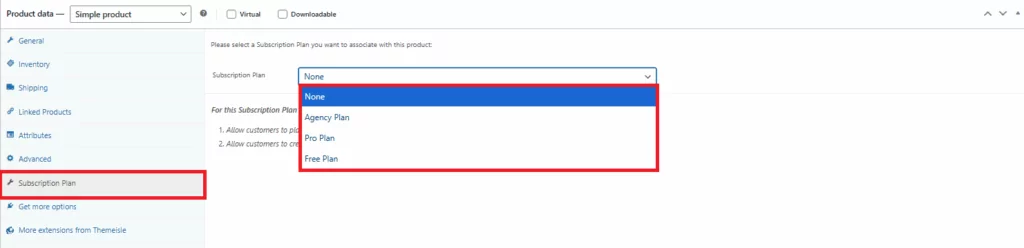
Now, when someone buys the WooCommerce product, it will unlock the subscription plan automatically.
Suppose you’ve already set up installment payments for that subscription plan. In that case, upon checkout, customers will have the option to spread payments over time, which will increase conversions and make bigger purchases more accessible.
Give Your Customers the Flexibility They Want
One of the main obstacles to purchasing is removed when you give your customers the option to go for an installment payment plan. It’s easier for them, it’s better for your sales, and now it’s incredibly simple to set up with Paid Member Subscriptions.
You can begin accepting installment payments right now and analyze the impact, regardless of whether you’re managing a membership site or a WooCommerce store.
Paid Member Subscriptions Pro
Accept (recurring) payments, create subscription plans and restrict content on your website. Easily setup a WordPress membership site using Paid Member Subscriptions.
Get Paid Member SubscriptionsRelated Articles
How To Create a Divi Membership Site
If you’re thinking of building a membership site in WordPress, you’ll need a solid theme and a membership plugin that pairs well with it. In this complete guide, we’ll show you how to create a Divi membership site using the popular Divi theme in combination with the Paid Member Subscriptions plugin.
Continue Reading
How to Hide Products by User Roles in WooCommerce?
Do you want to easily hide products by user roles in WooCommerce? Some WooCommerce store owners have a unique requirement where they want to hide certain products from all but a few specific groups of users. There may be many reasons for this, including selling exclusive products only to the more loyal customers, with a […]
Continue Reading
How to Create WordPress Redirects to Another Page, External URLs, or a Subdomain
There are different reasons WordPress site owners want to create WordPress redirects to another page, external URL, or a subdomain. The redirect can be based on an important user action or set up to redirect all users landing on a particular page. Whatever the type or need of your redirect, WordPress offers the flexibility to […]
Continue Reading