



Table of Contents
- 1 What is the new Profile Builder Form Builder?
- 2 What was wrong with the classic Profile Builder Form Editor?
- 3 How do you use the new Profile Builder Form Builder?
- 4 Where did the settings from the classic Profile Builder interface move?
- 5 What is the difference between New Fields and Existing Fields?
- 6 What happens when you remove or delete a field?
- 7 Do existing Profile Builder forms and user data need to be migrated?
- 8 Do existing Profile Builder shortcodes still work?
- 9 Do Profile Builder add-ons still work with the new Form Builder?
- 10 Can you switch back to the classic Profile Builder editor?
- 11 Frequently Asked Questions
- 11.1 Do I have to rebuild my existing Registration forms?
- 11.2 Will the new Form Builder change how my forms look on the front end?
- 11.3 Can the same custom field appear on multiple forms?
- 11.4 Can I switch back to the old Profile Builder editor?
- 11.5 Does the Profile Builder Form Builder work with Gutenberg?
- 11.6 Do my existing shortcodes still work?
- 11.7 Does Conditional Logic still work in the new Form Builder?
- 11.8 Can I create additional Registration and Edit Profile forms in the free version?
- 12 Same Data, Better Way to Build Forms
Building a custom registration form in WordPress used to mean managing fields in one screen, form settings in another, and checking the result on a third.
Profile Builder’s new visual Edit Profile and Registration Form Builder changes that, giving you a drag-and-drop canvas where you can build, arrange, and preview registration forms in one place. You can add fields, rearrange them, change their settings, and preview the result without jumping between separate screens.
If you’re already using Profile Builder, you don’t need to migrate or rebuild anything. Your existing forms, fields, settings, shortcodes, and user data stay intact, and your live forms continue working as they did before.
And if you’d rather keep using the classic Profile Builder editor for now, that’s still an option too.
This is a change we’ve wanted to make for a long time, and one that addresses a common frustration with the old form-building experience: you could create powerful registration forms, but you couldn’t actually see the form taking shape while you built it.
The new Form Builder changes that.
What is the new Profile Builder Form Builder?
The Profile Builder Form Builder is a visual drag-and-drop editor that lets you create and manage WordPress registration forms and edit profile forms from a single canvas; adding fields, adjusting settings, and previewing the result without leaving the editor.
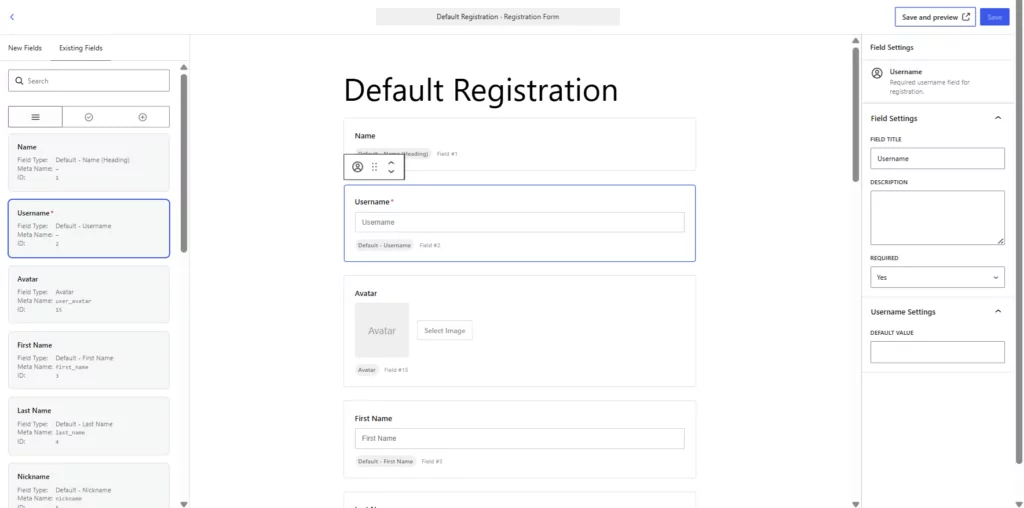
Instead of managing fields through tables and separate settings screens, you now work on a visual canvas. Fields appear as blocks, their settings open in a sidebar, and you can drag them into the order you want.
Importantly, the Form Builder changes how you edit your forms, not how Profile Builder stores them.
However, the underlying field definitions, form settings, and user data remain the same. The classic editor and new Form Builder both work with that same data.
What was wrong with the classic Profile Builder Form Editor?
There was definitely nothing wrong with the original builder. The classic Profile Builder setup worked just fine. However, building a form involved moving between different parts of the plugin, and that wasn’t ideal.
Fields were managed in one long list under Form Fields, while Registration and Edit Profile forms were assembled separately. You could select and reorder fields, but you couldn’t see the actual structure of the form while doing it.
That created a few practical problems:
- There was no visual representation of the form while building it.
- Reordering fields meant dragging rows inside a table.
- Field settings and form settings lived in different places.
- Long forms could become difficult to scan and reorganize.
- Checking the final result often meant visiting the page where the form was already embedded.
The Form Builder brings those tasks into one workspace. The result is a more intuitive registration form builder for WordPress, where the form, its fields, and their settings are much easier to manage together.
You can now see fields on the canvas, drag them into position, select one to change its settings, and preview the finished form without manually navigating to another page.
For simple forms, that means fewer clicks.
For longer or more complex forms, the difference is even more noticeable because you can understand the structure of the form at a glance.
How do you use the new Profile Builder Form Builder?
Using the new registration form builder in WordPress is straightforward. You can access it from: Dashboard → Profile Builder → Forms.
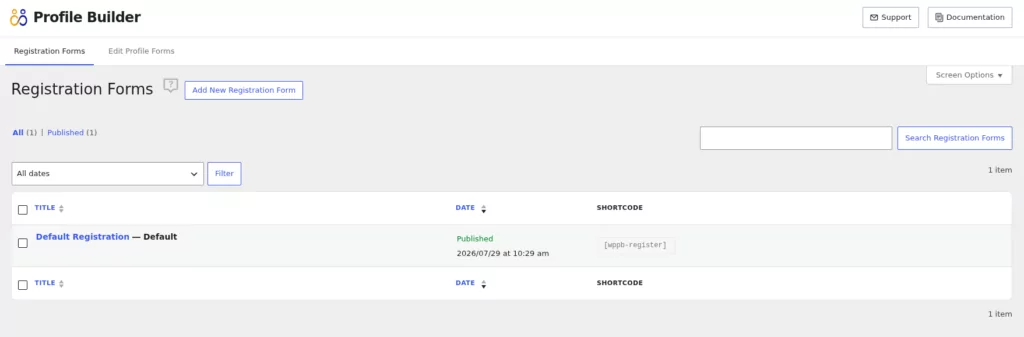
Registration Forms and Edit Profile Forms now appear together on this screen in separate tabs. Your existing forms are already listed there, including the Default Registration and Default Edit Profile forms.
The new builder is divided into three main areas.
1. Add fields from the left panel
The left panel contains three tabs:
- New Fields – creates a new field.
- Existing Fields – lets you reuse a field that already exists on your site.
- Examples – provides ready-made field arrangements you can insert.
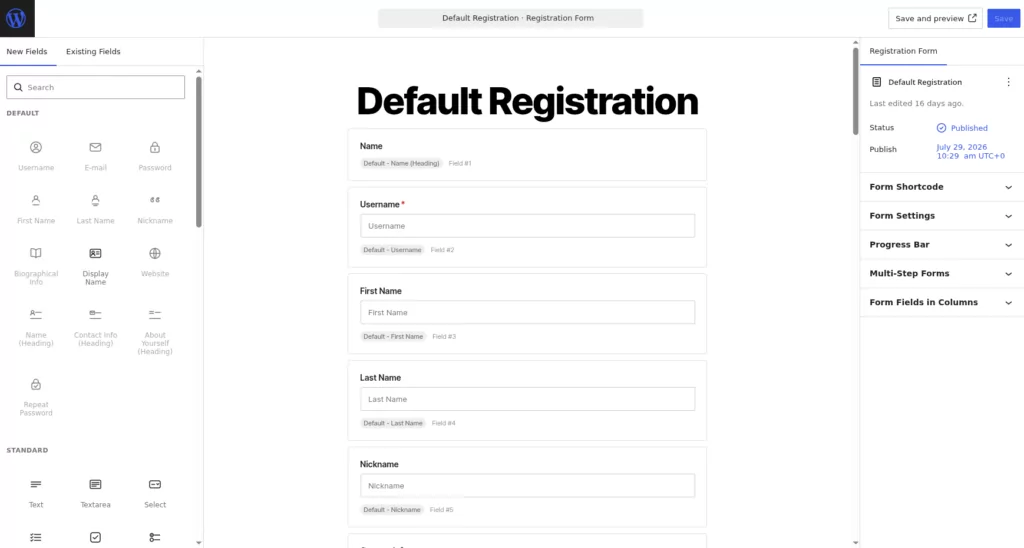
You can click a field to add it, use the Add field button at the bottom of the canvas, or use the + that appears between fields when you want to insert something in a specific position.
Field types are also grouped into categories instead of appearing in one long list, which makes it easier to find what you need.
2. Arrange fields directly on the form canvas
The middle of the editor is where your form takes shape.
Each field appears as a block showing its label, field type, description, and a preview of the input. To change the order, simply drag the block to a new position.
Structural features are represented visually too.
For example:
- Step Break blocks divide a Multi-Step Form into separate steps.
- Columns blocks let you place fields next to each other.
- Progress Bar settings can be configured for forms where that feature is enabled.
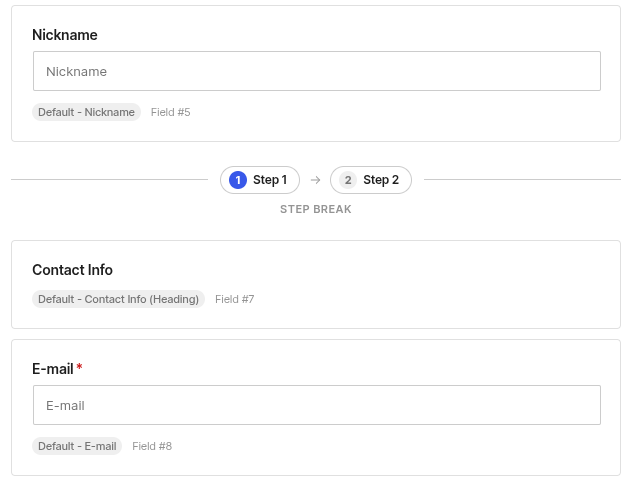
Instead of configuring the structure somewhere else and imagining the result, you’re working with the structure itself.
Click a field and its Field Settings appear in the right sidebar.
Depending on the field, you can configure things such as:
- Field title
- Meta name
- Description
- Required status
- Field-specific options
- Conditional Logic
- Field Visibility
- Additional settings
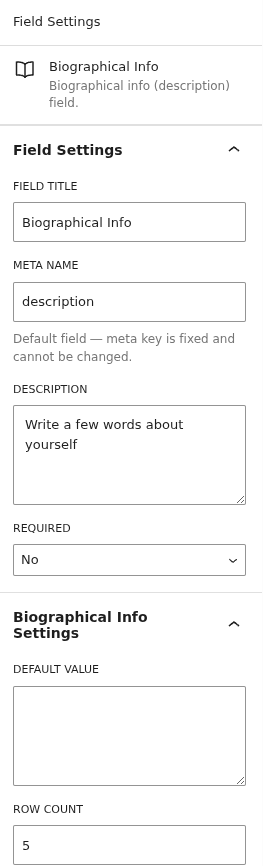
The form itself also has a Form Settings panel for options such as redirects and Ajax validation. Registration forms include additional settings such as the role assigned to new users and whether users should be logged in automatically after registration.
Everything is much closer to the thing you’re actually editing.
Preview the form without creating a test submission
When you want to check the result, click Save and preview.
Profile Builder opens a front-end preview of the form in a new tab. Preview mode is display-only, so previewing a Registration form won’t create a new WordPress user.
That removes the need to repeatedly visit the page where you’ve embedded the form just to see whether a layout change looks right.
Where did the settings from the classic Profile Builder interface move?
Most of the familiar functionality is still there. It simply lives closer to the form you’re building.
| In the classic interface | In the new Form Builder |
|---|---|
| Profile Builder → Form Fields | Existing Fields tab |
| Adding a new field | New Fields tab |
| Multiple Registration / Edit Profile Forms | Profile Builder → Forms |
| Selecting which fields belong to a form | Add blocks to the canvas |
| Reordering fields in a table | Drag blocks on the canvas |
| Individual field settings | Field Settings sidebar |
| Form-level settings | Form Settings sidebar |
| Shortcode metabox | Form Shortcode panel |
| Conditional Logic settings | Conditional Logic in Field Settings |
| Multi-Step breaks | Step Break blocks |
| Form Fields in Columns settings | Columns blocks |
| Visiting a live page to inspect the form | Save and preview |
So, although the editor looks very different at first, you don’t need to relearn Profile Builder from scratch.
Most of the functionality has simply been reorganized into a workflow that more closely matches how you’re actually building the form.
What is the difference between New Fields and Existing Fields?
There is one concept in the new Form Builder that’s worth understanding from the start.
New Fields creates a completely new Profile Builder field.
Existing Fields adds a field that has already been created to the form you’re currently editing.
The important detail is that an existing field is linked, not copied.
A linked field is one field definition that can appear on multiple forms. If you edit that field on one form, the change also applies everywhere else the same field is being used.
For example, imagine you have a Company field on both your Registration form and Edit Profile form. You don’t need to create two different Company fields. Add the original field from Existing Fields, and both forms use the same field and the same stored user data.
The practical rule is simple:
- Want the same field on another form? Use Existing Fields.
- Want a genuinely different field with separate data and settings? Use New Fields.
This isn’t a new way Profile Builder stores fields. Shared fields already worked this way; the Form Builder simply makes the relationship much more visible.
What happens when you remove or delete a field?
The new interface also makes an important distinction between removing and deleting a field.
If you remove a field block from the canvas, you’re only removing it from the form you’re currently editing. The field still exists in Profile Builder and can be added back later.
If you choose Delete from that field’s card in the Existing Fields list, you’re deleting the field itself. That removes it from every form where it’s currently used.
Profile Builder warns you before doing this and shows which other forms will be affected.
Importantly, neither action deletes data that users have already submitted for that field.
Do existing Profile Builder forms and user data need to be migrated?
No. There is no migration process because the new Form Builder isn’t introducing a separate system for storing forms.
Your existing:
- Registration forms
- Edit Profile forms
- Form fields
- Field order
- Form settings
- User profile data
…remain in place.
The new Form Builder reads and writes the same underlying data as the classic interface, and existing forms continue rendering on the front end as before. This also means you can move between the new and classic editors without having to convert a form from one format to another.
Do existing Profile Builder shortcodes still work?
Yes. Your existing Profile Builder shortcodes don’t need to be replaced.
The default forms continue using:
- [wppb-register]
- [wppb-edit-profile]
Additional forms continue using the corresponding form_name versions.
Published forms also display their shortcode directly in the Form Shortcode panel and on the main Forms screen. So changing the editing experience doesn’t require you to replace shortcodes across your site.
Do Profile Builder add-ons still work with the new Form Builder?
Yes. Existing Profile Builder features and add-ons continue working with the new Form Builder, with the same front-end behavior.
This includes commonly used features such as:
- Repeater Fields
- Multi-Step Forms
- Conditional Logic
- Form Fields in Columns
- Progress Bar
- Field Visibility
- Custom CSS Classes
- WooCommerce integration
- Paid Member Subscriptions integration
Some of these features are actually easier to understand in the visual editor.
With Multi-Step Forms, for example, you can place Step Break blocks directly between fields on the canvas. With Form Fields in Columns, the fields can be arranged visually inside a Columns block.
Conditional Logic now appears in the settings sidebar for the field it applies to, where you can define whether the field should be shown or hidden based on values entered elsewhere in the form.
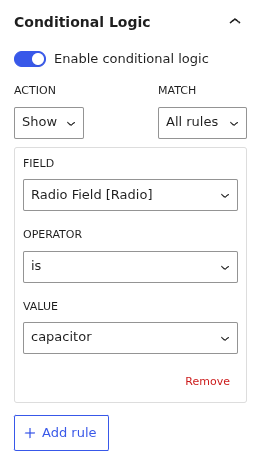
The behavior itself hasn’t fundamentally changed. What has changed is how you configure it.
Can you switch back to the classic Profile Builder editor?
Yes. If you prefer the previous workflow, go to: Dashboard → Profile Builder → Advanced Settings → Forms.
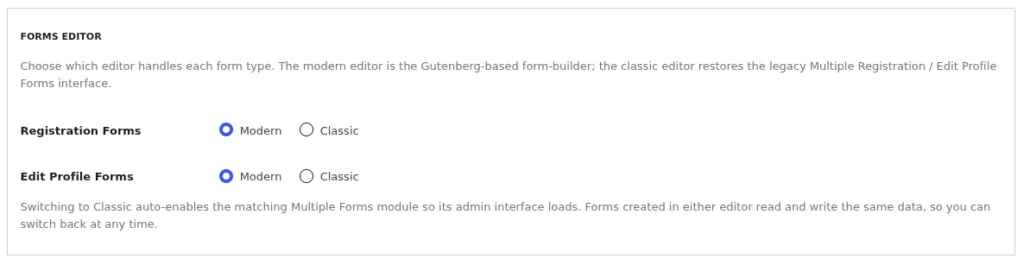
Then set Forms Editor to Classic for Registration Forms, Edit Profile Forms, or both. You aren’t locked into one editor after making the choice.
Both editors work with the same data, so you can switch back and forth without losing your forms or rebuilding them. You can even use the Form Builder for one form type and the classic interface for the other if that suits your workflow better. That makes the new editor an upgrade you can adopt at your own pace rather than a forced migration.
Frequently Asked Questions
Do I have to rebuild my existing Registration forms?
No. Existing forms and fields appear automatically in the new Edit Profile and Registration Form Builder, so there is no migration or rebuilding process.
Will the new Form Builder change how my forms look on the front end?
No. Moving to the new editor doesn’t change the front-end rendering of your existing forms. Their field order, settings, and behavior remain as they were unless you choose to edit them.
Can the same custom field appear on multiple forms?
Yes. Add the field through Existing Fields, and the same field can be used across multiple Registration or Edit Profile forms. Because it’s linked rather than duplicated, editing the field updates it everywhere it’s used.
Can I switch back to the old Profile Builder editor?
Yes. Go to Profile Builder → Advanced Settings → Forms and select the Classic editor for the form type you want to change. You can return to the Form Builder later without losing your work.
Does the Profile Builder Form Builder work with Gutenberg?
The Form Builder itself is built on the WordPress block editor experience.
If another plugin disables the block editor site-wide and that also prevents Profile Builder’s form editor from loading correctly, you can use the Classic editor for the affected form type instead.
Do my existing shortcodes still work?
Yes. [wppb-register], [wppb-edit-profile], and the form_name variants continue to work as before.
Does Conditional Logic still work in the new Form Builder?
Yes. Conditional Logic still controls whether fields appear based on values from other fields.
The main change is where you configure it: select the field and open the Conditional Logic panel in its Field Settings sidebar.
Can I create additional Registration and Edit Profile forms in the free version?
The free version includes the new Form Builder for the Default Registration and Default Edit Profile forms.
Creating additional Registration or Edit Profile forms requires Profile Builder Pro or higher. This isn’t a new limitation—multiple forms were already a paid feature before the Form Builder was introduced.
Same Data, Better Way to Build Forms
The brand-new Form Builder in Profile Builder isn’t about replacing the forms you’ve already created. It’s about making them easier to work with.
Instead of managing fields in one place, form configuration somewhere else, and checking the finished result on another page, you can now do most of that work from one visual editor.
Drag a field into position. Edit it in the sidebar. Reuse an existing field when you need it. Add Columns or Step Breaks directly to the form. Preview the result when you’re ready.
Underneath, it’s still the same Profile Builder data and the same forms your users already interact with. If you’re looking for a more visual registration form builder for WordPress, you now have a much easier way to build and manage them.
Create beautiful front-end registration and profile forms with custom fields. Setup member directories, custom redirects, cutomize user emails & more using the all in one user management plugin.
Profile Builder Pro
Related Articles

How To Create a Divi Membership Site
If you’re thinking of building a membership site in WordPress, you’ll need a solid theme and a membership plugin that pairs well with it. In this complete guide, we’ll show you how to create a Divi membership site using the popular Divi theme in combination with the Paid Member Subscriptions plugin.
Continue Reading
How to Hide Products by User Roles in WooCommerce?
Do you want to easily hide products by user roles in WooCommerce? Some WooCommerce store owners have a unique requirement where they want to hide certain products from all but a few specific groups of users. There may be many reasons for this, including selling exclusive products only to the more loyal customers, with a […]
Continue Reading
How to Create WordPress Redirects to Another Page, External URLs, or a Subdomain
There are different reasons WordPress site owners want to create WordPress redirects to another page, external URL, or a subdomain. The redirect can be based on an important user action or set up to redirect all users landing on a particular page. Whatever the type or need of your redirect, WordPress offers the flexibility to […]
Continue Reading