
Creating custom fields with our WordPress Creation Kit plugin has just become simpler.
We’ve redesigned the way Single Metaboxes work, reducing the number of steps required for adding content.
WCK’s Custom Field Creator allows you to create single or repeater metaboxes.
One of WCK’s strong points is the ability to create repeater fields as well as repeater groups. This is super helpful when you need to add multiple custom fields or groups of custom fields of the same kind, without knowing the exact number.
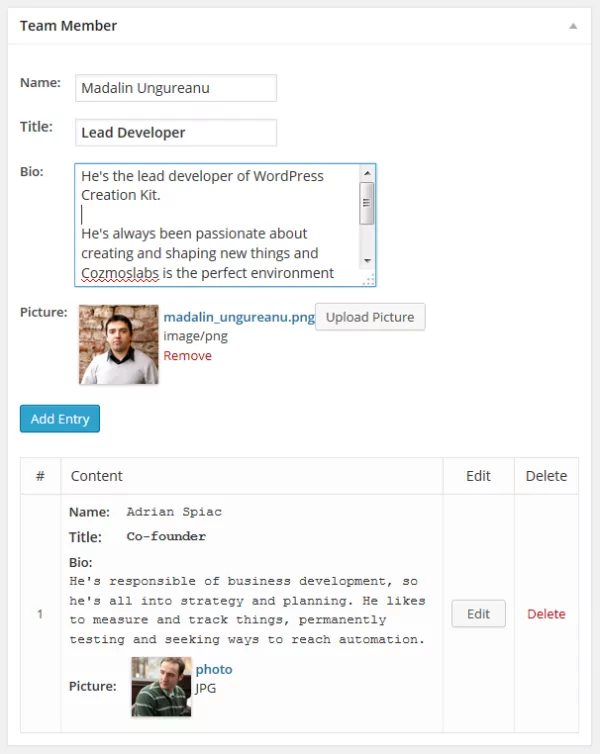
This repeater metabox attached to “Our Team” page allows you to add as many team members as you need.
WCK Single Metabox Improvements
The problem was that because WCK was designed with repeater custom fields in mind, the Single Metabox design was adapted from the Repeater one.
Simply put, in the previous version, to add custom fields which are not repeatable (stored in a single metabox) you needed to click the “Add Entry” button for each one of the custom field groups attached to a post, page or CPT. Only after doing this, you could “Publish” the page/post and have the saved custom fields attached to it.

Here we’re using a Single Metabox attached to a Events CPT to add event details stored in custom fields.

Only after clicking the “Add Entry” button custom fields data is saved and you can go ahead and “Publish” the event.
If however you forget to click the “Add Entry” button after adding content in the custom fields and simply click Publish, the custom field data will not be saved and the single metabox content will be empty. An alert of unsaved data may have helped, but it was still going half-way.
This was a serious usability issue which needed improvement. In the redesigned WCK Single Metaboxes, we rethinked the way Single Metaboxes are built, so that we can remove the “Add Entry” button altogether. This eliminates an extra step and simplifies the data entry process.
The NEW Single Metabox:

The NEW Single Metabox design eliminates the redundant “Add Entry” button.
This redesign impacts and simplifies the WCK UI as well. Based on WCK API, some WCK modules (like Custom Fields Creator, Front-end Posting etc.) were using the single metabox format as well.
This basically means that from now on creating custom content types with WCK will require less steps and fewer clicks.
Note: The improved WCK Single Metabox is available starting with WCK version 1.1.4.
Import / Export WCK Settings addon
Another important addition is the Import / Export Settings addon. This makes it really easy for people working on two environments, to export all WCK Settings from the development site and import them on the live site.
No need to define the same metaboxes, taxonomies or custom post types twice, for both sites. Simply export them to as many sites as you need.
Have any suggestions on how we can make WCK even better? Share your thoughts in the comments section below.
Related Articles

5 Best WordPress Automation Plugins Compared (Most Are Free)
Searching for the best WordPress automation plugins? Automation plugins are kind of like Zapier…but for your WordPress site. You can use them in all kinds of different ways, including some of the following: Integrating two or more plugins or services that you're using. Automating important tasks, such as automatically assigning a user a certain role […]
Continue Reading
Best WordPress Monetization Plugins & Tactics to Grow Your Revenue
You will agree that finding the best WordPress monetization plugins (and tactics) to grow your revenue is challenging. If that describes your situation, you're in the right place, and we have your back as always. Like you, I had big dreams when I started my first WordPress site. Also, like you, I was skeptical about […]
Continue Reading
5 Best WordPress User Management Plugins
By default, WordPress lets you add different types of users to your website. However, you might be looking for a more flexible way to manage the people who interact with your content. If this is the case, you can use a WordPress user management plugin to manage authors and contributors. With an efficient user management […]
Continue Reading
Excellent!
Well done!
It’s great to see WCK improving and to see your customer’s usability is such high priority.
Robert Hart Fletcher
YIKES!
I uploaded 1.1.5 and I got…
Plugin could not be activated because it triggered a fatal error.
Help!!!
Robert
Detailed report:
Fatal error: Cannot redeclare wck_remove_wck_submenu_page() (previously declared in /home/kidsandm/public_html/kami/wp-content/plugins/wordpress-creation-kit-pro/wck.php:56) in /home/kidsandm/public_html/kami/wp-content/plugins/wck-custom-fields-and-custom-post-types-creator/wck.php on line 57
Robert
Hi Robert,
I think you tried to activate both the free and the pro version.
Please only use one version. That’s what’s causing the issue.