

Setting up a WordPress Private Site is now easier than ever, with the help of the Profile Builder plugin. The private website feature is available in all versions of the Profile Builder.
If you’re looking to make your website visible to members only, then this feature is for you. Keep in mind that this lets you create a private website, not a password-protected website or content with password protection. WordPress sites with password protection or password-protected content require users to enter a password in order to access the content. In contrast, a private website is only viewable by authorized users, i.e., users with the correct user role that are logged in.
A lighter version of this would be restricting access to individual pages. Pages that are restricted won’t show up in search engines like Google. In other words, they won’t be indexed by search engines, so unauthorized users won’t be able to find the website’s content by running a Google search.
In this article, we’ll walk you through a step-by-step tutorial on how to make a WordPress site private. We’ll explain how you can make your entire site private, make only a part of it private, as well as make specific WordPress pages or posts private. We’ll do this using an easy to use private site plugin, Profile Builder Pro.
Profile Builder Pro
Create beautiful front-end registration and profile forms with custom fields. Setup member directories, custom redirects, cutomize user emails & more using the all in one user management plugin.
Get Profile BuilderWordPress Private Site Use Cases
There are tons of ways that you can use a WordPress private site. Here are some examples for inspiration:
- Personal site. Create a personal site (e.g., My Private Site) where you can share photos with your family members and friends.
- Company website. Set up a company website where team members can securely share resources. A WordPress private site is also great for creating an intranet site for your organization.
- Personal blog. Launch your own website i.e., a personal blogging site that you can use as a private diary if you’re a blogger. You can call it My Private Site or My Private Blog.
- Under construction site. Work on an under-construction website that is not yet fully ready for public viewing. Make it a WordPress private site while you’re working on it.
Of course, there are many other ways you can use a WordPress private site. The main idea is simple: only members or authorized users will be able to view your site and access the content you publish on it.
How to Make Your Entire WordPress Site Private
The Profile Builder Pro plugin makes it incredibly easy to make your entire WordPress website private. Once you have the plugin installed and activated on your site, all you have to do is enable the Private Website setting.
Here’s what you need to do to configure the privacy settings:
Log into your WordPress website and head over to Profile Builder > Settings > Private Website to access the settings page. From the Private Website Settings screen, set the Enable Private Website option to Yes using the dropdown.
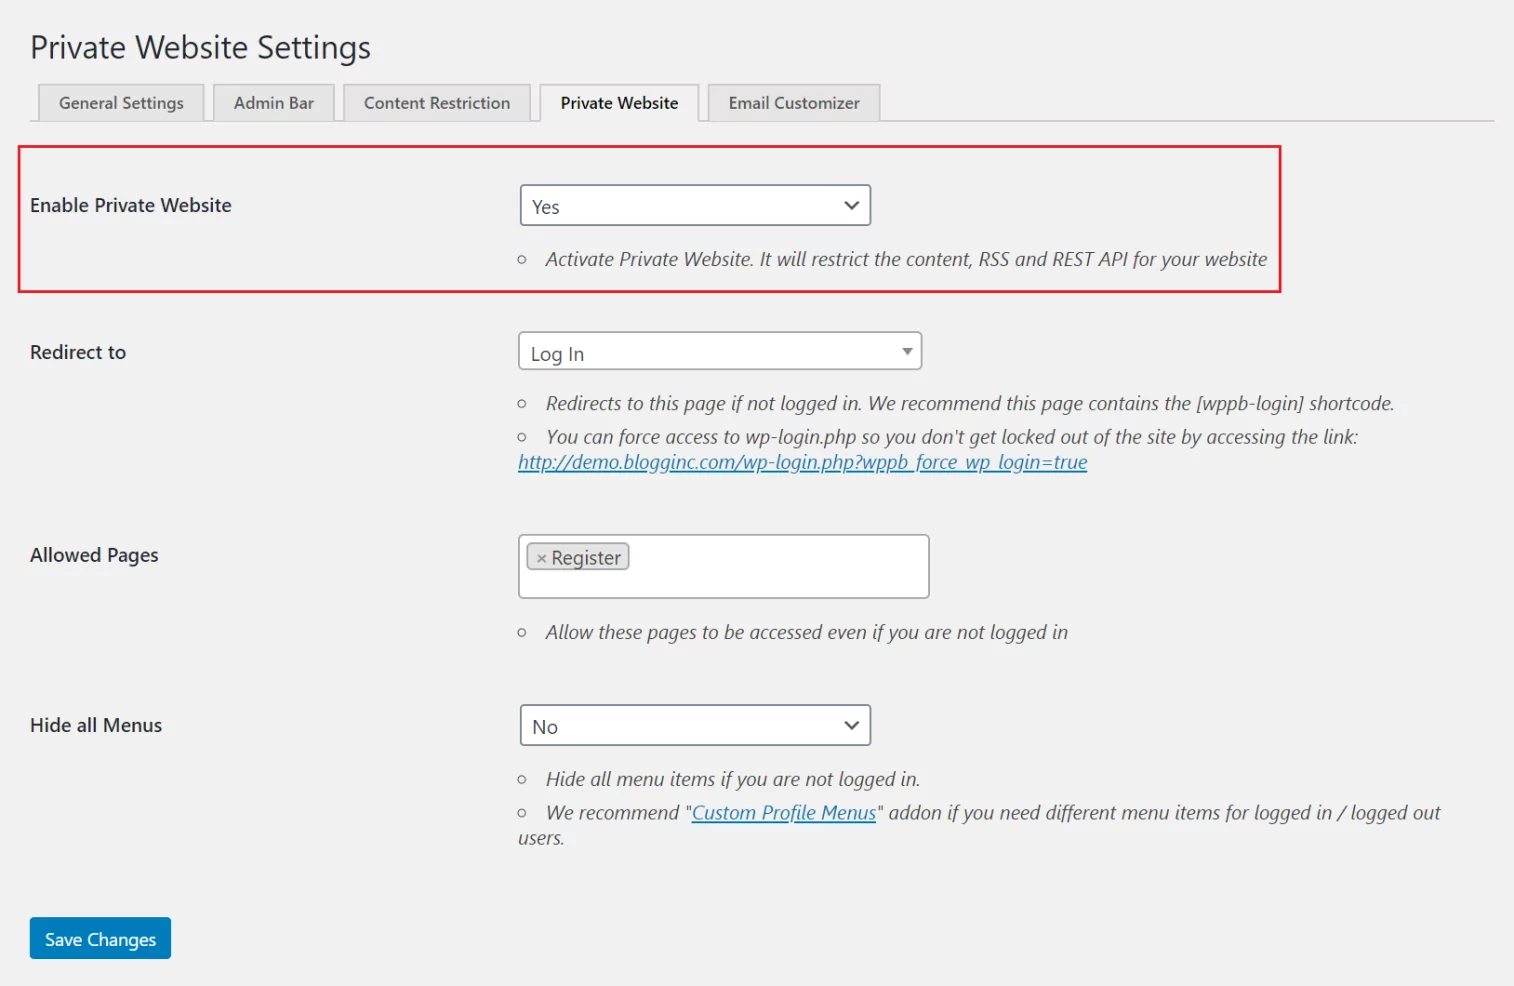
Click the Save Changes button at the bottom of the screen to proceed.
Once that’s done, your entire WordPress site – including RSS feeds and the REST API – will only be available to logged-in users.
Profile Builder also gives you the option to redirect users to a specific page if they’re not logged-in to their user account. You can use the Redirect to option to choose the page you’d like to redirect users to. For example, to deliver excellent user experience, you could redirect non-logged-in users to a login page or the homepage.
Pro tip: Create a Custom Login Page to your private site where you paste the [[wppb-login]] shortcode that creates a front-end login form so you can lead users away from the default WordPress login page (wp-login.php) and in the “Redirect to” dropdown select the created page.
In addition to this, you can add a list of pages on your WordPress private site that you’d like to allow all users access to, even if they’re not logged-in. Simply add them to the Allowed Pages option. For example, you can make the register page an allowed web page to encourage registrations.
And, finally, you can use the Hide all Menus option to hide menu items from users who aren’t logged in to their user account. This is especially useful if you don’t want non-members (on unauthorized users) to see the other links on the frontend.
Now that we’ve seen how to make your entire WordPress site private, let’s look at how you can make only parts of it private, while leaving the rest accessible to everyone.
How to Make a Part of Your WordPress Site Private
Using the Profile Builder Pro plugin, you can also choose to make only a part of your WordPress site private. The easiest (and most flexible) way to do this is by using the Roles Editor module. In other words, the user roles will determine what your users can and cannot do on your WordPress private site.
The first thing you need to do is activate Roles Editor. Go to Profile Builder > General Settings from the WordPress dashboard and set the “Roles Editor” Activated: option to Yes using the dropdown.
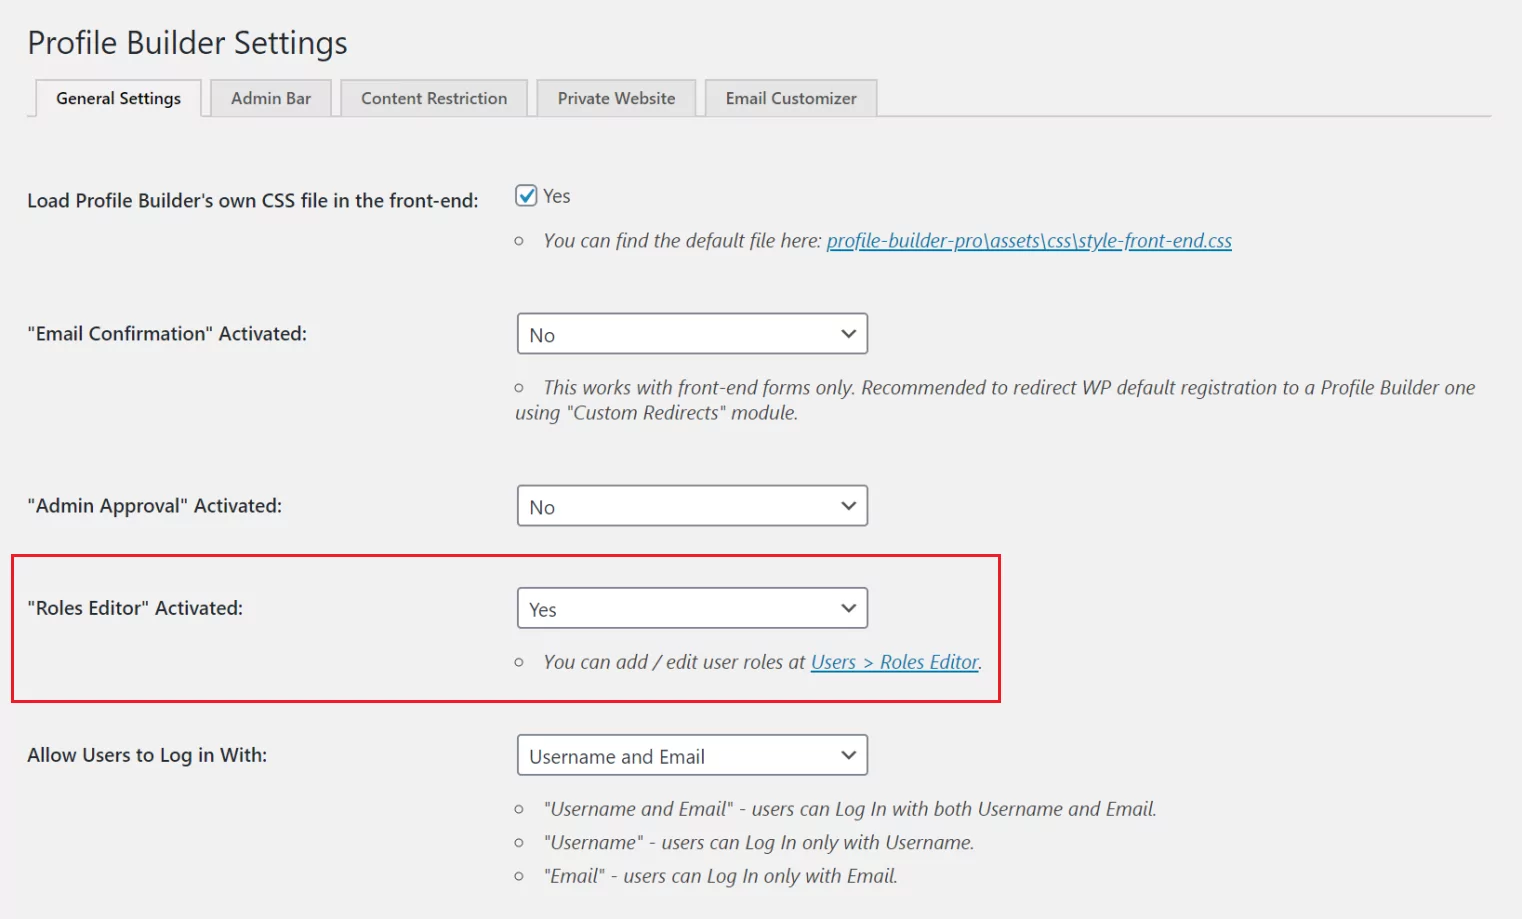
Click the Save Changes button to continue.
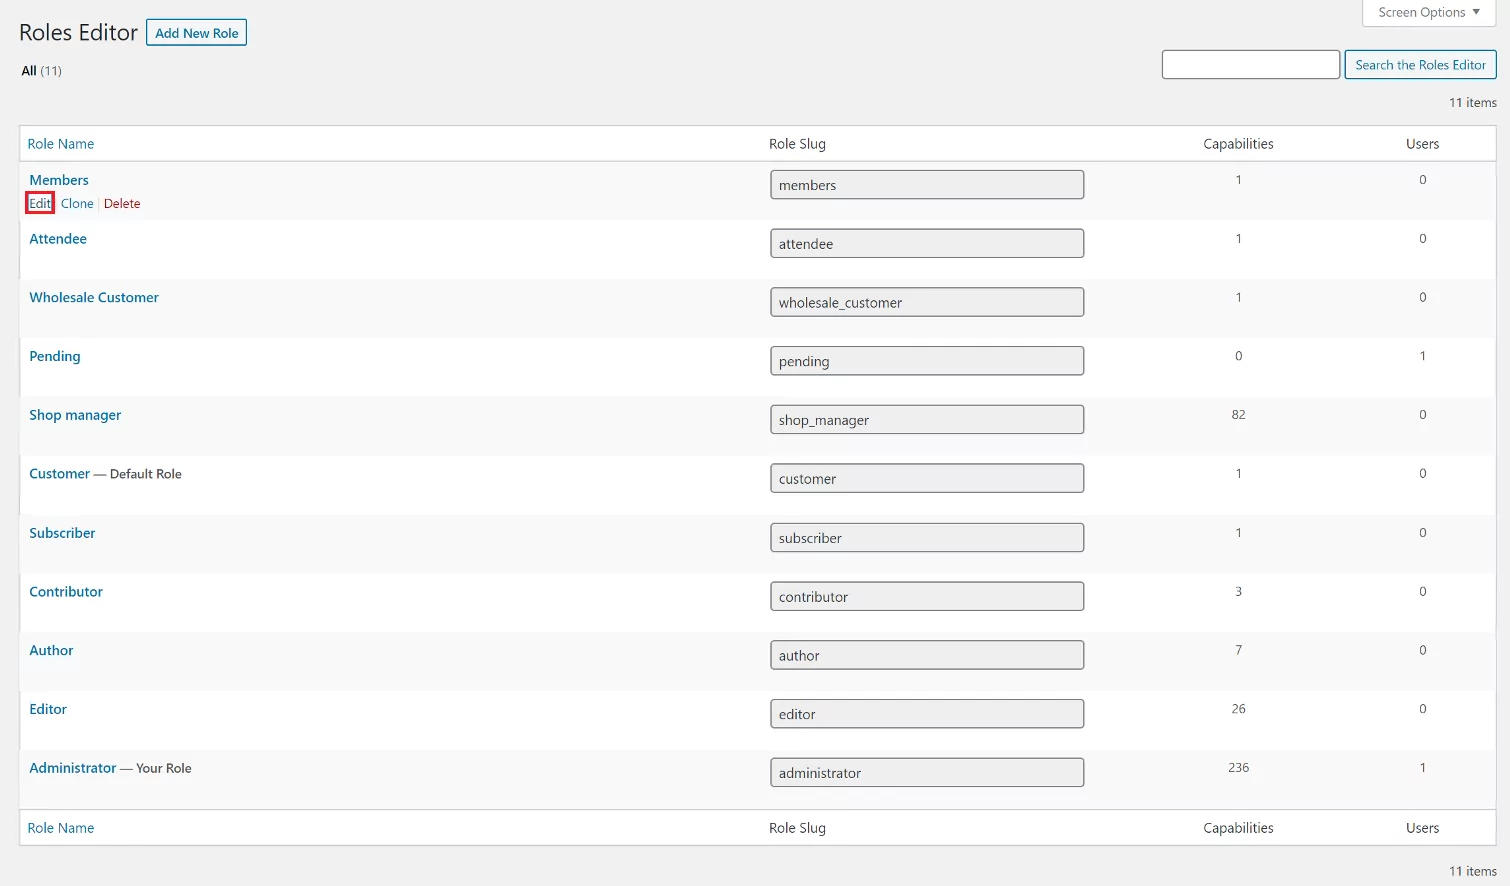
Next, head over to Users > Roles Editor. Hover over the user role you’d like to grant access to and click the Edit link.
From the Edit Role screen, you can edit the selected user role’s capabilities.
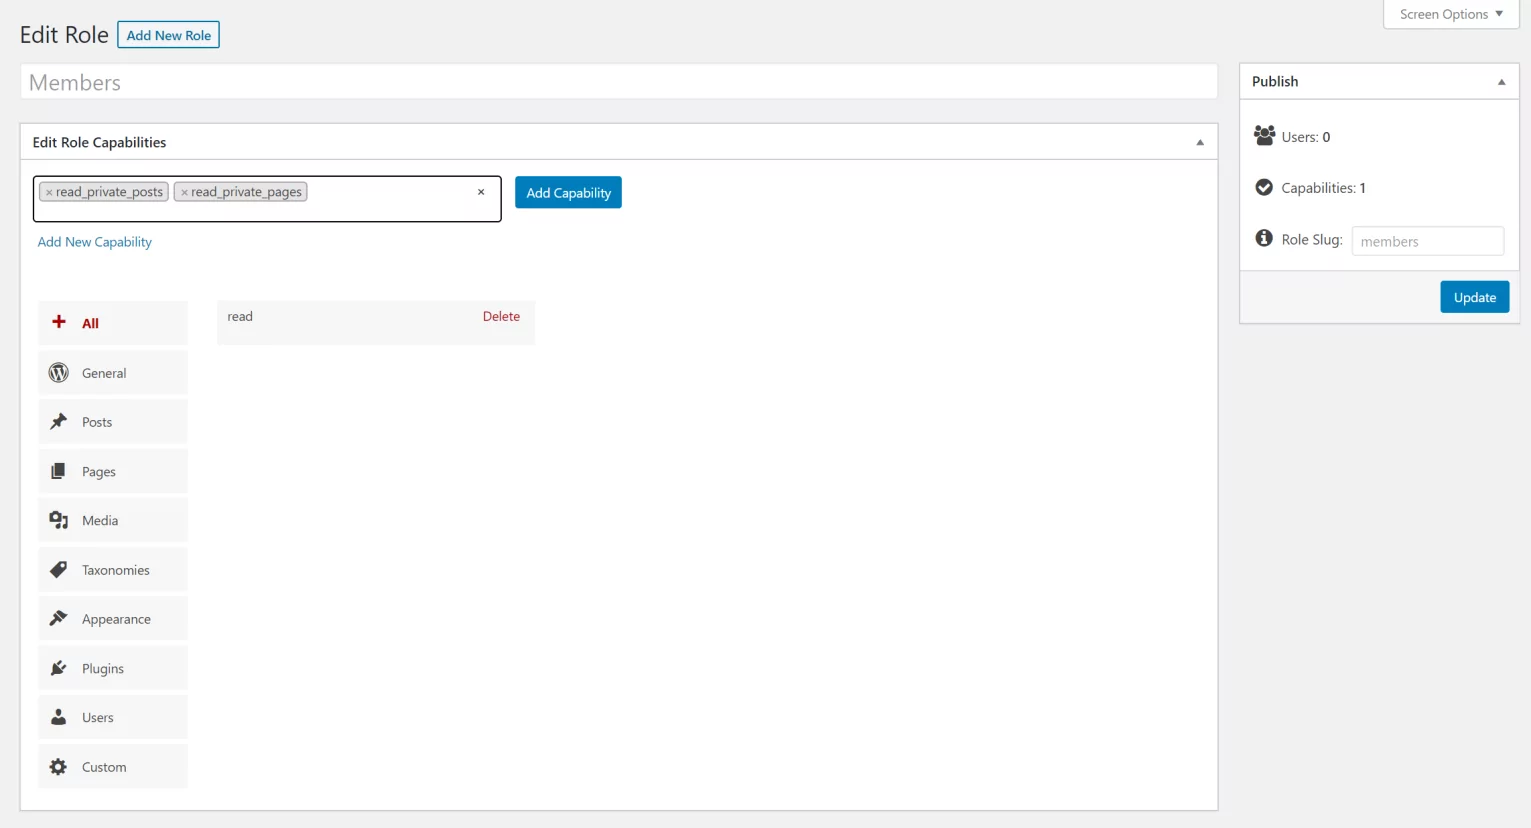
For example, if you want to grant a specific user role, e.g., Members the ability to consume private WordPress blog content (i.e., grant them access to only the blog on your WordPress private site), you would add the read_private_posts and read_private_pages capabilities. Simply select the capabilities you’d like to add and click the Add Capability button.
Click the Update button to continue.
You can follow these steps to assign different capabilities to different user roles. This is an easy way to make a part of your WordPress site private. Plus, it also works for WooCommerce capabilities. You can use this to allow authorized users to purchase merchandise from your WooCommerce members-only store.
How to Make a Specific WordPress Page or Post Private
Using the Profile Builder Pro plugin, you can make a specific WordPress page or post private, as well. This is especially useful for website owners that need to grant different types of users access to different private pages or private posts.
For example, if you’re a photographer, you might want to create a separate page or a private post on your WordPress private site to share albums with clients.
Here’s how you can use the Profile Builder Pro plugin to make a specific WordPress page or post private:
First, go to Profile Builder > Settings > Content Restriction from the WordPress admin panel to configure the plugin settings. Set the Enable Content Restriction option to Yes using the dropdown.
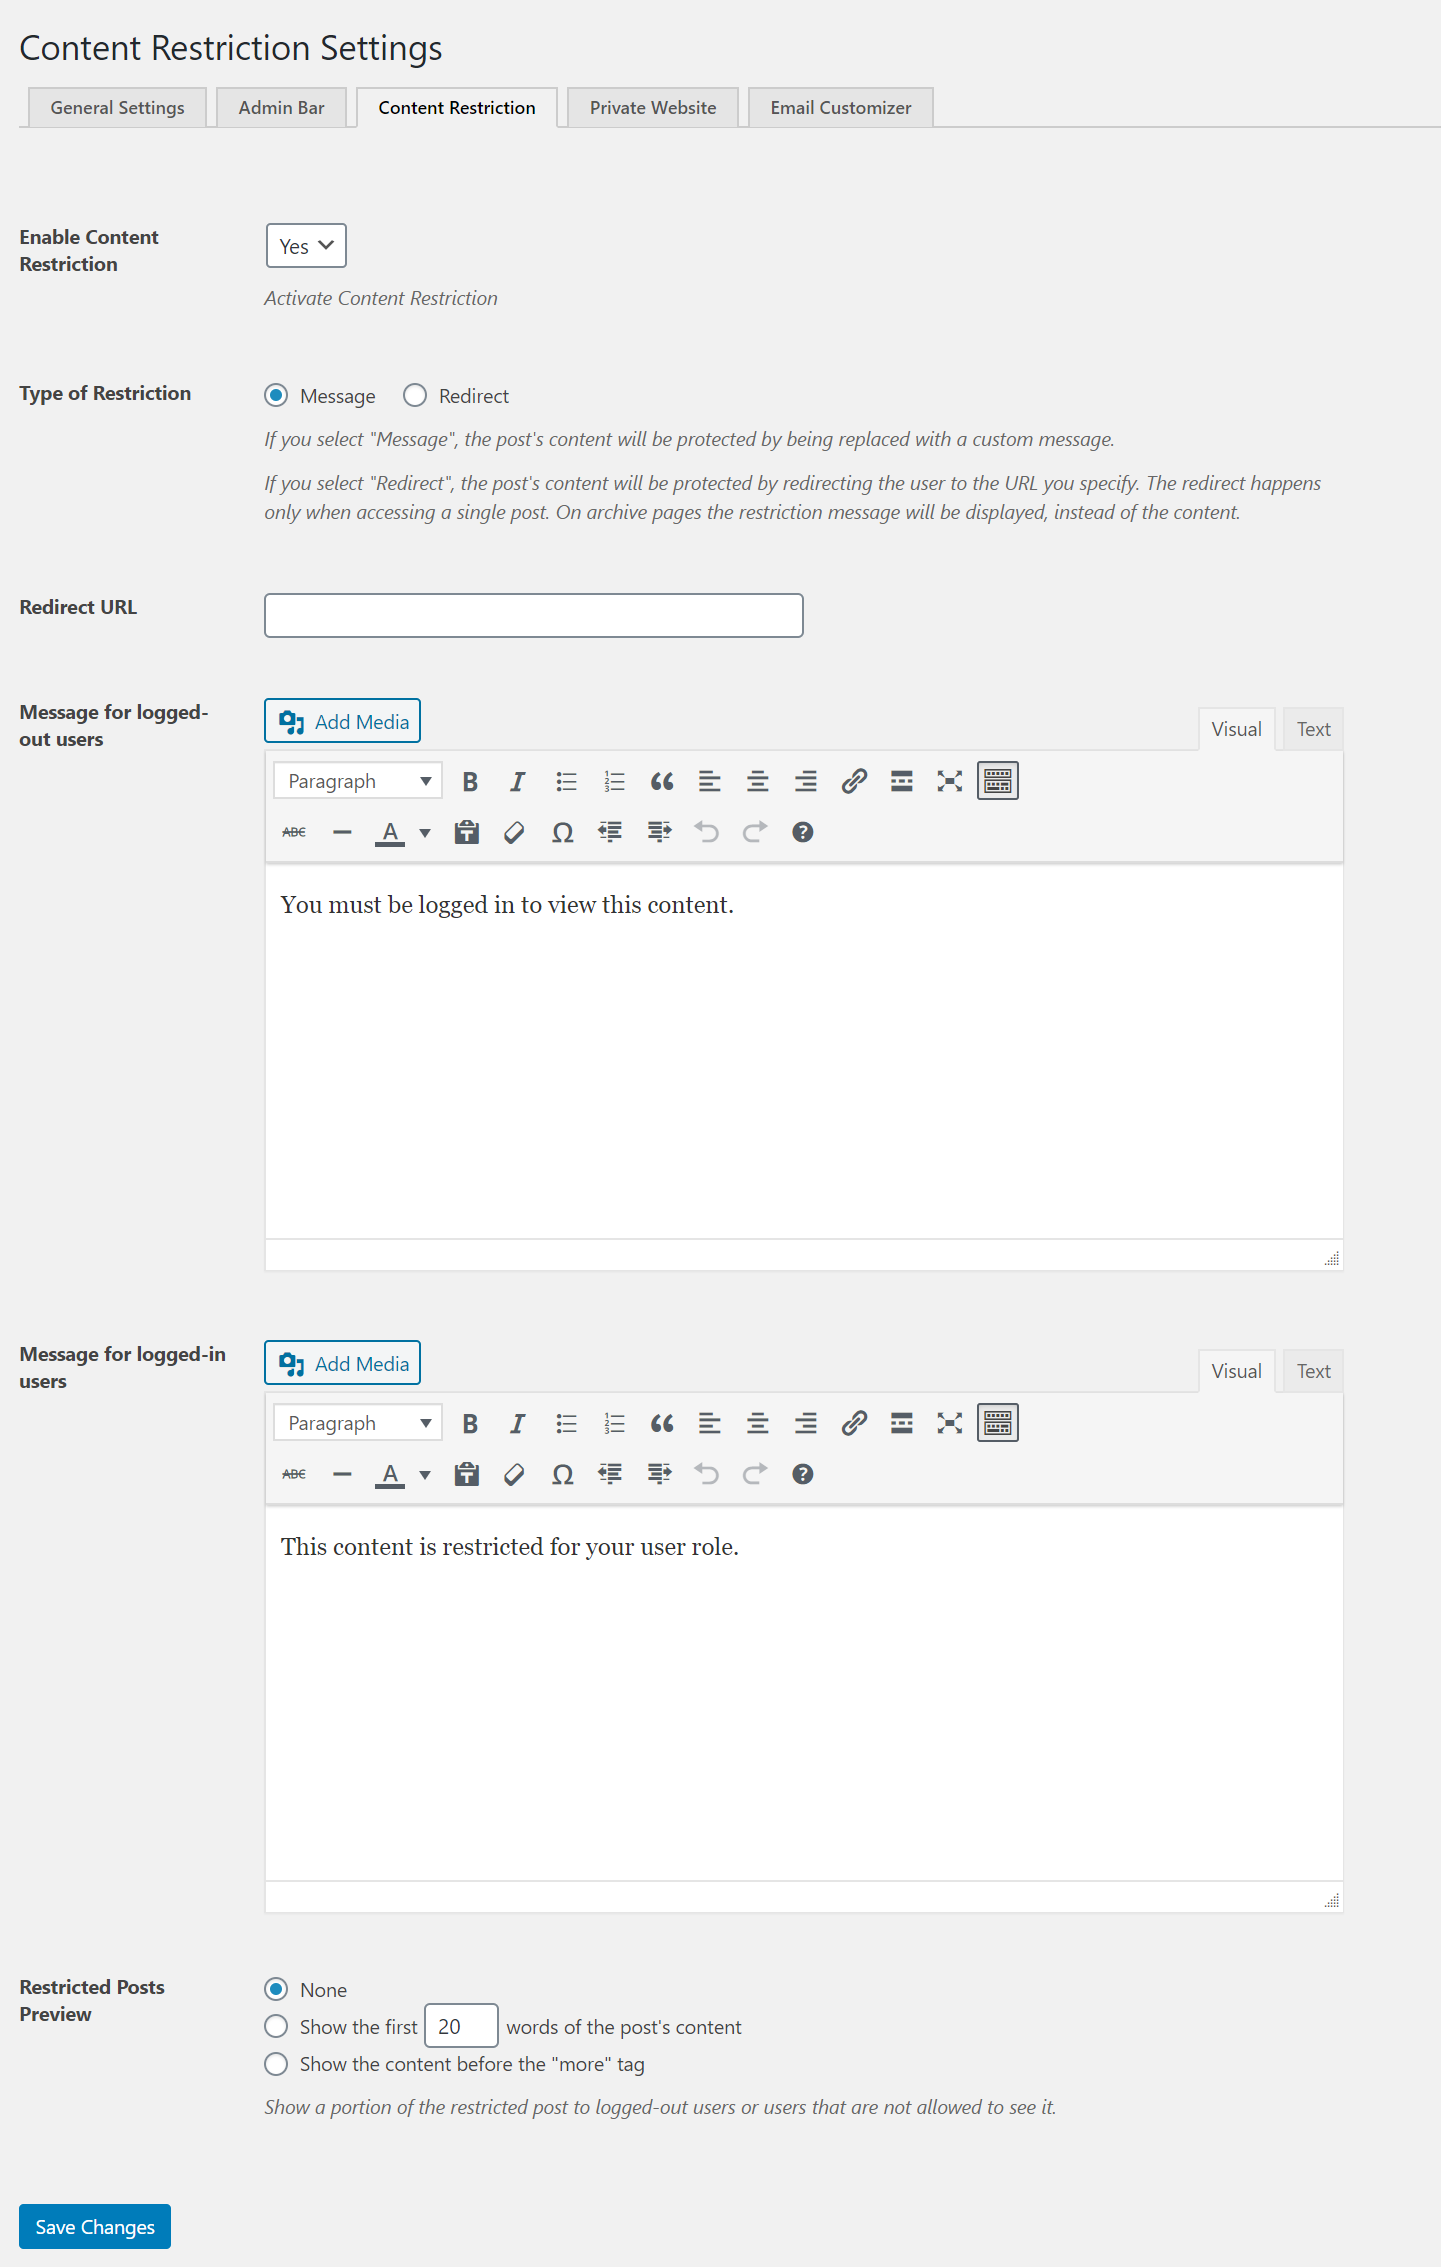
From the same screen, you can configure content restriction settings to grant users access to private content. You can choose to display a message or redirect unauthorized users to a different URL using the Type of Restriction option.
If you select the Redirect option, remember to set the Redirect URL that you’d like to redirect unauthorized users to.
And, if you select the Message option, use the Message for logged-out users and Message for logged-in users text editors to specify the message you’d like to display.
Finally, Profile Builder lets you use the Restricted Posts Preview option to show a portion of the private page or post to unauthorized users. This is useful if you want to give users a sneak peek and encourage them to register for full access.
Click the Save Changes button to proceed.
Pro tip: Create a Register Page where you paste the [[wppb-register]] shortcode to create a front-end registration form for new users. To allow non-logged-in users to access this page, then you must add the page in the Allowed Pages multiple select. Users will need to register to gain access to the private site.
Specify Who Can Access Content on Your WordPress Private Site
Now, all you have to do is go to the WordPress page or post you’d like to make private and open it up in the edit screen.
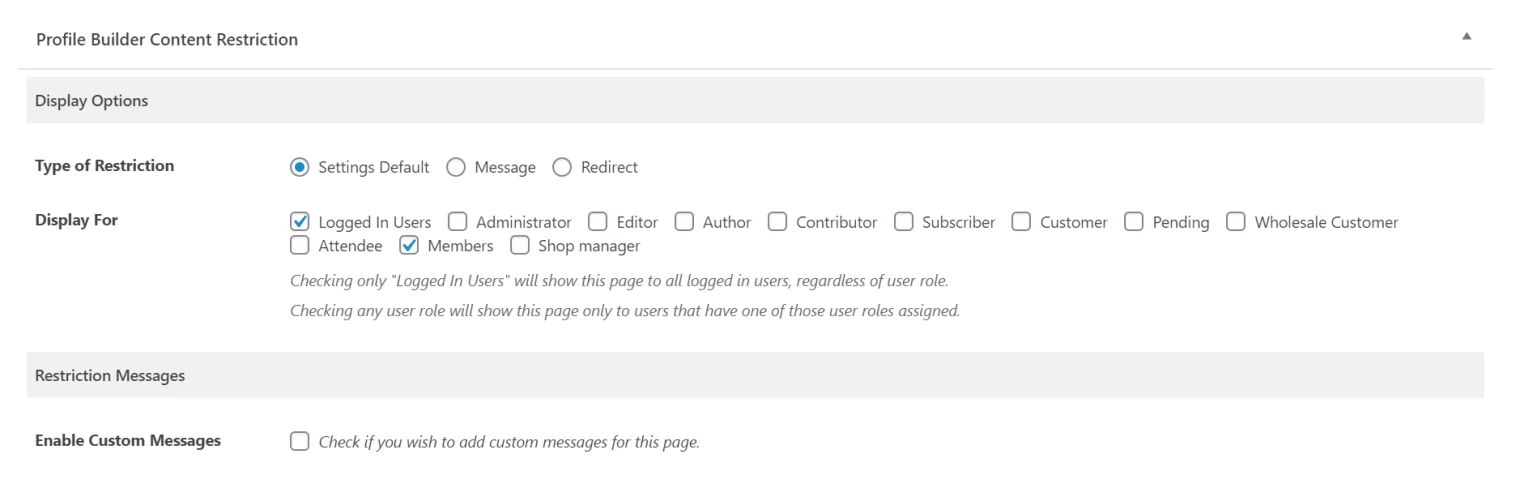
Scroll down till you reach the Profile Builder Content Restriction meta box. You can use it to decide which user roles have access to the private page or post.
This way, you can make individual posts and pages private by configuring their visibility options.
How to Make a WordPress Private Blog
The Profile Builder Pro plugin makes it easy to set up a WordPress private blog. This is great for anyone who’s looking for an easy way to restrict access to their blog page or individual blog posts.
The first thing you need to do is navigate to Profile Builder > Settings > Content Restriction from the WordPress admin panel. From there, set the Enable Content Restriction option to Yes using the dropdown.
Once that’s done, go to Pages > All Pages > Blog from the dashboard.

Scroll down till you reach the Profile Builder Content Restriction meta box. You can use it to decide which user roles have access to your WordPress private blog. In addition to this, you can also configure the visibility option of individual blog posts to make them private. This is useful for when you want to restrict access to some of the posts on your WordPress private blog instead of the entire blog.
Setup a WordPress Private Site Today
The Profile Builder Pro plugin makes it easy to create a WordPress private site in a variety of different ways. You can make your entire WordPress site or blog private, make only a part of it private (like specific WordPress pages and posts).
The options mentioned above give you a lot of flexibility when in comes to making your website or parts of it visible to members only.
Profile Builder Pro
Create beautiful front-end registration and profile forms with custom fields. Setup member directories, custom redirects, cutomize user emails & more using the all in one user management plugin.
Get Profile BuilderLooking to make your WordPress site private? Check out Profile Builder Pro‘s complete list of features.
I really like Profile Builder, and we recommend it to our plugin customers in our knowledge base. This sounds like a great way to hide your entire website. It’s particularly useful because some plugins (e.g. Password Protected) don’t work with certain hosts (e.g. WP Engine), so it’s good to hear that you can do this with Profile Builder instead.
If anyone reading this just wants to hide the WooCommerce parts of their website while leaving other areas such as the homepage and blog private, then Profile Builder also works beautifully with the WooCommerce Private Store plugin. To use the two plugins together, install WooCommerce Private Store to hide the store pages so that only logged in users can see them. Next, use Profile Builder to create a front end user login page that people can use to Please send me your WordPress logins and I’ll have a look at what’s happening into their account and unlock the private store. A lot of our customers use this combination.
If you don’t need to hide the whole shop, you can also use the Content Restriction feature from Profile Builder to hide individual products: https://www.cozmoslabs.com/docs/profile-builder-2/general-settings/content-restriction/#Restrict_WooCommerce_Products
Profile Builder lets you use the Restricted Posts Preview option to show a portion of the private page or post to unauthorized users.