

This tutorial explains why adding WordPress SSL & HTTPS is the best way to secure your site and why all of us should do it eventually.
Also, we’ll go into an option for adding a free SSL certificate on your WordPress site.
Let’s break it down.
What is SSL & HTTPS?
An SSL (Secure Sockets Layer) is a certificate that validates your website’s identity and encrypts all information sent to and from your website. It ensures that all data passed between the web server and browsers remains private and integral. At this point, SSL was renamed TLS (Transport Layer Security), but it’s still widely referred to as SSL or TLS/SSL.
The link between HTTPS and SSL is pretty simple. An SSL Certificate needs to be installed on your website to enable HTTPS browsing. Sites that have an SSL certificate installed to display a green https prefix in their URL (instead of HTTP).
Types of SSL Certificates
There are three main types of SSL certificates with different applications, which we’ll list below:
- OV (Organization Validates) SSL – The Certificate Authority verifies that the applicant is a valid business and checks the accuracy of its physical and web address.
- DV (Domain Validates) SSL – The CA checks the right of the applicant to use a specific domain name. This is less rigorous verification, where the applicant name and contact information only need to match the registration information in the domain whois.
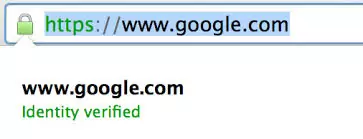
- EV (Extended Validation) SSL – Is issued after a more rigorous verification of the organization and domain ownership. EV Certificates are the most advanced certificate types, providing full website security + encryption. The green HTTPS address bar is exclusive to EV SSL certificates and reassures website visitors that they are interacting with a verified business on a secured domain.
Why add SSL & HTTPS to your WordPress site?
In a recent study, Google has researched some public and private data to track the HTTPS state on 100 non-Google sites, and their estimate is that this list of websites refers to 25% of all the website traffic. WordPress for sure is one of them.
-
- Build trust
This is important especially for websites that handle sensitive user information (like the ones who enable user registrations or offer paid membership plans). When people notice it’s an encrypted connection, it’s more likely that they will want to register or purchase something from you.
-
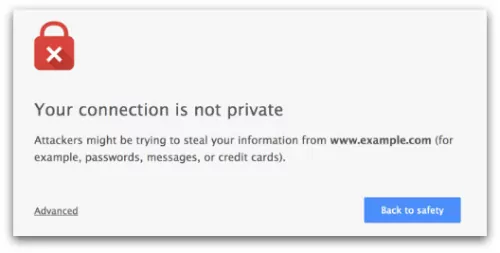
- Browsers show warnings on non-https sites
When people visit non-HTTPS websites most of the popular browsers will display a warning letting people know it’s not a secure connection.
-
- Improve SEO
Google announced a while ago that they would start to consider the use of HTTPS as a plus in calculating search rankings. To put it simply: better security will also mean better SEO. By adding WordPress SSL & HTTPS right now, you can offer your website an SEO boost.
-
- Faster page load times by using HTTP/2
Even though having https enabled increases security with the cost of Server’s computing power, this can be overcome by using HTTP/2.
HTTP/2 provides an optimized transport for HTTP semantics. It supports all of the core features of HTTP/1.1 but aims to be more efficient in several ways. Currently no browser supports HTTP/2 unencrypted, meaning that it requires HTTPS.
Since HTTP/2 is significantly faster (you’ll get much faster page load times), the best practice would be going full HTTPS. This way your website will not only be secure, but also load faster. If your shared hosting doesn’t support HTTP/2, you can use a service like CloudFlare as it enables HTTP/2.
However, while all of the above SSL certificate types need to be purchased and will cost you up to 100+$/year, you can add WordPress SSL & HTTPS for free using Let’s Encrypt.
Introducing Let’s Encrypt, Free SSL Certificate
![]()
Let’s Encrypt is a free certificate authority, that lets everyone be up and running with basic server certificates for their domains. According to BuiltWith, the trends are showing an impressive increase on websites using Let’s Encrypt, especially over the last year.
I’ve experimented with setting up a free Let’s Encrypt SSL Certificate a couple of weeks ago when I needed to quickly setup a live https WordPress site for testing our newly released PayPal Pro/Express add-on for the Paid Member Subscriptions plugin.
That’s when I bumped into Site Ground’s tutorial and noticed that they offer this in just a couple of clicks.
With Site Ground you can install let’s encrypt certificates directly from the cPanel of your shared hosting account.
This is the by far the quickest and most cost efficient way of adding WordPress SSL & HTTPS we found. If you’re not hosted with Site Ground they even offer you a free transfer of one website per account, removing all the friction normally related to the change of hosting.
Installing Let’s Encrypt yourself
If you’re a more technical oriented person, you can install Let’s Encrypt on your server and follow the steps below to get a certificate.
Log into the root of your server using SSH and run the commands below to install let’s encrypt on your server:
$ git clone https://github.com/letsencrypt/letsencrypt
$ cd letsencrypt
$ ./letsencrypt-auto --help
Now you’re ready to install your certificate as well. To obtain a certificate using a built-in “standalone” webserver (you may need to temporarily stop your existing webserver, if any) for example.com and www.example.com, the final command should be:
letsencrypt certonly --standalone -d example.com -d www.example.com
For more information please see the full documentation.
Why WordPress SSL & HTTPS is absolutely required for WordPress paid membership or e-commerce sites?
There are situations when there is no way around going full https. This is true for websites that handle sensitive user information.
If you’re running a paid membership or ecommerce site, then you absolutely need an SSL certificate, especially if you’re collecting payment information. Most popular payment providers like Stripe, PayPal Pro or Authorize.net will require you to have a secure connection using https.
Even if you’re using something basic like PayPal Standard, it also uses IPN (Instant Payment Notification) which has been updated to https for added security. HTTP postbacks will no longer be supported. This means you’ll need to enable https in order to collect payments even via PayPal Standard.
Is Let’s Encrypt the equivalent of the 90+$/year EV SSL?
There are a couple of differences between a free Let’s Encrypt Certificate and a paid Extended Validation SSL.
Let’s Encrypt SSL encrypts that connection, but an EV SSL offers more security on top of that. Also, an EV certificate gives a green bar on your browser, and since Let’s Encrypt doesn’t support EV there will be no green bar.
Let’s Encrypt certificates are a not wildcard, so you’ll need a separate SSL for each subdomain. With EV SSL certificates you’ll also get a dedicated IP address.
Extended Validation (EV) certificates should be used when processing payments and storing payment information or sensitive user data. Otherwise, an free Let’s Encrypt SSL should be enough.
How to setup WordPress SSL & HTTPS
If you are starting fresh with a new site and/or want to use HTTPS everywhere on your site, there are a few steps to follow. You can read the summary below or check out this “In-depth HTTP to HTTPS Migration Guide for WordPress” Written by Kinsta.
Install an SSL certificate
Using the paragraphs above, you can decide whether you will go for a free Let’s Encrypt SSL certificate which can be installed in a couple of clicks using Site Ground, or go for a paid and more advanced one (like Extended Validation certificates).
Either way, your hosting provider should be able to assist you in installing the certificate. Most hosting providers also allow you to purchase an SSL certificate directly from them.
Update your site URL
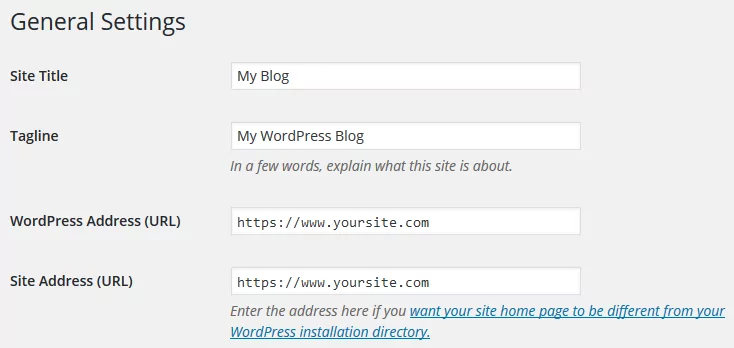
Next, after installing one of the SSL certificate types mentioned above, you will need to update your site URL.
For this, navigate to Settings-> General -> and make sure to change both WordPress Address and Site Address urls to use https intead of http.
Force HTTPS through the site
You can force the HTTPS access everywhere by adding the following directives to your .htaccess file:
RewriteEngine On
RewriteCond %{SERVER_PORT} 80
RewriteRule ^(.*)$ https://www.yoursite.com/$1 [R,L]
Note: Don’t forget to replace yoursite.com with your site URL. Also, the .htaccess should be located in the site main folder.
Wrapping it up
By now you should be have a comprehensive knowledge of SSL and HTTPS. You’re familiar with the types of SSL certificates and which one should be used depending on the type of website you own. Most importantly, you can follow these steps to setup WordPress SSL & HTTPS and secure your site and user data.
As you noticed, the trend is definitely going full https and based on the advantages we mentioned above, the sooner you do it the better.
Great post. Thanks, Adrian!
Happy you find it useful!
Hi,
Thanks for this post!
Just a small correction maybe:
If you set the WP address and Site address in dashboard to `https://www.yoursite.com` shouldn’t there be `RewriteRule ^(.*)$ https://www.yoursite.com/$1 [R,L]` (with the `www.`) in .htaccess file?
Regards,
Oliver
Well spotted Oliver, I made the small edit. Thank you.
then why haven’t you made your site https?
We are in the process of doing so. We have a new redesign coming up soon, and will go full https soon after.
Right now, https is only enabled for processing plugin payments.